7 Days To Die server setup tutorial, including how to host a server and enable multiplayer gameplay.
This guide is tailored for absolute beginners. Follow the steps, and you'll successfully set up your server! Early access was launched on June 22, and the official version was released on June 24.
Video tutorial: https://www.youtube.com/watch?v=wSMcdx1jUDo
Game Overview
7 Days To Die is an open-world game that uniquely combines elements of first-person shooting, survival horror, tower defense, and role-playing. Dive into this groundbreaking zombie survival sandbox RPG. Navezgane awaits you!
With over 18 million copies sold, 7 Days To Die has become the benchmark for survival games, featuring unparalleled crafting and world-building mechanics. Set in a post-apocalyptic world teeming with zombies, this open-world game integrates first-person shooting, survival horror, tower defense, and role-playing elements. Engage in combat, crafting, scavenging, mining, exploration, and character progression, all of which have earned the passionate support of players worldwide. Embark on the ultimate zombie survival sandbox RPG and explore the vast world of Navezgane!
Key Features
- Explore – Discover vast, unique, and immersive environments, offering complete freedom to play your way. The game includes five distinct biomes and a 100-square-kilometer map.
- Craft – Create and repair weapons, clothing, armor, tools, vehicles, and more, using over 500 recipes. Find schematics to unlock advanced crafting techniques.
- Build – Design your own fortress, complete with traps, electricity, automated turrets, motorized doors, gadgets, and defensive structures. Survive zombie assaults in a fully destructible and moldable world.
- Cooperate or Compete – Work with others to establish settlements or compete by raiding their bases. In a wasteland overrun by zombies and rogues, your choices define your experience.
- Create – Let your imagination run wild by using over 800 in-game items, 1,300 unique building blocks, and the painting system to build limitless possibilities.
- Upgrade – Enhance your skills with numerous skill points spread across five main attributes. Read over 100 books to unlock additional abilities. 7 Days To Die is the ultimate survival RPG.
- Choose – Experience the campaign world or explore randomly generated worlds featuring towns, lakes, mountains, canyons, roads, caves, and over 700 unique locations.
- Fight – Face nearly 60 different zombie archetypes, each with unique behaviors. Special infected zombies increase the challenge, offering endless replayability.
- Survive – Experience hardcore survival mechanics. Nearly 50 buffs, enhancements, and diseases influence gameplay, presenting both challenges and survival opportunities.
- Destroy – Buildings and terrain collapse under structural damage or poor architectural design, adhering to realistic structural integrity rules.
- Scavenge – Loot the best weapons, tools, and armor from across the world. Items come in six quality tiers, offering thousands of combinations. Use mods to further enhance your gear.
- Quest – Meet various trader NPCs who buy and sell goods and offer rewarding quests. Take on unique missions across over 700 different locations.
- Customize – Create your own character with detailed customization options. Craft or loot a vast array of clothing and armor to personalize your experience.
- Drive – Enjoy a robust vehicle system. Find parts, learn recipes, and craft and customize your bicycle, minibike, motorcycle, 4x4 truck, or gyrocopter. Share rides with friends.
- Farm or Hunt – Build a garden for sustainable resources or venture into the wild to hunt dozens of unique animals.
Preparation
To host a server, you'll first need a server machine. For this tutorial, I'm using the Rainyun Suqian high-defense cloud server. It offers 4 cores and 8GB of RAM for just 88 CNY/month (with a 30% discount for annual payments).
Rainyun Discount Registration Link: https://www.rainyun.com/A9527_?s=blog-en
Discount Code: zeruns
Benefits:
- Use the discount code during registration and bind your account to WeChat to receive a 50% off coupon.
- Earn up to 20% cashback on purchases.
Other Cloud Server/VPS Recommendations:
https://blog.zeruns.tech/archives/383.html
- Rain Cloud 14900K Ningbo high-defense cloud server performance review: https://blog.vpszj.cn/archives/2115.html
- Zhidian Cloud Shaoxing 14900K high-defense cloud server performance review: https://blog.vpszj.cn/archives/2122.html
- Alibaba Cloud Discount Registration Link: https://www.aliyun.com/minisite/goods?userCode=jdjc69nf
After registering your account, log in to the Rainyun control panel. Navigate to Cloud Products and locate the Cloud Server section. Click on Buy Now:

For the region, select Jiangsu Suqian (you can choose other regions if preferred; Game Cloud VPS options are also suitable).
For the configuration, choose Xeon® Gold, and for the package, select KVM Top Configuration (4 cores, 8GB RAM).


Set the operating system to Windows 2022, and for the public IP option, choose NAT Shared Mode (where multiple users share one public IP address. Rainyun provides each server with 10 port mapping rules. You can access the server using port forwarding. If you select a dedicated public IP, you can skip the NAT port mapping setup. For cheaper public IP options, consider the Ningbo region.)
Click Buy Now; alternatively, you can try the server for 1 CNY for one day.

In the My Cloud Servers section of the dashboard, you will find the server you just purchased. Click Manage to enter the server control panel.

Connecting to the Server
Open the built-in Remote Desktop Connection (RDP) software.

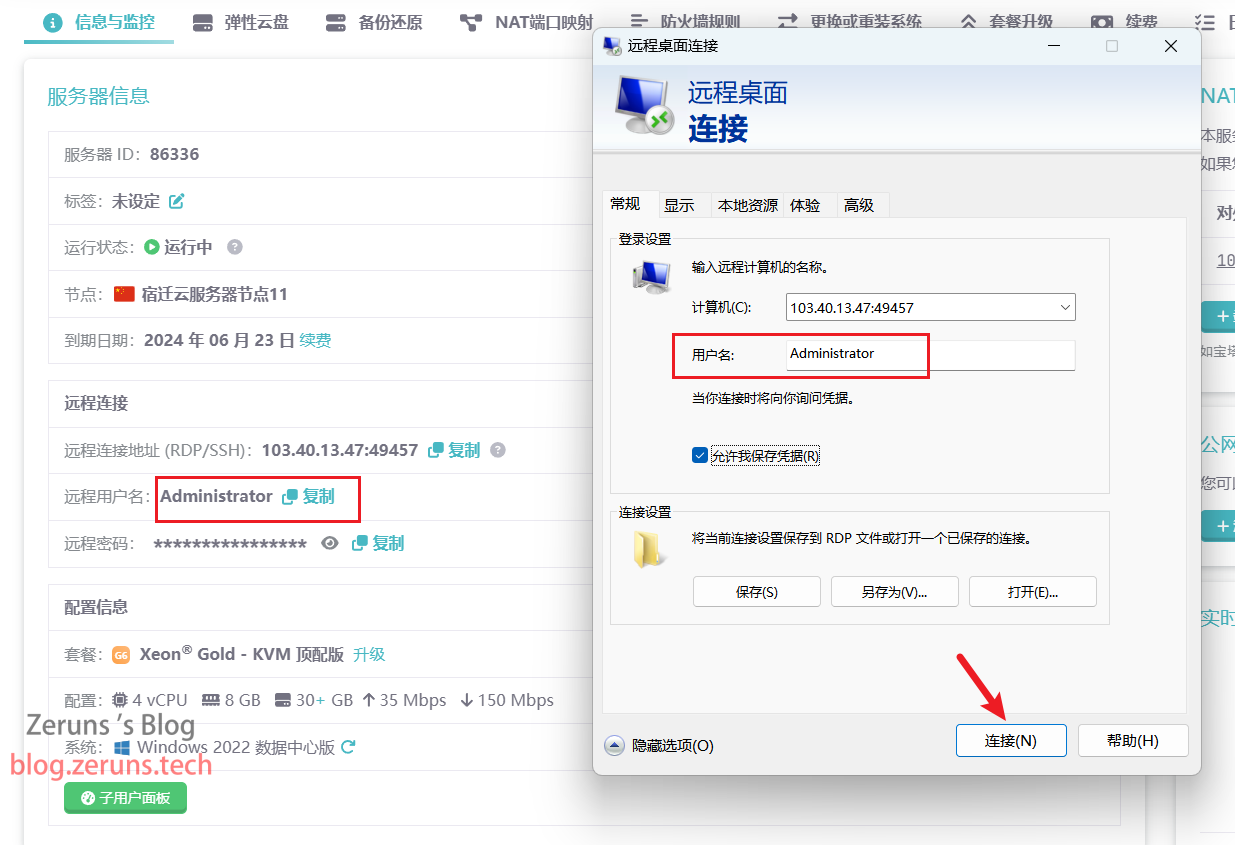
Enter the server's remote connection address and port (these can be found in the server control panel), then click Show Options.

Next, enter the username and click Connect.
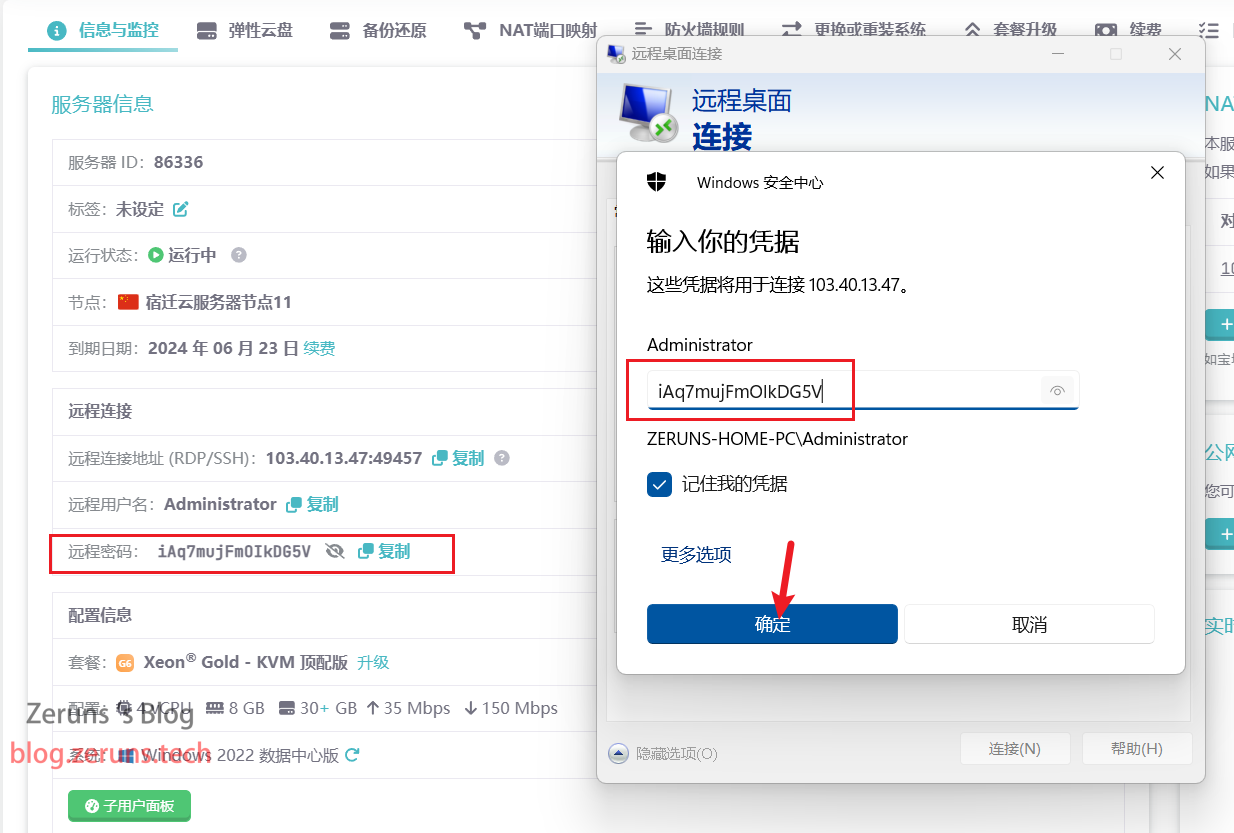
Enter the password and click OK to connect to the server.
Setting Up Port Forwarding
If you chose an NAT server, you'll need to configure port forwarding to map the internal server ports to public ports. If your server has a dedicated public IP, this step is not required.
In the server control panel, click on NAT Port Mapping.
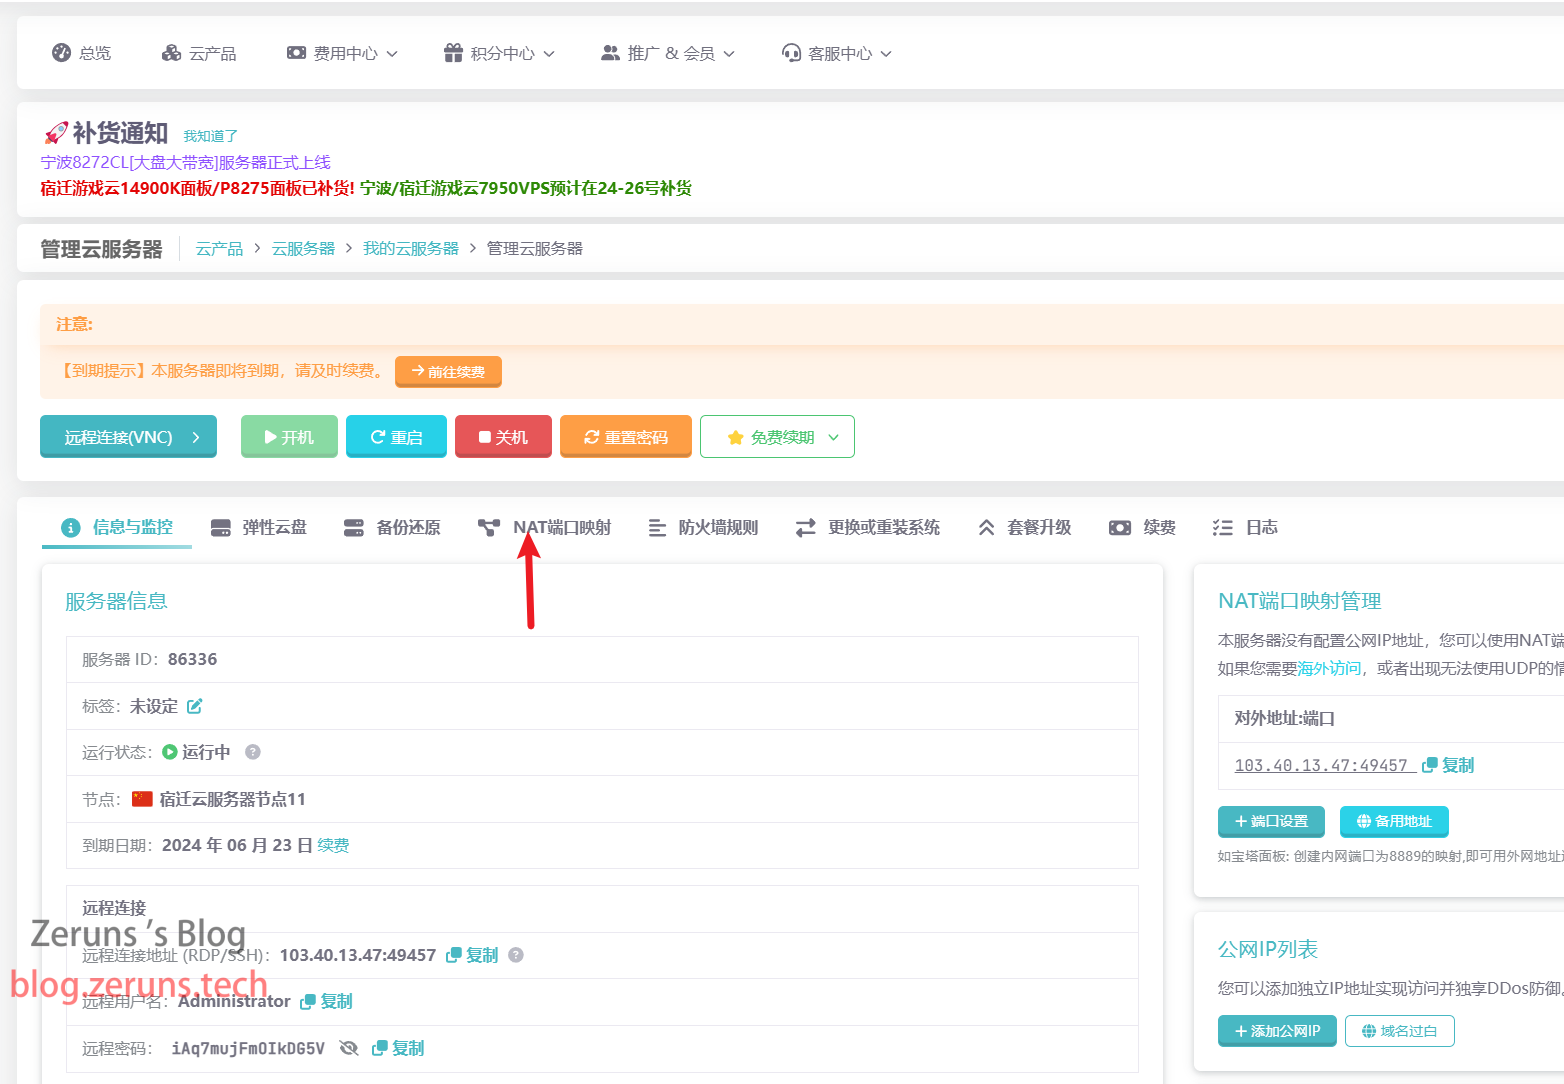
Click Add Rule. For the internal port, use the randomly generated external port. Ideally, the ports should match. If the port is already in use, simply enter a different port.

Take note of the port you've set.

Expanding Disk Space
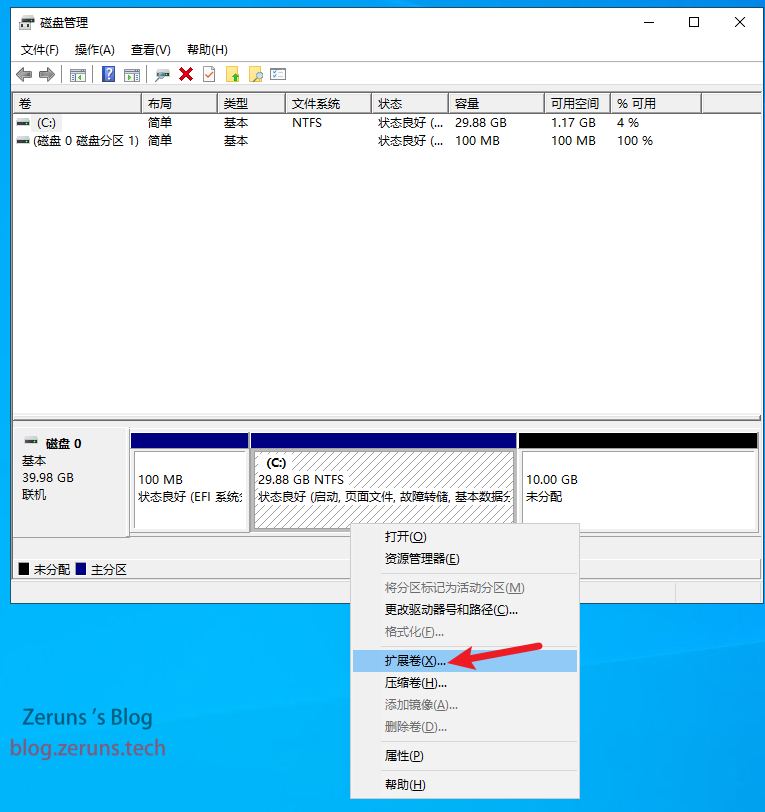
Since the default disk size for Rainyun cloud servers is only 30GB, and the 7 Days To Die server requires 15GB (with the system itself taking up over 10GB), additional space will be necessary. If your disk space is sufficient, you can skip this step.
In the server control panel, click Elastic Cloud Disk, then Adjust Disk.
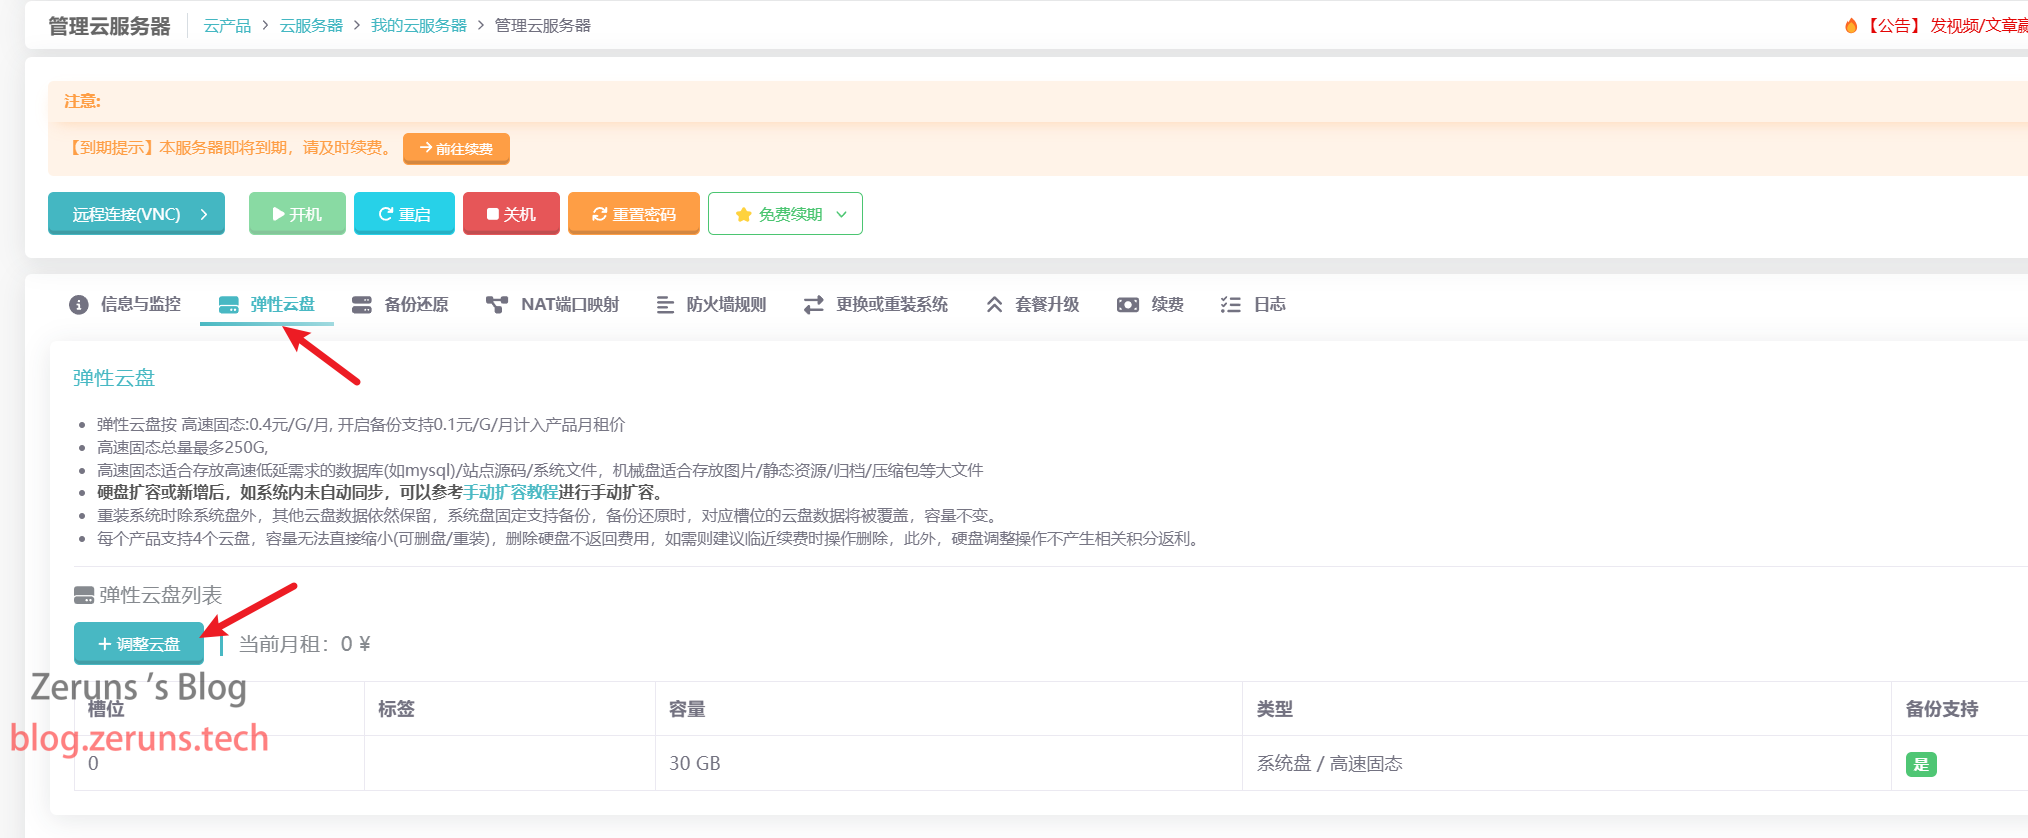
Adjust the disk size to 40GB (or more) using the slider, then click Confirm. You can also choose to add a new disk.

On the server, right-click the Start (Win) button in the lower-left corner, then click Disk Management.

Right-click on the C drive, then select Extend Volume.
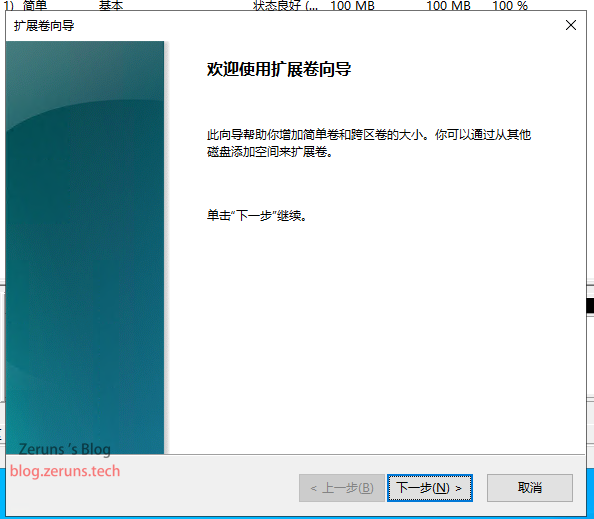
Follow the prompts and click Next until the expansion is complete.

Starting the Server
First, you need to download the SteamCMD software.
SteamCMD is the command-line version of the Steam client, allowing users to install and update various game servers available on the Steam platform through a command-line interface.
Official SteamCMD download link: https://steamcdn-a.akamaihd.net/client/installer/steamcmd.zip
123 Cloud Disk download link: https://url.zeruns.tech/SteamCMD
Open the browser on your server to download SteamCMD, then click to open the file.

Create a new folder to store the server files. Here, I created a folder called 7days on the desktop and dragged the files from the SteamCMD zip file into this new folder.

Next, hold down the Shift key and right-click within this folder. From the context menu that appears, select Open PowerShell window here.

In the command window that opens, type the following command and press Enter:
./steamcmd.exe +login anonymous +app_update 294420 validate +quit
This command downloads and installs the 7 Days to Die server. You can also use this command to update the server. Wait patiently for the download to complete.

If the following error appears, the installation failed. Simply re-run the command.

This is what a successful download looks like. The Rainyun server provides a maximum download speed of 150 Mbps, and you can see the bandwidth being fully utilized.
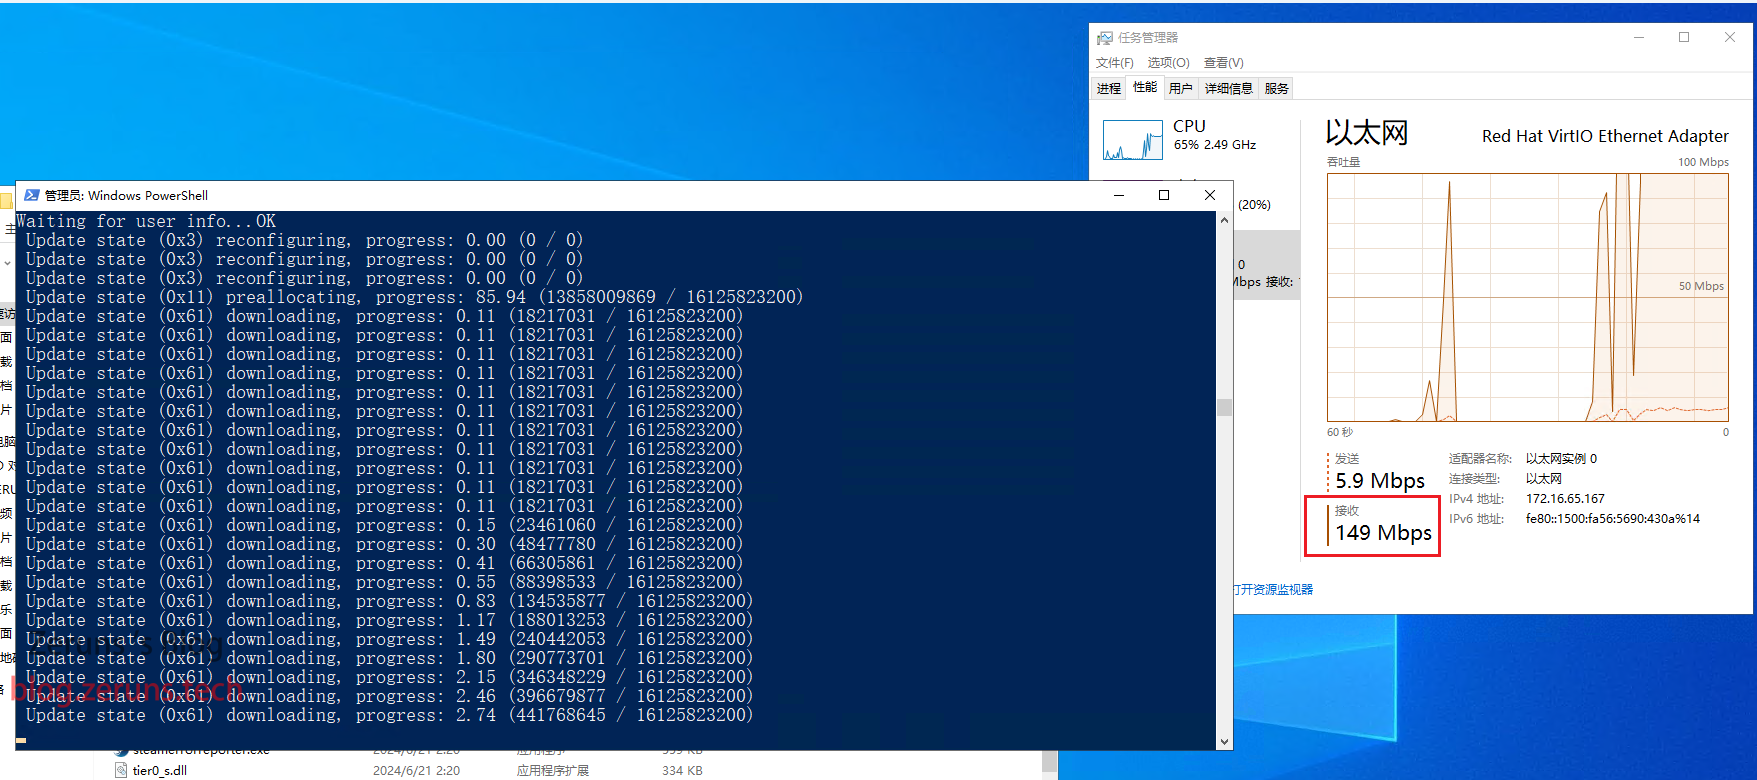
When you see "success," the download is complete.

Navigate to the directory 7days\steamapps\common\7 Days to Die Dedicated Server. This is the root directory for the 7 Days to Die server.
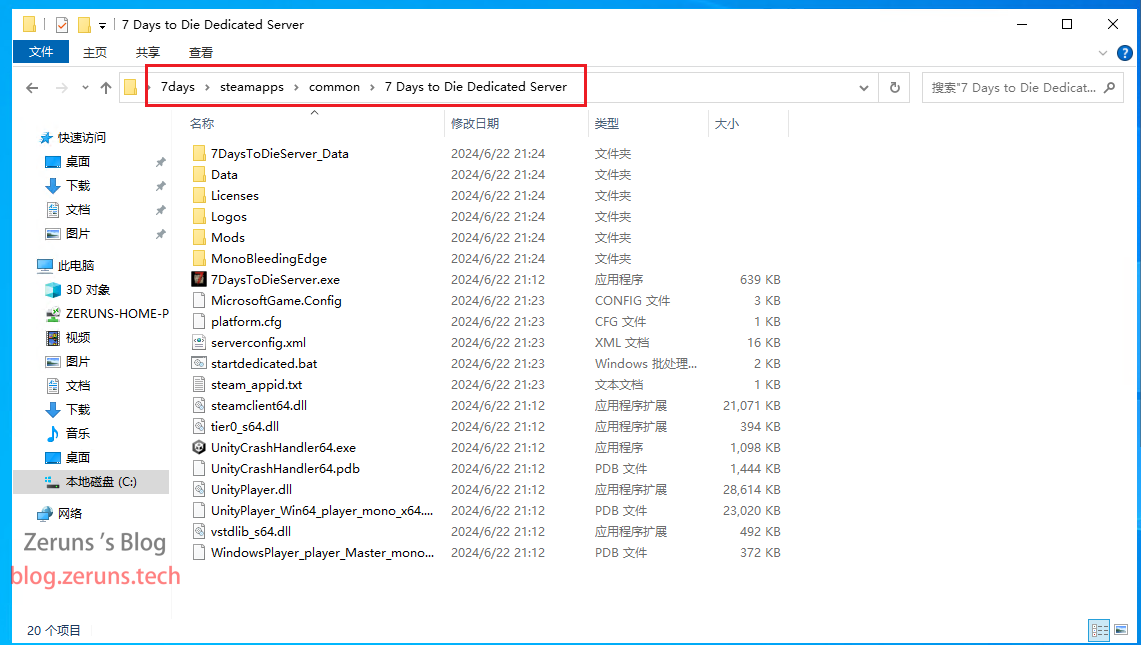
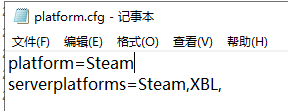
Open the platform.cfg file with Notepad. Delete the second line, crossplatform=EOS, and save the file as shown below.

Next, open the serverconfig.xml file with Notepad. This file contains the server's configuration settings.
Modify the server details as shown below. You can set a custom server name and description. Change the server region to Asia and the server language to Chinese. The default server port is 26900. If your server has a public IP, you can keep this default. Otherwise, set it to the port you configured during port mapping.

Delete the line <property name="ServerDisabledNetworkProtocols" value="SteamNetworking"/>.

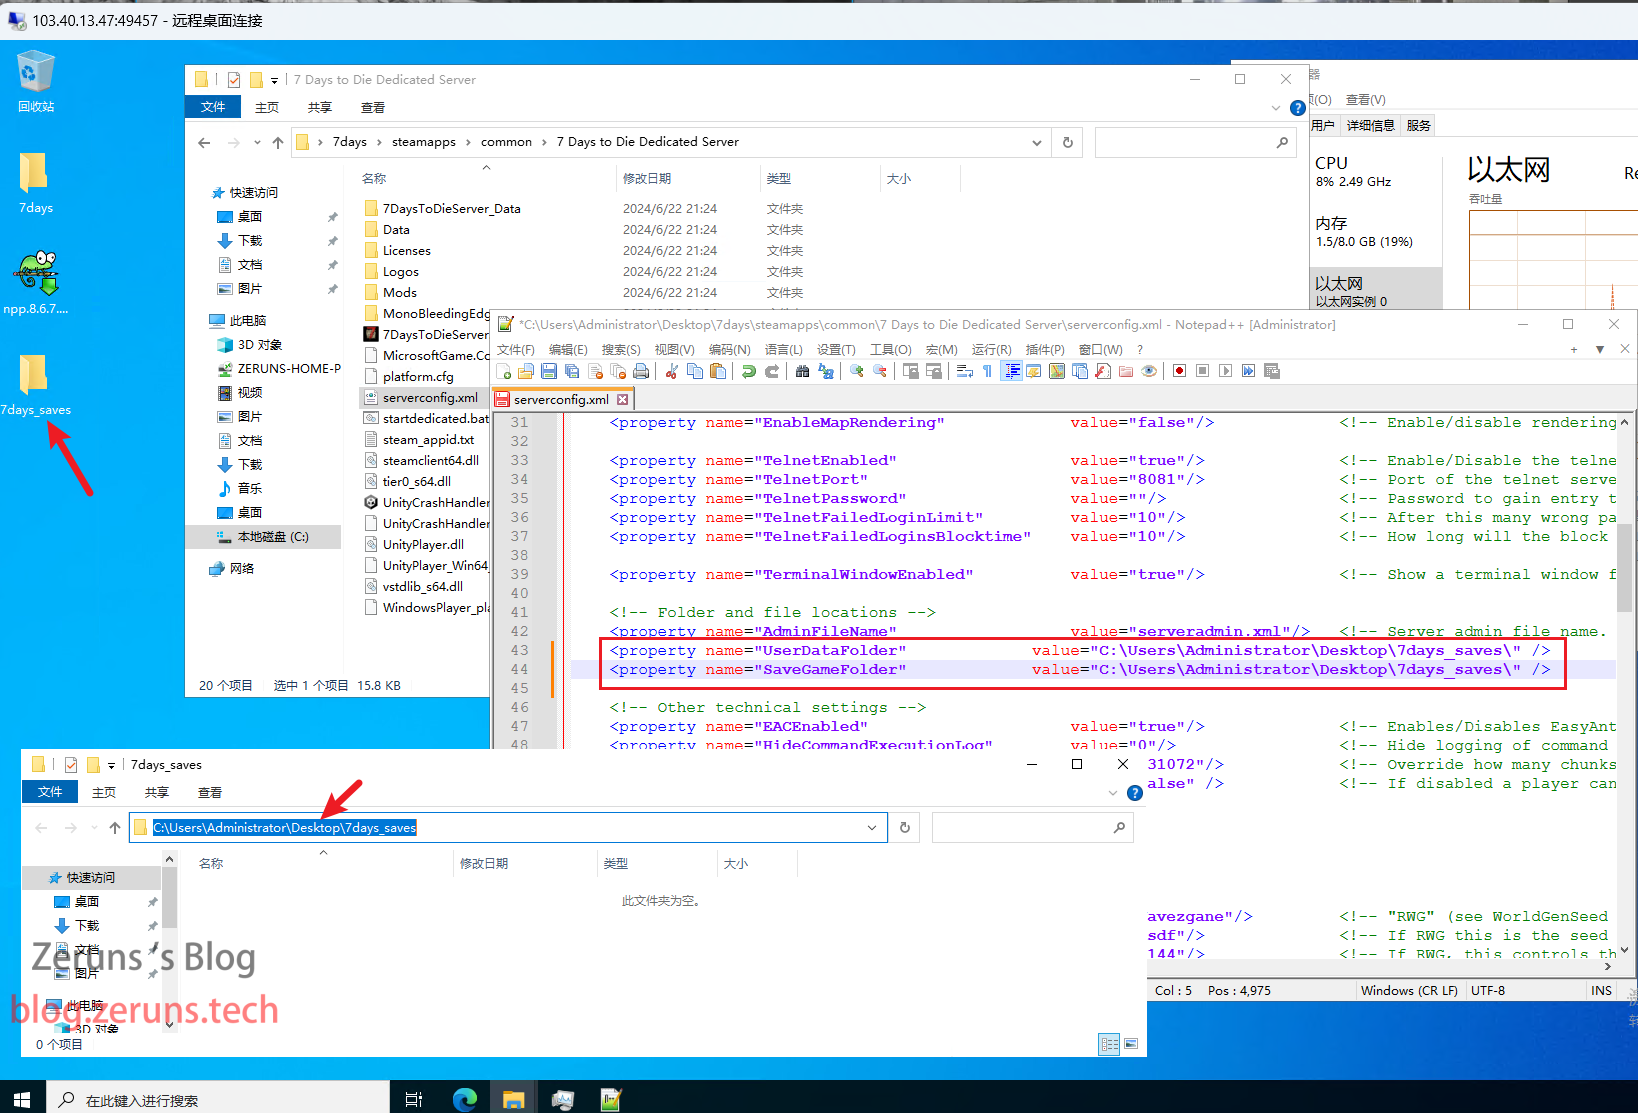
Locate the following lines, which specify the save file locations:
<!-- <property name="UserDataFolder"				value="absolute path" /> -->	<!-- Use this to override where the server stores all generated data, including RWG generated worlds. Do not forget to uncomment the entry! -->
<!-- <property name="SaveGameFolder"				value="absolute path" /> -->	<!-- Use this to only override the save game path. Do not forget to uncomment the entry! -->
Create a folder to store the save files and copy its path from the address bar. Here, I created a folder called 7days_saves on the desktop with the path C:\Users\Administrator\Desktop\7days_saves\. Update the configuration with the actual folder path (ensure the path ends with a backslash \). Save the file after editing.
<property name="UserDataFolder"				value="C:\Users\Administrator\Desktop\7days_saves\" />
<property name="SaveGameFolder"				value="C:\Users\Administrator\Desktop\7days_saves\" />
Here is the Chinese interpretation of the 7 Days to Die server configuration file:
<?xml version="1.0"?>
<ServerSettings>
	<!-- GENERAL SERVER SETTINGS -->

	<!-- Server representation -->
	<property name="ServerName"						value="My Game Host"/>
  <!-- 服务器名字 随便填 -->
	<property name="ServerDescription"				value="A 7 Days to Die server"/>	<!-- 服务器描述 随便填 -->
	<property name="ServerWebsiteURL"				value=""/>
  <!-- web服务器url 没有不用填 留空就行 -->
	<property name="ServerPassword"					value=""/>
  <!-- 房间密码 留空为不设密码 -->
	<property name="ServerLoginConfirmationText"	value="" />
  <!-- 进入游戏后的提示信息 留空为不生效 -->
	<property name="Region"							value="NorthAmericaEast" />
  <!-- 服务器的地址(用于搜索游戏时使用) 可填入的值为: NorthAmericaEast, NorthAmericaWest, CentralAmerica, SouthAmerica, Europe, Russia, Asia, MiddleEast, Africa, Oceania -->
	<property name="Language"						value="English" />
  <!-- 服务器的语言(用于搜索游戏时使用)不影响游戏内实际显示的语言 -->

	<!-- Networking -->
	<property name="ServerPort"						value="26900"/>
  <!-- 服务器监听的端口 不建议小白修改 -->
	<property name="ServerVisibility"				value="2"/>
  <!-- 服务器的可见性 可填入的值为 2公开 1仅朋友可见 0不可见 不影响ip直连 影响搜索游戏-->
	<property name="ServerDisabledNetworkProtocols"	value="SteamNetworking"/>
  <!-- 网络协议配置 默认即可 不建议小白修改 -->
	<property name="ServerMaxWorldTransferSpeedKiBs" value="512"/>
  <!-- 玩家加入游戏时 下载地图的最大带宽单位KB(根据服务器带宽调整)带宽不够会导致有人加游戏时 游戏内玩家地图资源不加载 或者掉出地图外面 或者回弹等情况 -->

	<!-- Slots -->
	<property name="ServerMaxPlayerCount"			value="8"/>
  <!-- 房间支持最大玩家数量-->
	<property name="ServerReservedSlots"			value="0"/>
  <!-- 房间满人时留给vip的位置 默认即可 -->
	<property name="ServerReservedSlotsPermission"	value="100"/>
  <!-- 使用上述vip位置的玩家权限需要达到的级别 默认即可 -->
	<property name="ServerAdminSlots"				value="0"/>
  <!--房间满人时留给管理员的位置 默认即可 -->
	<property name="ServerAdminSlotsPermission"		value="0"/>
  <!-- 使用上述管理员位置的玩家权限需要达到的级别 0为最高 默认即可 -->

	<!-- Admin interfaces -->
	<property name="WebDashboardEnabled"			value="false"/>
  <!-- 是否打开web控制台  默认即可 可填入项 true/false -->
	<property name="WebDashboardPort"				value="8080"/>
  <!-- web控制台监听的端口 默认即可-->
	<property name="WebDashboardUrl"				value=""/>
  <!-- web控制台所绑定的url 默认即可 -->
	<property name="EnableMapRendering"				value="false"/>
  <!-- web控制台是否渲染地图 默认即可 可填入项 true/false -->

	<property name="TelnetEnabled"					value="true"/>
  <!-- 是否支持远程访问 建议关闭改为false -->
	<property name="TelnetPort"						value="8081"/>
  <!-- telnet所监听的端口 默认即可 -->
	<property name="TelnetPassword"					value=""/>
  <!-- 远程登录所需要的密码 关闭的情况下默认即可 -->
	<property name="TelnetFailedLoginLimit"			value="10"/>
  <!-- 远程登录失败次数 密码输错10次将被拉黑 默认即可 -->
	<property name="TelnetFailedLoginsBlocktime"	value="10"/>
  <!--  拉黑时间 单位分钟 默认即可 -->

	<property name="TerminalWindowEnabled"			value="true"/>
  <!-- 是否显示命令终端 关闭telnet后 默认即可 -->

	<!-- Folder and file locations -->
	<property name="AdminFileName"					value="serveradmin.xml"/>
  <!-- 管理员文件名 默认即可 -->
	<!-- <property name="UserDataFolder"				value="absolute path" /> -->	<!-- Use this to override where the server stores all generated data, including RWG generated worlds. Do not forget to uncomment the entry! -->
	<!-- <property name="SaveGameFolder"				value="absolute path" /> -->	<!-- Use this to only override the save game path. Do not forget to uncomment the entry! -->

	<!-- Other technical settings -->
	<property name="EACEnabled"						value="true"/>
  <!-- 是否开EAC作弊检测 开启会增加加载时的检测时间 看自己需要是否开启 -->
	<property name="HideCommandExecutionLog"		value="0"/>
  <!-- 是否隐藏命令执行日志 默认即可 -->
	<property name="MaxUncoveredMapChunksPerPlayer"	value="131072"/>
  <!-- 玩家跑图解锁的地图范围 默认即可 -->
	<property name="PersistentPlayerProfiles"		value="false" />
  <!-- 玩家配置文件相关 默认即可 -->


	<!-- GAMEPLAY -->

	<!-- World -->
	<property name="GameWorld"						value="Navezgane"/>
  <!-- 游戏地图 支持字段 Navezgane PREGEN10k PREGEN8k PREGEN6k RWG -->
	<property name="WorldGenSeed"					value="asdf"/>
  <!-- 地图种子 默认即可 -->
	<property name="WorldGenSize"					value="6144"/>
  <!-- 地图大小 用于随机地图生成时的大小 6K 8K 10K地图对应的值 6144, 8192, 10240. -->
	<property name="GameName"						value="My Game"/>
  <!-- 游戏名字(影响存档的文件夹名,同名会导致存档覆盖) -->
	<property name="GameMode"						value="GameModeSurvival"/>
  <!-- 游戏模式 默认即可 -->

	<!-- Difficulty -->
	<property name="GameDifficulty"					value="2"/>
  <!-- 游戏难度 0-5 5最难 -->
	<property name="BlockDamagePlayer"				value="100" />
  <!-- 玩家对砖块的伤害 100为100%标准伤害 -->
	<property name="BlockDamageAI"					value="100" />
  <!--僵尸对砖块造成的伤害 -->
	<property name="BlockDamageAIBM"				value="100" />
  <!-- 血月时僵尸对砖块造成的伤害 -->
	<property name="XPMultiplier"					value="100" />
  <!-- 经验倍率 100为100%标准经验 -->
	<property name="PlayerSafeZoneLevel"			value="5" />
  <!-- 玩家安全等级(仅用于创建时周围不会生成僵尸) -->
	<property name="PlayerSafeZoneHours"			value="5" />
  <!-- 玩家安全时间(游戏内的时间)仅用于创建时周围不会生成僵尸 -->

	<!--  -->
	<property name="BuildCreate"					value="false" />
  <!-- 是否开启创造模式 -->
	<property name="DayNightLength"					value="60" />
  <!-- 游戏内一天所对应的真实时间 单位分钟 -->
	<property name="DayLightLength"					value="18" />
  <!-- 白天的时长 -->
	<property name="DropOnDeath"					value="1" />
  <!-- 死亡掉落 0不掉落 1掉落所有 2只掉落快捷栏 3只掉落背包 4删除所有 -->
	<property name="DropOnQuit"						value="0" />
  <!-- 退出游戏时掉落 0不掉落 1掉落所有 2只掉落快捷栏 3只掉落背包 -->
	<property name="BedrollDeadZoneSize"			value="15" />
  <!-- 睡袋区域的大小 僵尸将不会在睡袋范围内刷新 默认即可. -->
	<property name="BedrollExpiryTime"				value="45" />
  <!-- 角色离线后 睡袋保留的天数 默认即可 -->
	<property name="AllowSpawnNearBackpack"			value="false"/>
  <!-- 是否允许玩家在最后掉落的背包附近重生 -->

	<!-- Performance related -->
	<property name="MaxSpawnedZombies"				value="64" />
  <!-- 最大僵尸数量 这里可以突破64 僵尸数量会极度占用服务器资源 根据需求修改-->
	<property name="MaxSpawnedAnimals"				value="50" />
  <!-- 最大动物数量 动物数量会极度占用服务器资源 根据需求修改-->
	<property name="ServerMaxAllowedViewDistance"	value="12" />
  <!-- 最大视距 6-12 -->
	<property name="MaxQueuedMeshLayers"			value="1000" />
  <!-- 最大等待队列长度 默认即可 -->

	<!-- Zombie settings -->
	<property name="EnemySpawnMode"					value="true" />
  <!-- 是否刷新僵尸 -->
	<property name="EnemyDifficulty"				value="0" />
  <!-- 僵尸难度 0正常 1困难(感知模式) -->
	<property name="ZombieFeralSense"				value="0" />
  <!-- 感知时间段 0-3 (关闭, 白天, 晚上, 总是) -->
	<property name="ZombieMove"						value="0" />
  <!-- 僵尸白天移动速度0-4 -->
	<property name="ZombieMoveNight"				value="3" />
  <!-- 僵尸晚上移动速度0-4 -->
	<property name="ZombieFeralMove"				value="3" />
  <!-- 僵尸感知模式移动速度0-4 -->
	<property name="ZombieBMMove"					value="3" />
  <!-- 血月时僵尸移动速度0-4  -->
	<property name="BloodMoonFrequency"				value="7" />
  <!-- 血月周期 0为不开血月 -->
	<property name="BloodMoonRange"					value="0" />
  <!-- 血月随机偏移天数 0为不偏移 1的话会可能是第6天血月或者第8天血月 -->
	<property name="BloodMoonWarning"				value="8" />
  <!-- 血月提示(时间变为红色字体)默认为提前8小时提示 -1则永不提示 -->
	<property name="BloodMoonEnemyCount"			value="8" />
  <!-- 血月波数 -->

	<!-- Loot -->
	<property name="LootAbundance"					value="100" />
  <!-- 战利品搜刮倍率 100为100%标准倍率 200则为2倍物资 -->
	<property name="LootRespawnDays"				value="7" />
  <!-- 物资刷新时间 单位天 -->
	<property name="AirDropFrequency"				value="72"/>
  <!-- 空投周期 单位小时 默认为72小时即3天一空投 -->
	<property name="AirDropMarker"					value="true"/>
  <!-- 是否显示空投标记 -->

	<!-- Multiplayer -->
	<property name="PartySharedKillRange"			value="100"/>
  <!-- 玩家共享经验距离 改大即可全图共享经验(组队) -->
	<property name="PlayerKillingMode"				value="3" />
  <!-- 玩家击杀模式 0关闭友伤 1击杀盟友 2只击杀陌生人 3击杀所有 -->

	<!-- Land claim options -->
	<property name="LandClaimCount"					value="3"/>
  <!-- 每个玩家最大领地数量 -->
	<property name="LandClaimSize"					value="41"/>
  <!-- 每个玩家最大领地范围 -->
	<property name="LandClaimDeadZone"				value="30"/>
  <!-- 两个领地最小间隔(非盟友) -->
	<property name="LandClaimExpiryTime"			value="7"/>
  <!-- 领地过期时间 -->
	<property name="LandClaimDecayMode"				value="0"/>
  <!-- 离线玩家领地衰减模式 0慢性衰减 1快速衰减 2无保护. -->
	<property name="LandClaimOnlineDurabilityModifier"	value="4"/>
  <!-- 玩家在线时领地石加强砖块硬度 0无敌 默认4倍-->
	<property name="LandClaimOfflineDurabilityModifier"	value="4"/>
  <!-- 玩家离线时领地石加强砖块硬度 0无敌 默认4倍-->
	<property name="LandClaimOfflineDelay"			value="0"/>
  <!-- 玩家离线时 领地石从在线硬度保护转换到离线硬度保护所需要的时间 单位分钟-->


	<property name="DynamicMeshEnabled"				value="true"/>
  <!-- 是否启动动态网格系统 -->
	<property name="DynamicMeshLandClaimOnly"		value="true"/>
  <!-- 动态网格系统是否仅在LCB区域类生效  -->
	<property name="DynamicMeshLandClaimBuffer"		value="3"/>
  <!-- 动态网格系统LCB范围半径-->
	<property name="DynamicMeshMaxItemCache"		value="3"/>
  <!-- 动态网格系统支持并发项 -->

	<property name="TwitchServerPermission"			value="90"/>
  <!-- 连接twitch所需要的权限级别 -->
	<property name="TwitchBloodMoonAllowed"			value="false"/>
  <!-- 在血月时是否支持twitch功能 国内网络连不上twitch -->

	<property name="MaxChunkAge"					value="-1"/>
  <!-- 默认即可 -->
	<property name="SaveDataLimit"					value="-1"/>
  <!-- 默认即可 -->

	<!-- There are several game settings that you cannot change when starting a new game.
	You can use console commands to change at least some of them ingame.
	setgamepref BedrollDeadZoneSize 30 -->
</ServerSettings>
Next, double-click the startdedicated.bat file to launch the 7 Days to Die dedicated server.

Joining the Server in the Game
On the game's main menu, click Join Game.
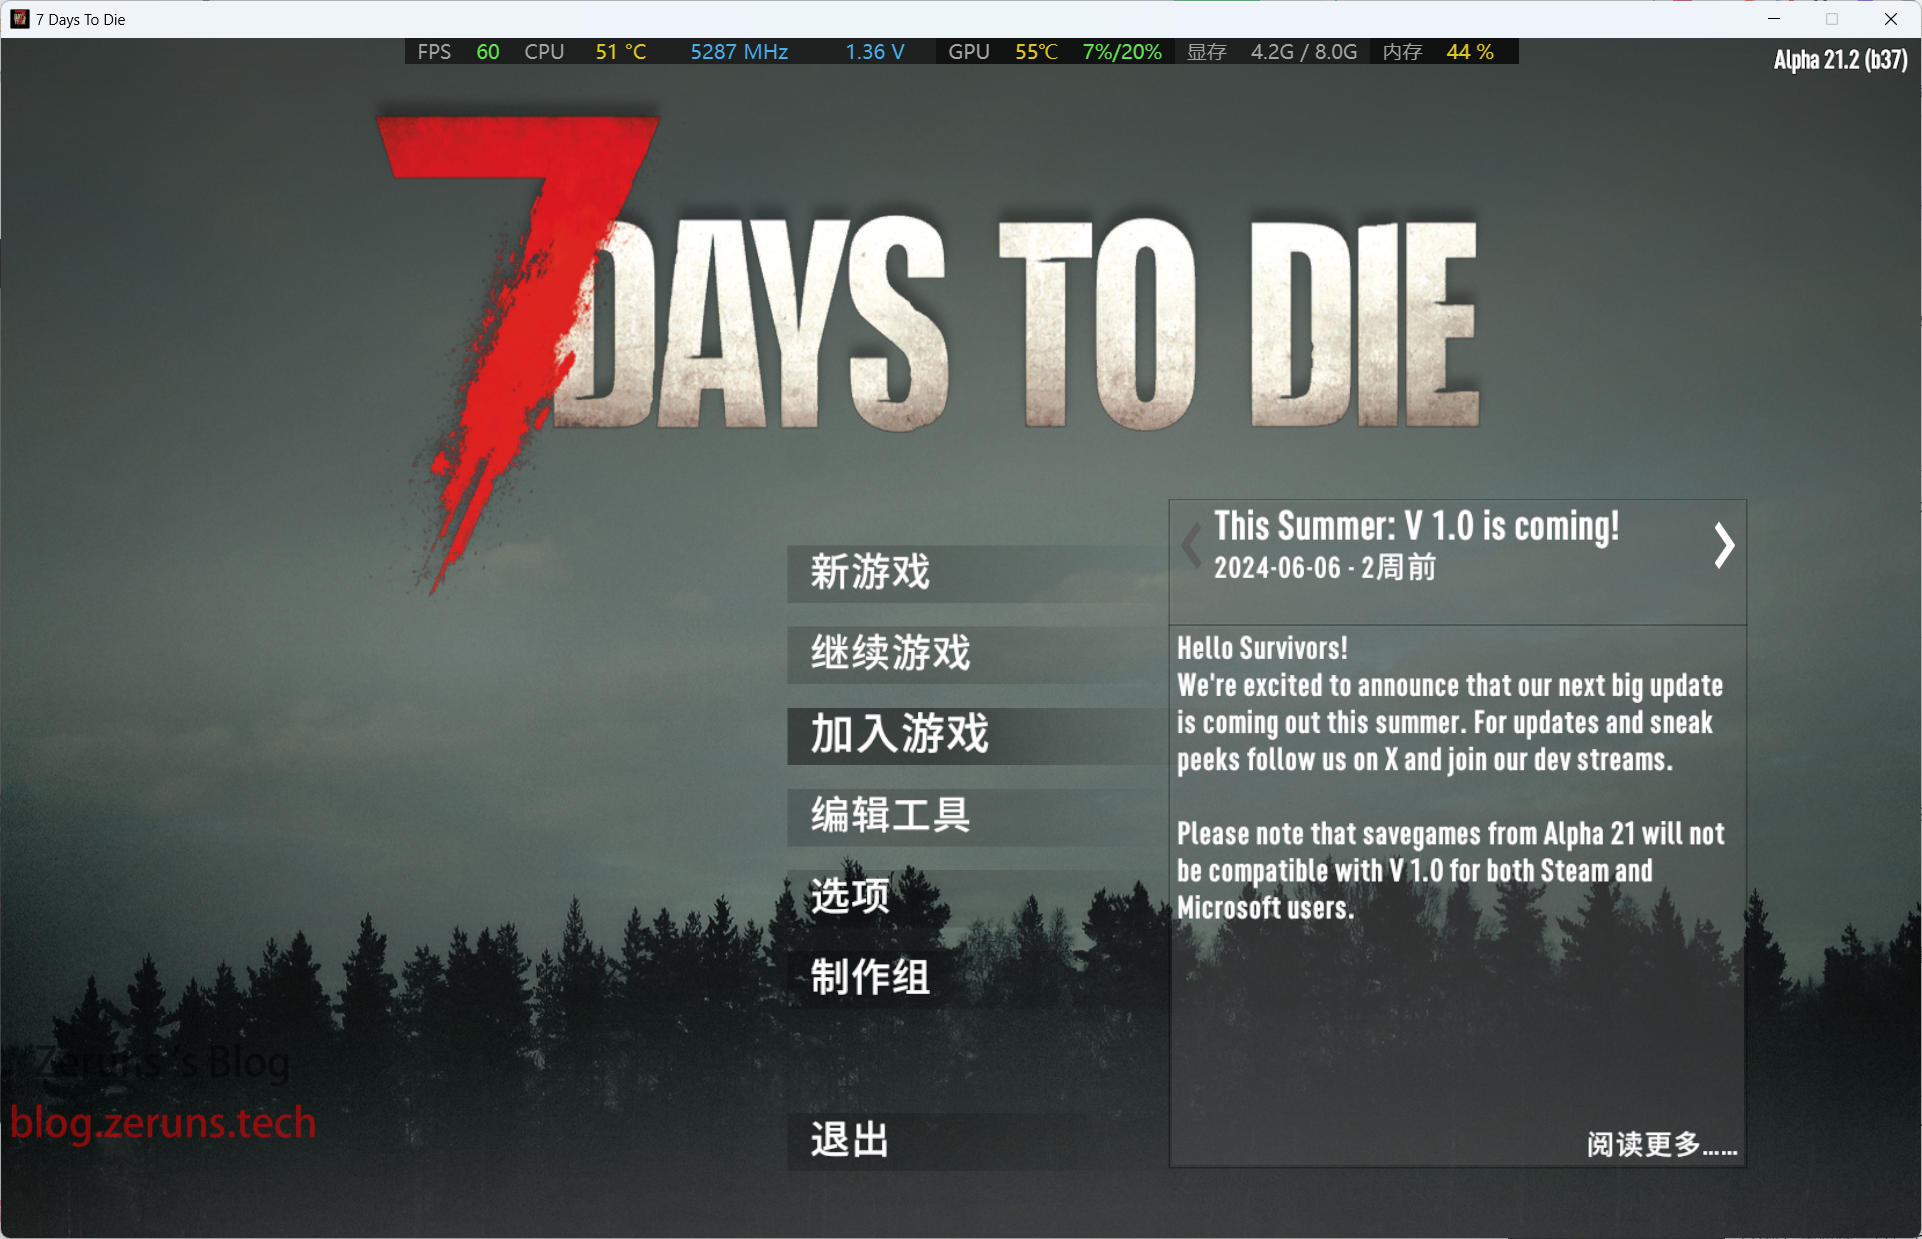
Click Connect to IP, enter your server's public IP in the IP field, and input the port you configured earlier in the port field. Then click Connect to join the server.


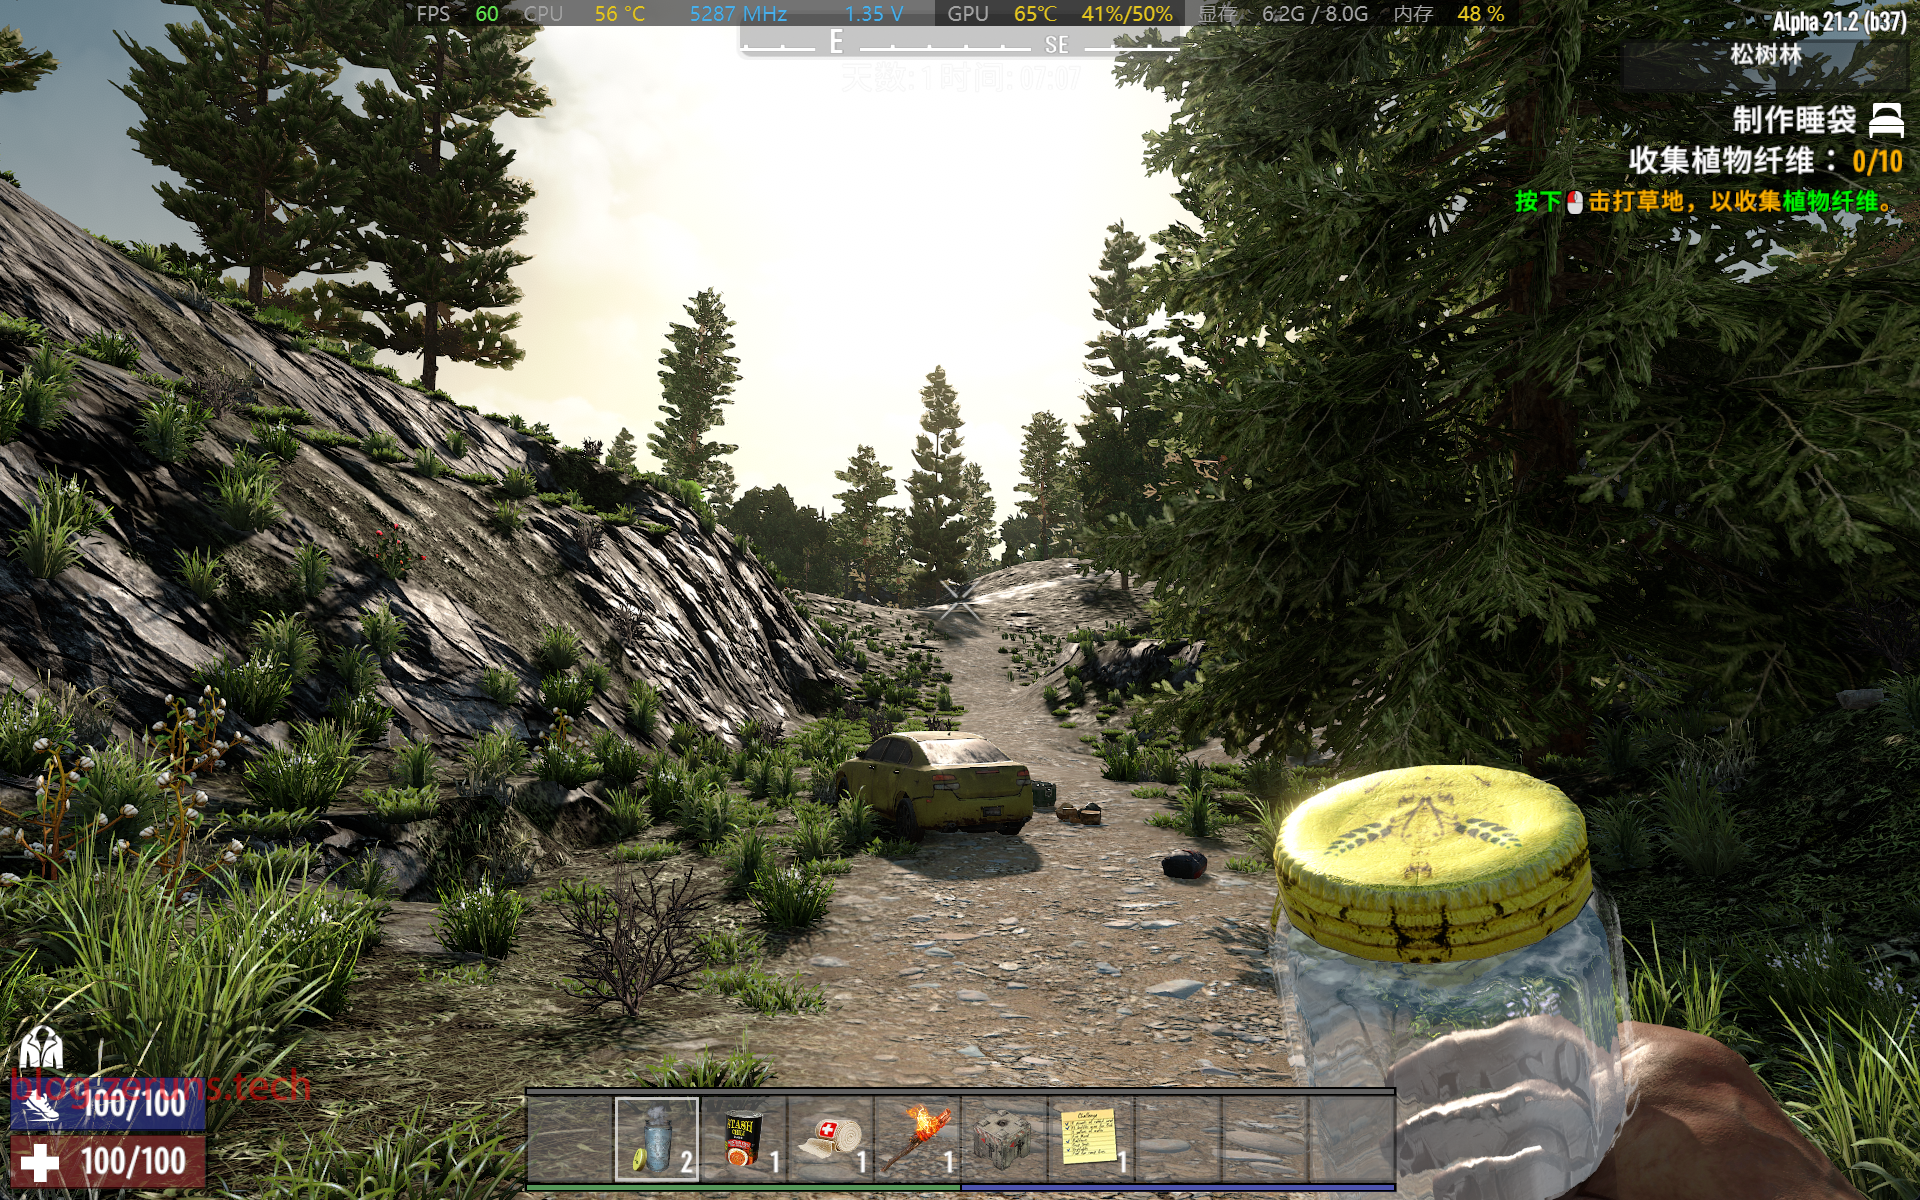
And that's it! You're in the game. Share your server's IP and port with your friends so they can join, and you can enjoy playing together.
Recommended Reading
- High-cost-performance and affordable VPS/cloud server recommendations: https://blog.zeruns.tech/archives/383.html
- Minecraft server setup tutorial: https://blog.zeruns.tech/tag/mc/
- Palworld server setup tutorial: https://blog.zeruns.tech/tag/PalWorld/
- Internal network penetration server setup tutorial, NPS setup and usage guide: https://blog.zeruns.tech/archives/741.html
- Rainyun Ningbo 8272CL high-bandwidth and anti-DDoS cloud server review, featuring up to 500 Mbps bandwidth and 1TB cloud storage: https://blog.zeruns.tech/archives/789.html
- Code-free personal blog setup! A detailed tutorial for building a personal blog: https://blog.zeruns.tech/archives/783.html


Comment Section