


Linux Server Uses MCSM 10 + Docker to Set Up My World "Dragon Adventure: New Journey 2.0" Mod Pack Server Tutorial, Minecraft Mod Pack Server Opening Tutorial.
Video Tutorial: https://www.bilibili.com/video/BV1cdNKetEkU/
What is a Mod Pack
A Minecraft mod pack is a game version that includes multiple mods and configuration files, allowing players to experience different game styles and content. Mod packs are usually created and released by community players or teams, and some are launched by official or cooperative parties. There are many types of mod packs, such as technology, magic, adventure, survival, etc., each with its own characteristics and gameplay.
- Linux Sets Up My World (MC) Mod Pack Server, ATM9 Mod Pack Server Opening Tutorial: https://blog.zeruns.com/archives/775.html
- My World (MC) Mod Pack Server Opening Tutorial, Pokehaan Craft 2 Mod Pack Server Setup Tutorial: https://blog.zeruns.com/archives/755.html
- Linux Sets Up Minecraft Utopia Exploration Journey 3.2 Mod Pack Server: https://blog.zeruns.com/archives/796.html
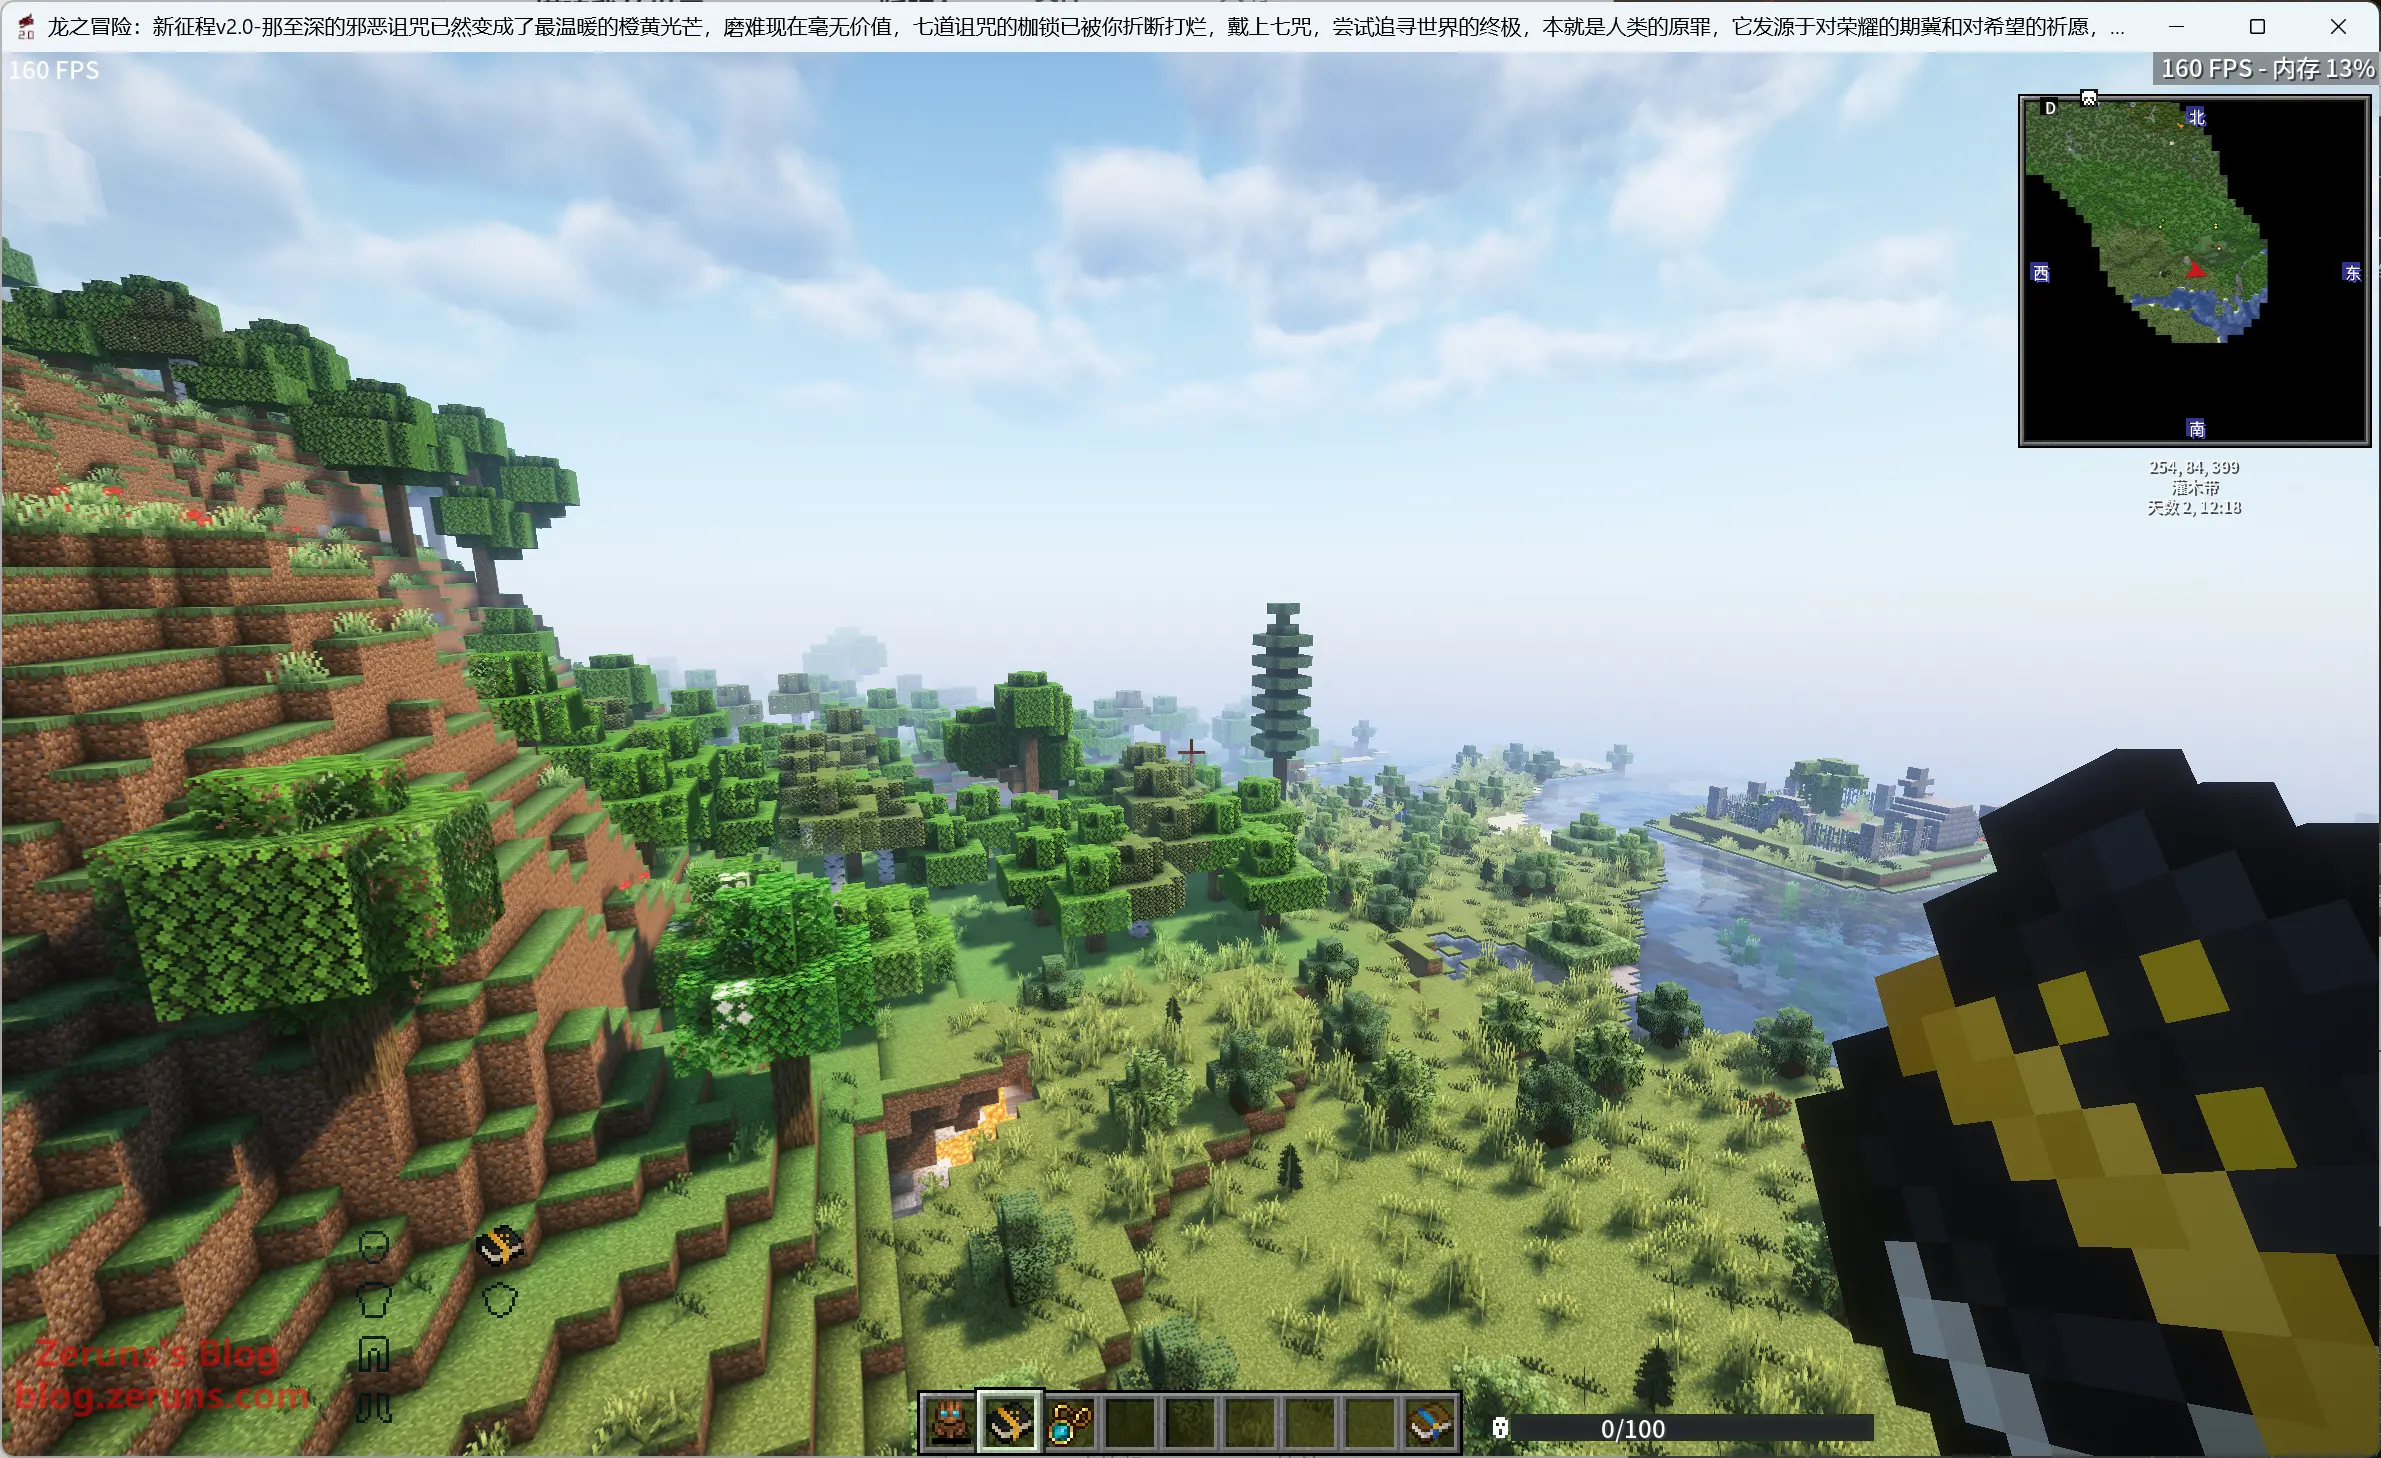
"Dragon Adventure: New Journey 2.0" Mod Pack Introduction
Mod Pack Introduction
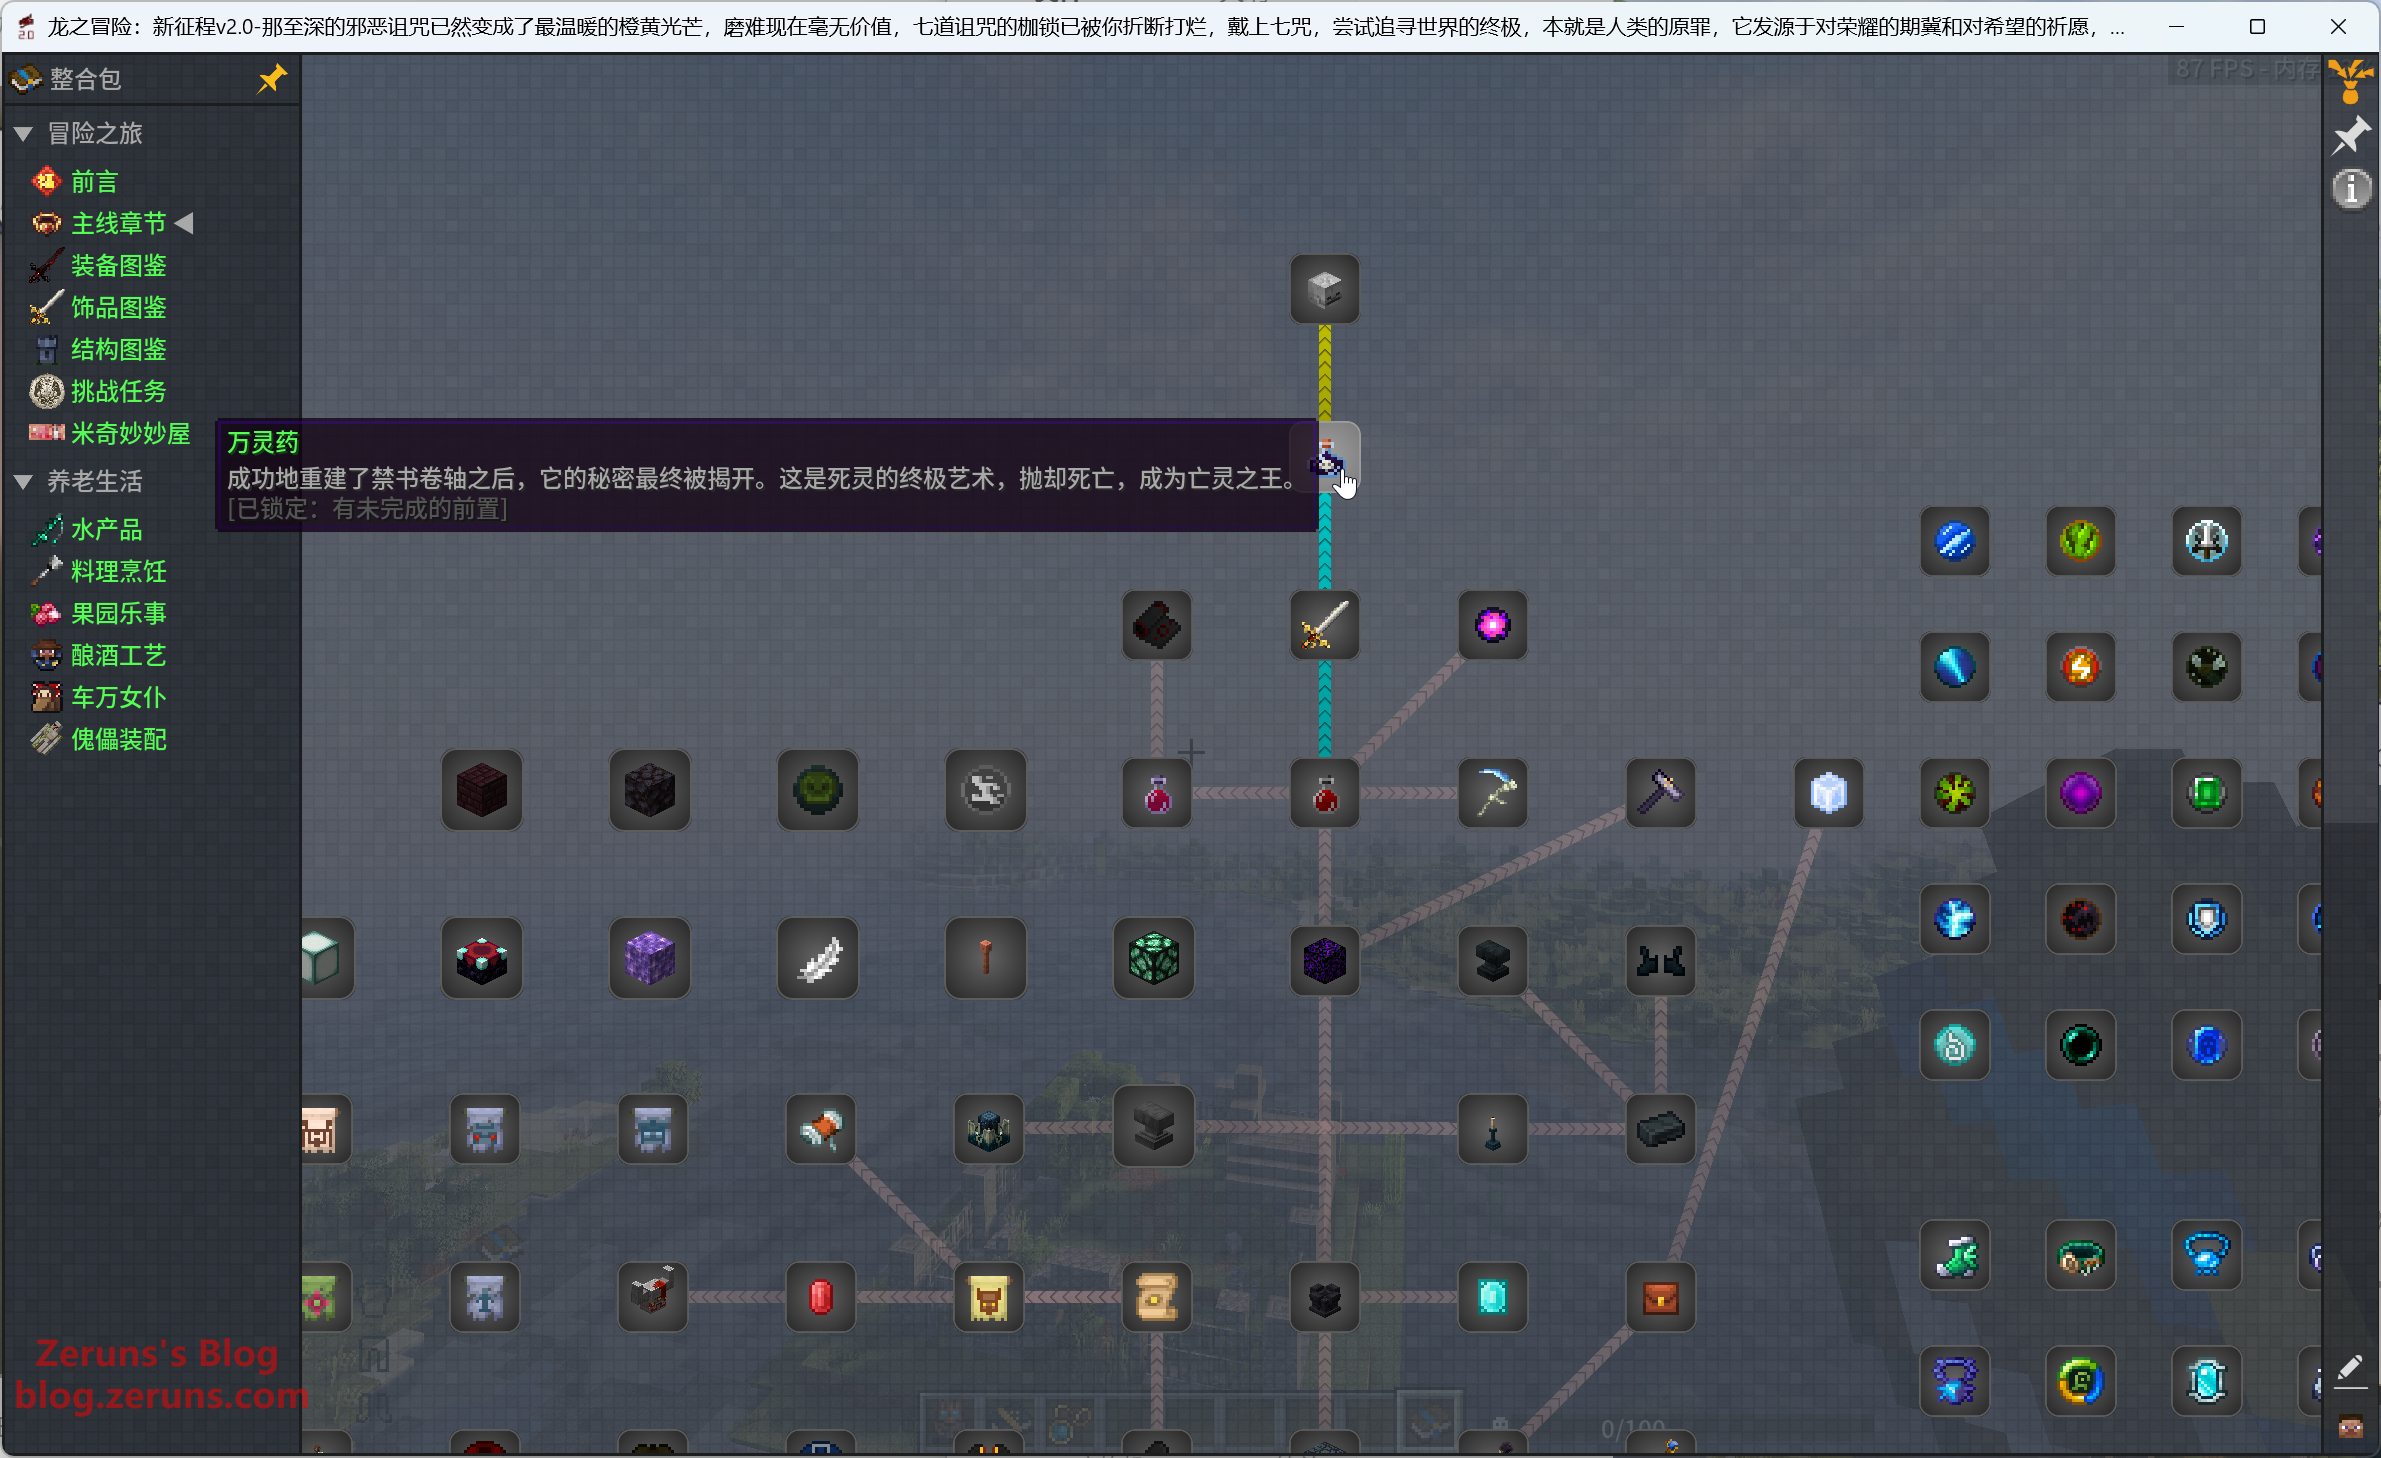
- 600+ tasks with detailed introductions and guides, so you don't have to worry about not understanding the main mods even if you play for the first time.
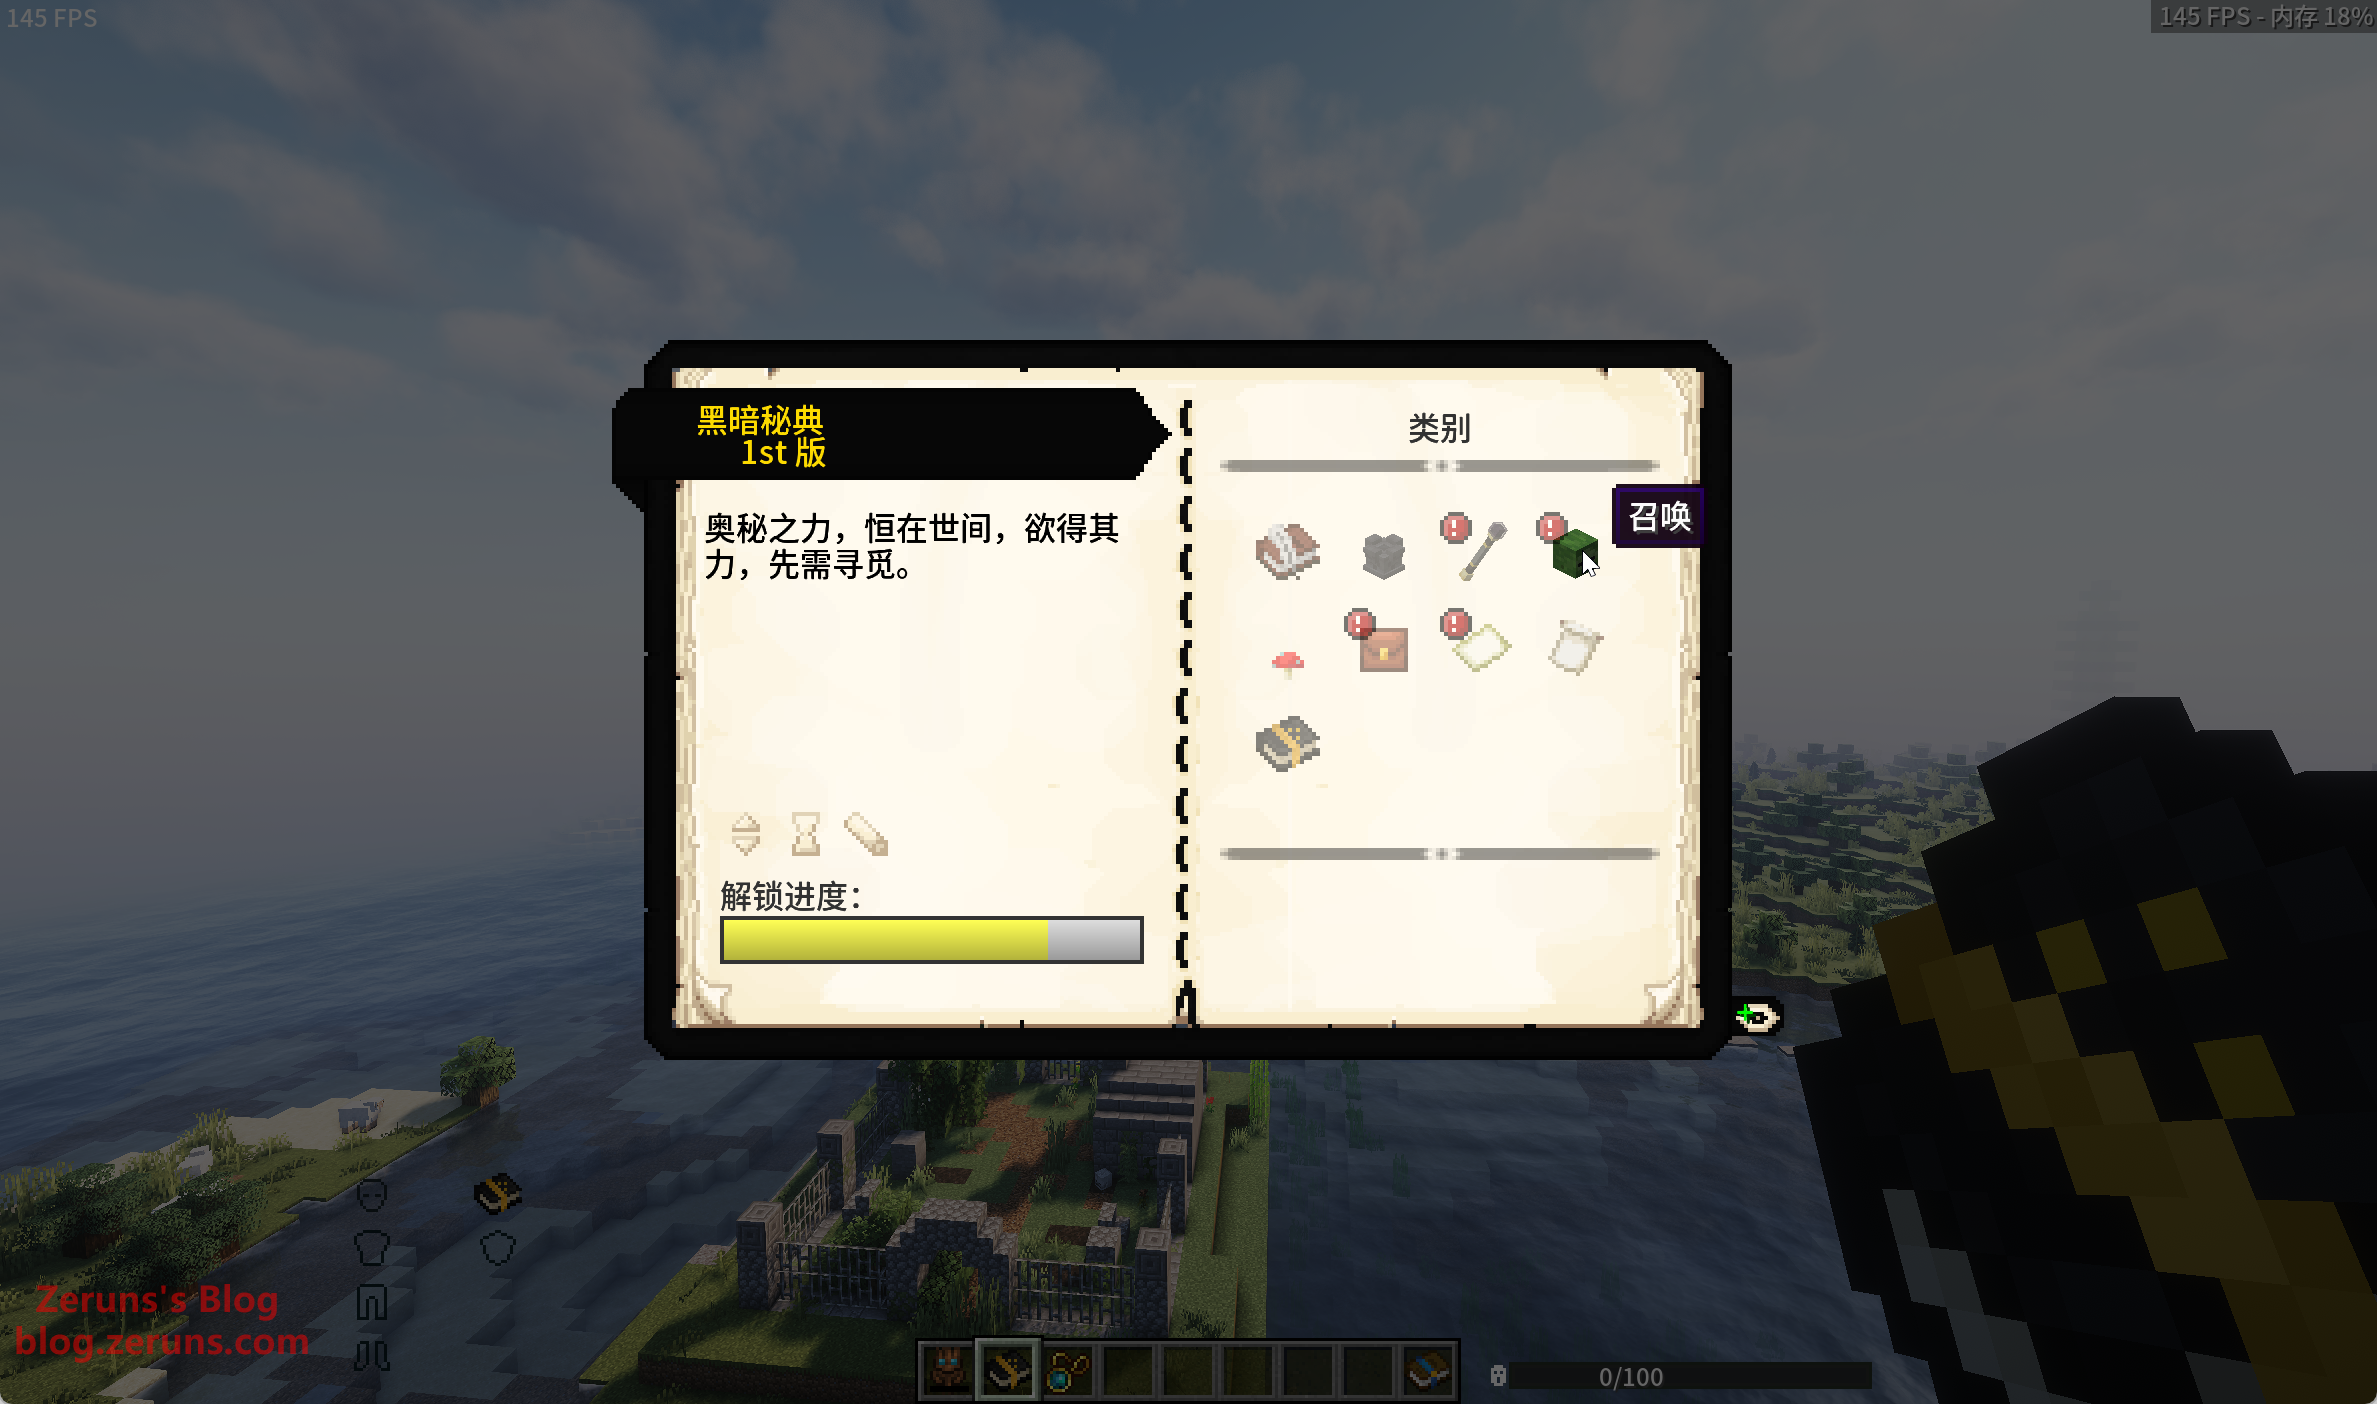
- All-new dark magic, providing great help for adventures.
- Added a task store to increase the fun of playing.
- Over 20 challenging BOSSes.
- Dozens of dungeon ruins waiting to be explored.
- Nearly 100 powerful accessories in the mod pack.
- Hundreds of foods cooked through an immersive cooking method, allowing people to experience the joy of cooking.
- Contains 27 new types of wine to experience the joy of brewing.
This mod pack is based on version 1.20.1.
The author's Bilibili introduction video for this mod pack: https://url.zeruns.com/GAy1d
The MC百科 link for this mod pack: https://www.mcmod.cn/modpack/737.html
My World Server Opening Exchange QQ Group 2: 746189110
MC Server Opening Exchange QQ Channel: https://pd.qq.com/s/ckmpr5e63
Mod Pack Features
- The mod pack enforces the wearing of the Seven Curses Ring, and under its influence, you will gain seven curses and seven blessings.
- Every weapon, equipment, tool, and accessory in the mod pack has a quality, which can be recast through an anvil.
- The hydration value system, the mod pack has adapted the hydration value for some foods in other MODs.
- Many item recipes and Mod configuration files have been adjusted and modified, so the familiar Mods will be somewhat different in this mod pack.
- Health values cannot be naturally restored. Health values can be restored through bonfires, medical items, magic, and special props. (Some medical items will be given in the early tasks)
- Going to the End is now different from the original version, and you need to collect 12 different eyes to activate the portal.
- All-new ALEX caves are waiting to be explored.
MCSM10 Introduction
MCSManager is an open-source, distributed, one-click deployment control panel that supports Minecraft and Steam game servers.
MCSManager has gained a certain degree of popularity in the Minecraft and other games communities. It can help you centrally manage multiple physical servers, dynamically create game servers on any host, and provides a secure and reliable multi-user permission system, making it very easy to help you manage multiple servers.
The official documentation for the MCSM panel: https://url.zeruns.com/FhpqL
Various installation methods and setup tutorials for the MCSManager10 panel on Linux: https://blog.zeruns.com/archives/787.html
Download the Mod Pack
First, you need to download the server and client for "Dragon Adventure: New Journey 2.0". You can find the download link in the author's Bilibili video or download it from the link below.
The server in my link below includes the Windows version of JDK17, which can be run directly by double-clicking the one-click start bat file on a Windows server;
I also put the Windows client with JDK21 and the PCL2 launcher, which can be played directly after downloading; For the Mac client, I put the JDK17 installation package (ARM) and the HMCL launcher. First, install JDK17, then open the HMCL launcher to start the game.
- "Dragon Adventure: New Journey 2.0" Server 123 Cloud Disk Unlimited Speed Download Address: https://www.123865.com/ps/2Y9Djv-uu5vH
- "Dragon Adventure: New Journey 2.0" Server Baidu Cloud Disk Download Link: https://pan.baidu.com/s/1oDs5LexbUJOHagngILdz_A?pwd=ny8a
- "Dragon Adventure: New Journey 2.0" Win Client 123 Cloud Disk Unlimited Speed Download Address: https://www.123865.com/ps/2Y9Djv-Uu5vH
- "Dragon Adventure: New Journey 2.0" Win Client Baidu Cloud Disk Download Link: https://pan.baidu.com/s/1dYrD63qqTRPDU7HyjHMAnw?pwd=wpgn
- "Dragon Adventure: New Journey 2.0" Mac Client 123 Cloud Disk Unlimited Speed Download Address: https://www.123865.com/ps/2Y9Djv-Su5vH
- "Dragon Adventure: New Journey 2.0" Mac Client Baidu Cloud Disk Download Link: https://pan.baidu.com/s/1iIxejaYYbg7Kf2nHKwKYMA?pwd=yysp
Preparation
Next, you need a server to host the game. I used Rainyun Game Cloud VPS, and I chose the 13900K model with a configuration of 4 cores and 8GB of RAM.
The server configuration must have at least 4 cores and 8GB of RAM! Moreover, the server's CPU should have a high clock speed and high single-core performance, such as 14900K/13900K, 7950X, 9950X, etc.! High-version Java servers are very demanding on single-core performance and memory, and large mod packs are even more demanding on performance!
Rainyun Discount Registration Link: https://www.rainyun.com/zeruns_?s=blog-en
Discount Code: zeruns
After registering with the discount code and binding WeChat, you can receive a 50% off coupon
Other Cloud Server/VPS Recommendations: https://blog.zeruns.com/archives/383.html
- Rainyun 14900K Ningbo High-Defense Cloud Server Performance Review: https://blog.vpszj.cn/archives/2115.html
- Introducing 4 Useful Panel Servers, which can be used to host various MC mod packs, Phantasmal Parlu, 7 Days to Die, CSGO, and other servers with one click: https://blog.zeruns.com/archives/808.html
- LinFeng Cloud 9950X Cloud Server Performance Review: https://blog.vpszj.cn/archives/2197.html
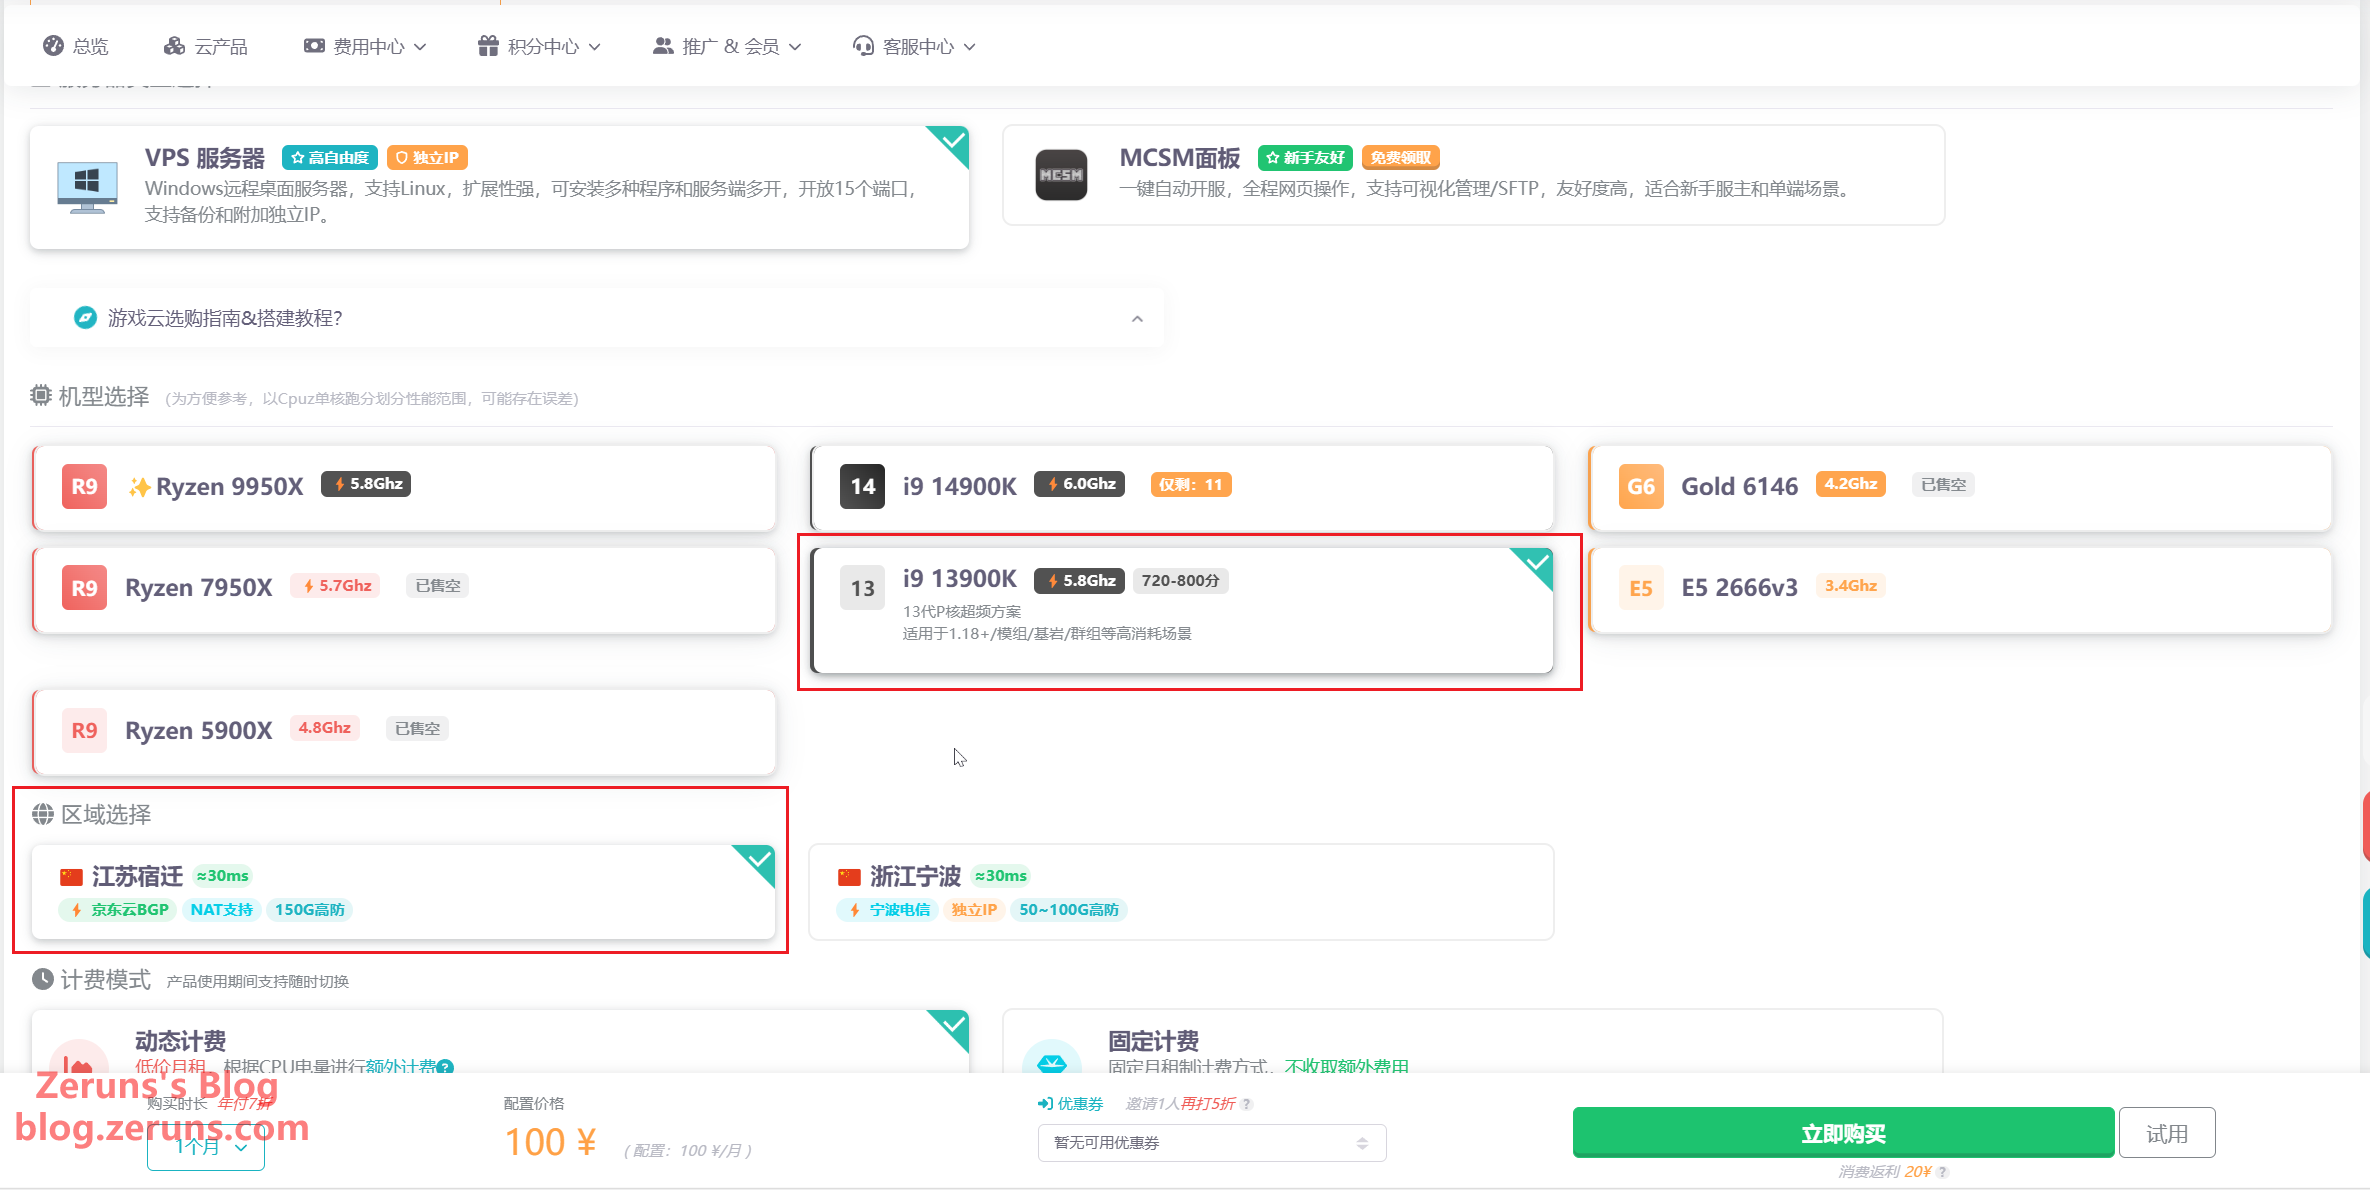
After registering an account, go to the Rainyun console, click on Cloud Products → Game Cloud → Purchase Now:
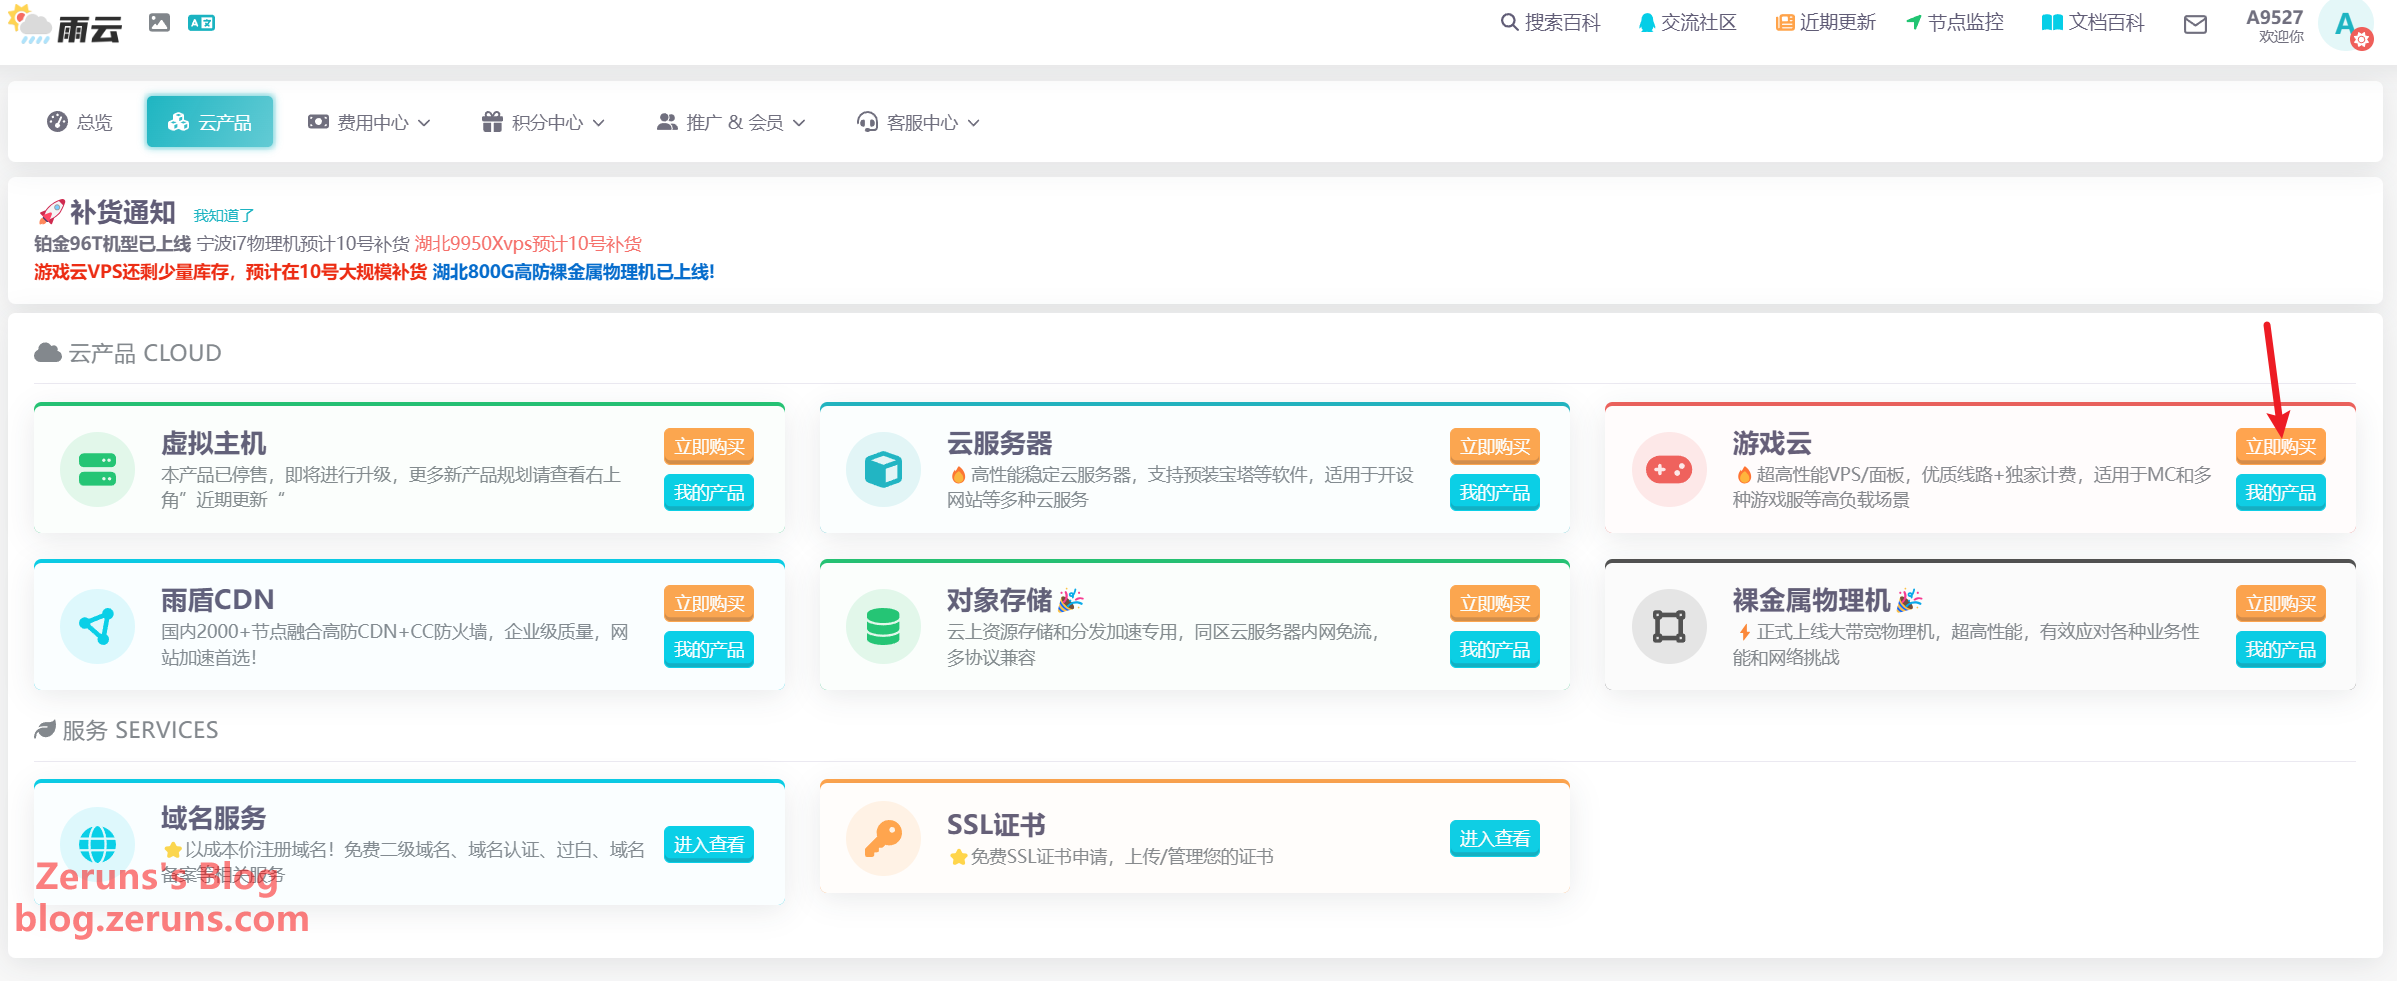
Select the VPS server, choose the model (I chose 13900K), select the region (Jiangsu Suqian is a NAT network that requires port mapping and provides 15 ports), Zhejiang Ningbo has a public IP address and does not require port mapping.
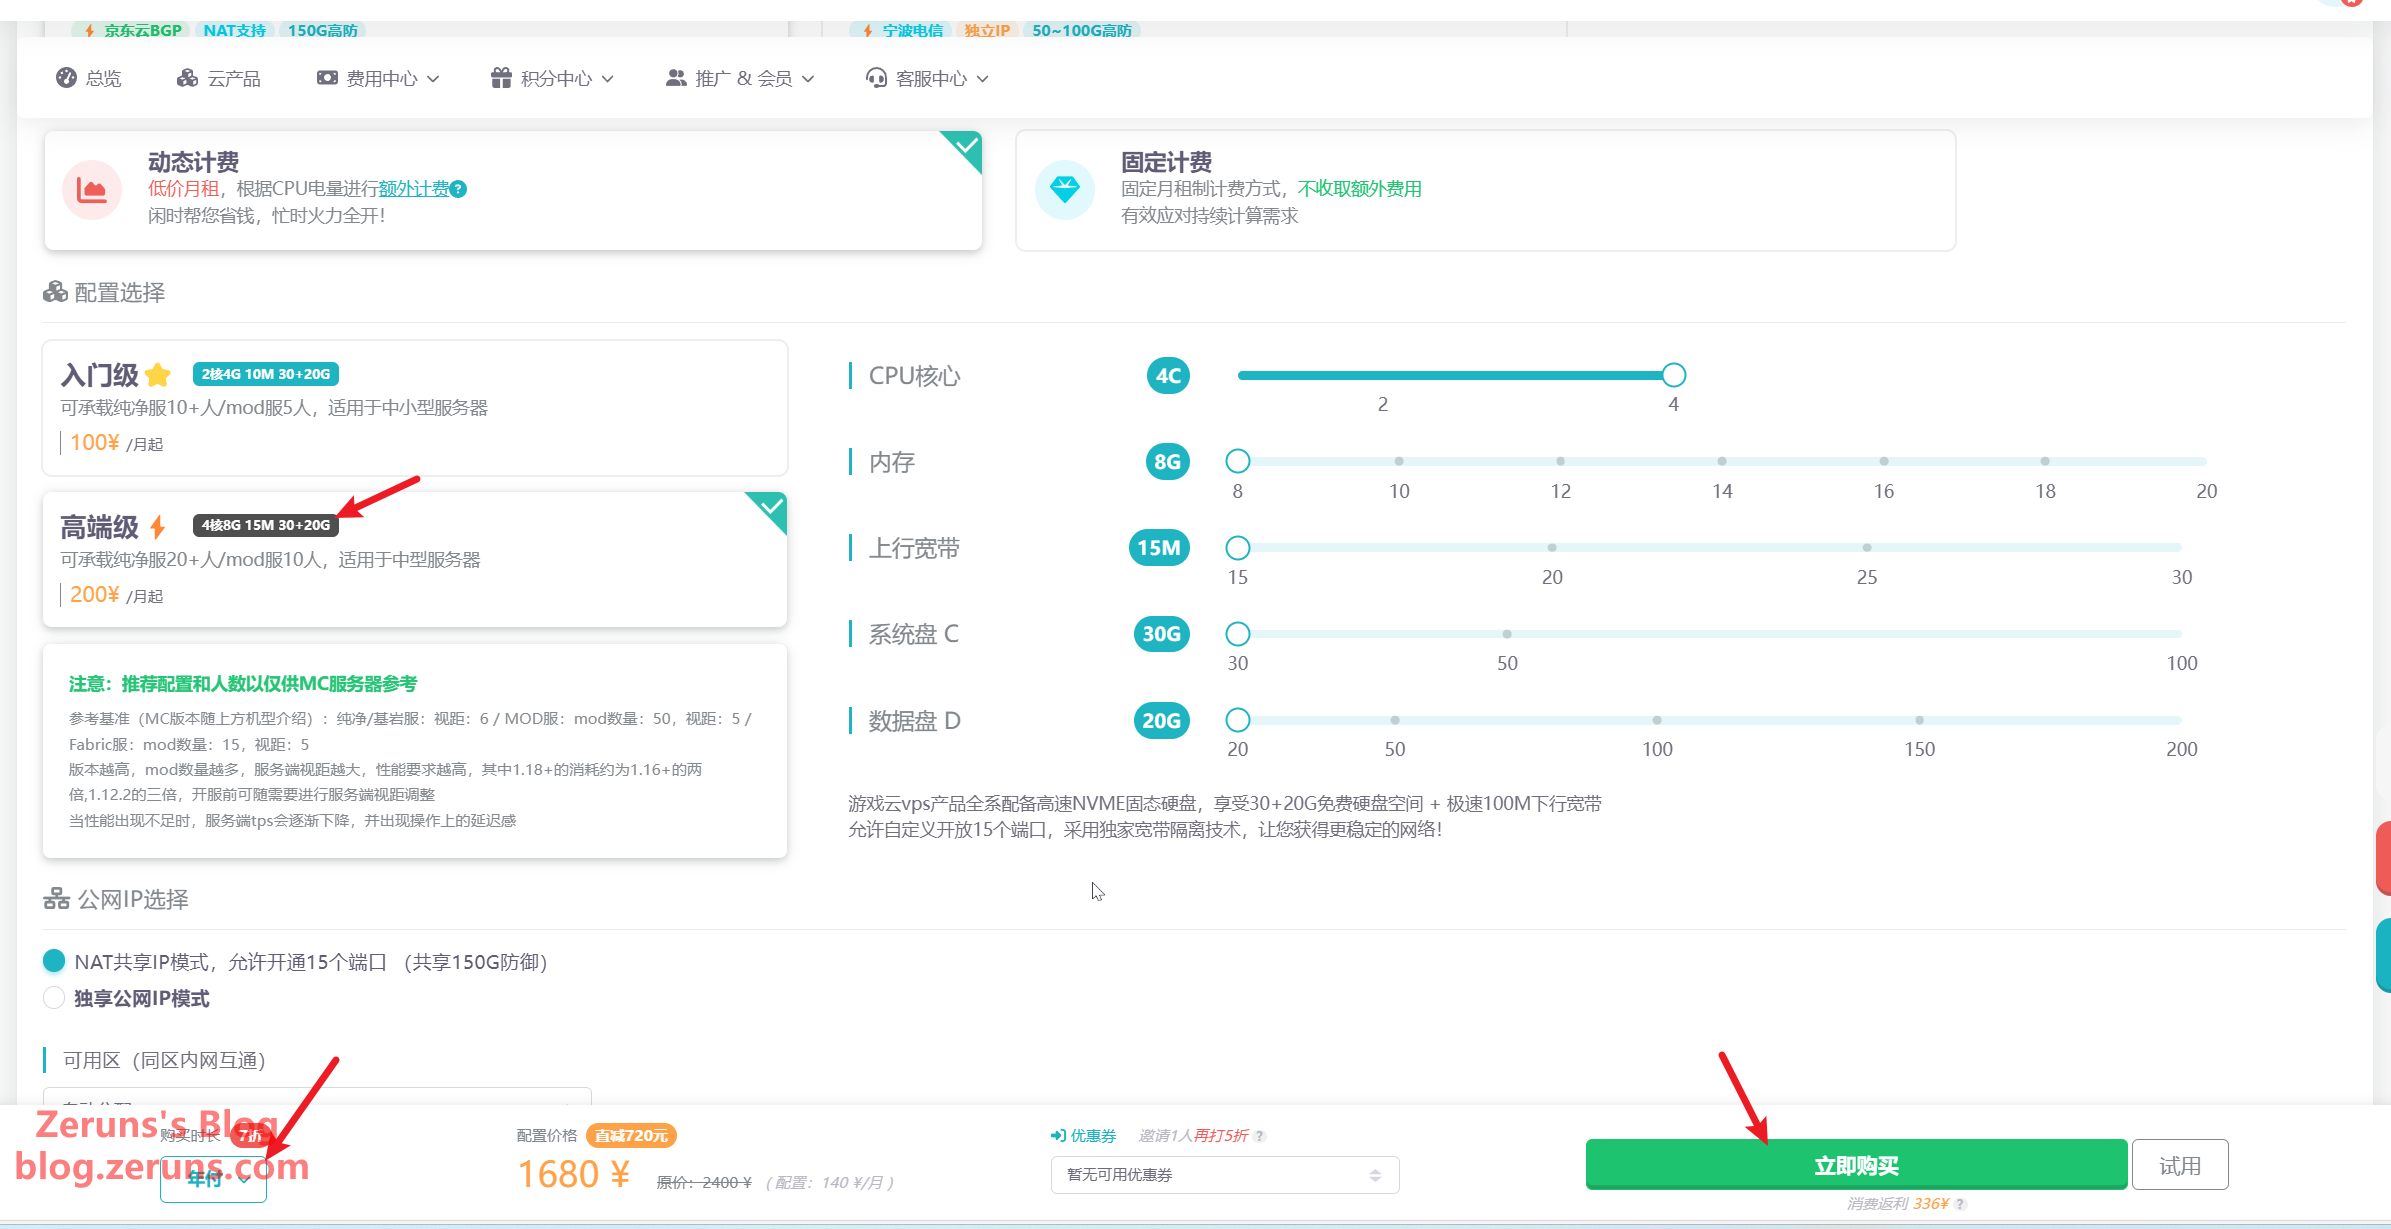
Choose the billing mode, which includes dynamic billing and fixed billing. If you only play occasionally, it is recommended to choose dynamic billing, and select the configuration of 4 cores and 8GB.
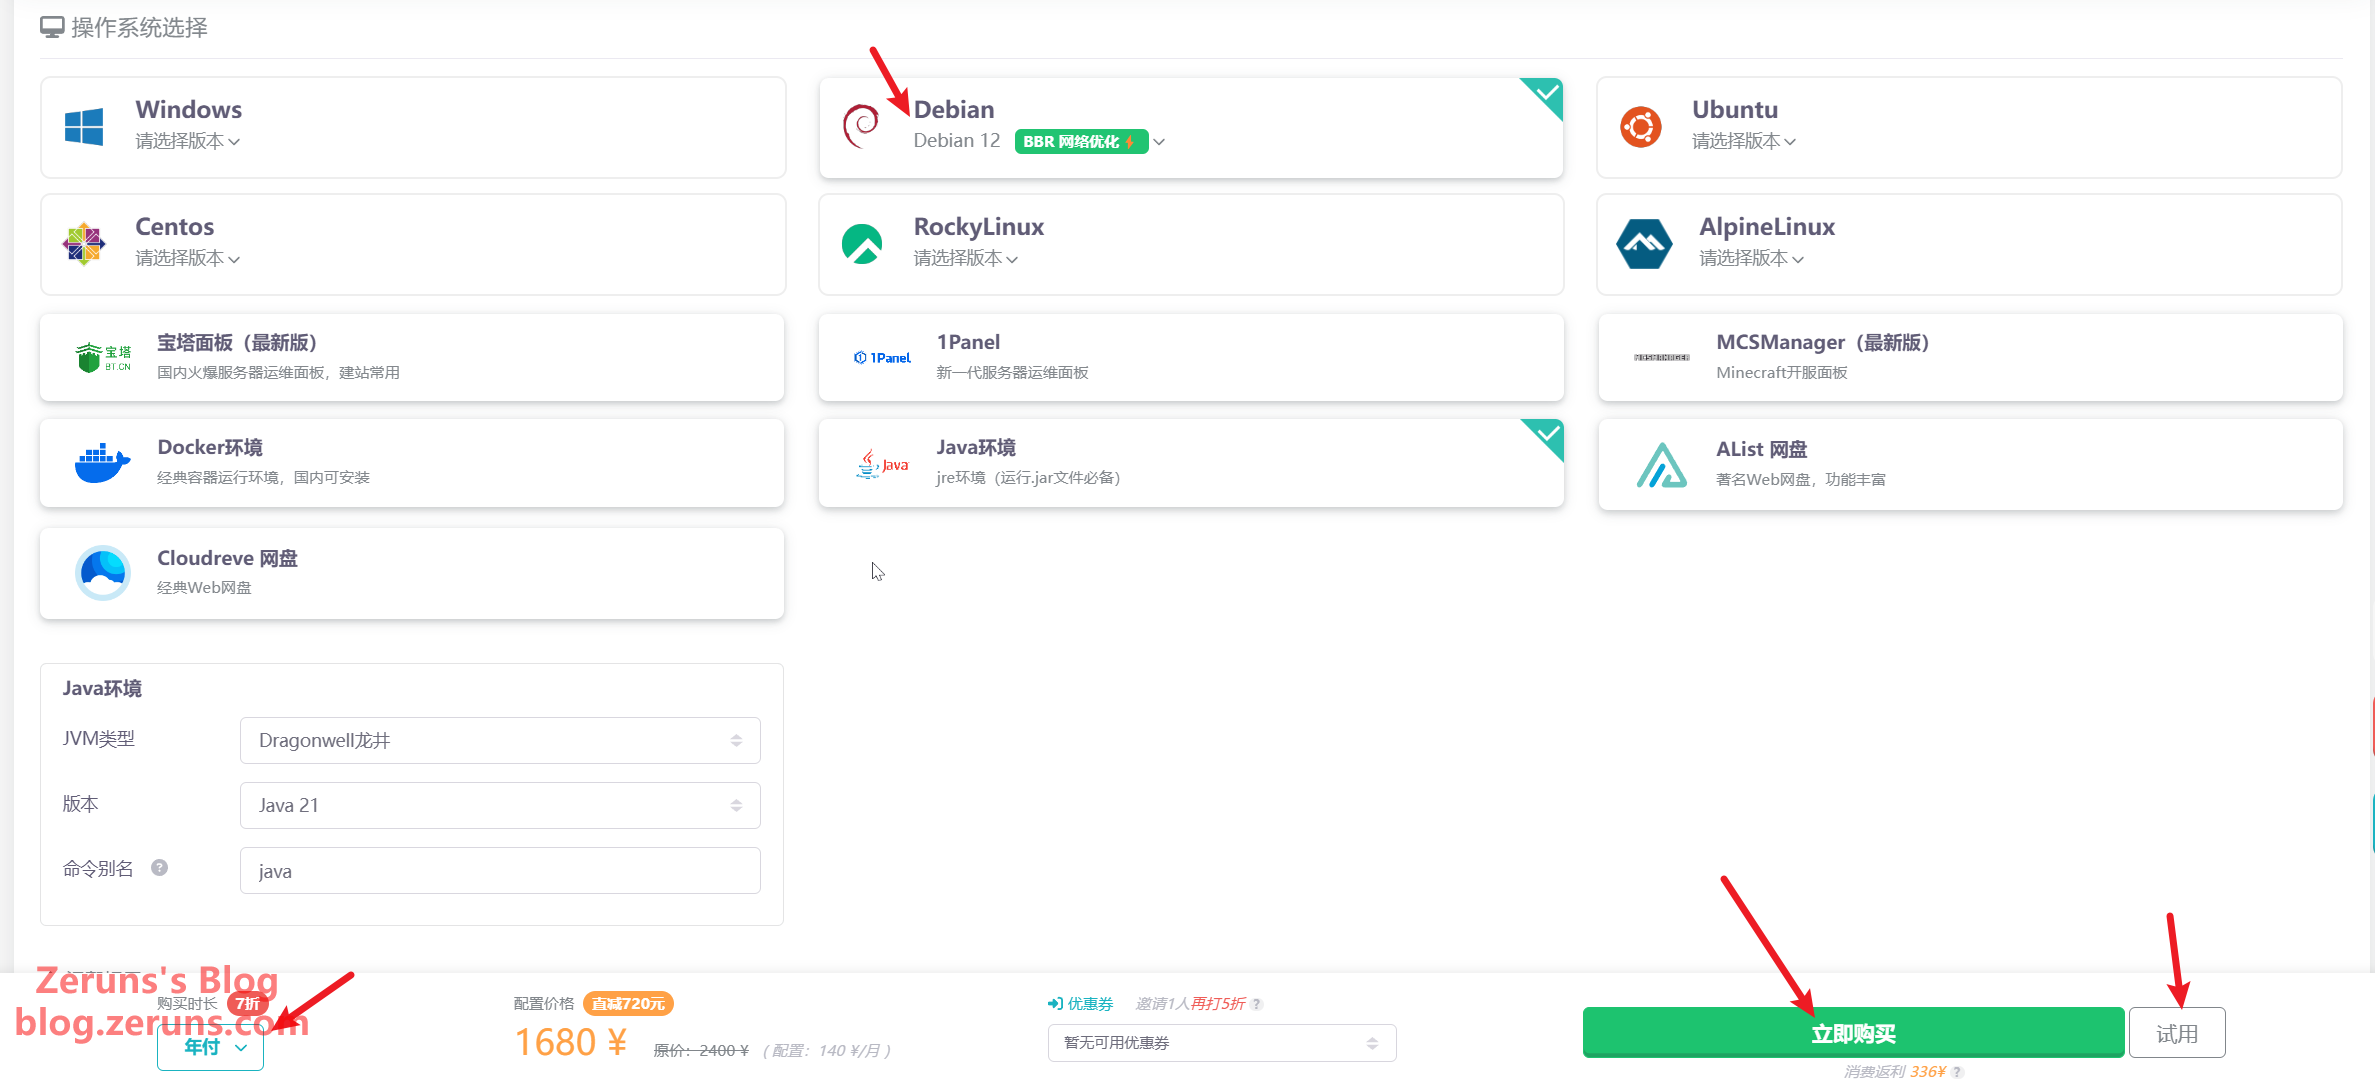
Select the operating system as Debian 12, then choose the purchase duration. Annual payment has a 30% discount, and you can also try it for 1 day for 2 yuan.
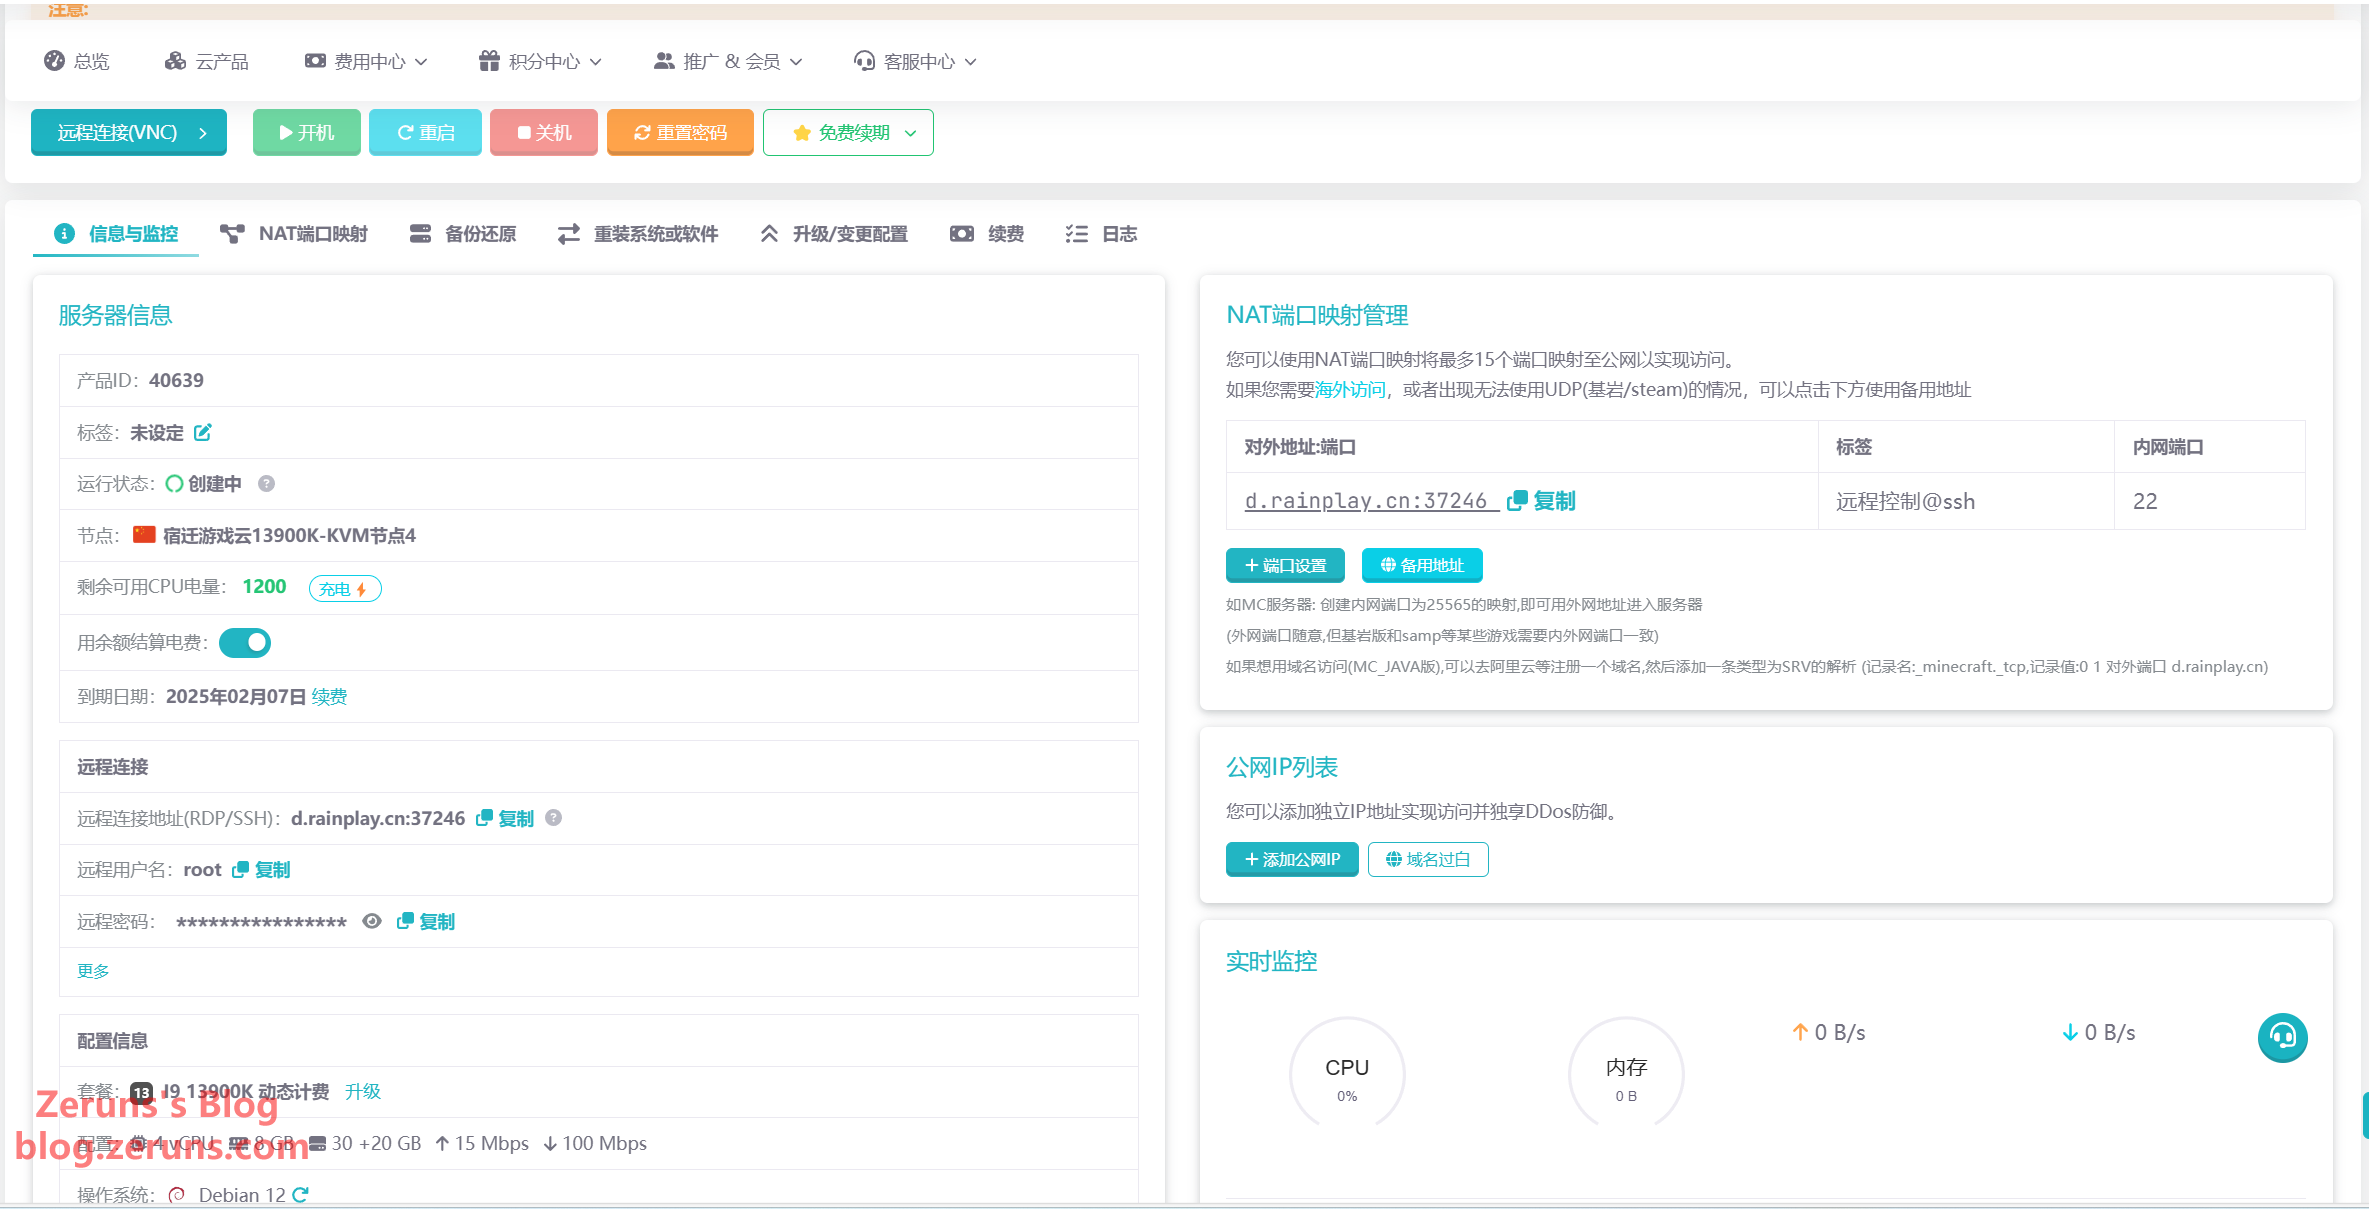
After purchasing, you can see the VPS you bought in My Game Cloud. Click on this card or the Manage button.
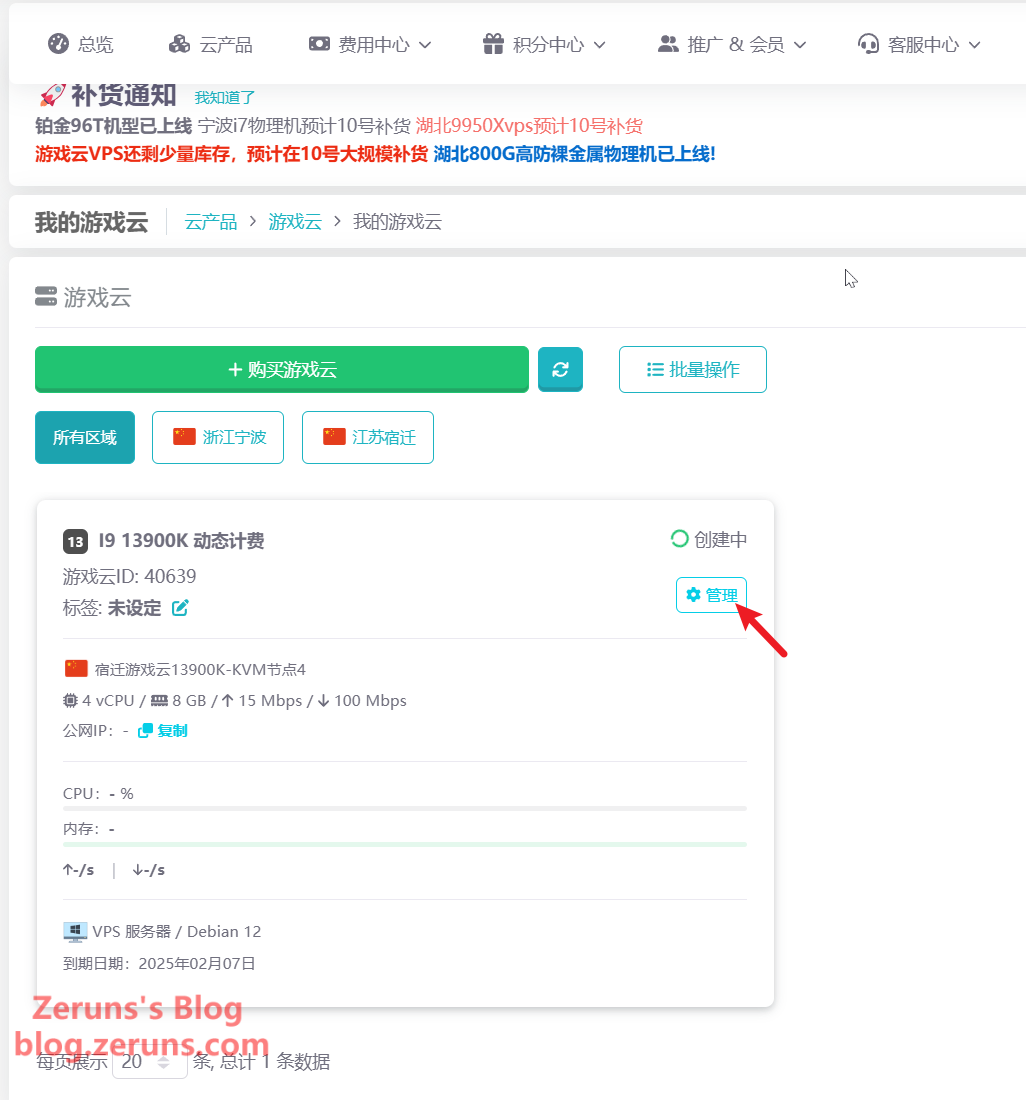
Then you can see the information of the VPS. Here, you can reinstall/switch the system and upgrade the configuration.
Connecting to the Server
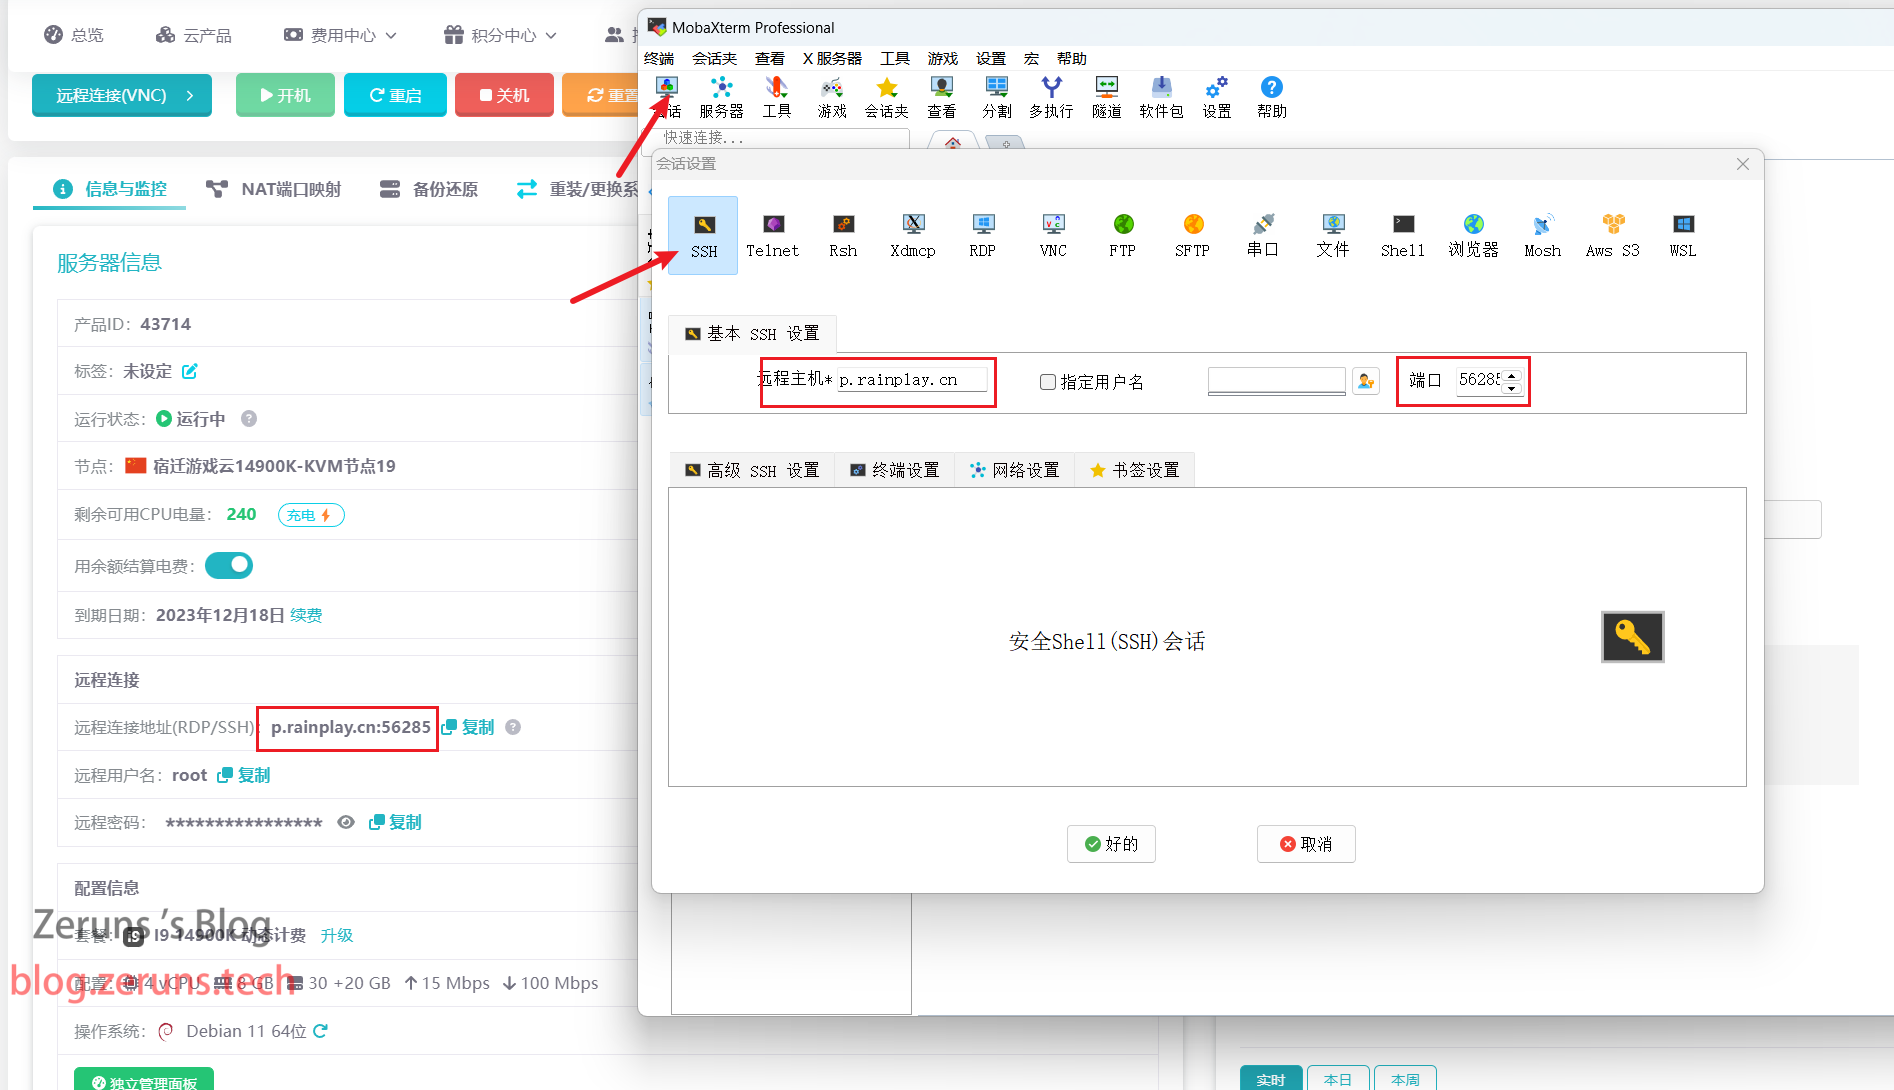
Download, install, and open the SSH client software. Recommended SSH client software includes Putty or Mobaxterm.
I used Mobaxterm. Enter your server's IP address or domain name (obtained from the Rainyun console) and the SSH port in the SSH client, then click OK or Open.
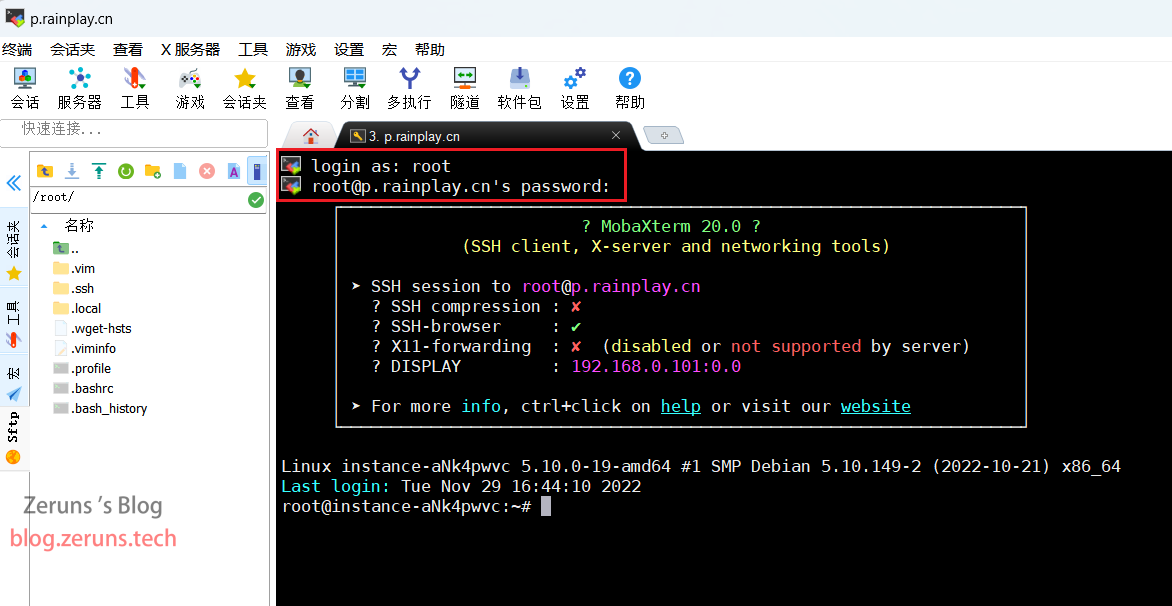
Then enter the account and press Enter. The account is generally the default root, followed by entering the password and pressing Enter to confirm. The password will not be displayed when entered.
Warm Reminder: In the SSH terminal, hold the left mouse button to select text, then release the mouse, and click in an empty area to copy the selected text; right-click in the SSH terminal to paste.
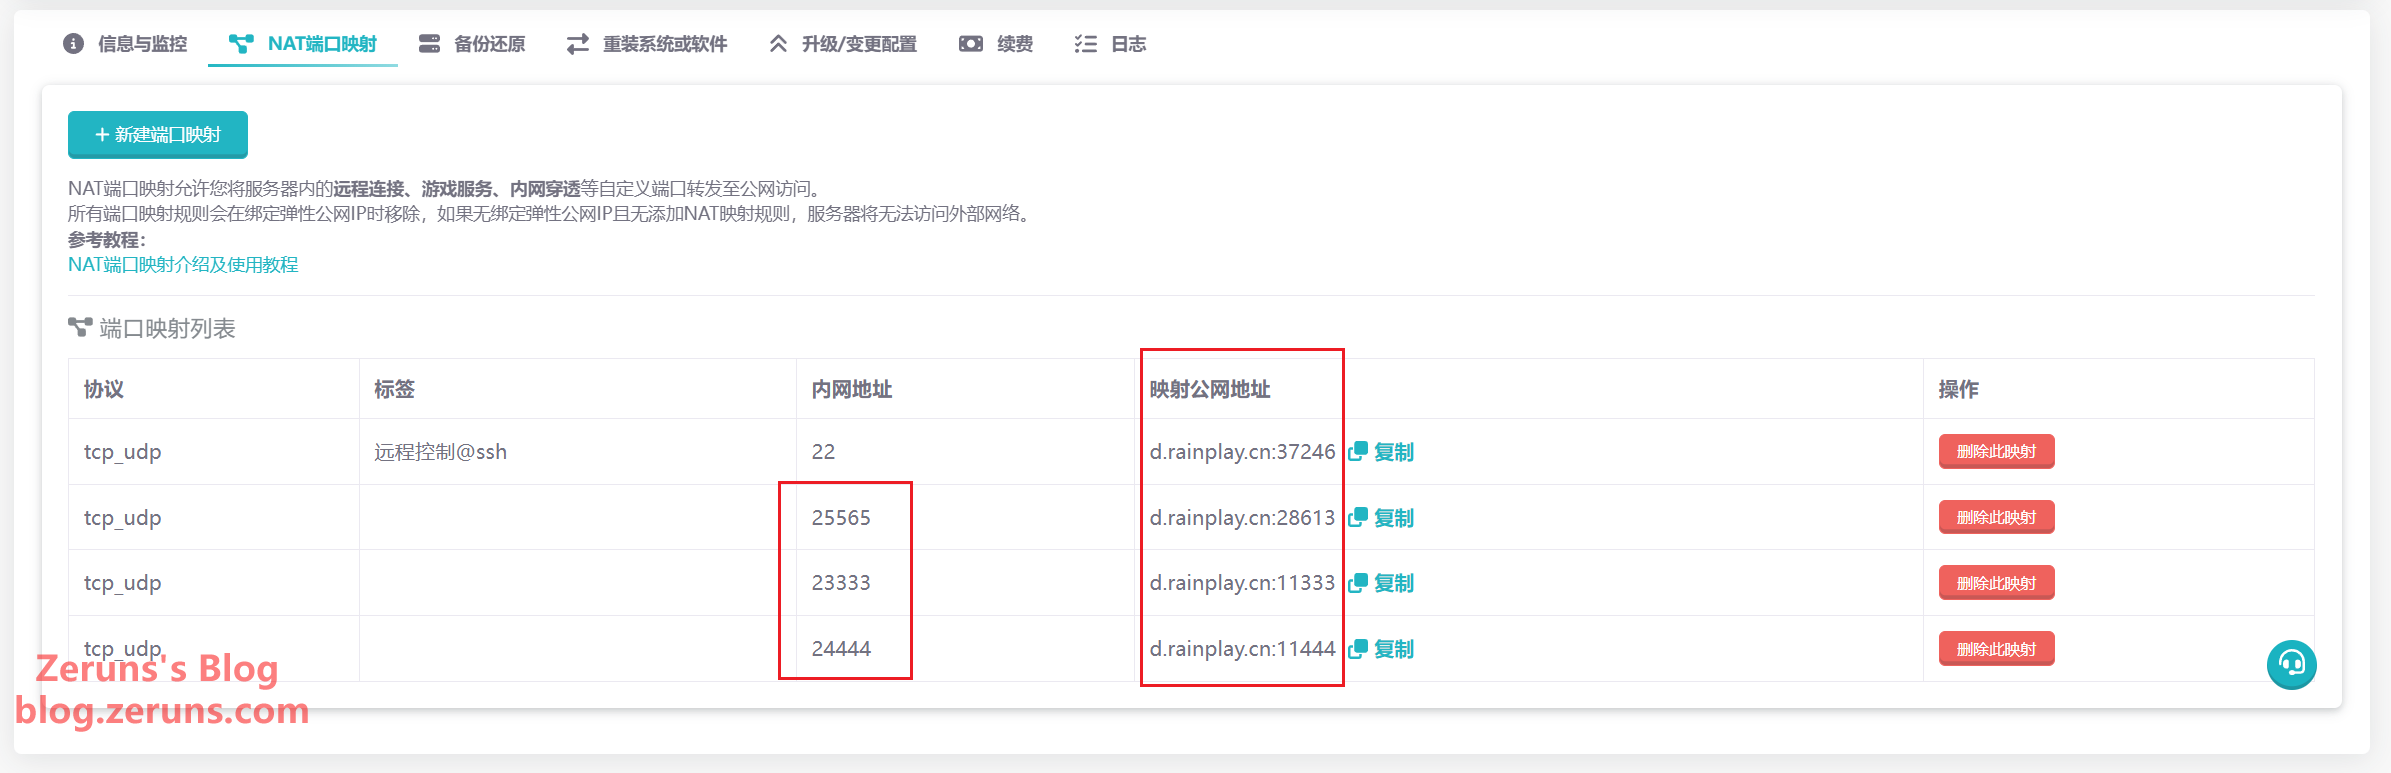
Setting Up Port Mapping
Click on NAT Port Mapping
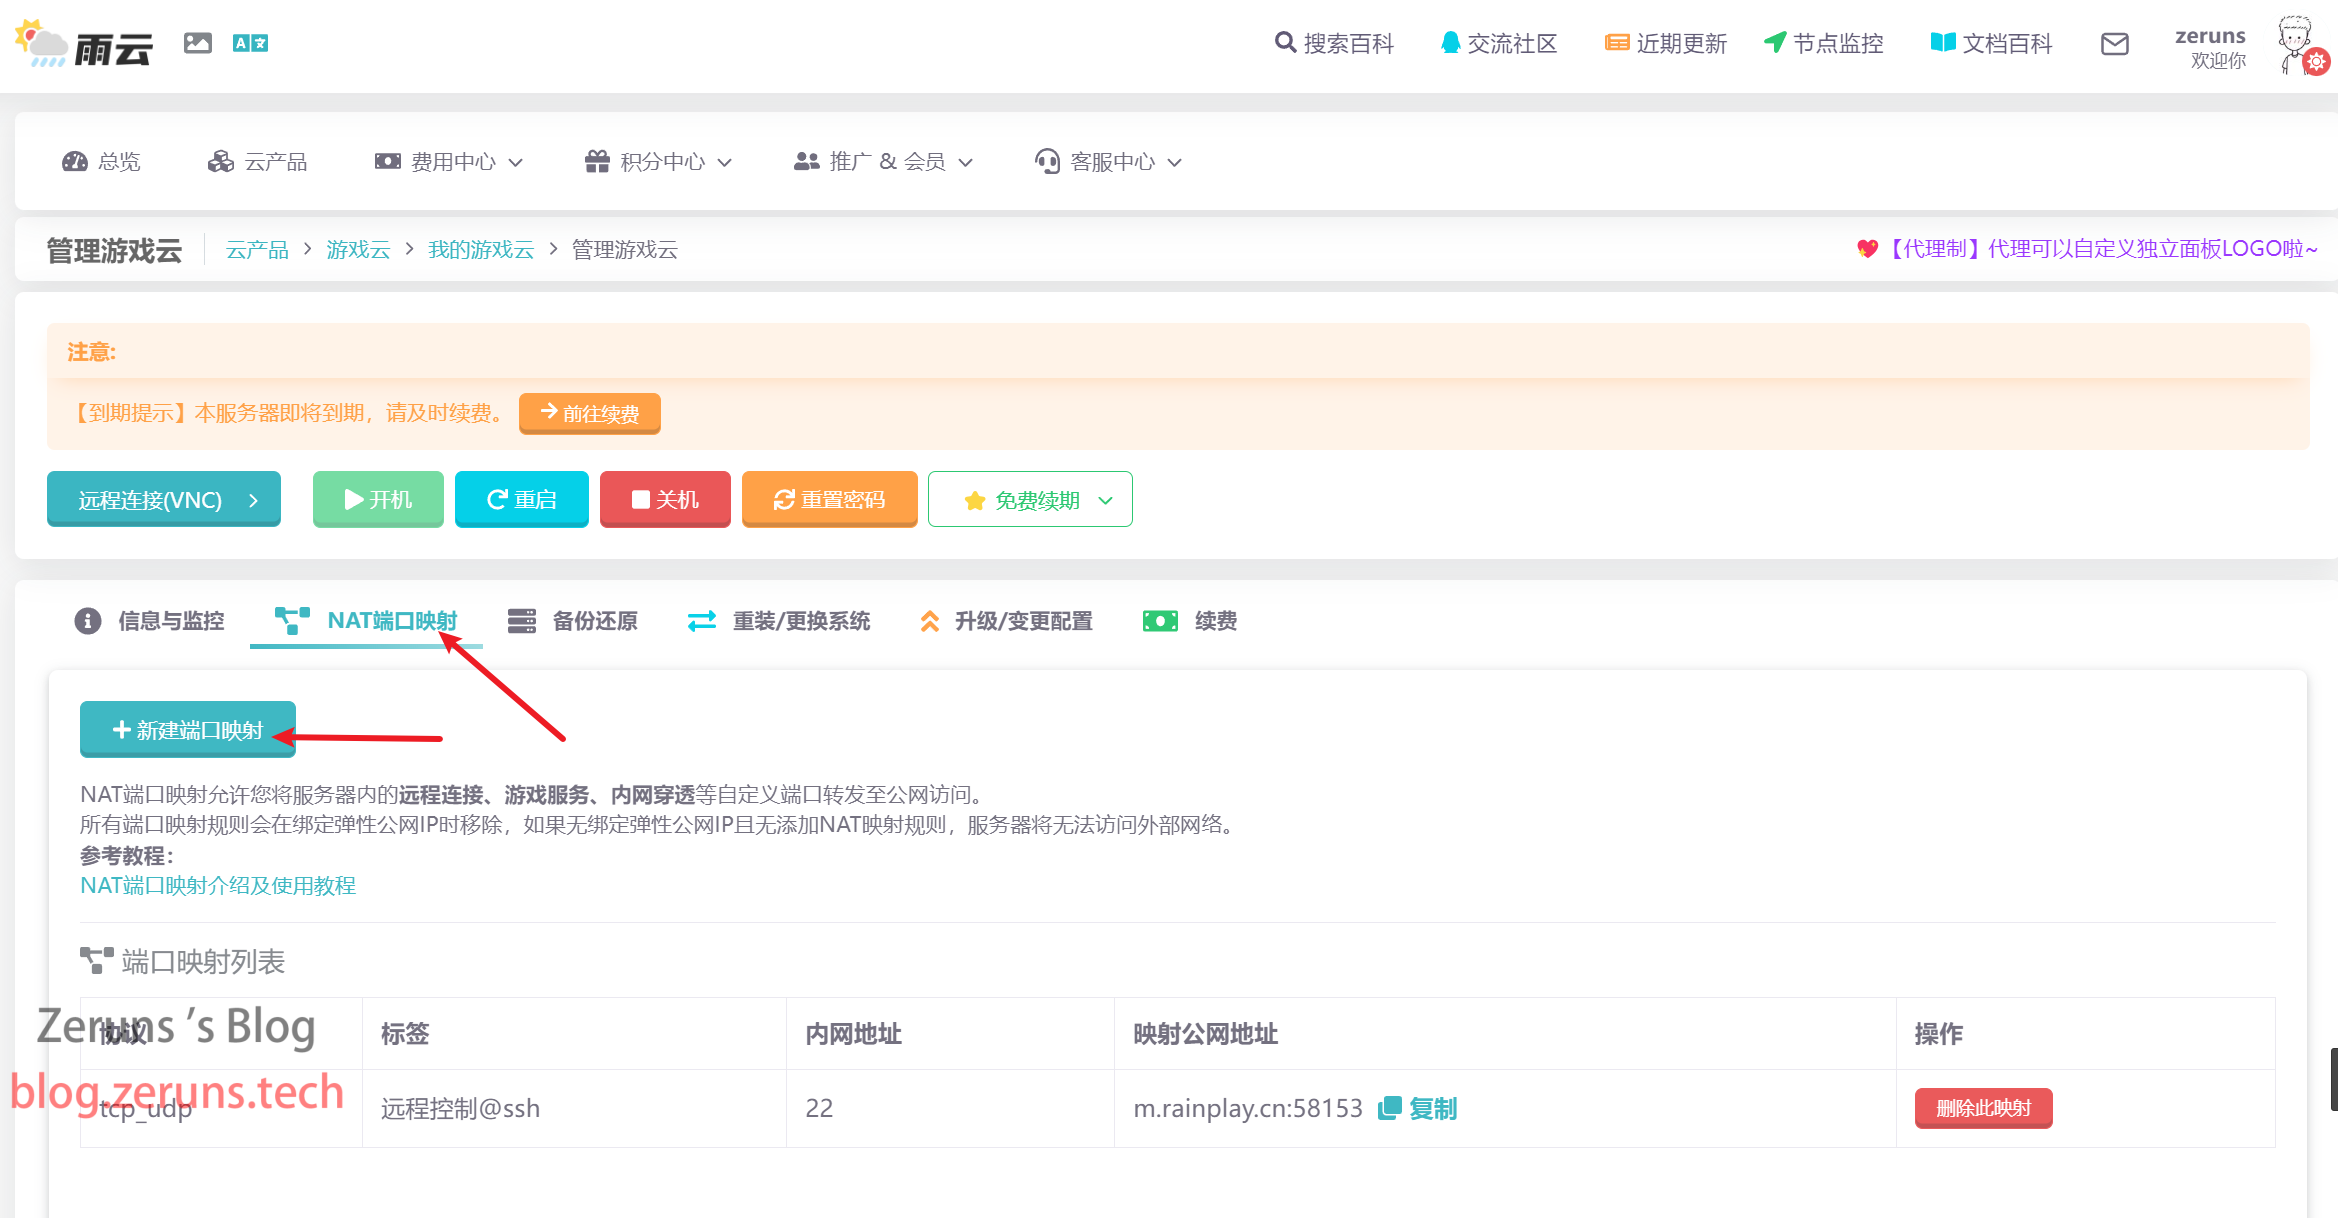
Create a new rule, set the internal network port that needs to be mapped, then click Create Mapping Rule. The external network port does not need to be changed; it will be randomly generated. If the creation prompts that the external network port is in use, manually enter any number.

The ports needed for MCSM are: 23333 and 24444
The port needed for the Minecraft server is: 25565
You need to map the above ports. Remember the public network port after mapping, as it will be used below.
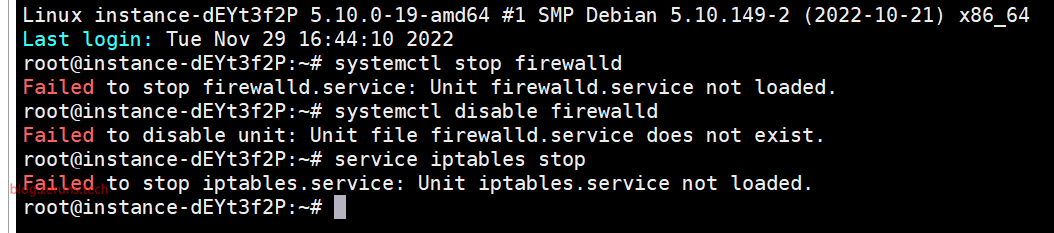
Then go back to the SSH terminal and enter the following commands to disable the system's built-in firewall (you can also choose not to disable the firewall and configure it to open the required ports yourself, which is more secure, but this will not be detailed here).
# Disable the firewall, execute in sequence
systemctl stop firewalld
systemctl disable firewalld
service iptables stop
The command prompt indicates that the firewall was not enabled, but to ensure a smooth server setup, I executed the commands as usual.
Installing the MCSM Panel
Quick Installation via Script
Run the following command, and if prompted to continue, enter y to confirm.
apt update && apt -y install wget && apt -y install git && sudo su -c "wget -qO- https://script.mcsmanager.com/setup_cn.sh | bash"
- The script is only compatible with AMD64 architecture Ubuntu/CentOS/Debian/ArchLinux.
- After execution, use
systemctl start mcsm-{daemon,web}.serviceto start the panel service. - Use
systemctl enable mcsm-{daemon,web}.serviceto enable auto-start at boot. - The panel code and runtime environment are automatically installed in the
/opt/mcsmanager/directory.
Configuration file directory: data/SystemConfig/config.json
User data file directory: data/User/*.json
Remote service configuration file directory: data/RemoteServiceConfig/*.json
If you see information similar to the image below, the installation was successful.
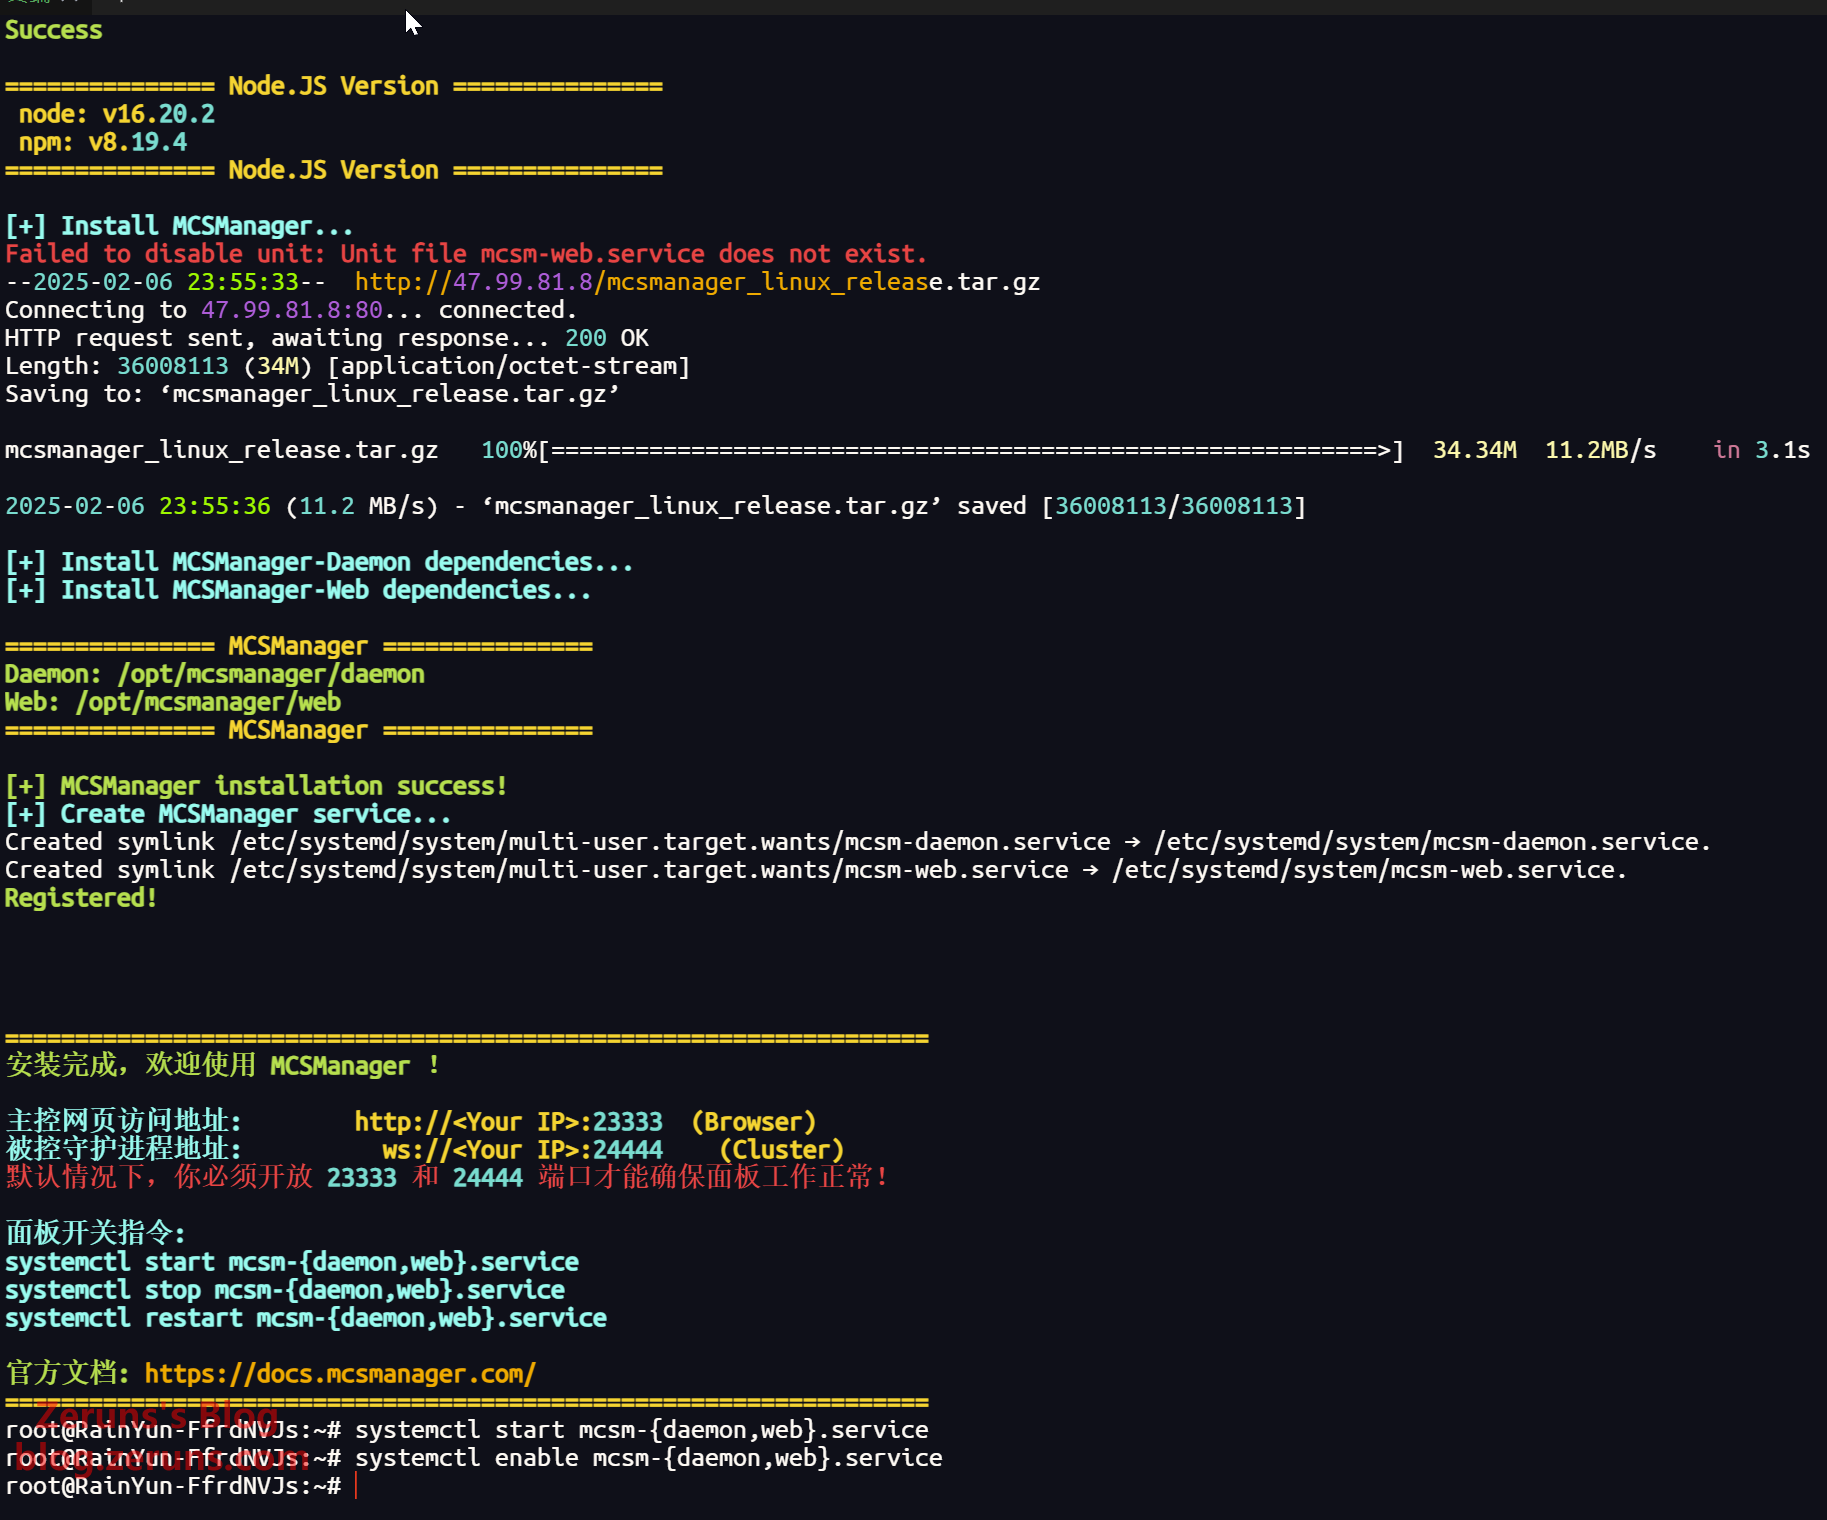
After installation, access the panel at http://your_server_ip_or_domain:23333/.
Since my server does not have a dedicated public IP, the port 23333 in the address above needs to be replaced with the public port you mapped. For example, my mapped public port for 23333 is 11333. Do not copy mine; use your own.
So the final panel access address is: http://d.rainplay.cn:11333 (yours may be different, depending on your actual setup).
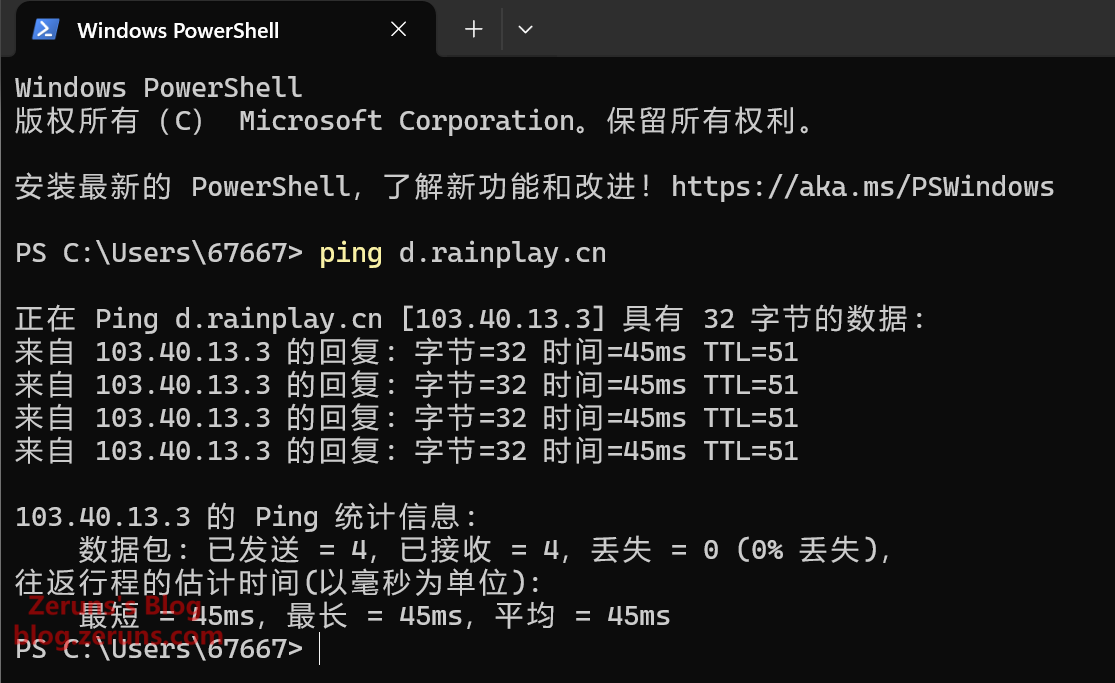
Since the domain provided by Rainyun is not filed with the authorities, you may not be able to access it via the domain name. You need to ping the domain to get the server's IP and access it directly via IP: http://103.40.13.3:11333 (your server IP may be different). When adding the server in Minecraft, you can directly use this domain name, as only the web HTTP service requires filing.
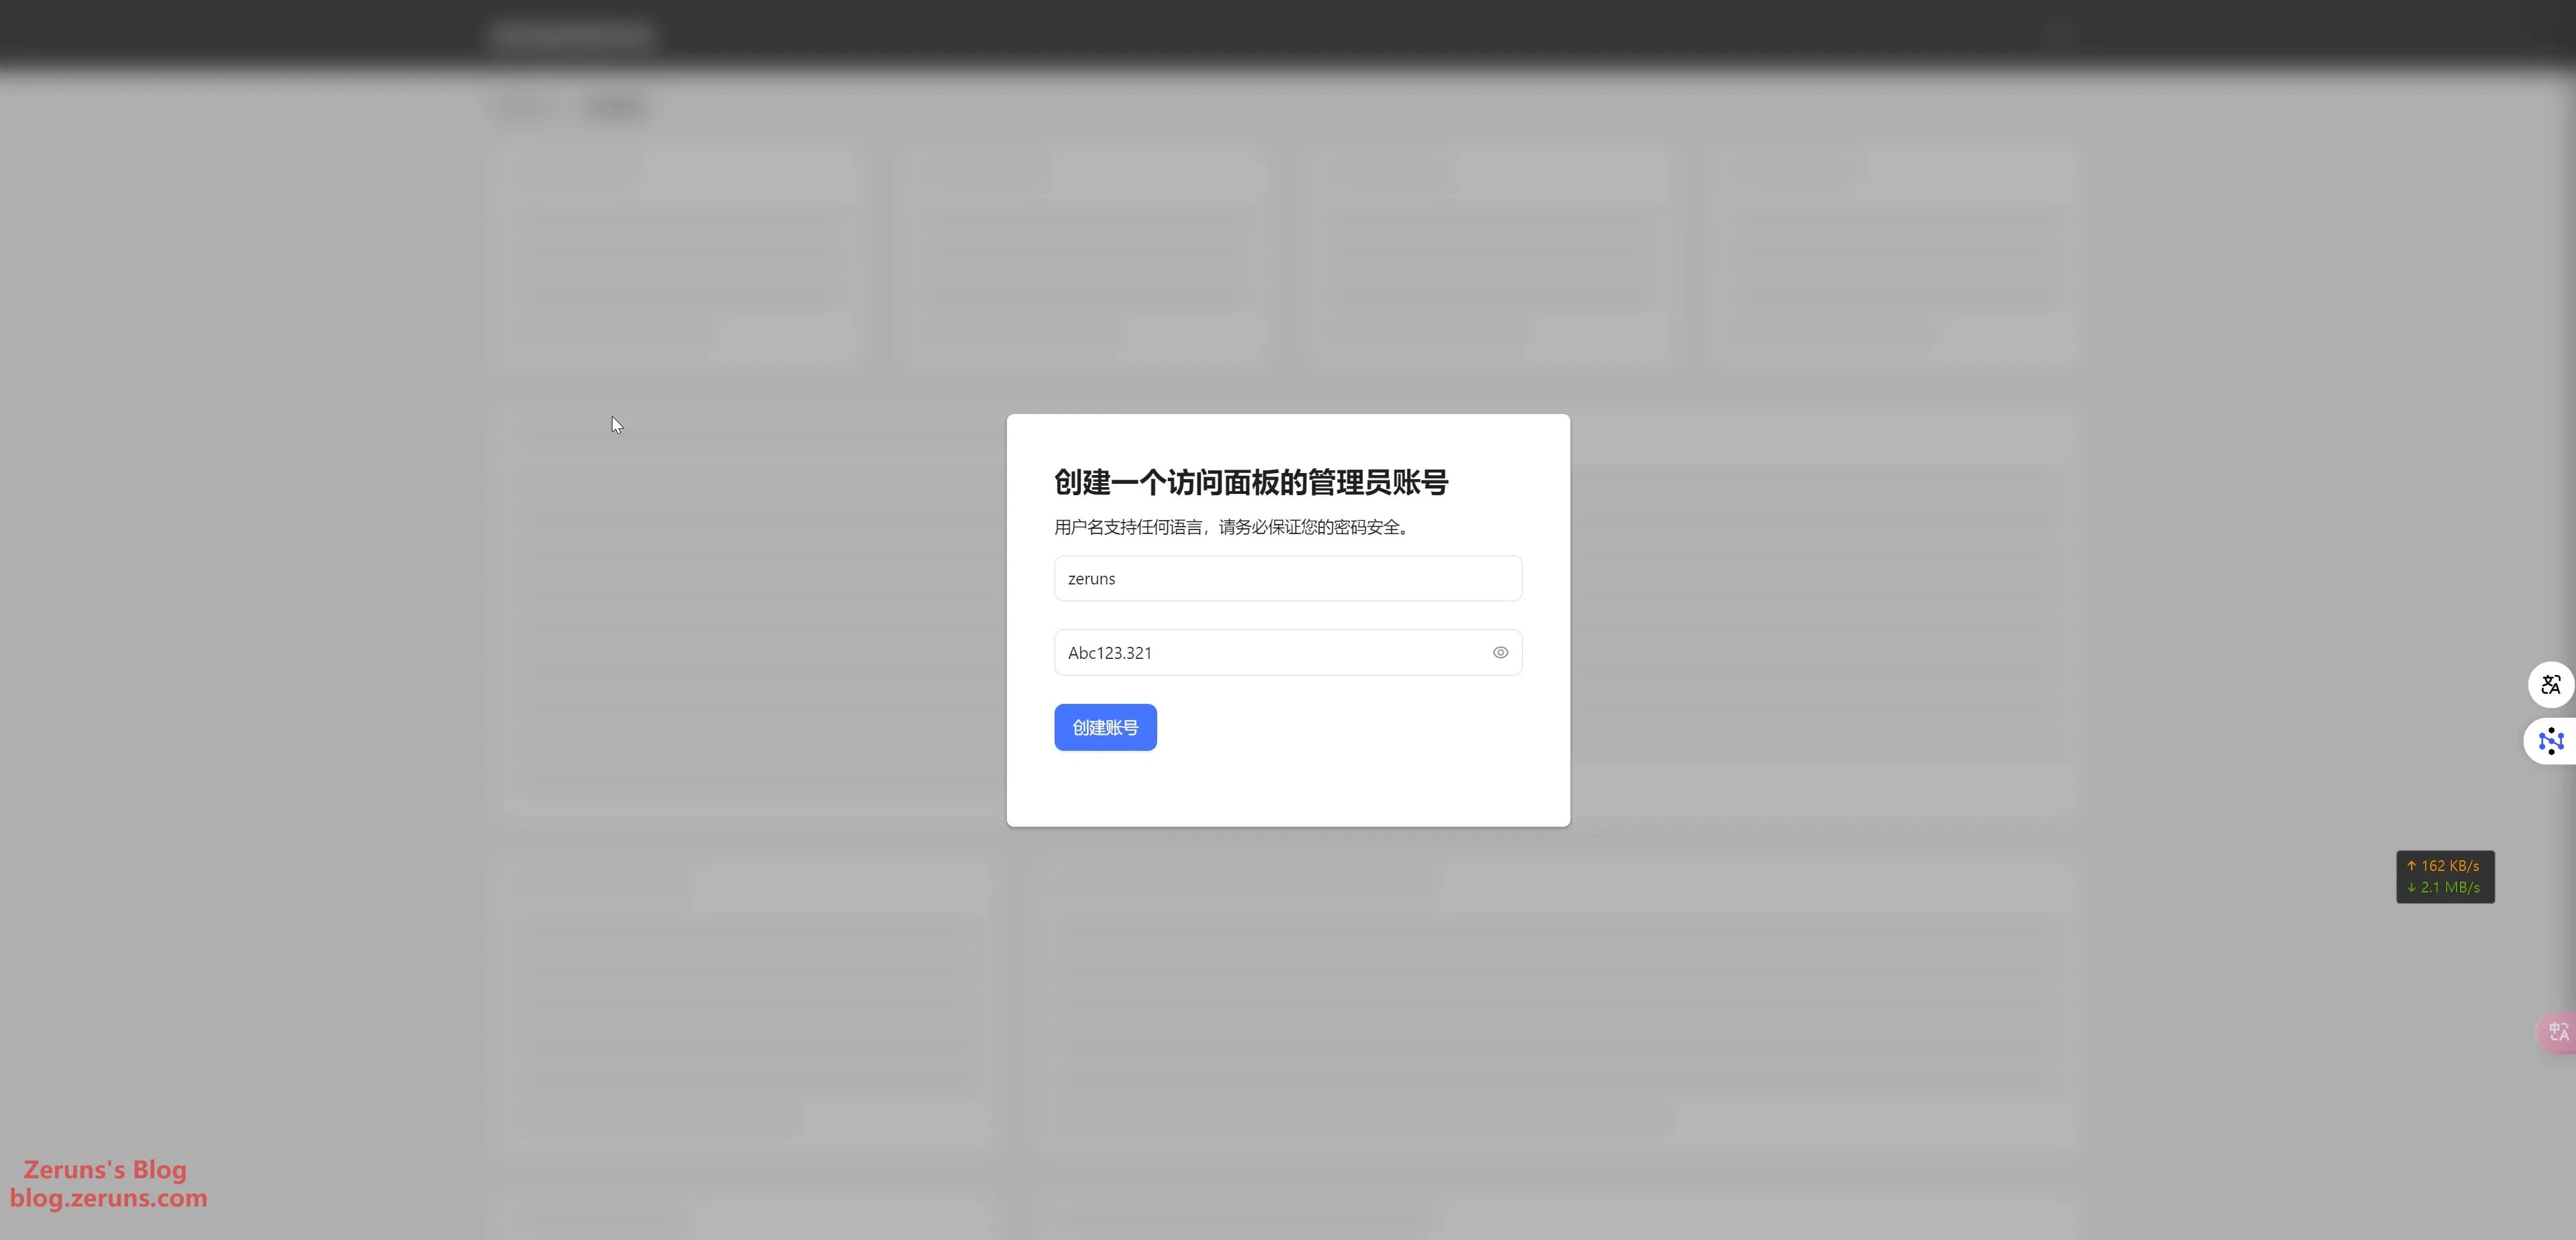
After entering the panel, follow the prompts to set your account and password.
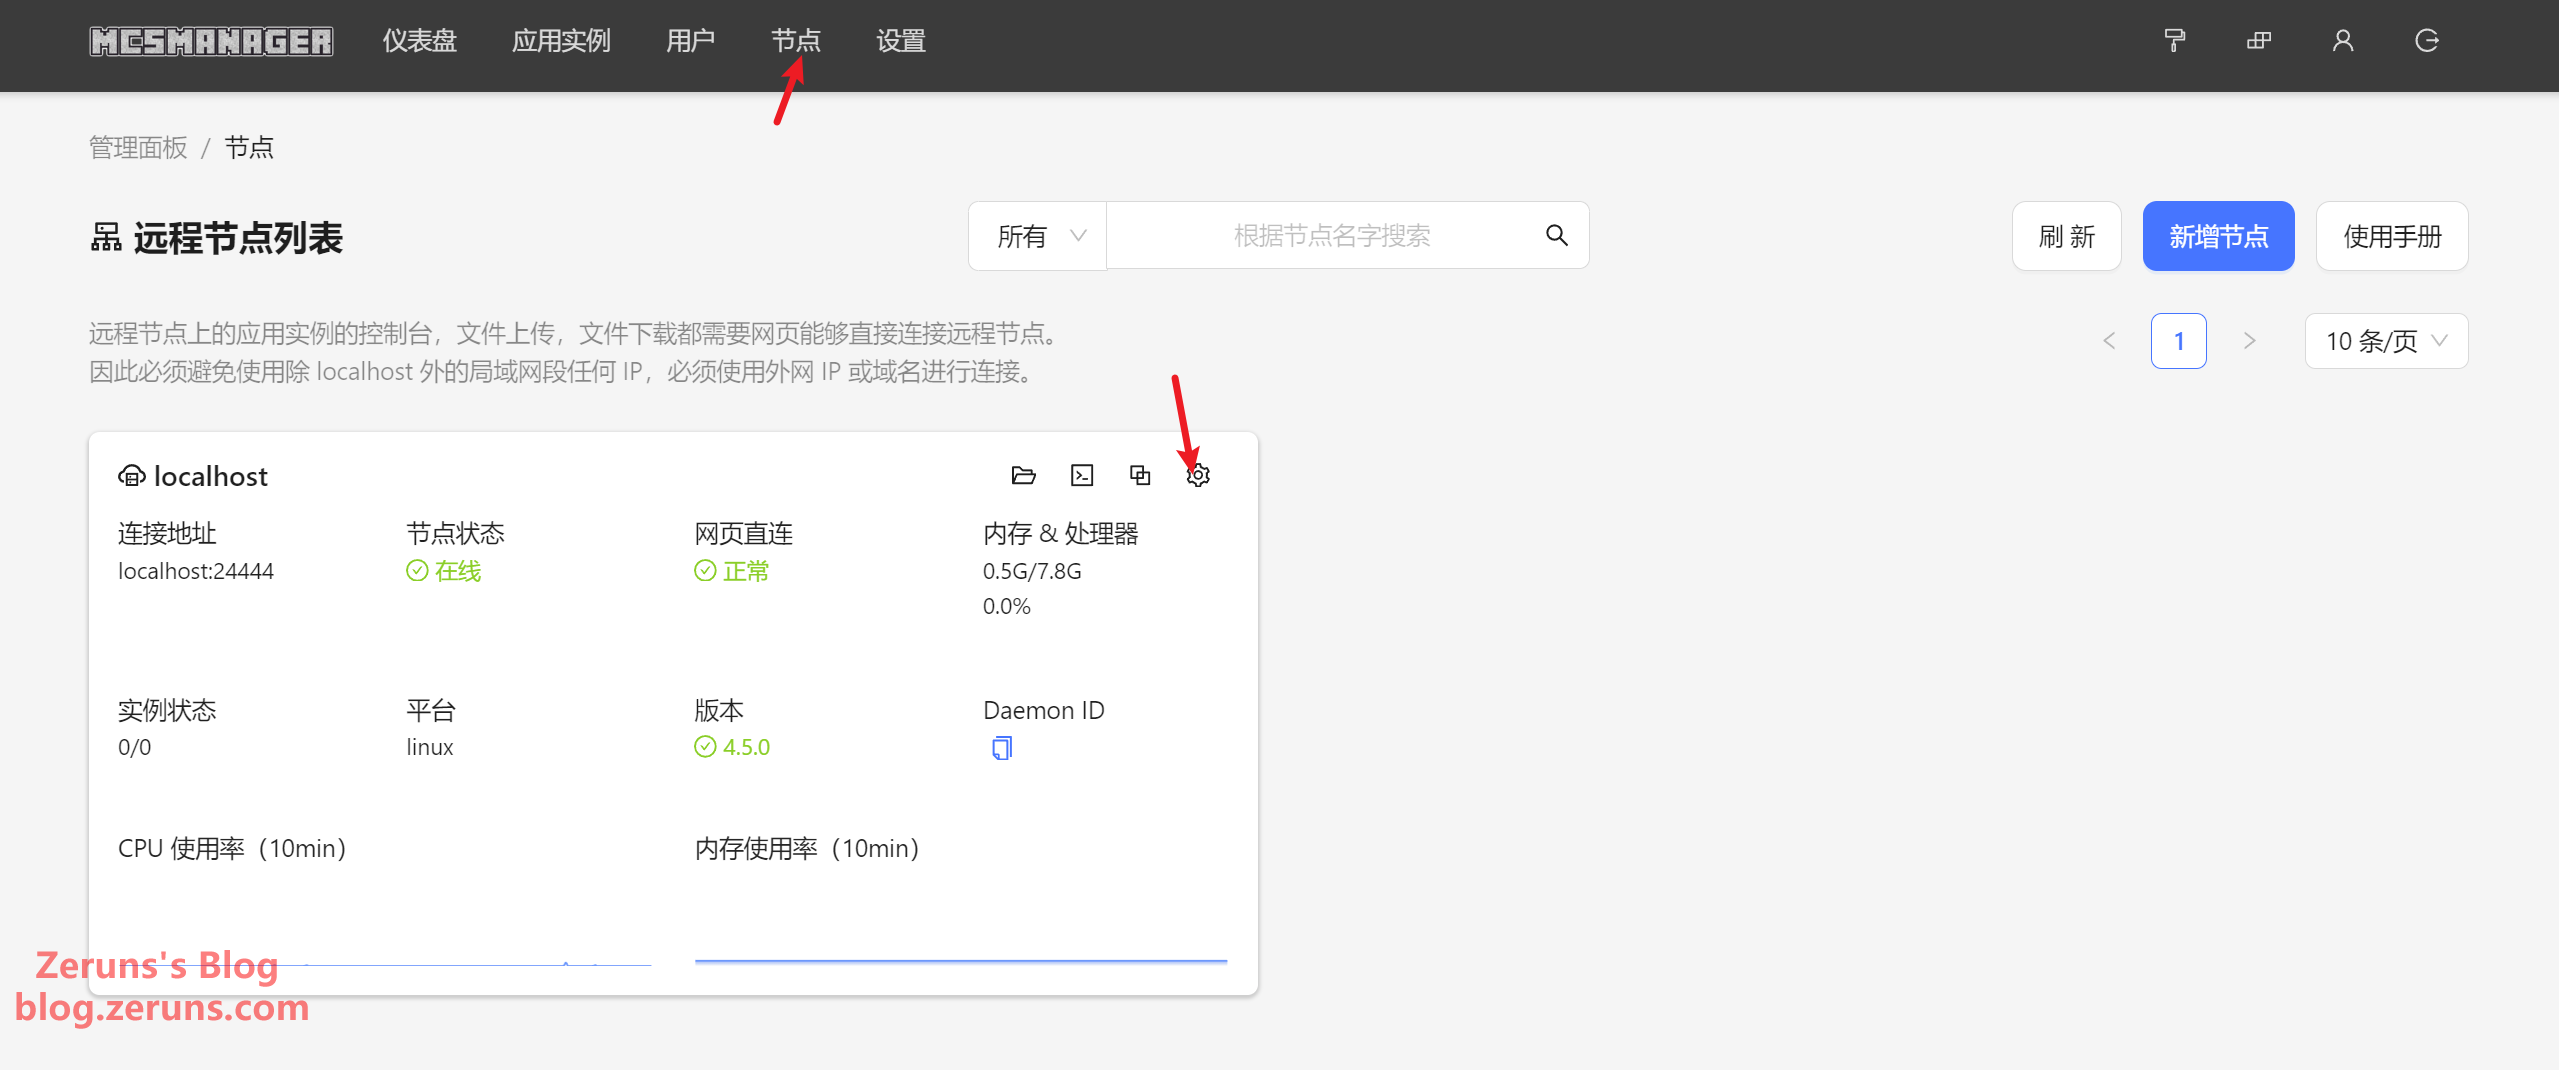
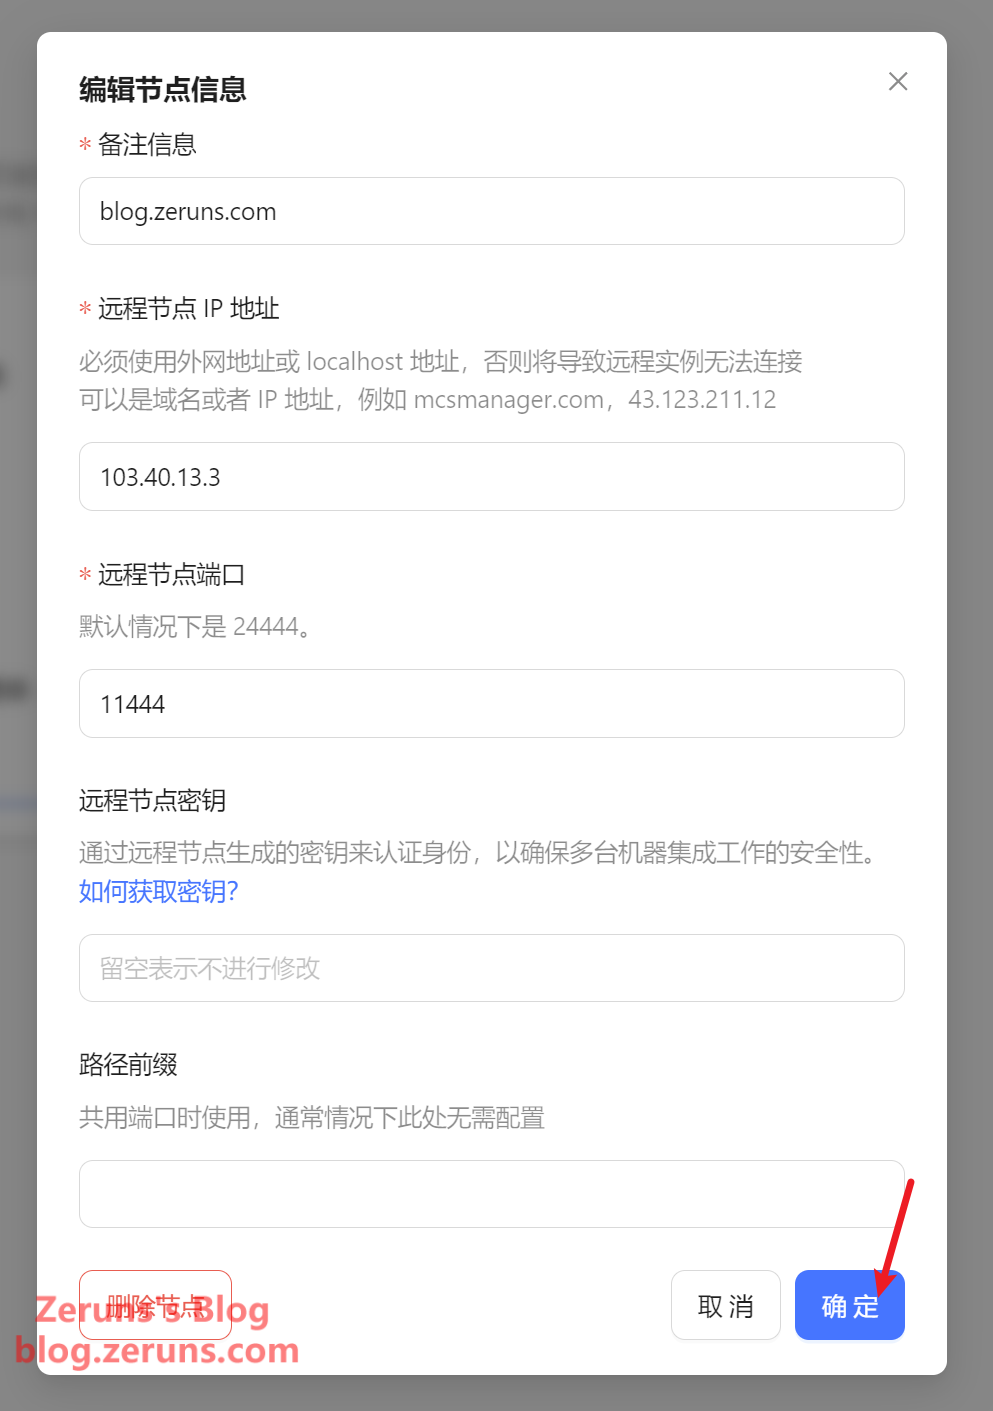
Next, go to Node Management to set up the node. Set the Node Address to your server's IP or domain name and the Port to the public port you mapped for 24444. In my case, it's 11444. Change localhost to your server's public IP or domain name, then click the update button on the right.
Installing Docker
Return to the SSH terminal and enter the following command.
Installing via apt package manager:
# Install Docker, and if prompted to continue, enter y to confirm
apt install docker.io

# Set Docker to auto-start at boot and start Docker
systemctl enable docker && systemctl start docker

# Check if installation was successful; if successful, it will display Docker version x.x.x
docker -v

If installation fails, try the following script:
# For users in China, run this step
export DOWNLOAD_URL=https://mirrors.ustc.edu.cn/docker-ce

# Docker installation script
curl -fsSL https://get.docker.com -o get-docker.sh && sudo sh get-docker.sh

# Check if installation was successful; if successful, it will display Docker version x.x.x
docker -v
If it still doesn't work, try the manual installation tutorial from the link below:
Docker manual installation tutorial: https://www.runoob.com/docker/ubuntu-docker-install.html
Switching Docker to a domestic mirror source:
echo '{"registry-mirrors": ["https://docker.1ms.run", "https://docker.1panel.live", "https://9uy9qgvj.mirror.aliyuncs.com"]}' | sudo tee /etc/docker/daemon.json > /dev/null

# Restart Docker
systemctl daemon-reload && systemctl restart docker.service
Installing the Java Environment
Before running the Java server, the Java runtime is essential. Below is a list of the required Java runtime versions corresponding to different versions of Minecraft:
| Required Java Version | Minecraft Game Versions |
|---|---|
| Java8 | 1.7.x, 1.8.x, 1.9.x, 1.10.x, 1.12.x, 1.13.x, 1.15.x, 1.16.x |
| Java16 & Java17 | 1.17.x |
| Java17 | 1.18.x |
| Java17 and above | 1.18.x & 1.19.x & 1.20.x |
If you are using version 1.17.x, please do not use Java 20+ as there might be compatibility issues.
You should always check which Java versions your plugins support before making a decision. If a plugin does not specify, please consult the plugin developer to avoid any unnecessary trouble.
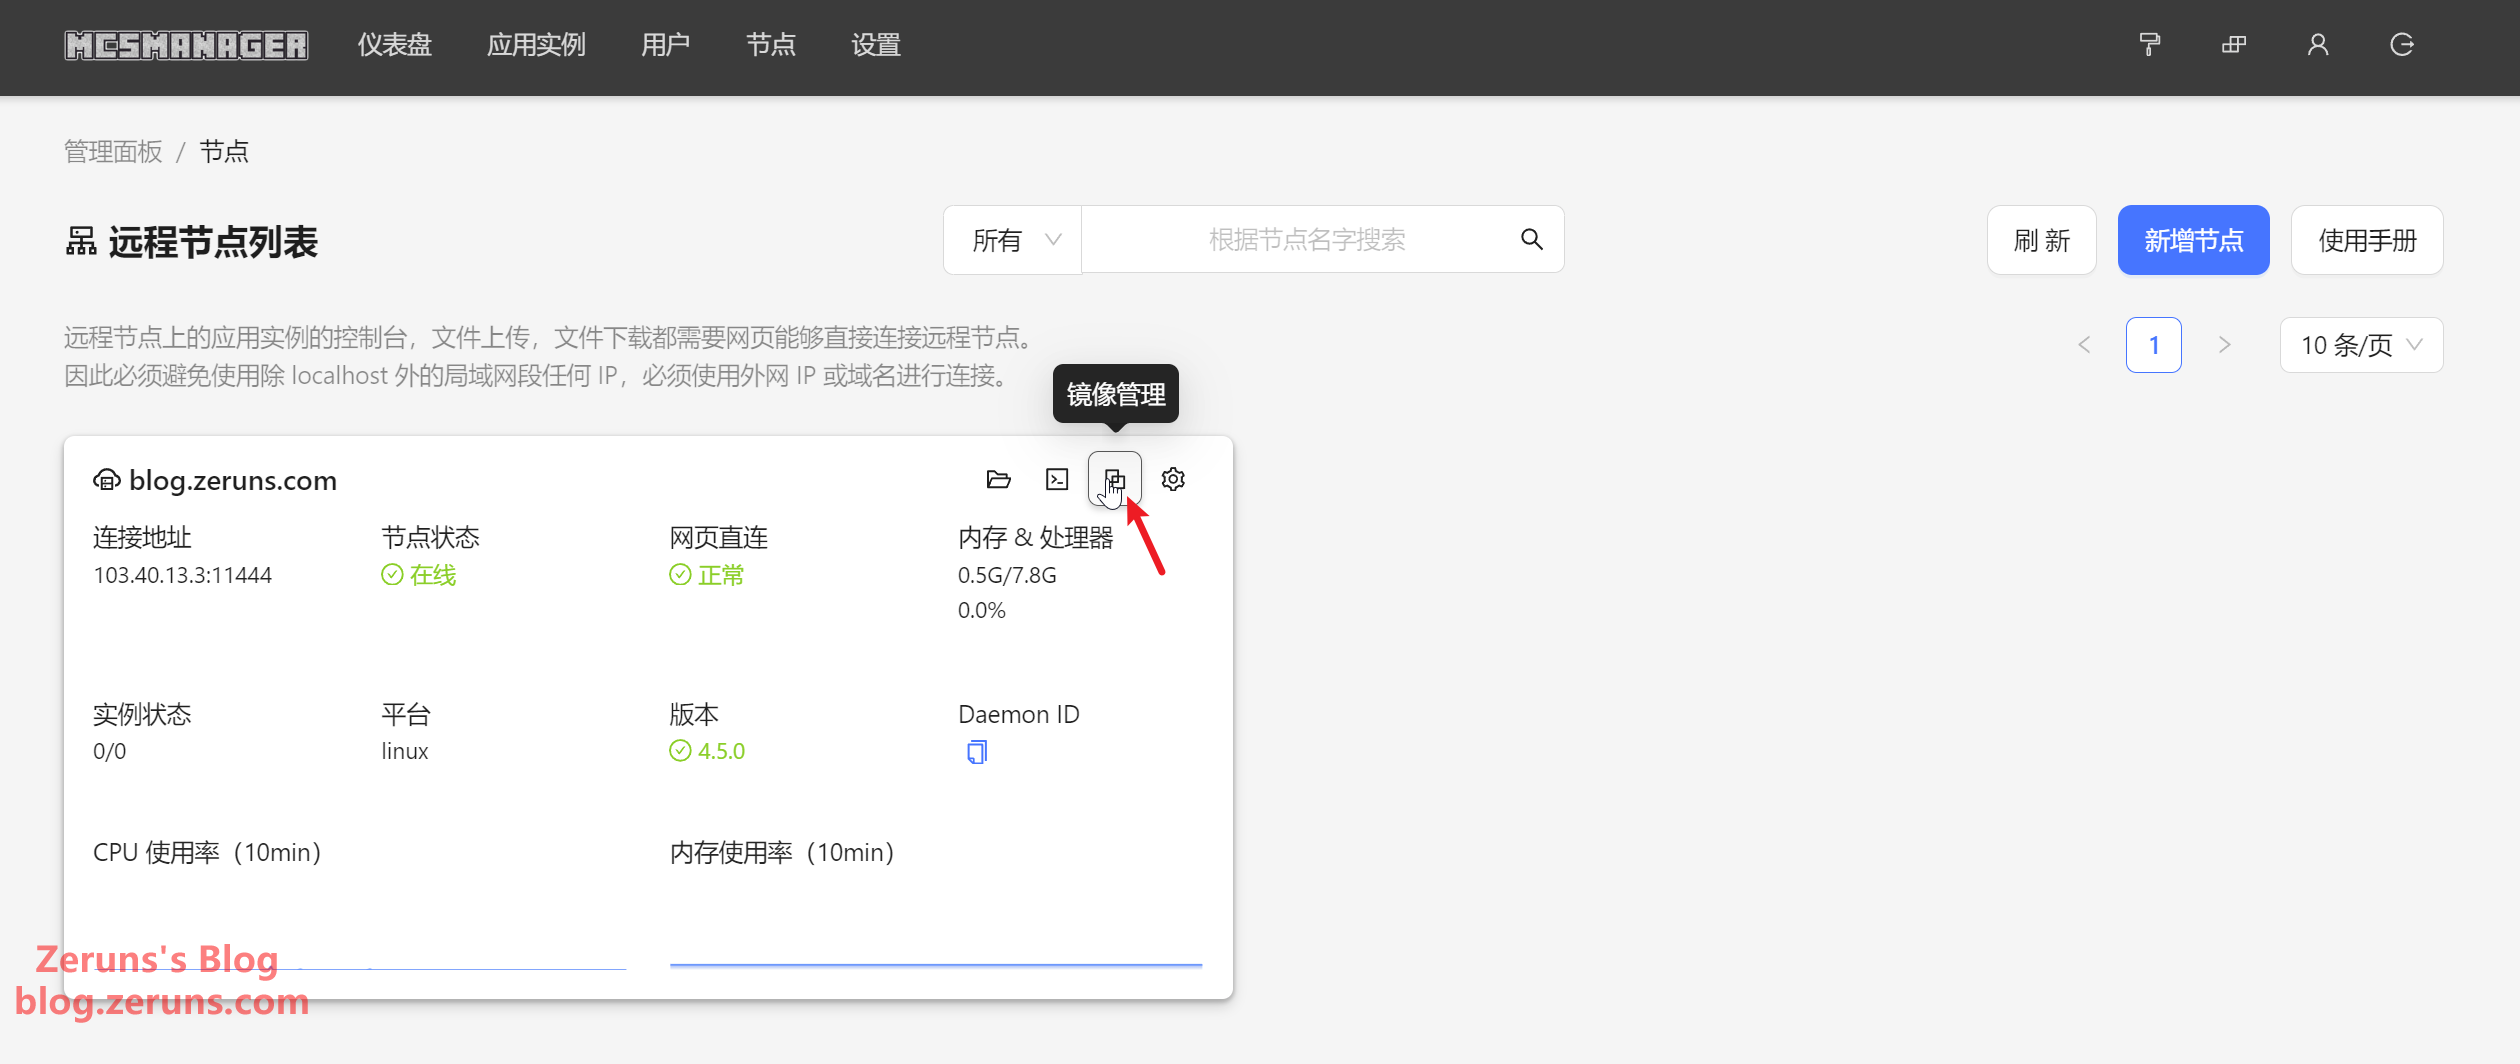
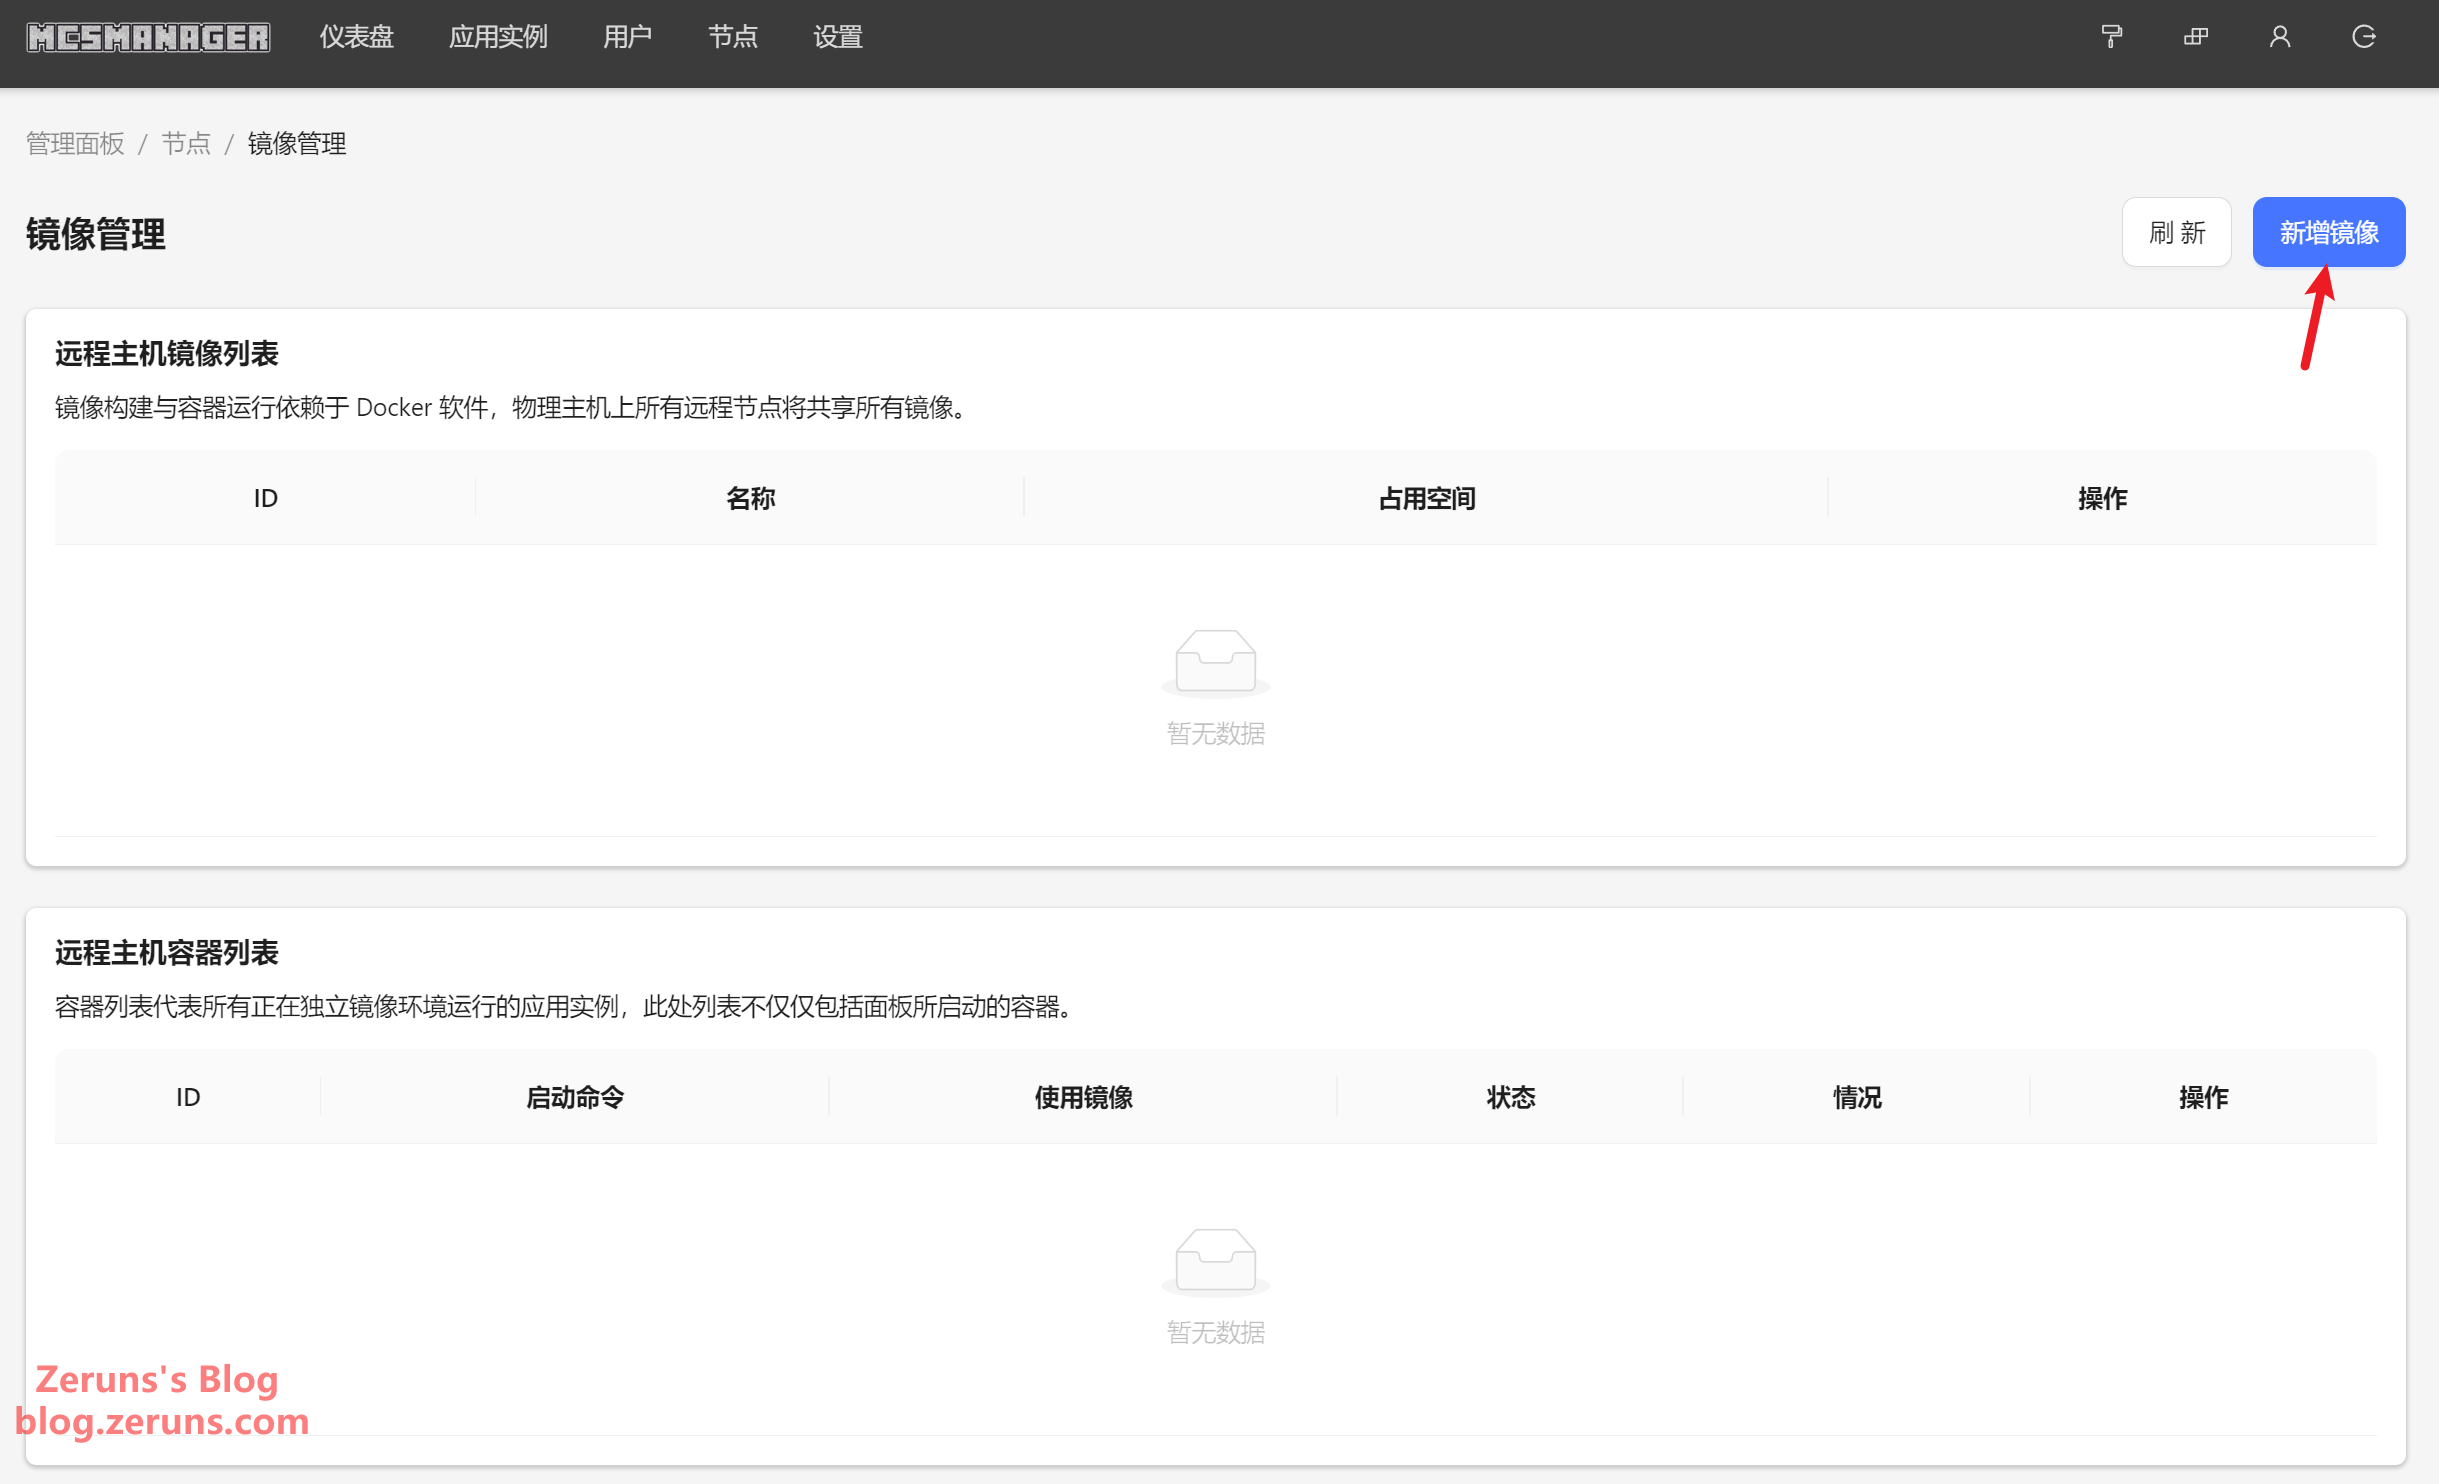
Next, log in to the panel and navigate to Node Management. Under this section, find Image Management and click to enter.
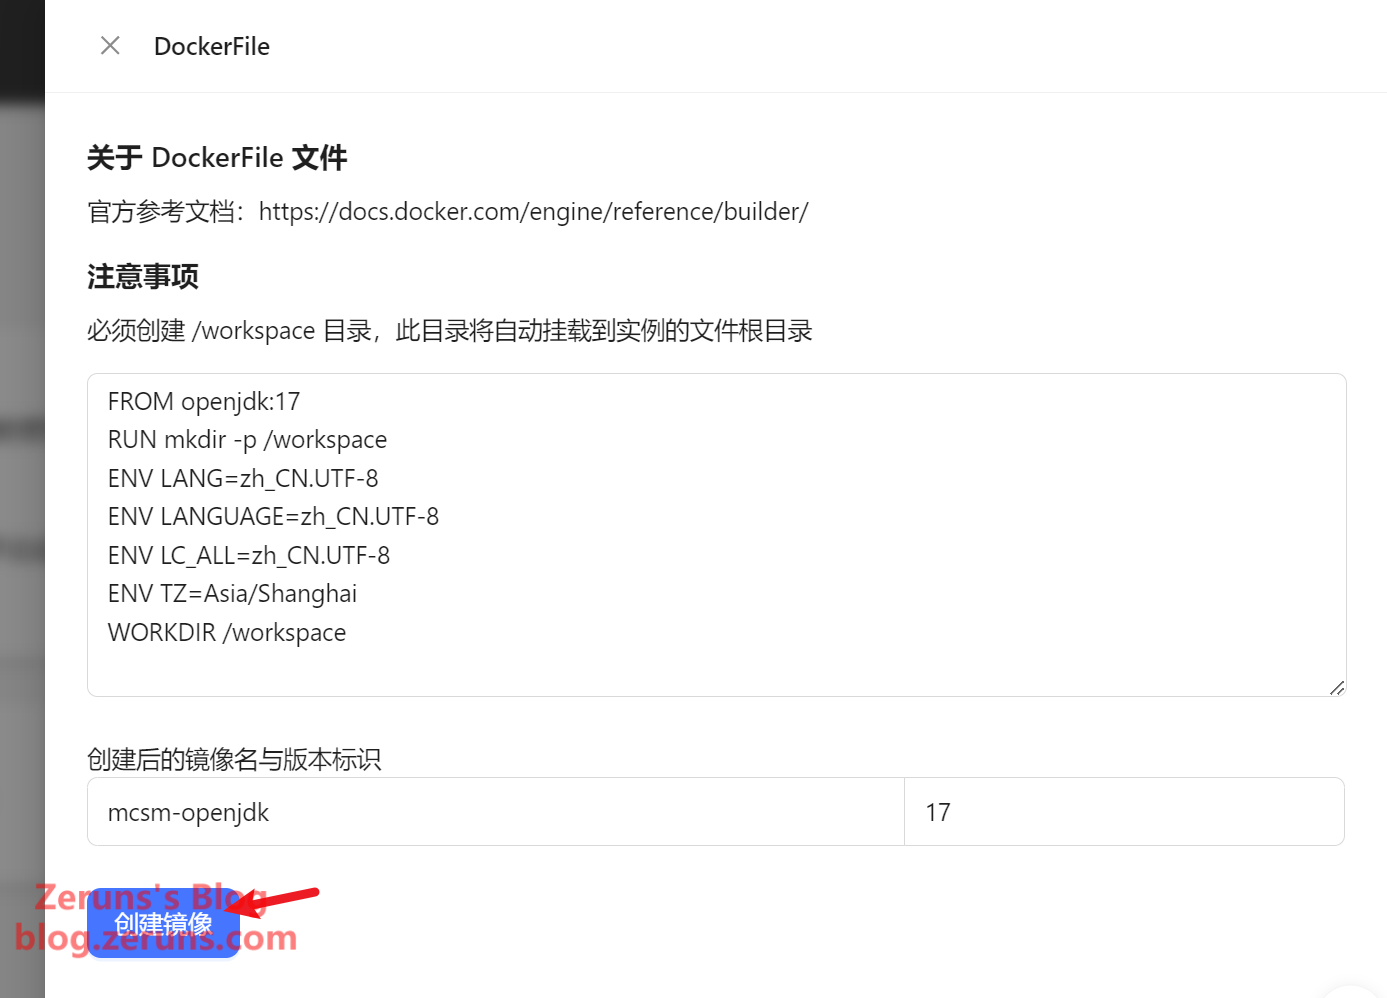
Click on New Image, then select Create OpenJDK 17 Environment Image (For version 1.12.2 and below, choose JDK8; for version 1.16 and above, choose JDK17).
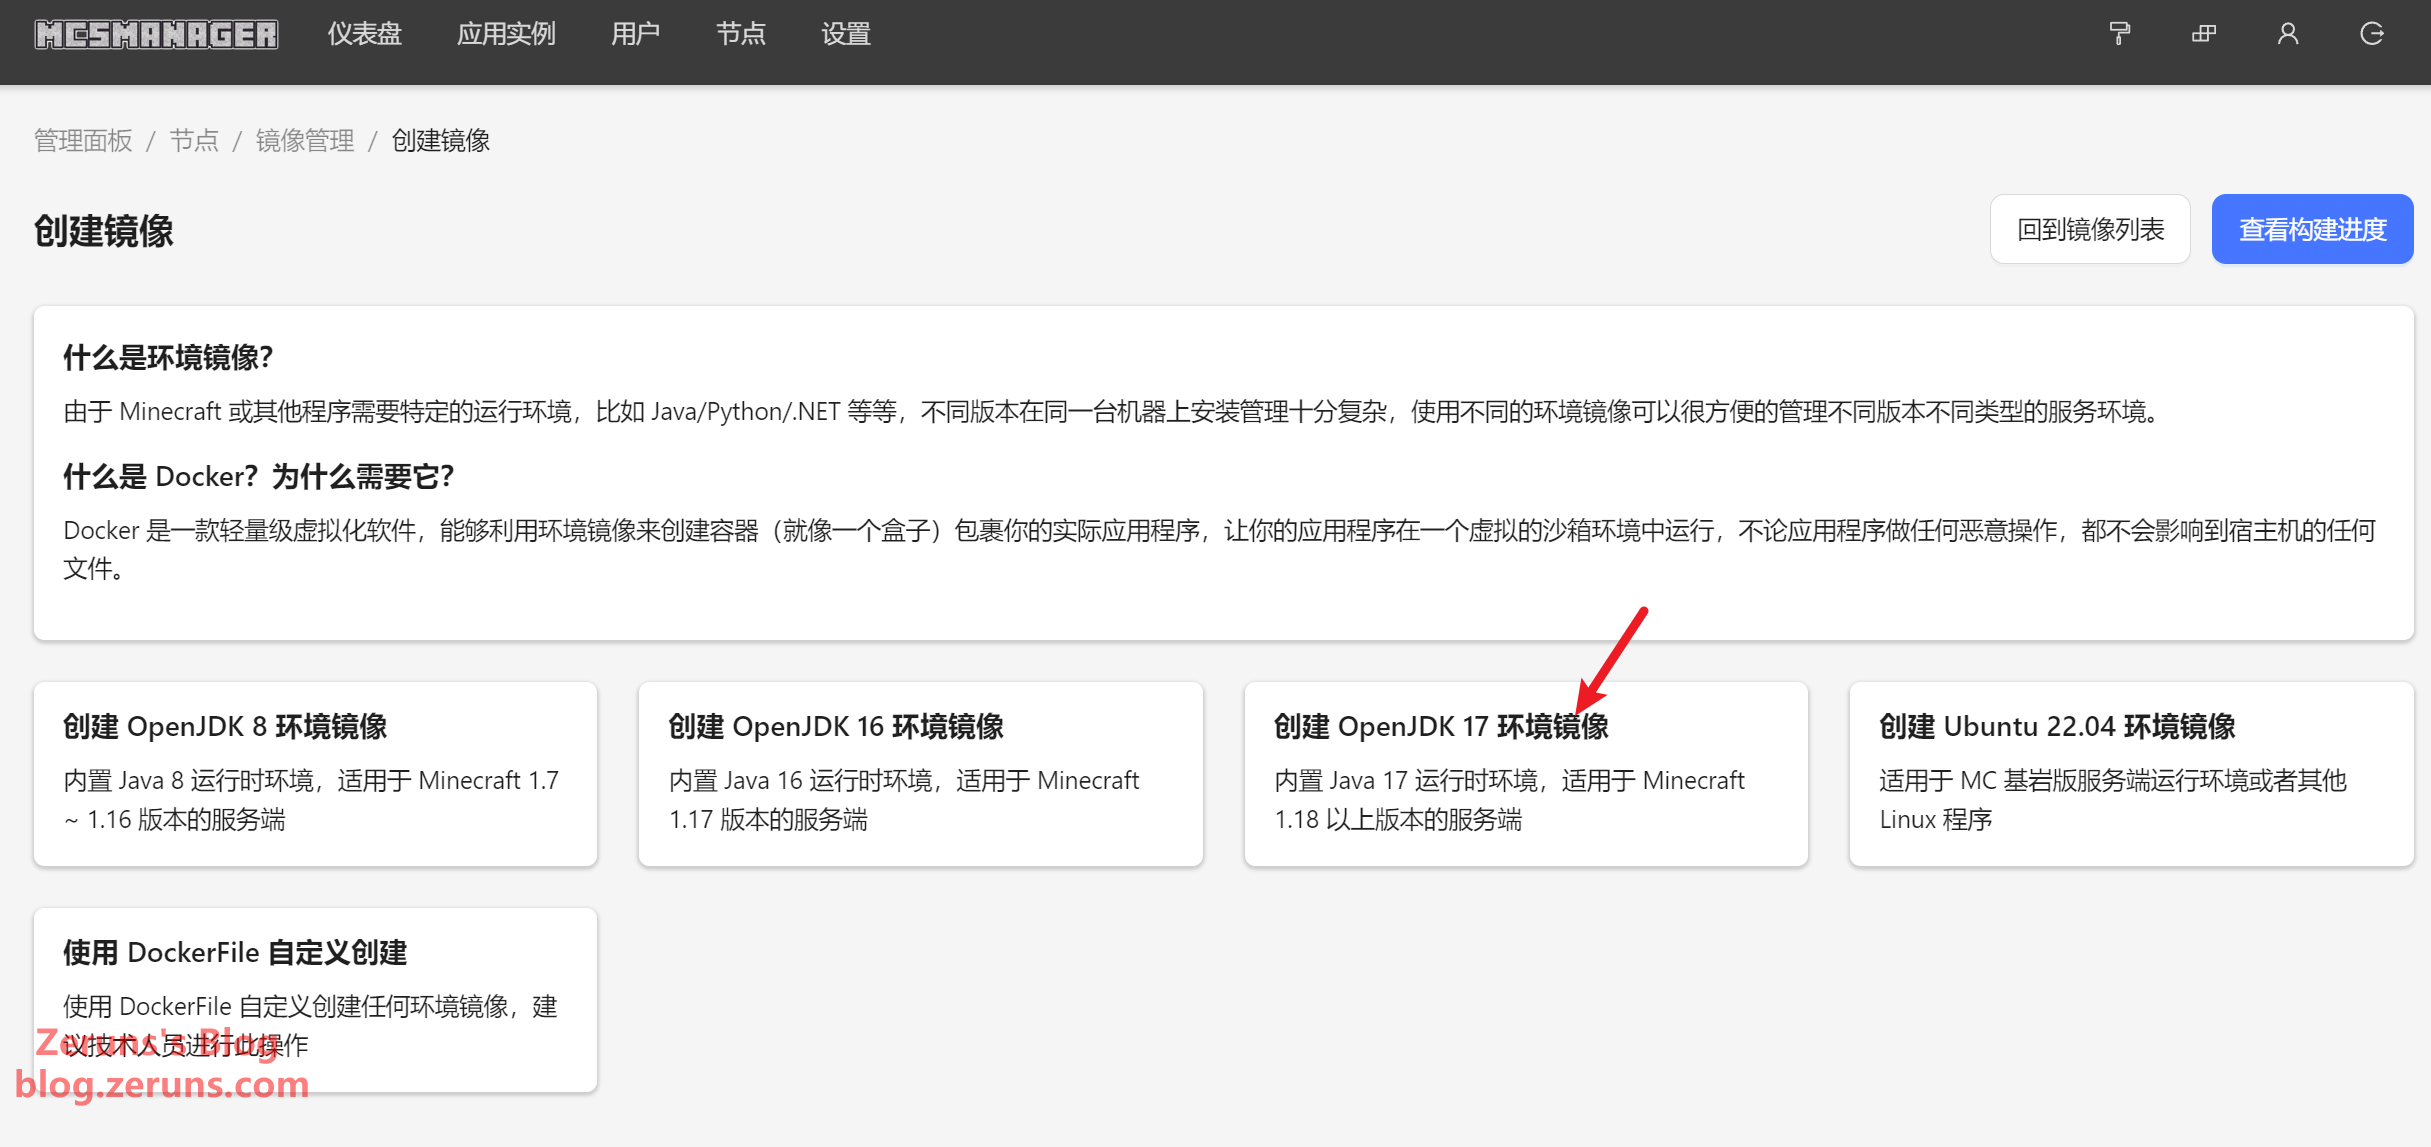
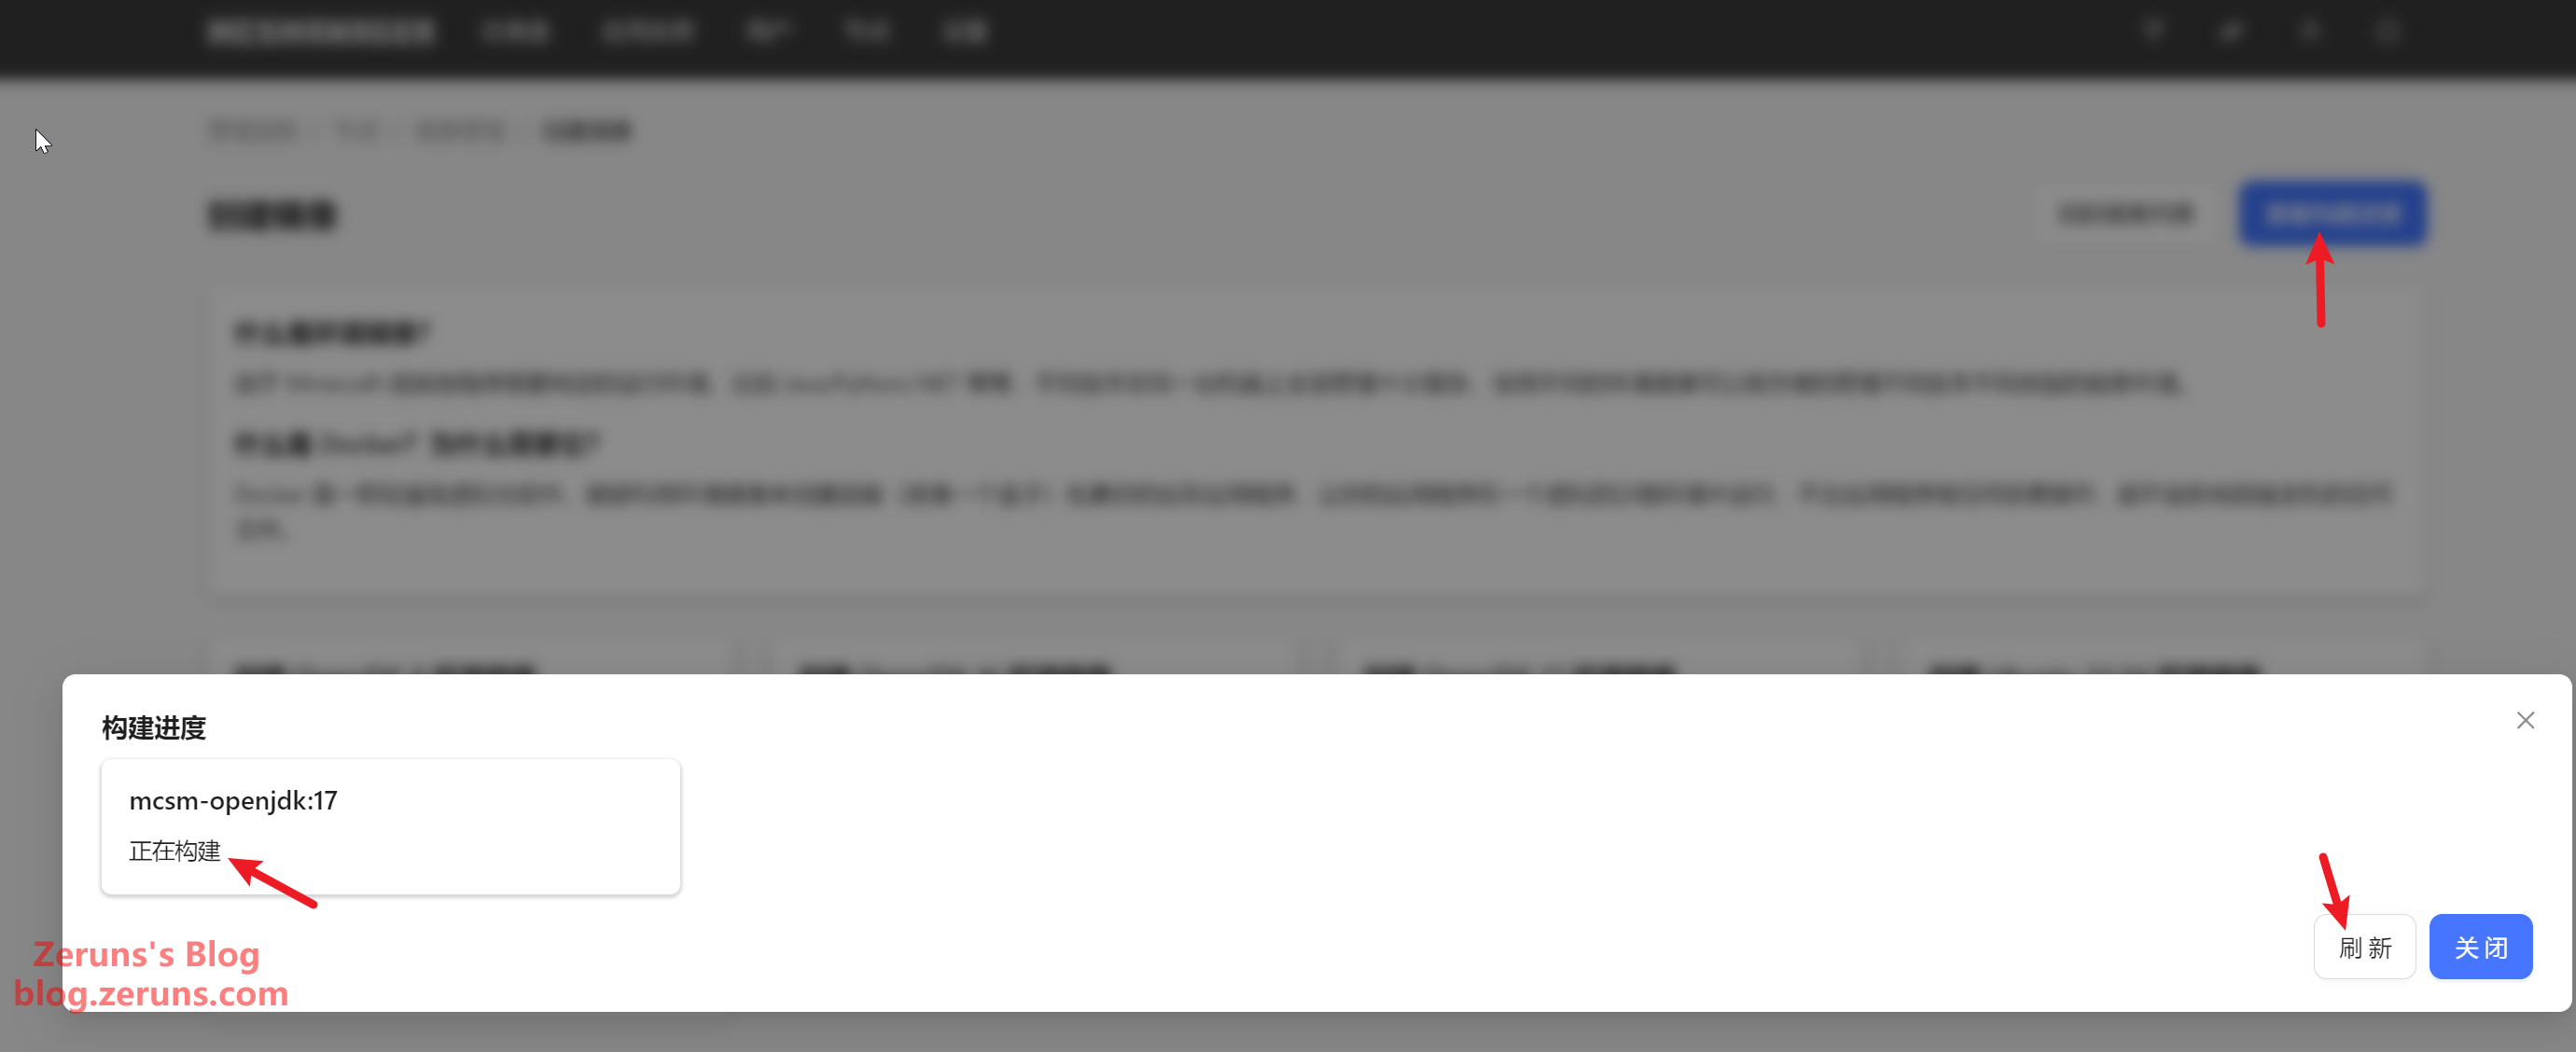
Click Confirm and wait for the build to complete.
Running the Server
First, download the modpack server from the link provided above.
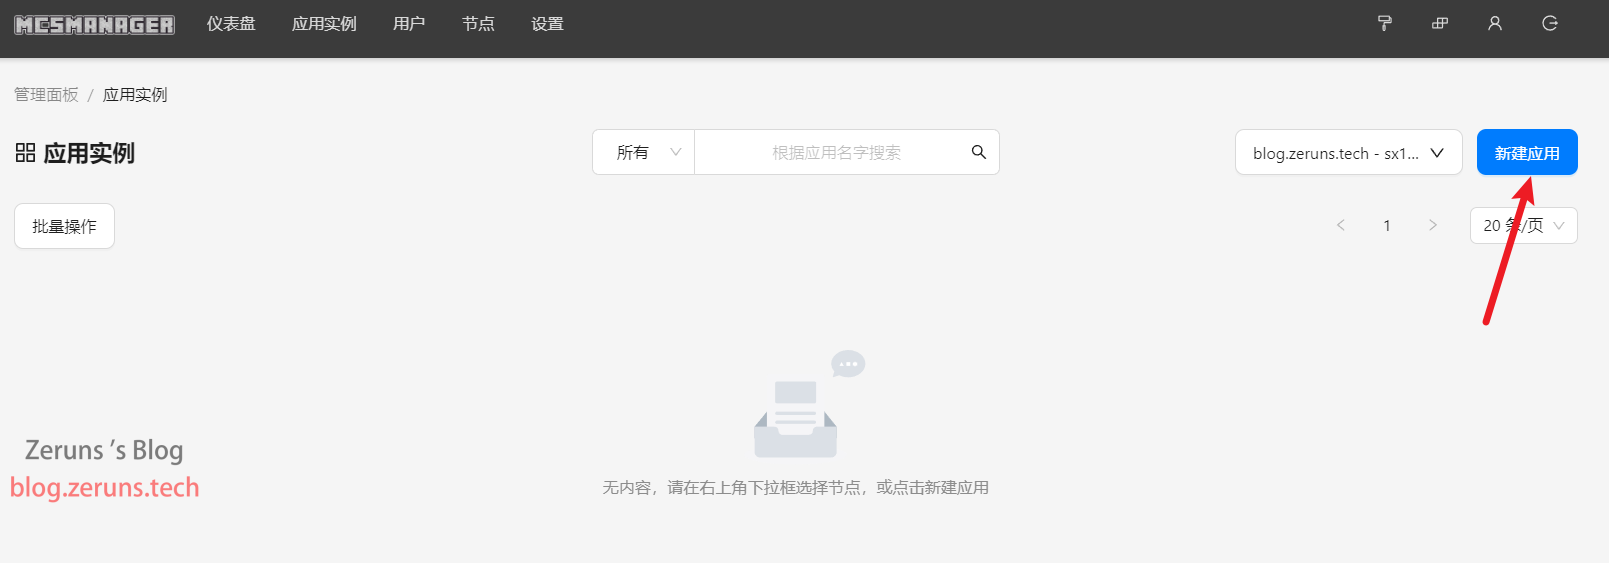
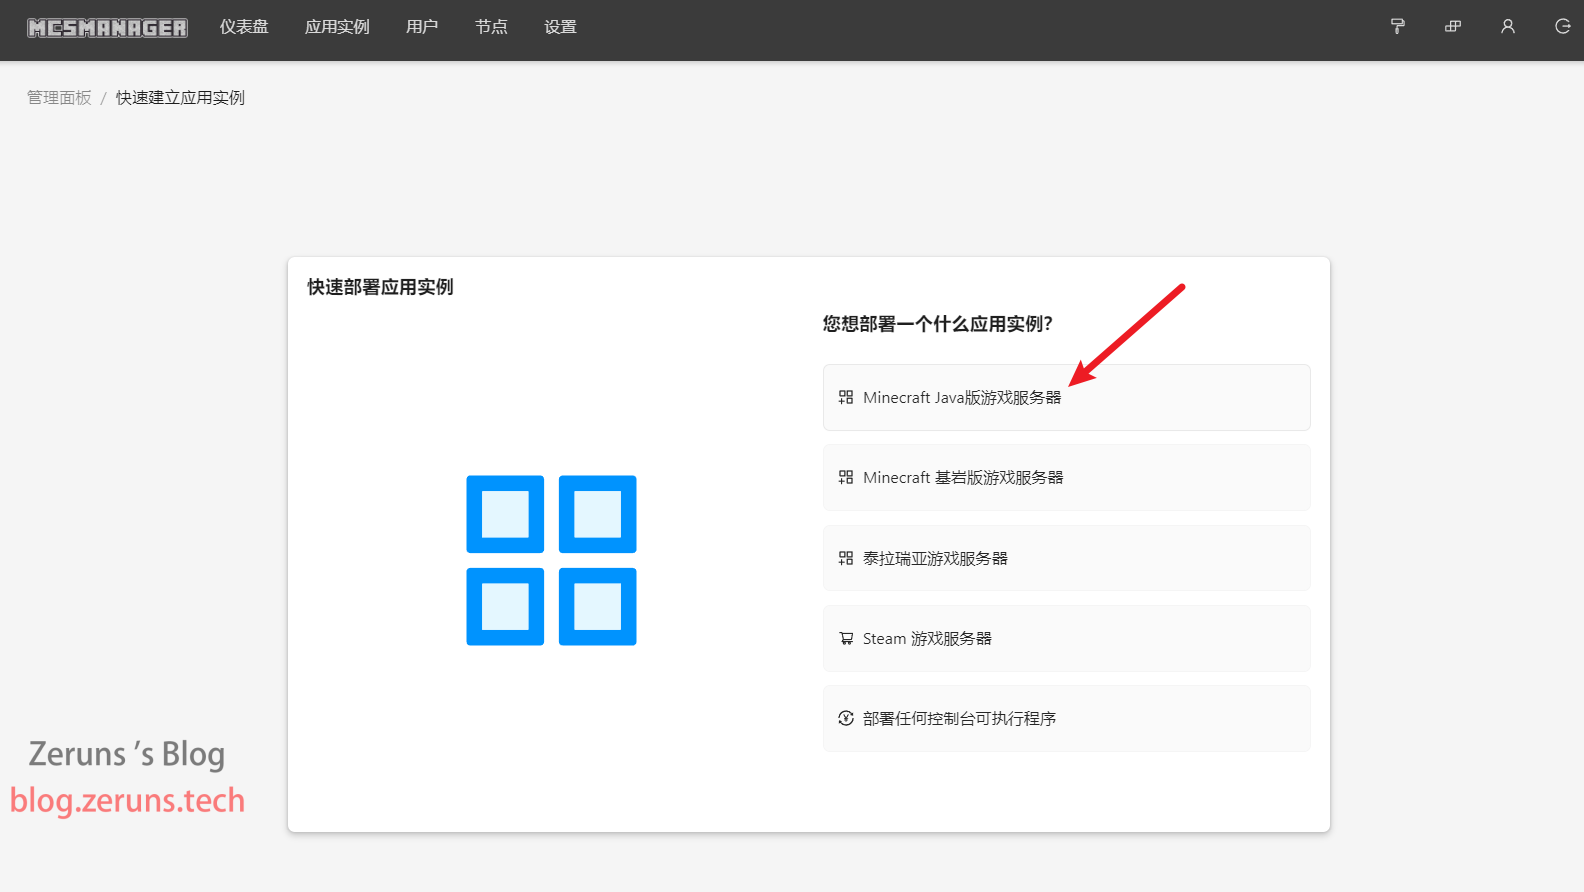
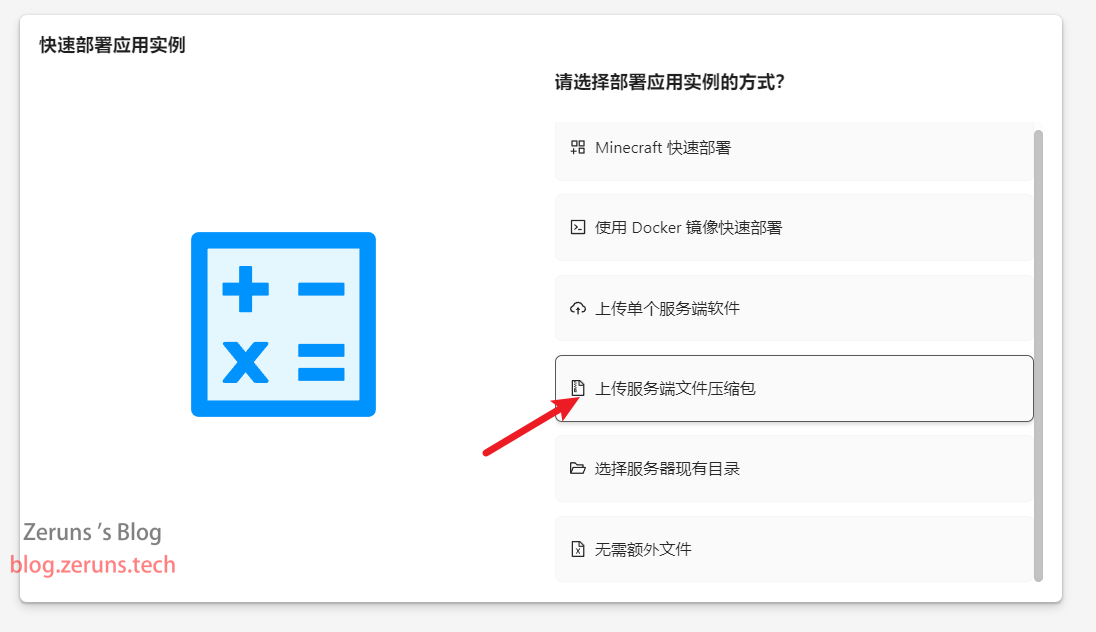
In the MCSM panel, click Application Instance → New Application → Minecraft Java Edition Server → Upload Server Archive.
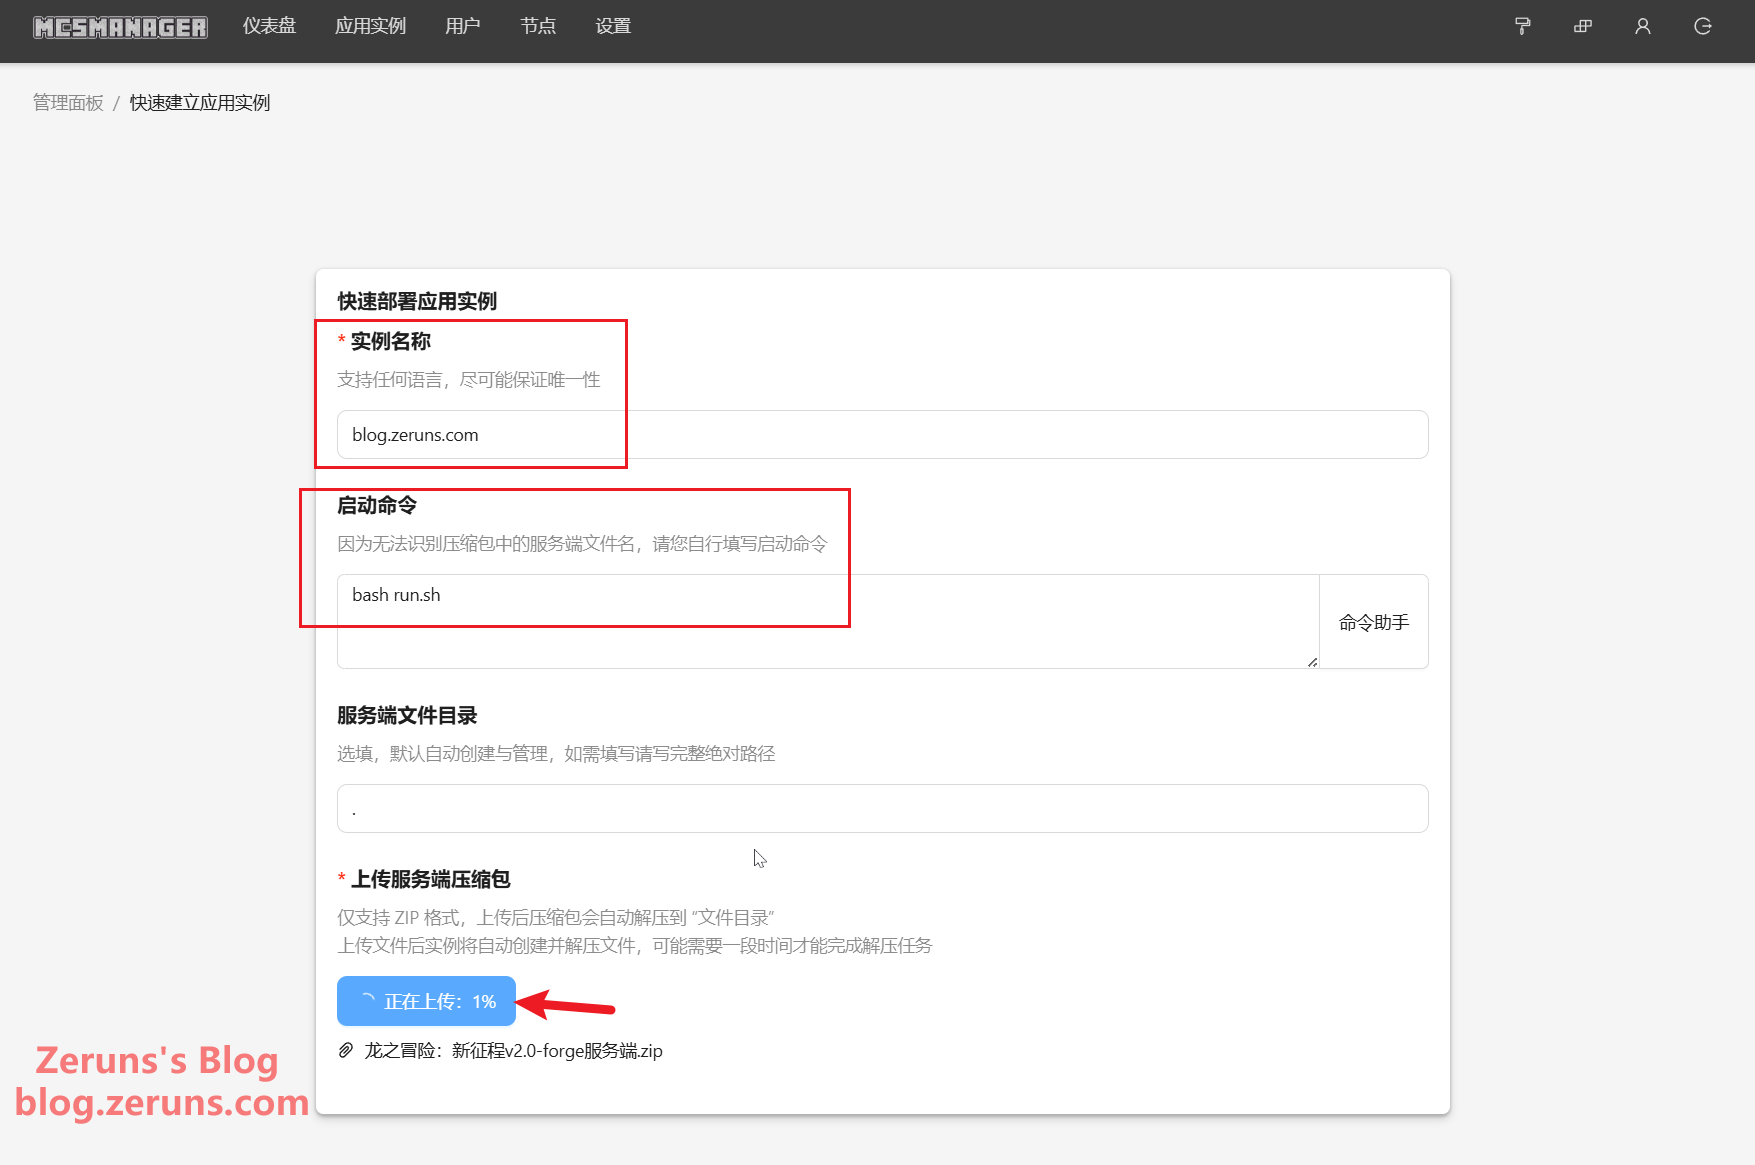
For Instance Name, enter any name you like. For the Startup Command, input bash run.sh (this command executes the run.sh script; the startup command is already set in the run.sh file. If you need to modify the maximum and minimum memory limits or other parameters, edit the user_jvm_args.txt file). Then, click Choose zip file below, select the downloaded modpack server archive, and set the extraction encoding to GBK.
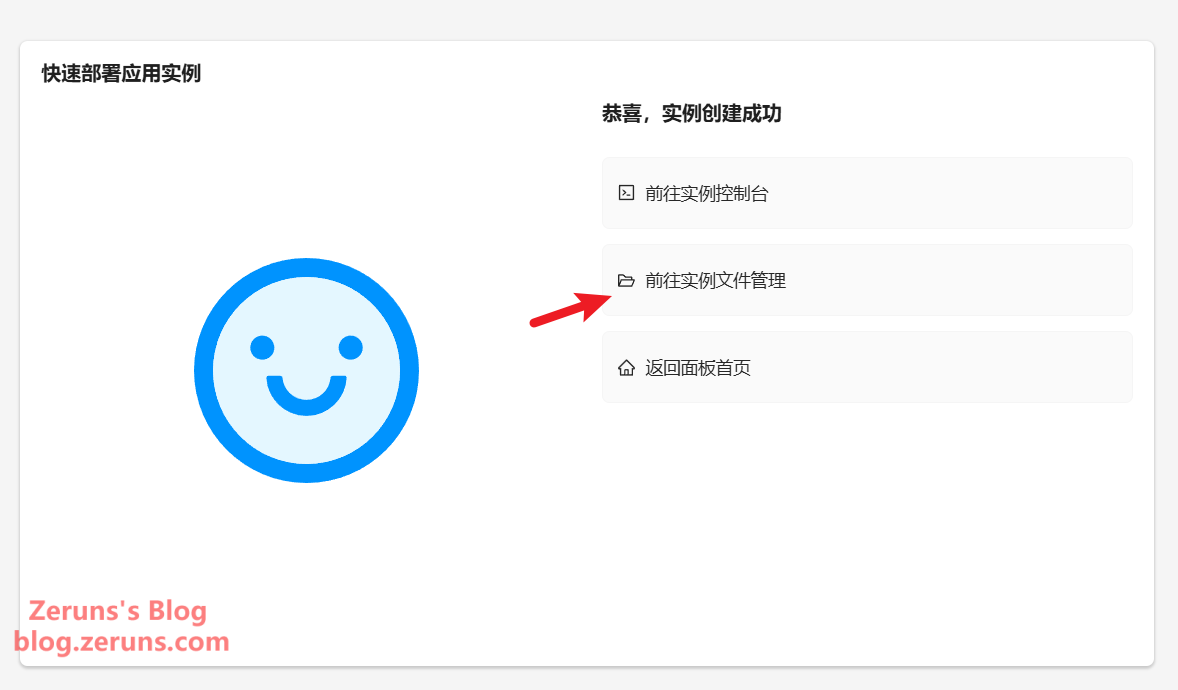
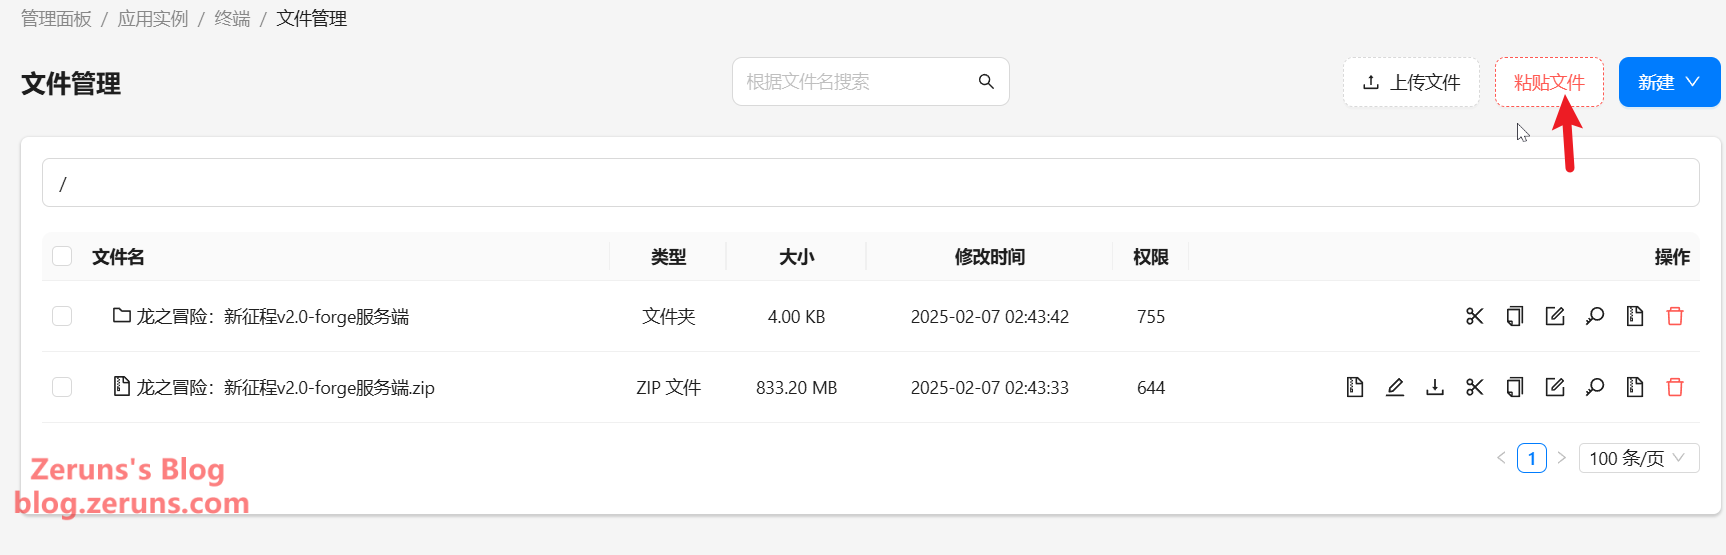
After uploading, click Go to Instance File Management.
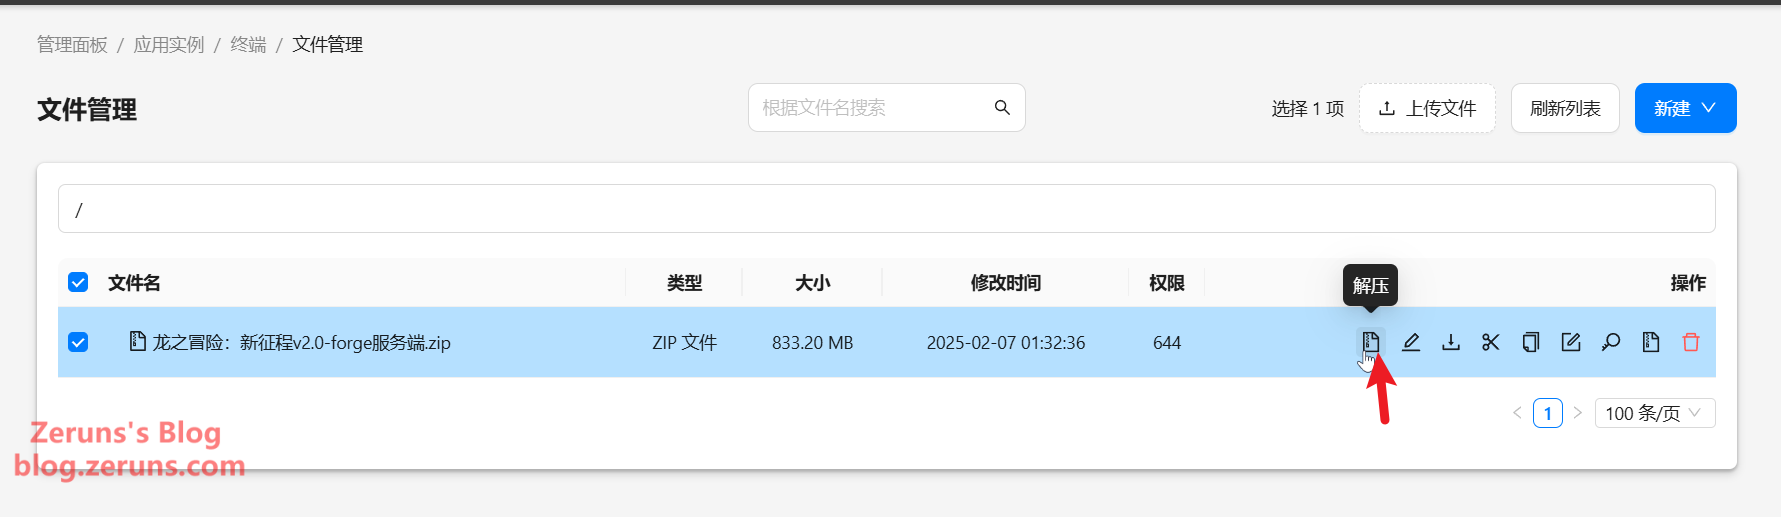
If the archive has not been extracted automatically, click the extract button on the right, choose to extract to the current directory, and select GBK as the encoding.
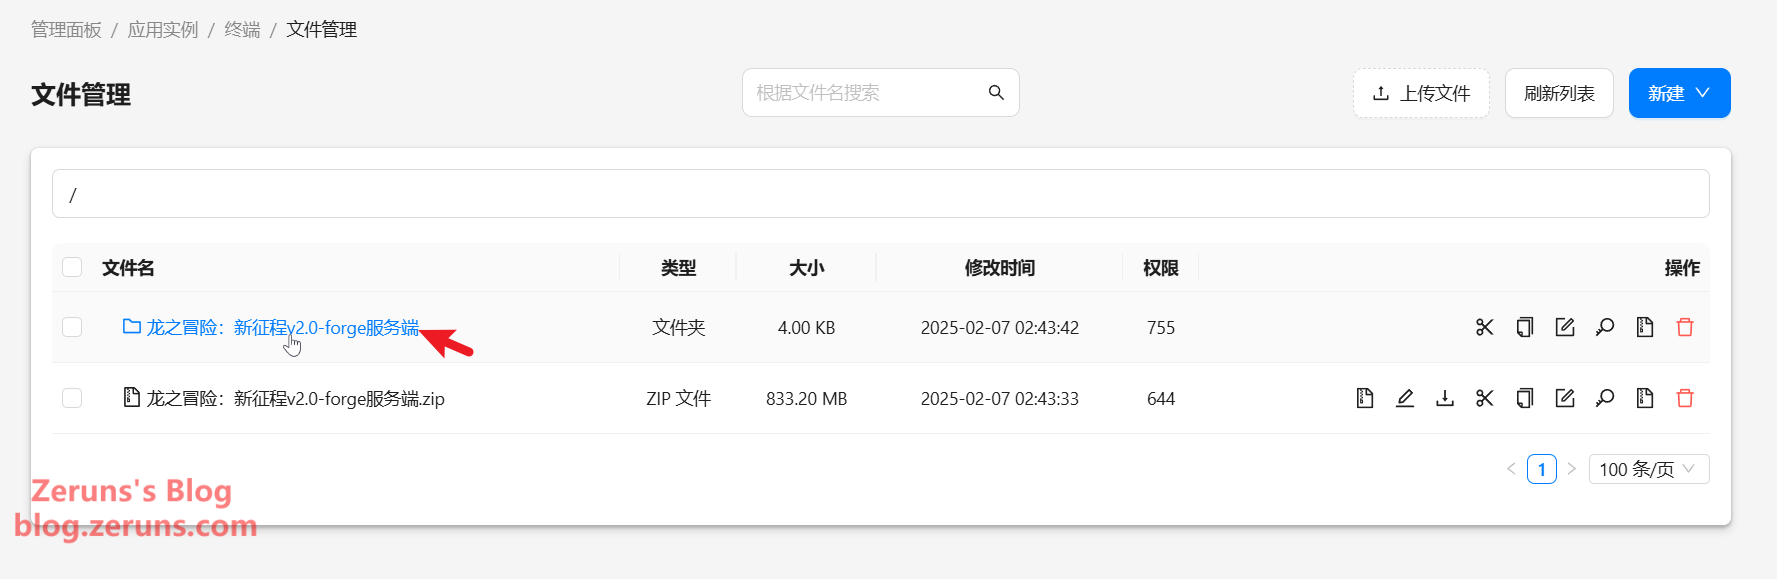
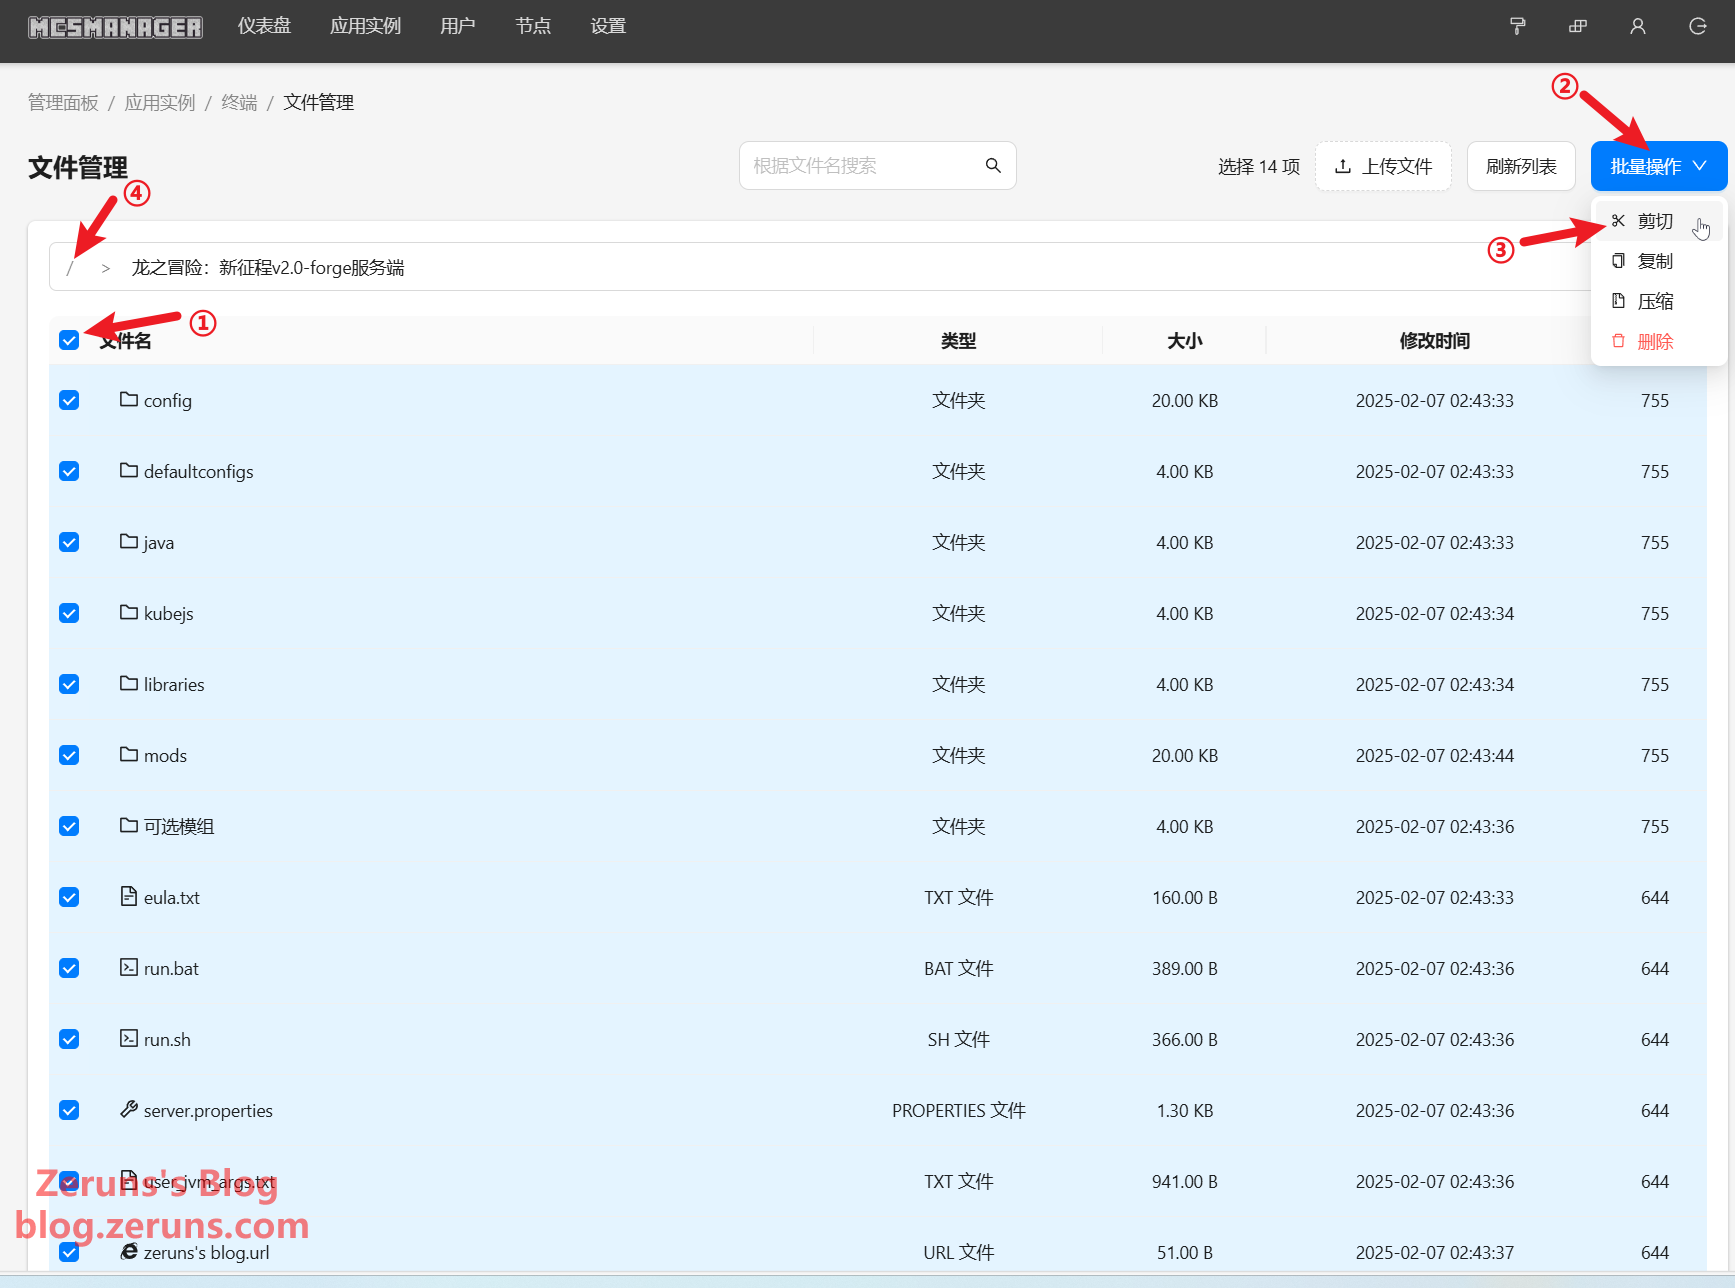
You will see an extracted folder. Open this folder, select all the files, cut them, and paste them into the root directory.
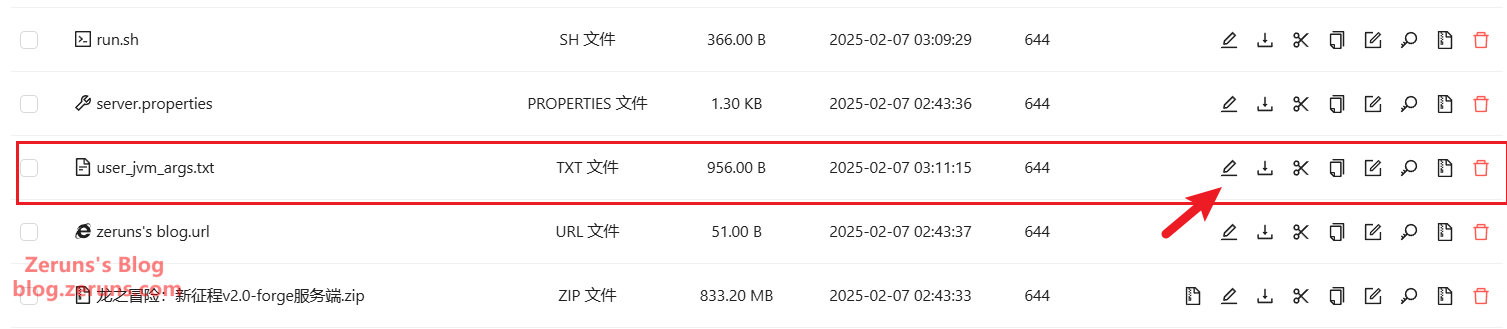
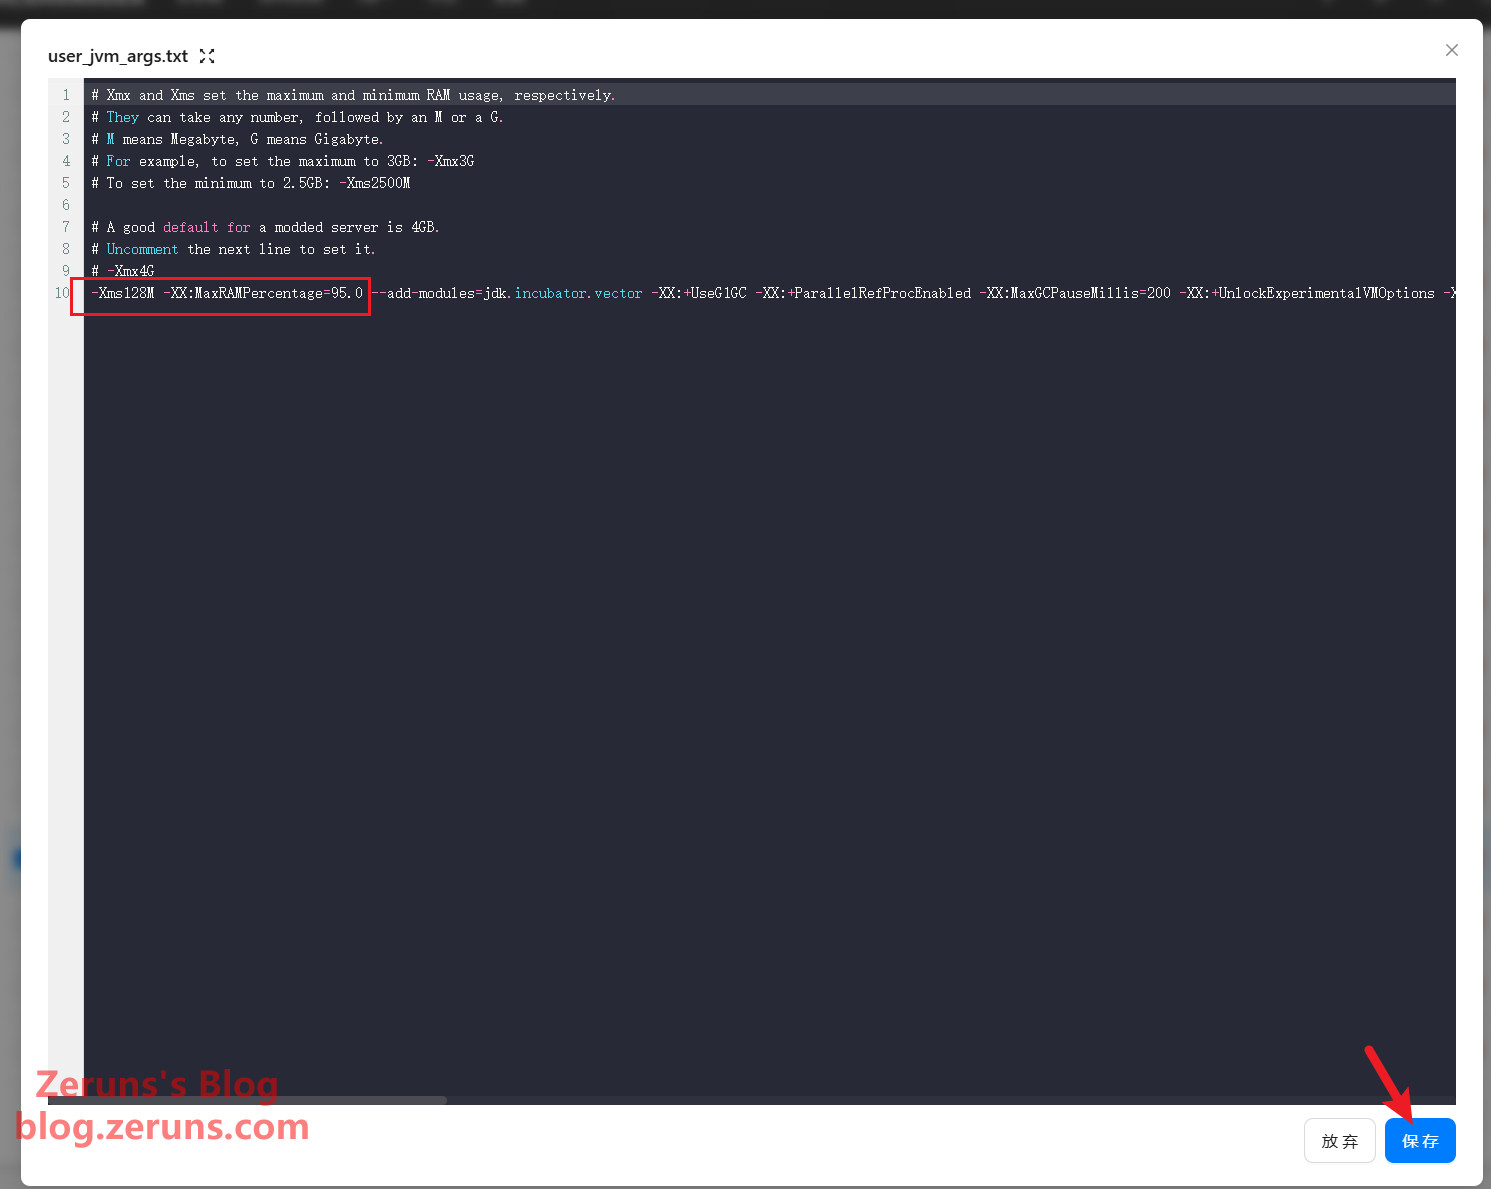
Edit the user_jvm_args.txt file, change -Xms8192M -Xmx8192M to -Xms128M -XX:MaxRAMPercentage=95.0, and then save the file.
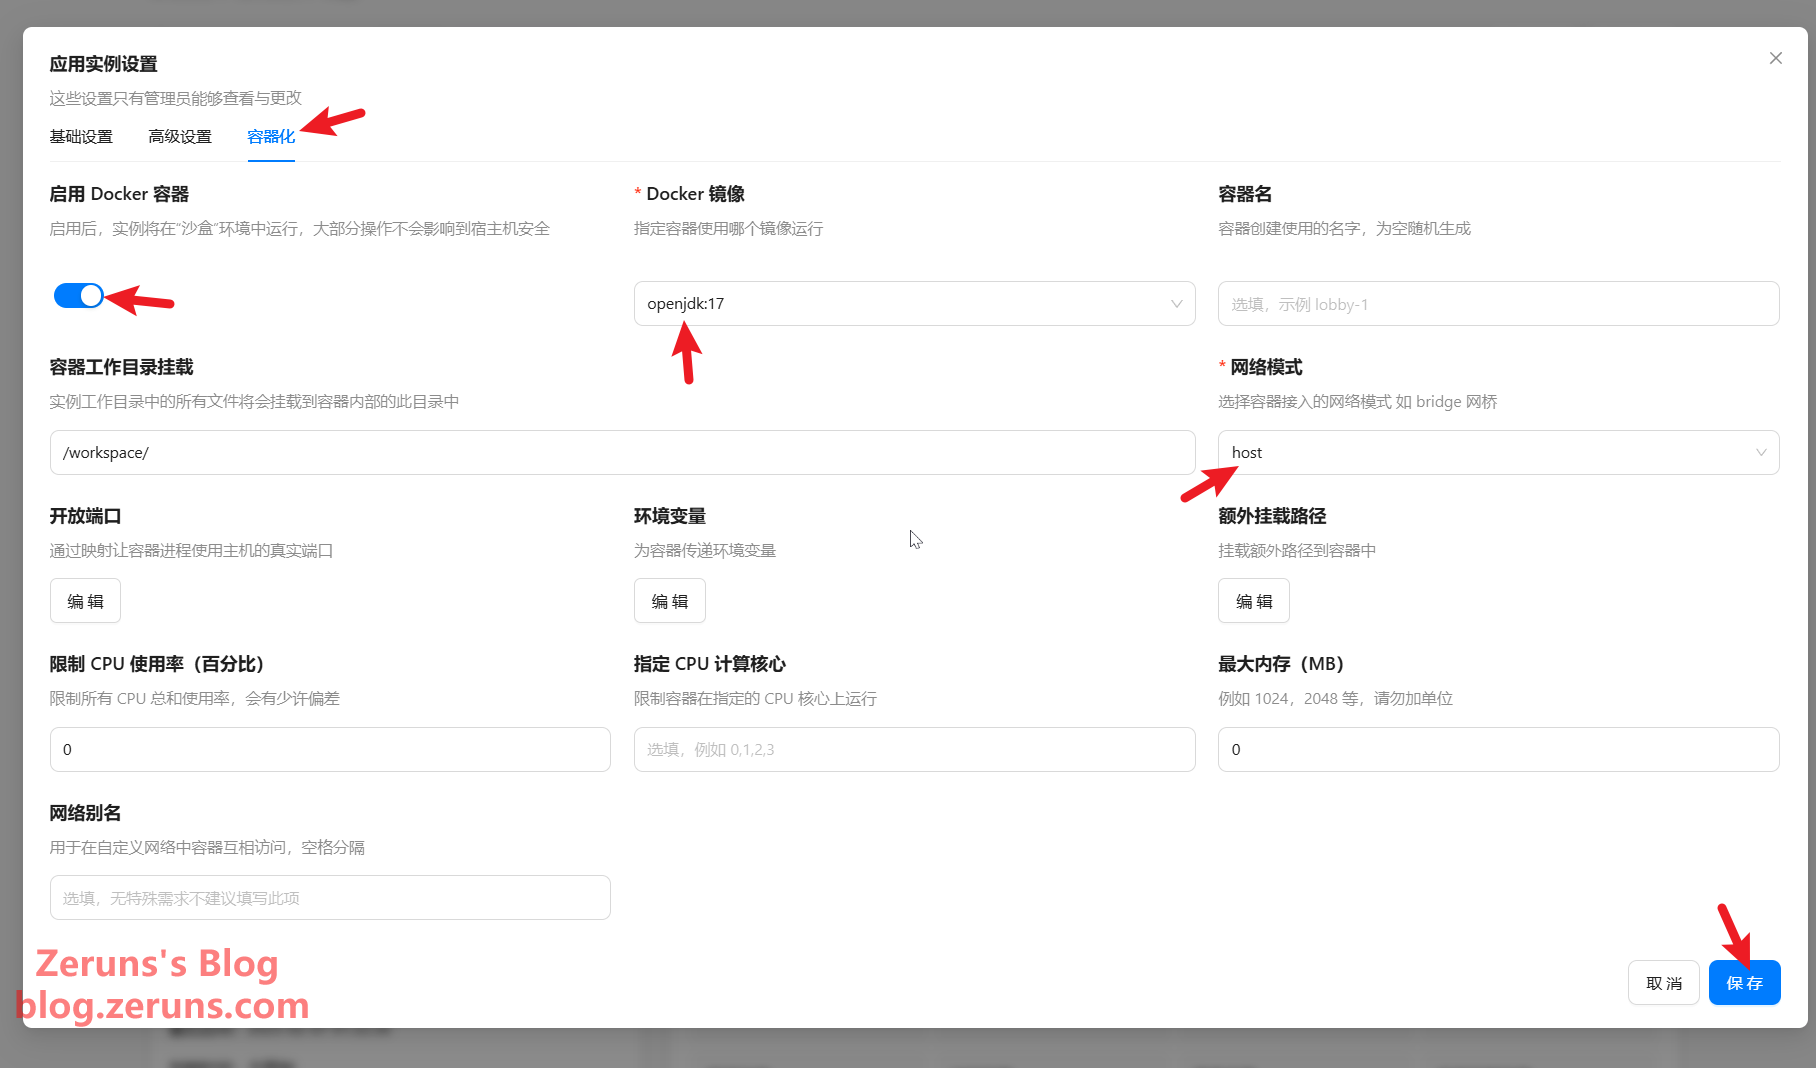
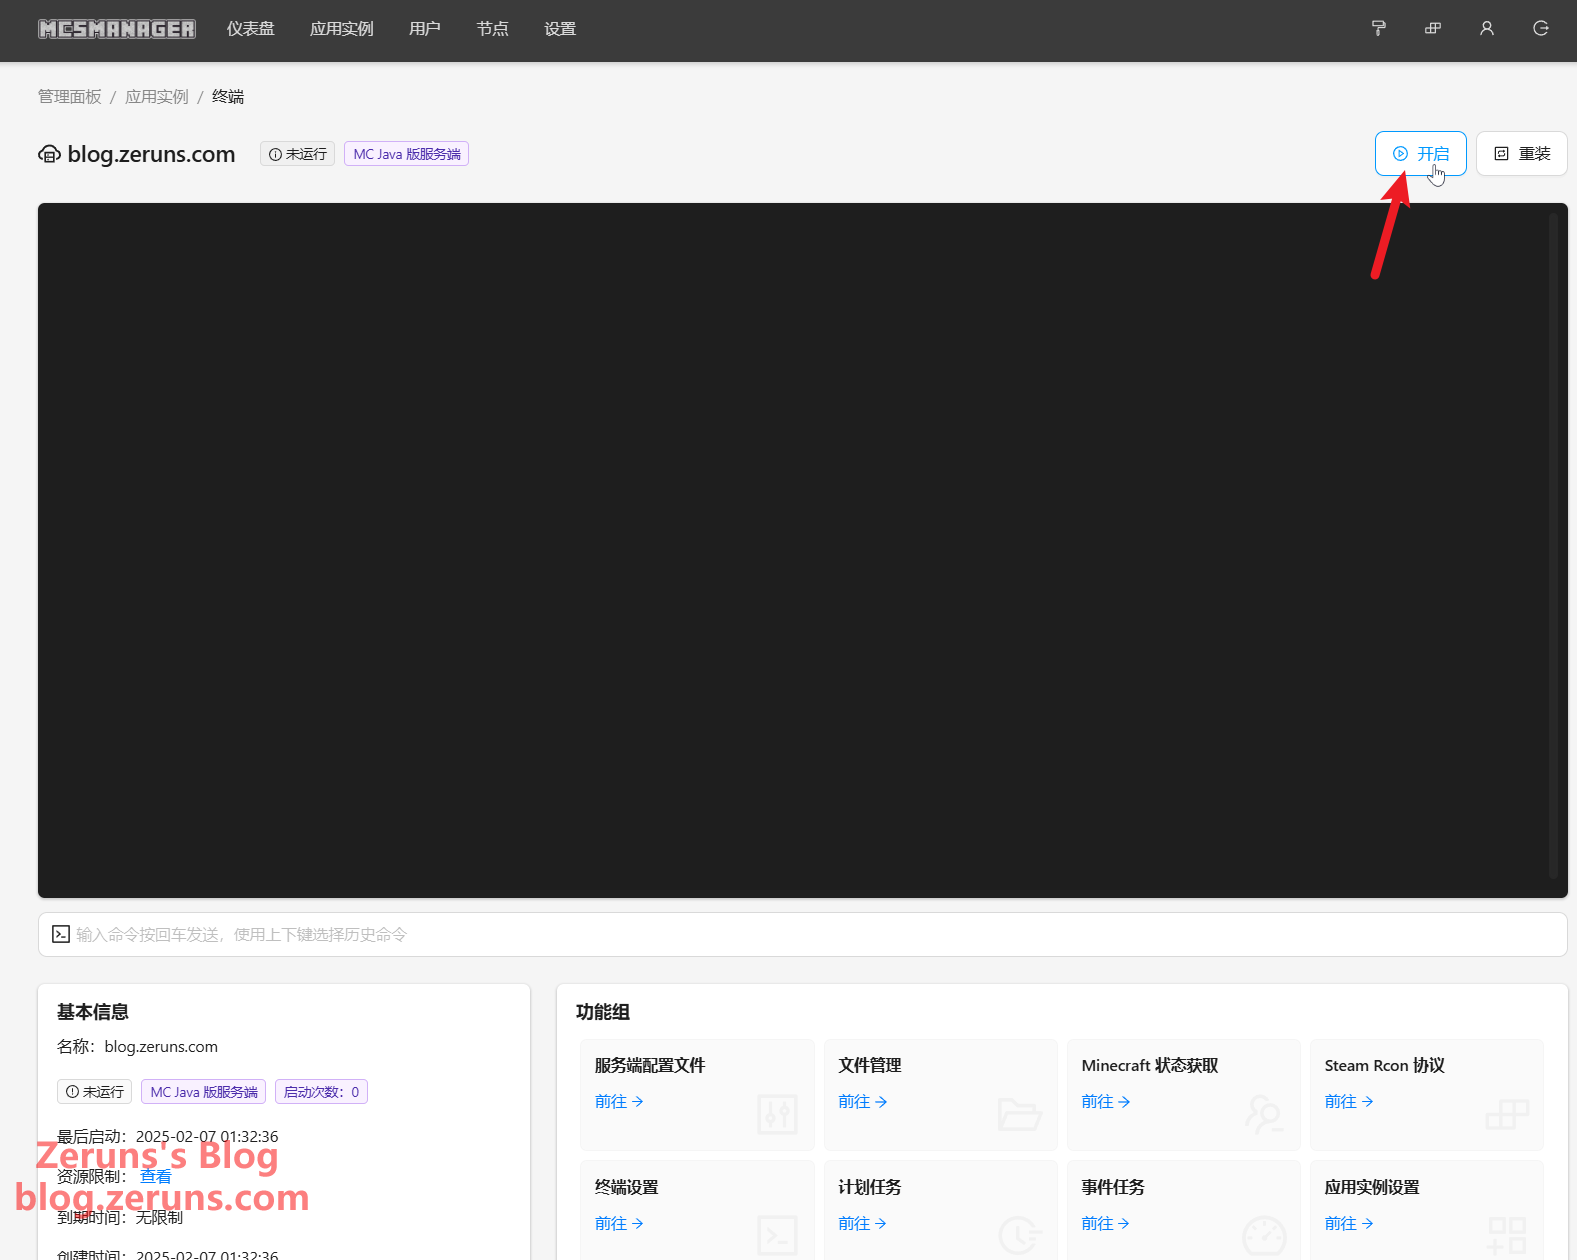
Next, return to the Instance Terminal and click on Application Instance Settings.
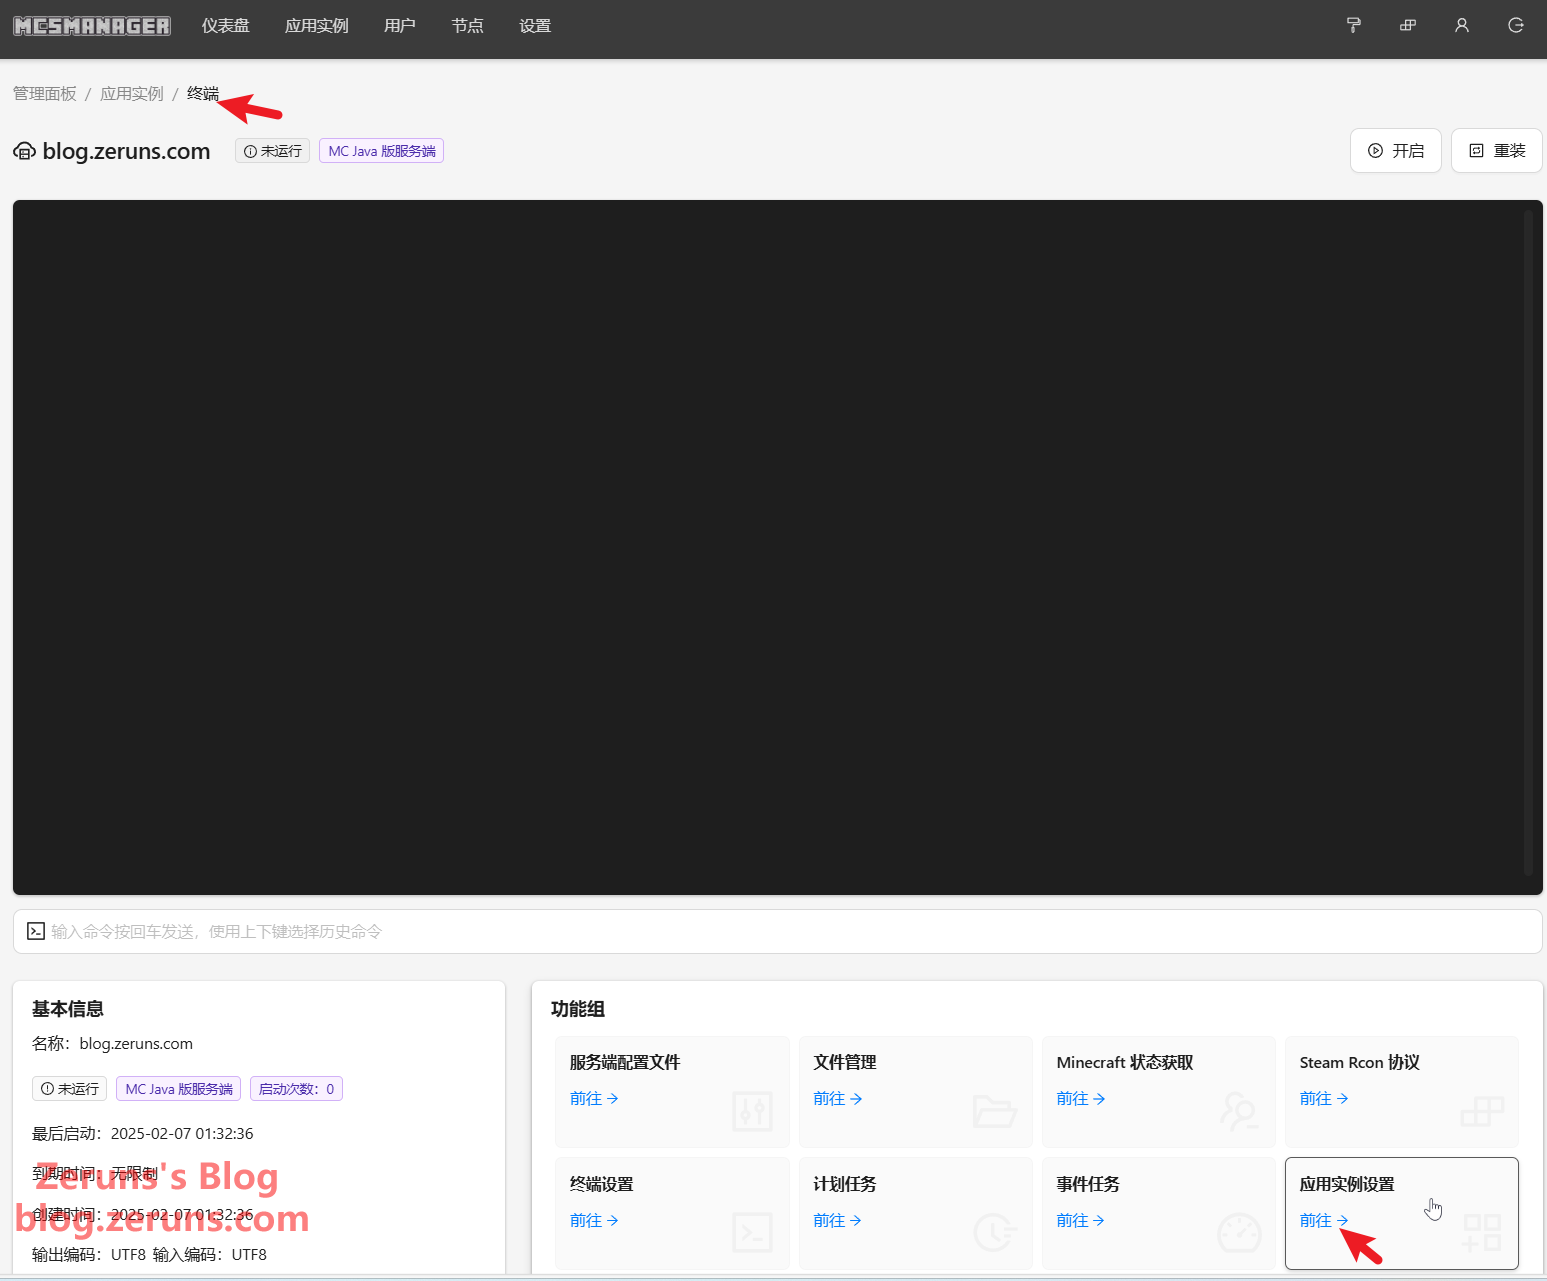
Click on Containerization, then Enable Docker Container. For the Docker Image, select openjdk:17, and for Network Mode, choose host (this means the container shares the same network interface as the host, with container ports mapping directly to the host’s ports without additional port mapping). After making your selections, click Save at the bottom right. You can also specify the maximum memory to limit the Docker container’s memory usage. After saving, click Start Instance.
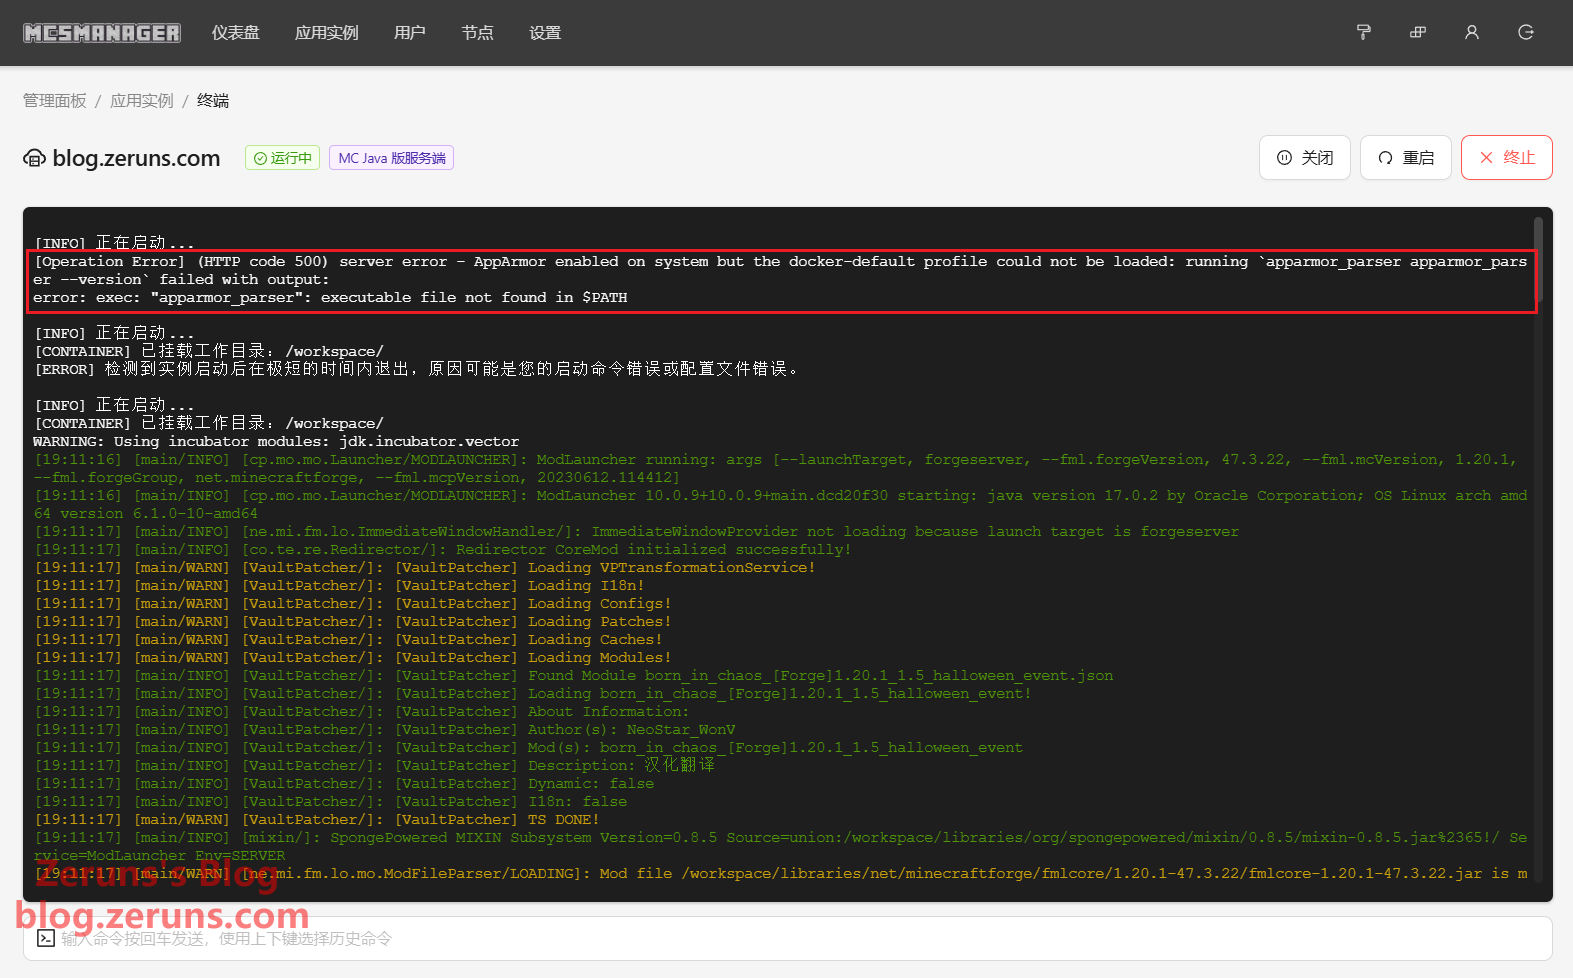
If you encounter the error error: exec: "apparmor_parser": executable file not found in $PATH, open an SSH terminal and execute apt -y install apparmor apparmor-utils, then click Start Instance again.
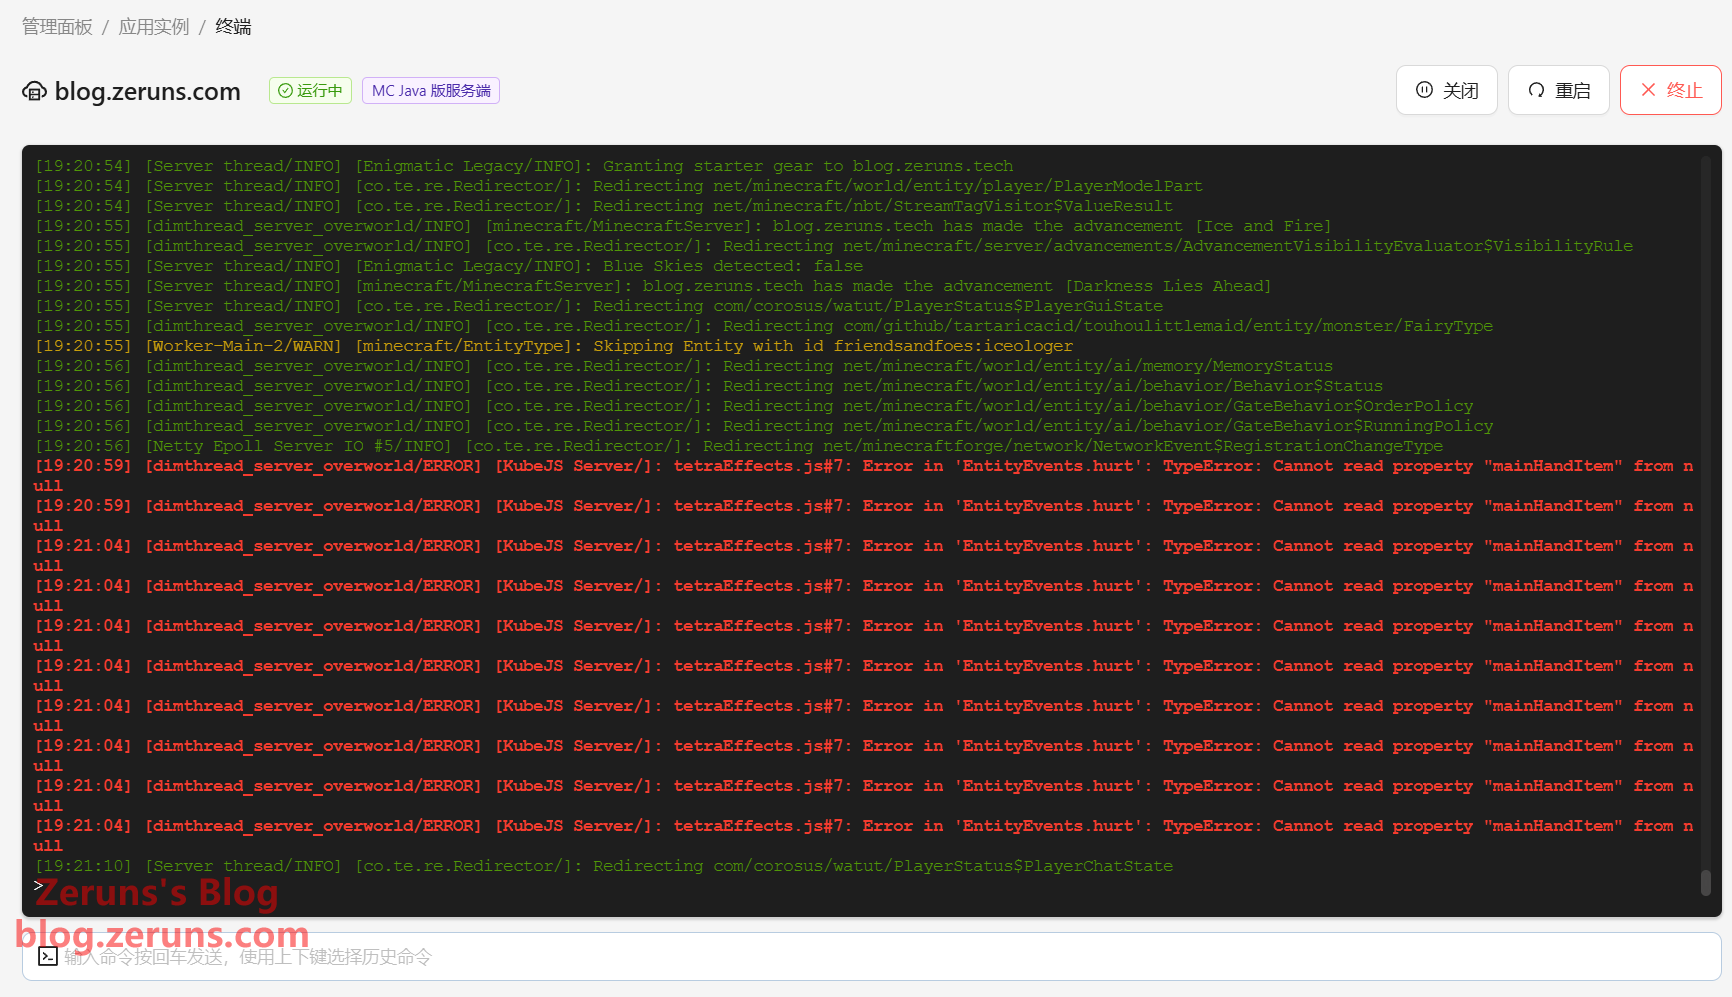
After a few minutes, the server will start, and you can enter the game to add the server.
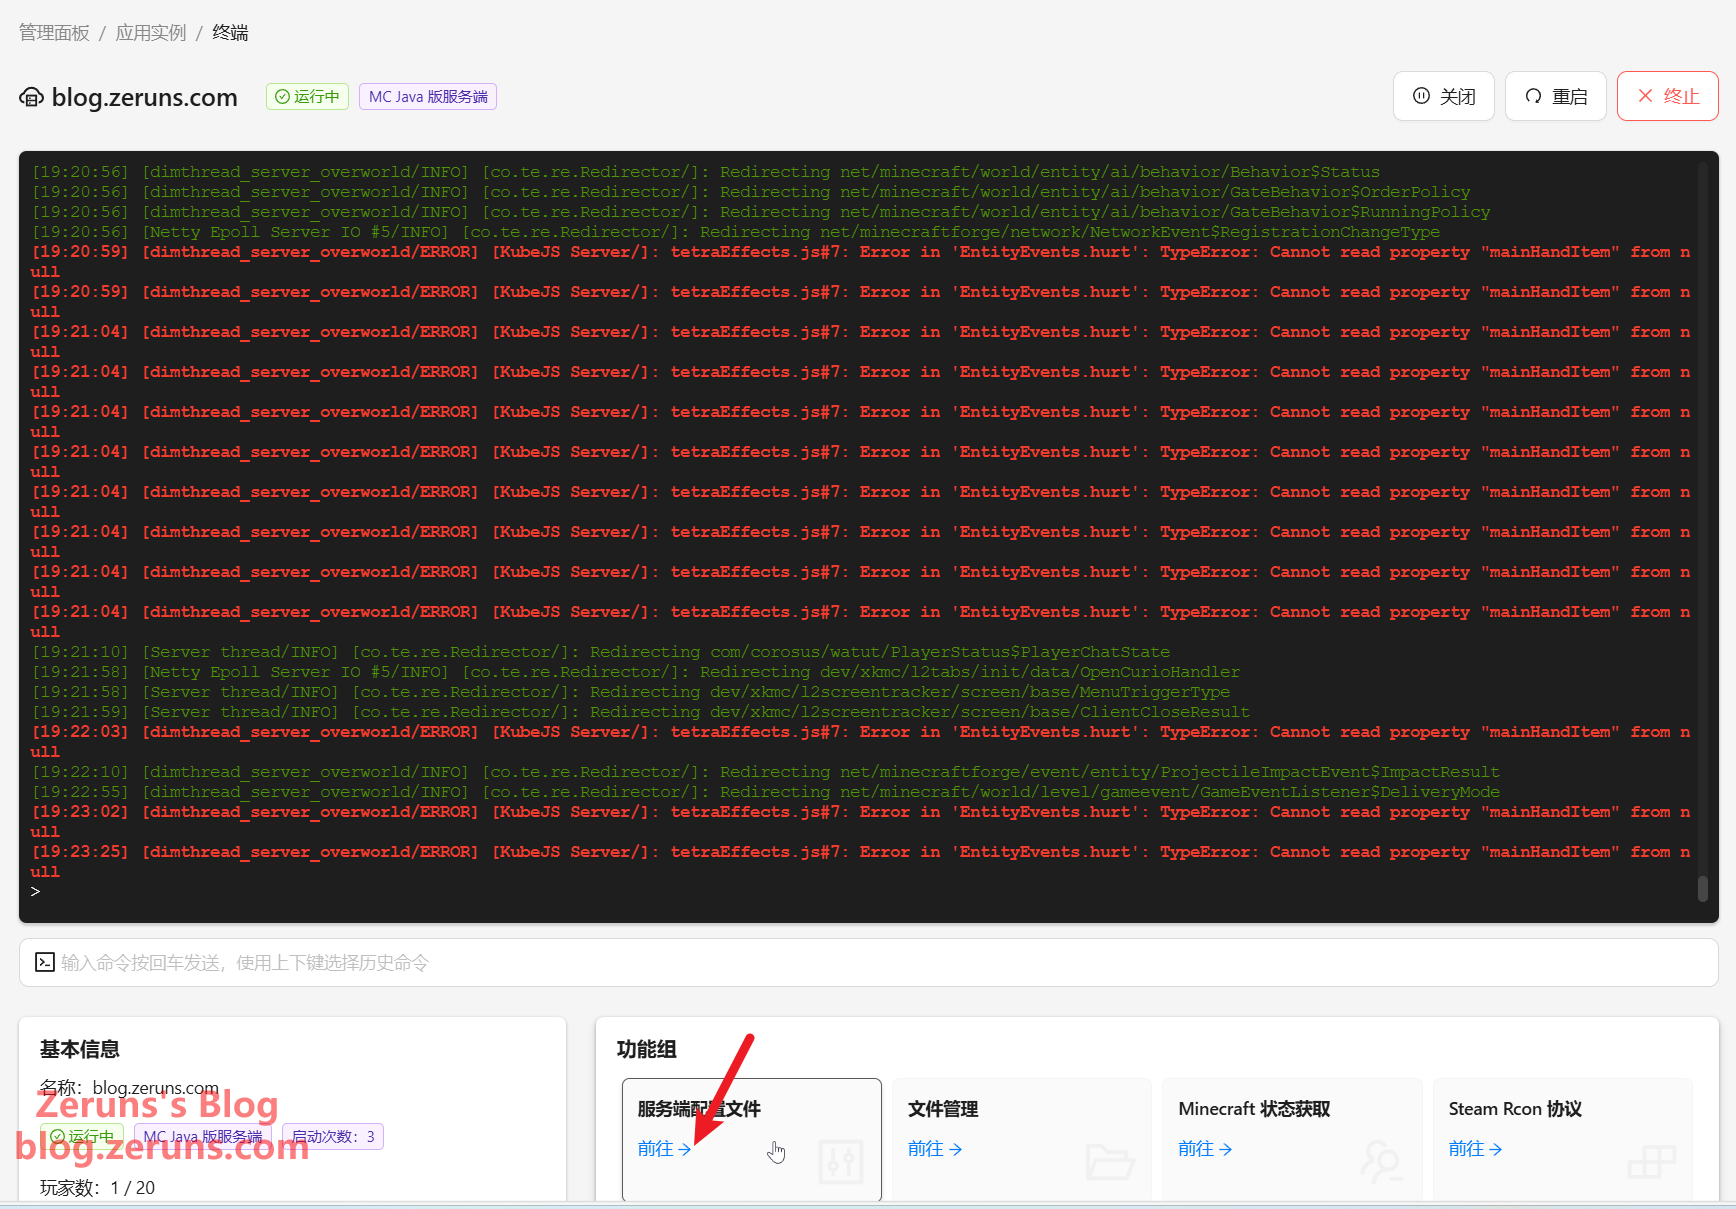
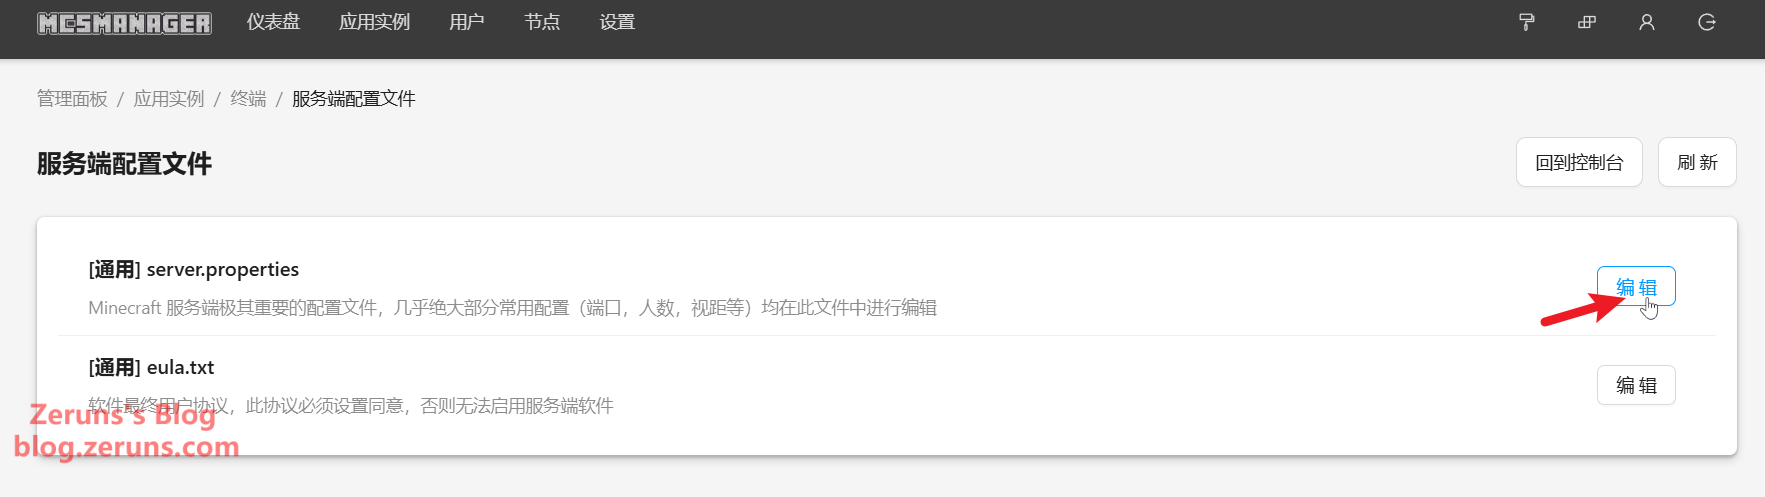
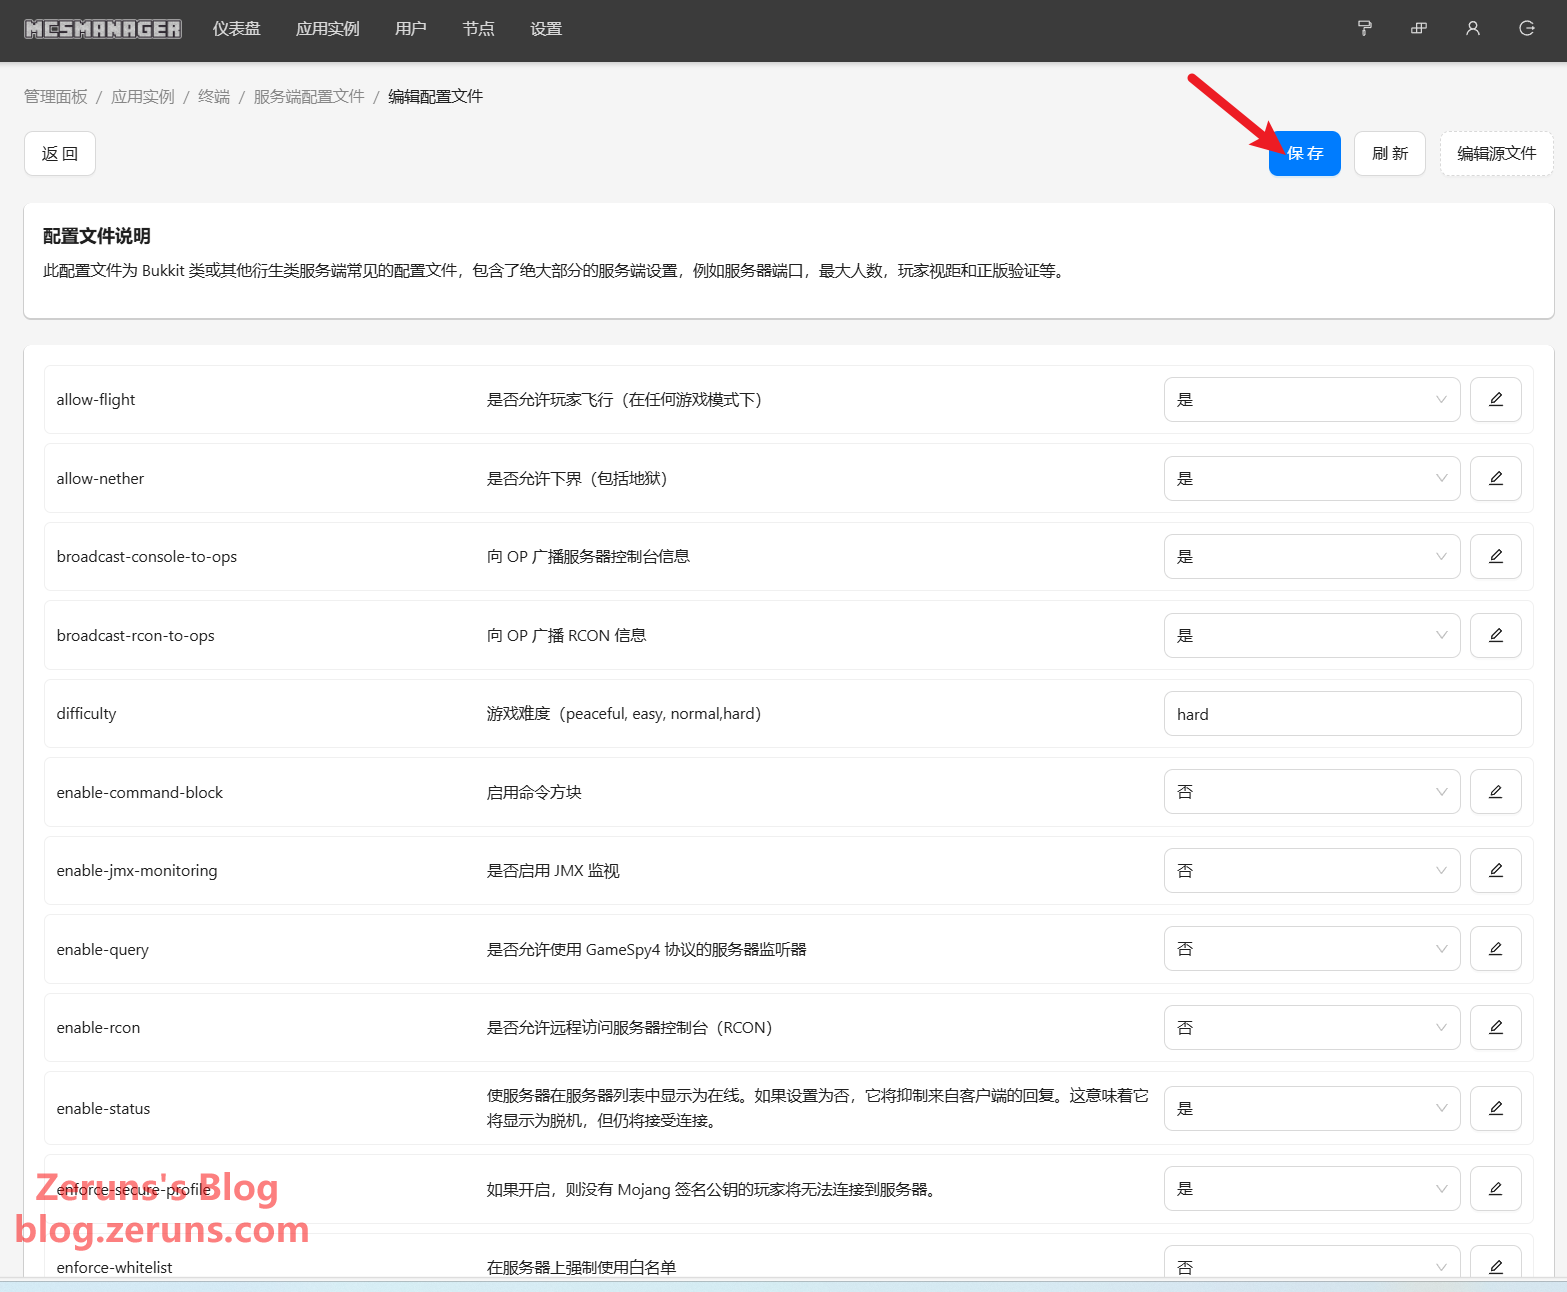
If you need to modify any server settings, click Server Configuration Files → server.properties. Here you can change the server settings. Non-premium users should set Online Mode to false (although it is recommended to purchase a premium account). After making changes, be sure to click Save. If you need to change the port, after editing the configuration file, you must also configure the NAT port mapping in the Rain Cloud console.
Remember to restart the instance after making any modifications!
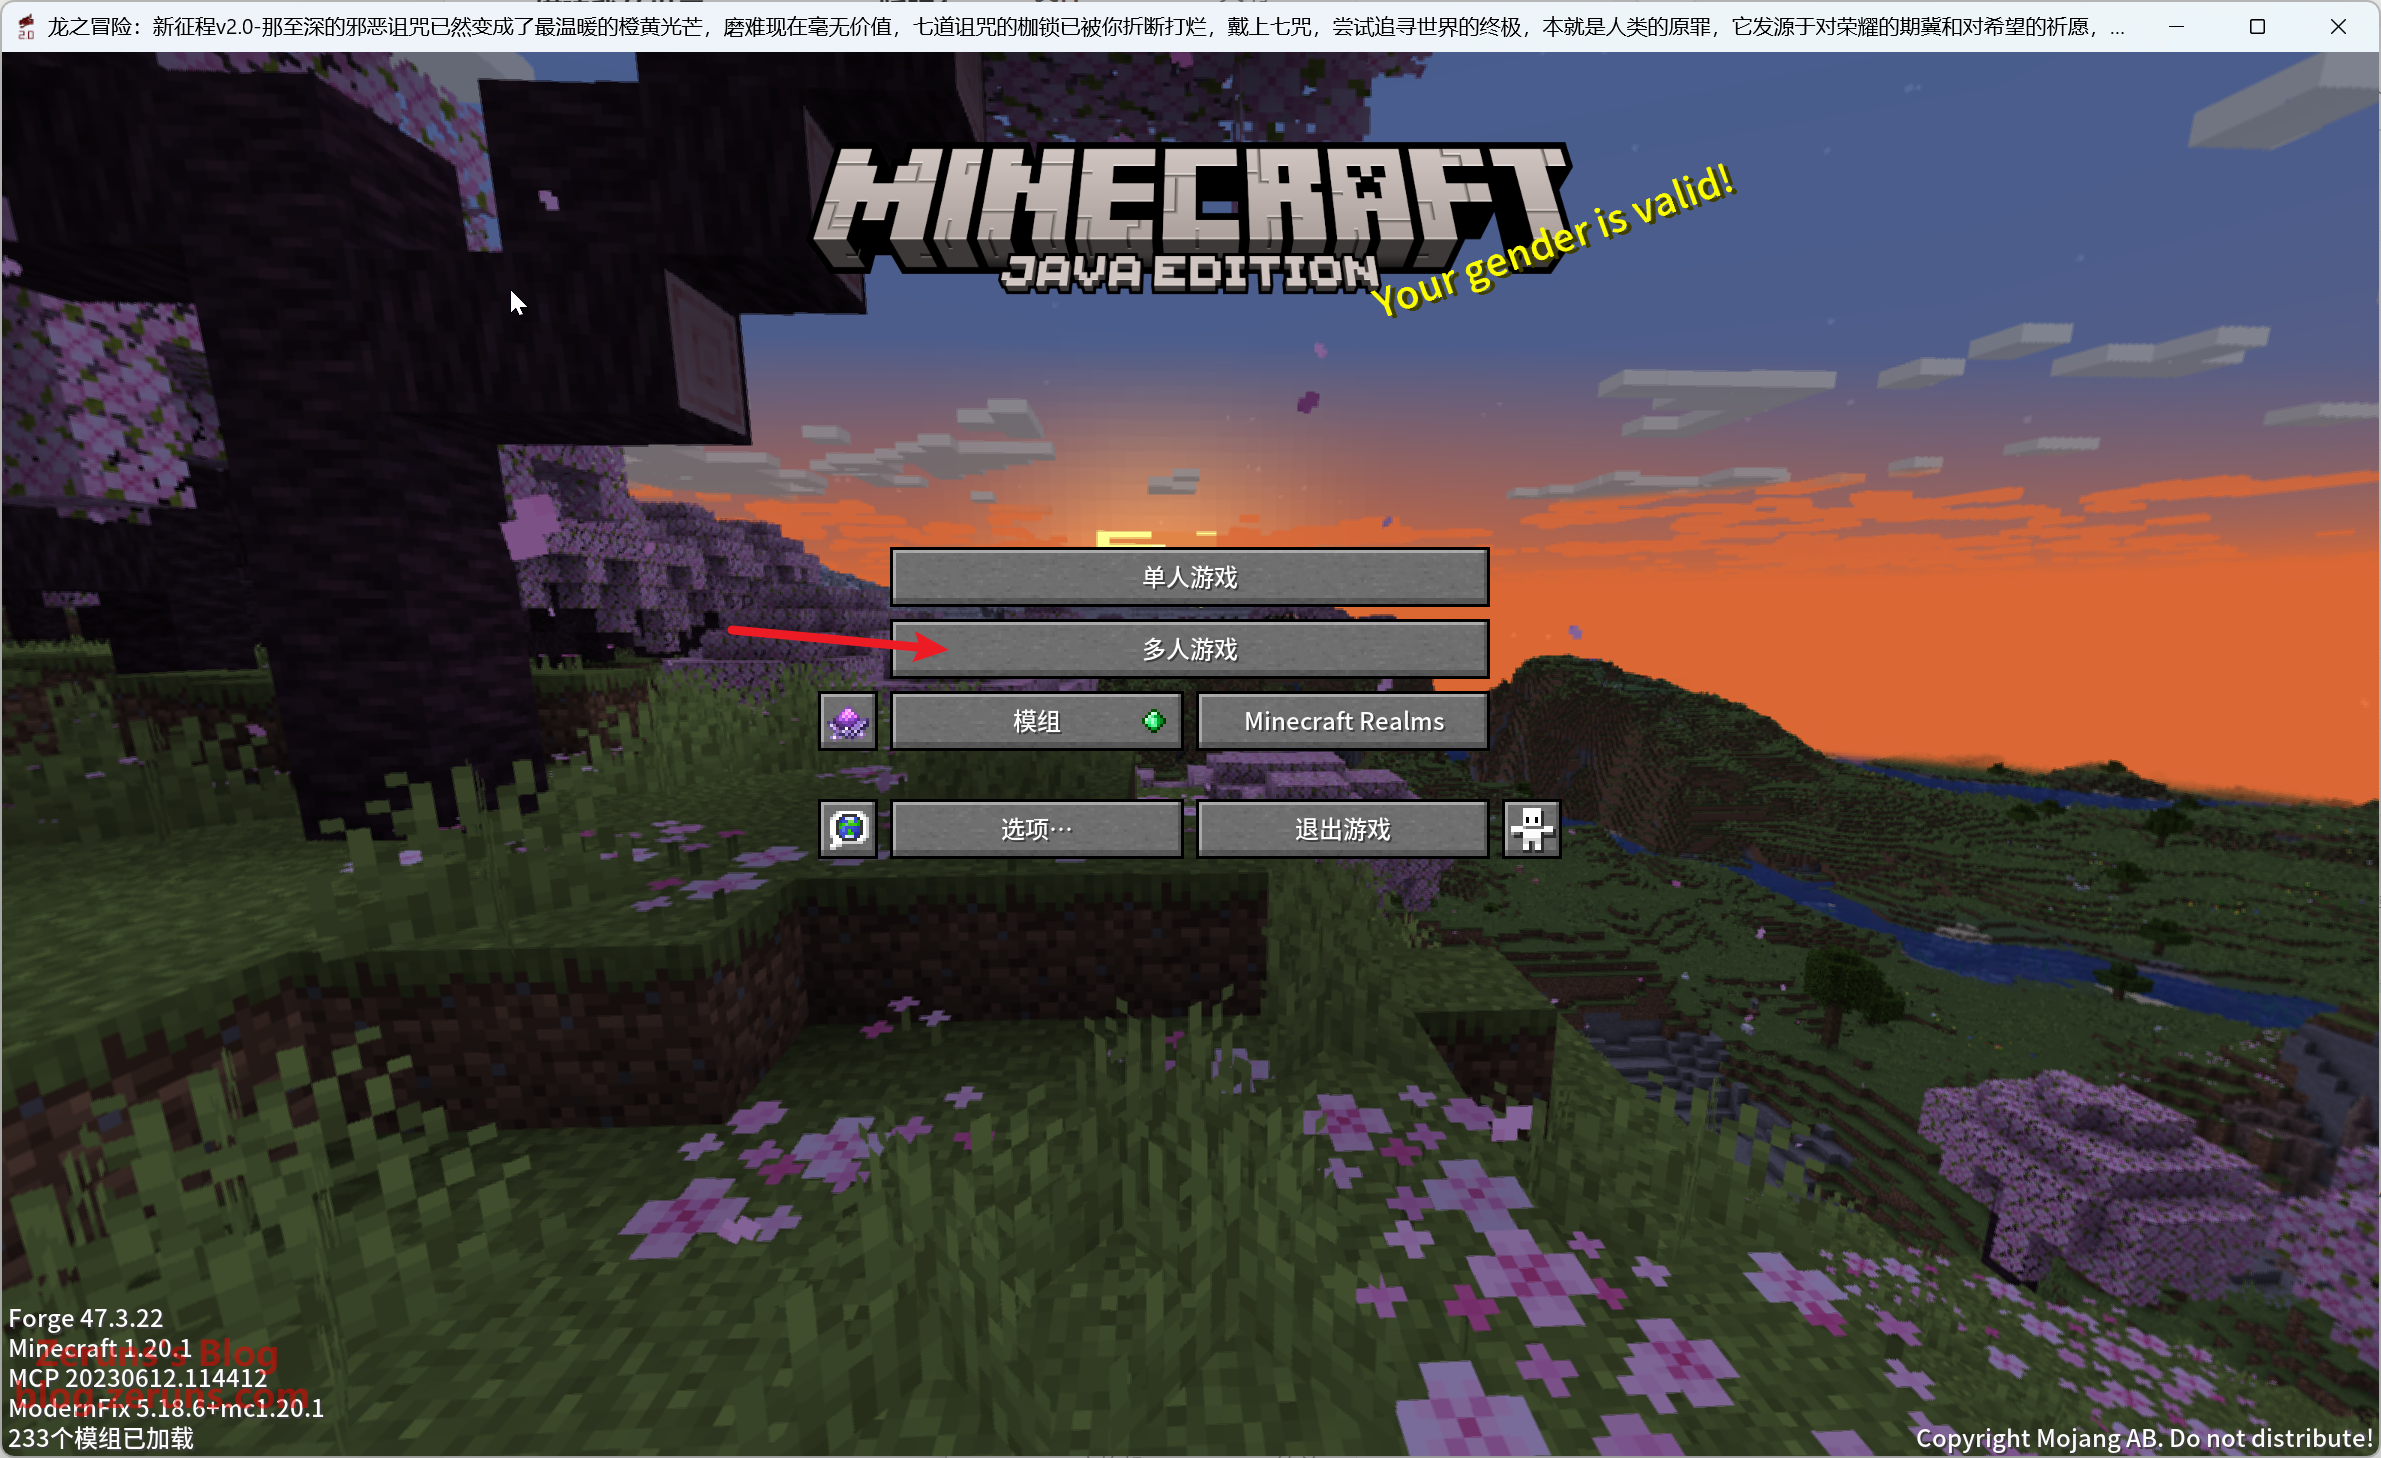
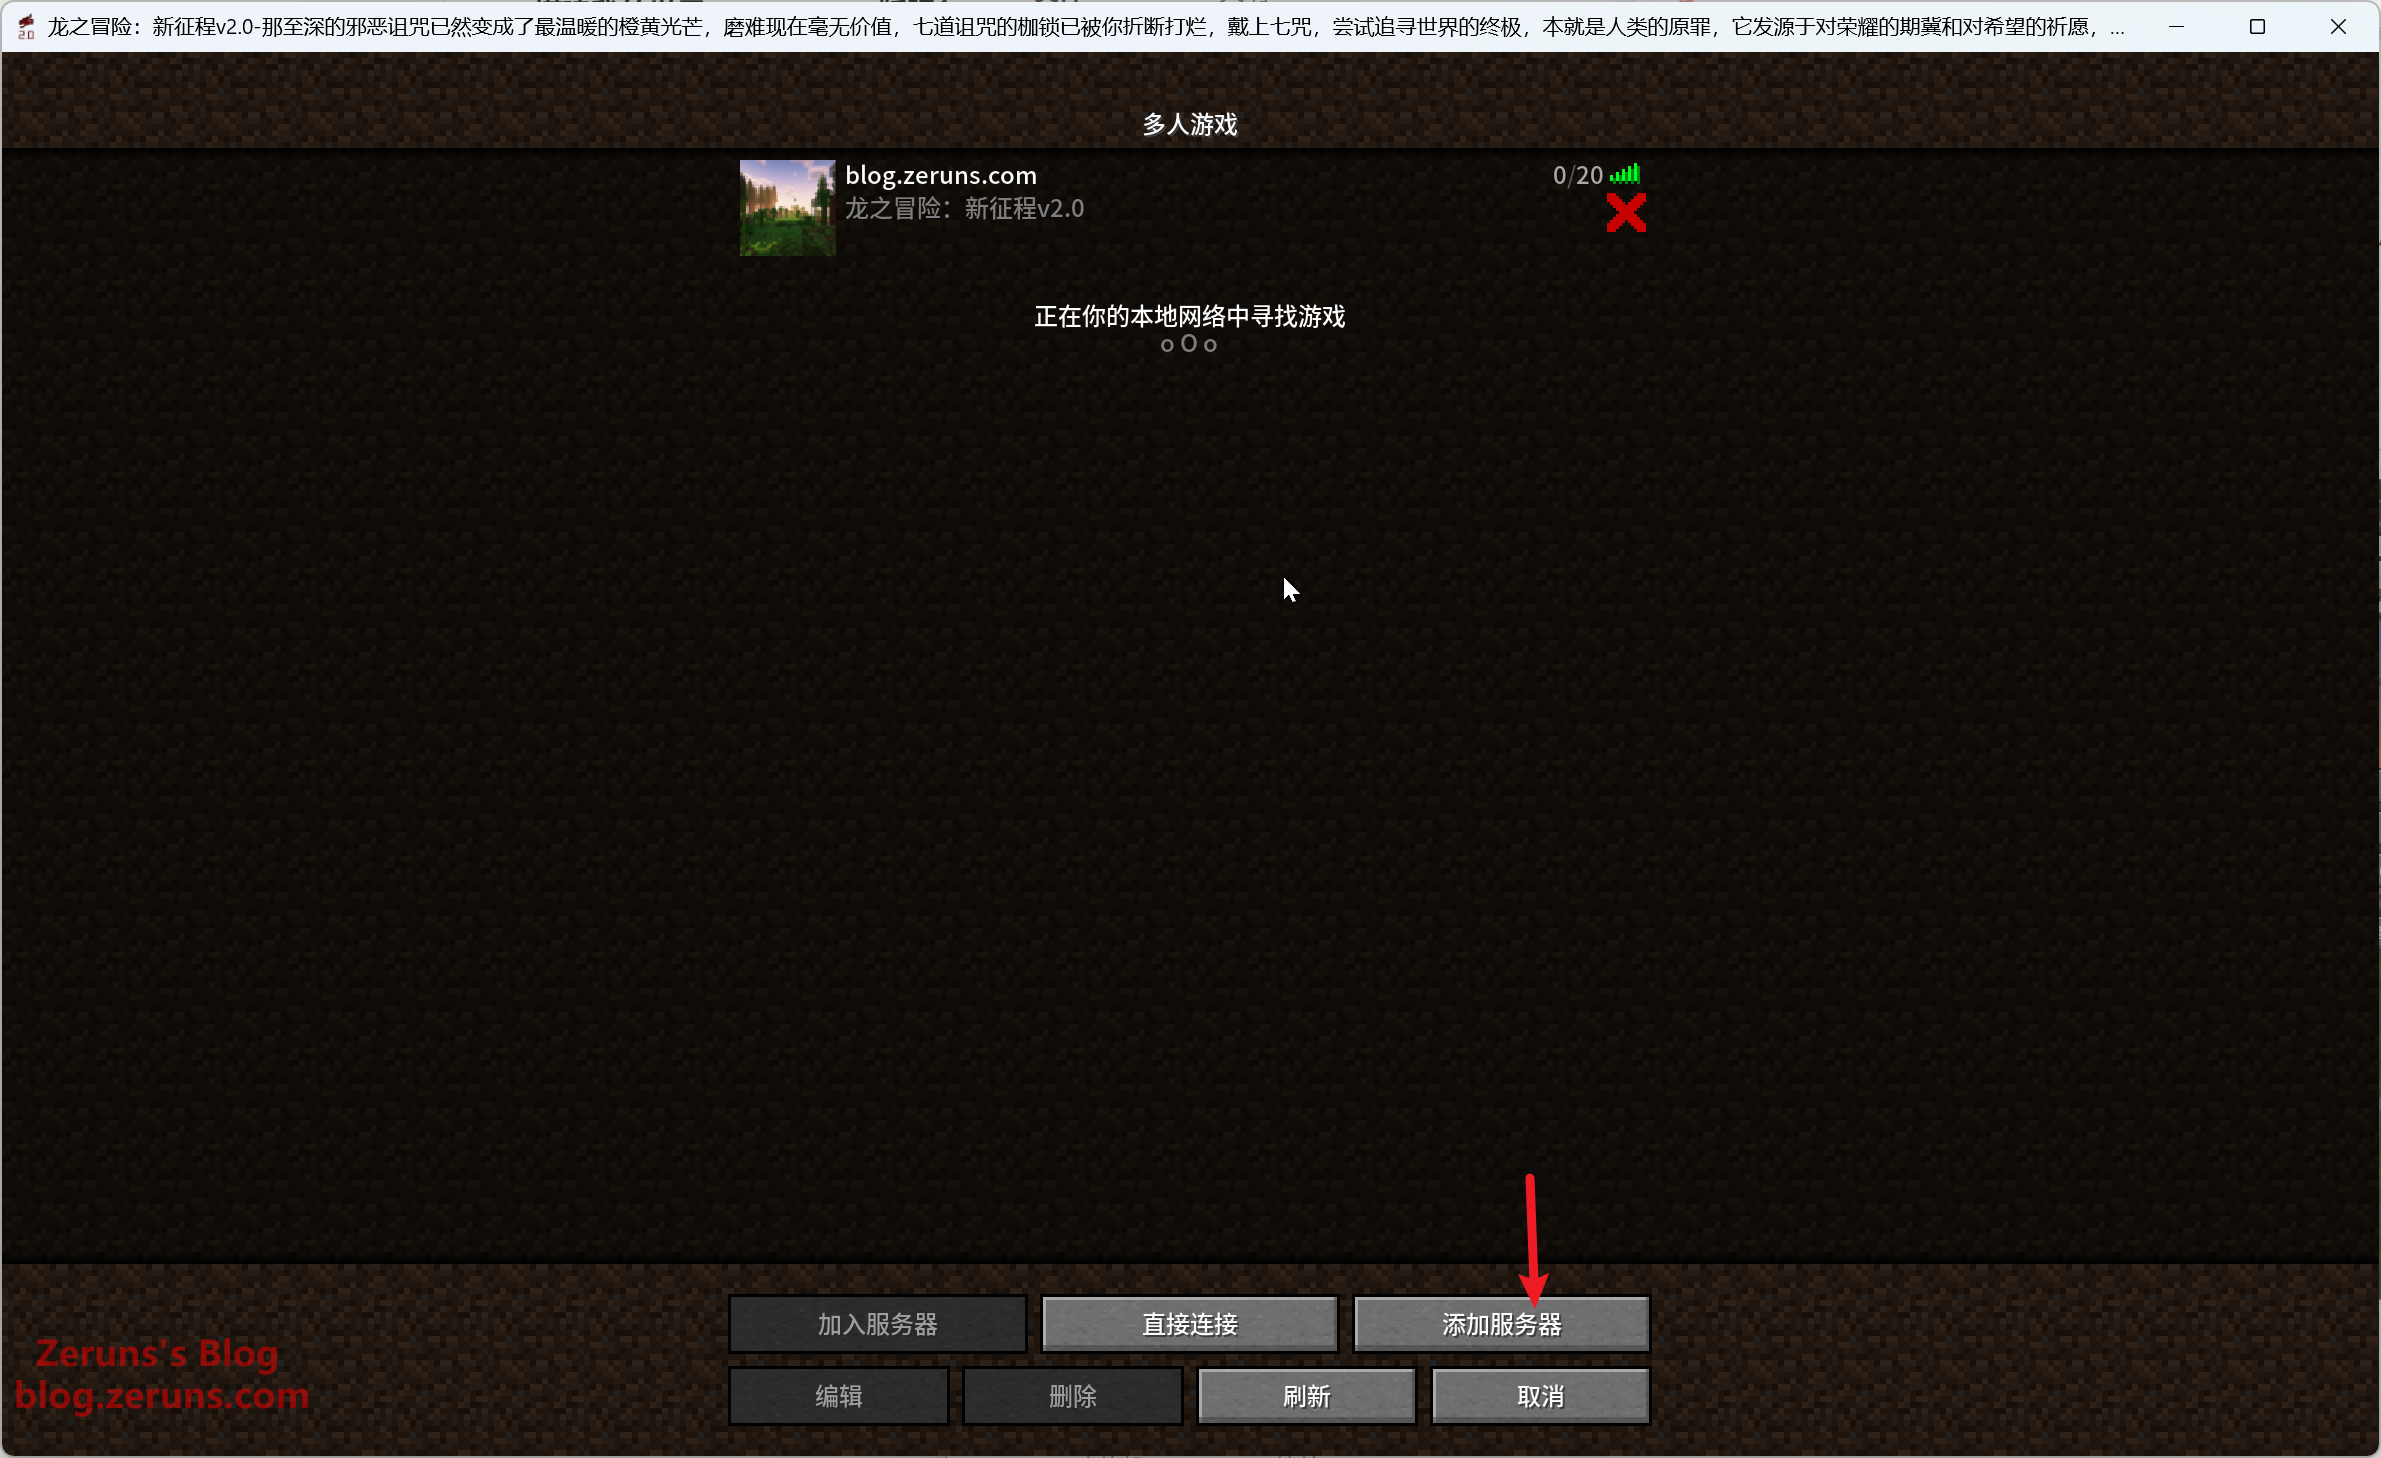
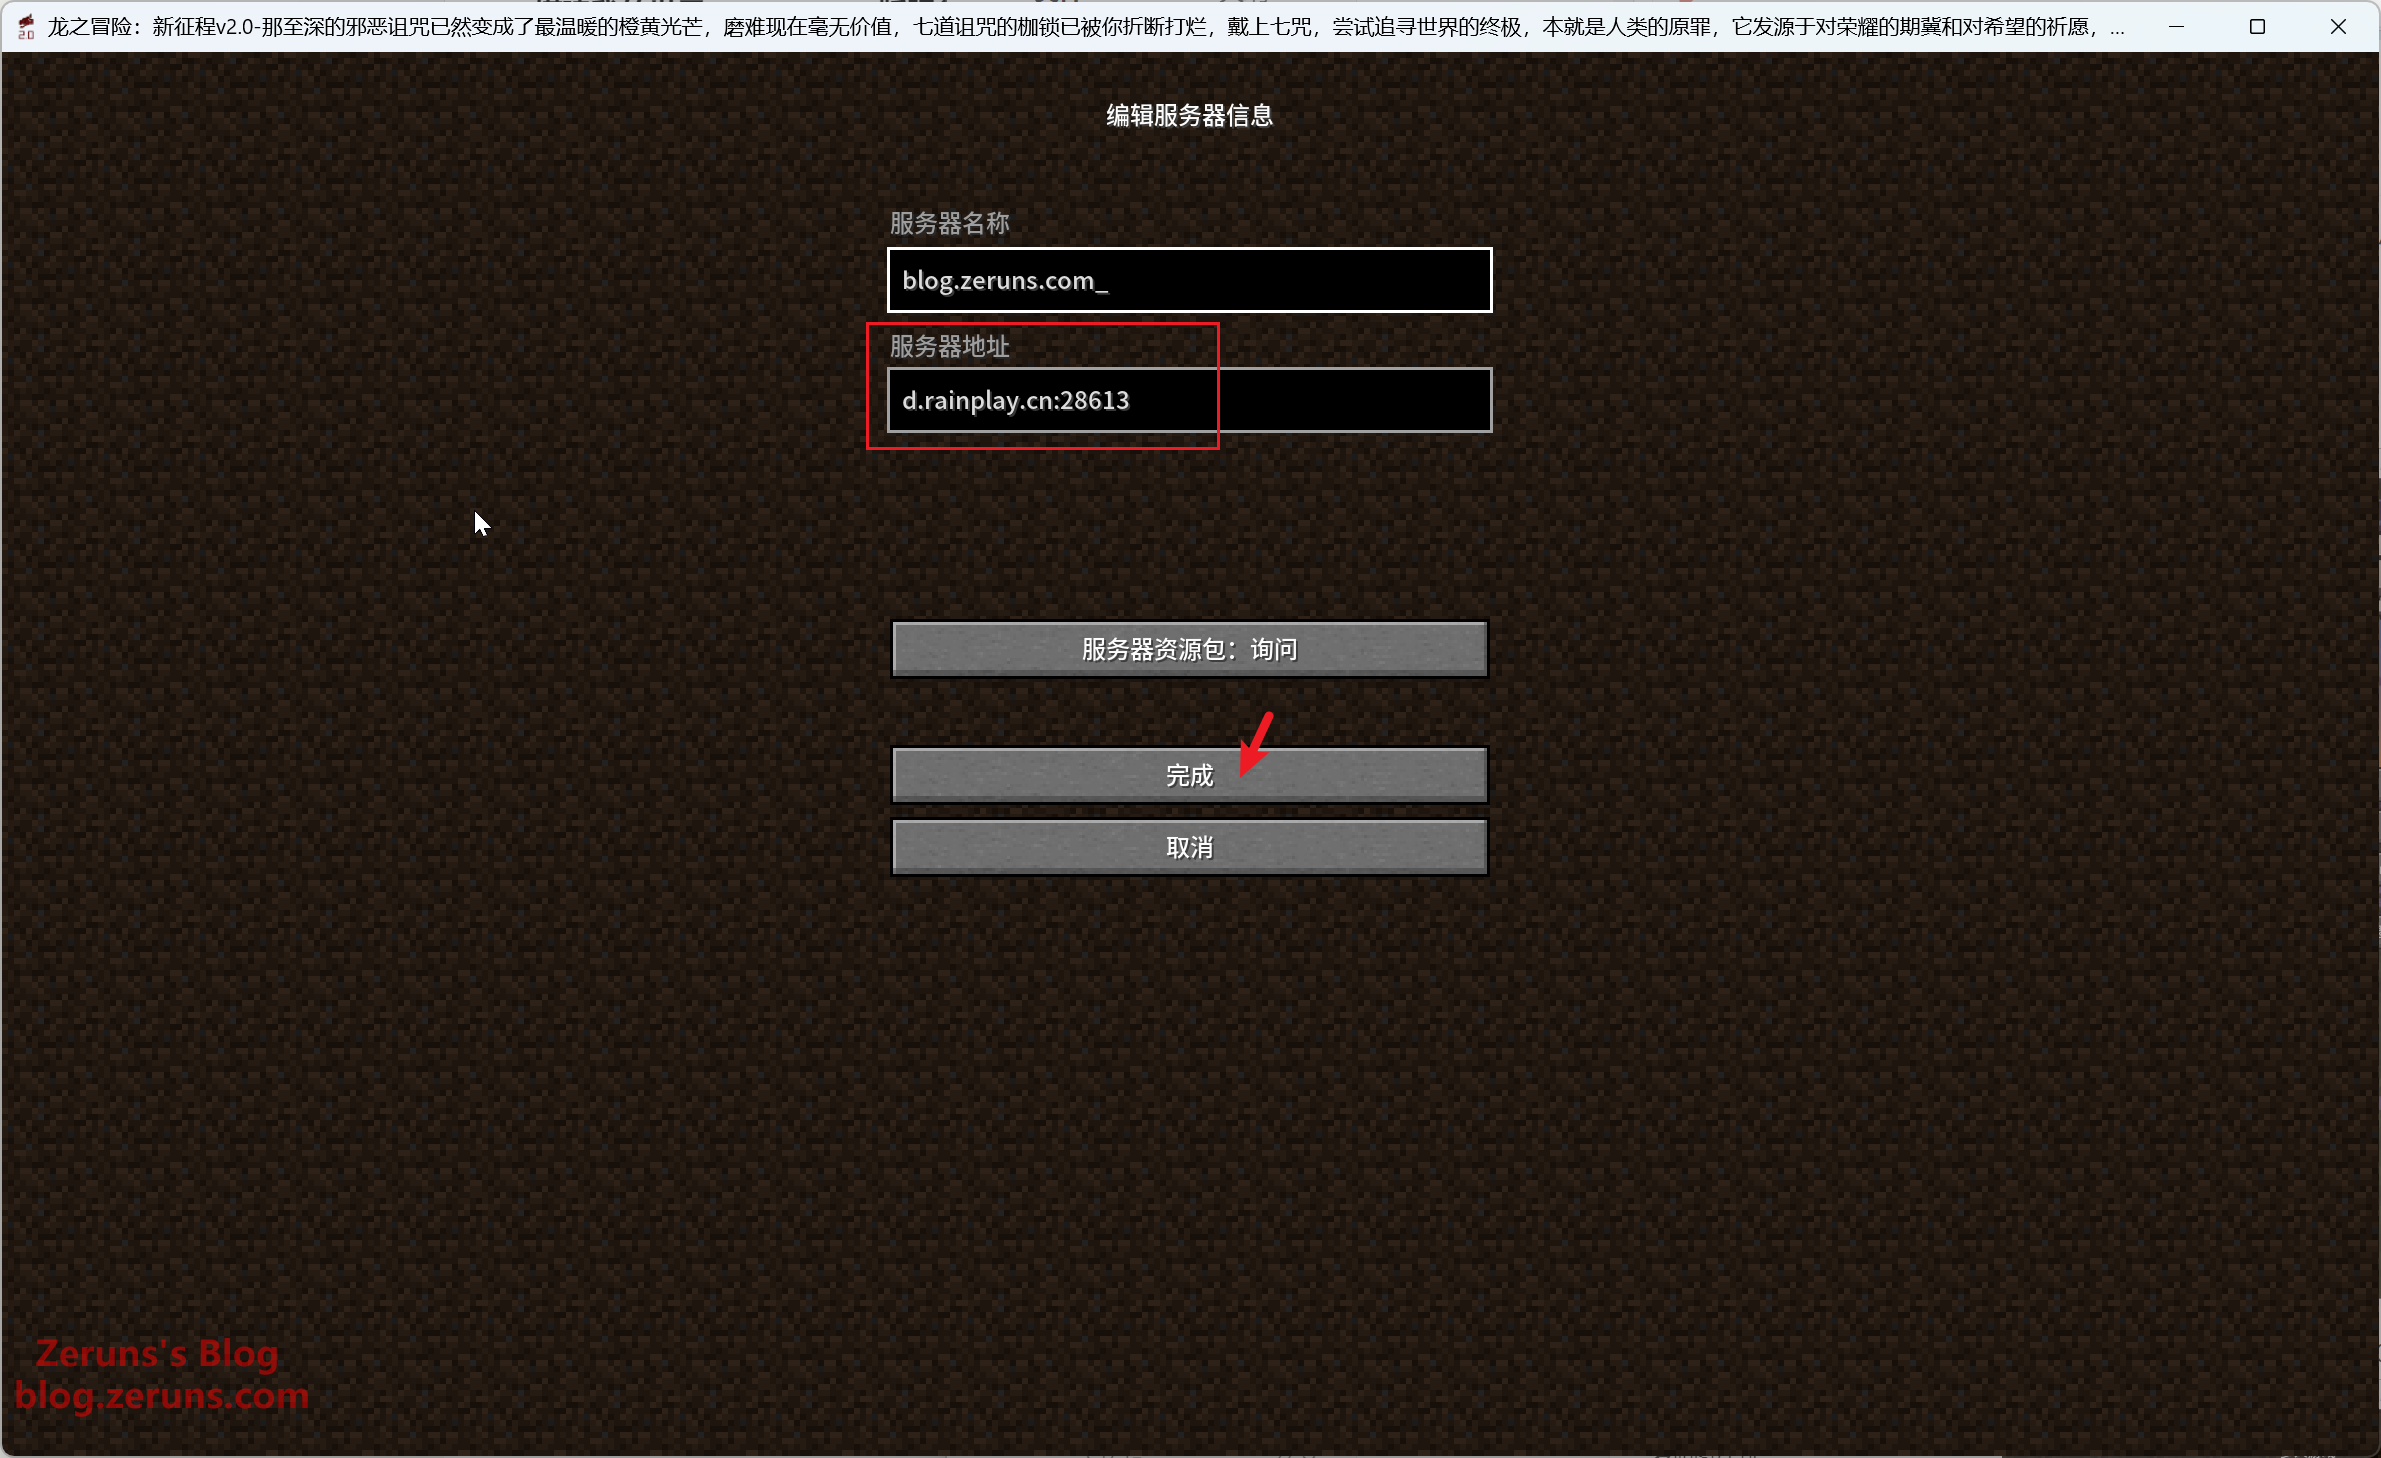
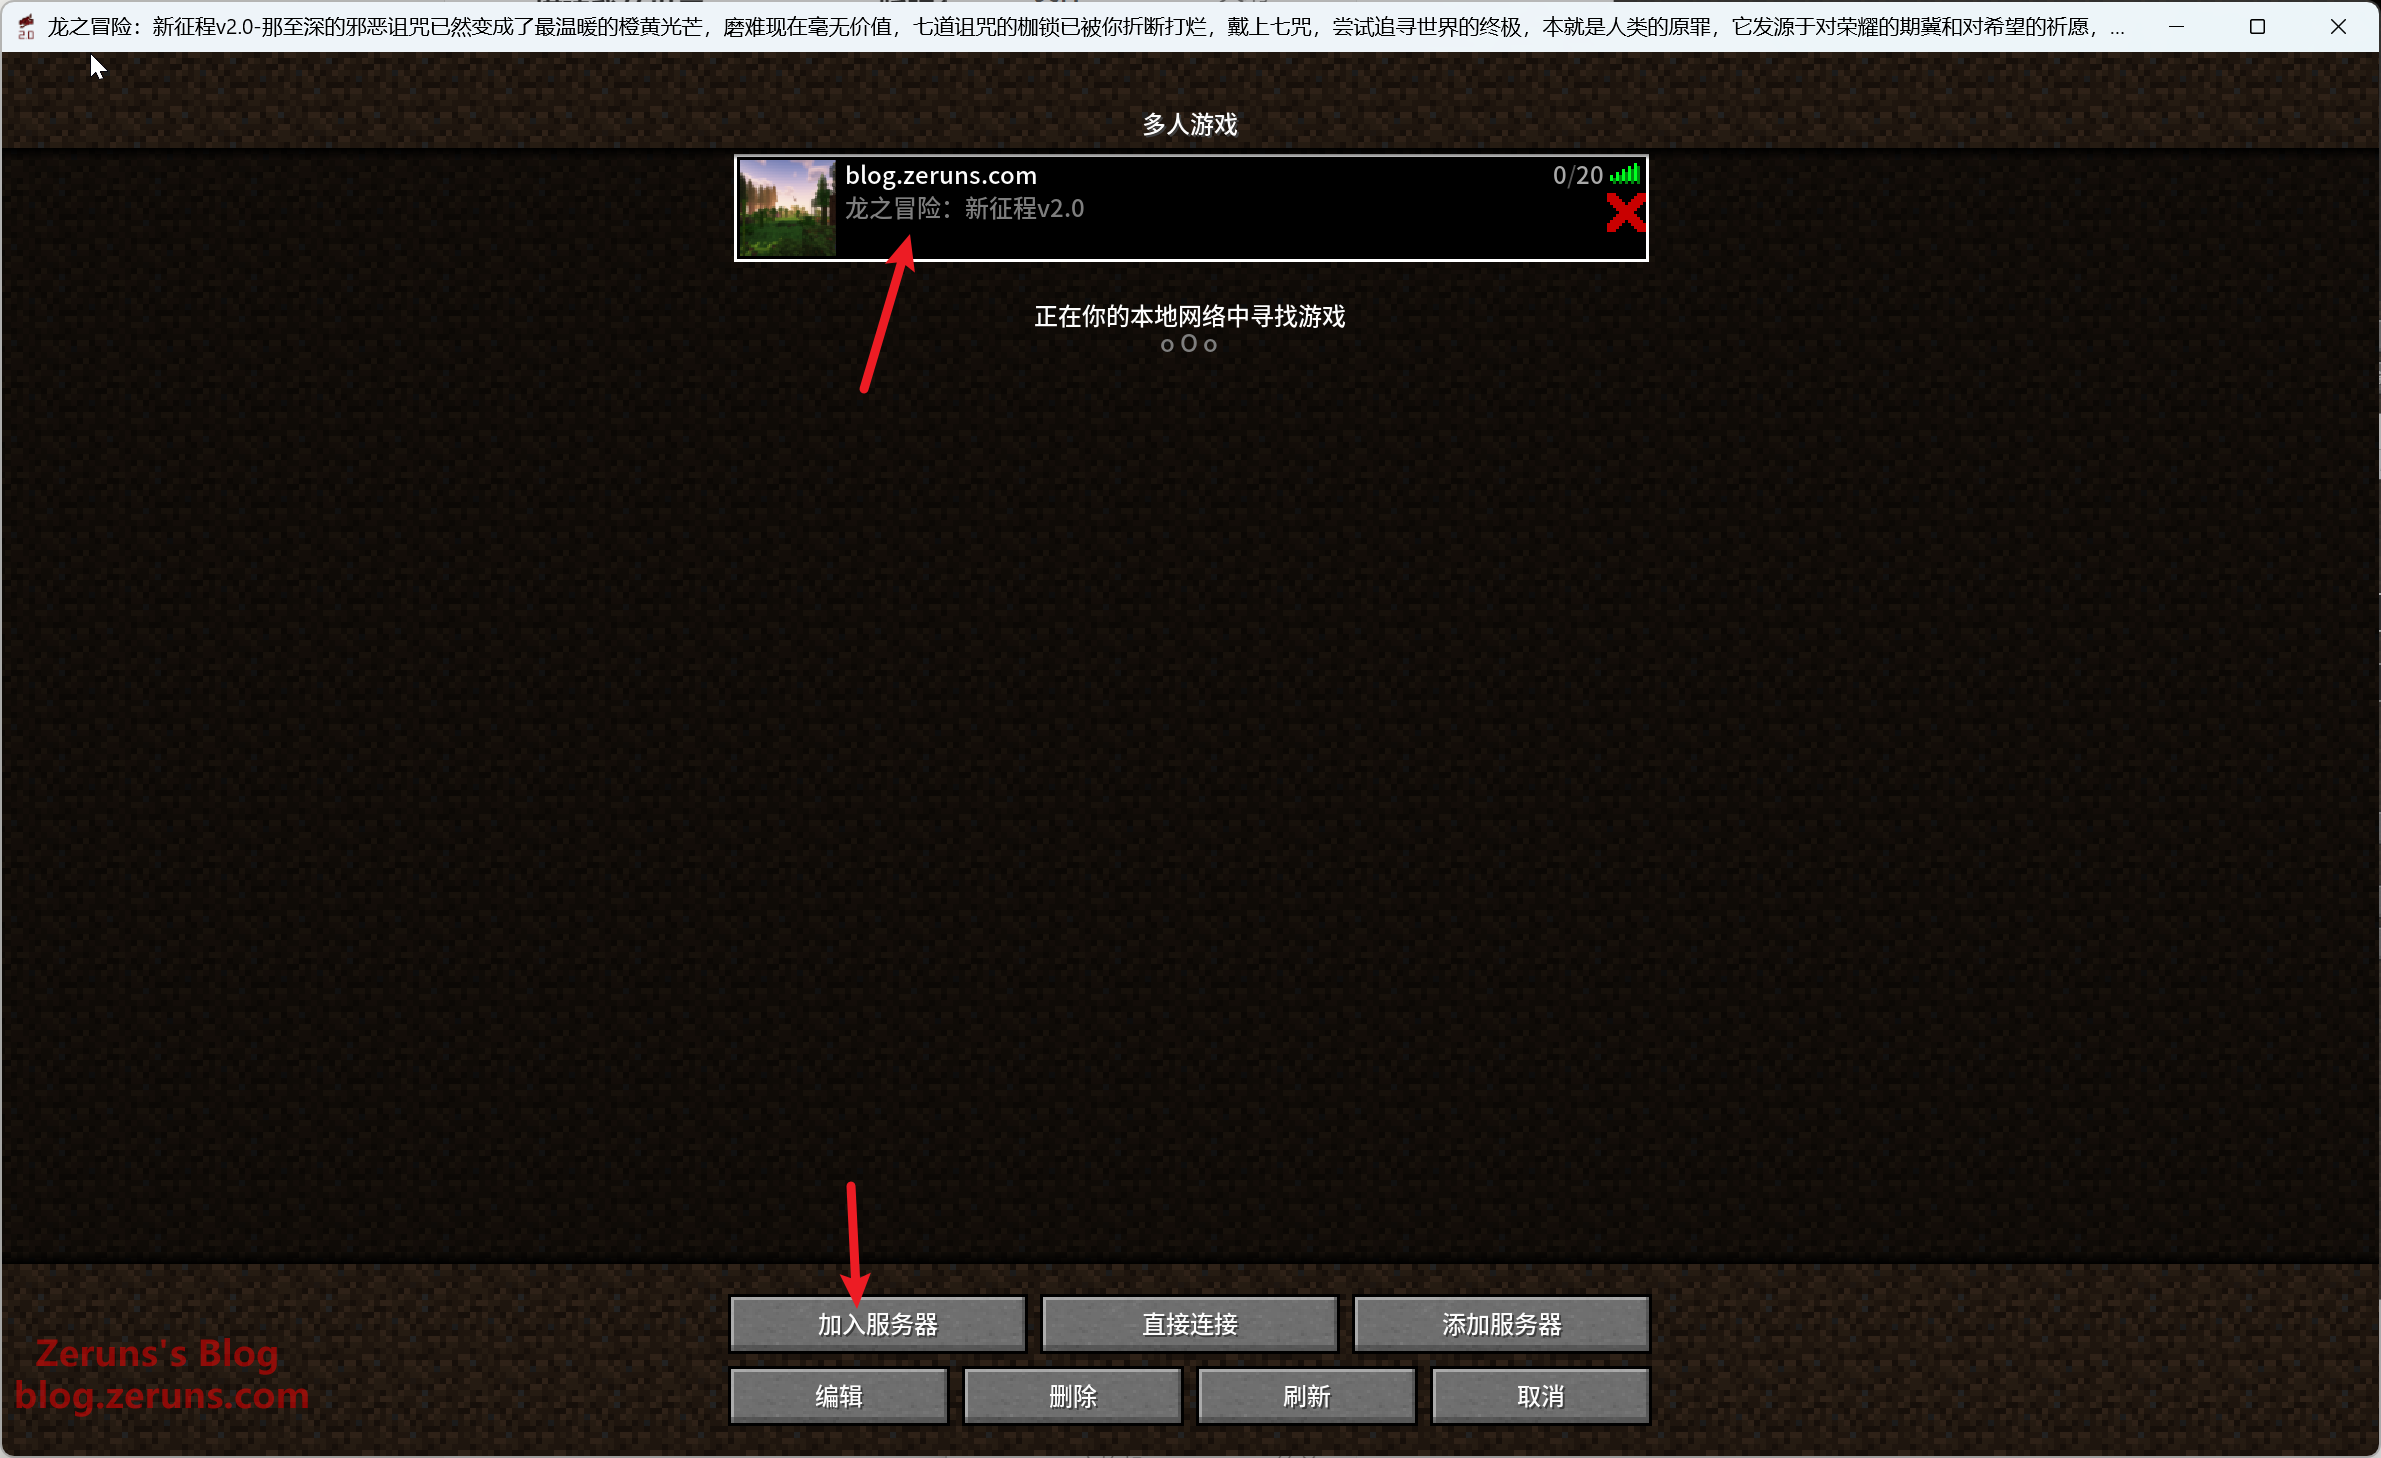
Entering the Game
In the game, click Multiplayer and then Add Server. Enter your server's public IP or domain name along with the port number. The port number is the public port mapped from the 25565 port you set earlier. Use an English colon to separate the IP and the port, as shown in the images below (do not copy my input exactly; use your actual details).
For example, mine is: d.rainplay.cn:28613

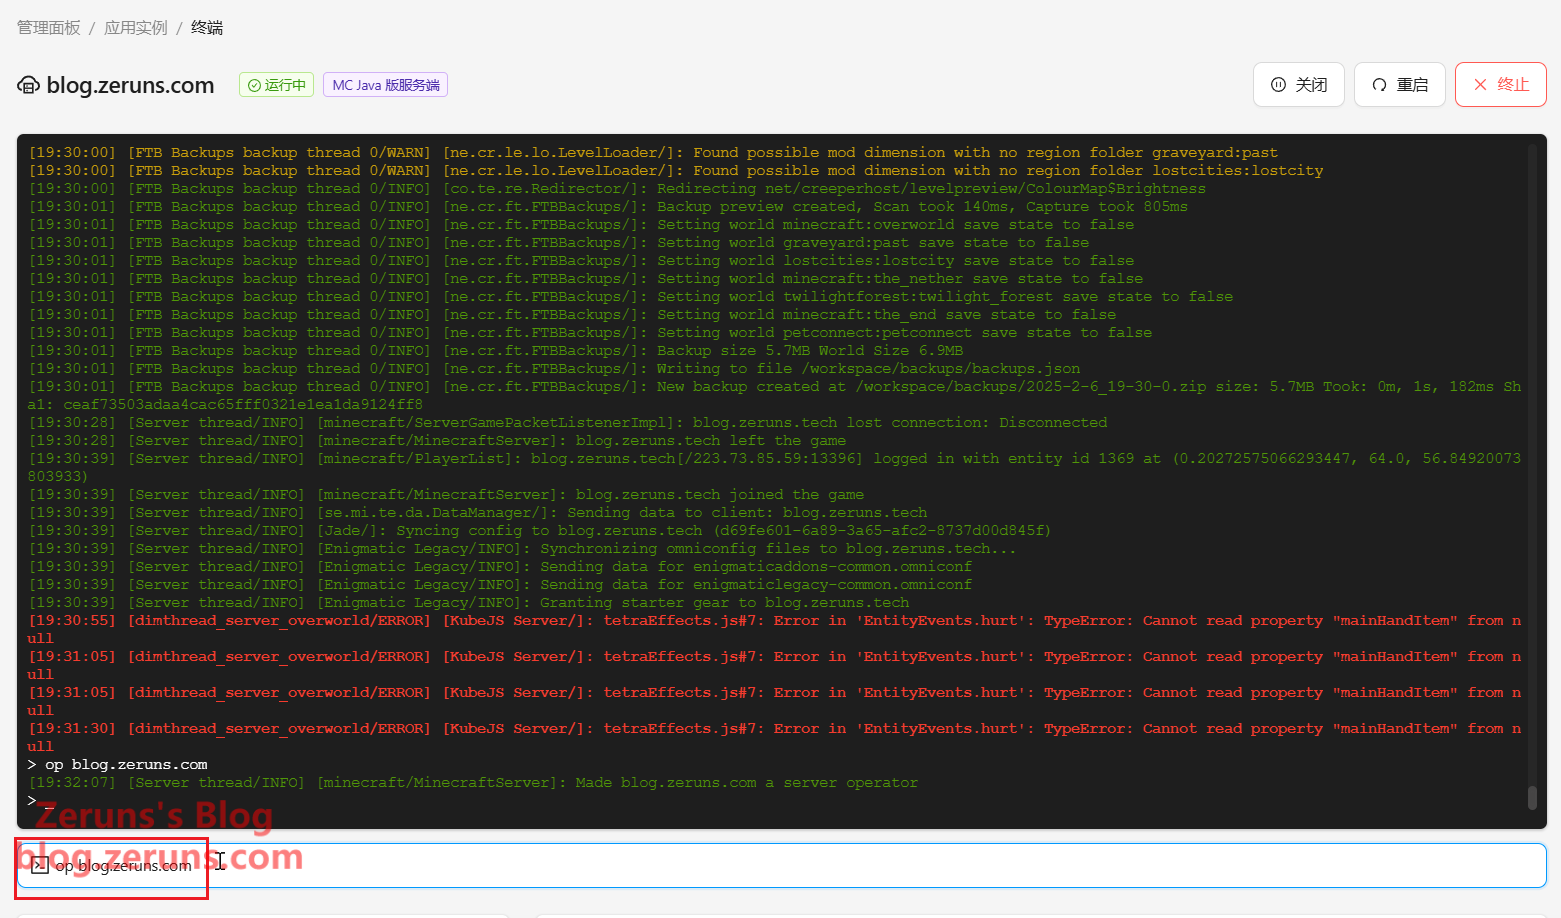
In the input box at the bottom of the MCSM panel terminal, type op [UserID] and press Enter to grant that user operator (admin) privileges.
Recommended Reading
- Highly Cost-Effective and Affordable VPS/Cloud Server Recommendations: https://blog.zeruns.com/archives/383.html
- Minecraft Server Setup Tutorial: https://blog.zeruns.com/tag/mc/
- Travel Journal and Photo Sharing for Haikou - Beijing - Macau: https://blog.zeruns.com/archives/849.html
- Apple Mac Mini M4 Mini PC Review and Teardown – The Best Single-Core Performance Mini PC: https://blog.zeruns.com/archives/851.html
- Rain Cloud Ningbo I7-14700HX Dedicated Server Review – 28 Cores, 64G, 500Mbps: https://blog.zeruns.com/archives/839.html
- Step-by-Step Guide to Setting Up a Personal Blog on a Cloud Server with Typecho: https://blog.zeruns.com/archives/749.html


Comment Section