Minecraft Bedrock Edition (BDS) Server Setup and Multiplayer Tutorial, MC Bedrock Edition Server Construction Guide, using Debian system + MCSM panel to build Minecraft Bedrock Edition server, which can be managed via web interface, convenient and easy to use.
Video Tutorial: https://www.youtube.com/watch?v=s8BanTAuOnk
Introduction
Minecraft Bedrock Edition (BDS), commonly referred to as Bedrock Edition, is a sandbox game developed by Mojang Studios. Compared to the Java Edition, the Bedrock Edition offers better optimization and compatibility, supports cross-platform multiplayer, allowing players to enjoy the game together on different devices. Bedrock Edition is available on platforms such as Windows, Android, iOS, Xbox, PlayStation, and Switch, and is one of the most popular versions of Minecraft.
Key features of Bedrock Edition include:
- Cross-platform multiplayer: Enables players to game together across different devices, breaking down platform barriers.
- Optimized performance: Compared to the Java Edition, Bedrock Edition delivers better graphics and performance.
- Simplified controls: The controls in Bedrock Edition are more straightforward, suitable for players of all ages.
Why choose Debian for server setup? Because the Linux system (Debian is one of the Linux distributions) has a smaller memory footprint (less than 500MB), leaving more memory available for the MC server, and it is very stable; whereas using Windows would consume about 1GB of memory, leaving relatively little remaining.
Next, we will provide a detailed guide on how to set up your own Minecraft Bedrock Edition server, allowing you to easily embark on your own adventure journey!
- Tutorials for setting up other versions of Minecraft servers: https://blog.zeruns.tech/tag/mc/
- Minecraft 1.21 multi-server setup tutorial, Original/Forge/Fabric/Paper/Mohist...: https://blog.zeruns.tech/archives/803.html
- Introduction to two useful panel servers, which can one-click open various MC mod packs, Phantom Parrot, Seven Days to Die, CSGO, and other servers: https://blog.zeruns.tech/archives/808.html
Minecraft Server Setup Communication QQ Group 2: 746189110
MC Server Setup Communication QQ Channel: https://pd.qq.com/s/ckmpr5e63
Minecraft Server Setup Communication TG Group: https://t.me/Minecraft_zeruns
MCSM10 Introduction
MCSManager is an open-source, distributed, one-click deployment control panel that supports Minecraft and Steam game servers.
MCSManager has gained a certain popularity within the Minecraft and other gaming communities, as it can help you centrally manage multiple physical servers, dynamically create game servers on any host, and provides a secure and reliable multi-user permission system, making it easy for you to manage multiple servers.
Official documentation for MCSM panel: https://url.zeruns.tech/FhpqL
Various installation methods and setup tutorials for MCSManager10 panel on Linux: https://blog.zeruns.tech/archives/787.html
Preparation
First, you'll need a server (skip this step if you already have one). Below are some recommended options:
- Alibaba Cloud: https://www.aliyun.com/minisite/goods?userCode=jdjc69nf
- Tencent Cloud: https://curl.qcloud.com/rbDL8jYd
- Rainyun: https://www.rainyun.com/zeruns_?s=blog-en
- Laika Cloud: https://url.vpszj.cn/lcayun
- UCloud: https://url.vpszj.cn/uc
Other VPS/server recommendations: https://blog.vpszj.cn/archives/41.html
For configurations, 4 cores and 8GB RAM is recommended. A 4-core, 8GB RAM, and 10Mbps bandwidth server can support approximately 15 concurrent players. Do not purchase servers with only 1Mbps bandwidth! 1Mbps is suitable for one or two players at most. At least 5Mbps is recommended!
In this guide, I'm using a Beishao Cloud Henan 8272CL server. This provider offers good cost-performance ratios and is a relatively reliable small-scale service provider with an IDC license.
Performance review of Beishao Cloud Henan 8272CL Gaming Cloud Server: https://blog.vpszj.cn/archives/2150.html
Beishao Cloud discounted registration link: https://url.vpszj.cn/beishaoidc
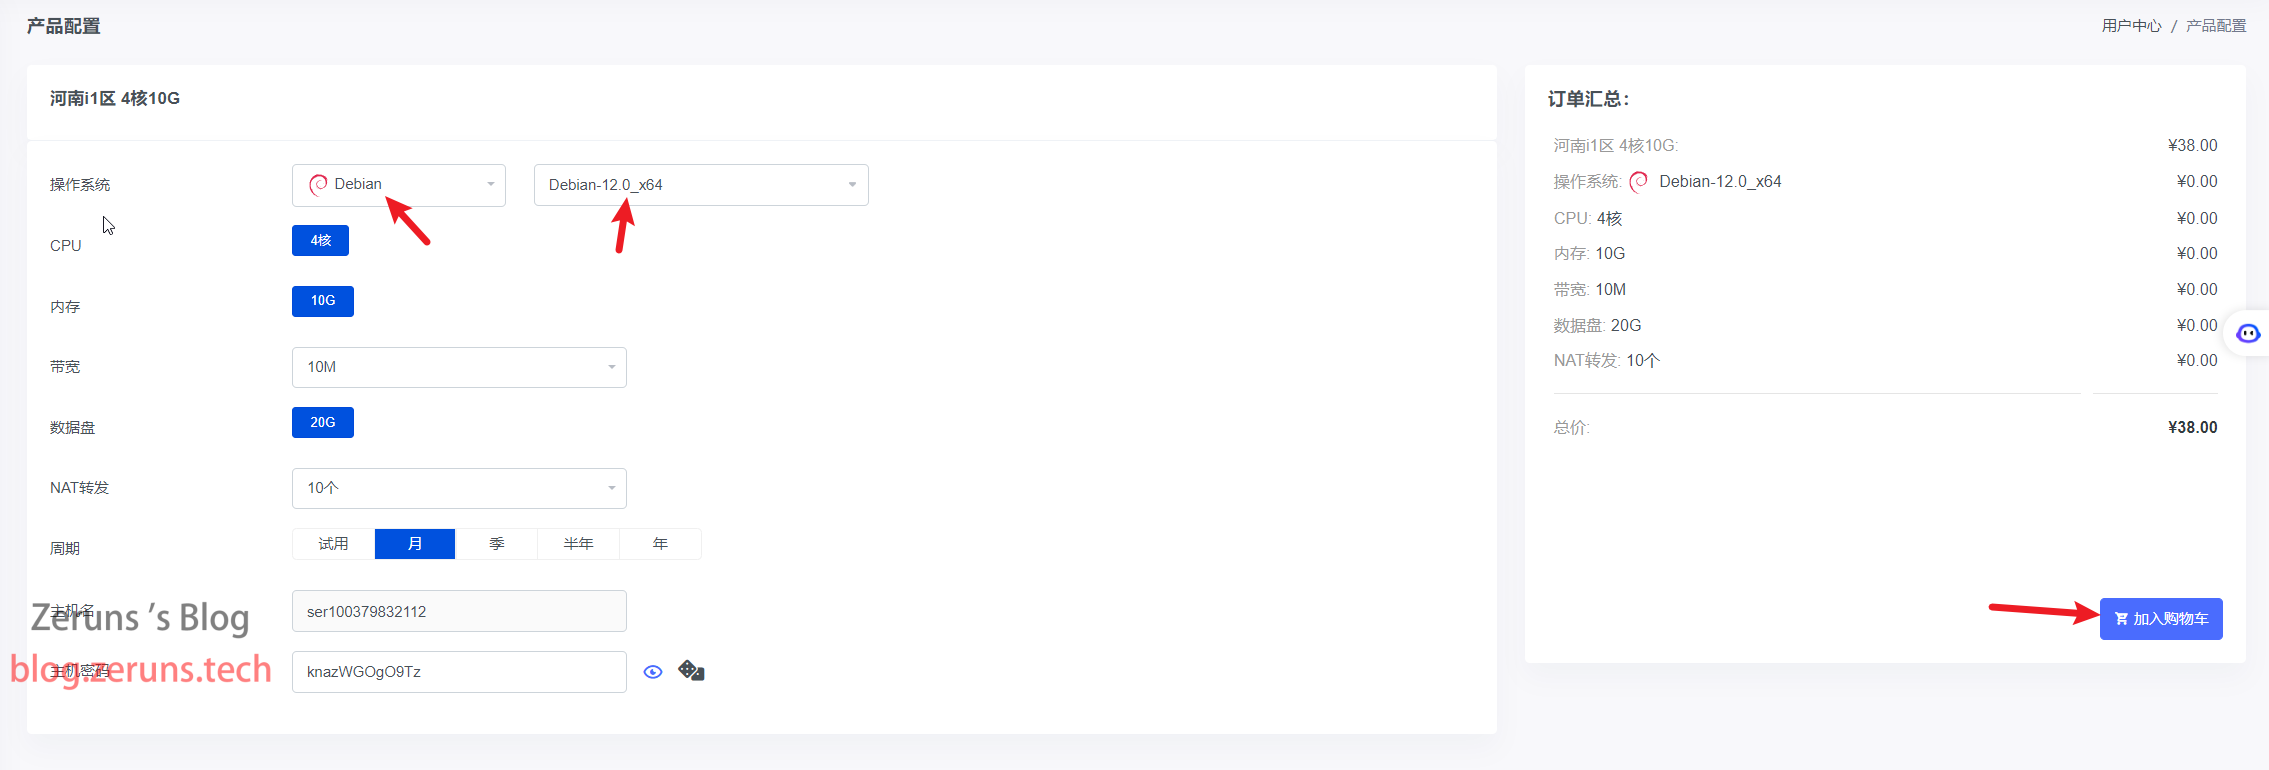
After registering, go to Order Products → NAT Game Cloud → Henan Platinum 8272CL, and select the 4-core 10GB RAM option. Then click Buy Now.

Choose Debian 12 or Debian 11 as the operating system, and click Add to Cart.
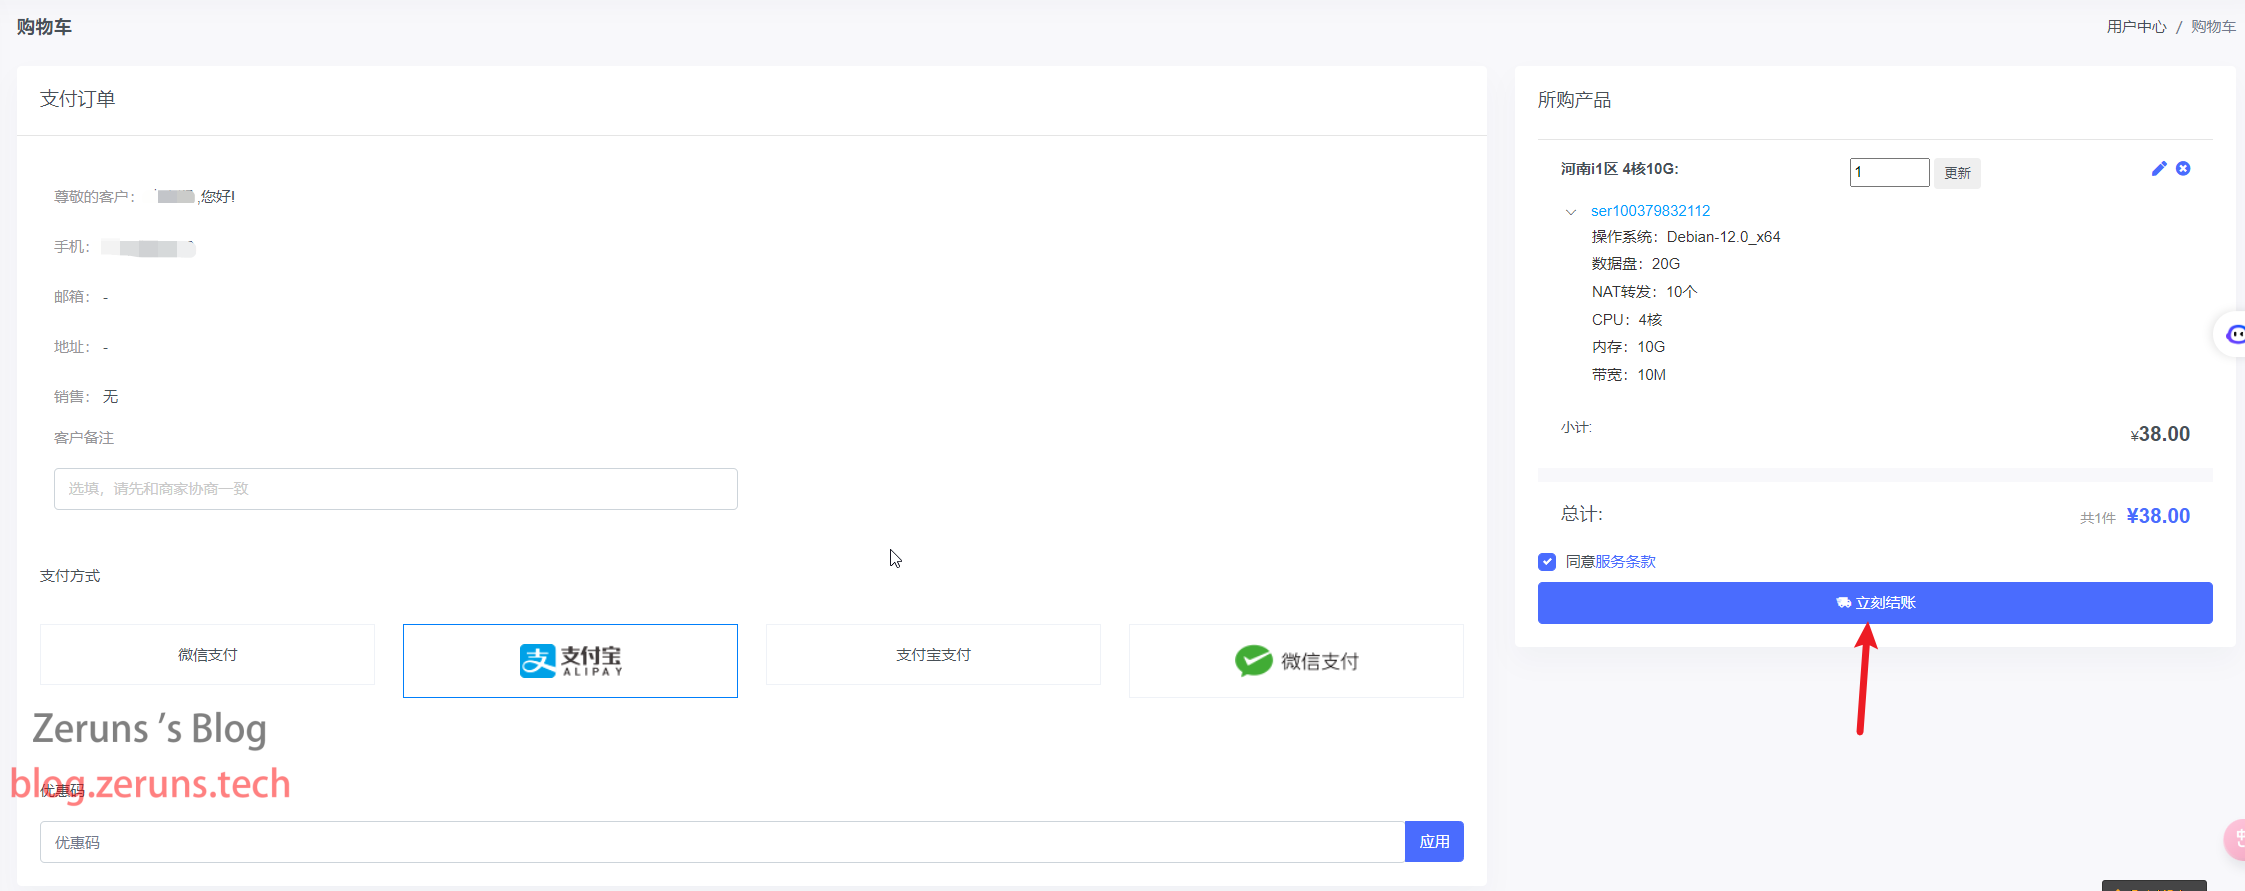
Next, proceed to Checkout.
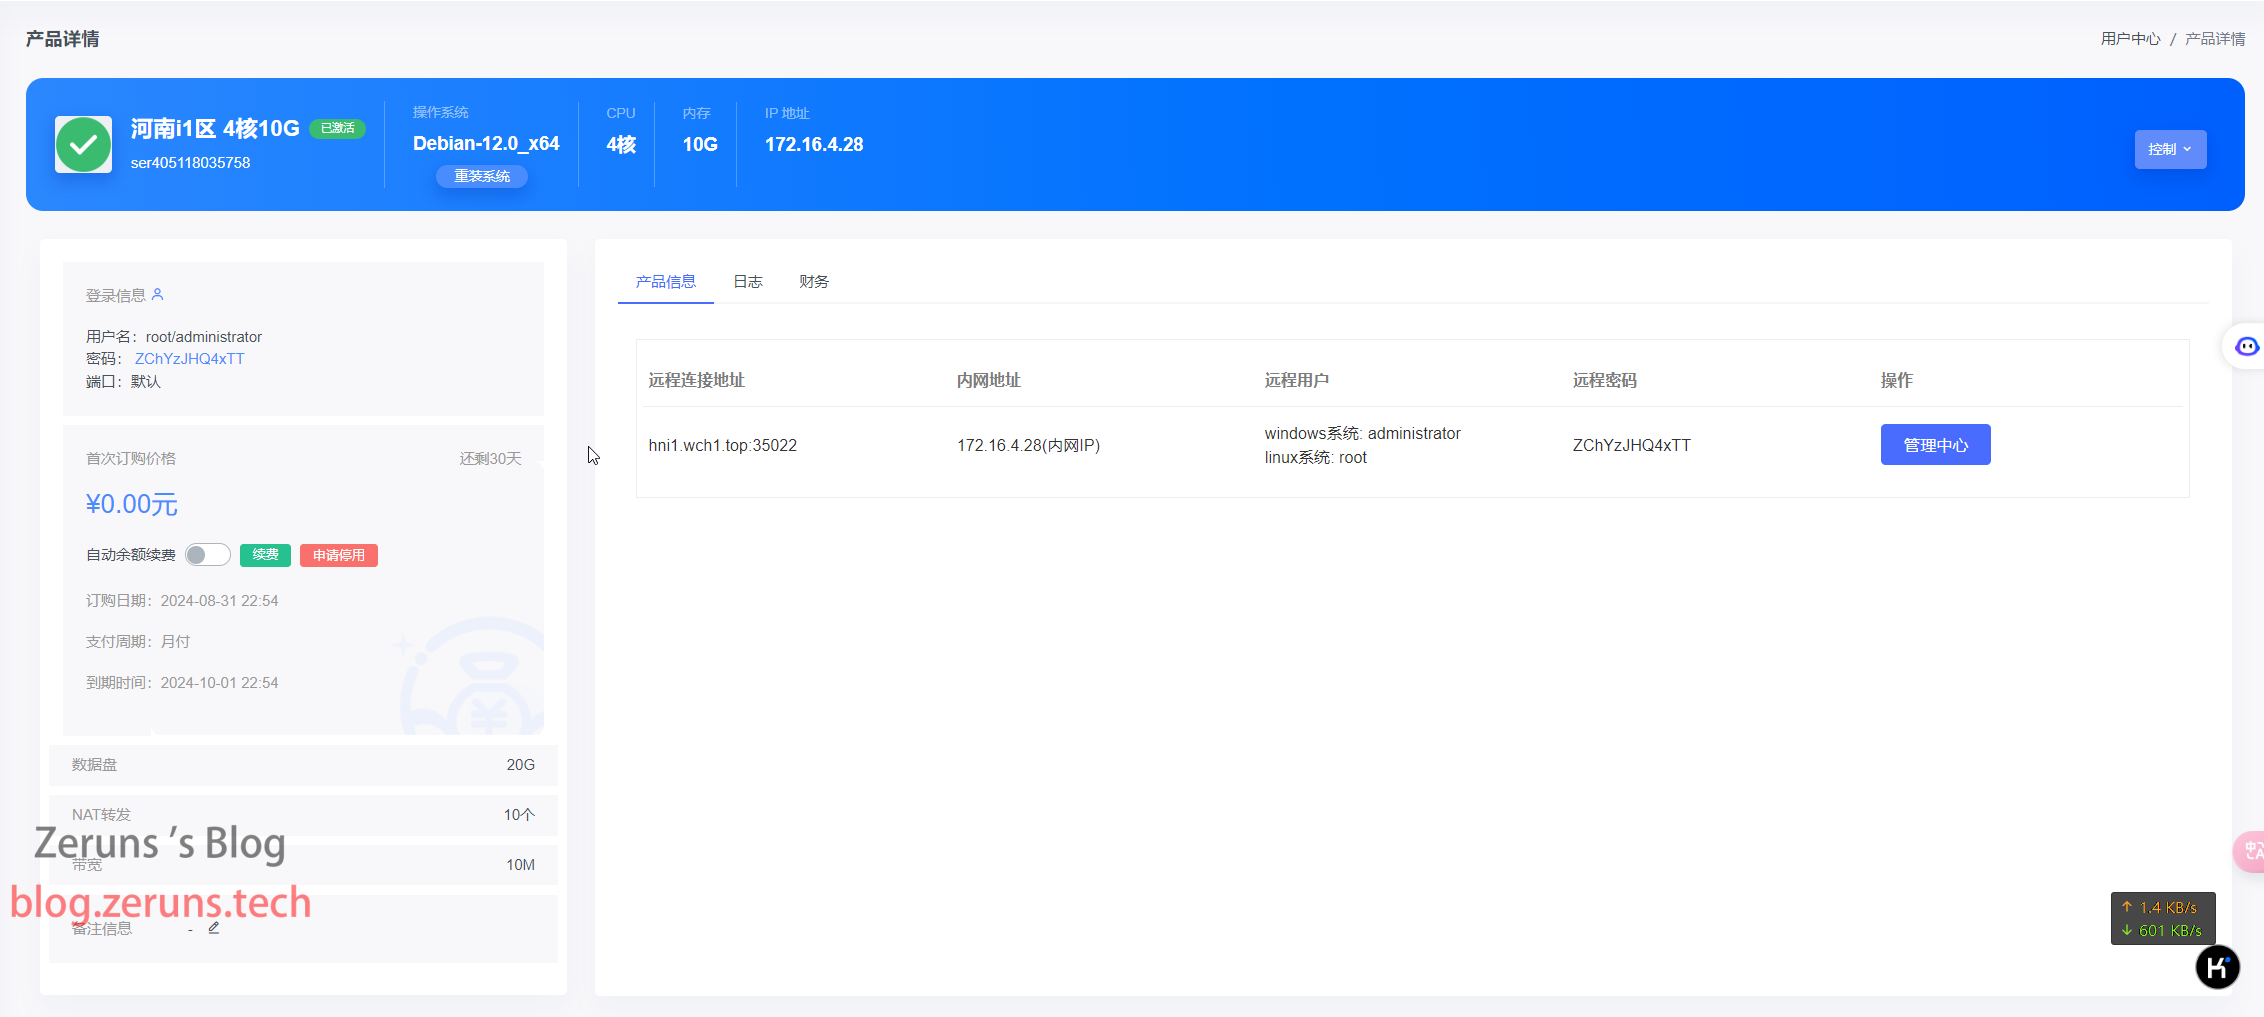
In the control panel under Game Cloud, locate your server and click on it.

You will now see all the server details and control options.
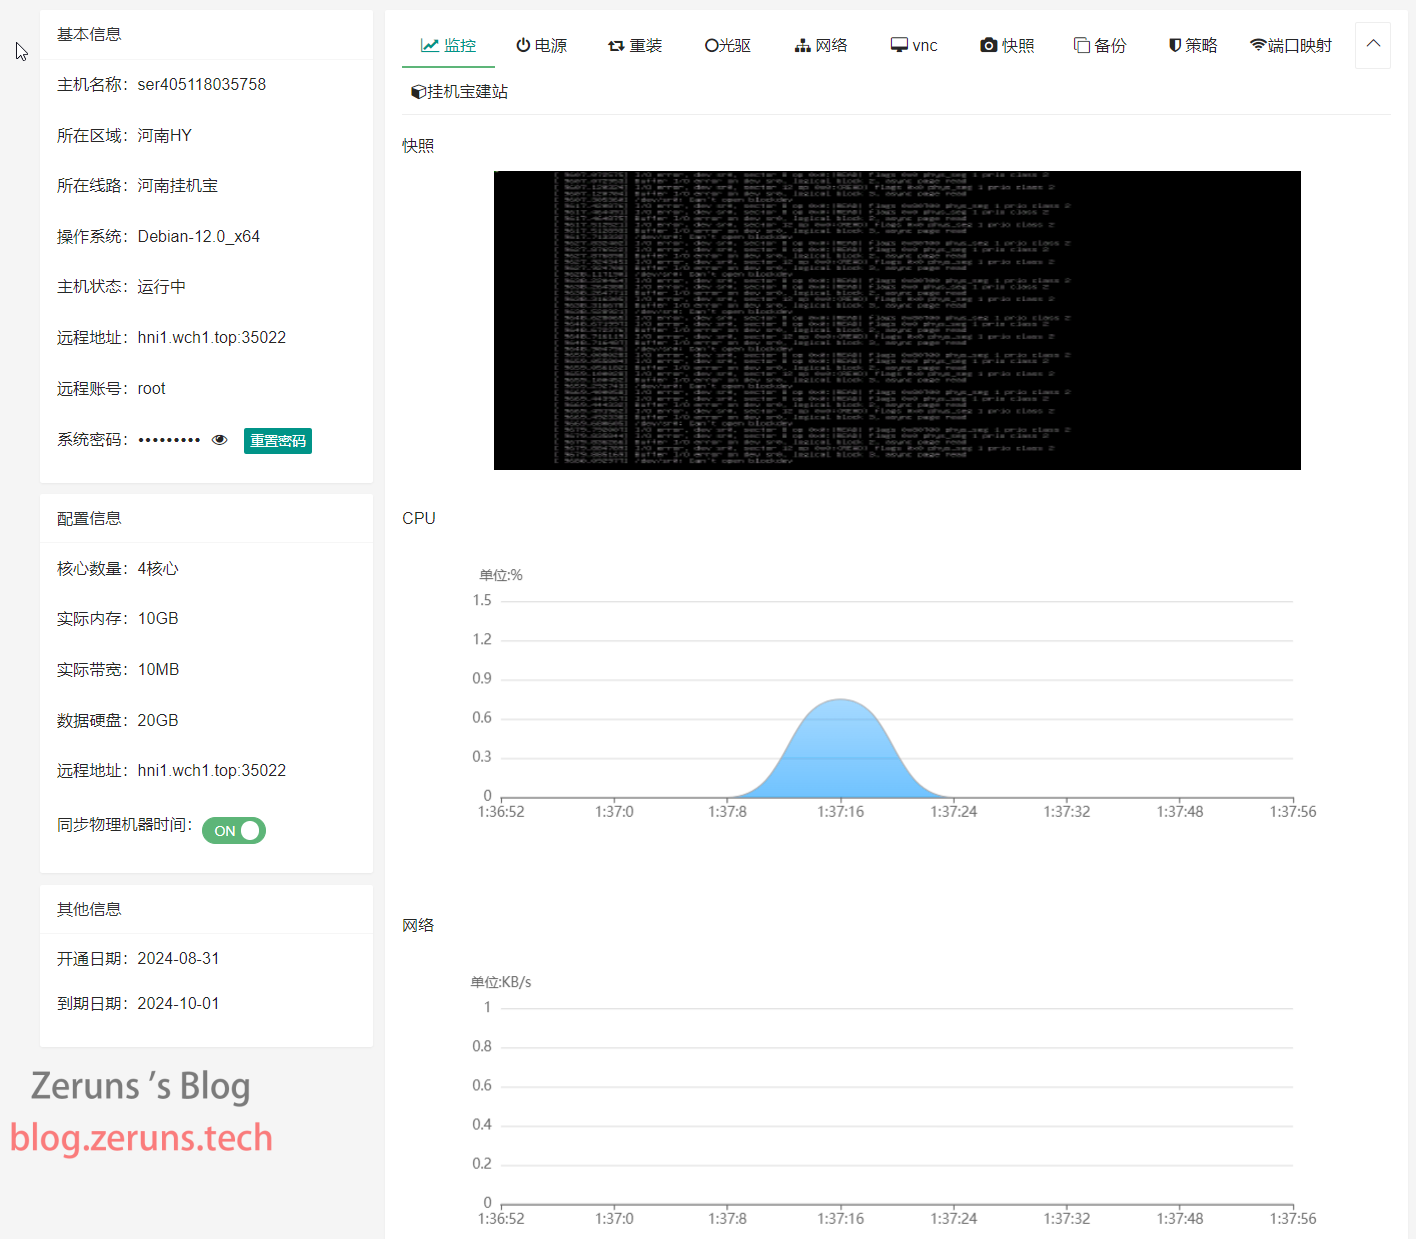
By clicking Management Center, you'll find more information and additional server control options.
Configure Port Mapping
Since this server uses a NAT network without a dedicated public IP address, you'll need to set up port mapping to forward internal network ports to a shared public IP address. If your server has a dedicated public IP, you can skip this step and simply allow the required ports through the firewall or security group settings.
In the server management center, locate the Port Mapping option and click Add Port Mapping. Enter any number as the public port, select a random option from the dropdown menu, and assign a service name (this can also be arbitrary). Here, we'll first configure the port required for the MCSM panel management page. For the internal port, enter 23333.
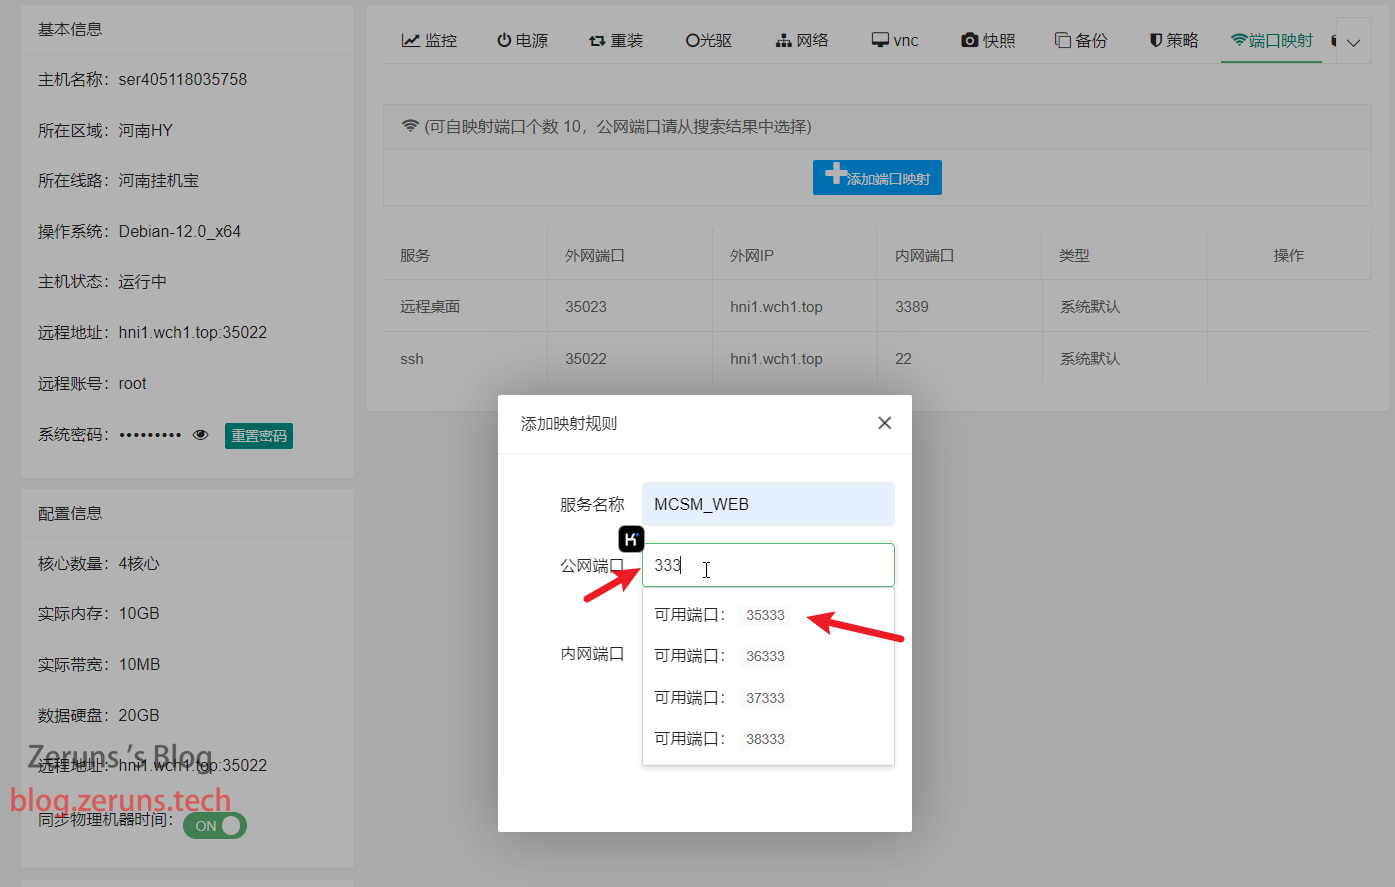
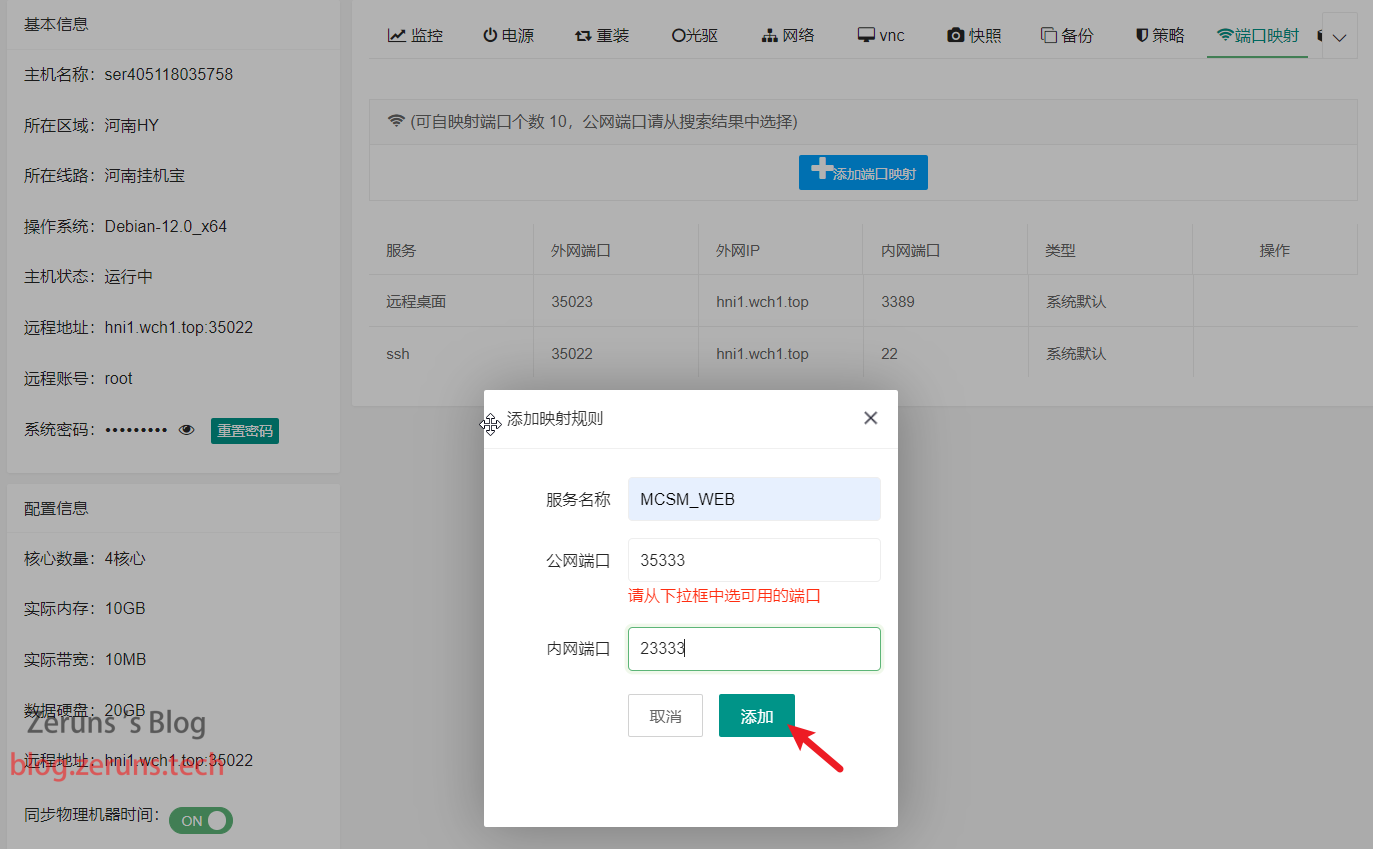
Repeat these steps to map the 24444 port, which is required for the MCSM panel's Daemon service.
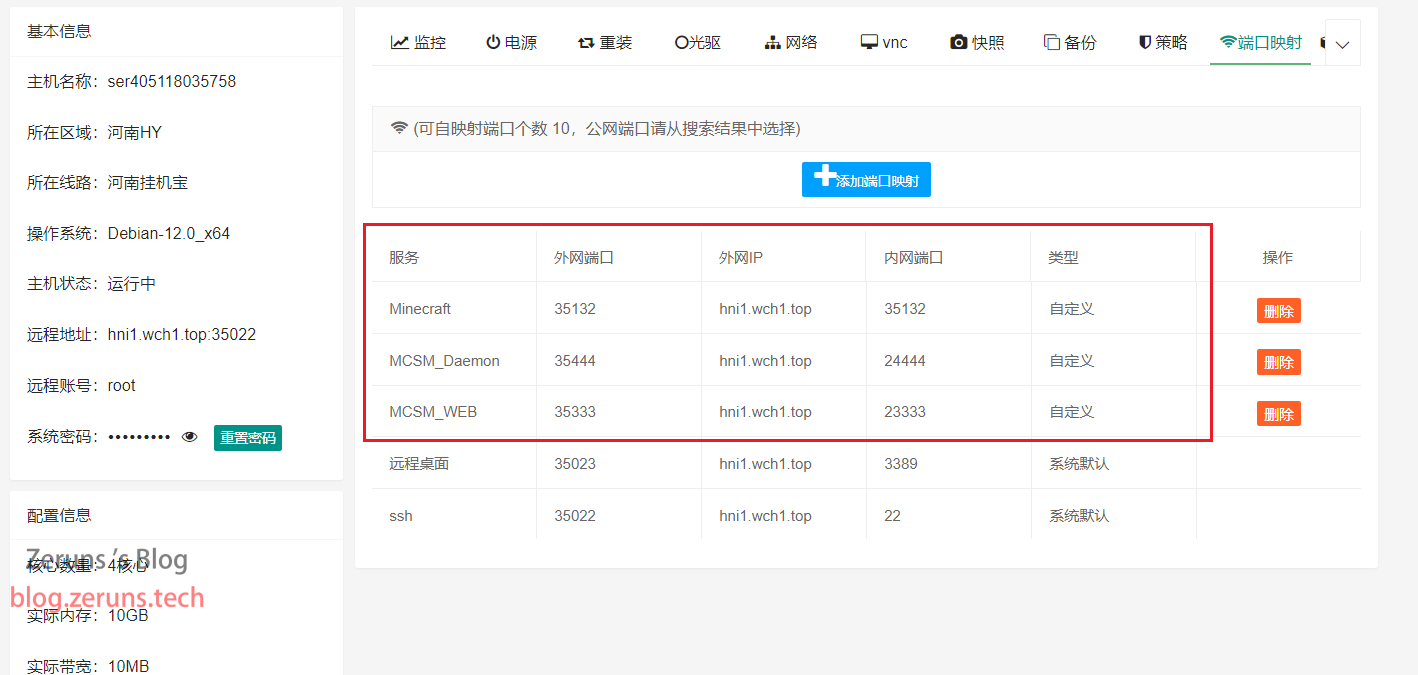
Next, map the ports for the Minecraft server. For Minecraft Bedrock Edition, it's best to use the same number for both public and internal ports. In other words, the number you assign as the public port should match the internal port.
The default port for Bedrock Edition servers is 19132. Later, you'll need to edit the server's configuration file to use the port number you set during port mapping. For servers with a dedicated public IP, you can simply use the default port.
Once the port mapping is complete, your configuration should look like the image below. These details will be needed later.
Connect to the Server
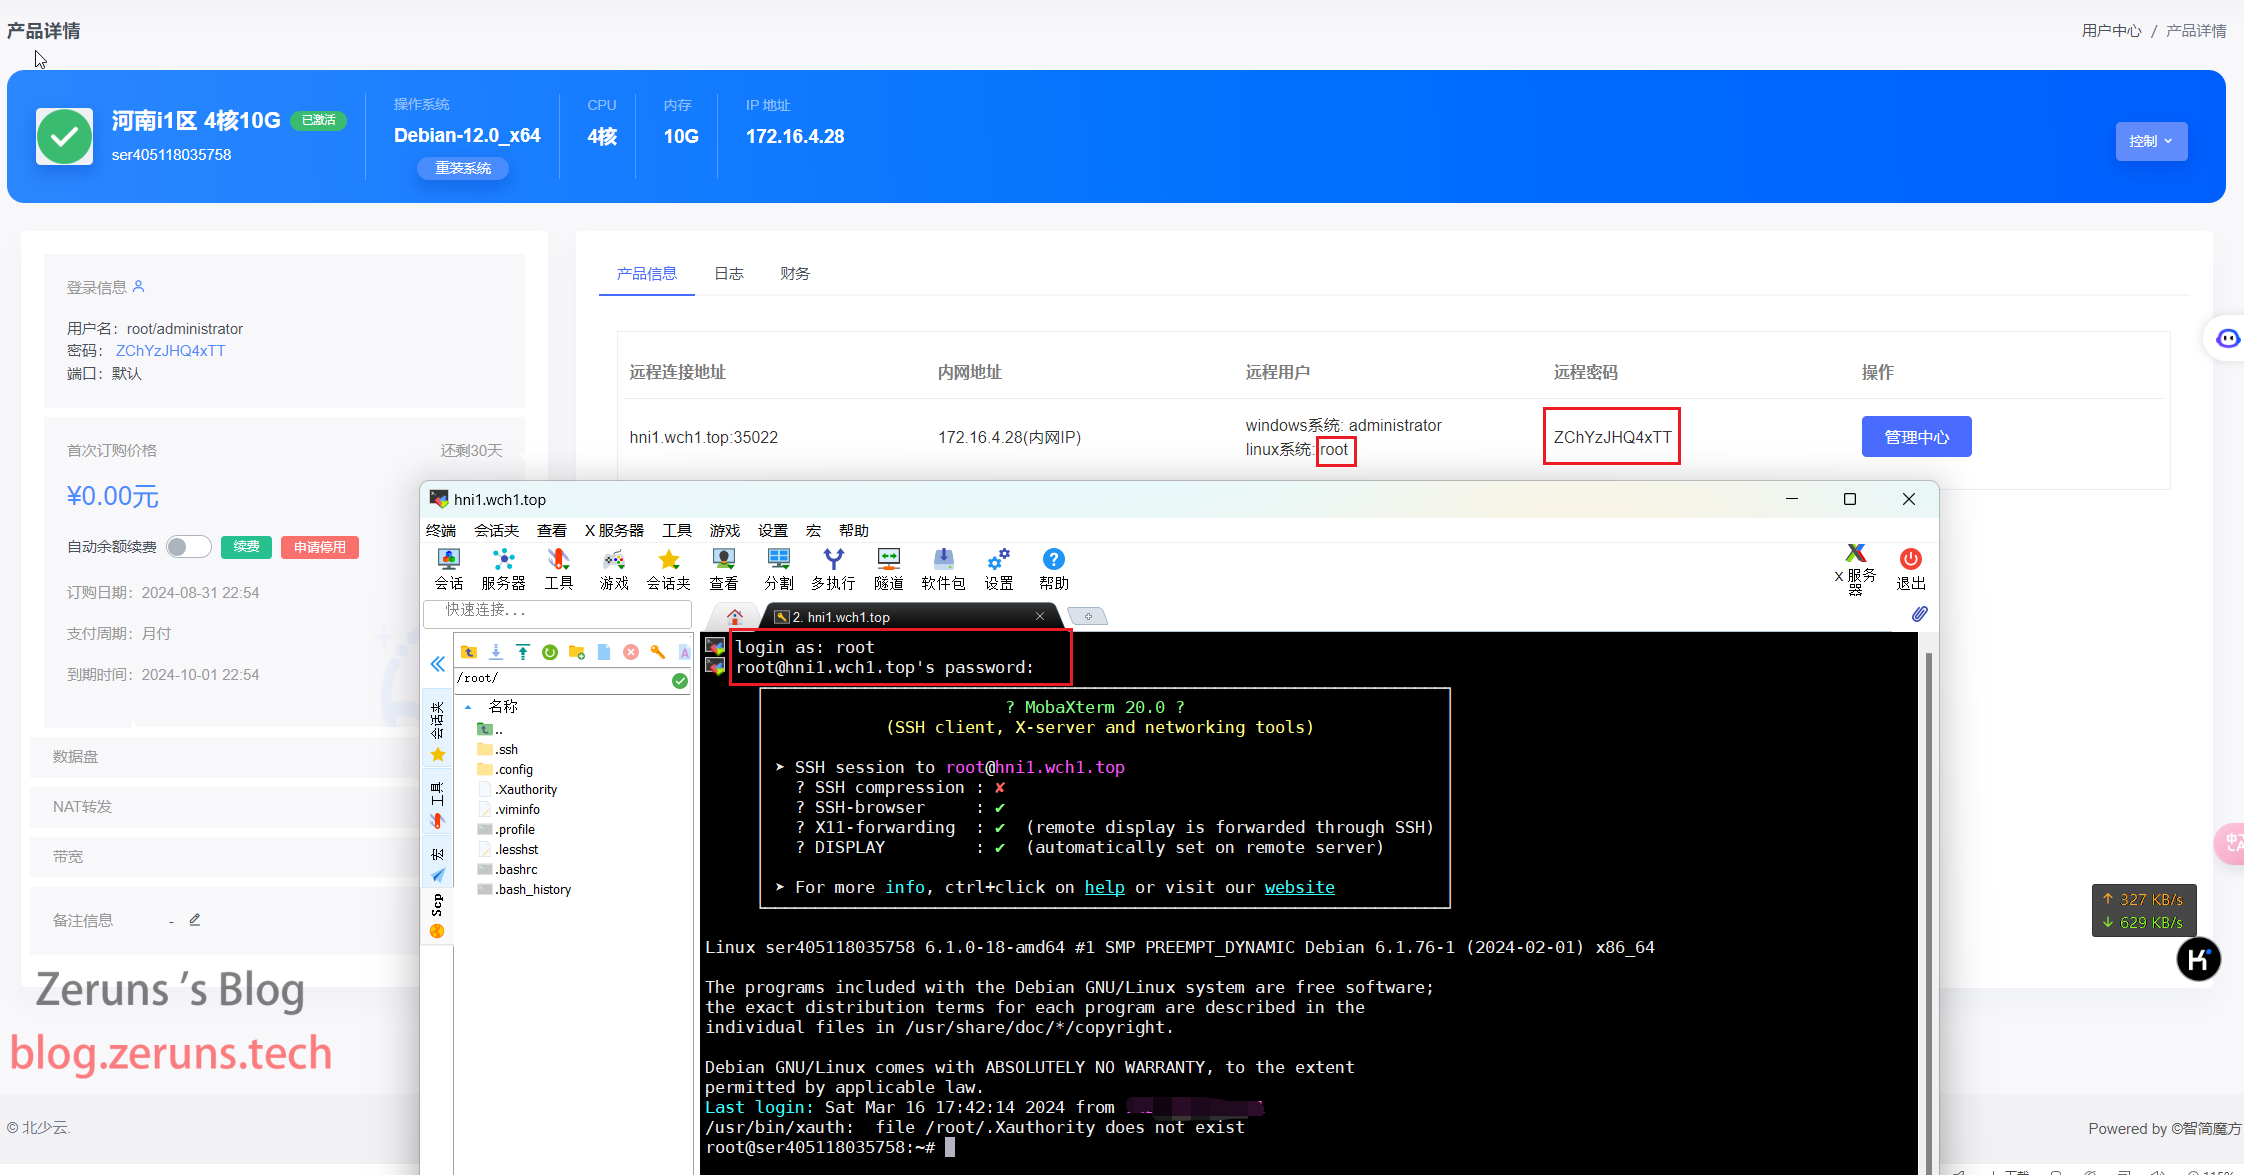
Download and open an SSH client. Recommended SSH clients include PuTTY or MobaXterm.
SSH client download link: https://www.123pan.com/ps/2Y9Djv-UAtvH.html
Here, we'll use MobaXterm. In the SSH client, enter your server's public IP address or domain name, along with the SSH port.
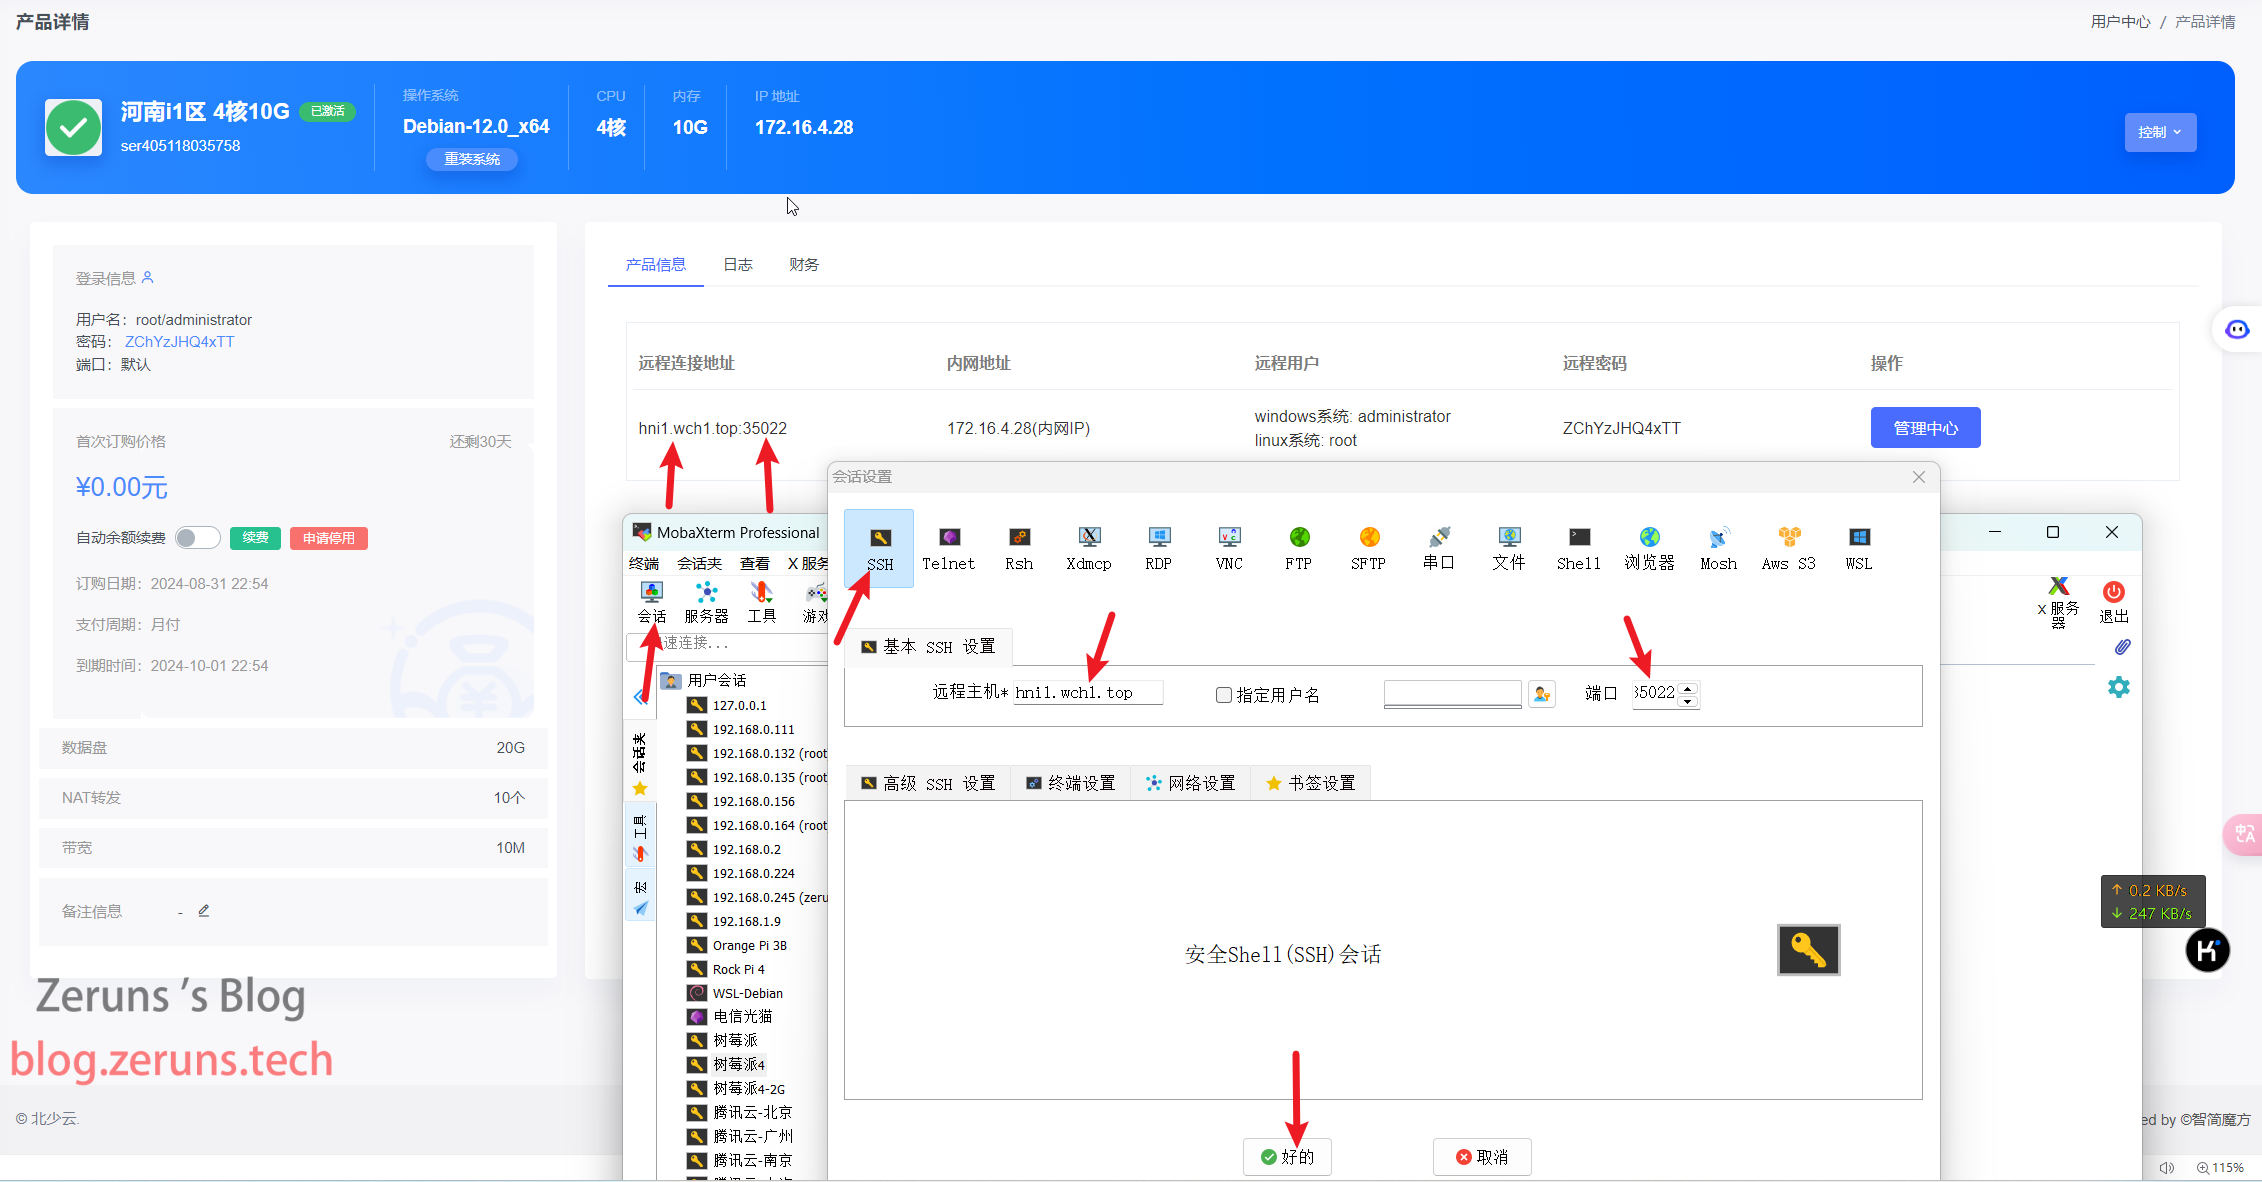
Next, enter the username and press Enter. The username is typically root by default. Then, type your password and press Enter to confirm. Note that the password won't be visible while typing.
Tip:
In the SSH terminal, you can copy text by holding the left mouse button to select it, releasing the button, and then clicking anywhere blank. Paste by right-clicking in the SSH terminal. (This applies to MobaXterm; other software may differ.)
Install MCSM Panel
One-click Installation Script
Execute the following two commands, and if prompted to continue, input y to confirm.
Enter the following command in the SSH terminal and press Enter to run. The one-click installation script must be run with root privileges.
wget -qO- https://script.mcsmanager.com/setup_cn.sh | bash
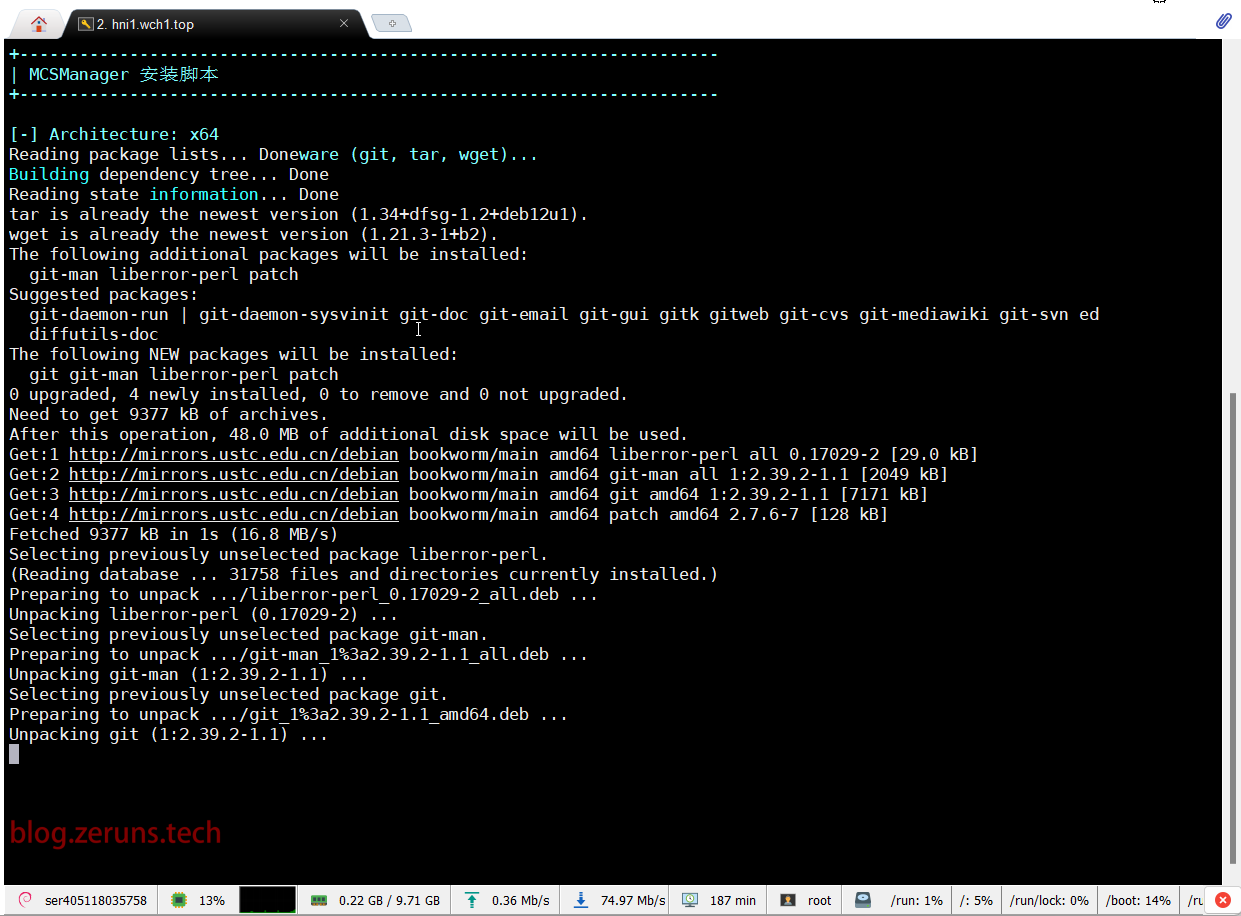
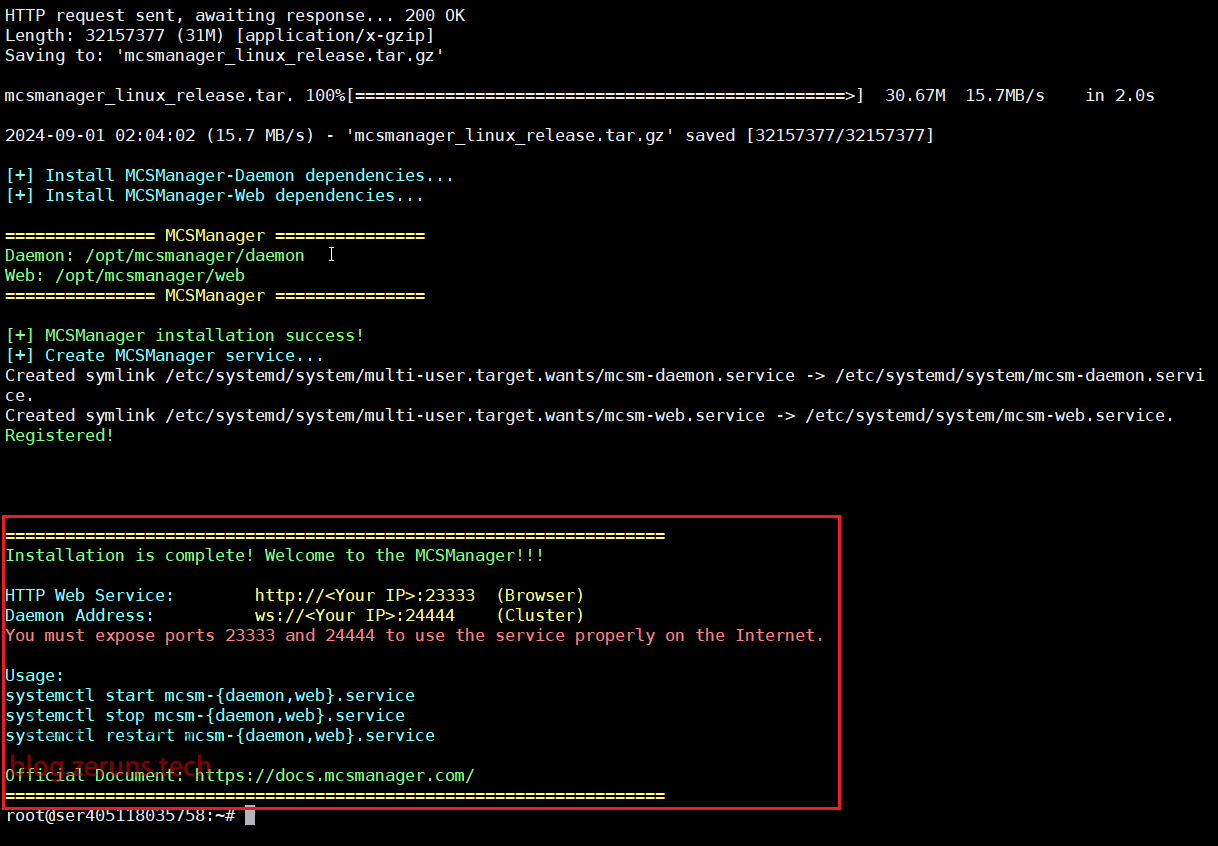
The following information will appear upon completion of the installation.
Startup Method
Generally, the installation script will automatically start the panel and enable auto-start on boot. The following commands do not need to be executed.
# First, start the panel daemon process.
# This is a service process for process control and terminal management.
systemctl start mcsm-daemon.service
# Then start the panel Web service.
# This service is used to support web access and user management.
systemctl start mcsm-web.service
# Restart panel commands
systemctl restart mcsm-daemon.service
systemctl restart mcsm-web.service
# Stop panel commands
systemctl stop mcsm-web.service
systemctl stop mcsm-daemon.service
# Commands to enable panel auto-start on boot
systemctl enable mcsm-web.service
systemctl enable mcsm-daemon.service
# Commands to disable panel auto-start on boot
systemctl disable mcsm-web.service
systemctl disable mcsm-daemon.service
If the installation fails, you can follow this tutorial for manual installation: https://blog.zeruns.tech/archives/787.html
After installation, visit http://your_server_ip_or_domain:23333/ to access the panel.
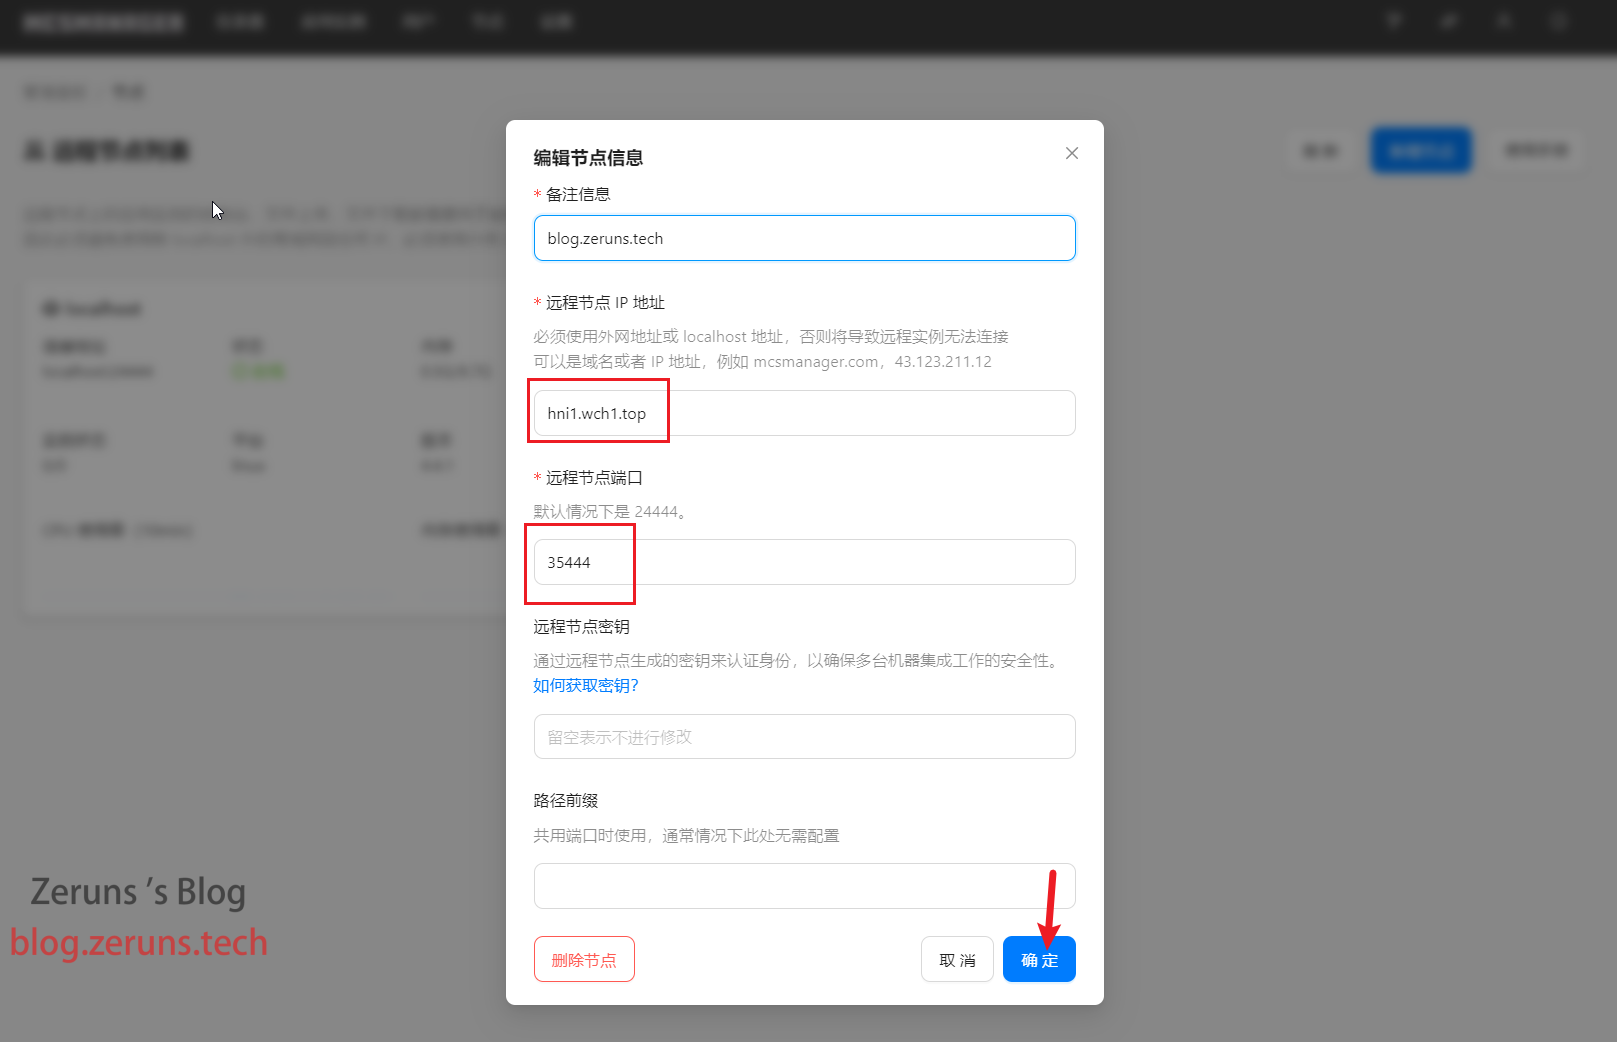
Since my server does not have a dedicated public IP, the port 23333 in the above address needs to be replaced with your mapped public port. In my case, the public port mapped from 23333 is 35333, which varies for each person, so do not copy mine directly.
Therefore, the final panel access address is: http://hni1.wch1.top:35333. Yours may be different, adjust accordingly.
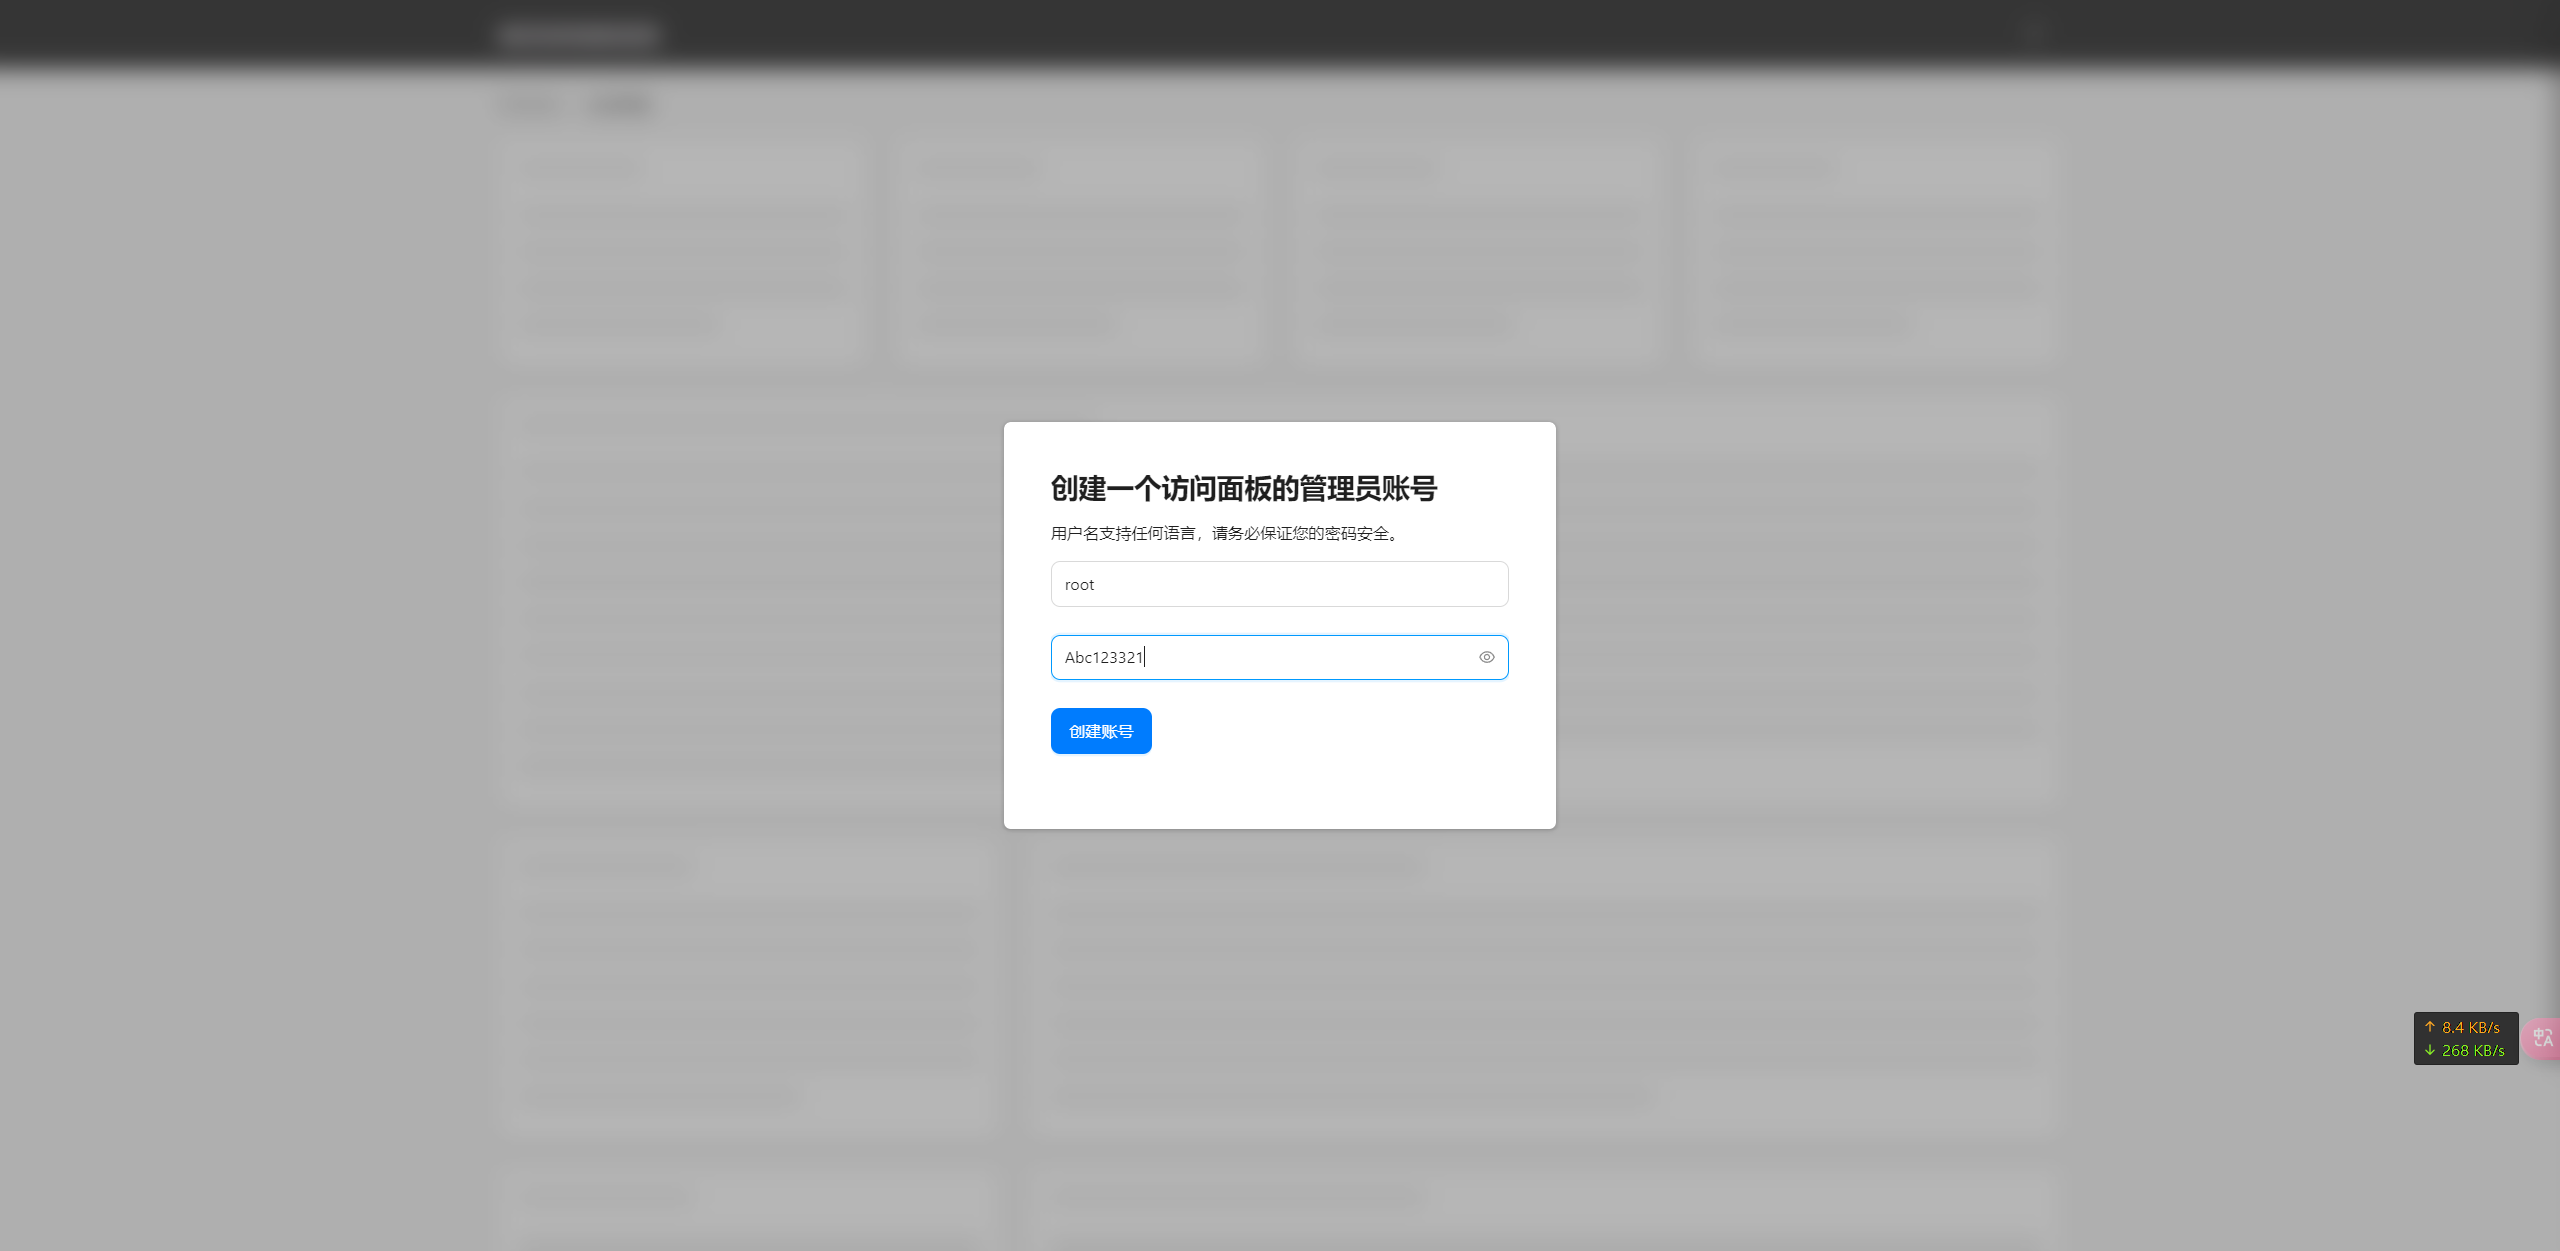
After entering the panel, follow the prompts to set up your own username and password.
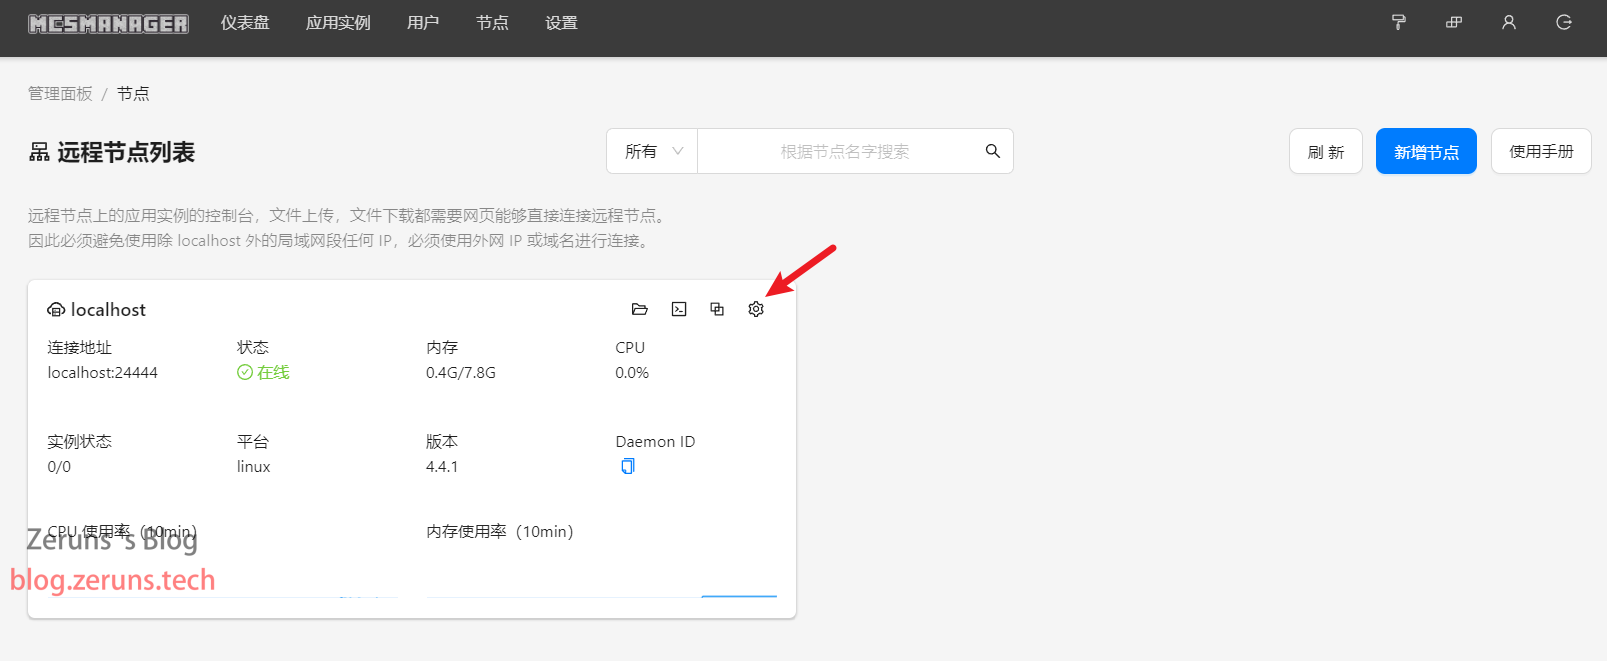
Next, go to the Node section to set up the node. Change the Remote Node IP Address to your server's public IP or domain name, and modify the Remote Node Port to the public port you mapped from 24444. In my case, it's 35444. Then click the confirm button below. (Adjust the port according to your actual situation. If your server has a dedicated public IP, you can use the default port directly.)
Installing the libcurl Library
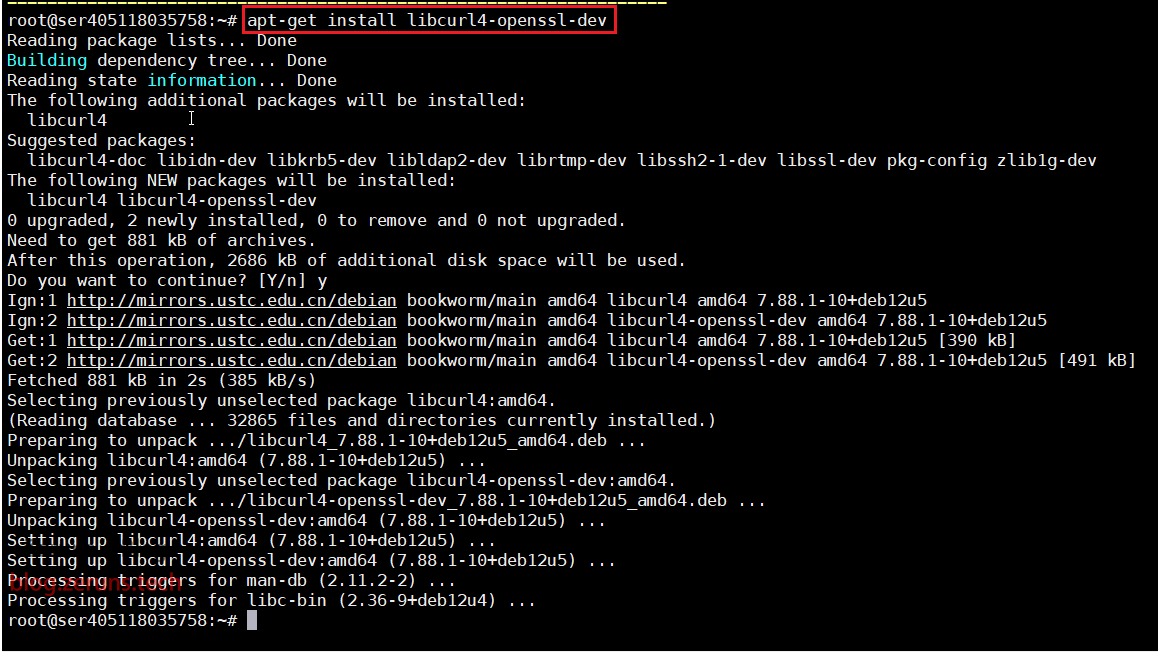
Enter the following command in the SSH terminal to install the libcurl library:
apt-get install libcurl4-openssl-dev
On Debian systems, this library is missing. If you do not install it, you will encounter an error when running the Bedrock Edition server: error while loading shared libraries: libcurl.so.4: cannot open shared object file: No such file or directory. This issue does not exist on Ubuntu systems.
Installing and Running the Minecraft Server
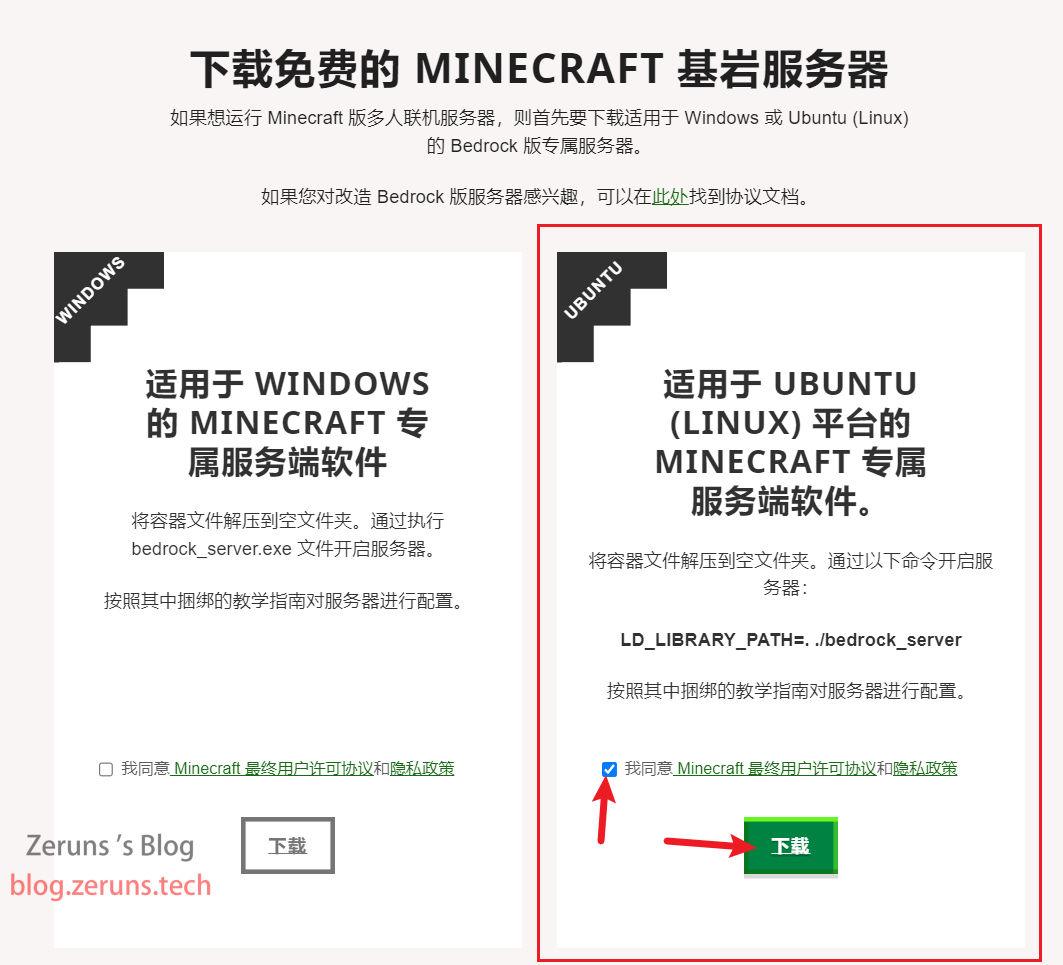
First, download the Bedrock Edition server for Linux from the official Minecraft website. The website only provides the latest version of the server, so your game client must also be updated to the latest version. The version used in this tutorial is 1.21.22.01.
Minecraft official download link: https://url.zeruns.tech/BDS
Bedrock Edition server (version 1.21.22.01) download link via 123 Cloud: https://www.123pan.com/s/2Y9Djv-nCivH
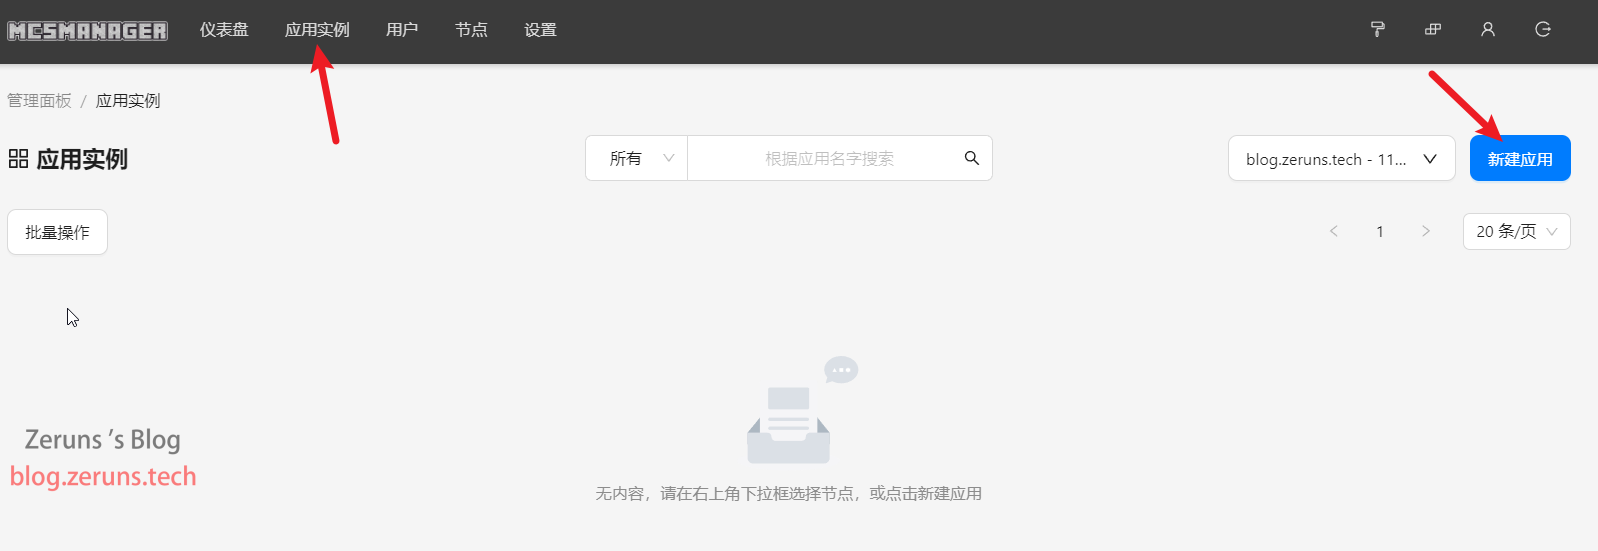
Return to the MCSM panel and navigate to App Instances → Create New Application → Minecraft Bedrock Edition Game Server → Upload Server Files as a Compressed Archive.

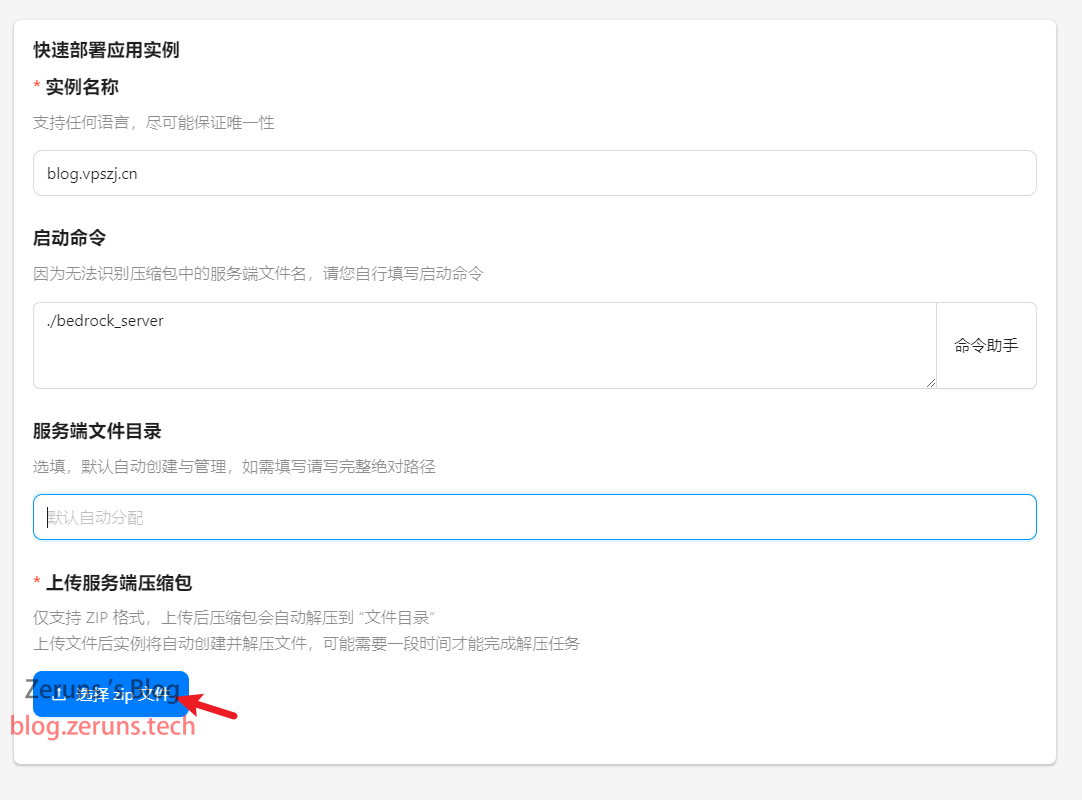
Next, give your instance a name of your choice and set the startup command to ./bedrock_server. Then upload the compressed server file you just downloaded. For the decompression encoding, select UTF-8. The system will automatically extract the files once the upload is complete.
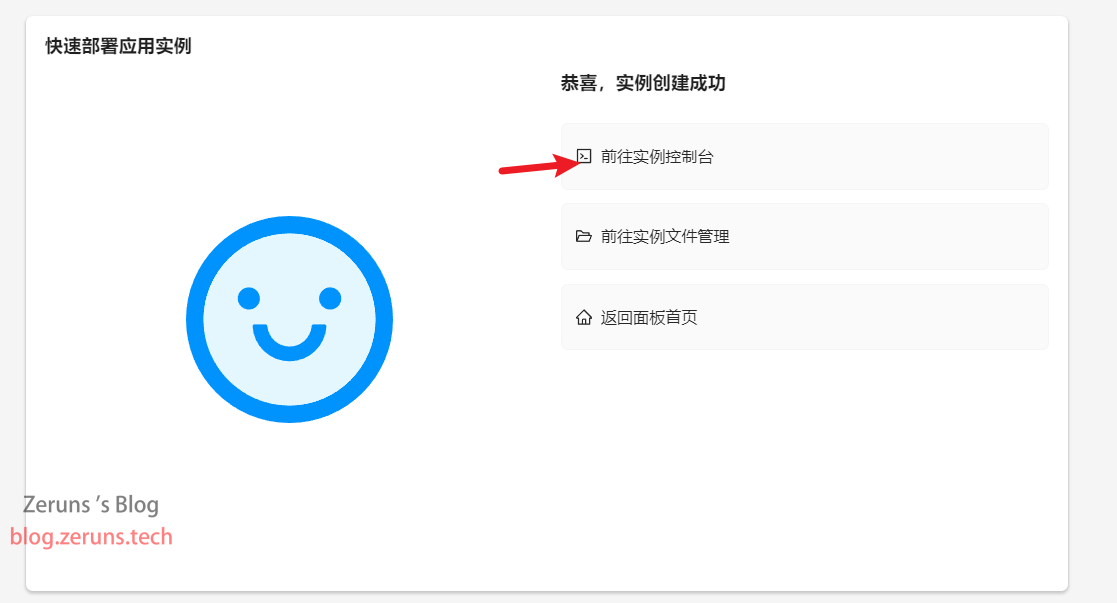
After the upload is complete, click Go to Instance Console.
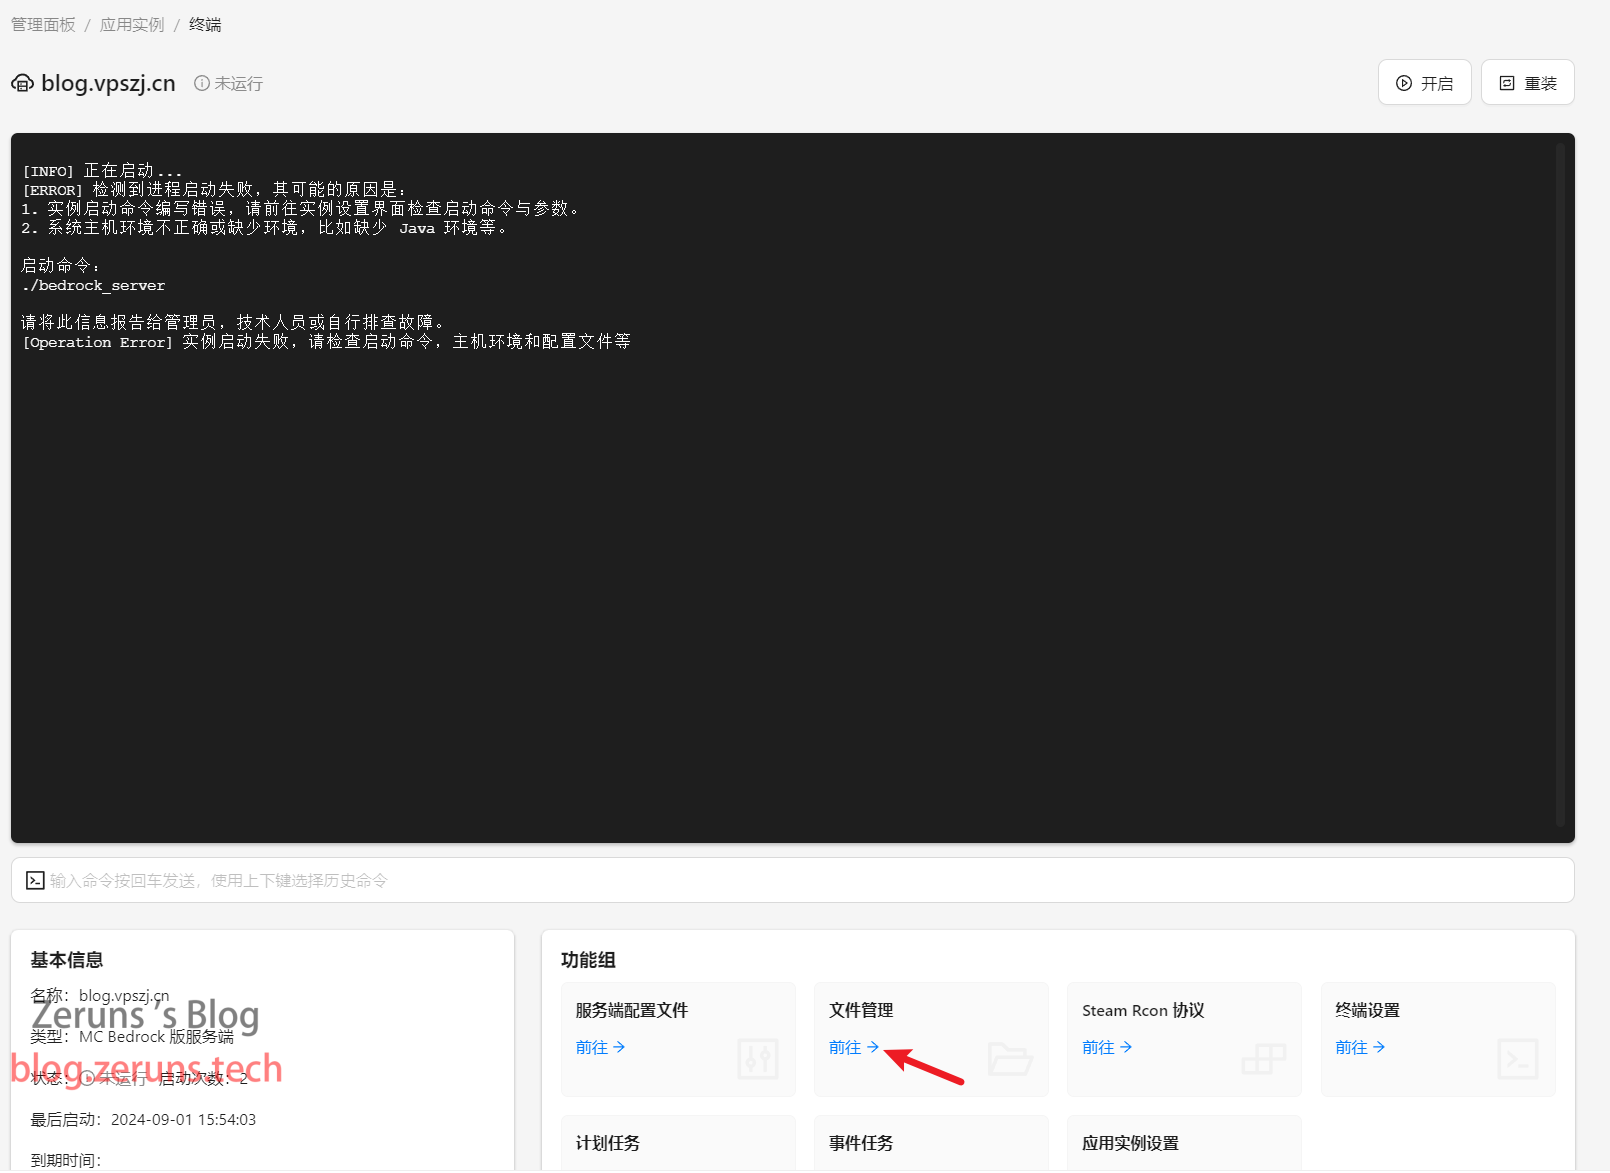
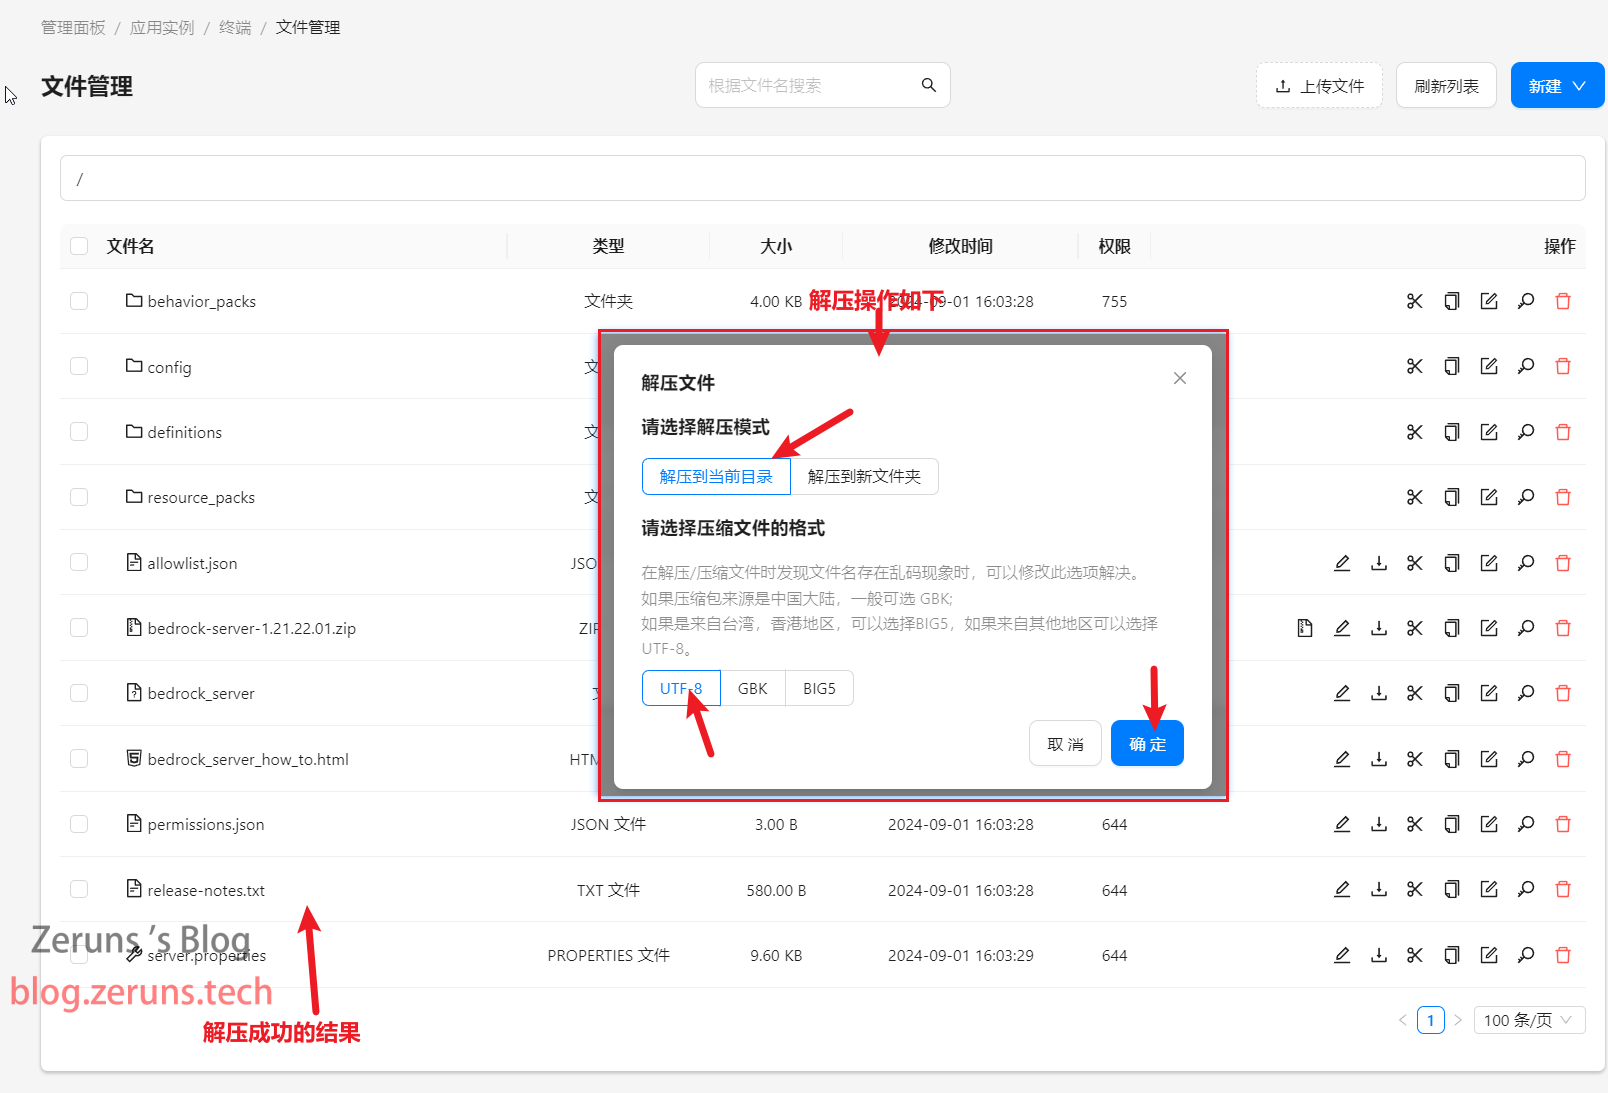
Navigate to the file management section to verify whether the archive has been successfully extracted. If not, manually extract it.

For extraction mode, choose Extract to Current Directory, and set the file format to UTF-8.
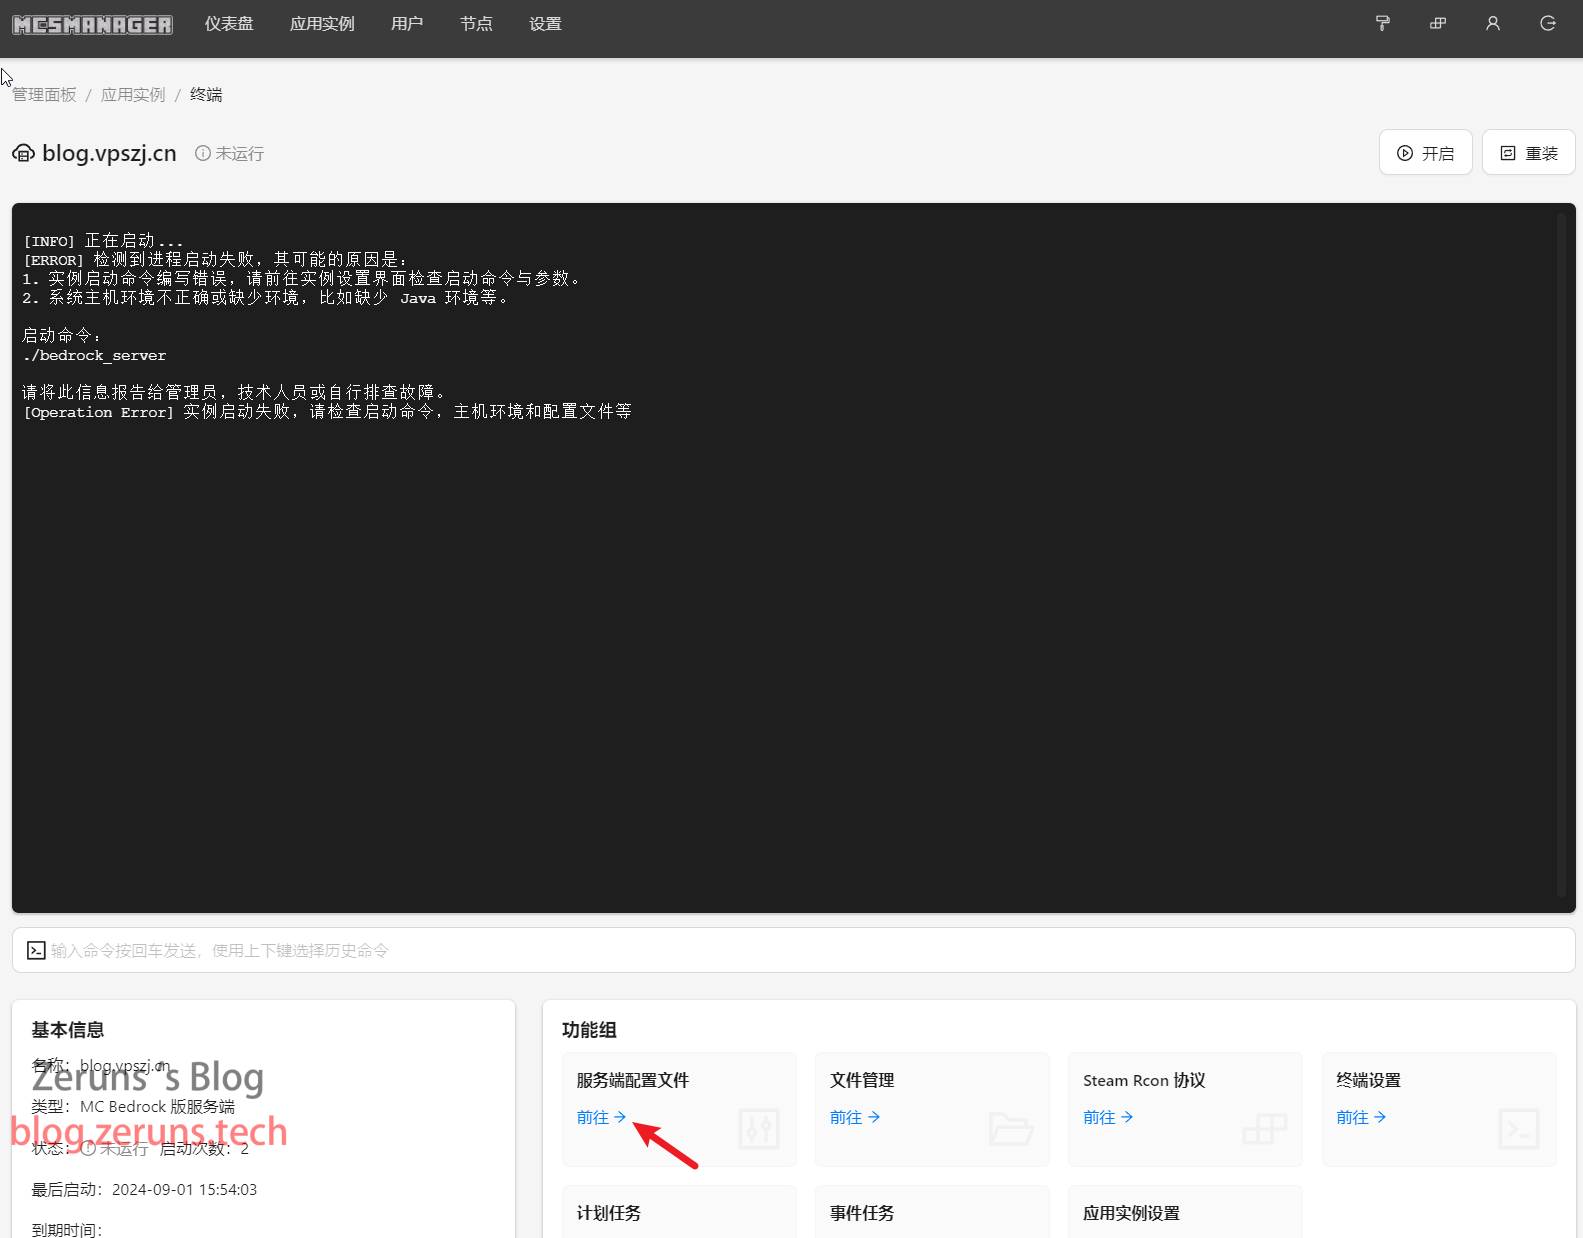
Return to the instance terminal and click Server Configuration Files to modify the port settings.
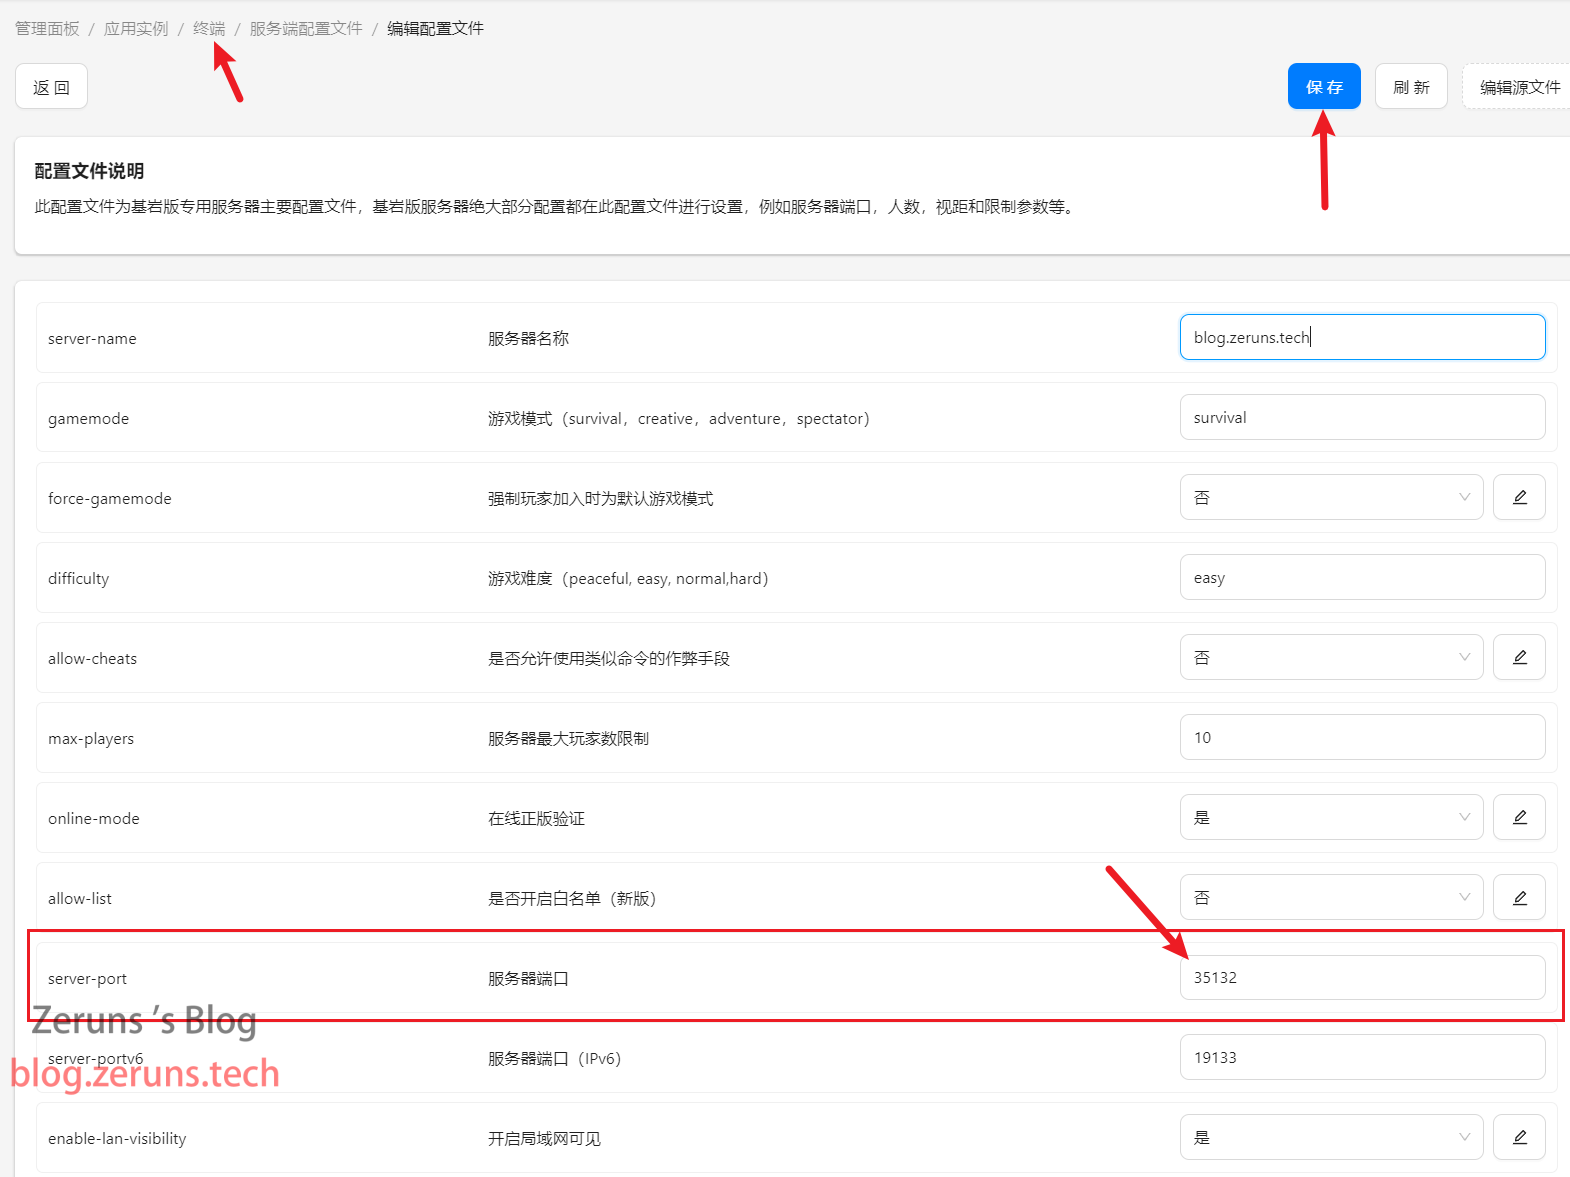
Click the edit button to the right of the server.properties file. Locate the server-port entry and change the port number to the one you previously mapped for Minecraft. For this guide, I used port 35132. Adjust based on your setup. If your server has a dedicated public IP address, you can use the default port 19132 without changes. Save the file after making edits.

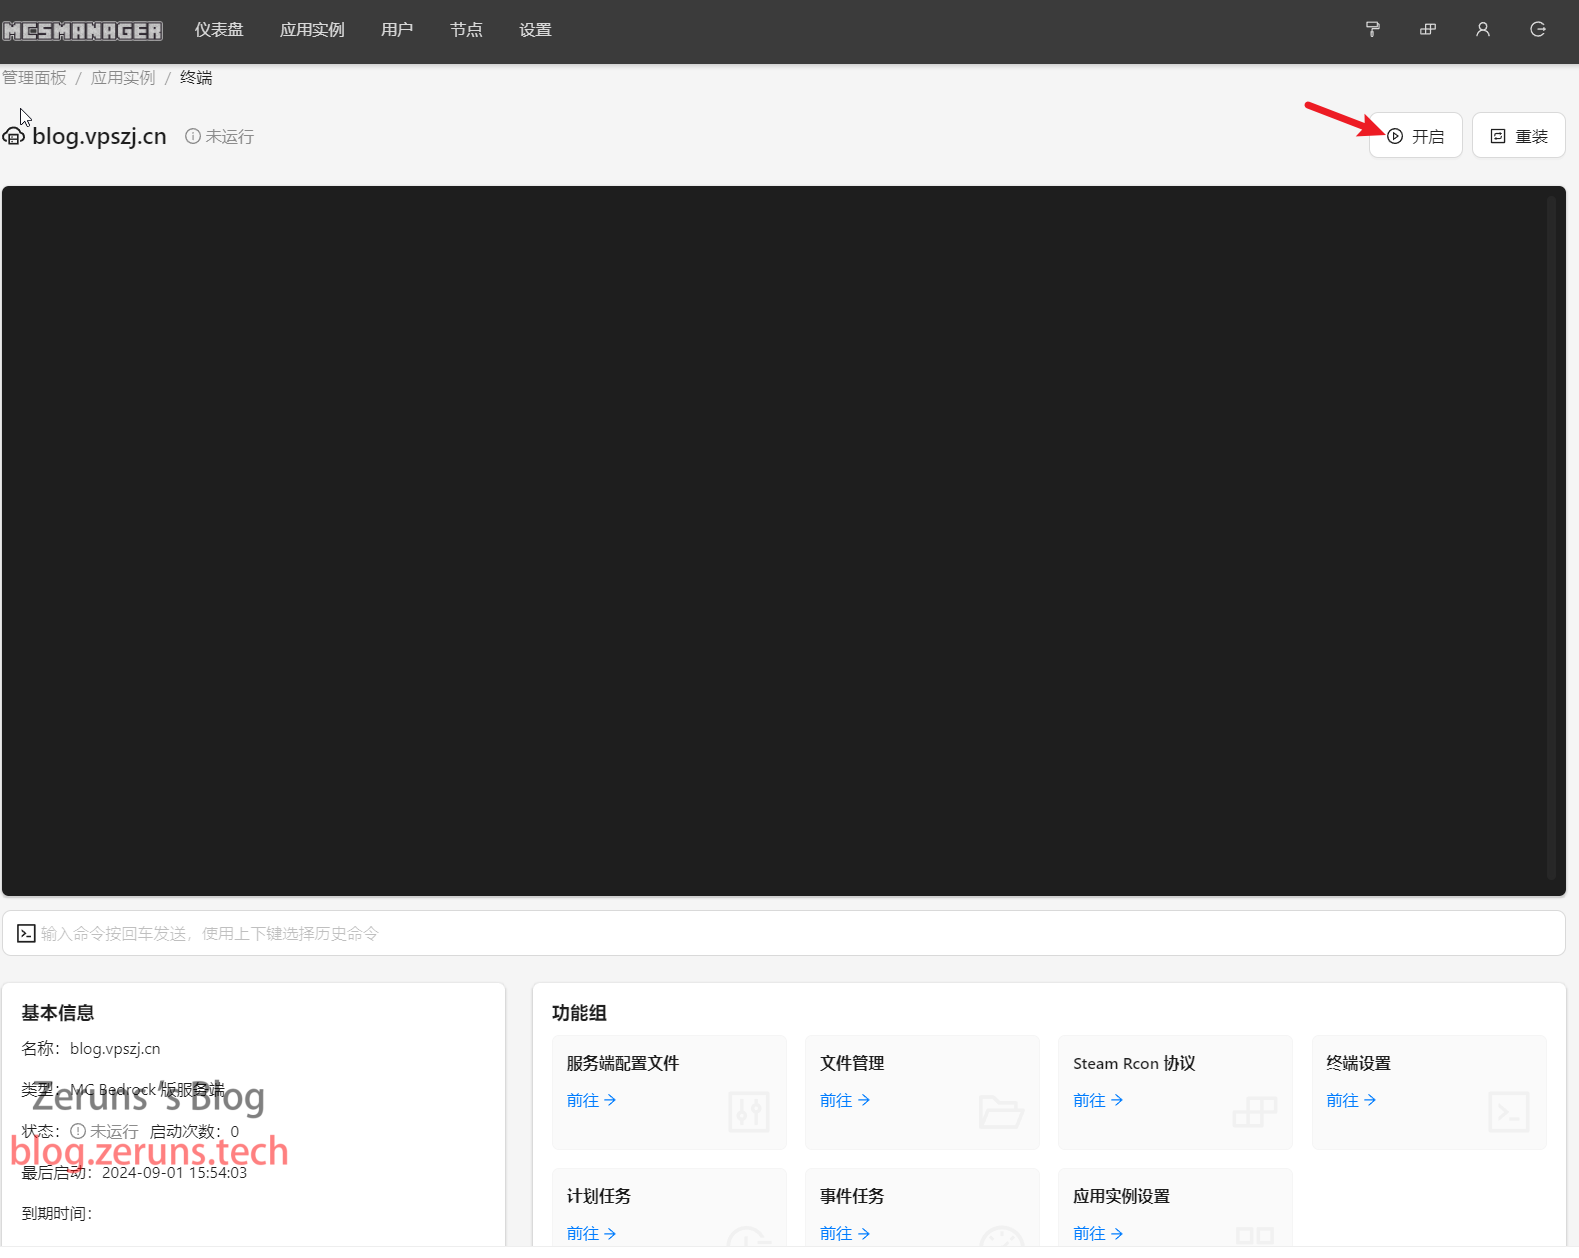
Return to the instance terminal and click Start.
If the information shown matches the image below, the server has successfully started.

Joining the Game
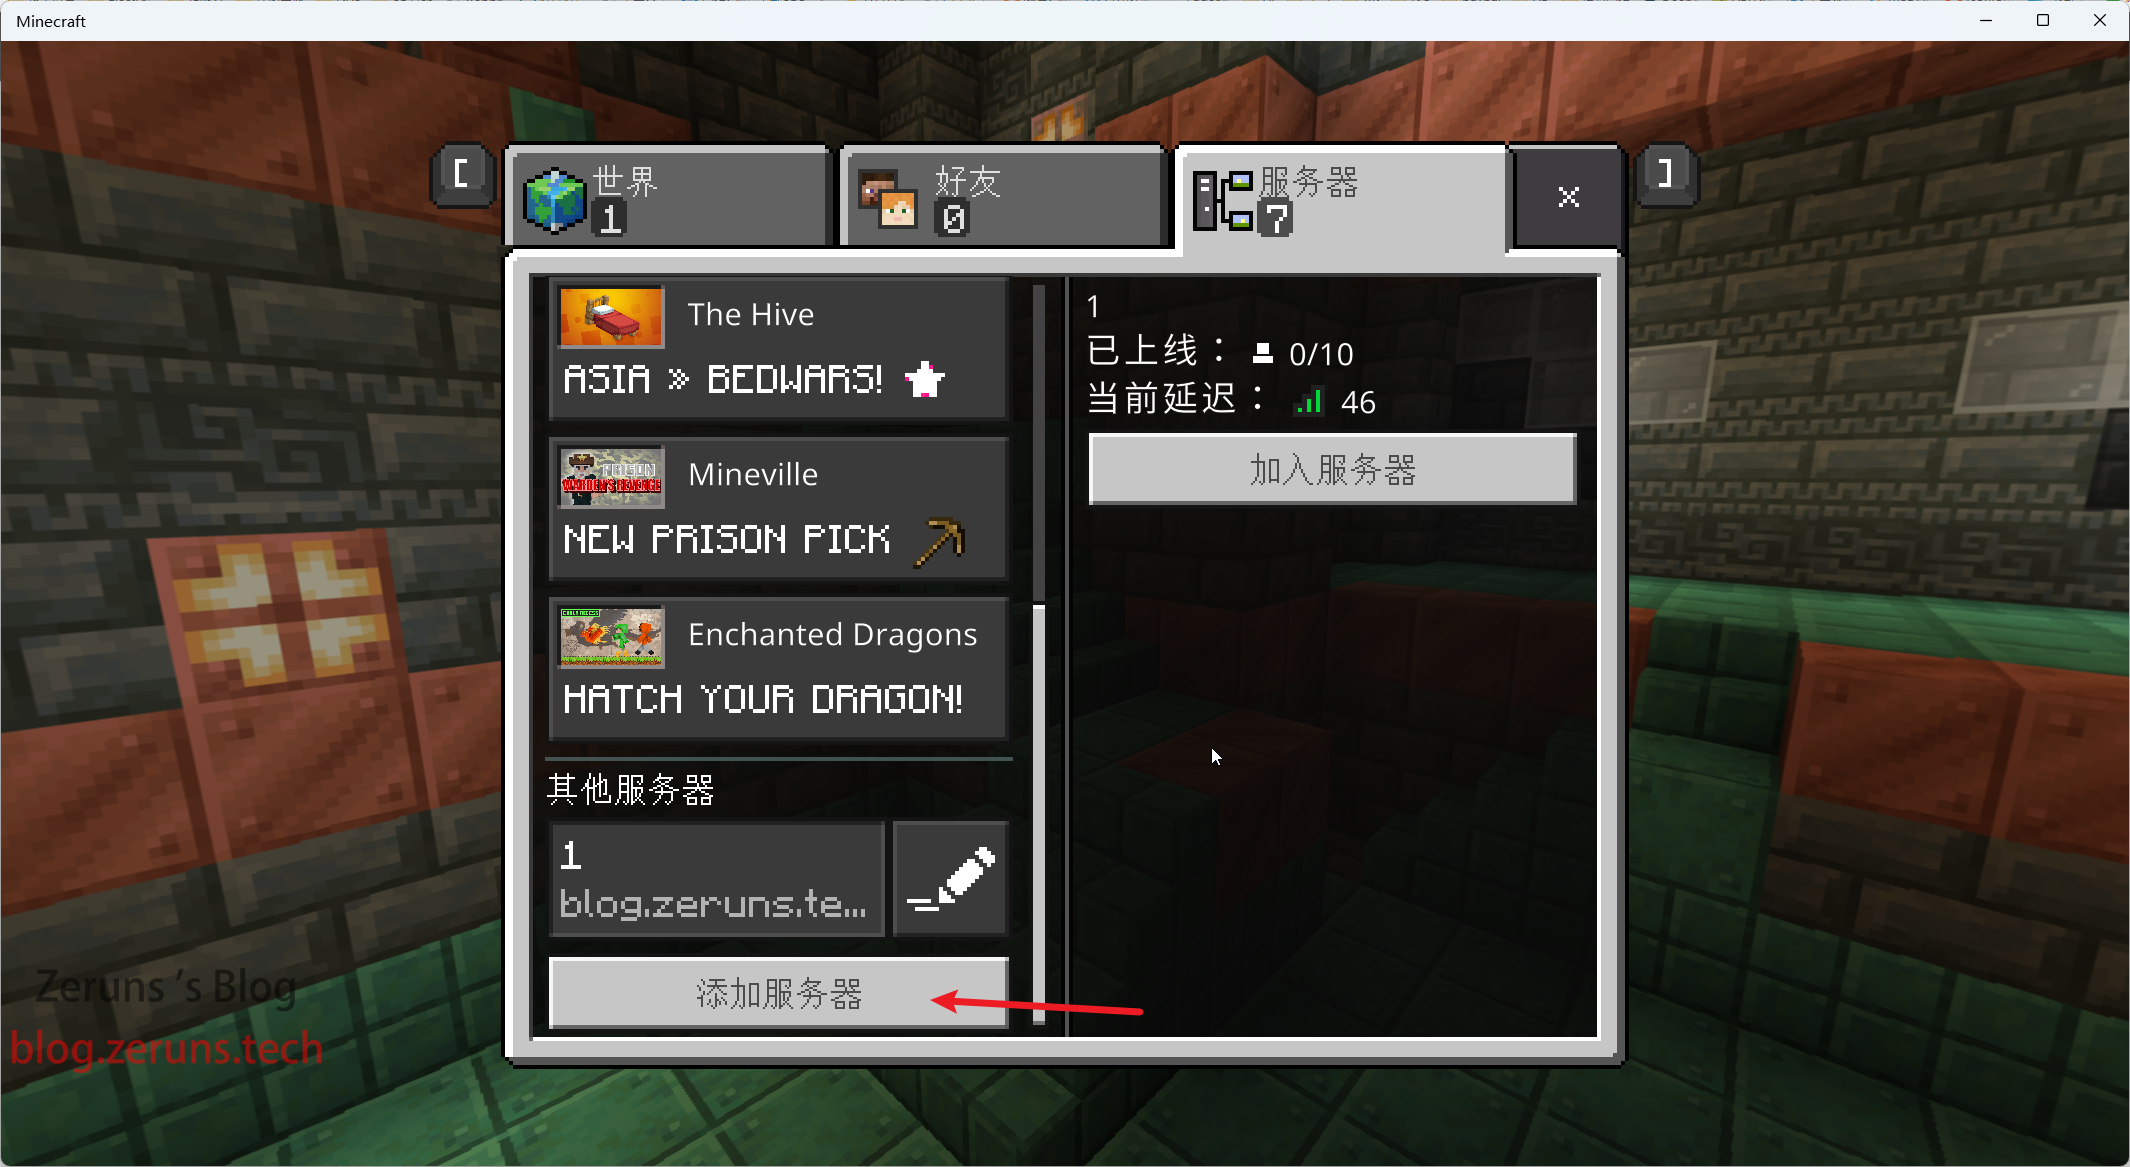
Open the Minecraft Bedrock Edition game client, navigate to Play → Servers, and click Add Server.
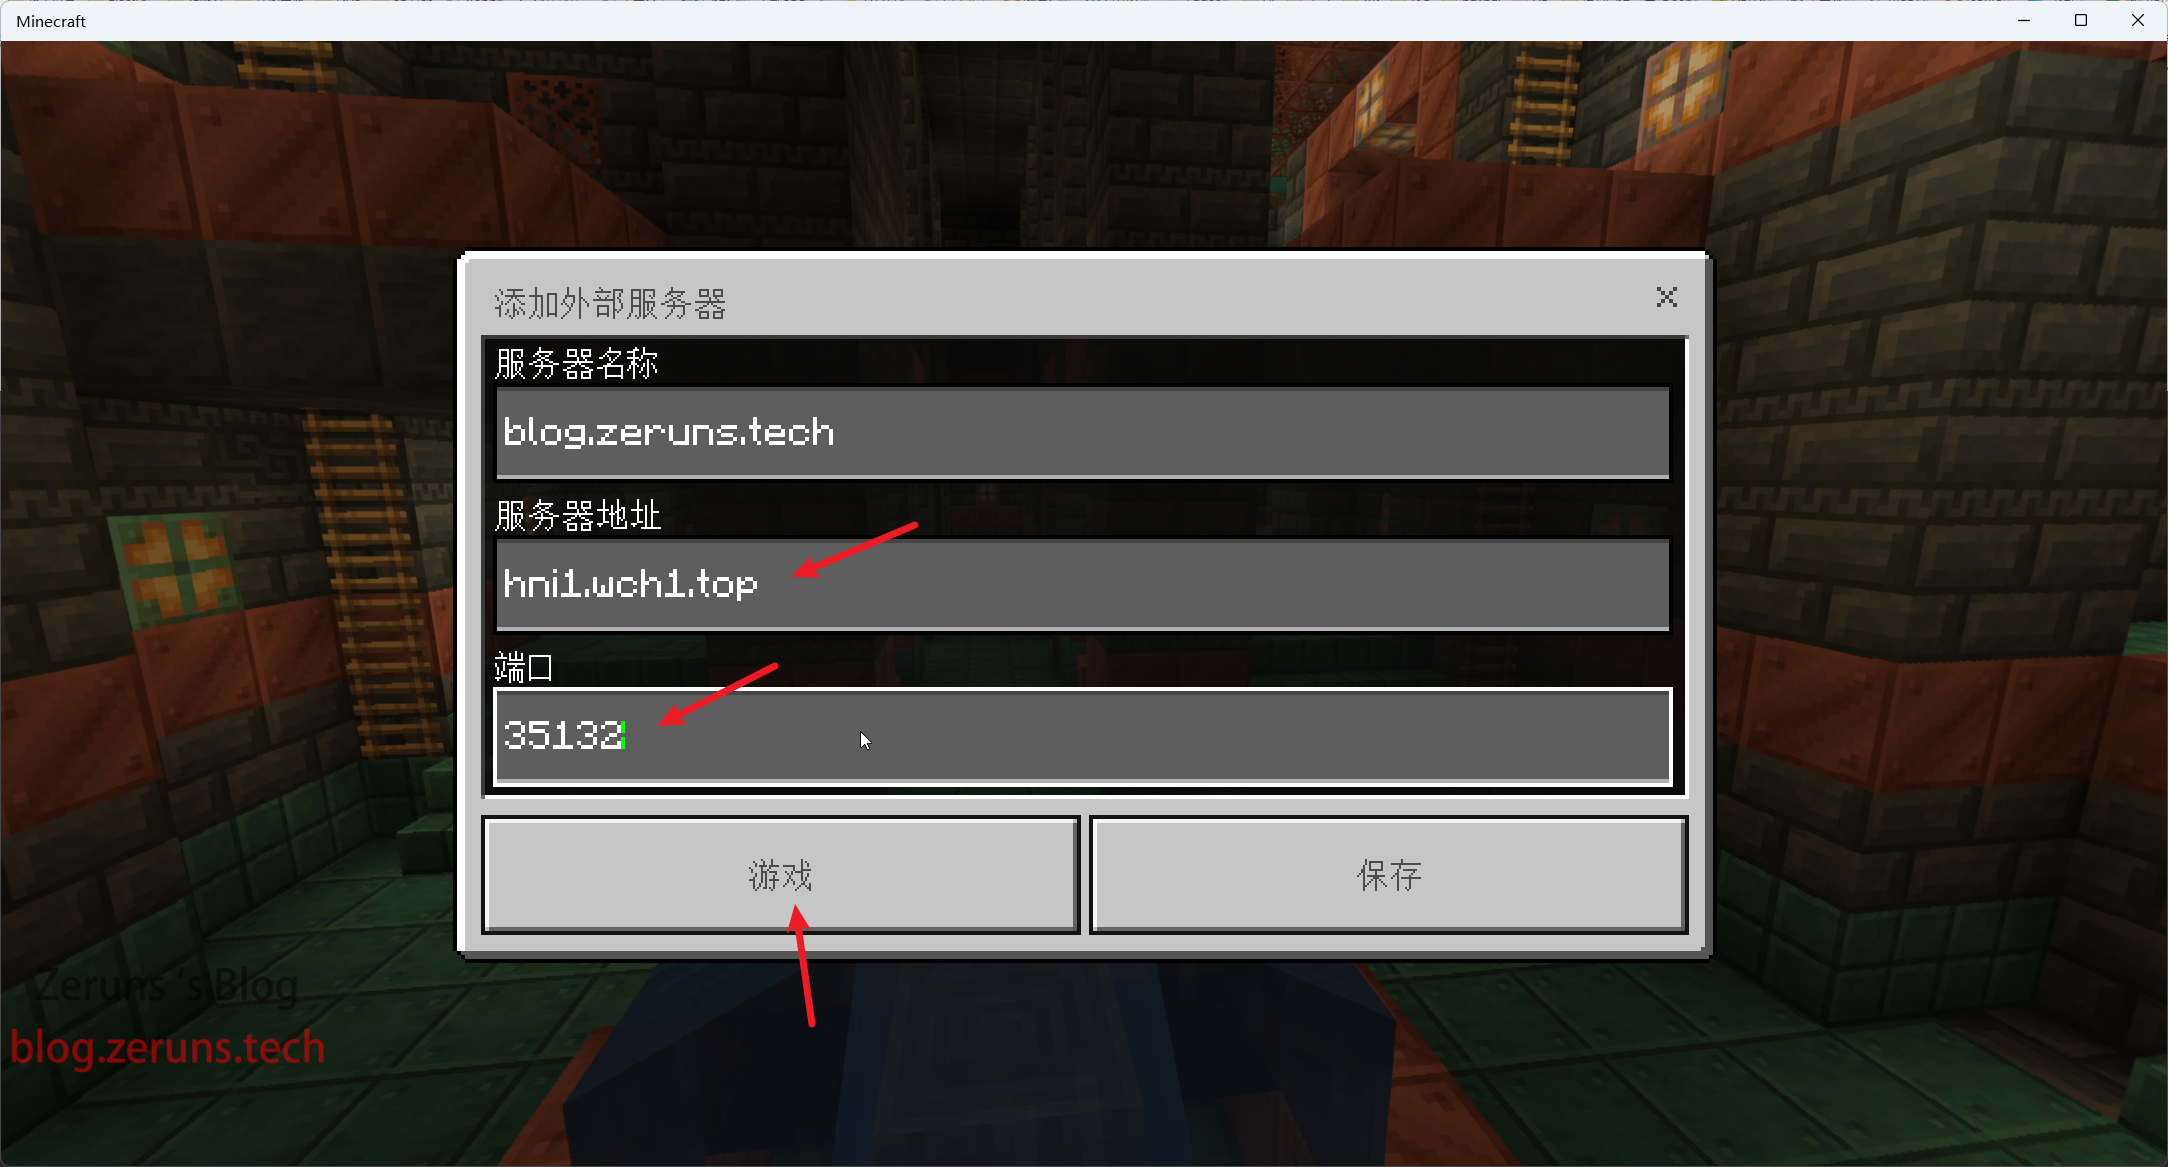
Enter the external IP address of your server and the port number mapped for the Minecraft server, then click Play.
You will then enter the server’s world.

Assigning OP Permissions
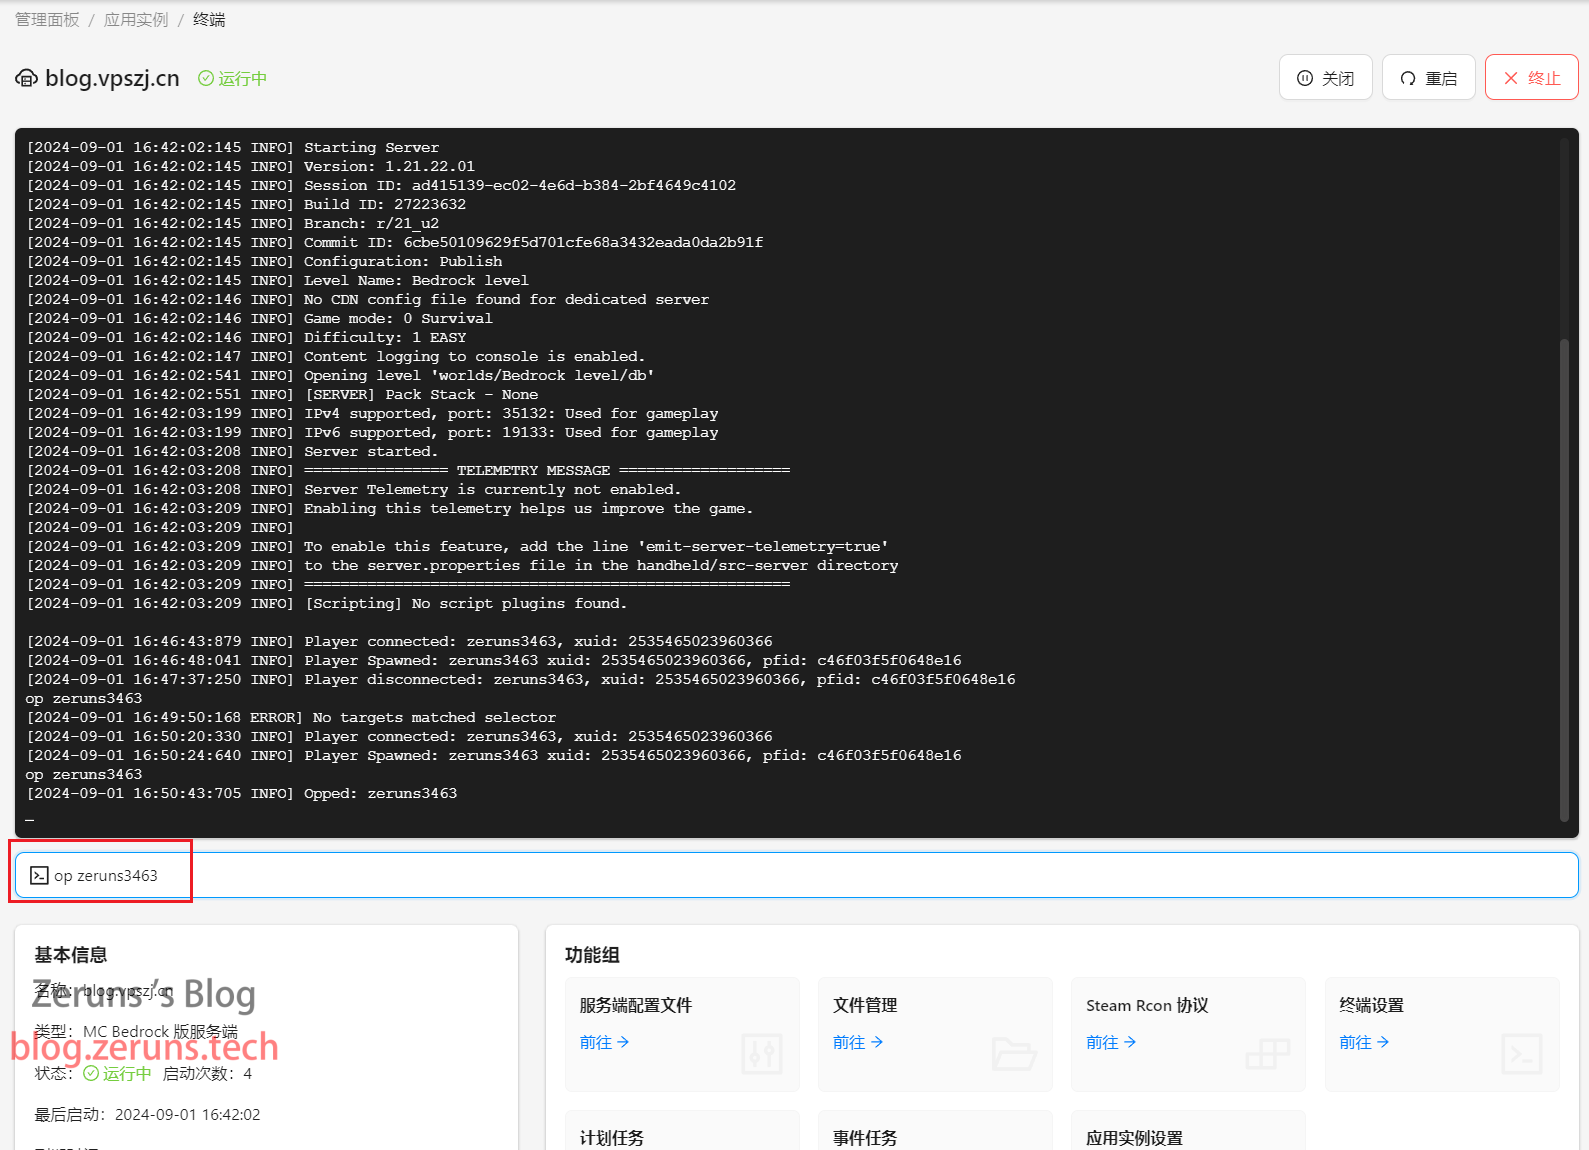
To assign OP (admin) permissions to a user, type the command op <PlayerID> in the instance terminal, replacing <PlayerID> with the ID of the user you want to grant permissions to.
Recommended Reading
- High-Value and Affordable VPS/Cloud Server Recommendations: https://blog.zeruns.tech/archives/383.html
- Minecraft Server Hosting Tutorials: https://blog.zeruns.tech/tag/mc/
- PalWorld Server Hosting Guide: https://blog.zeruns.tech/tag/PalWorld/
- Internal Network Tunneling Setup Tutorial (NPS Setup and Usage): https://blog.zeruns.tech/archives/741.html
- 7 Days To Die Server Hosting Guide: https://blog.zeruns.tech/archives/800.html
- Build Your Blog Without Coding! A Comprehensive Personal Blog Setup Guide: https://blog.zeruns.tech/archives/783.html


Comment Section