This guide walks you through every step of setting up your own Minecraft Java Edition server. We'll be using the official server software that Mojang provides as a free download — in other words, the vanilla server.
The stack we'll use is Debian + MCSManager + Docker. MCSManager is a management panel that makes running the server far easier: edit config files in your browser, upload/download mods and plugins, and so on.
Video tutorial: https://www.bilibili.com/video/BV1bhuc6VEBN/
What Is a Minecraft Server?
A Minecraft Server lets players play Minecraft together, either online or over a local network. Under the hood, the game already runs a server during single-player — that's by design, so the single-player and multiplayer experiences stay consistent and any change to the game (like a bug fix) applies to both modes.
Plenty of servers out there are known for their unique content, rules, and the communities that form around them. No two servers are exactly alike, and the lines between server types are often blurry. Many specialized servers use map editors or Creative mode to build custom maps, and run CraftBukkit to add extra features. Some focus on PvP; some lean toward Survival, Creative, or Hardcore; some have economy systems; some ship with built-in mini-games.
Roughly speaking: a server built around Survival mode is a "survival server"; one centered on mini-games is a "mini-game server"; one meant for sharing building tips is a "building server"; one driven by RPG mechanics is an "RPG server"; and a server that bundles several of these together is often called a "network server" or "group server."
In plain terms, a Minecraft server is "a plot of land you've claimed" inside Minecraft — you're the owner, and what you say goes. Single-player is a solo adventure; a server is a shared world you and your friends can drop into any time to build and explore together. Whether you want a quiet survival world with a handful of friends or a massive group build, running your own server is how you open that door.
- Minecraft Server Hosting QQ Group: 966038270
- MC Server Hosting QQ Channel: https://pd.qq.com/s/ckmpr5e63
- Minecraft Server Hosting Telegram Group: https://t.me/Minecraft_zeruns
Why Host Your Own Server?
You might be wondering: there are tons of public servers out there — why not just hop on one instead of going through the hassle of setting up your own?
Fair question. Let's talk about what's actually different.
Your world, your rules. On a public server, the game mode, plugins, difficulty, terrain generation — it's all been decided for you. You might start building a nice house, only for the server to reset the map. You might hate PvP, but the server has friendly fire switched on. Your own server is different: you're the owner, and you call the shots. Want to fly around in Creative mode building a castle? Go for it. Want to mine in peace on Peaceful difficulty? No problem. Want to add a map mod and go exploring with everyone? Up to you.
Play only with the people you want. Public servers draw players from everywhere, with wildly varying play styles. Get lucky and you'll meet friendly folks; get unlucky and you'll run into griefers, base-wreckers, or straight-up cheaters. On your own server you can set up a whitelist and let only friends you actually know join. You know exactly who's running around in your world — that's something public servers simply can't give you.
Play anytime, anywhere. Unlike a single-player save that only opens on your own computer, a server stays online 24/7. Friends can hop on whenever they like — they don't need you to be around. Picture this: you get home late from work, log in, and find your friends have spent the whole afternoon baking potatoes in the server. That "we share a world" feeling is what makes Minecraft multiplayer so special.
And the software won't cost you a dime. Mojang's official server software is completely free — unlike a lot of games, there's no "server monthly pass" or "hosting license" to buy.
At this point you might be thinking: so can I just run it on my own PC? Absolutely. Running the server on a spare computer is the quickest way to get started — many server owners' first servers were born exactly this way. But hosting on your own machine comes with a few unavoidable headaches: shut down your PC to sleep, and the server goes down with it; home broadband is fine for streaming video, but multiplayer is extremely sensitive to latency, and friends will start complaining about "lag" the second they join; and the biggest pain of all, home broadband usually doesn't come with a public IP, so letting outside friends connect means either wrestling with NAT traversal or configuring port forwarding on your router — pretty daunting for beginners, and the gameplay experience tends to suffer regardless.
None of this is unsolvable — it can all be sorted out, it just takes extra time and effort. That's why, after "testing the waters on their own PC," a lot of server owners end up moving the server to the cloud and paying a bit for peace of mind. We'll get into that in detail shortly.
Who Is This Guide For?
If any of the following sounds like you, this guide was written with you in mind:
- You've played Minecraft Java Edition and want to play multiplayer with friends, but aren't sure how to set it up;
- You've got a vague sense of words like "server," "port," and "IP address," but don't really know what they mean;
- You have no programming background, and the command line feels a bit intimidating — don't worry, this guide uses the MCSManager visual management panel. Most operations are just a few mouse clicks, and you'll barely need to type any commands;
- You've got a computer to do the setup on, plus a cloud server to run the Minecraft server — don't worry, the guide walks you through buying and configuring the cloud server step by step;
- You're willing to spend roughly ten-plus minutes following along.
The goal of this guide is: a vanilla official-server setup guide aimed at complete beginners. We won't get into fancy advanced setups, and we won't assume you know any code. All you need are basic computer skills — copy and paste, opening a browser — that's plenty. The MCSManager panel handles most of the server management for you: one-click start/stop, editing configs in the browser, viewing console output — wave goodbye to that intimidating black terminal window. Just follow the steps and your server will be up and running.
If you need to set up modpack servers, modded servers, plugin servers, Bedrock Edition servers, or other Minecraft server types, check here: https://blog.zeruns.com/tag/mc/
One-click quick Minecraft server setup guide, supporting all MC versions (forge, fabric, paper, bedrock, etc.): https://blog.zeruns.com/archives/923.html
Meet MCSManager
Before we dive in, let's introduce the core tool we'll be using — MCSManager.
Think of it as a "remote control for your server." It's a free, open-source management panel for Minecraft and Steam game servers. Once it's installed, there's no need to type commands into a terminal — start/stop the server, edit config files, upload mods and plugins, check the run logs — all done with a few mouse clicks in your browser.
Even more handy is its multi-user permission system. Say you want a friend to help manage the server, but you don't want them touching core settings — just give them a regular admin account and limit what they can do. And if you end up running more than one server down the road, MCSManager can manage all of them from a single panel, no jumping between machines required.
Long story short, MCSManager saves you all that time spent "wrestling with the black terminal" and frees you up to focus on the fun stuff — like naming your server, picking where to build the spawn town, or deciding whether to add a map mod. We'll install it with Docker this time — one command and you're done. Don't let the word "Docker" spook you; just copy and paste along with the guide.
MCSM panel official docs: https://url.zeruns.com/FhpqL
Multiple installation methods and setup guides for MCSManager 10 on Linux: https://blog.zeruns.com/archives/787.html
What You'll Need
Alright, enough preamble — let's look at what you need to get started. The list is short, so don't sweat it.
A cloud server. This is the "computer" that runs the Minecraft server. This guide uses the RainYun Game Cloud VPS as an example, on a 14900K machine with 4 cores and 8GB of RAM. Feel free to pick a different model based on your own needs.
One thing about server specs deserves a special callout: Java Edition Minecraft servers — especially versions 1.18 and up — are quite demanding on single-core CPU performance. We recommend picking a machine with a CPU-Z single-core score above 600. High-clock CPUs like the 14900K, 13900K, 7950X, and 9950X are all proven, reliable choices. On the memory side, 4 cores / 8GB is the recommended starting point. You can squeak by on less, but once the player count climbs and you add mods and plugins, the experience takes a hit. We'll walk through the exact selection and setup steps in the main body of the guide.
A legitimate Minecraft account. This is what you'll use to log into your own server. You can turn off online-mode verification, but then anyone can join — and if you ban someone, they can just swap to a new ID and waltz right back in, making it easy for griefers to cause chaos.
A little patience. Running into errors, ports that won't connect, friends who can't get in... it's all completely normal. Pretty much everyone who's ever run a server has been there. The guide will help you troubleshoot each issue — relax.
That's the lot. No hidden requirements, no cryptic code, nothing you can't handle.
First, register a RainYun account and log in:
- RainYun discount registration link: https://rain.zeruns.com/?s=blog-en
- RainYun promo code: zeruns (registering with this code gets you a 50%-off coupon for your first month, plus an 80%-off new-purchase coupon from the points mall; the 80% coupon stacks with RainYun's annual-pay 70% discount, working out to 56% off in total)
Other high-value cloud server / VPS recommendations: https://blog.zeruns.com/archives/383.html
- RainYun 14900K Ningbo DDoS-protected cloud server performance review: https://blog.vpszj.cn/archives/2115.html
- Introducing 2 handy panel-hosting services — one-click servers for all kinds of MC modpacks, Palworld, 7 Days to Die, CSGO, and more: https://blog.zeruns.com/archives/808.html
- RainYun Ningbo DDoS-protected 8745HS dedicated server review — 16 cores, 32GB, 500Mbps, just 446 yuan/month: https://blog.vpszj.cn/archives/2628.html
- RainYun 14900K Wenzhou dual-line DDoS-protected Game Cloud VPS — 4 cores, 8GB, 15Mbps, just 112 yuan/month: https://blog.vpszj.cn/archives/948.html
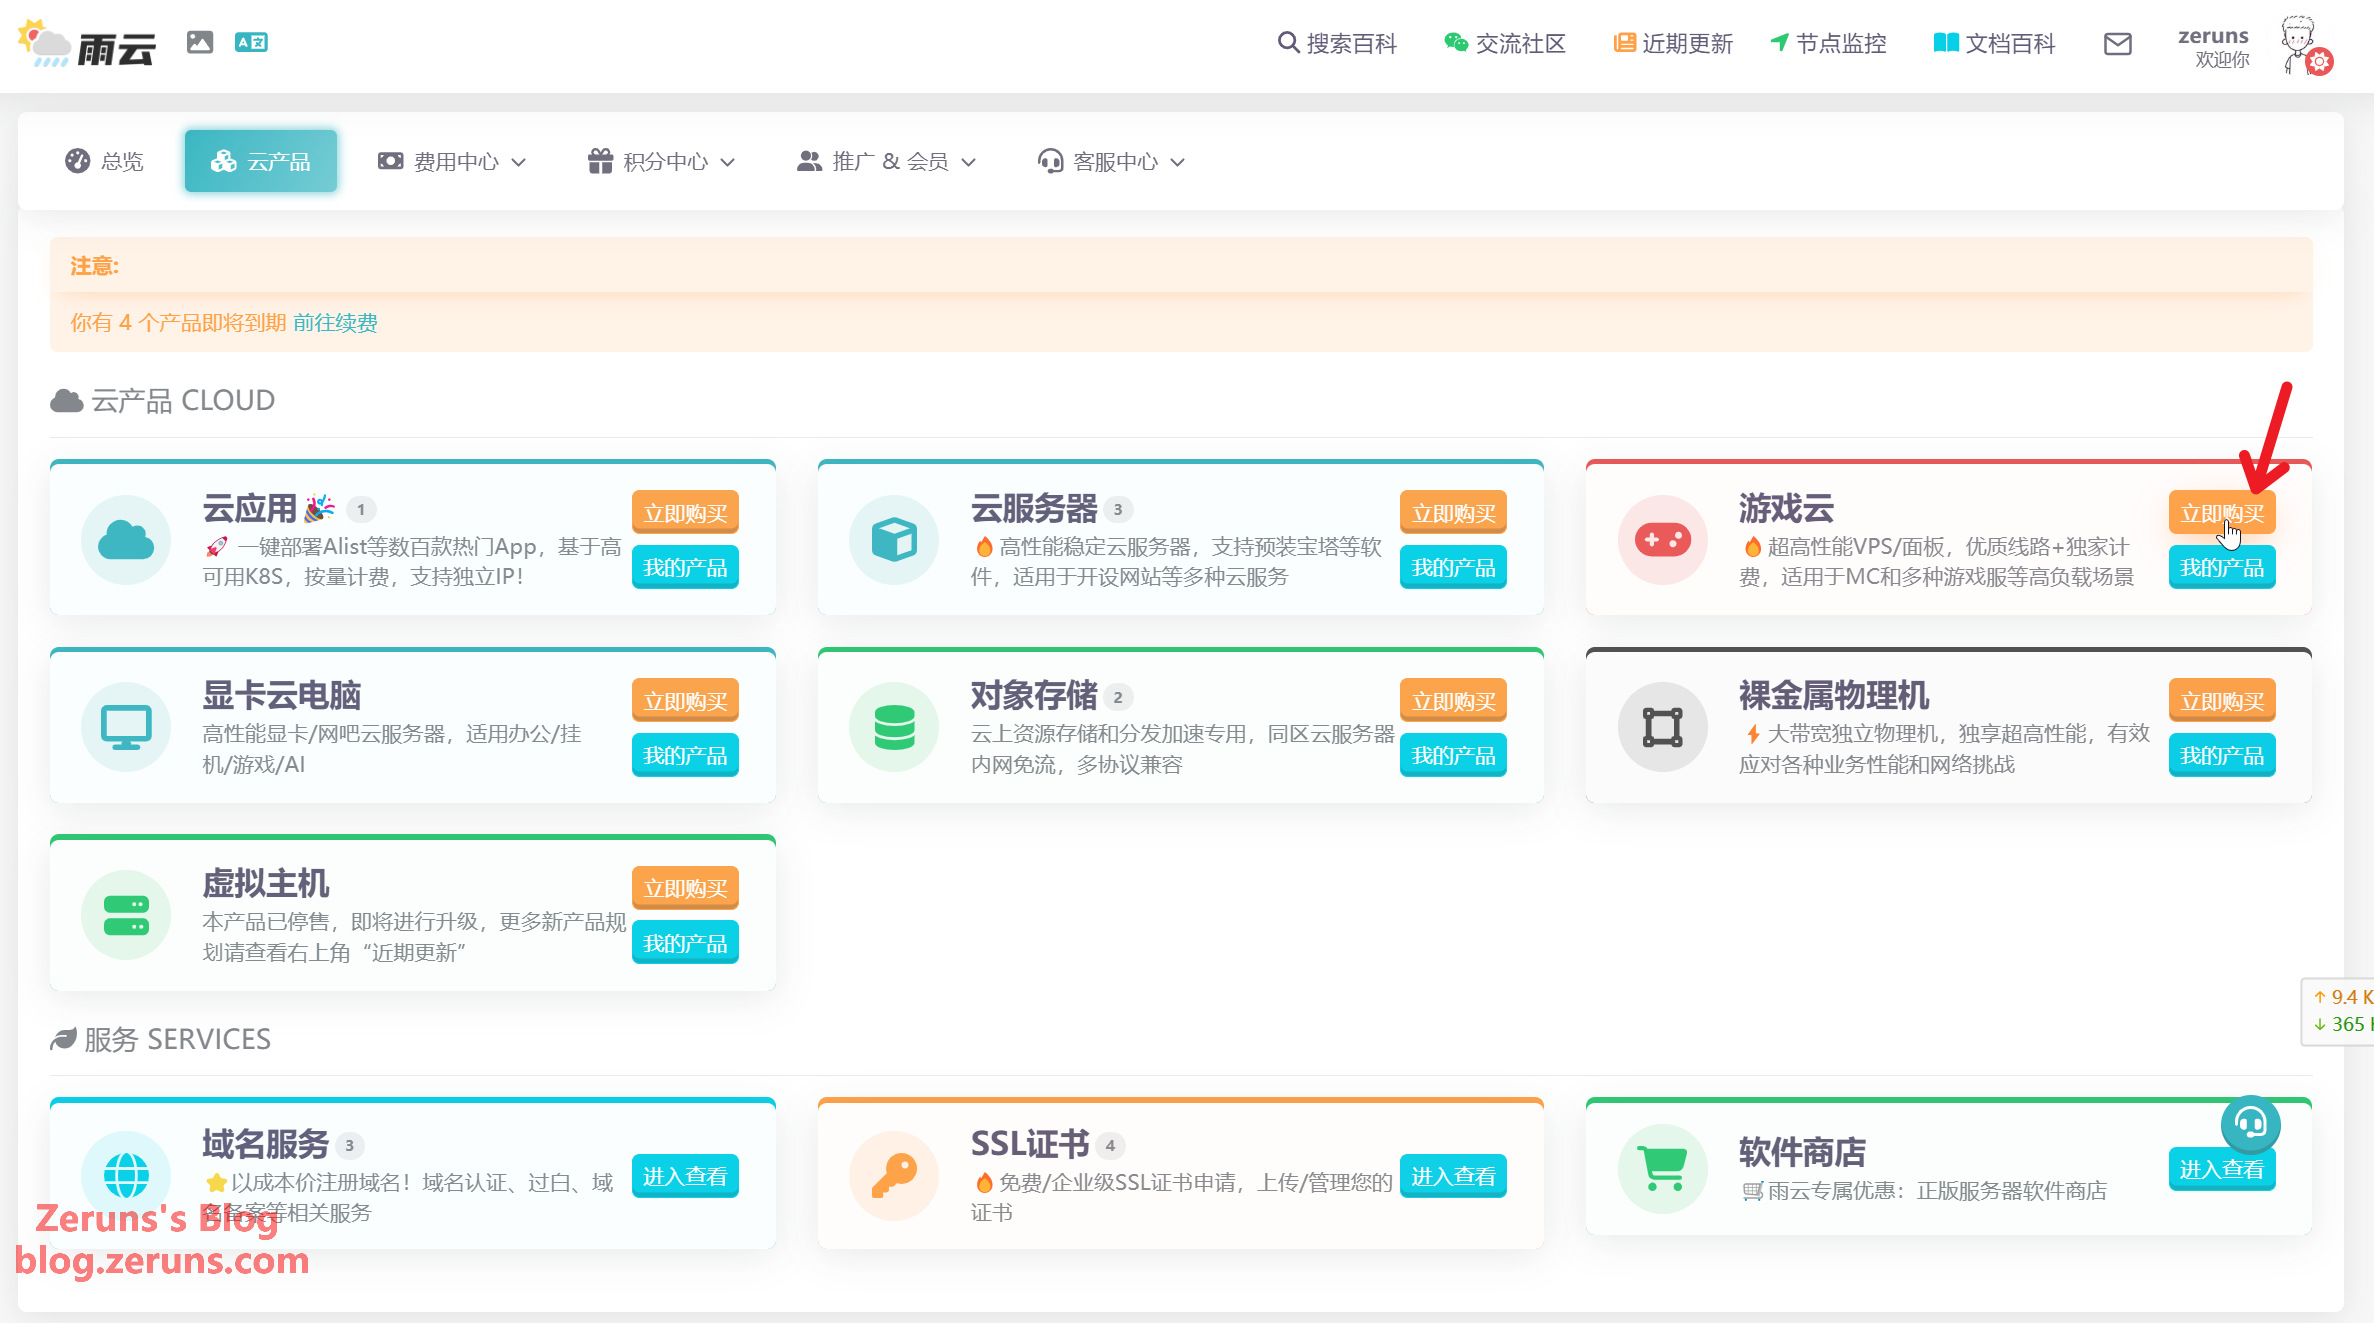
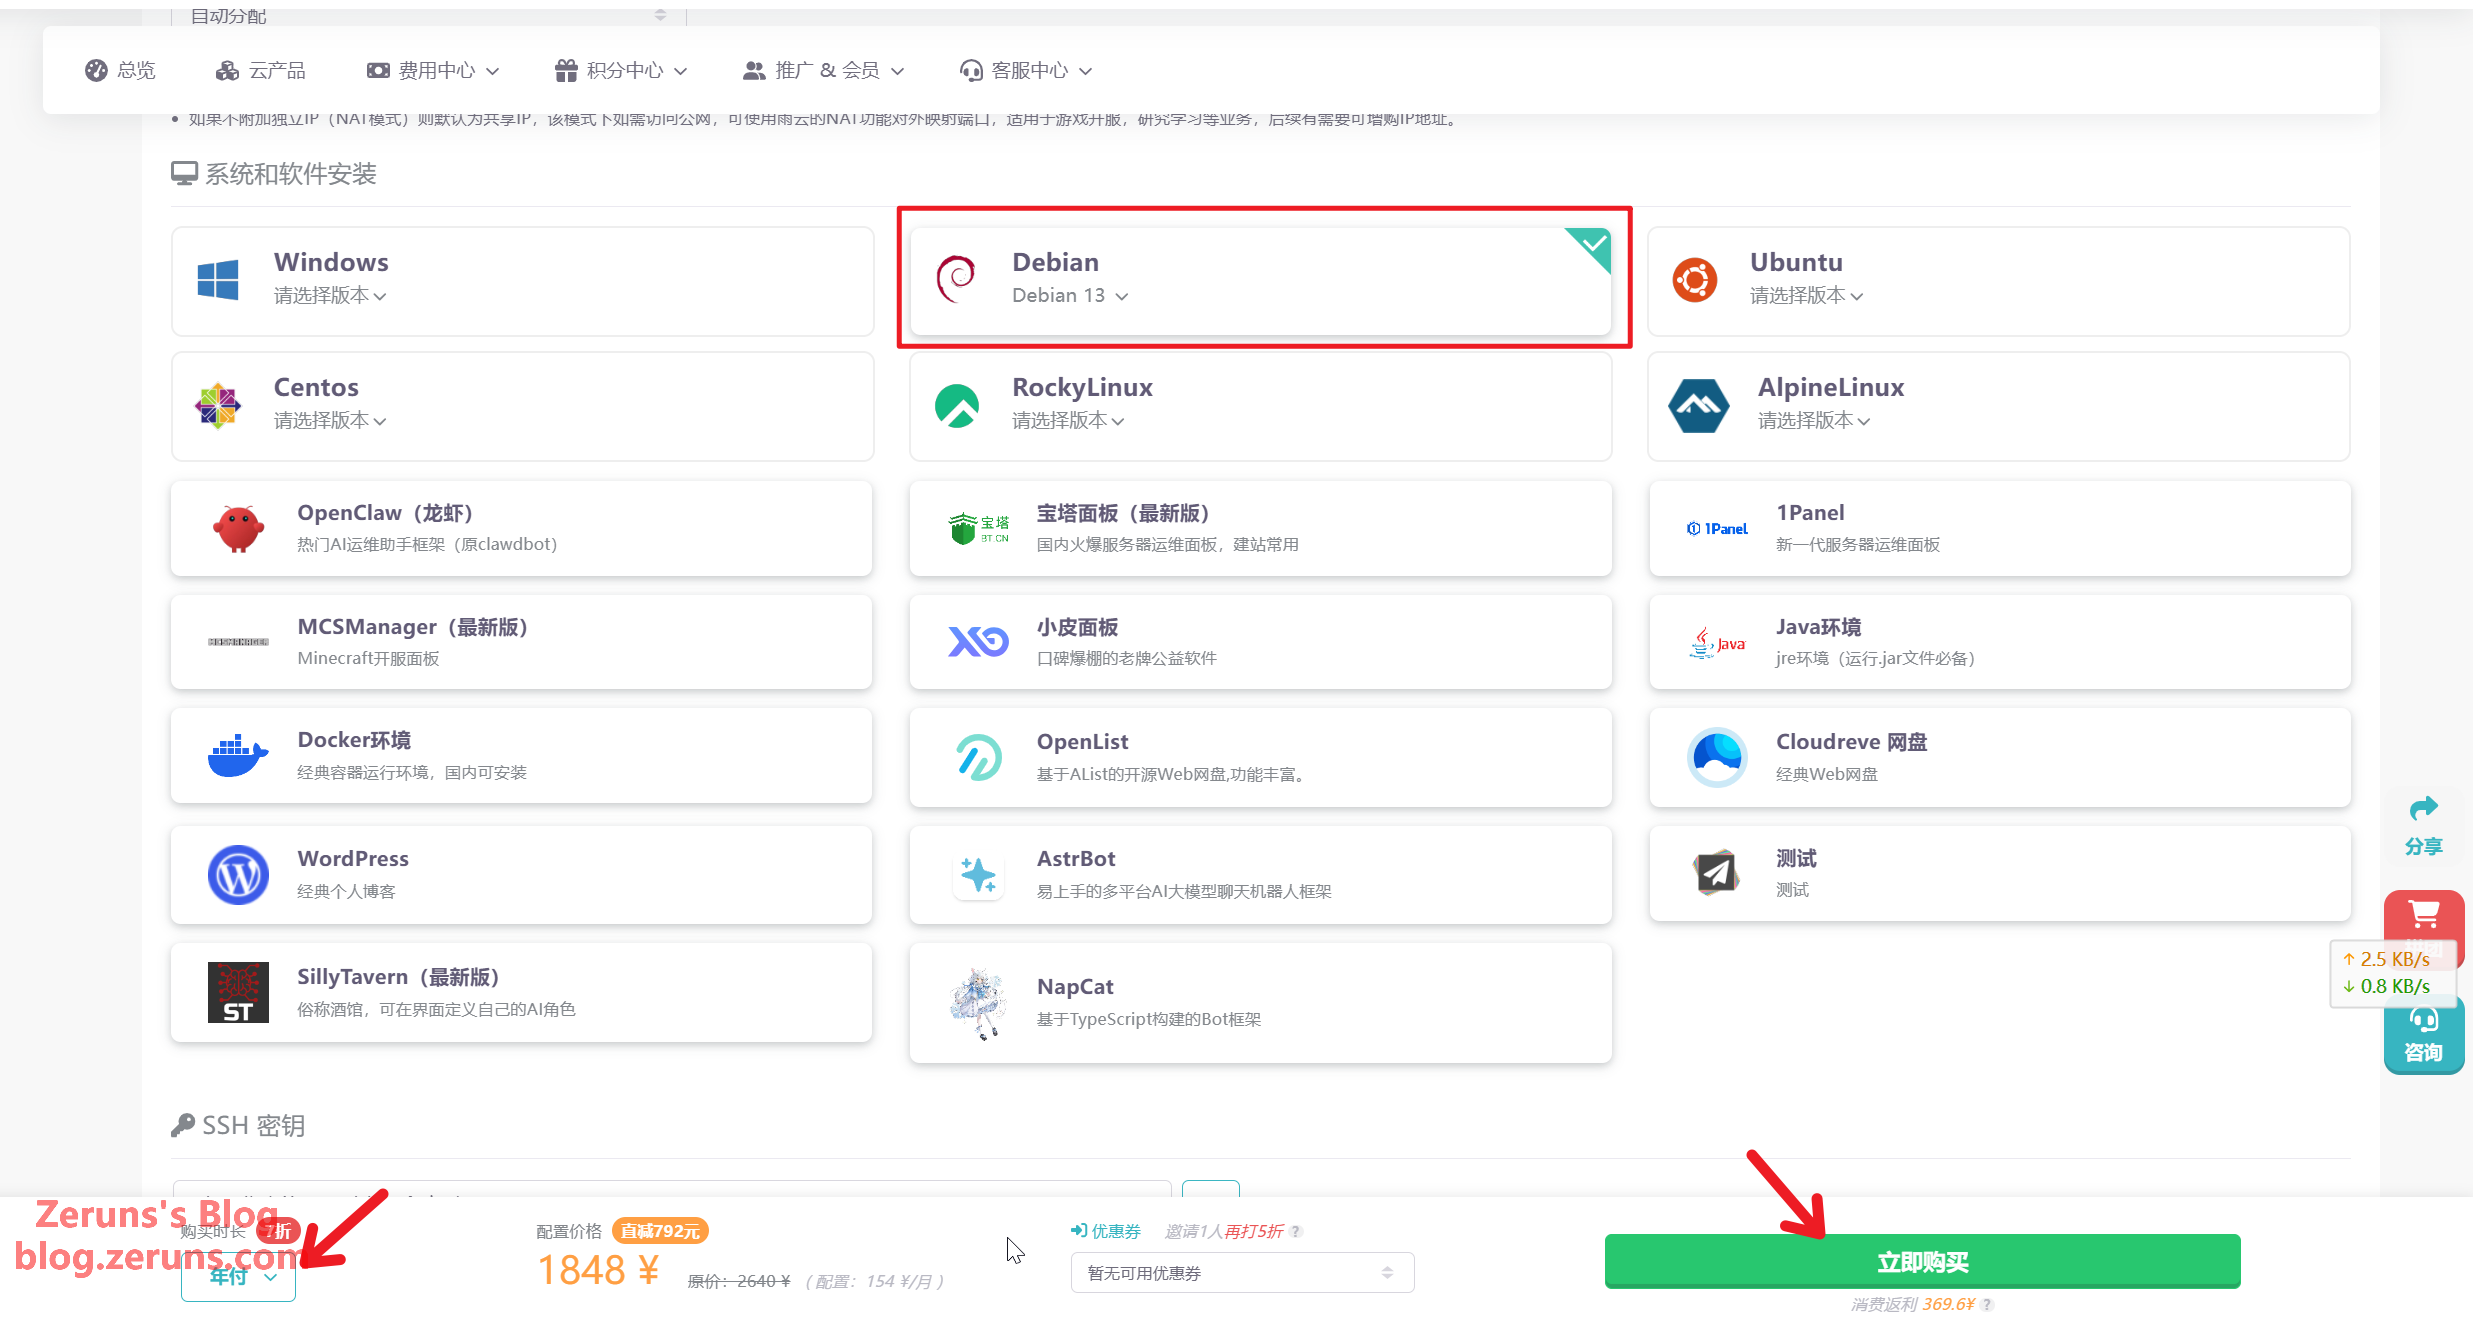
Once you've registered, head to the RainYun console and click Cloud Products → Game Cloud → Buy Now:
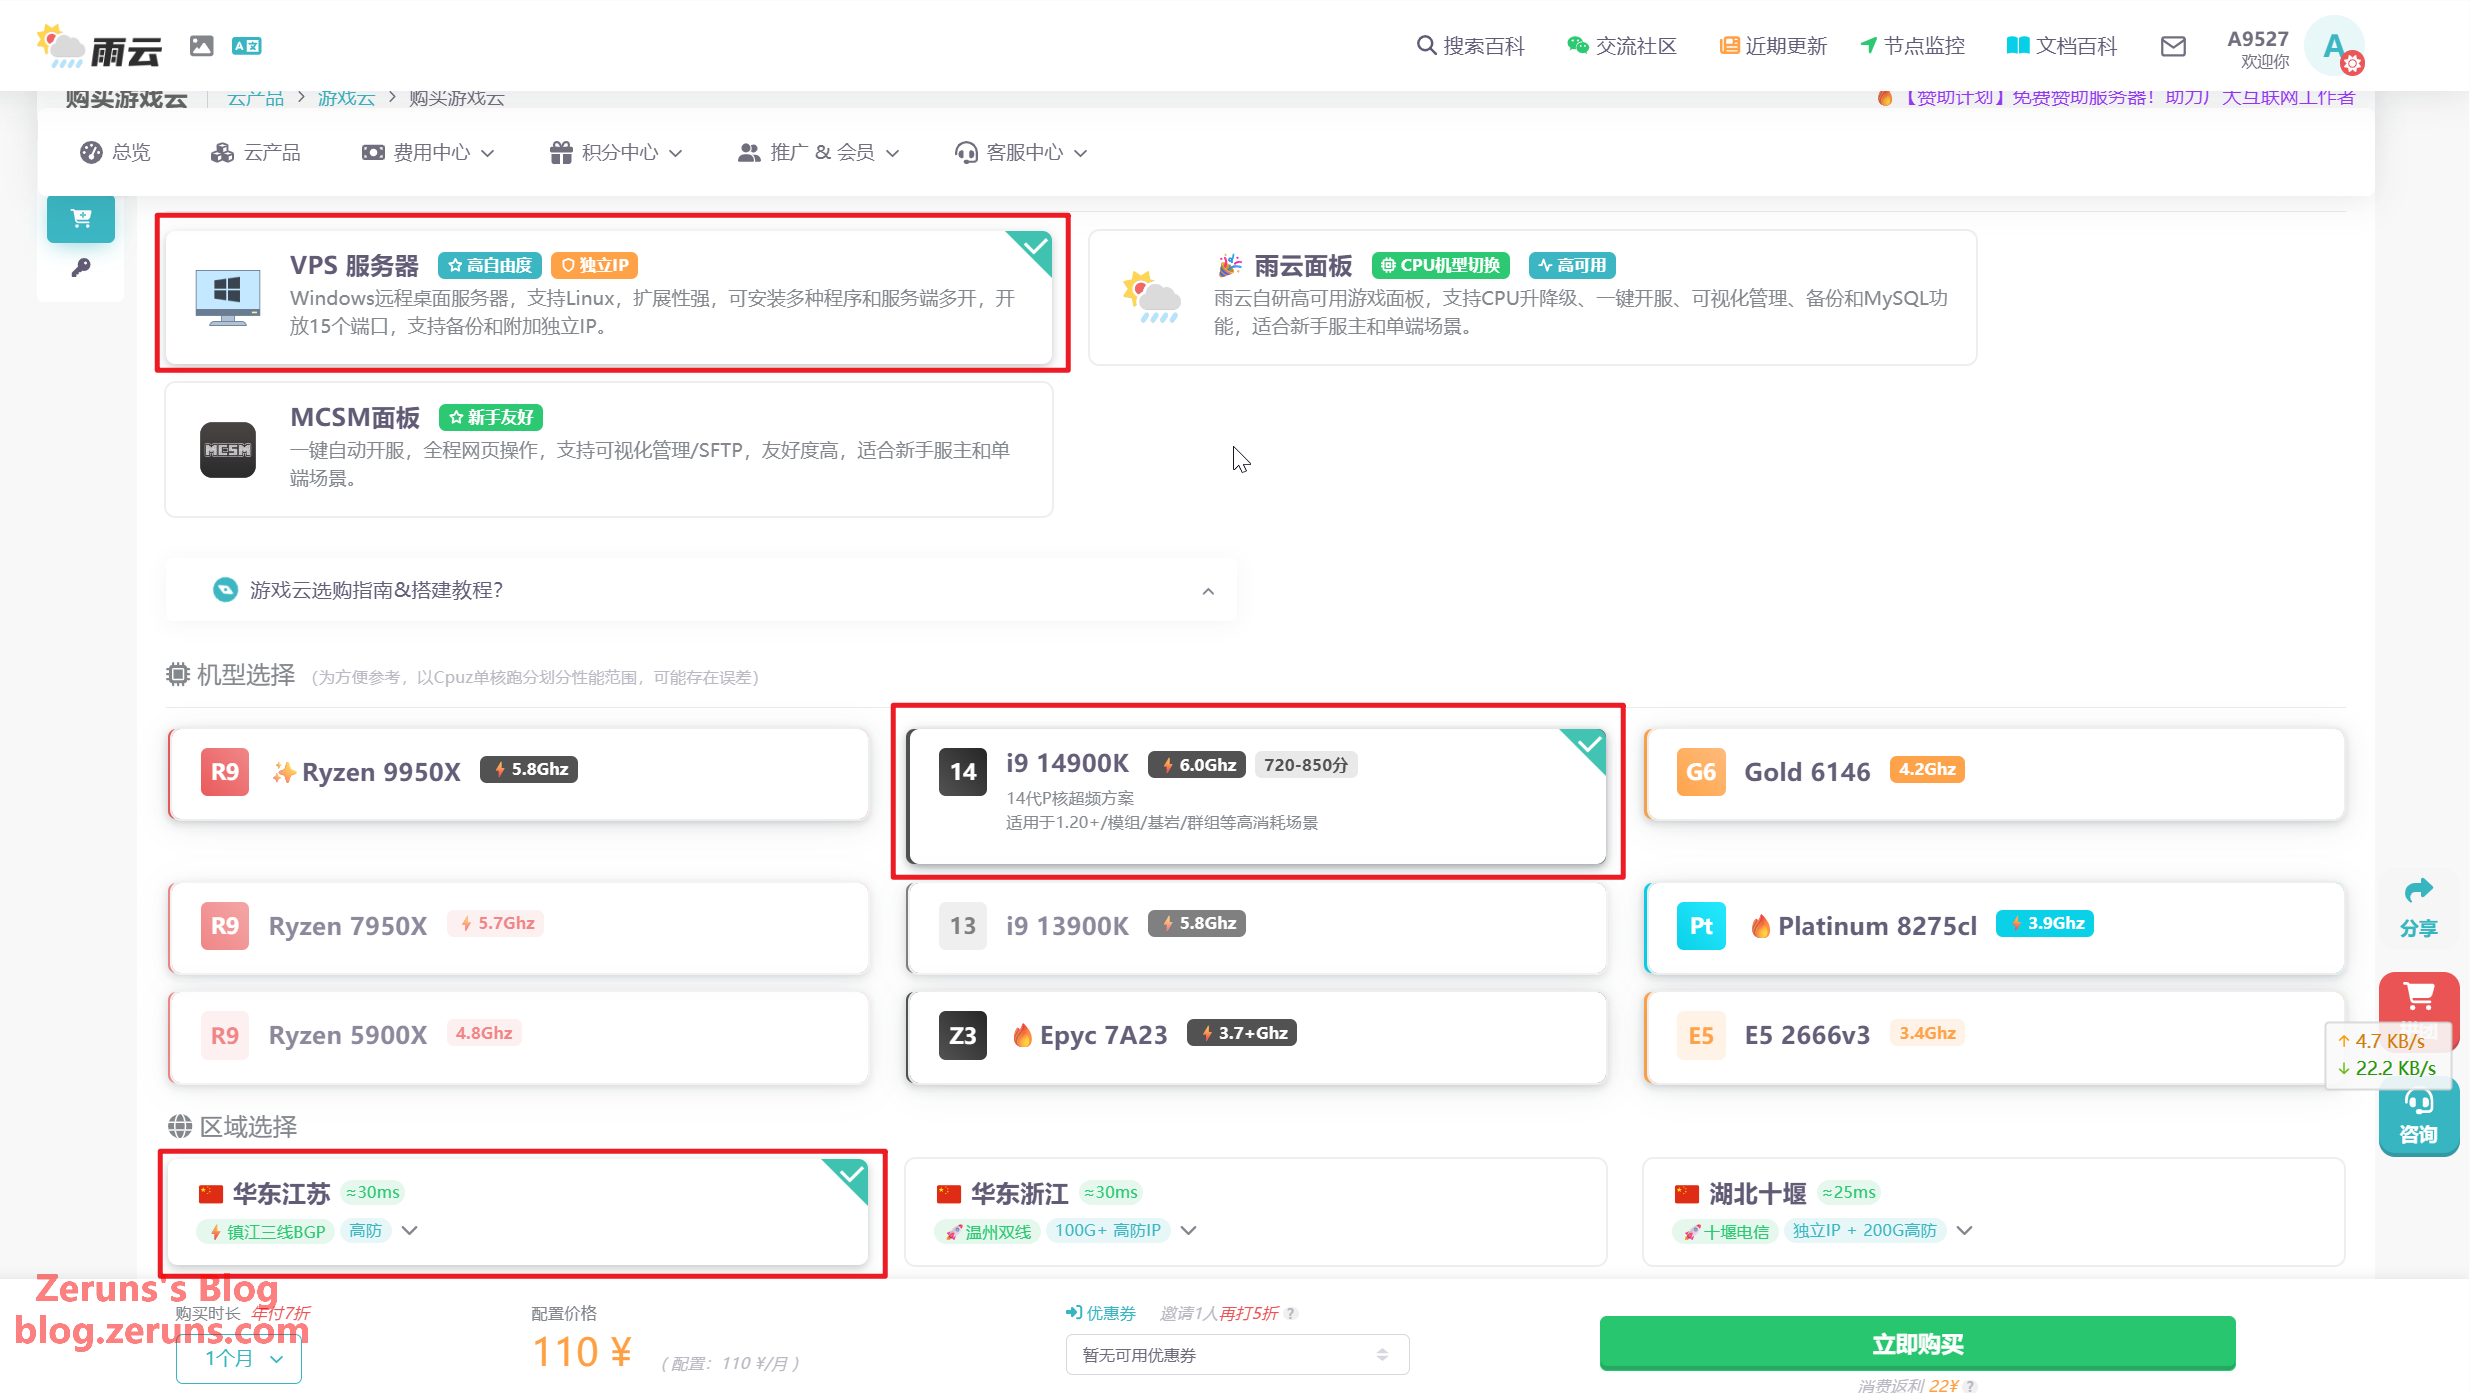
Pick VPS Server, choose your model — I'm going with the 14900K — then pick a region. I'll choose Zhenjiang, JiangsuZhenjiang.
Note: Zhenjiang, Jiangsu uses NAT networking (NAT means multiple users share a single public IP; you can pay extra for a dedicated public IP), so you'll need to set up port mapping, with 15 ports available. Ningbo, Zhejiang offers cheap dedicated public IPs, but it's China Telecom single-line only — users on other ISPs will see higher latency during peak hours. Both Zhenjiang and Suqian use BGP routing, where users across all ISPs enjoy lower latency and better overall performance.
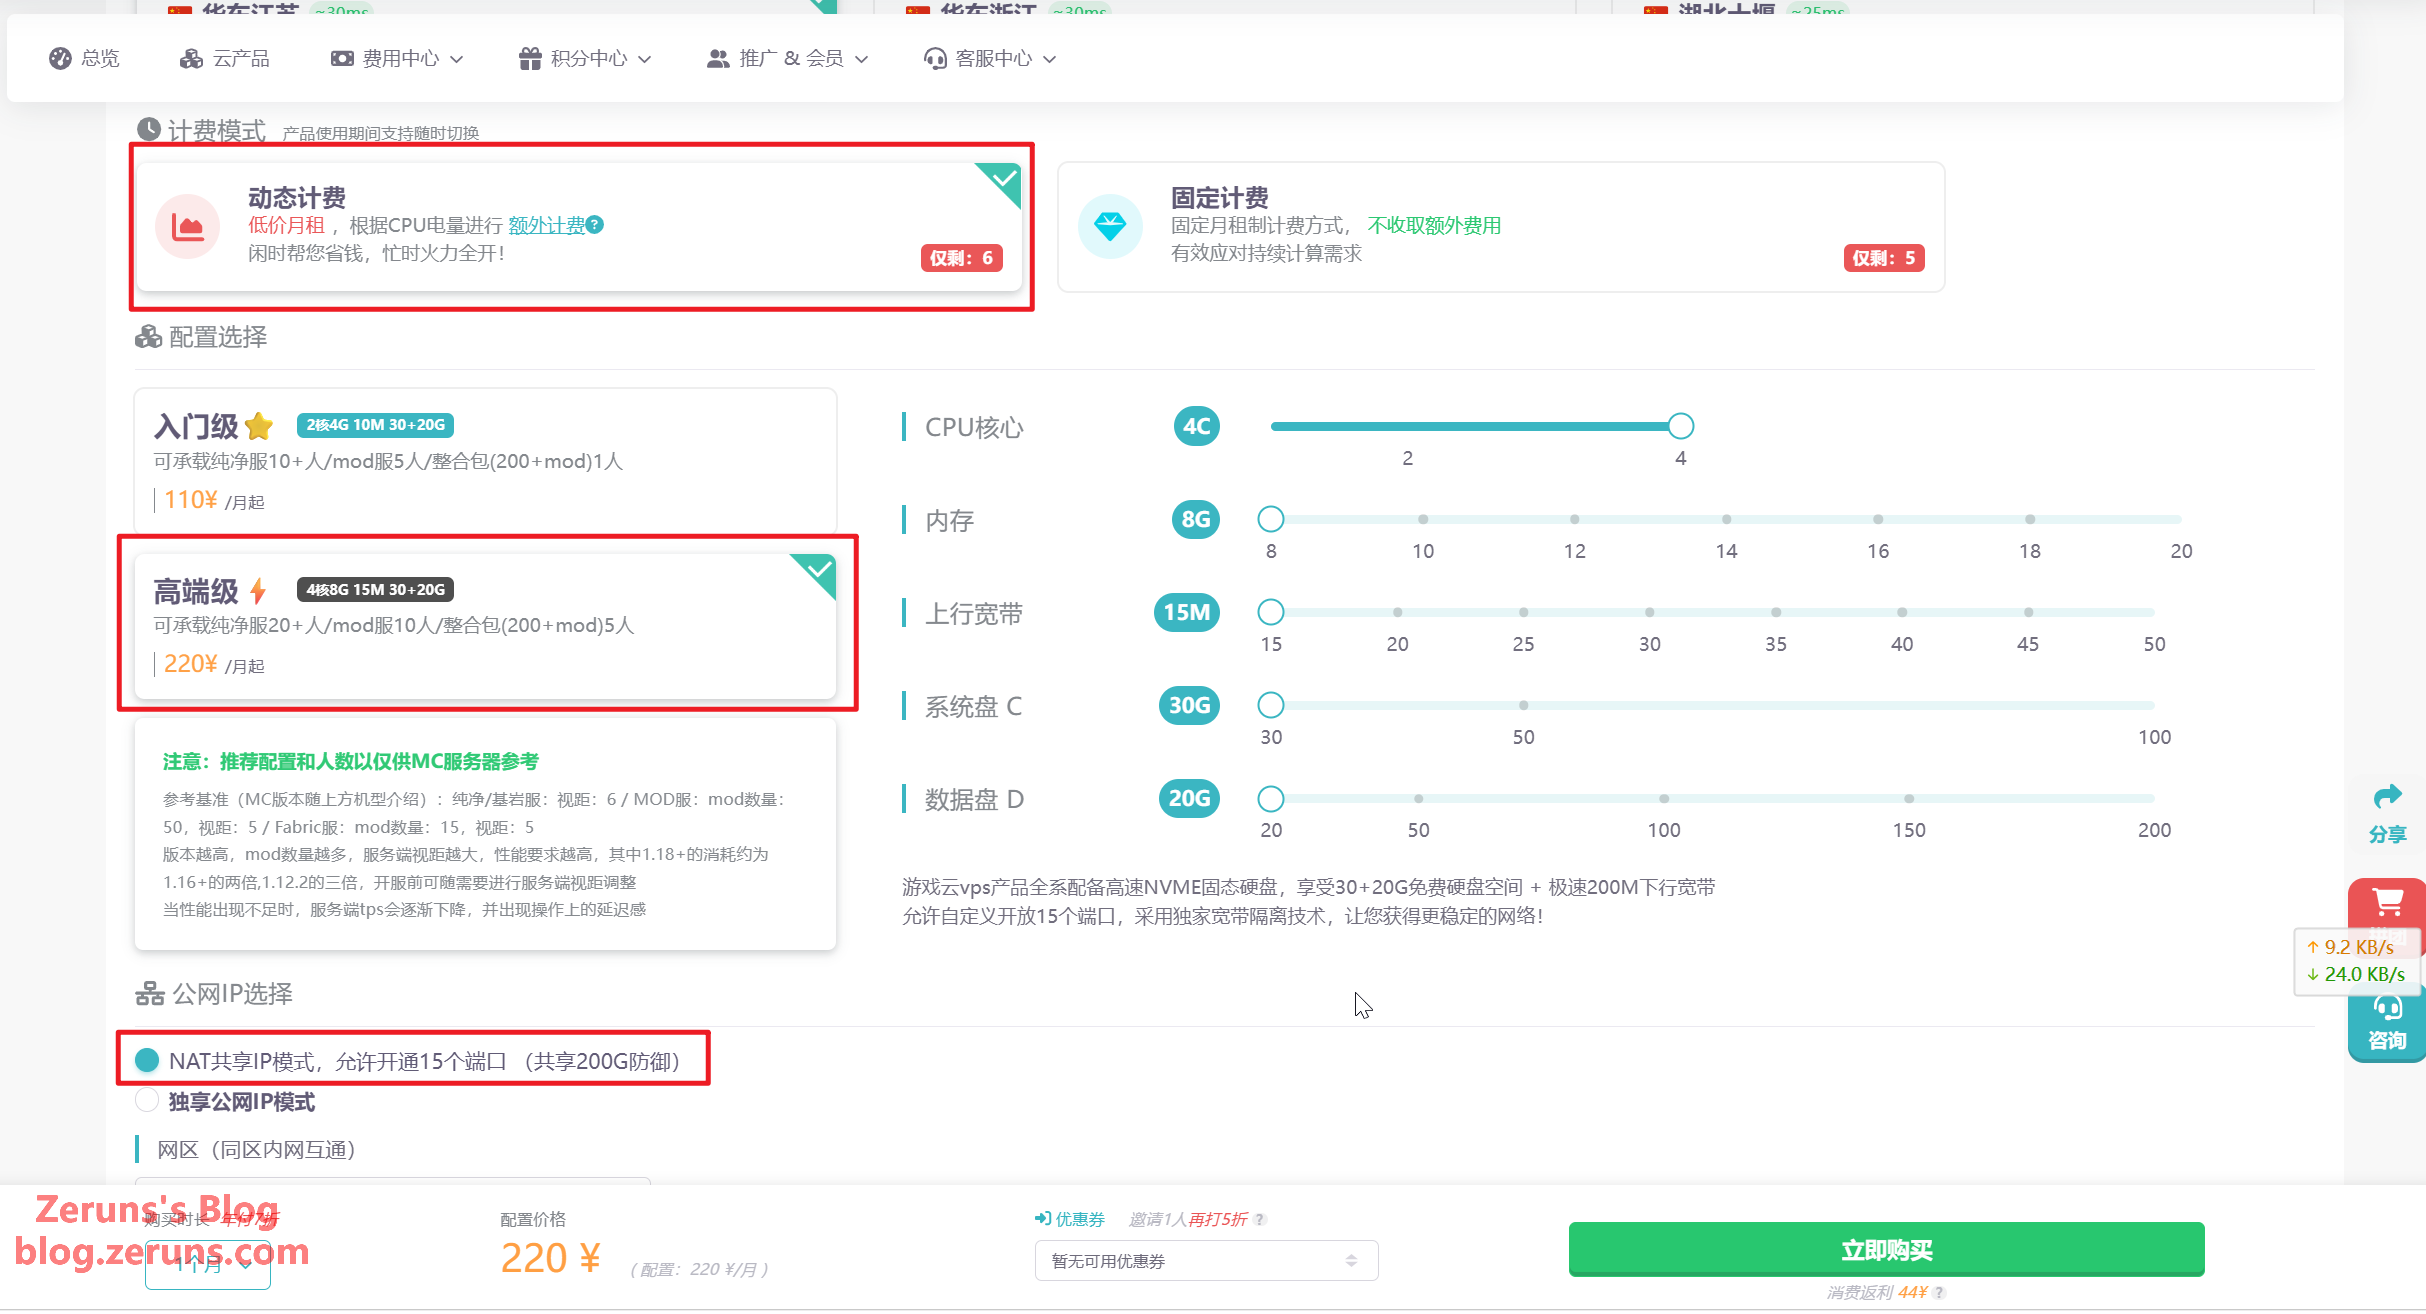
Choose a billing mode — there's dynamic billing and fixed billing. If you're only playing occasionally, go with dynamic billing (extra charges kick in only when CPU usage tops 20%, with a daily free allowance). For specs, pick 4 cores / 8GB or above (drag the slider on the right if you need more). You can always bump up the memory later as your player base grows. For IP type, the default NAT is fine.
For the OS, select Debian 12. Leave "software installation" unchecked, then choose your billing period. Annual plans get 30% off (and you can stack the 80% coupon I posted in the points mall — only available if you registered through my link).
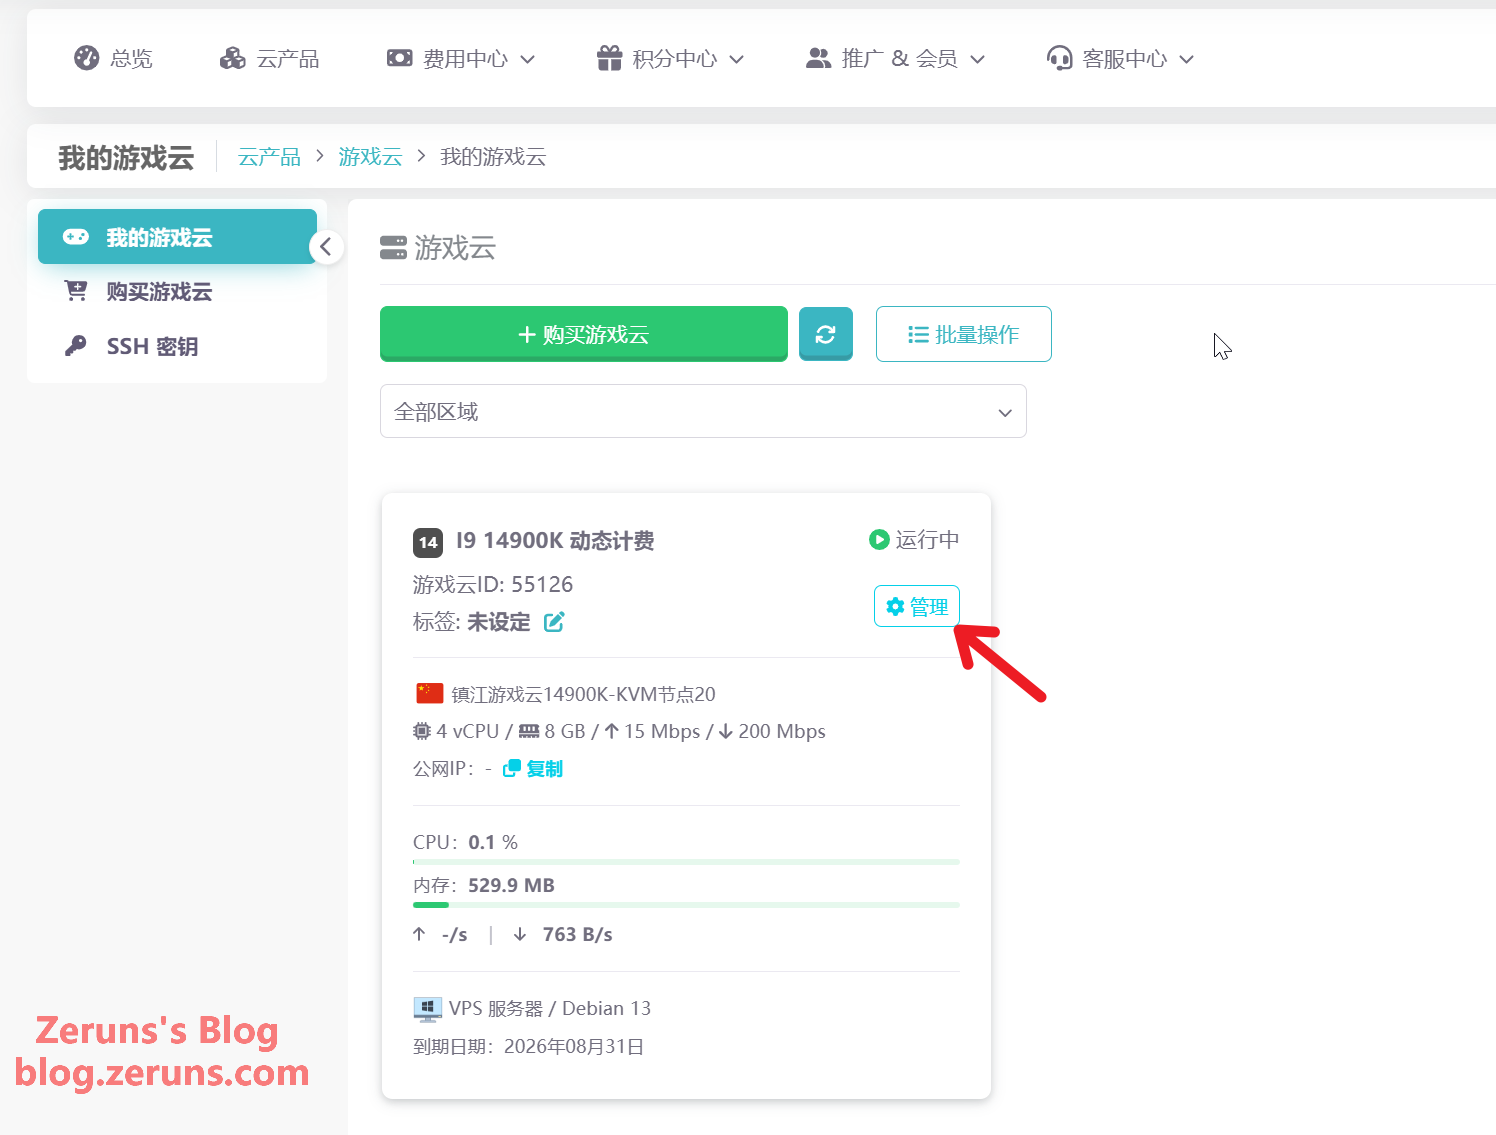
Once purchased, your VPS shows up under "My Game Cloud." Click the card or the Manage button.
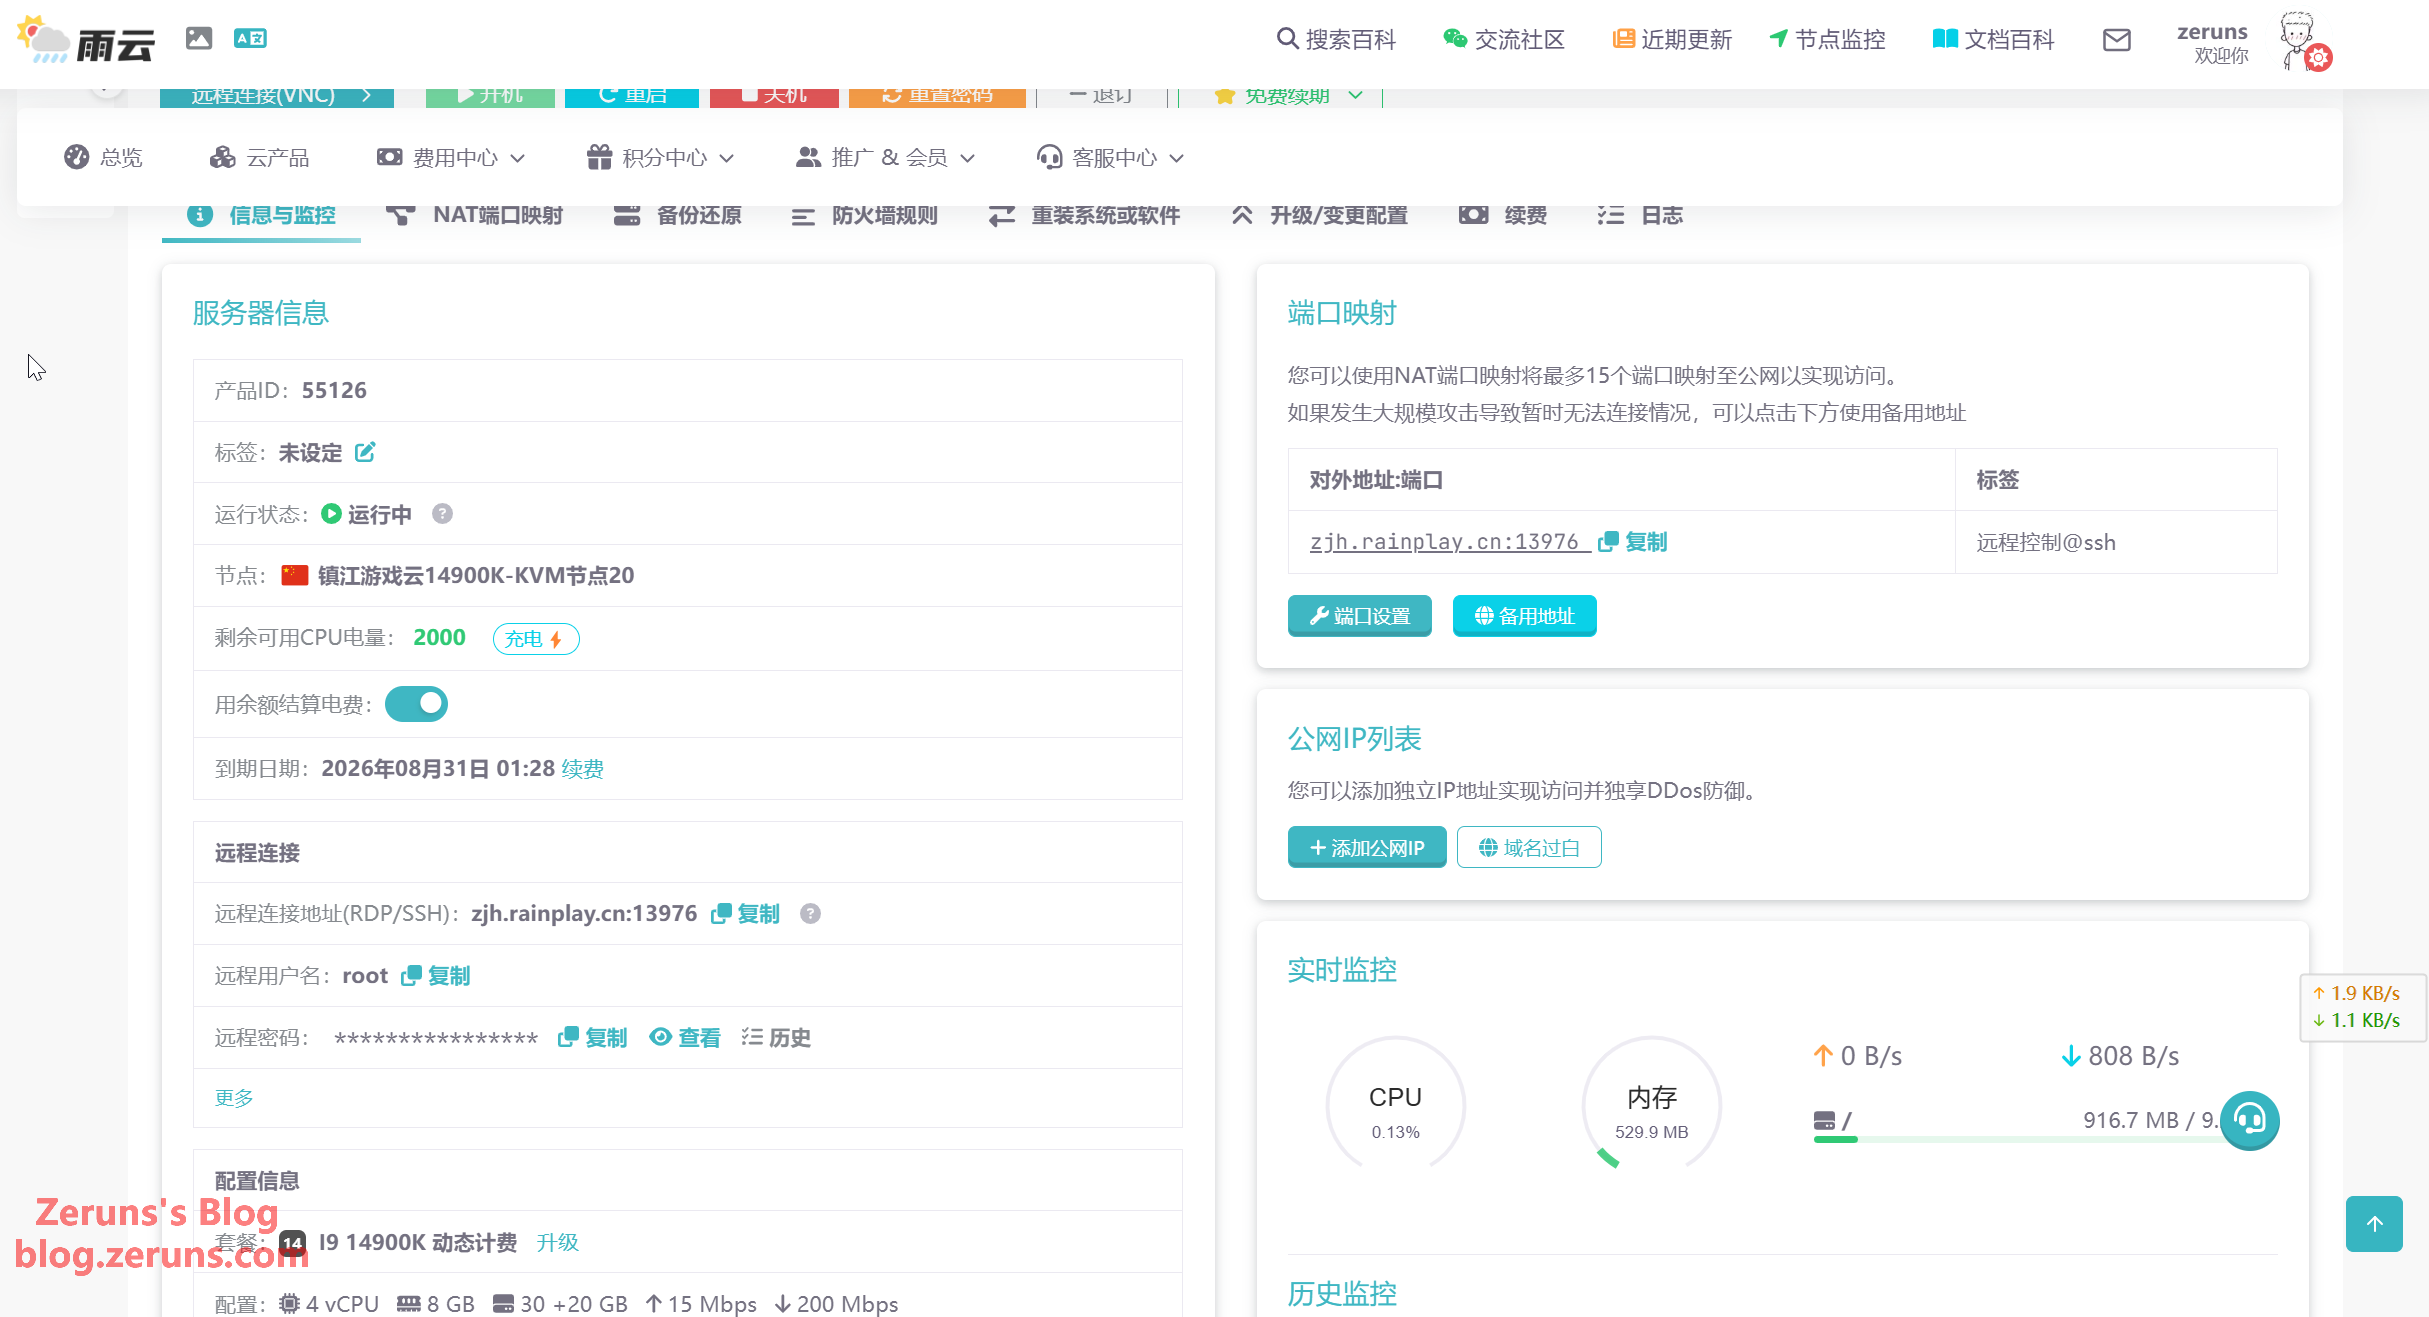
From here you can see your VPS details, reinstall or switch the OS, and upgrade the specs.
Setting Up Port Mapping
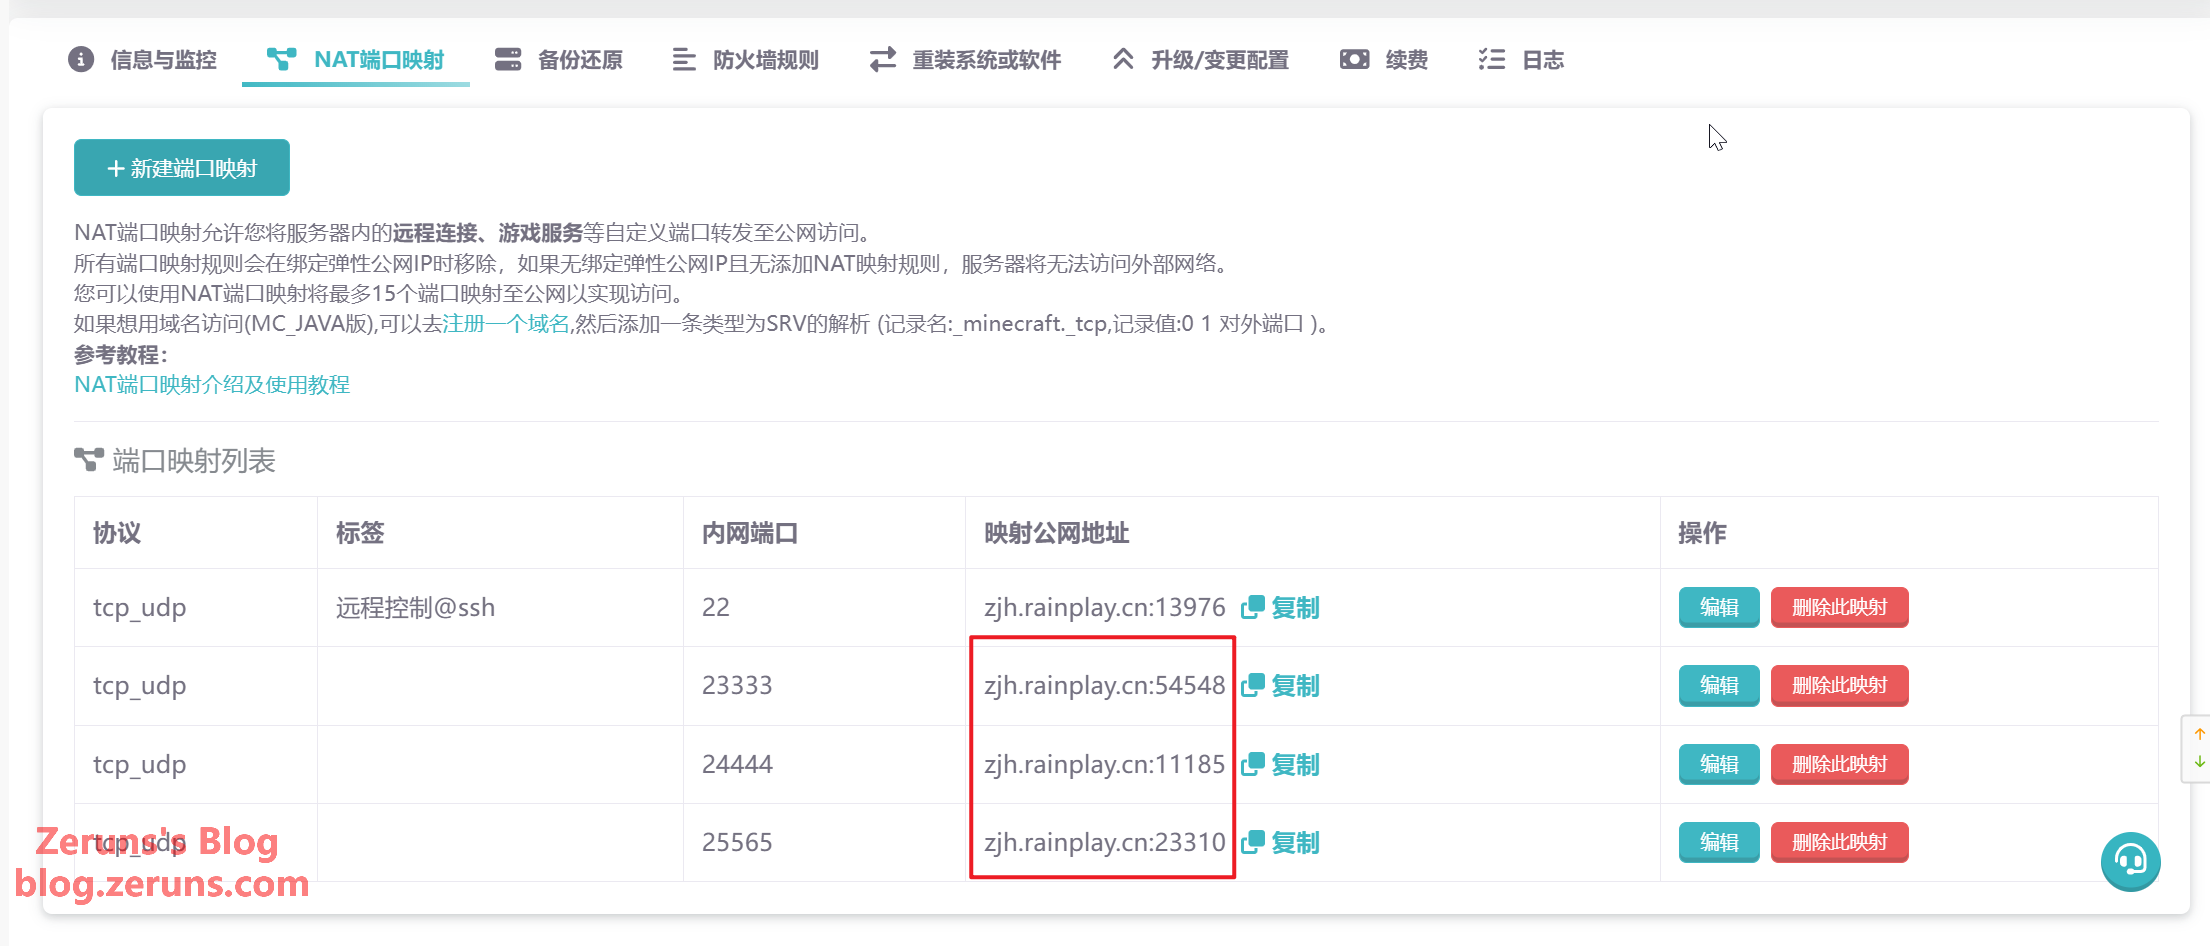
Since the server we bought shares a public IP (it's a NAT machine), we need to set up port mapping to expose the panel and Minecraft server ports to the outside world.
Think of a port as a door number for each service on the server — MCSM panel uses 23333 and 24444, and the Minecraft server uses 25565.
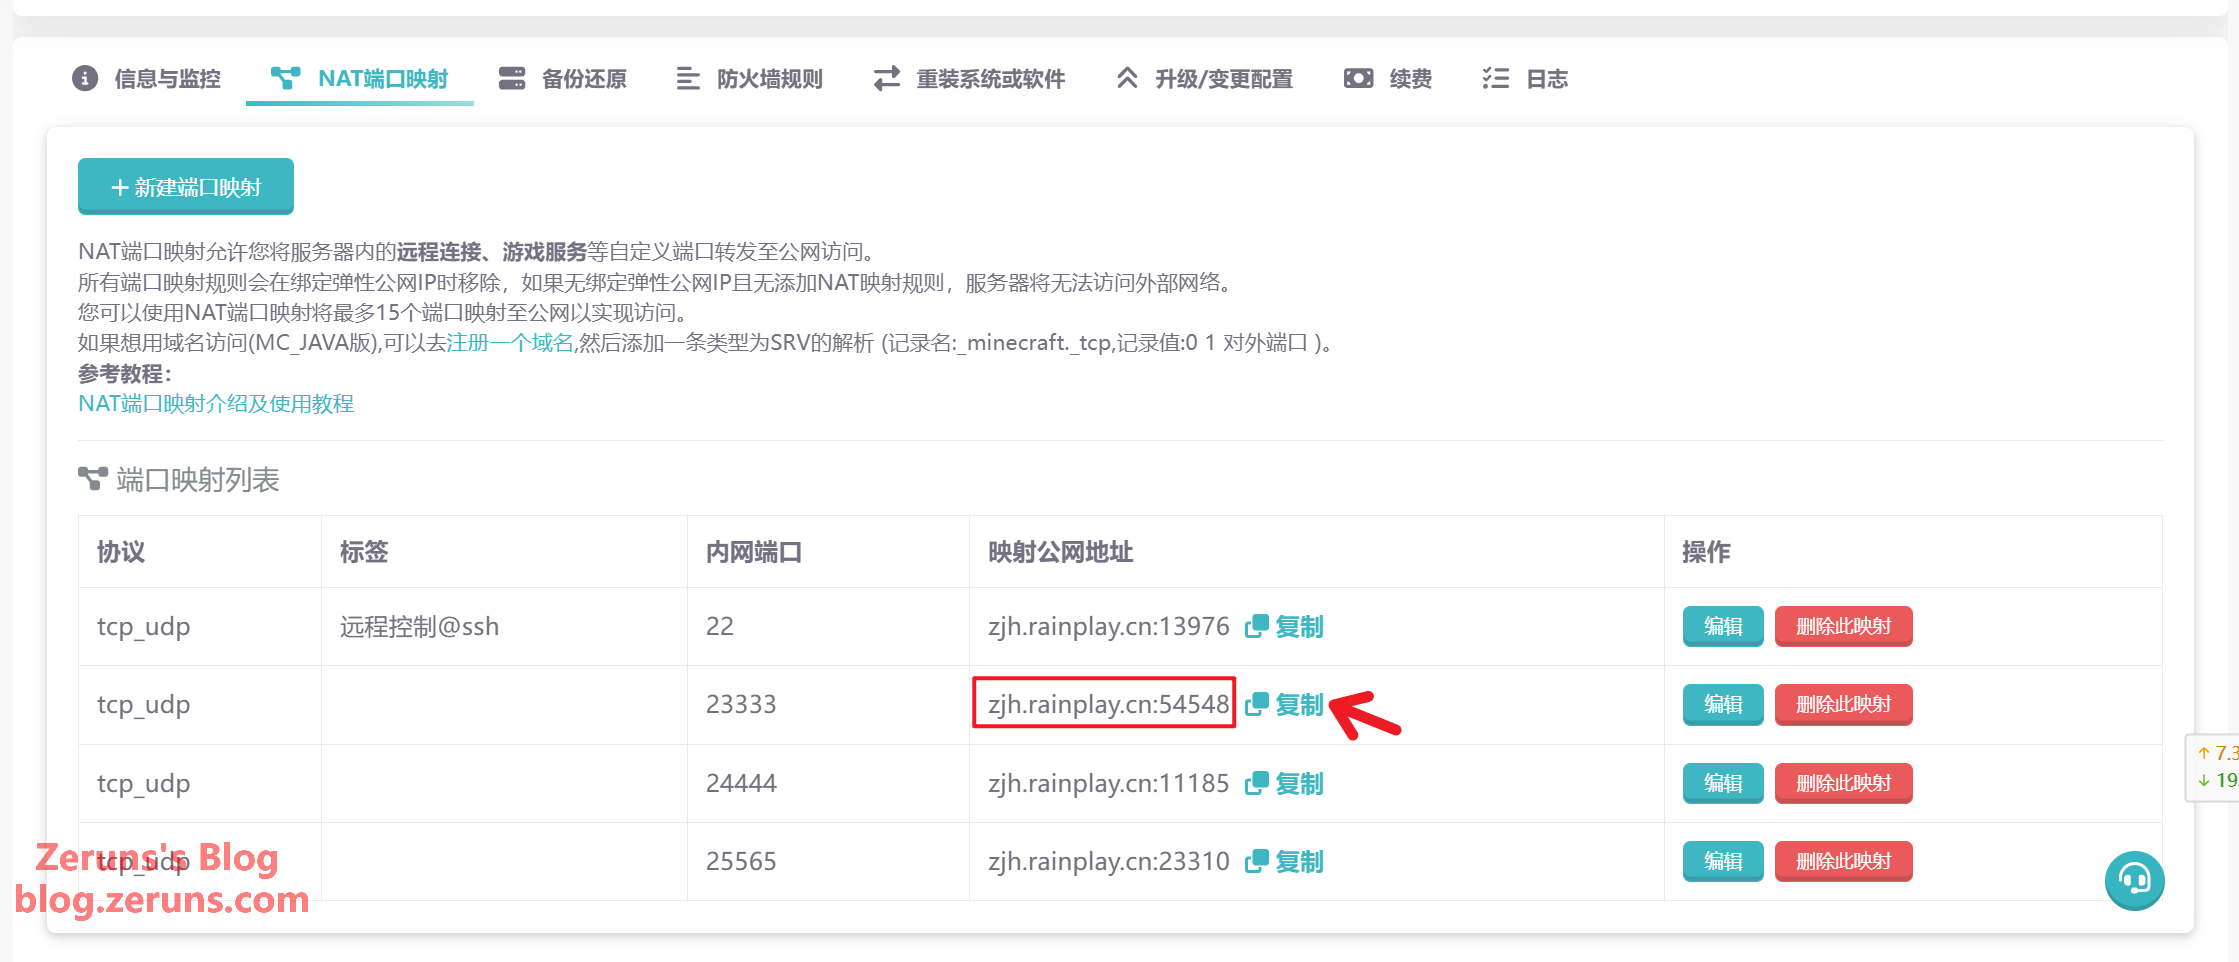
Head back to the RainYun console, click NAT Port Mapping, then New Port Mapping. Set the protocol to TCP+UDP, enter 23333 for the internal port, and leave the external port as the random default. Click Create Mapping Rule. If it tells you the external port is already taken, just pick any external port yourself (port range: 10000–60000).
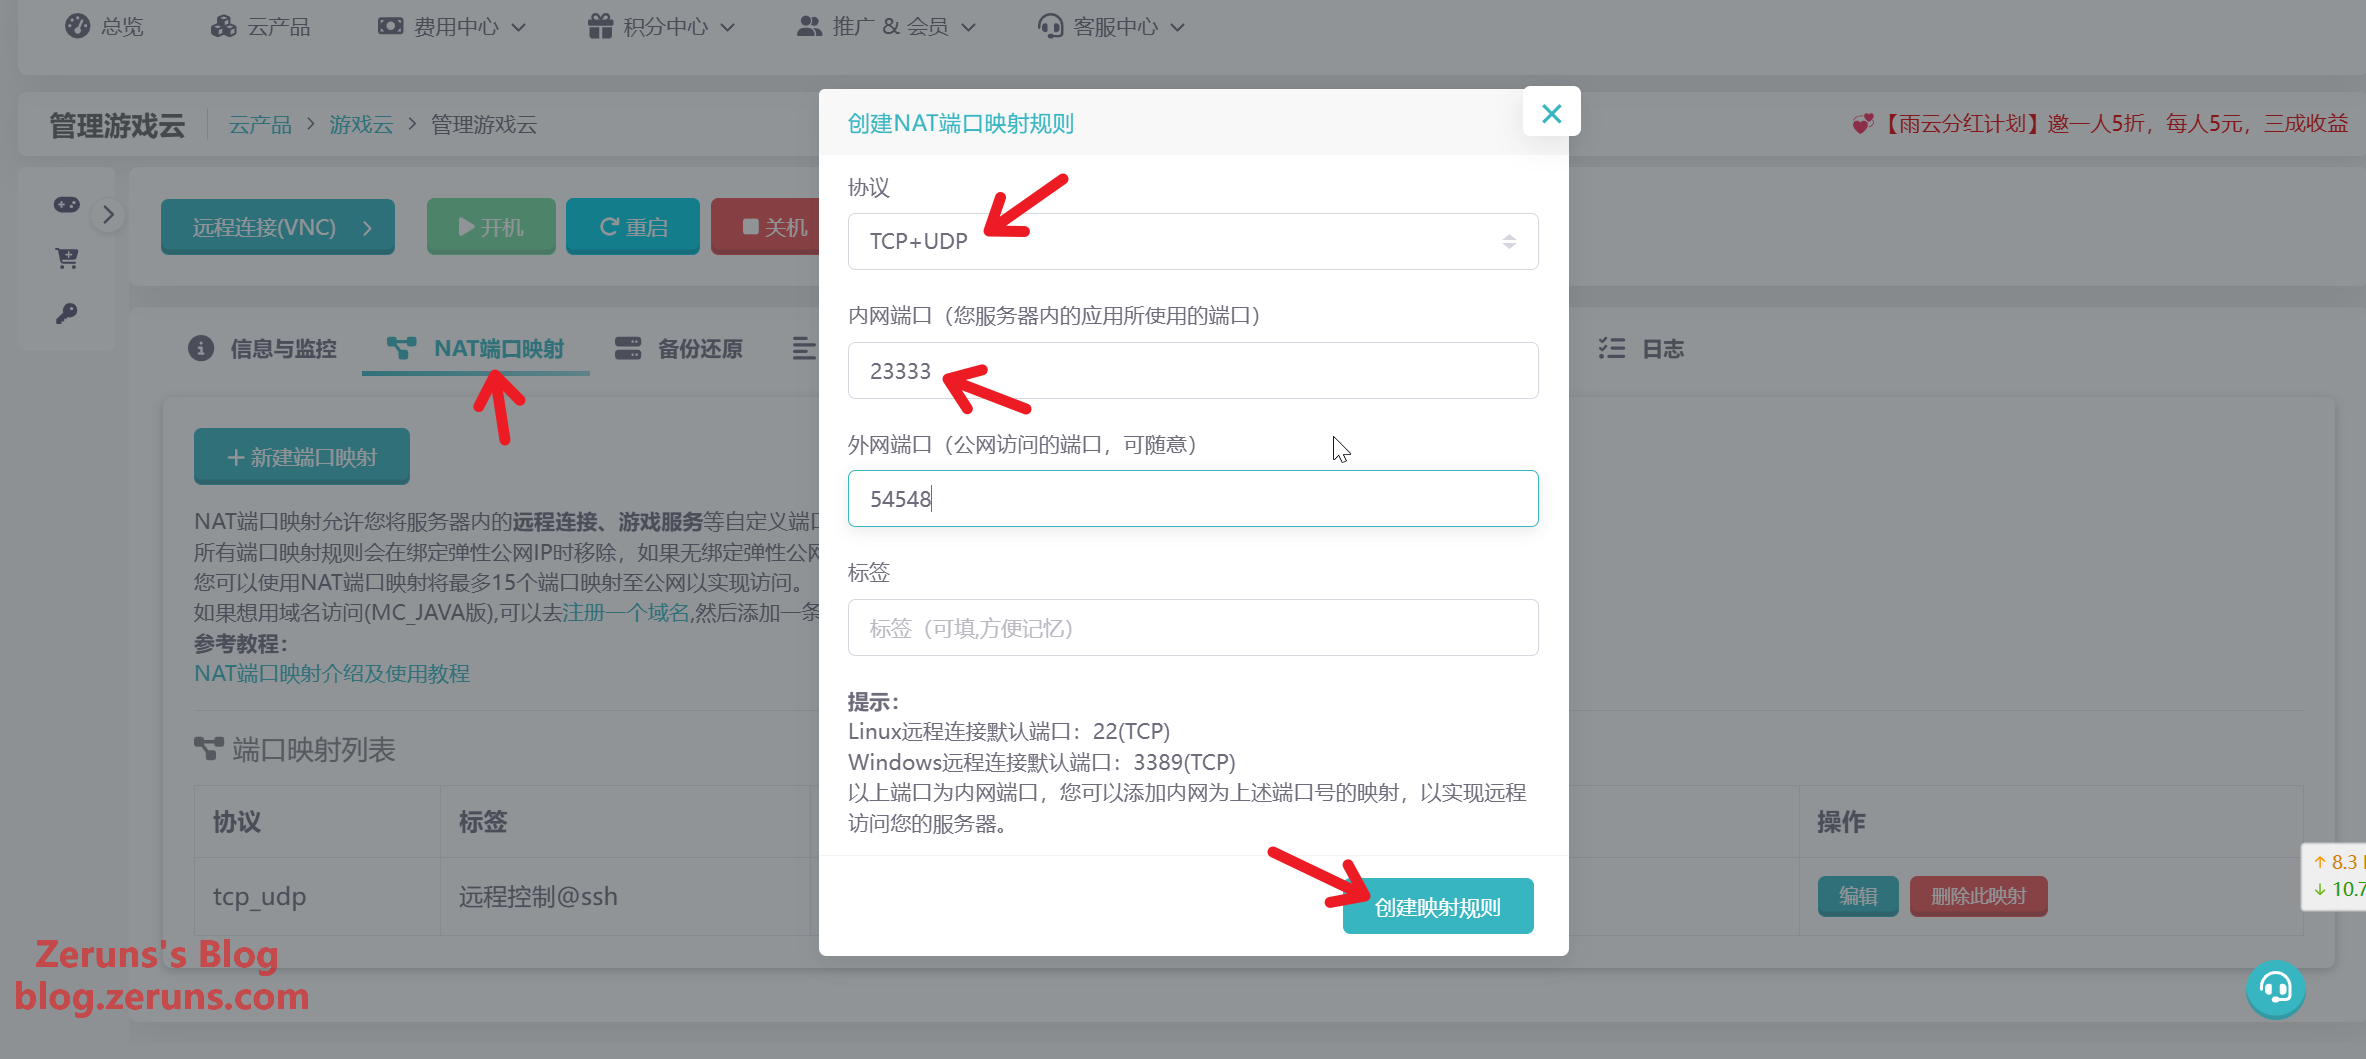
Repeat the steps above to add mappings for all the ports you'll need:
MCSM needs ports: 23333 and 24444
The default Minecraft server port: 25565
Connecting to Your Server
Download, install, and open an SSH client. PuTTY and MobaXterm are both good choices.
SSH client download: https://www.123pan.com/ps/2Y9Djv-UAtvH.html
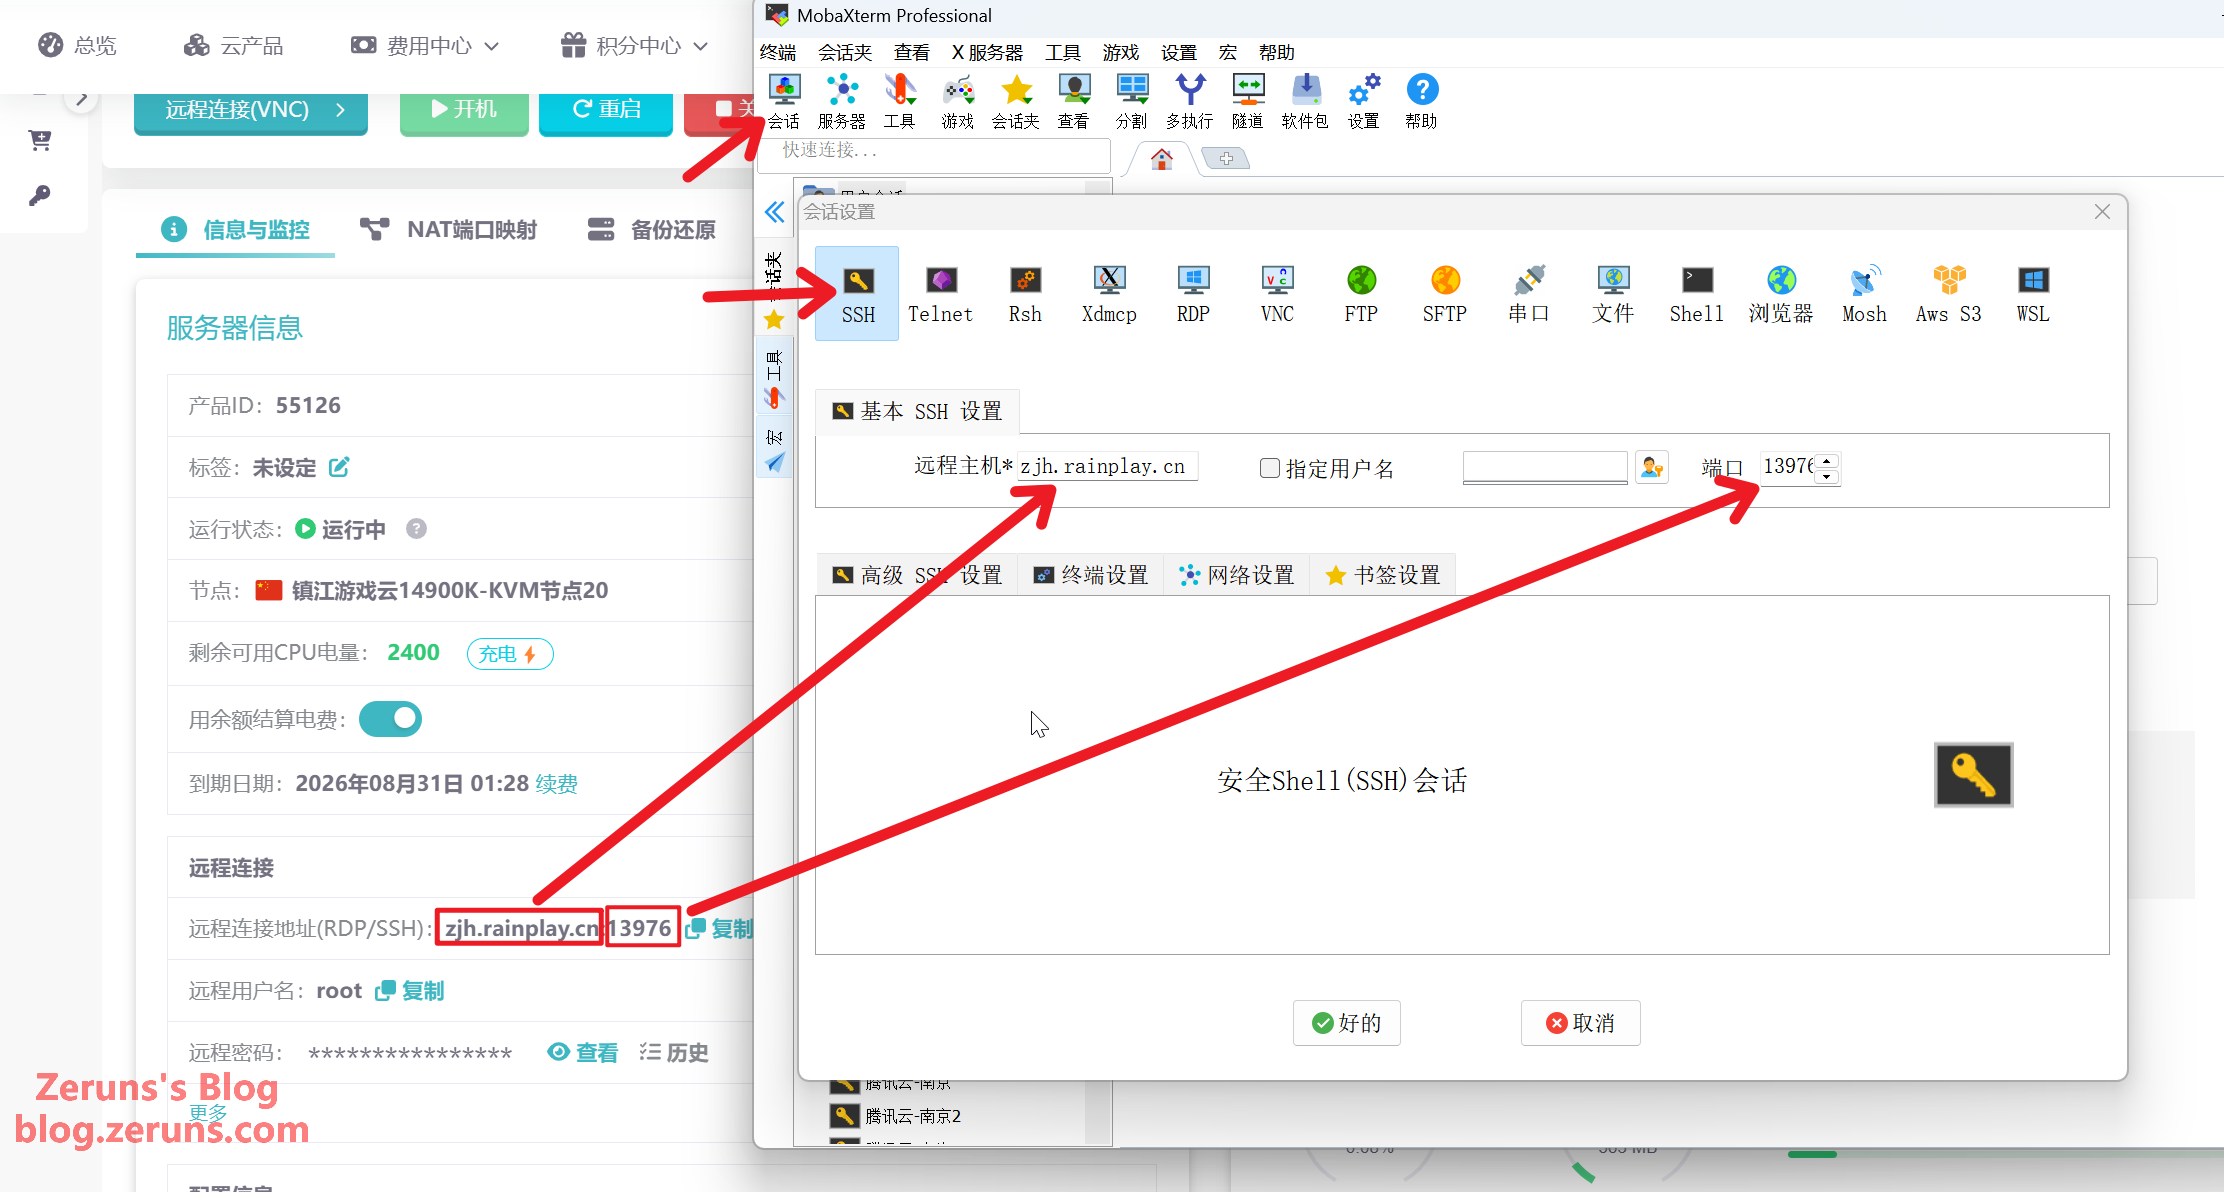
I'll use MobaXterm here. Open it, click Session → SSH, type your server's IP address and port into the Remote Host field (if you have a dedicated public IP, the port is usually 22), then click OK.
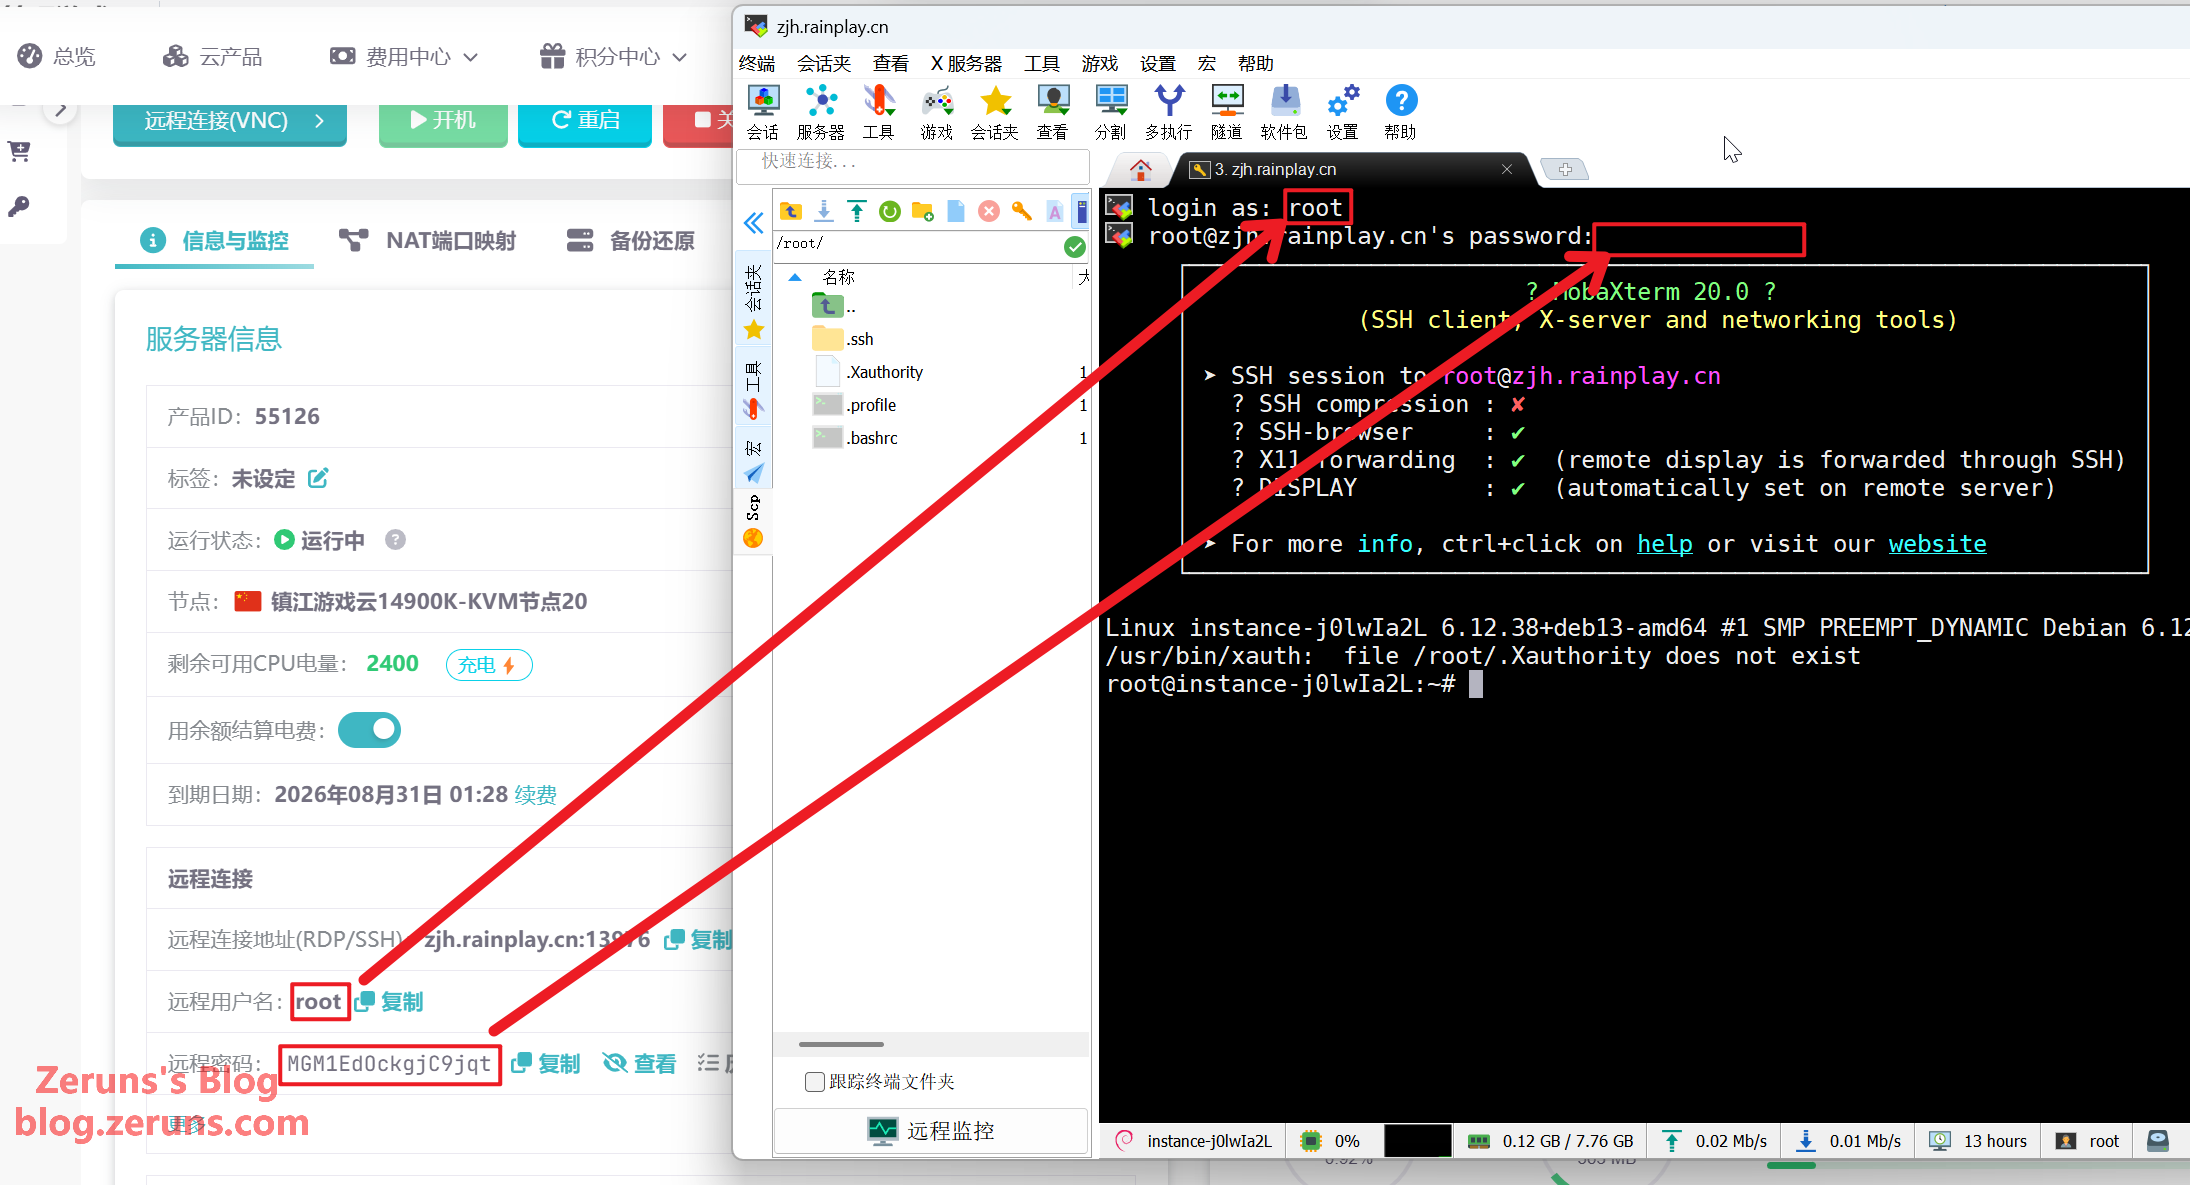
Type the username and hit Enter — it's usually root by default. Then type the password and press Enter to confirm. Note: the password won't show up on screen as you type.
Handy tip: in the SSH terminal, hold the left mouse button to highlight text, release it, then click once in a blank spot to copy what you highlighted. Right-click in the SSH terminal to paste.
Switching the APT Mirror
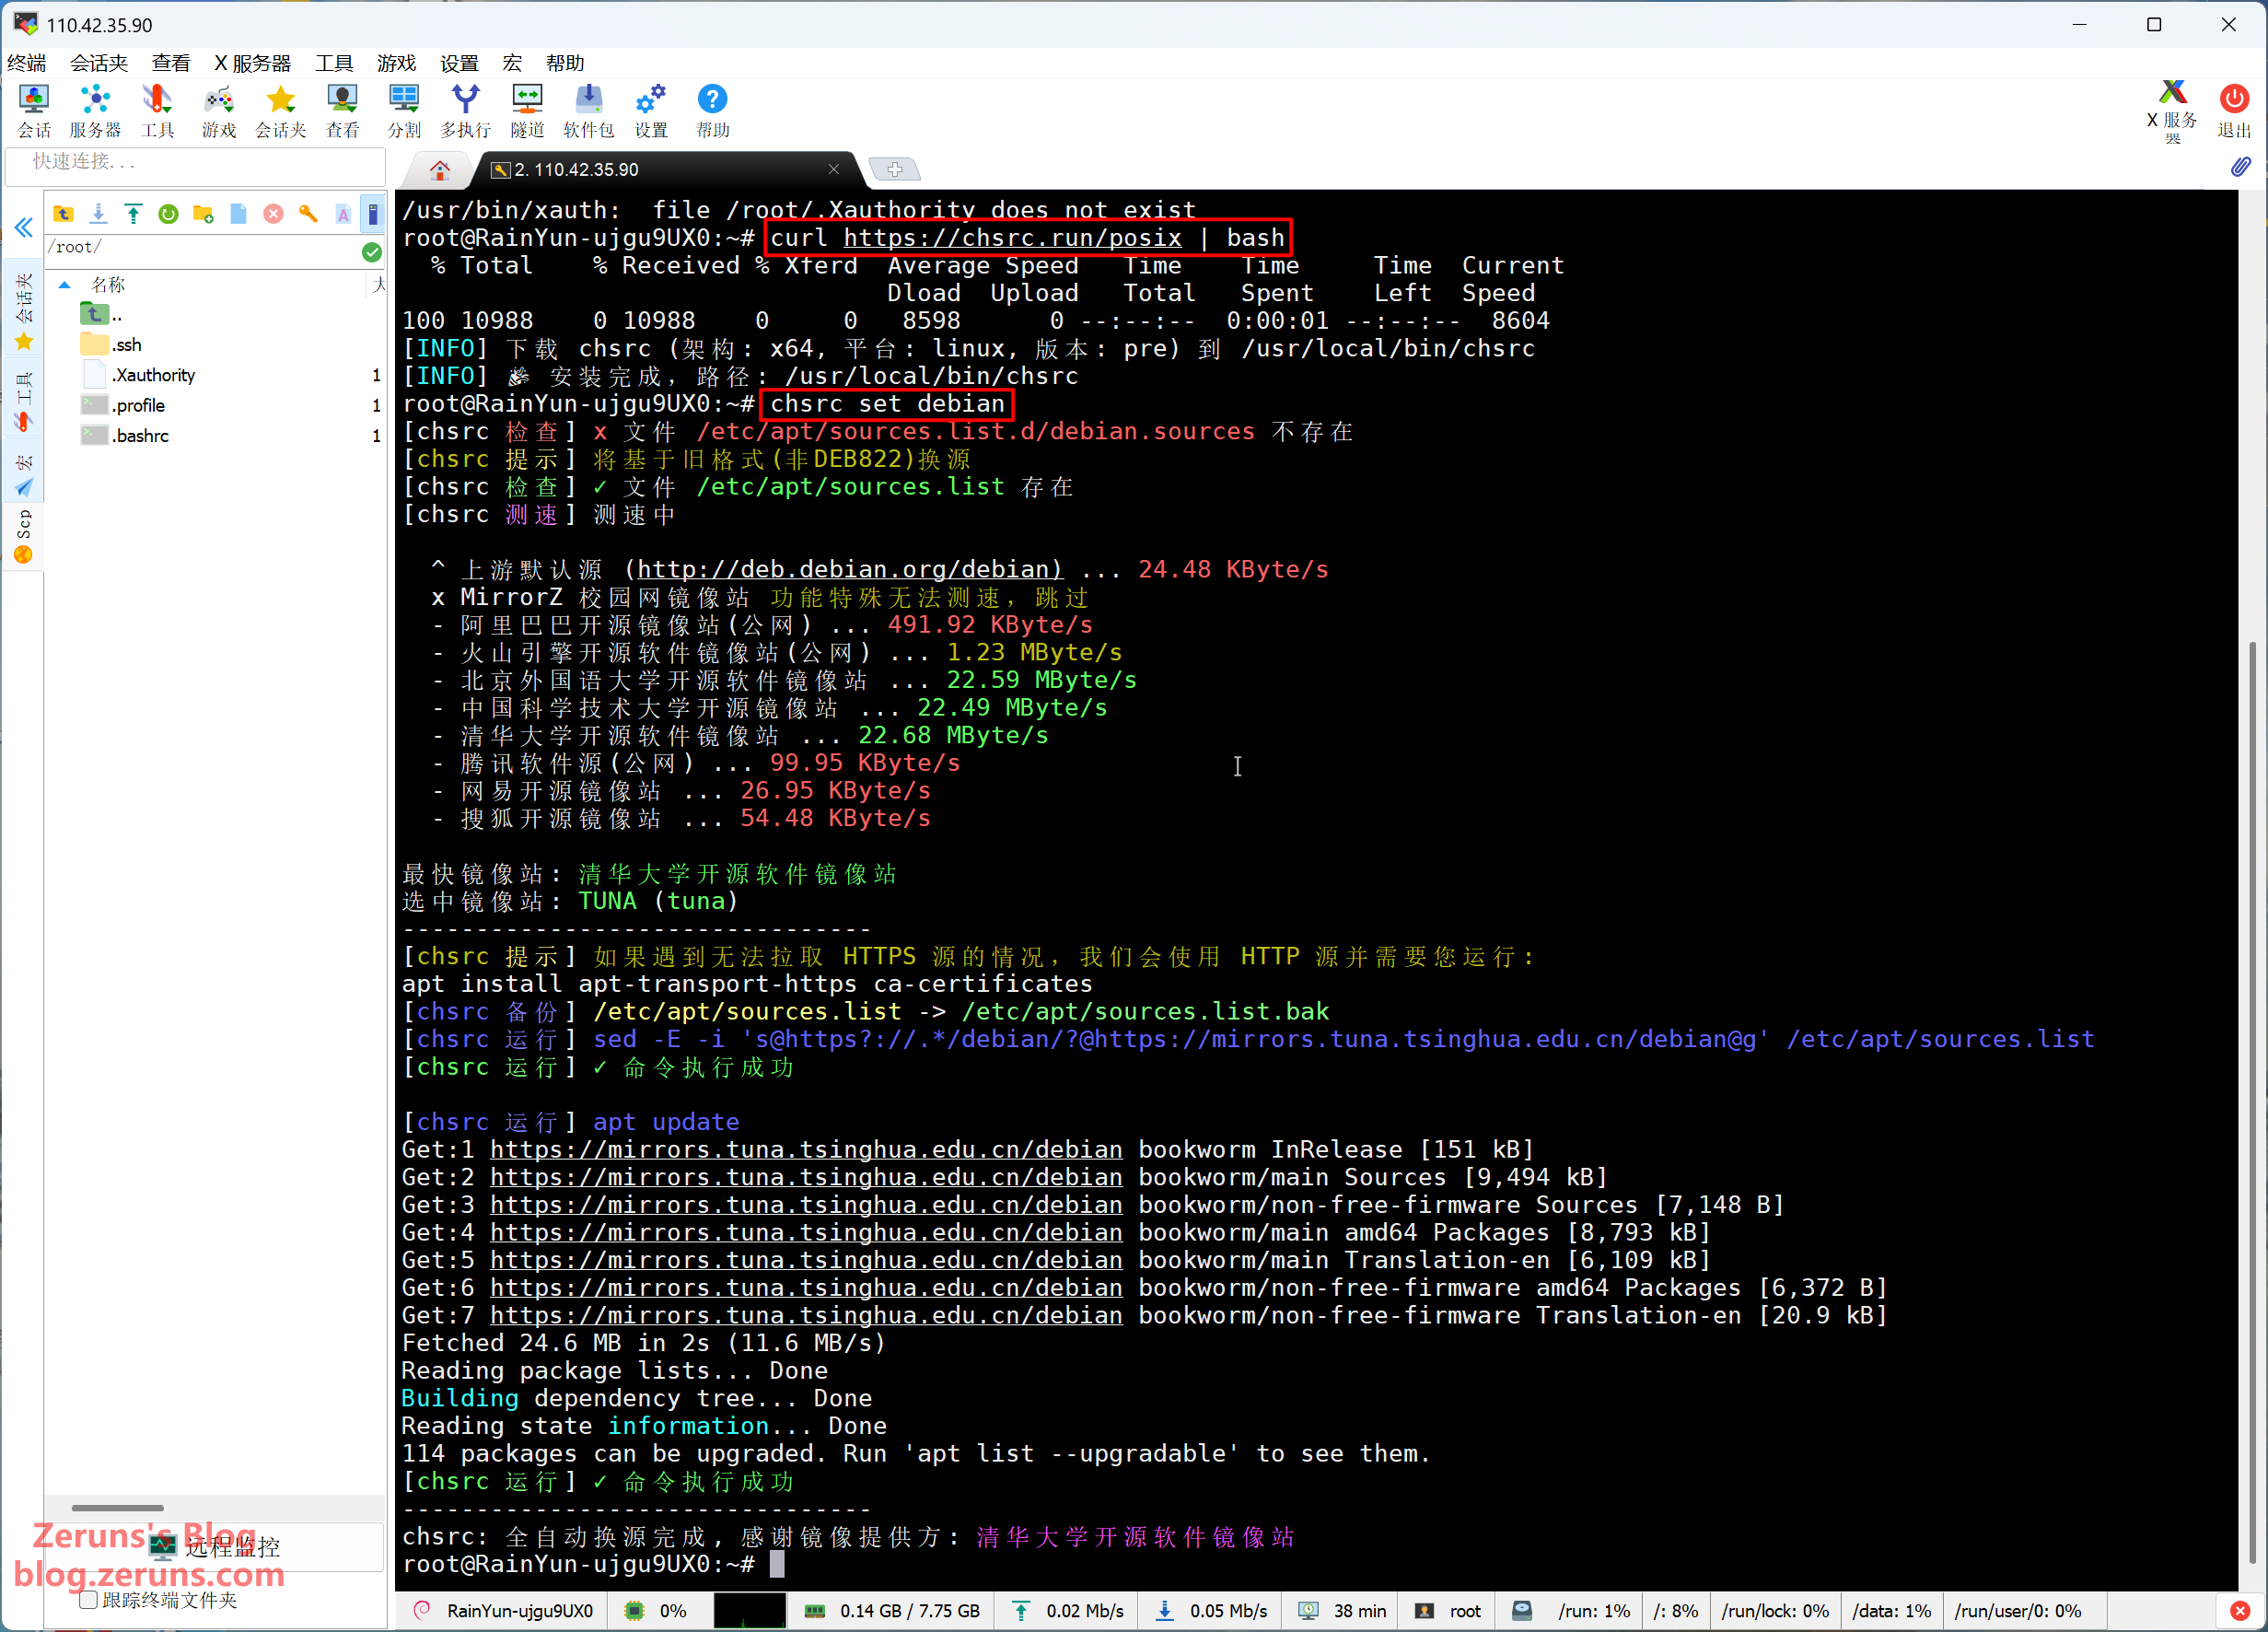
The system's default apt package source points to overseas servers, so we'll swap it for a domestic mirror using chsrc.
In the SSH terminal, run the following commands (lines starting with # are comments — no need to type those):
# Download and install chsrc
curl https://chsrc.run/posix | bash

# Auto-test speeds, pick the fastest mirror, and switch
chsrc set debian
Installing the MCSM Panel
Quick script install
Run the following command:
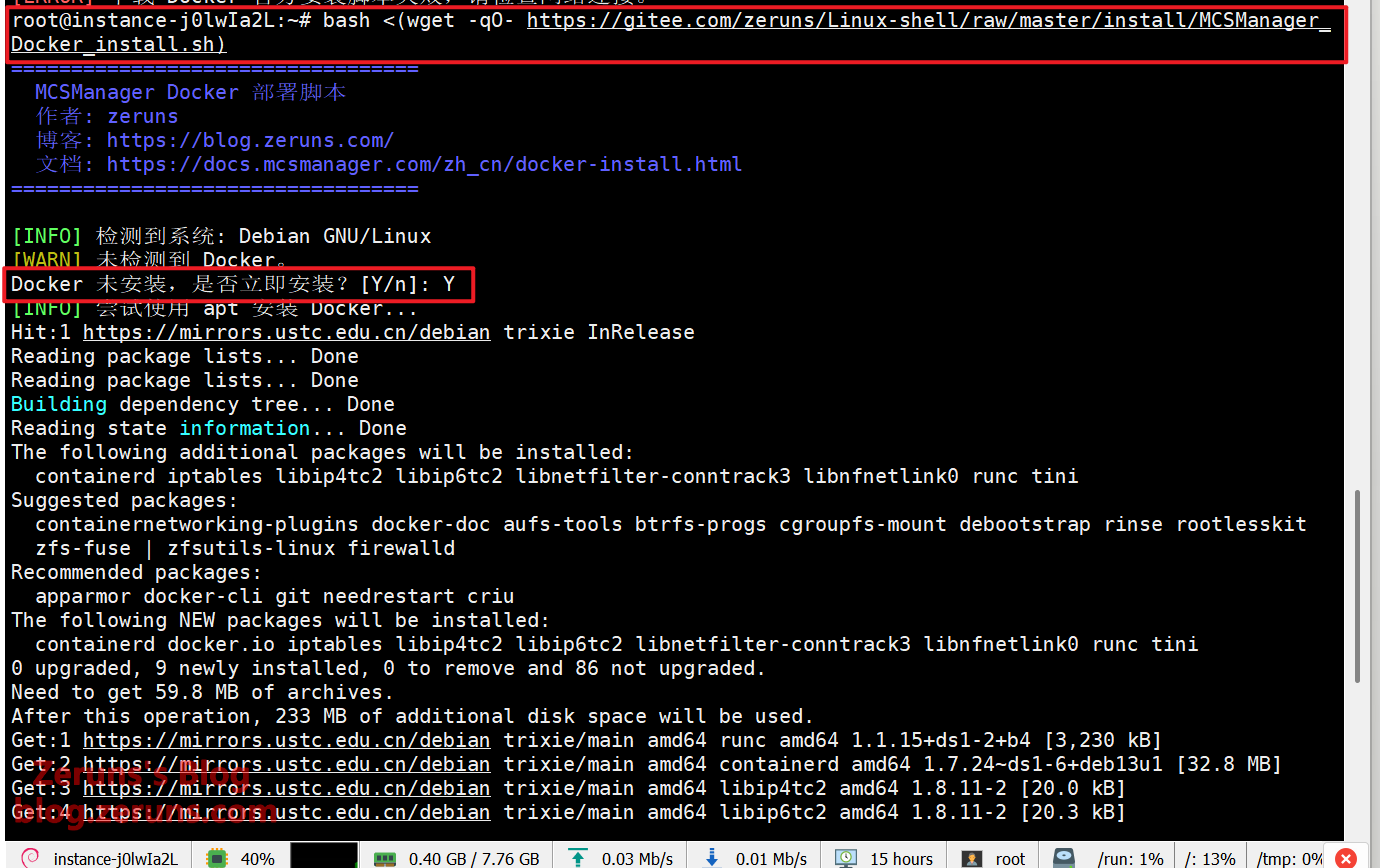
bash <(wget -qO- https://gitee.com/zeruns/Linux-shell/raw/master/install/MCSManager_Docker_install.sh)
This is a Docker-based MCSM panel install script I wrote with AI.
If Docker isn't installed yet, it'll ask whether to install it — type Y and hit Enter.
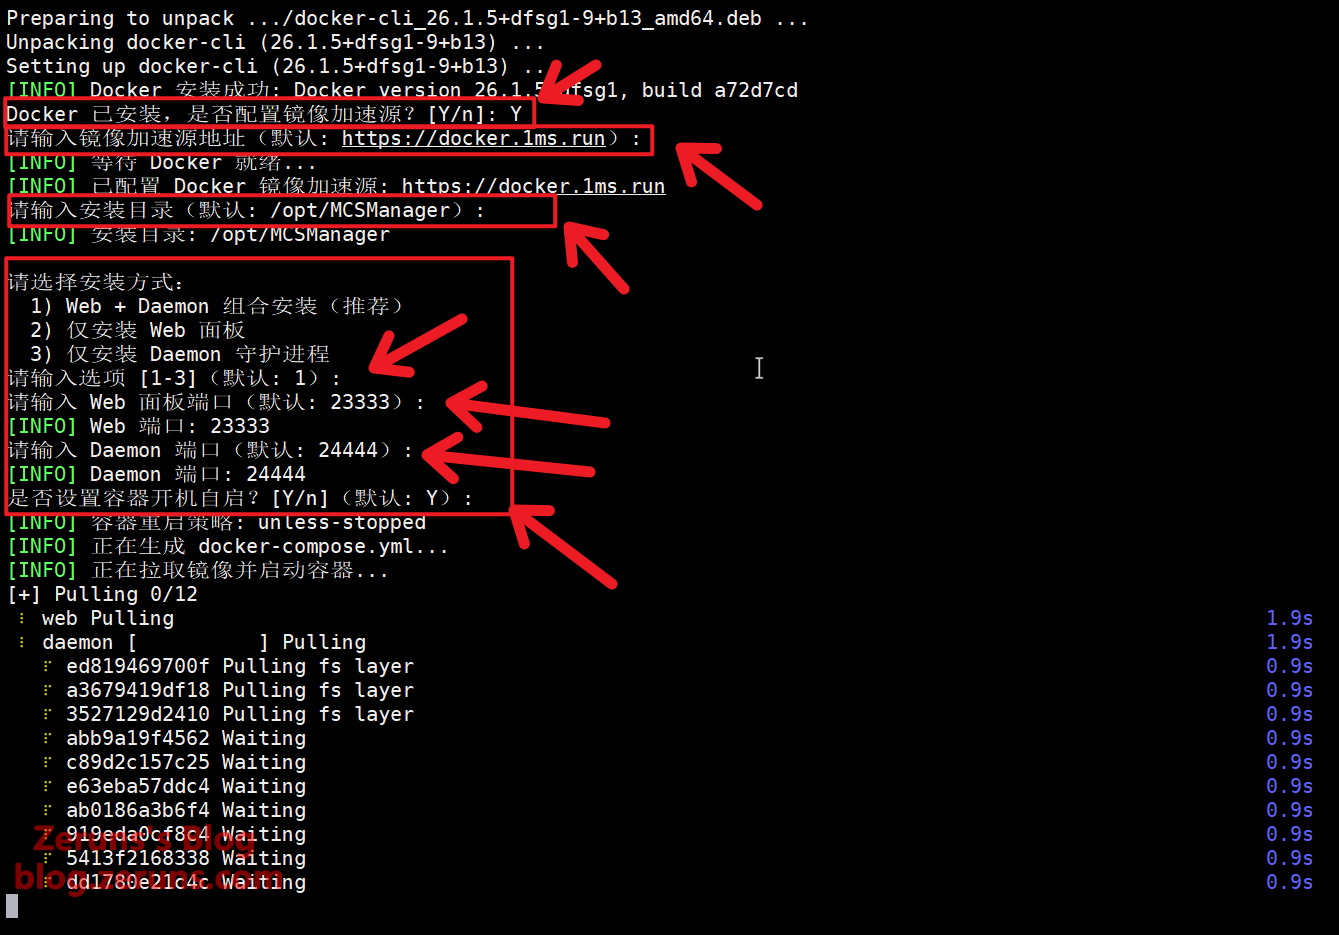
Next it'll ask about configuring a mirror accelerator — type Y and hit Enter. For the remaining prompts, just press Enter to accept the defaults.
If you've got multiple servers that need MCSM, you can install just the Daemon (the agent) on the other machines, then add them as nodes from the server running the Web panel — that way you manage everything from one web interface.
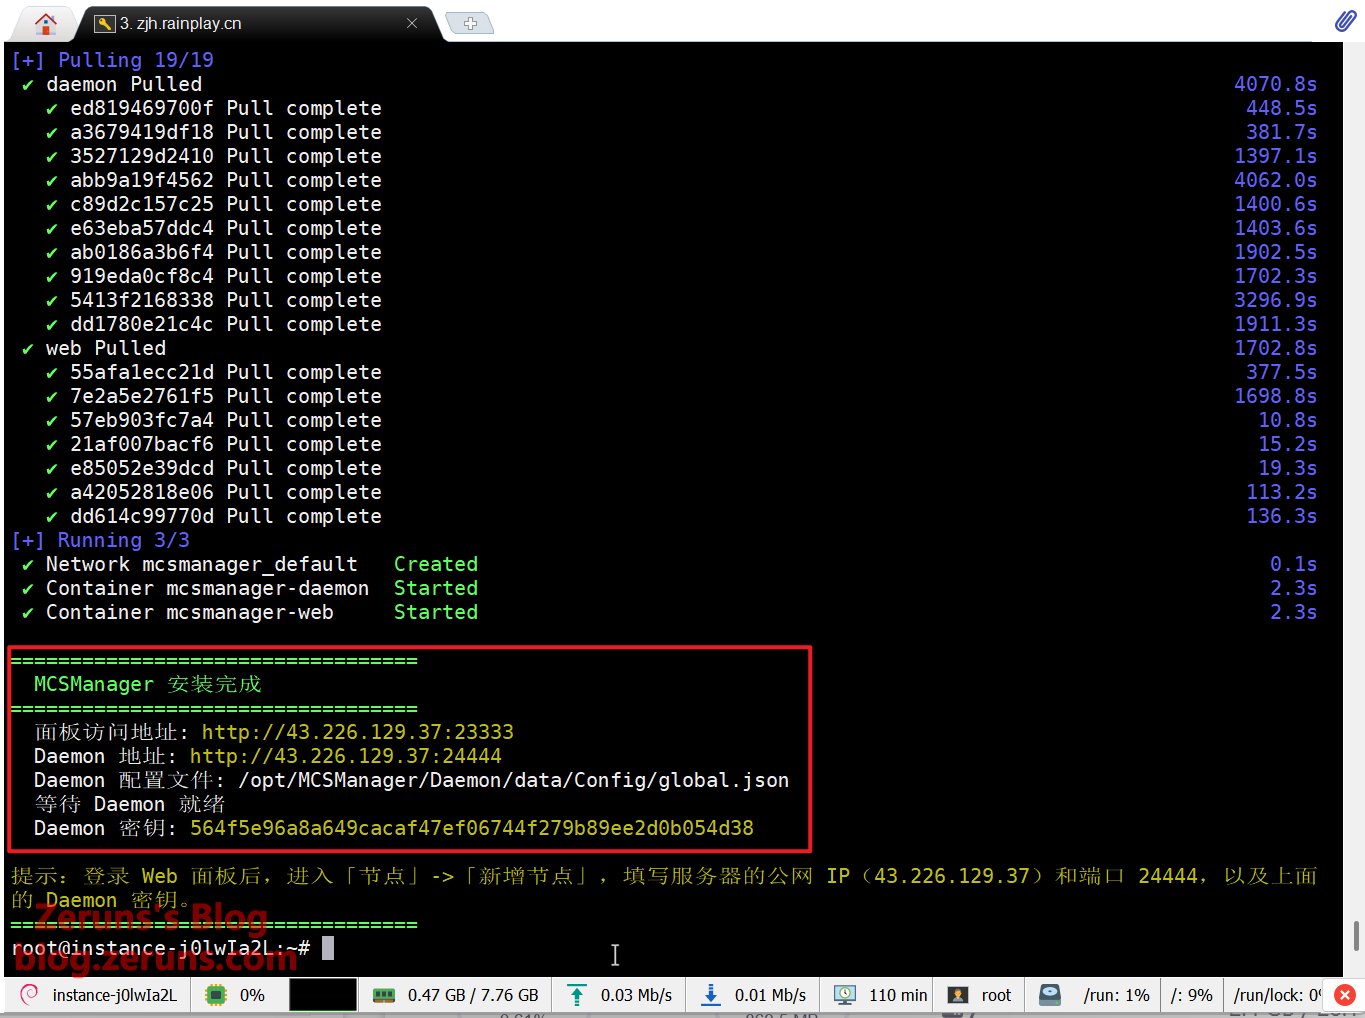
When the install finishes, it'll display the panel address, Daemon key, and other info.
Open your browser and type in your server's public address plus the port — that's the port mapped from 23333 (you can grab the public address for the 23333 mapping straight from the NAT Port Mapping section in the RainYun console and paste it into your browser).
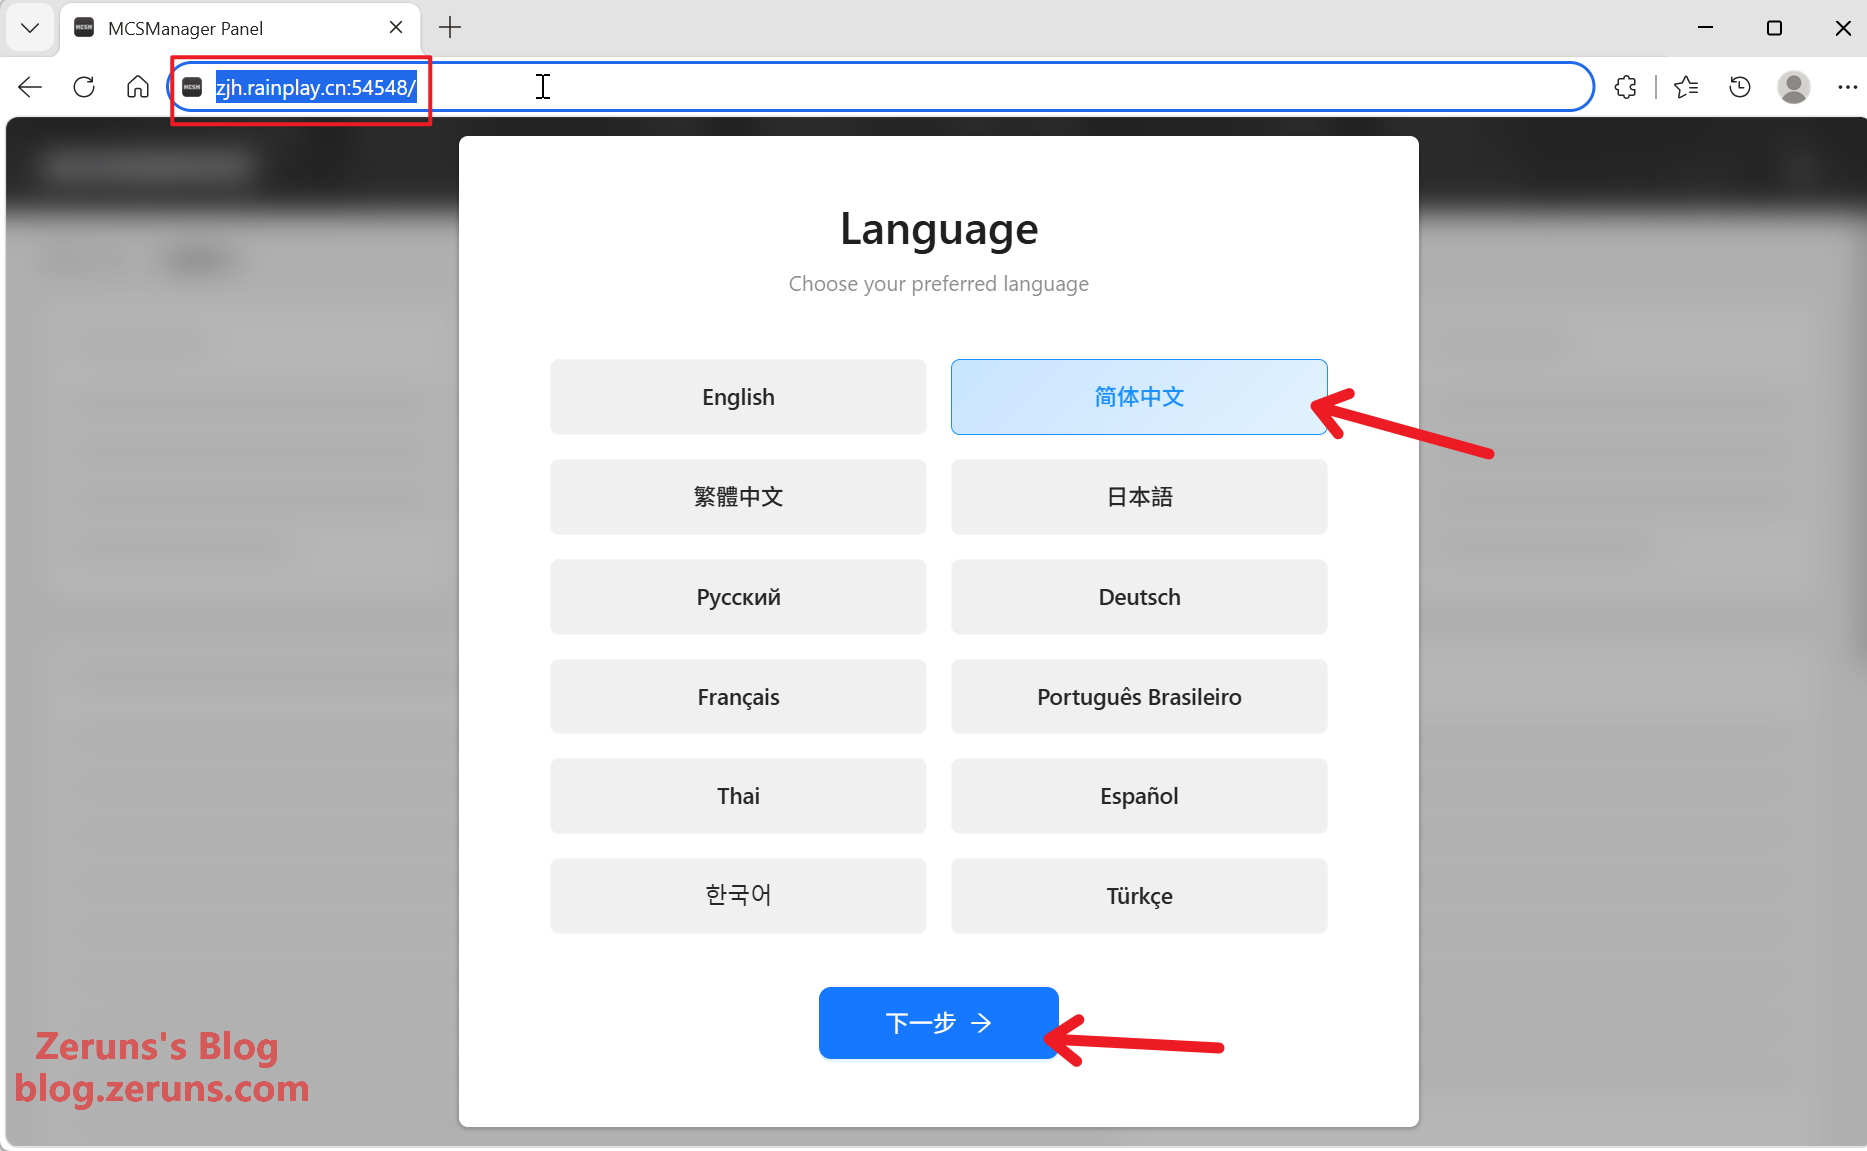
Once the MCSM panel loads, follow the on-screen wizard to set the language and create an admin account.
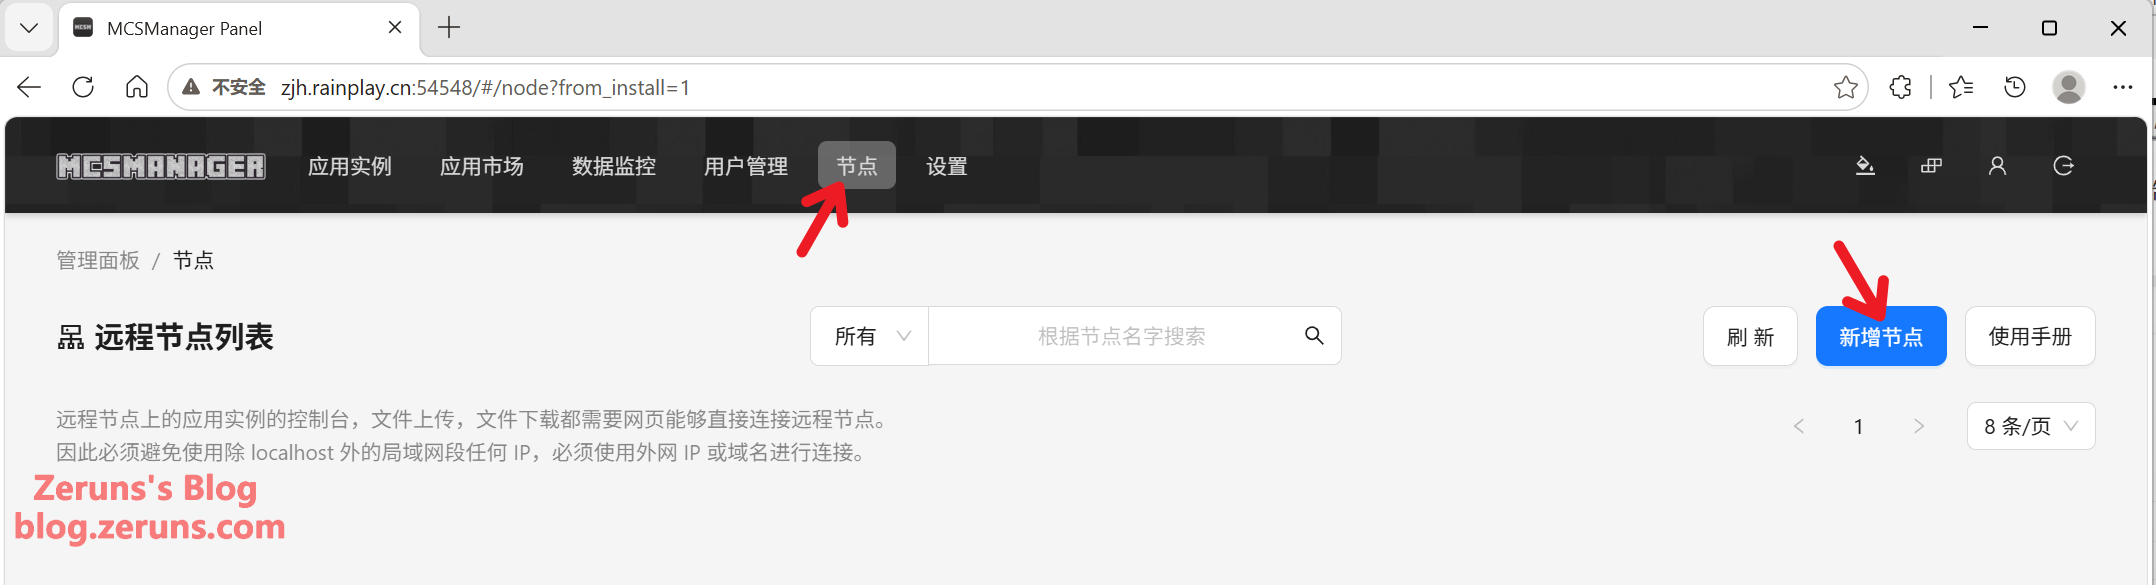
In the top navigation bar, click Nodes → New Node.
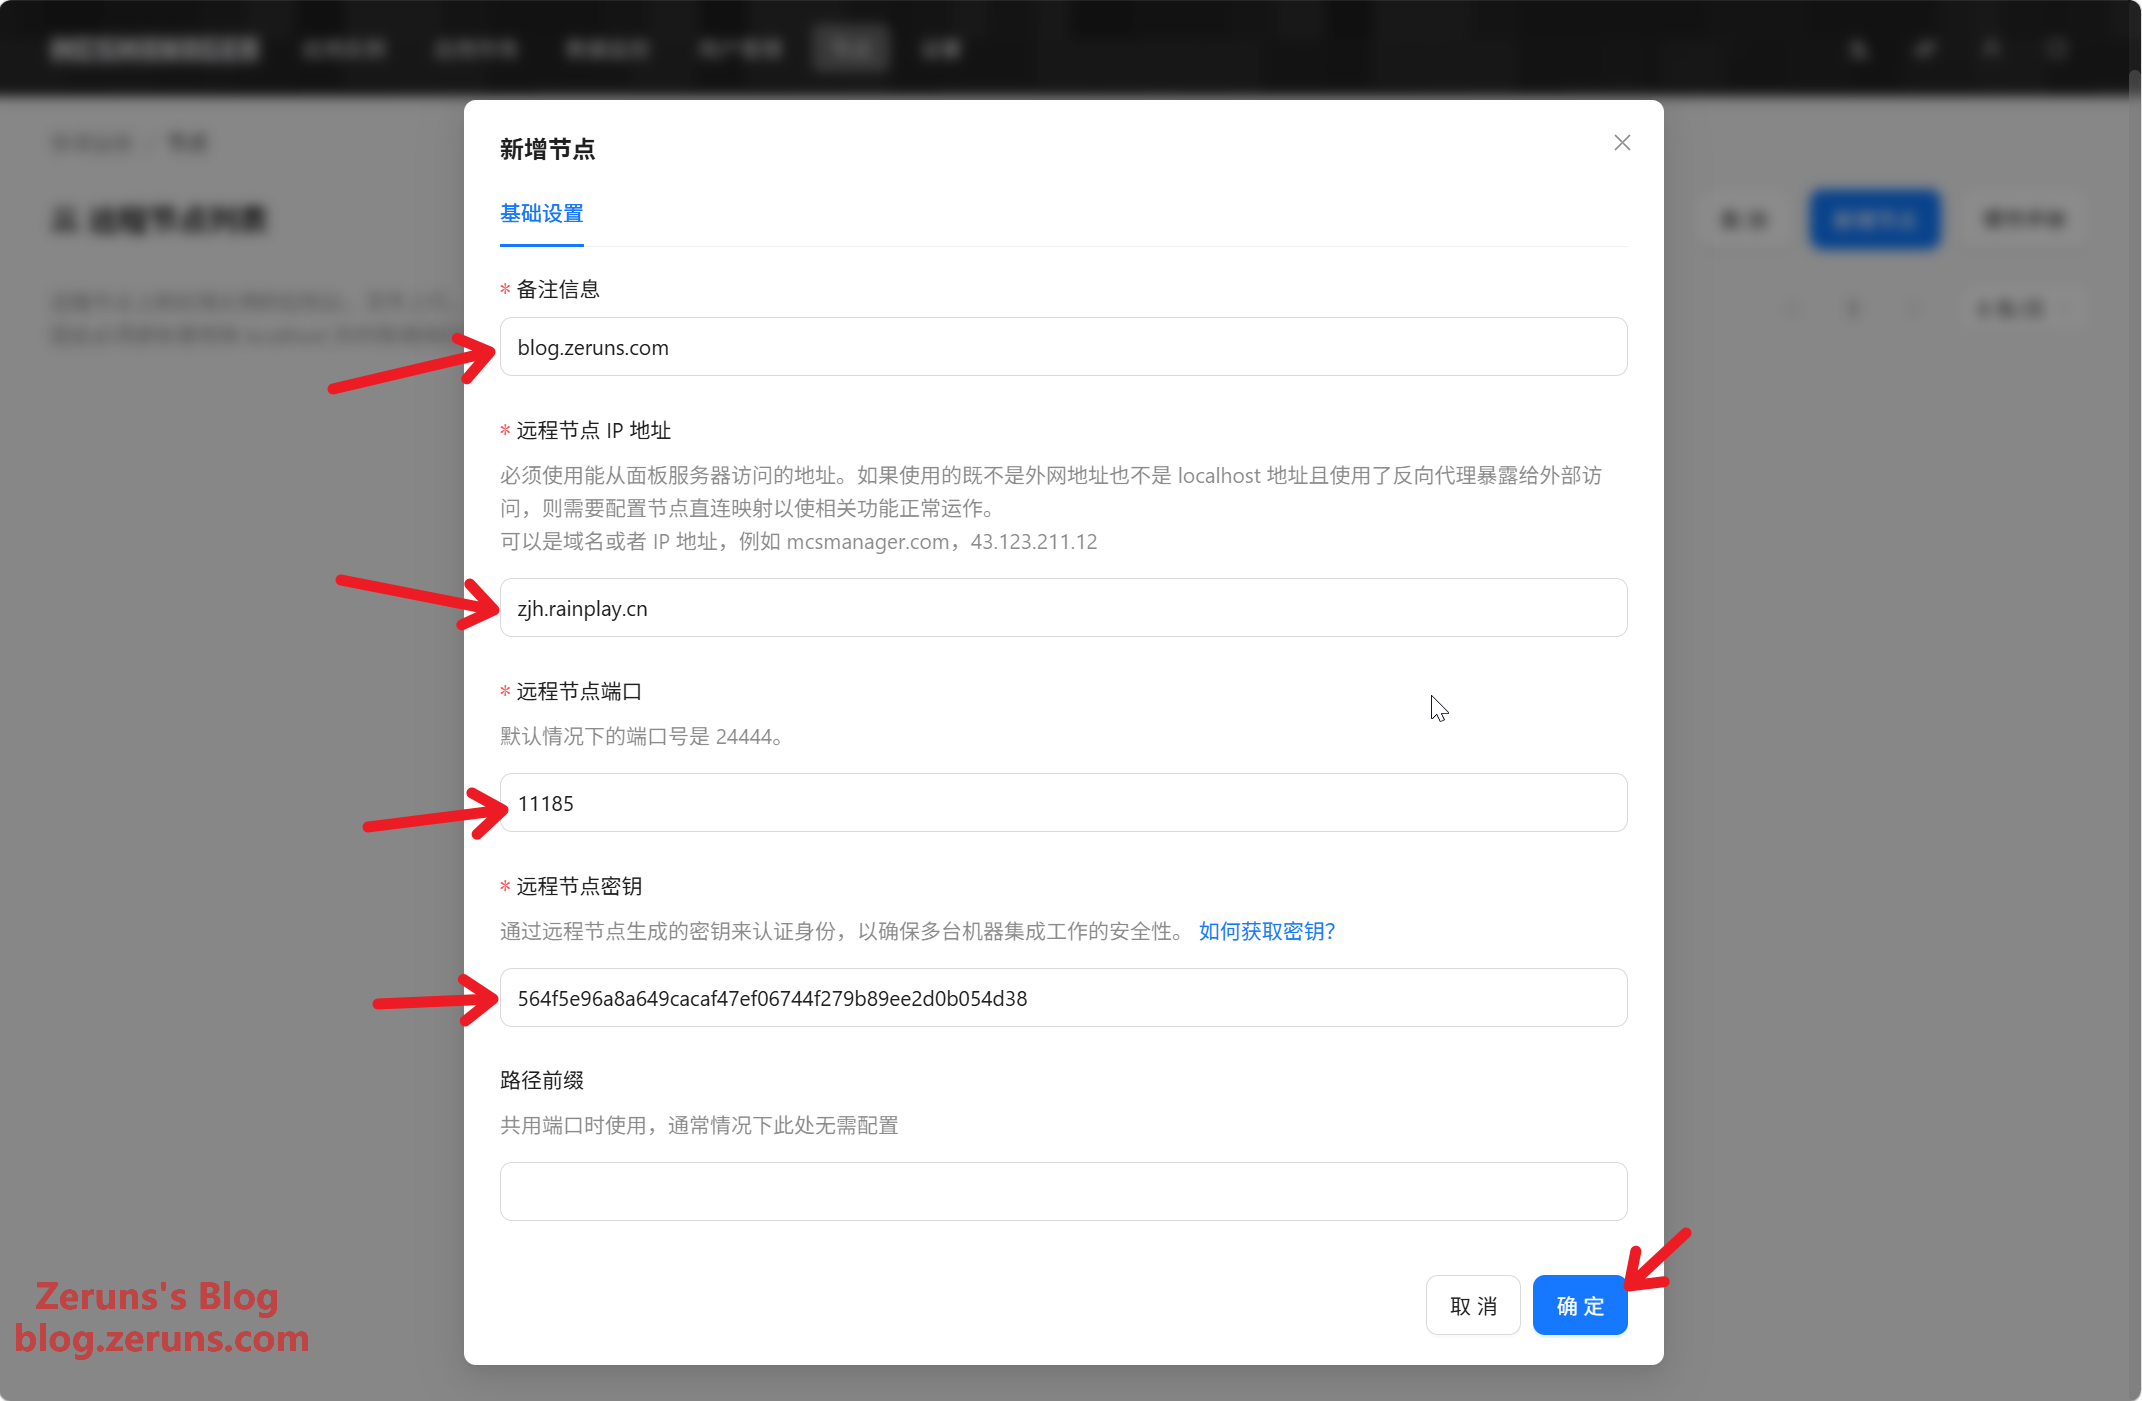
Remarks — whatever you like. Remote Node IP Address — enter your server's public IP or domain. Remote Node Port — the port mapped from 24444. Remote Node Key — the Daemon key shown after the MCSM install finished above. Click OK.
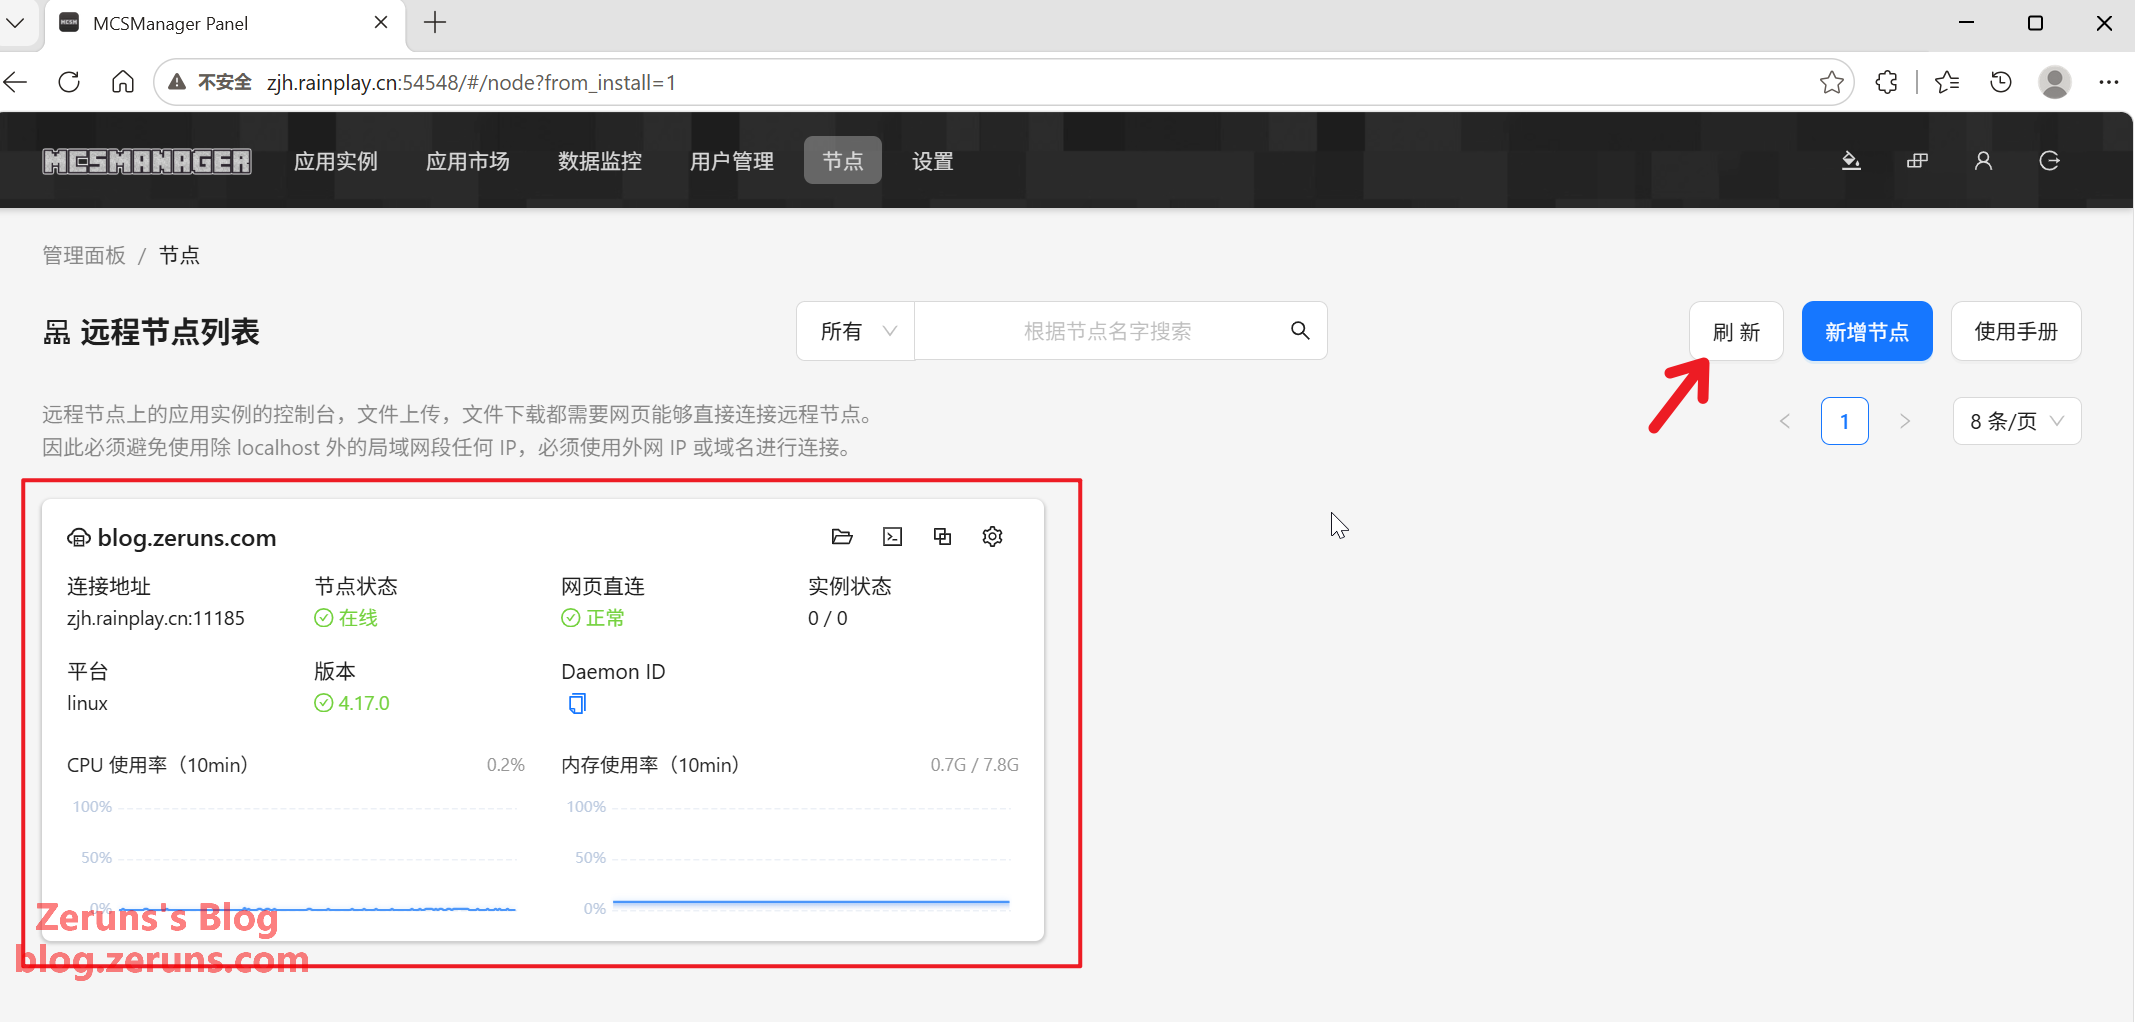
Hit Refresh, and the node you just added will appear in the remote node list.
Installing Java
Before you can run a Java server, you'll need a Java runtime (JDK). Here's the Java version each Minecraft version requires:
| Java Version Required | Minecraft Game Version |
|---|---|
| JDK 8 | Minecraft 1.7 and below |
| JDK 11 | Minecraft 1.8 ~ 1.16 |
| JDK 17 | Minecraft 1.17 ~ 1.19 |
| JDK 21 | Minecraft 1.20 and above |
| JDK 25 | Minecraft 26 and above |
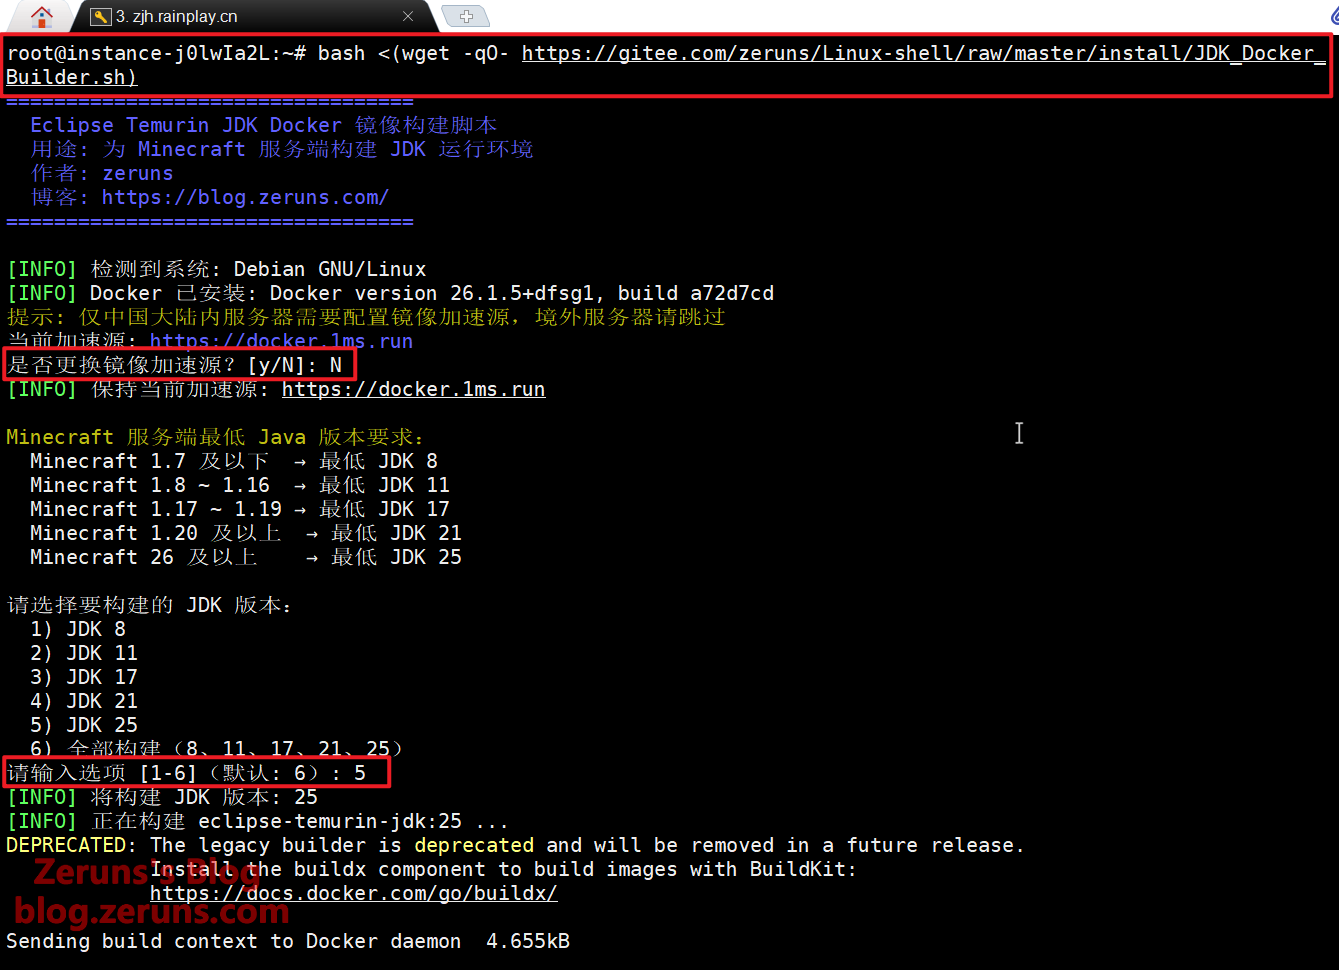
Back in the SSH terminal, run this command to launch the Docker JDK install script:
bash <(wget -qO- https://gitee.com/zeruns/Linux-shell/raw/master/install/JDK_Docker_Builder.sh)
This is a Docker-based JDK install script I wrote with AI.
The script will ask whether to switch the mirror accelerator. Since we already did that during the MCSM install, type N and hit Enter. It'll then ask which JDK version to install — we're setting up a Minecraft 26.2 server, so we need JDK 25. Type 5 and hit Enter (pick the JDK that matches whatever Minecraft version you're running, or install them all).
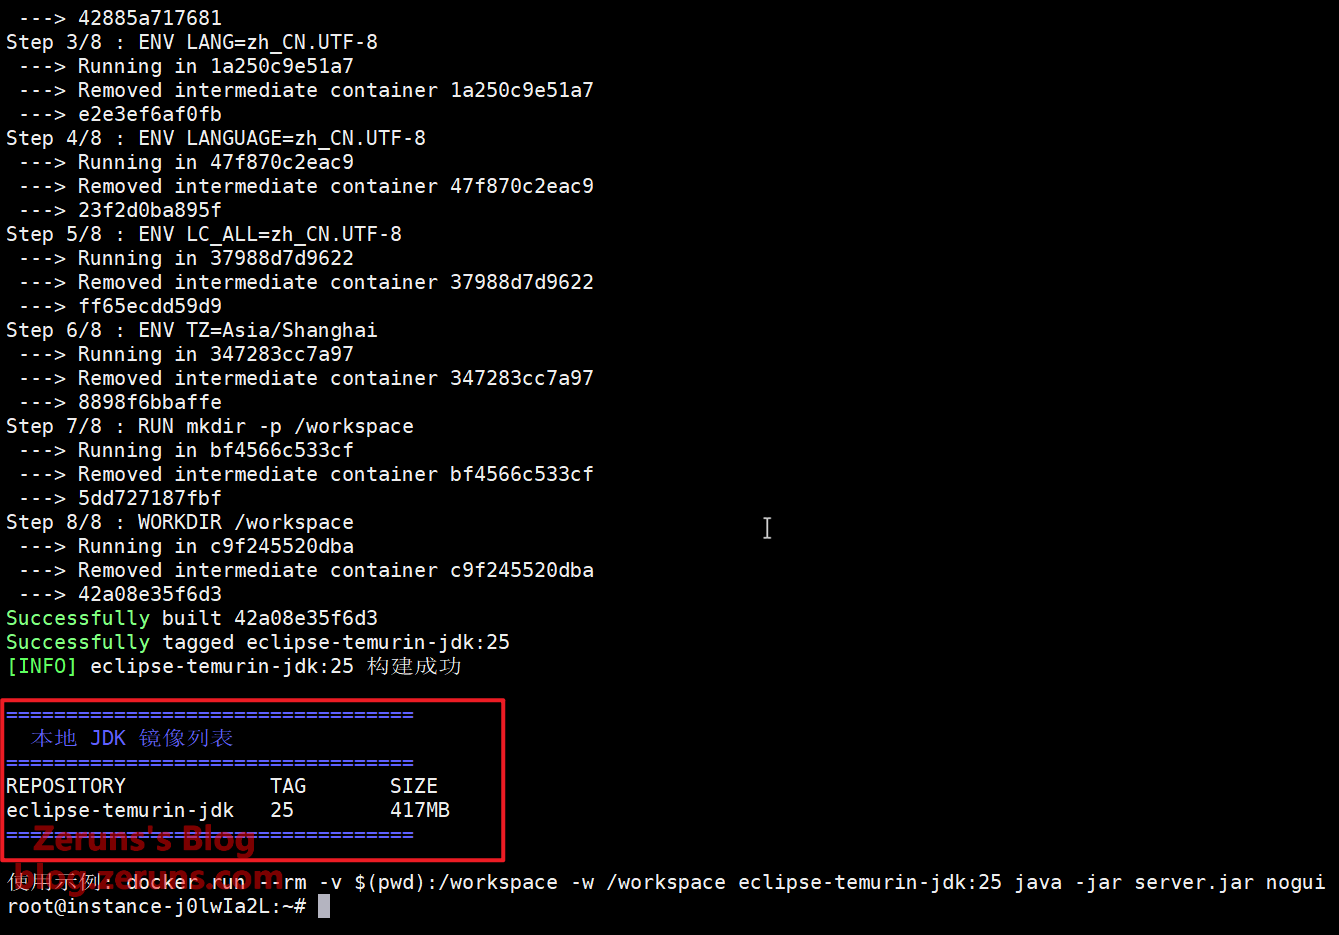
Once the install wraps up, you'll see something like this:
Launching the Server
First, download the Minecraft server jar file. You can grab the latest version from the official site, get version 26.2 from my link below, or find another version on your own.
- Official download: https://www.minecraft.net/zh-hans/download/server
- Minecraft 26.2 server download: https://1826574343.share.123pan.cn/123pan/2Y9Djv-UtKhH
Rename the downloaded jar to server.jar (files from the official site usually already have this name).
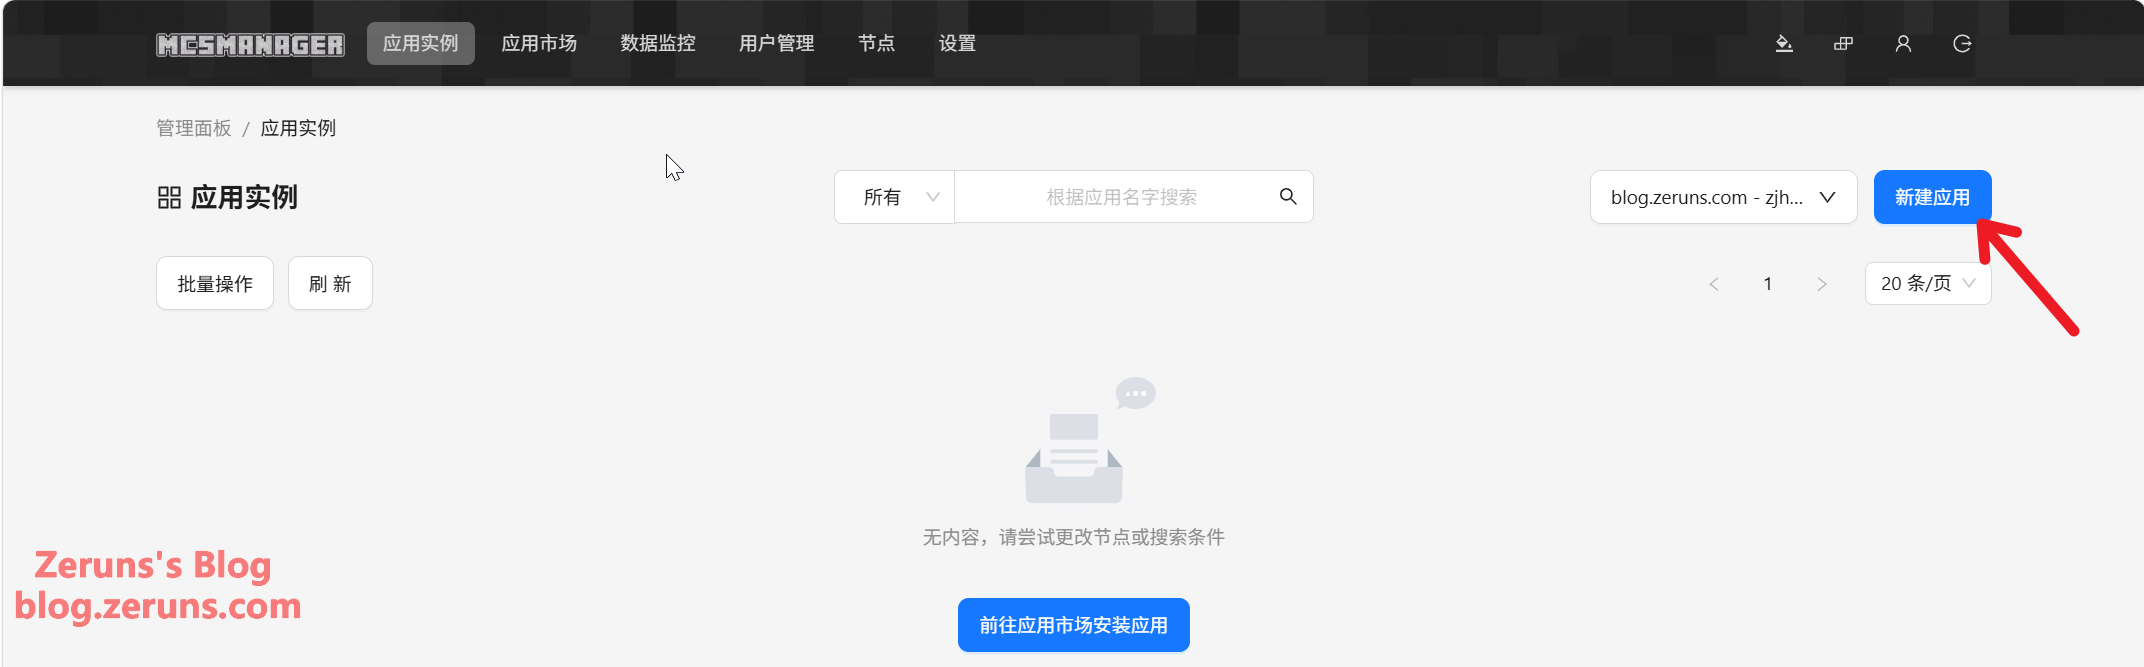
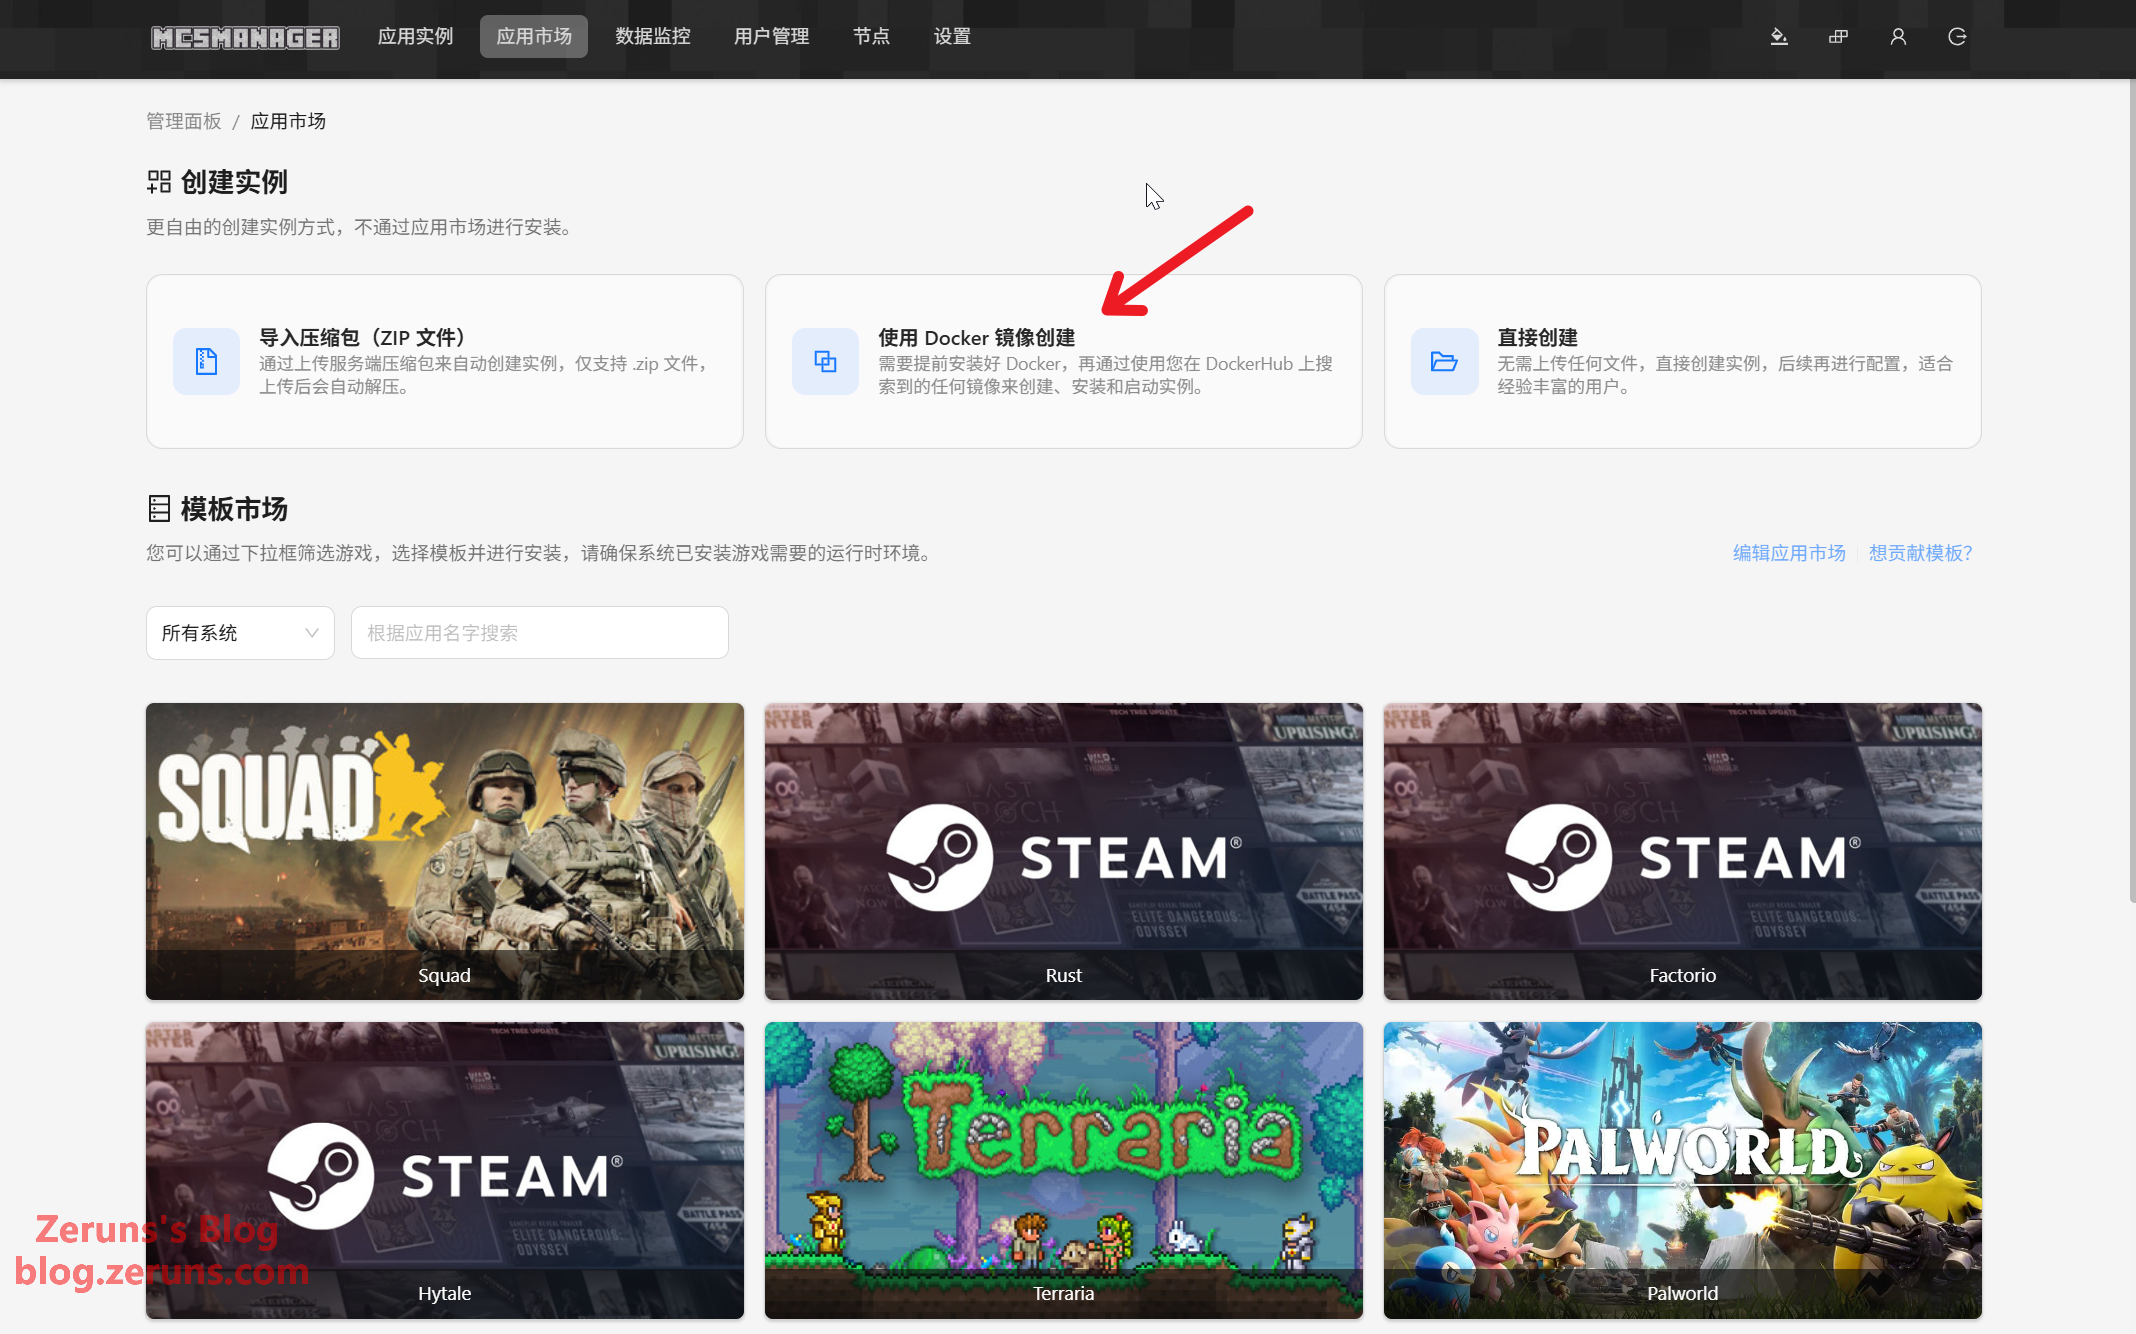
Back in the MCSM panel, click Application Instances → New Application → Create from Docker Image → Select Node
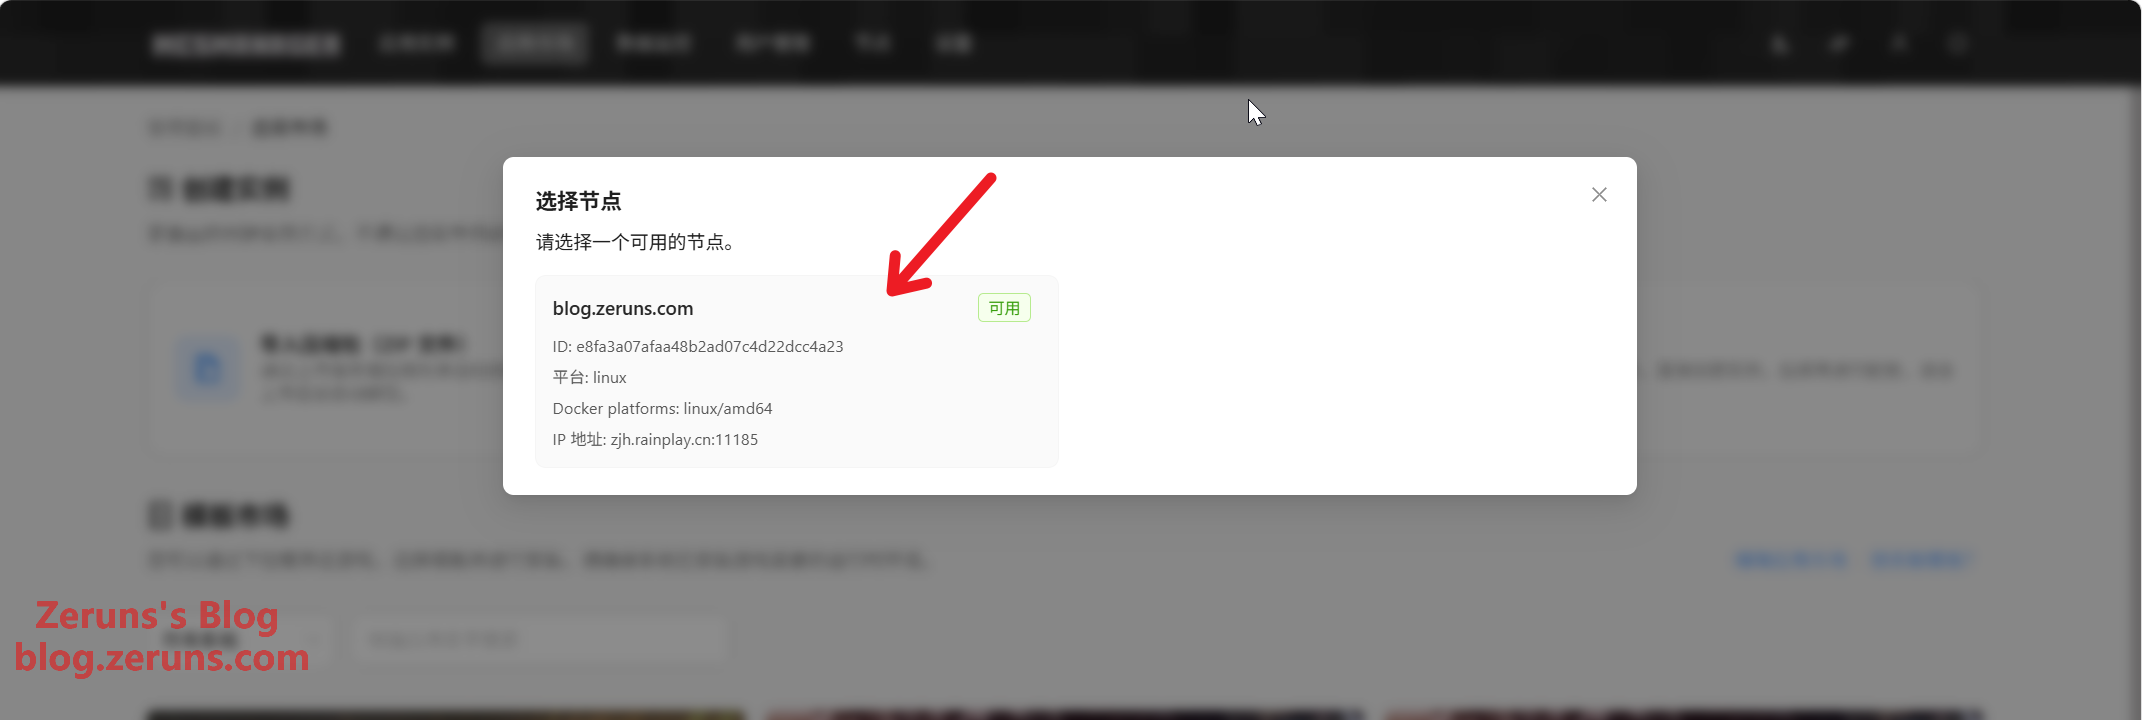
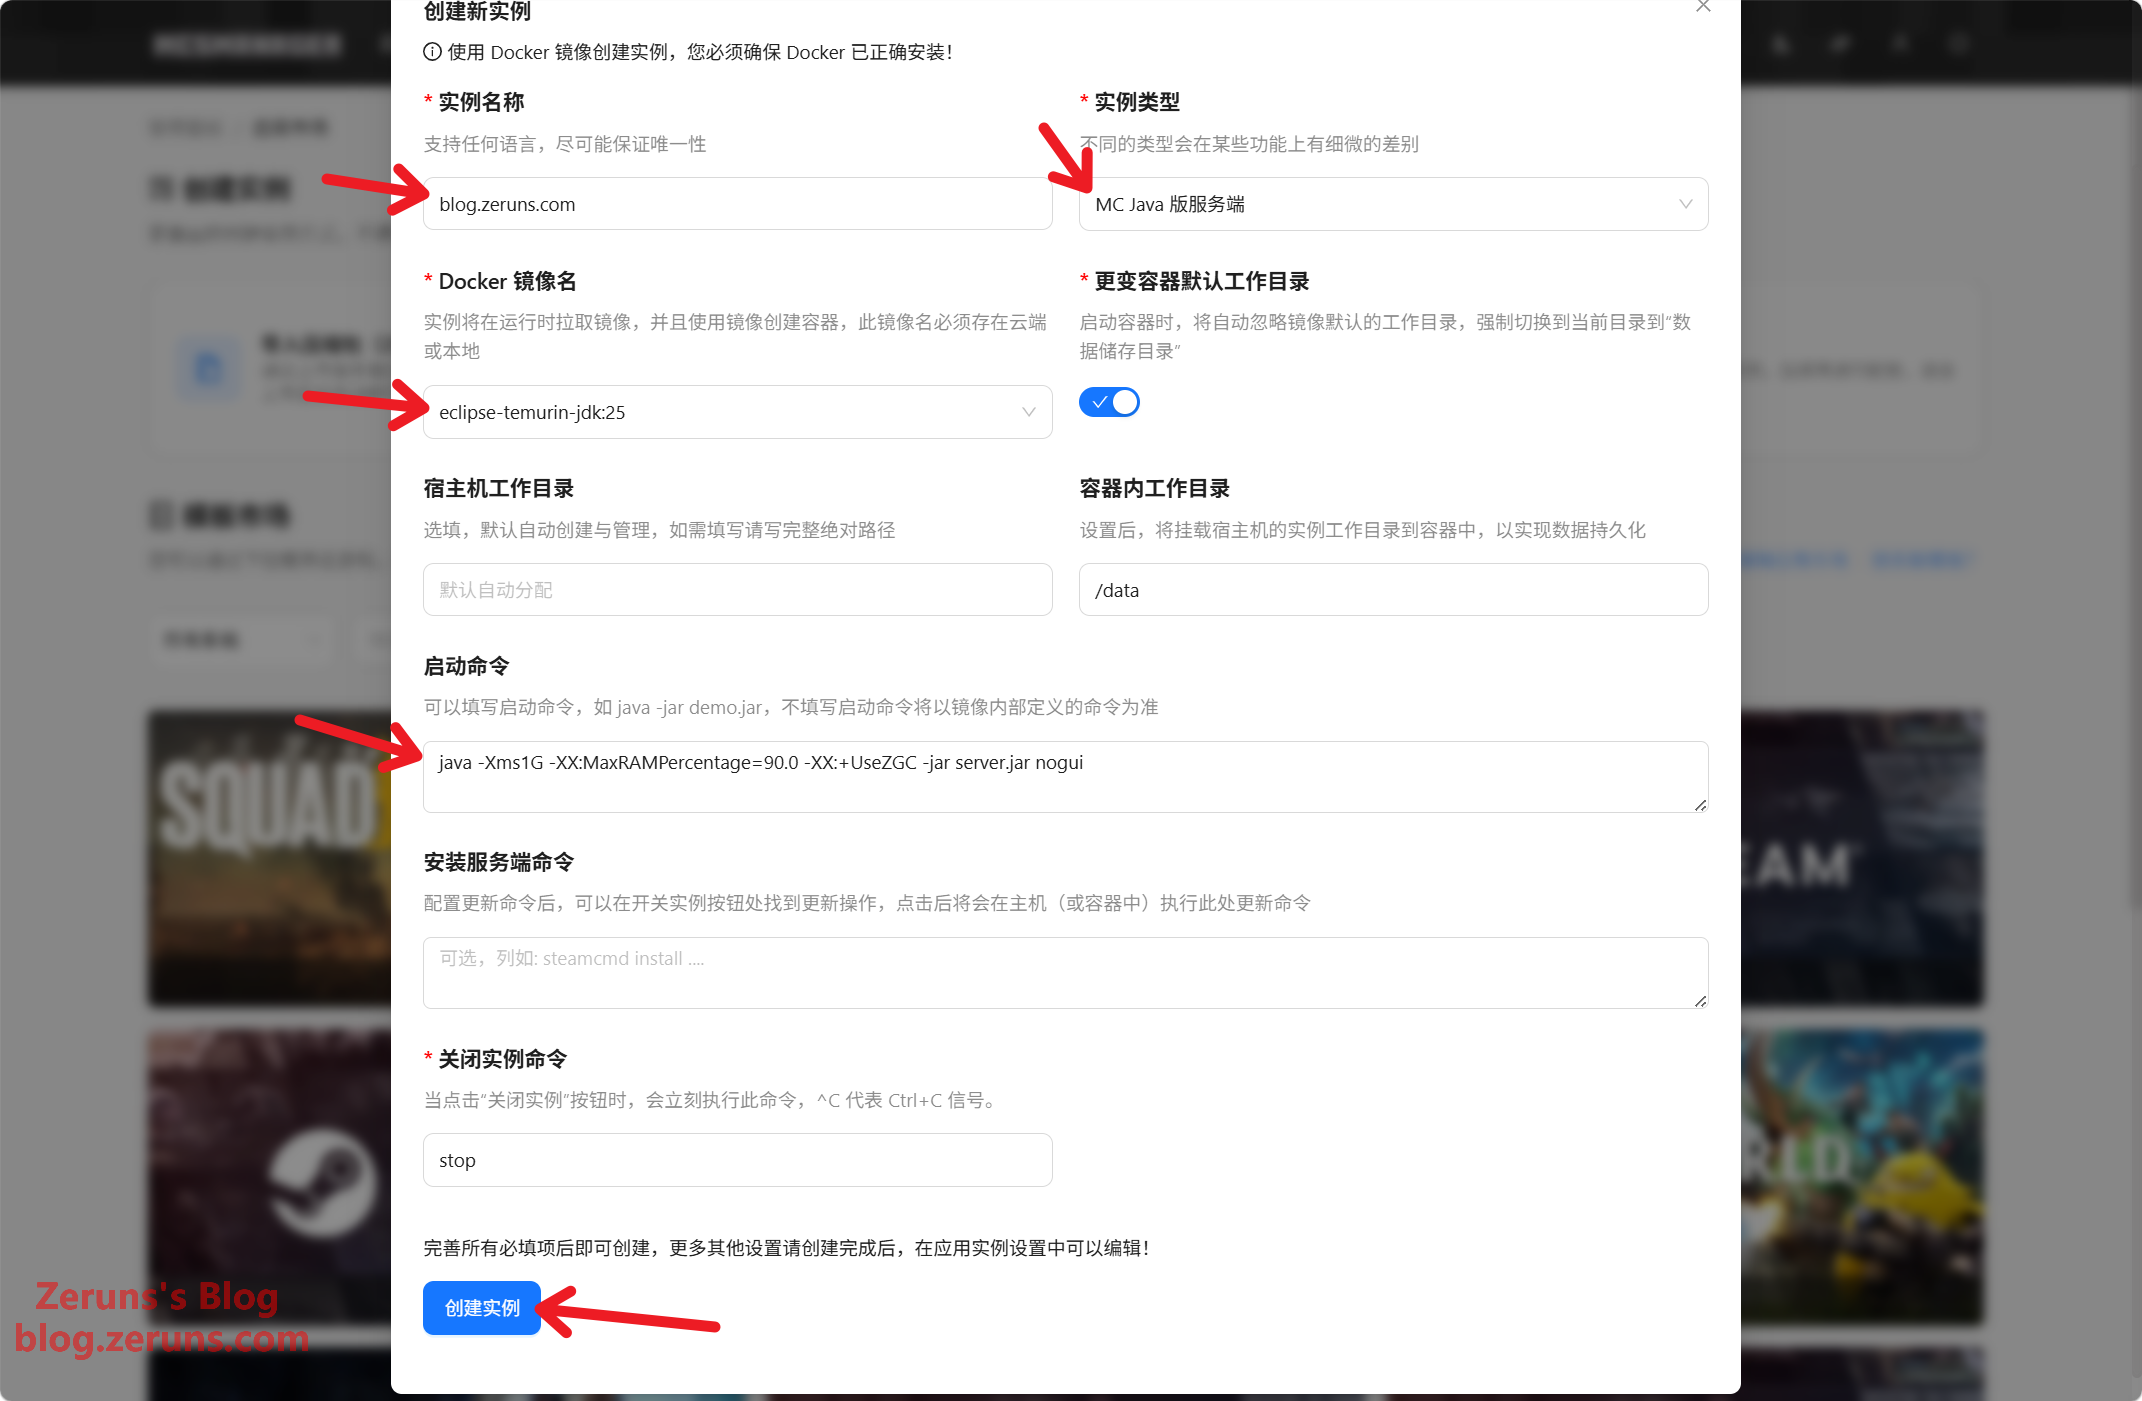
Fill in the settings as follows (anything not mentioned here, just leave at the default):
- Instance Name: whatever you'd like to call it
- Instance Type:
MC Java Edition Server - Docker Image Name:
eclipse-temurin-jdk:25(if you're running a different Minecraft version, pick the matching JDK) - Startup Command:
java -Xms1G -XX:MaxRAMPercentage=90.0 -XX:+UseZGC -jar server.jar nogui
Once you've filled everything in, click Create Instance
Breaking down the startup command:
-jartells Java to run a jar program; the file name goes right after. Mine isserver.jar— adjust it if you downloaded a differently named file.-XX:MaxRAMPercentage=90.0caps the JVM at 90% of system memory (leaving 10% for the OS and other processes). If you'd rather set a fixed value, swap in something like-Xmx7Gto pin the max at 7GB.-Xms1Gsets the initial heap to 1GB, pre-allocating memory at startup so Java isn't constantly resizing the heap and hurting performance.noguiskips the graphical interface — the server runs in the background and doesn't need a window.-XX:+UseZGCturns on the ZGC garbage collector. ZGC is a low-latency GC designed for large heaps, well-suited to a long-running Minecraft server — it noticeably cuts down on lag spikes. (Officially supported on JDK 15 and above; drop this flag on older JDK versions.)
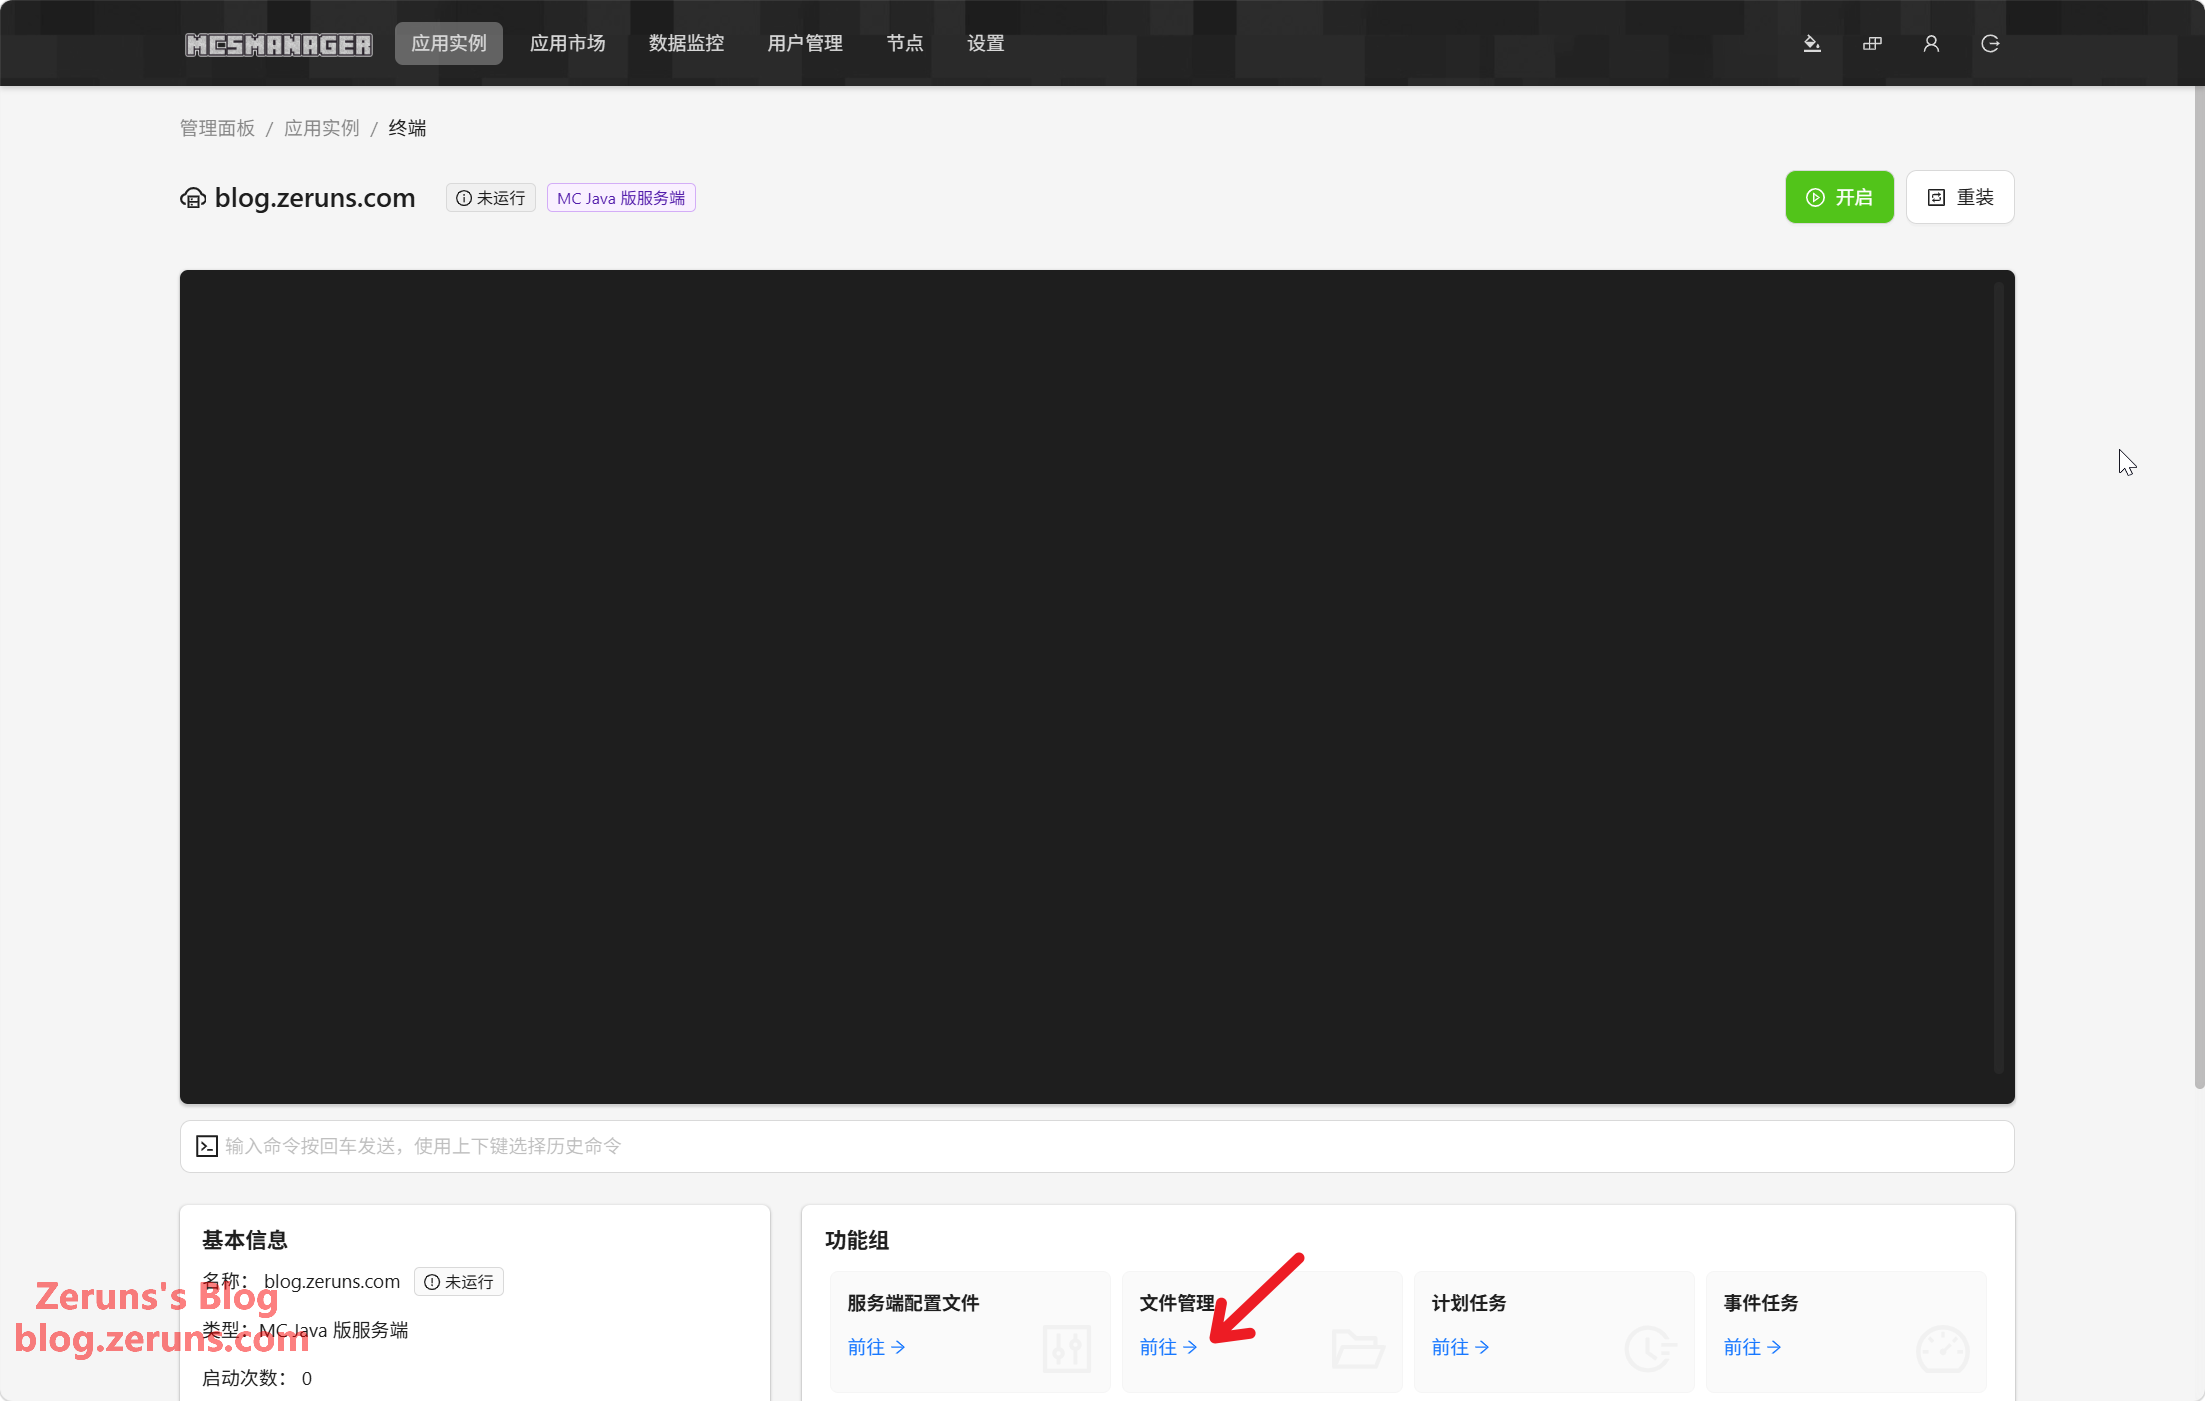
Click File Management below the instance console to open the file manager.
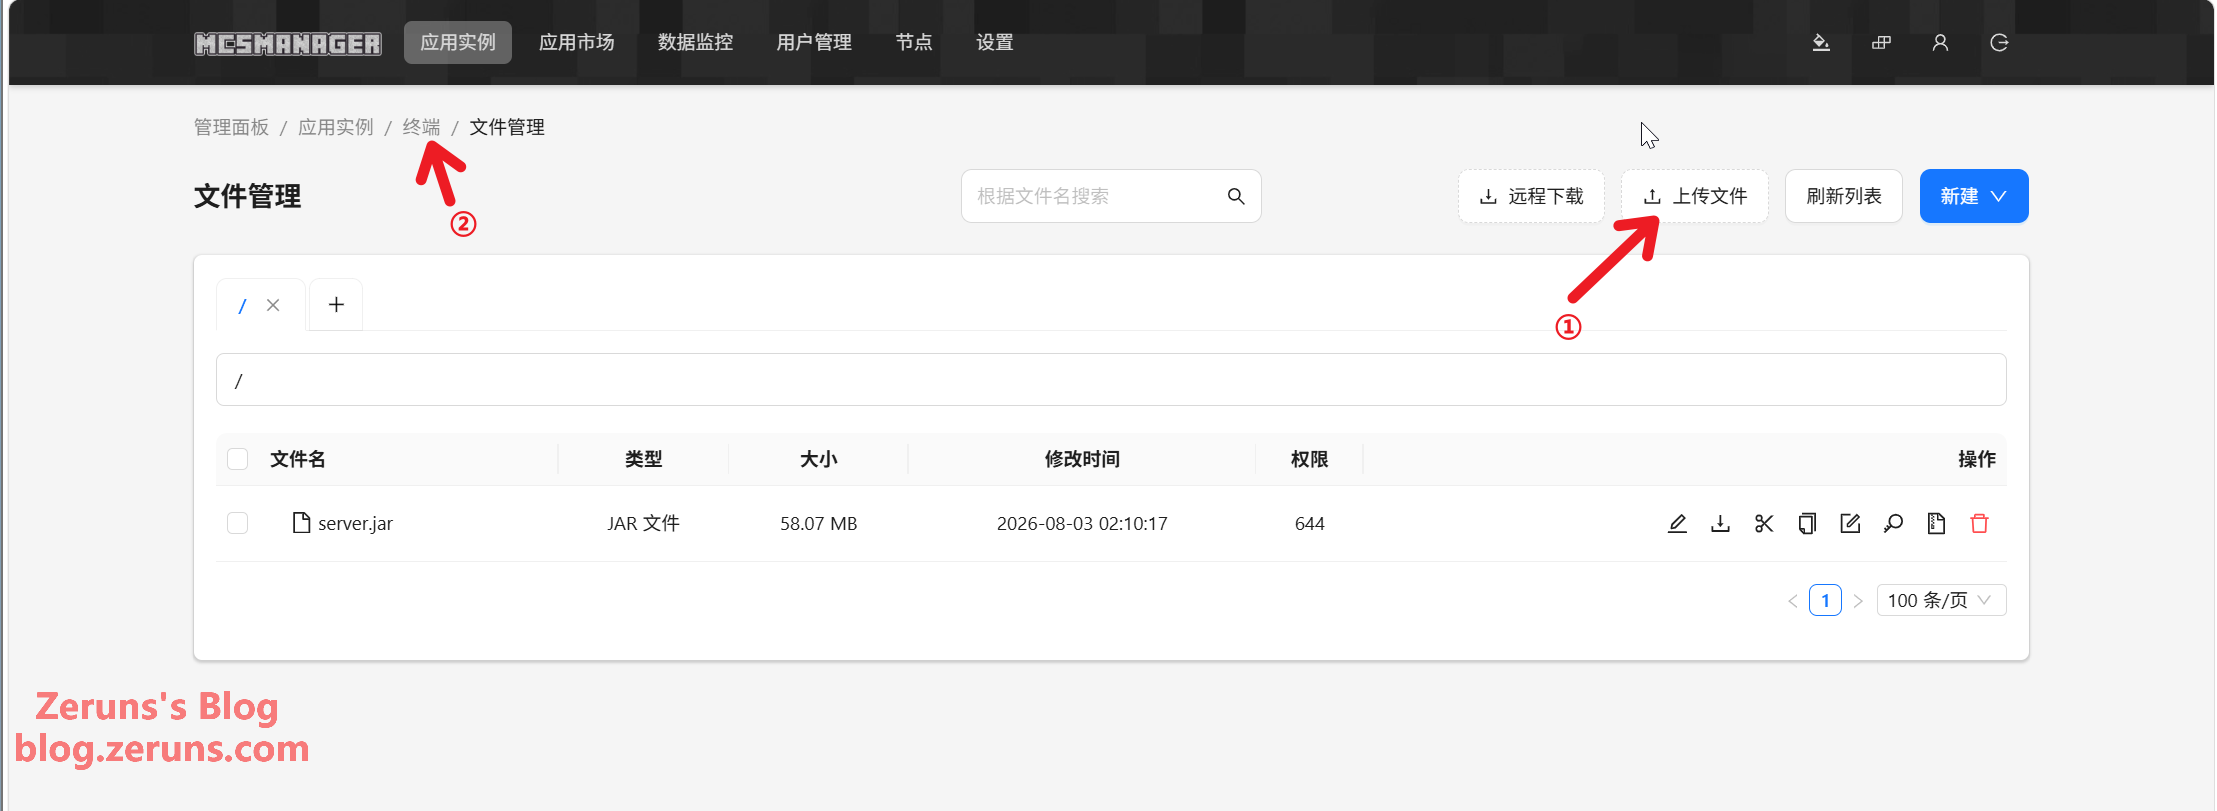
Upload the server.jar you downloaded. Once it's uploaded, click Terminal in the nav bar to go back to the instance console.
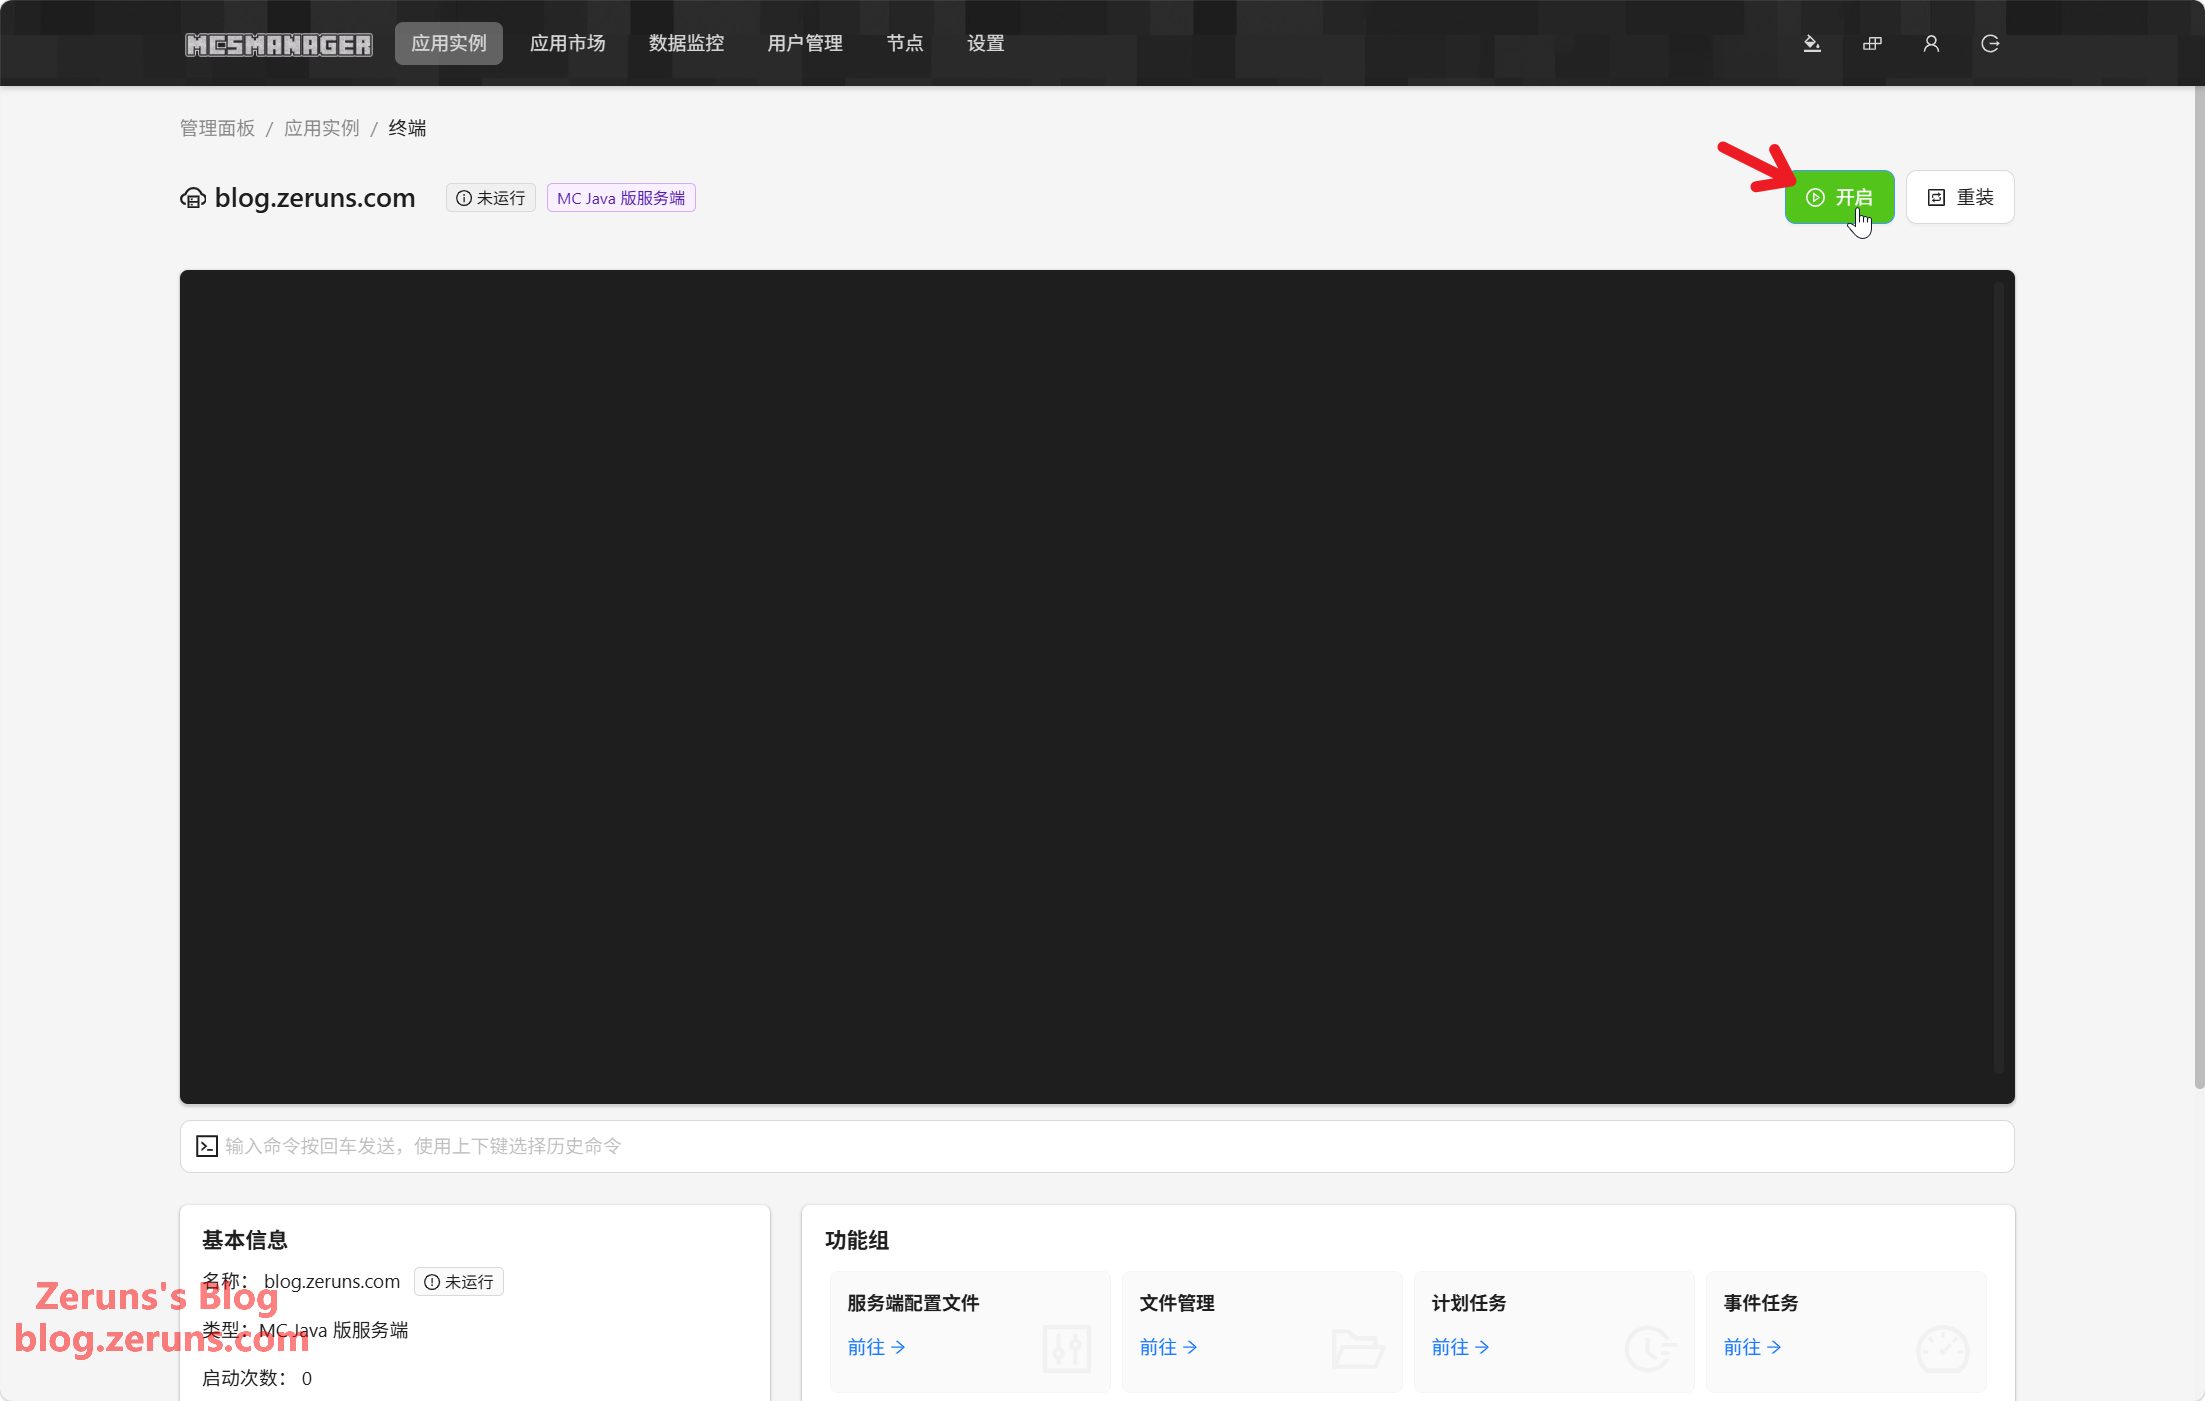
Click Start.
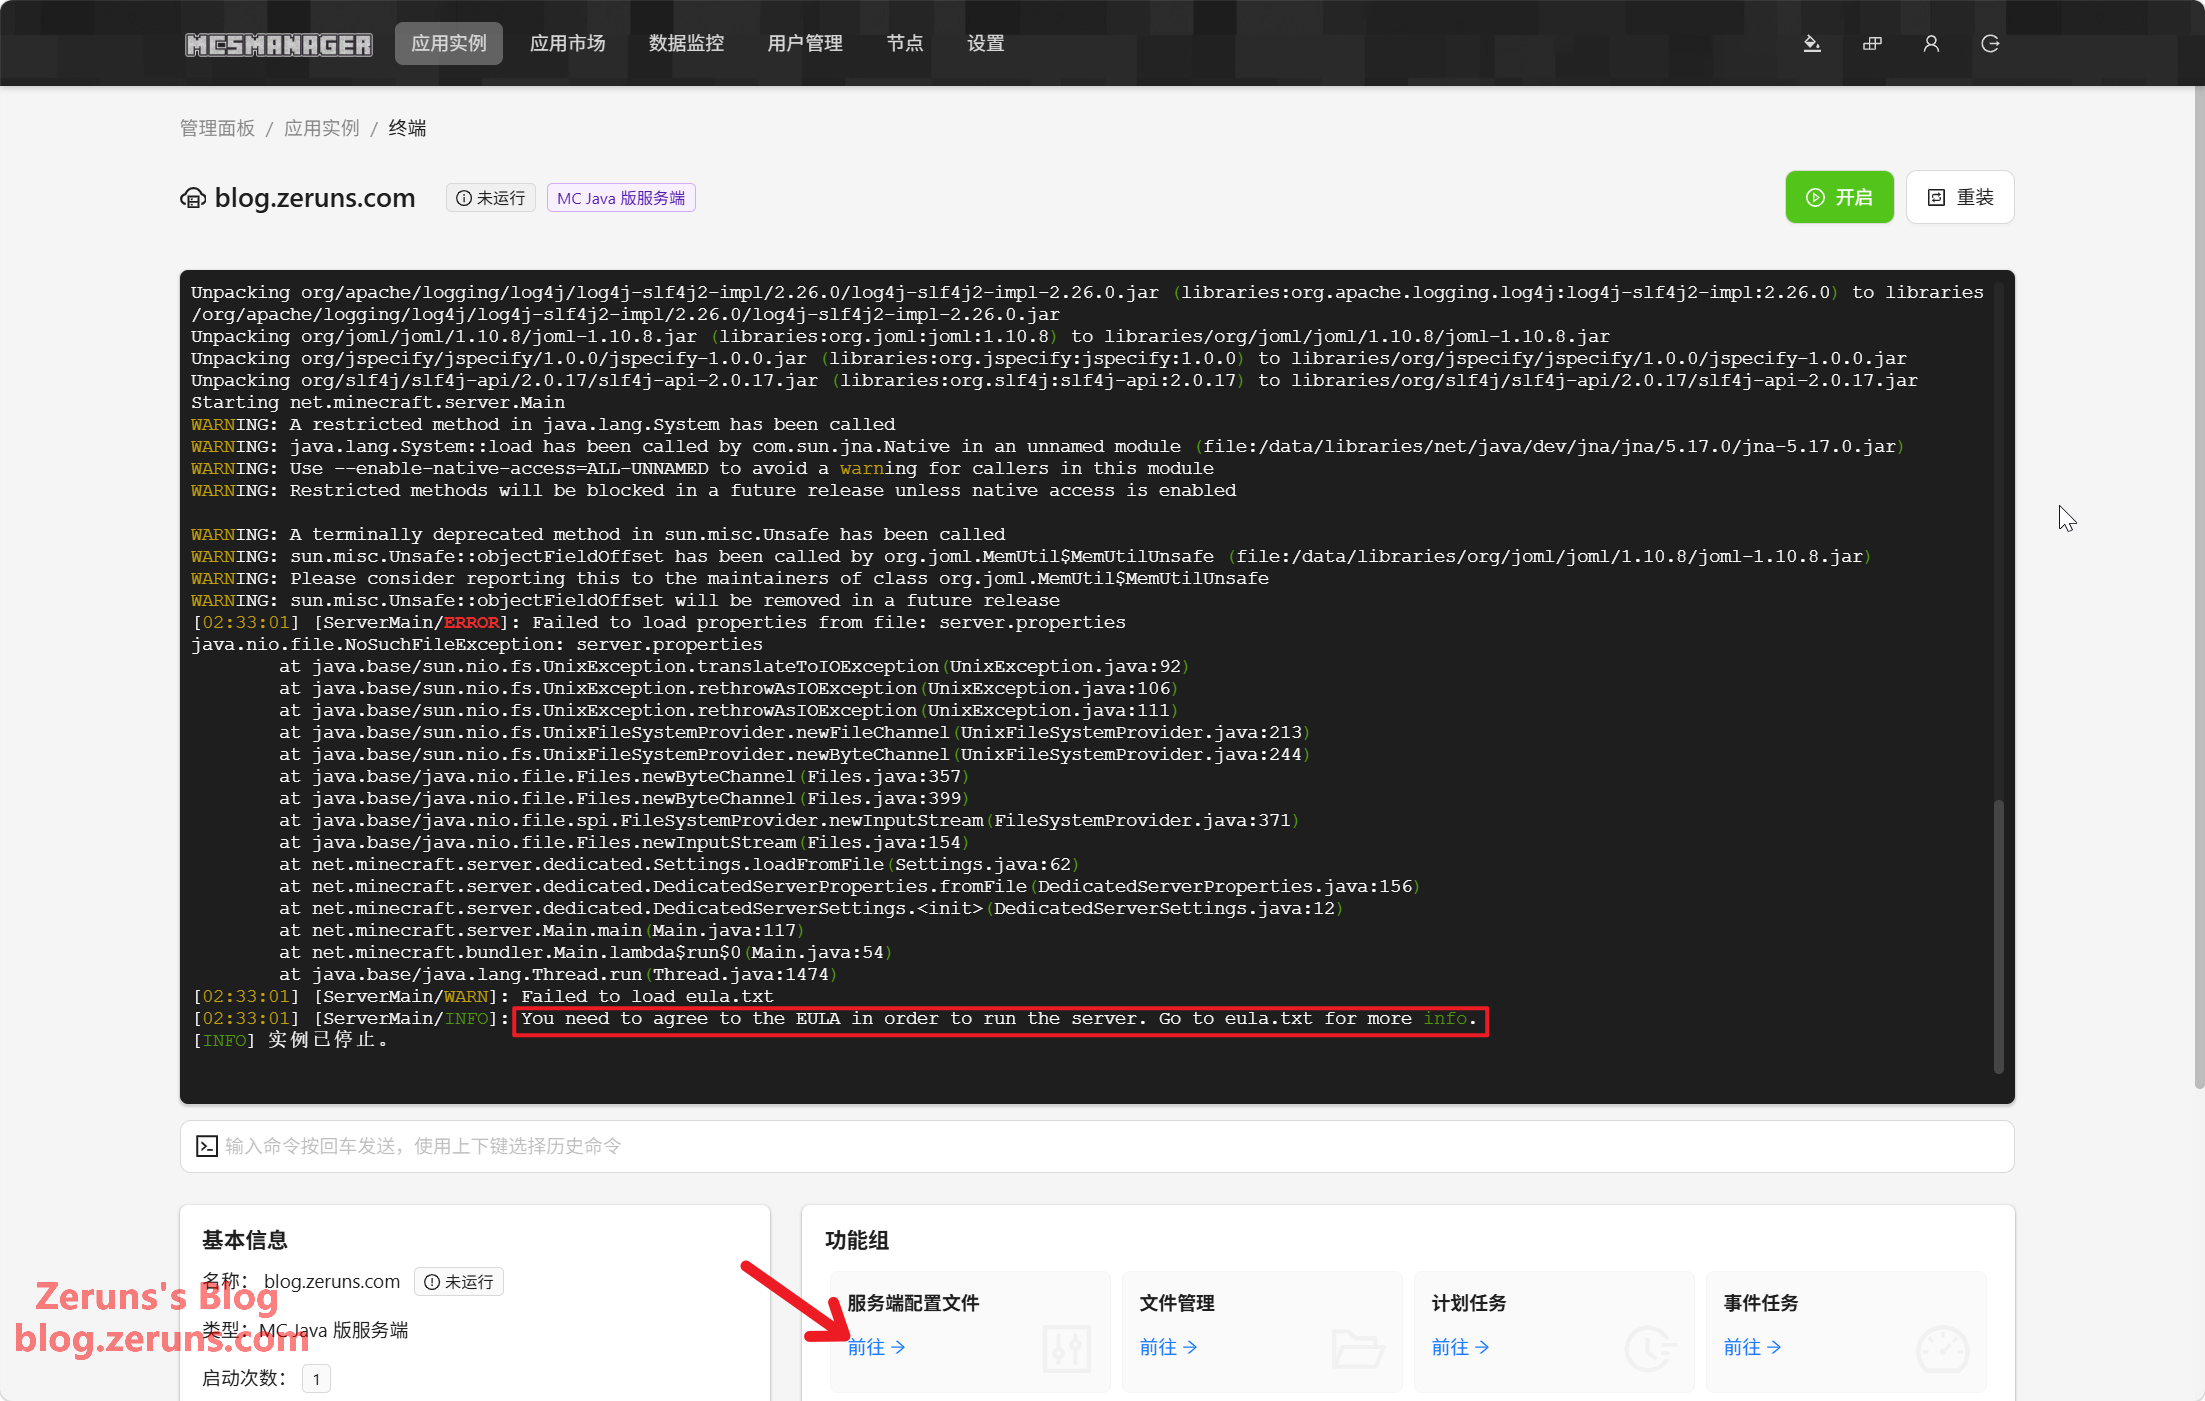
If you see You need to agree to the EULA in order to run the server. Go to eula.txt for more info., you'll need to accept the EULA first. Click Server Config Files below the terminal.
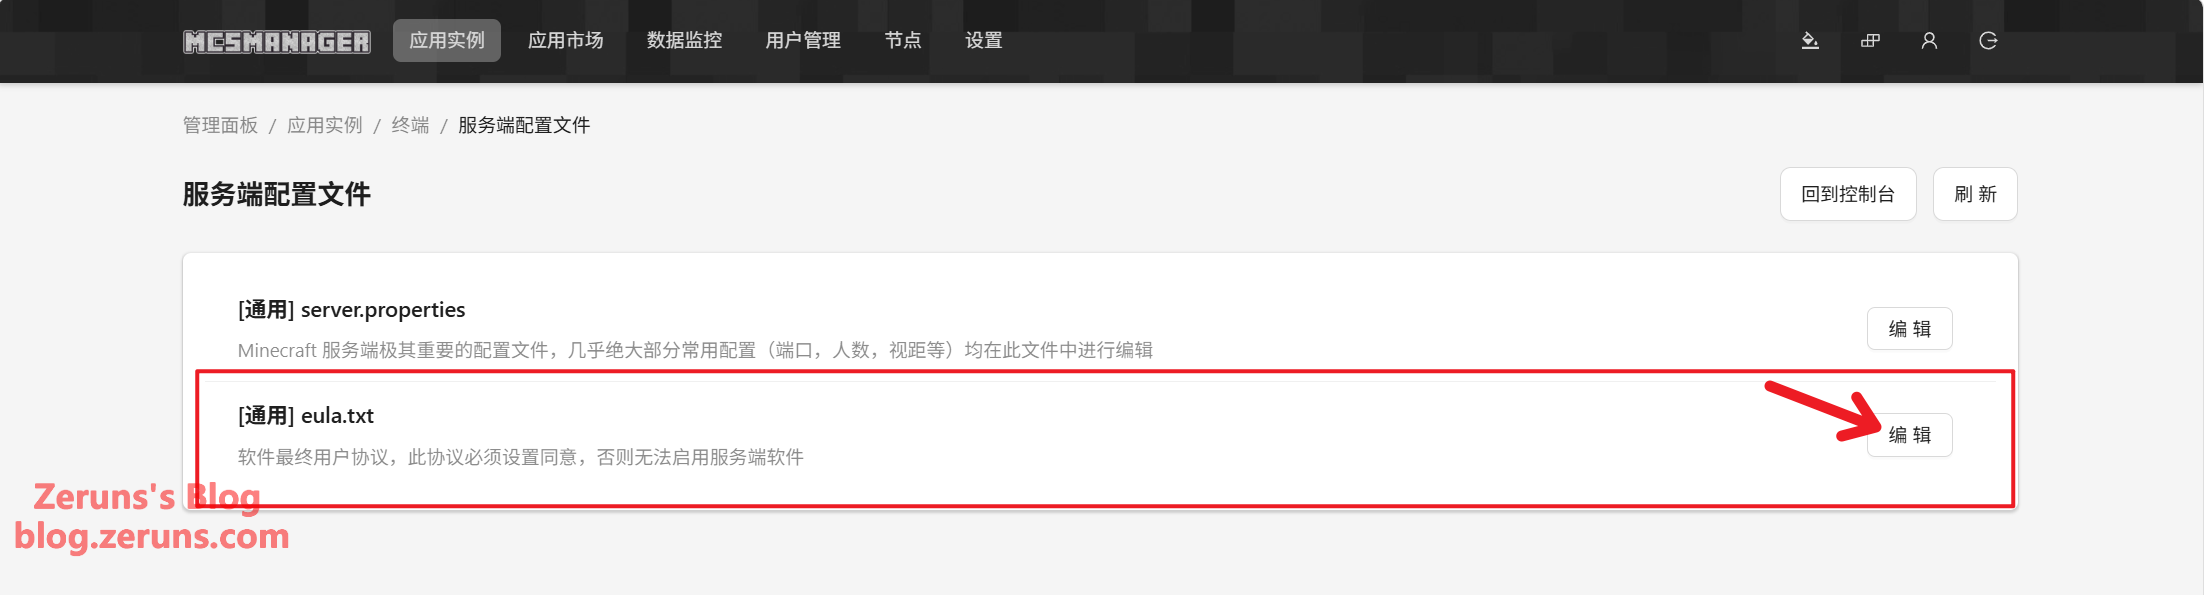
Click Edit next to eula.txt, flip the eula setting from false to true, then Save, and head back to the Terminal.
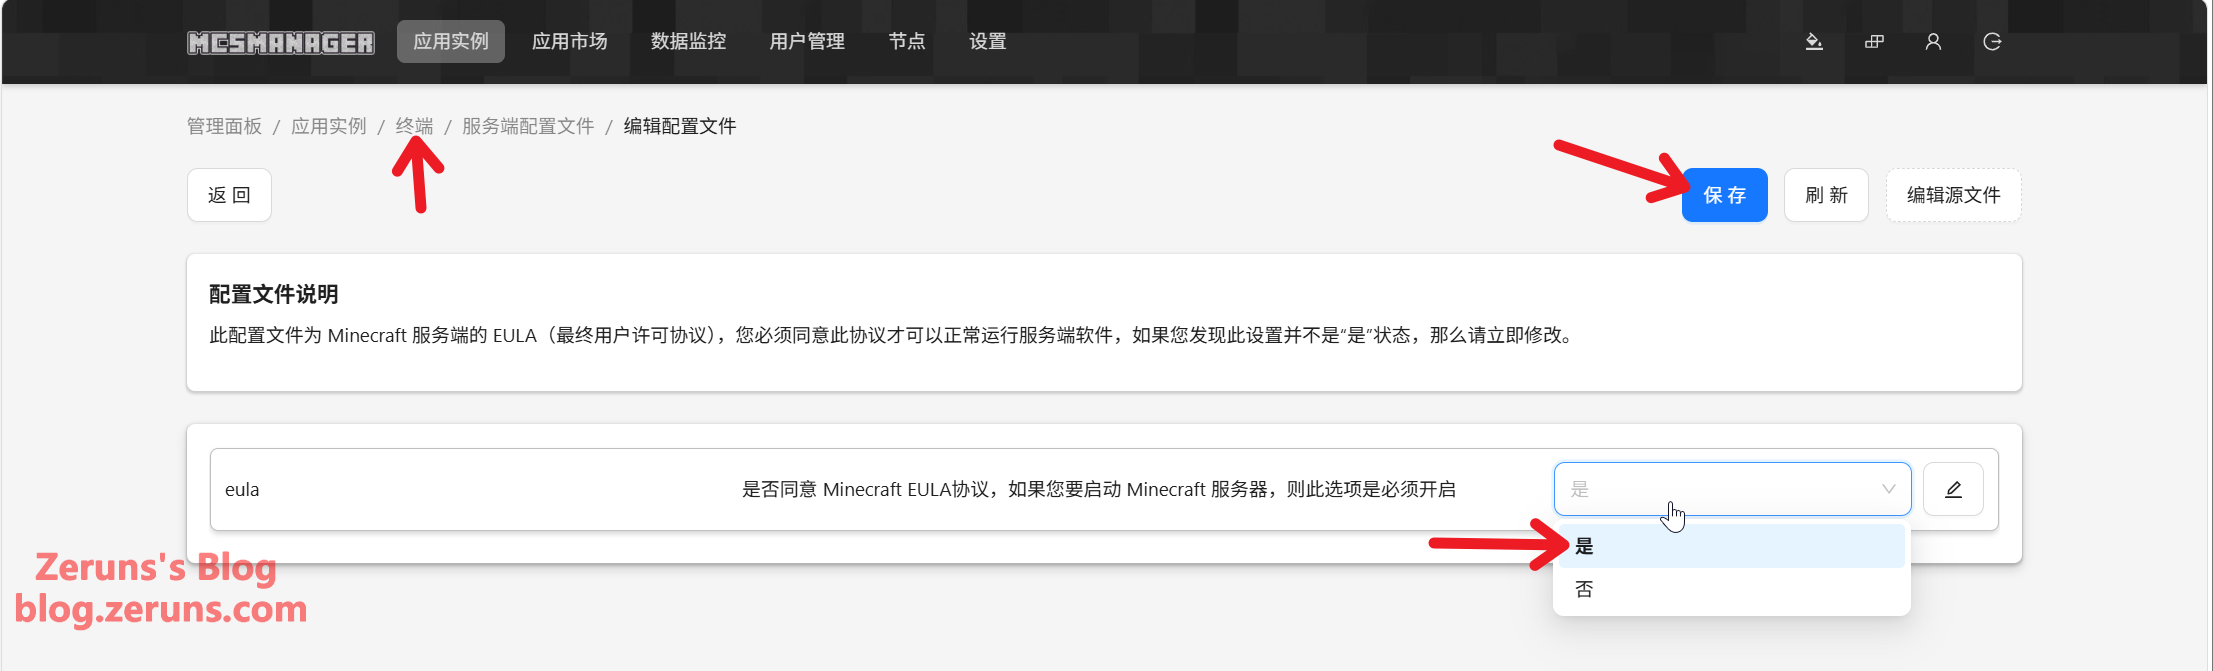
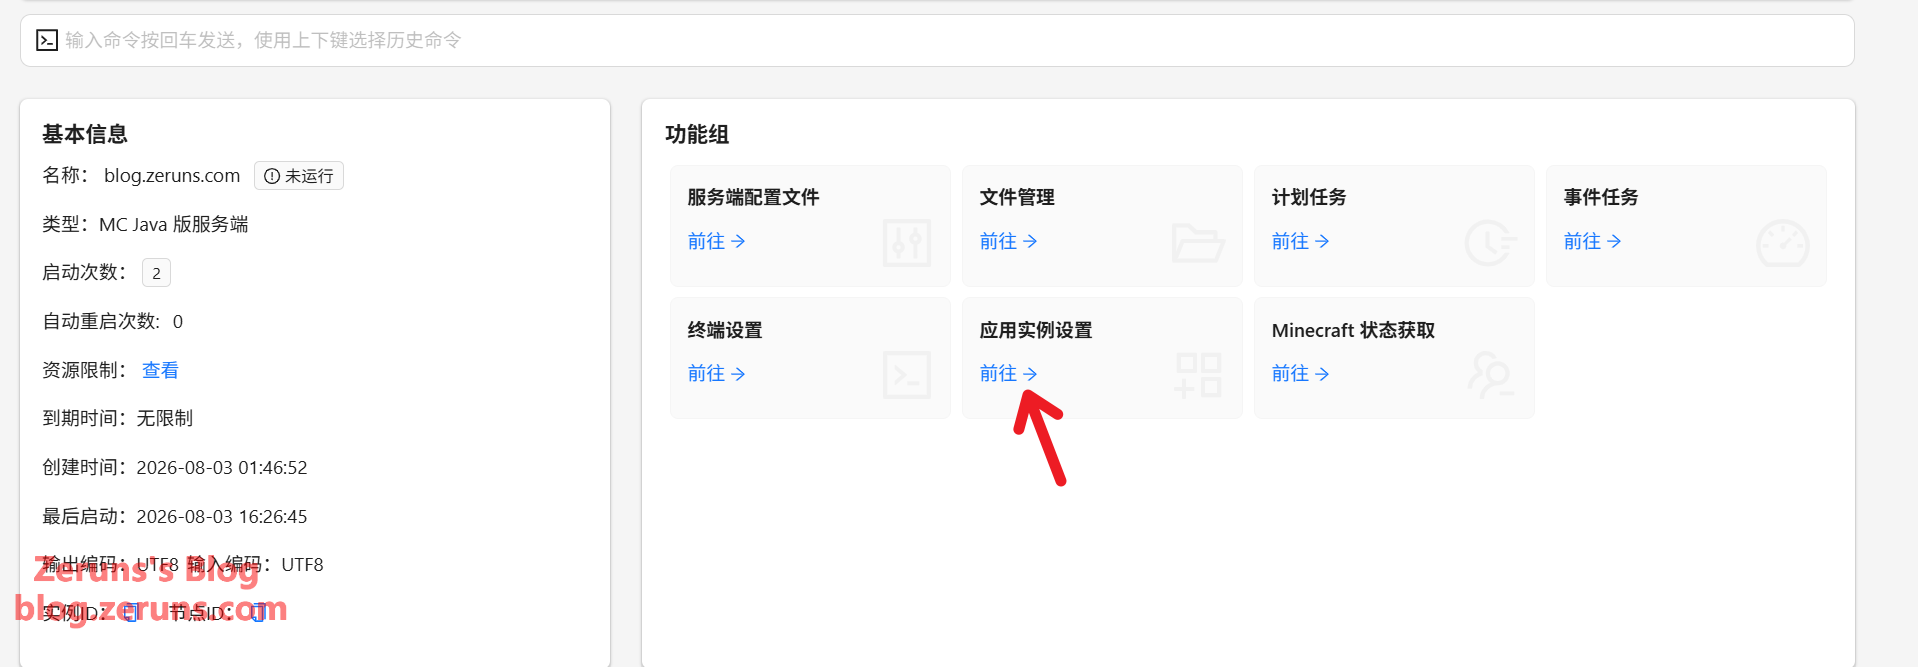
Click Application Instance Control below the terminal.
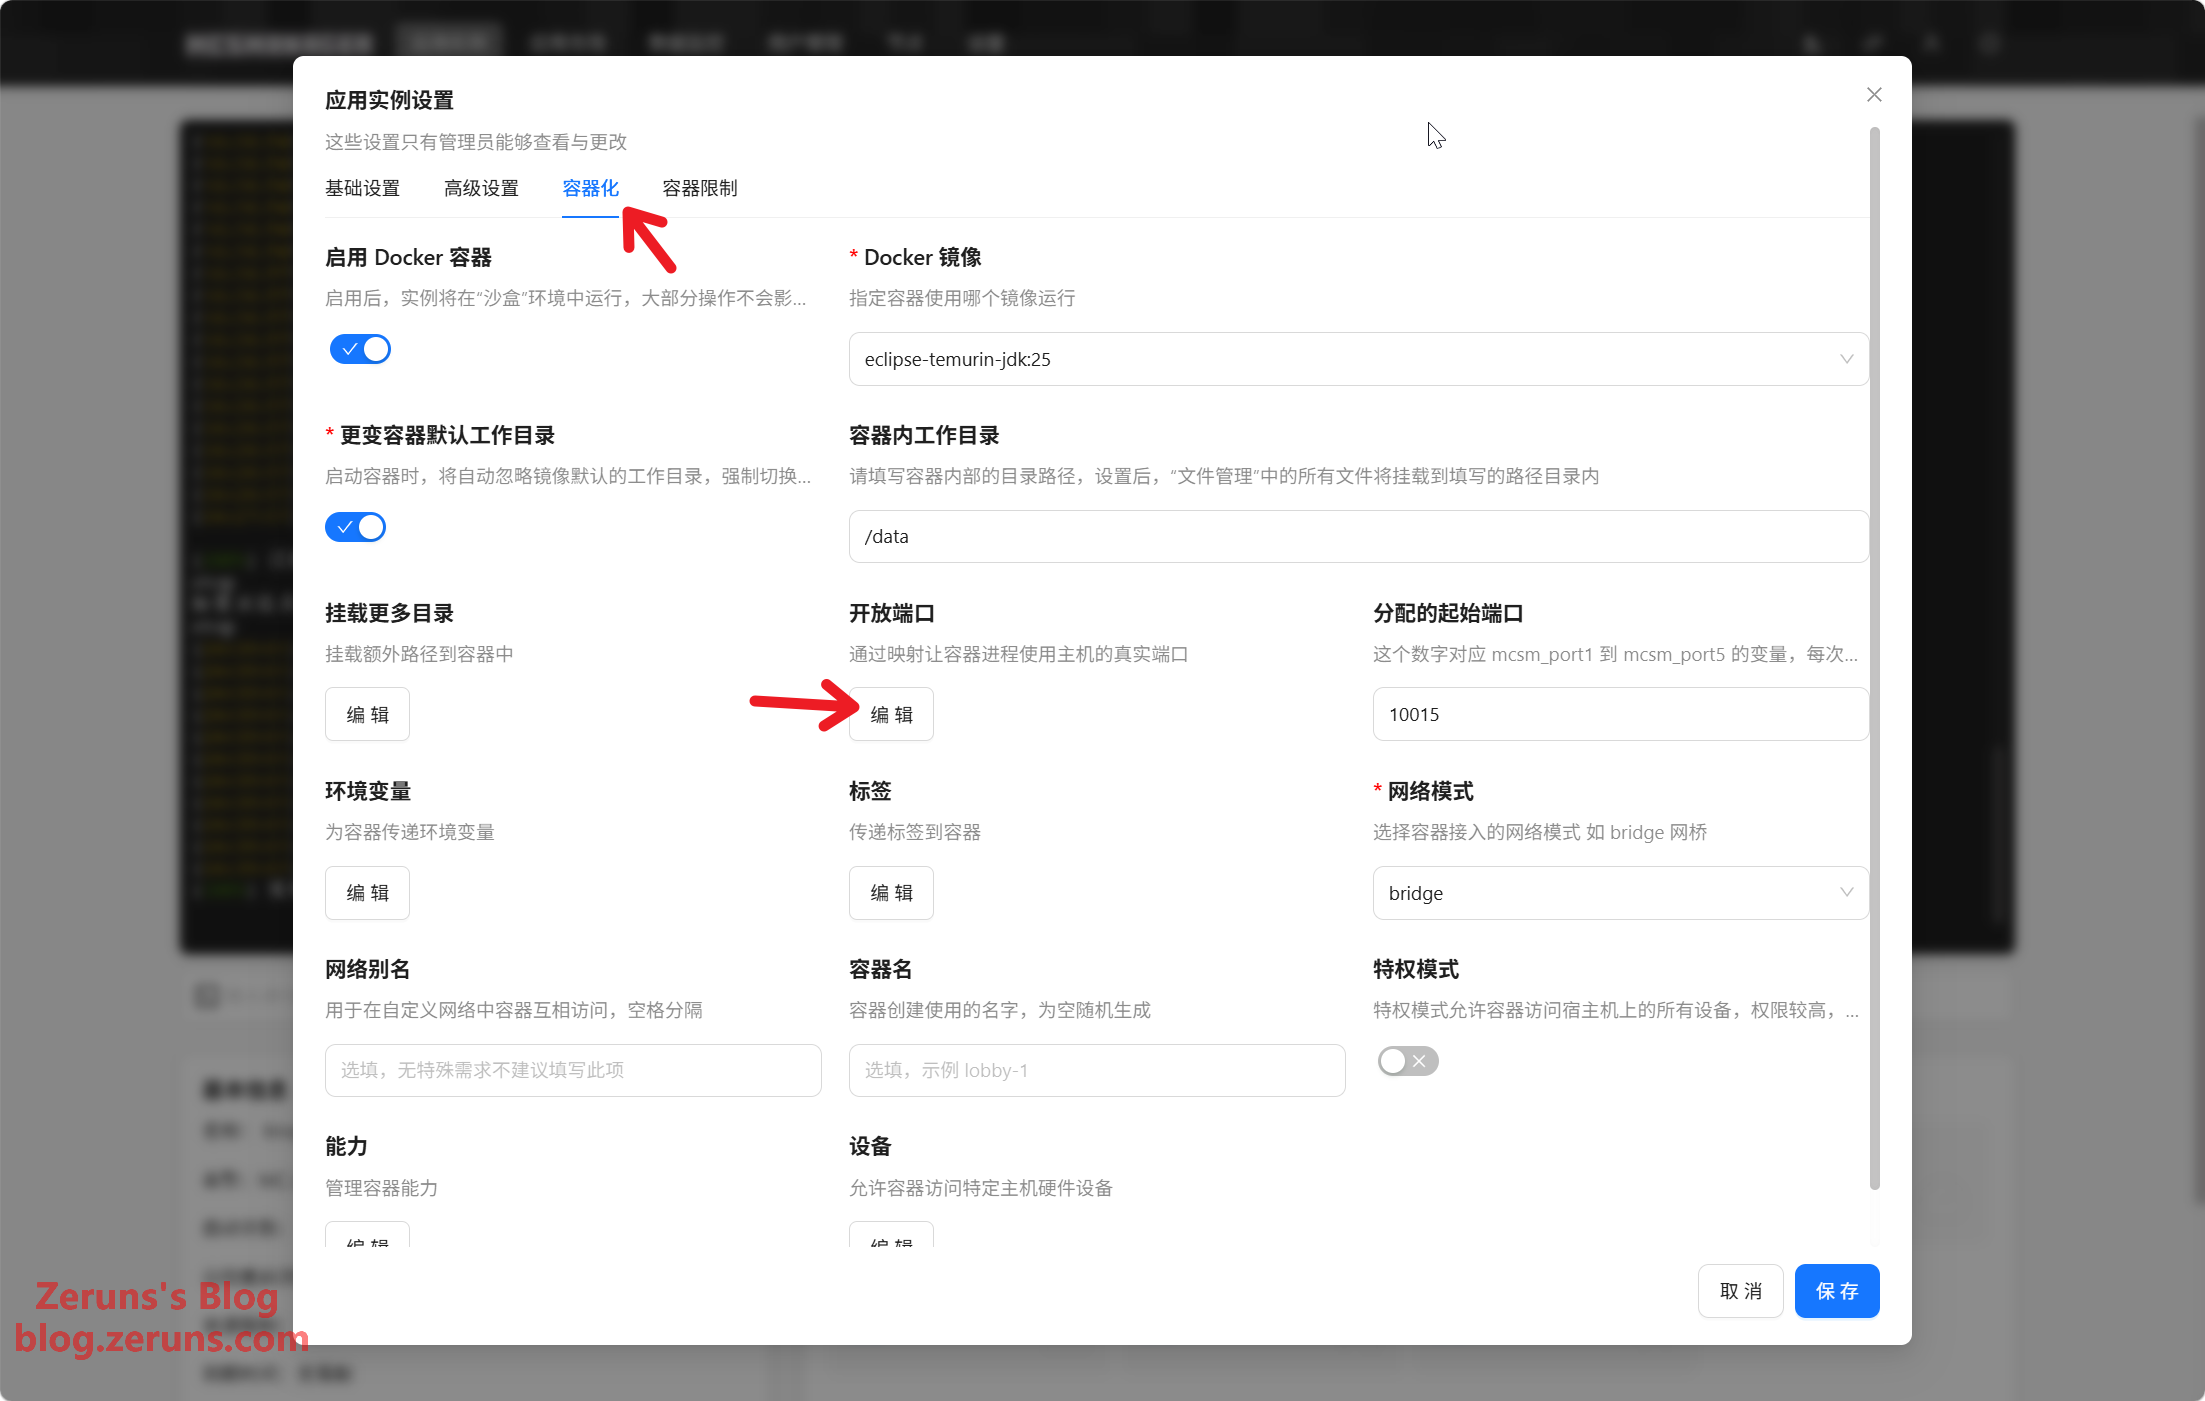
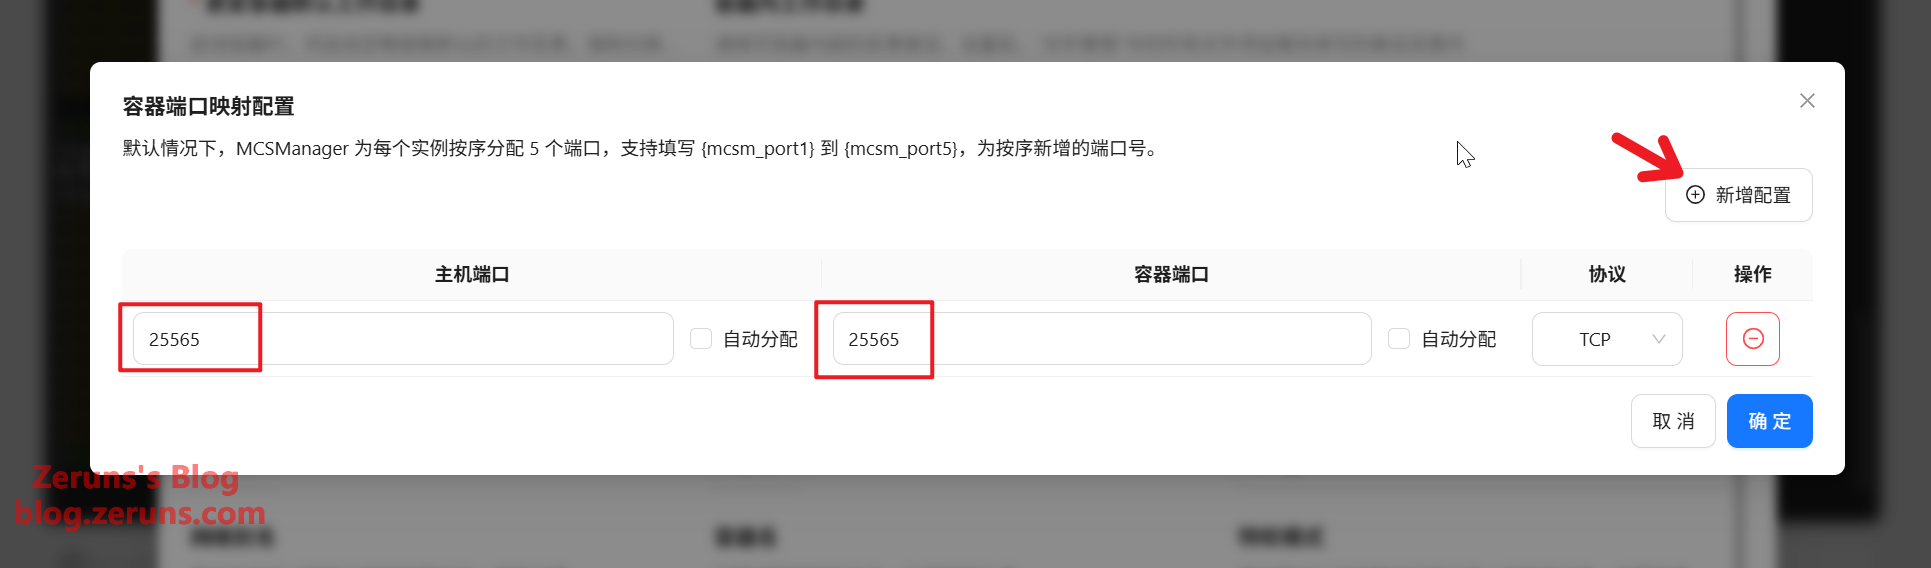
Click Containerization → Open Ports → Edit → Add Configuration. Enter 25565 for both Host Port and Container Port, set the protocol to TCP, click OK, then OK again. (This exposes the Minecraft server port from inside the Docker container.)
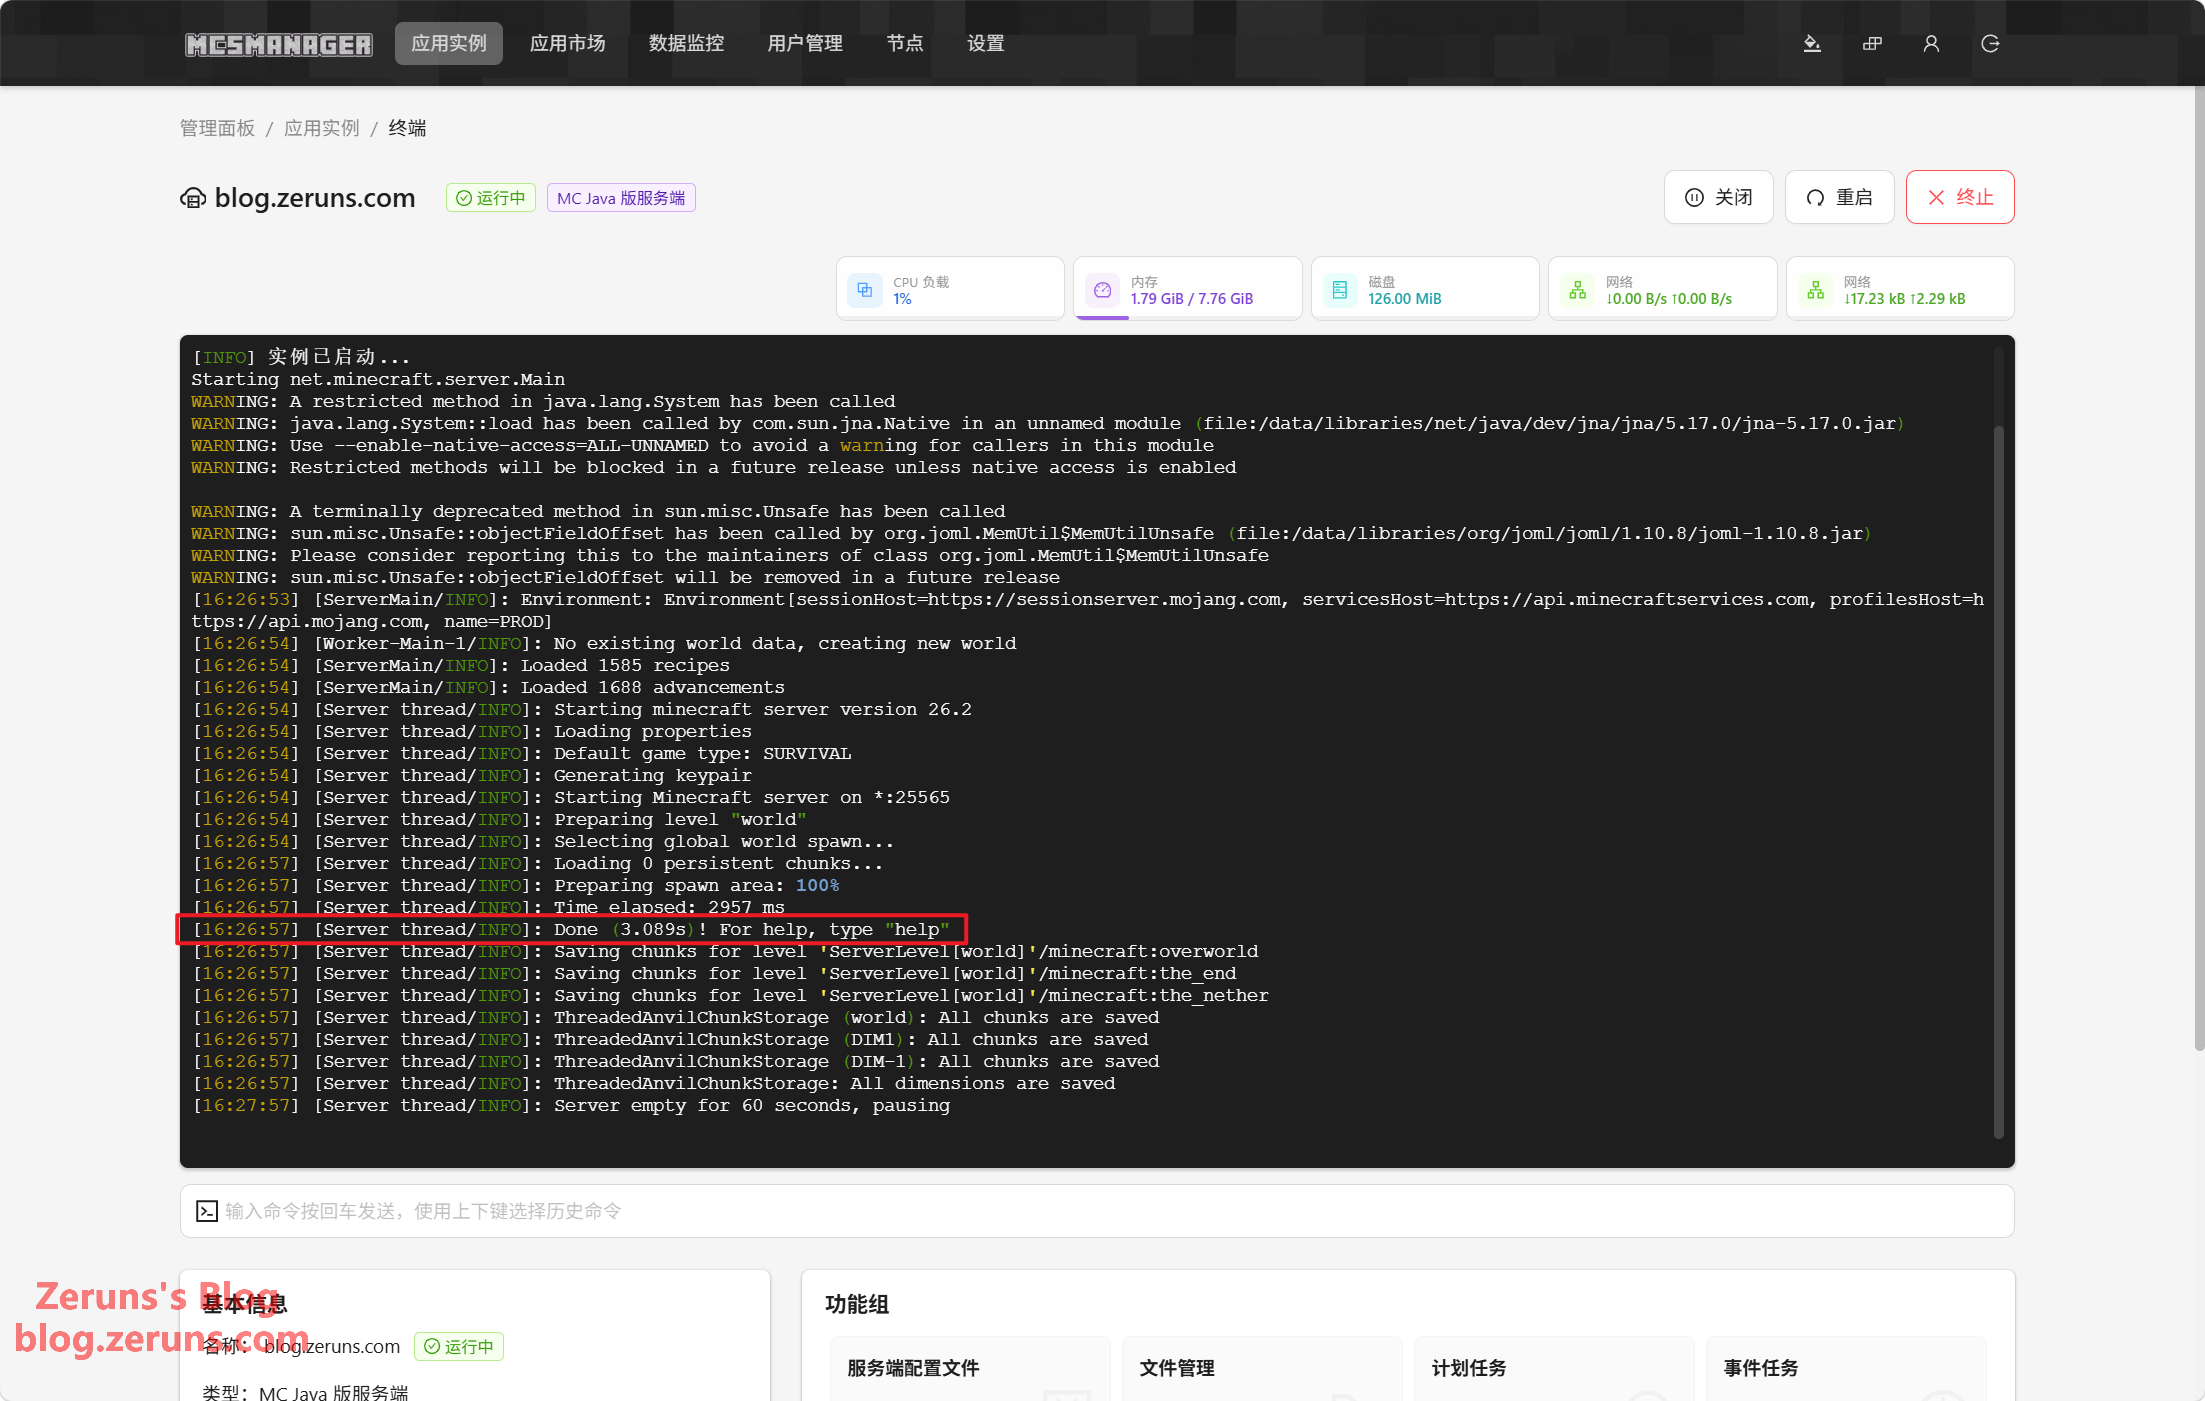
Back at the terminal, click Start again. Once you see Done, the server is live.
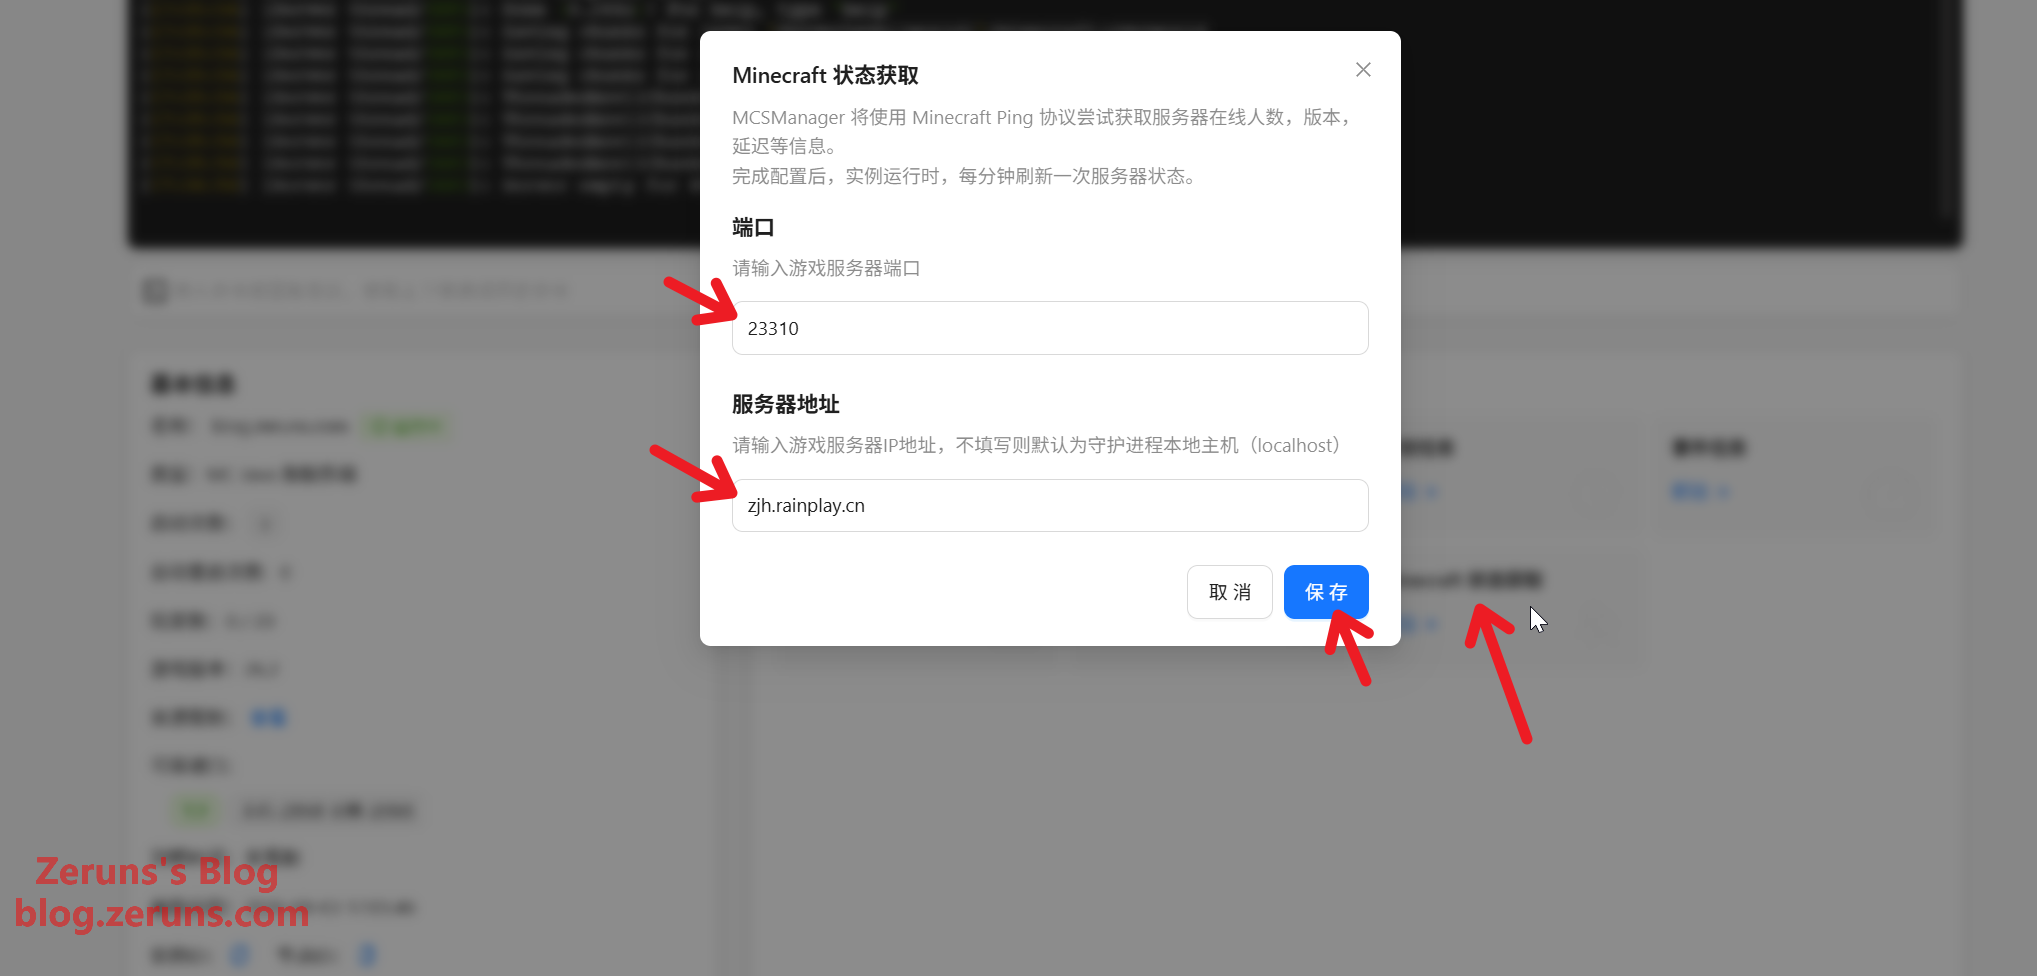
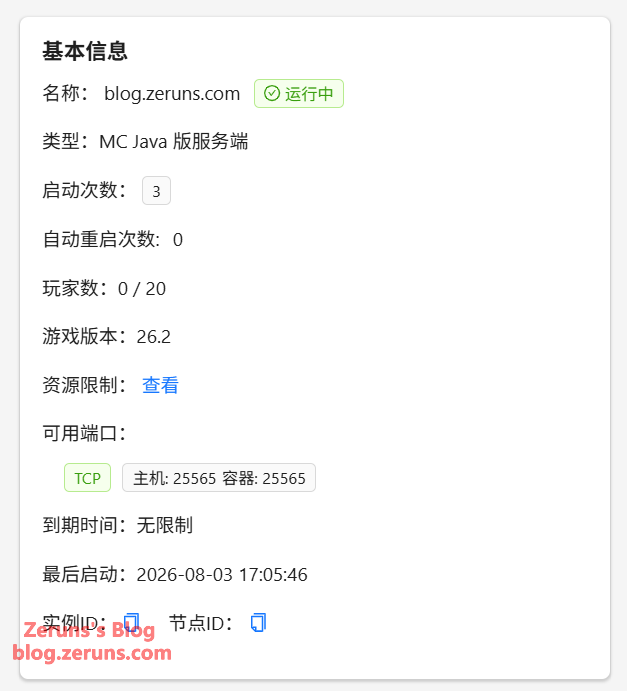
Click Minecraft Status Fetch below the terminal, type in your server's public address and the public port mapped from 25565, then click Save. You'll now see the server's game version and online player count in the basic server info.
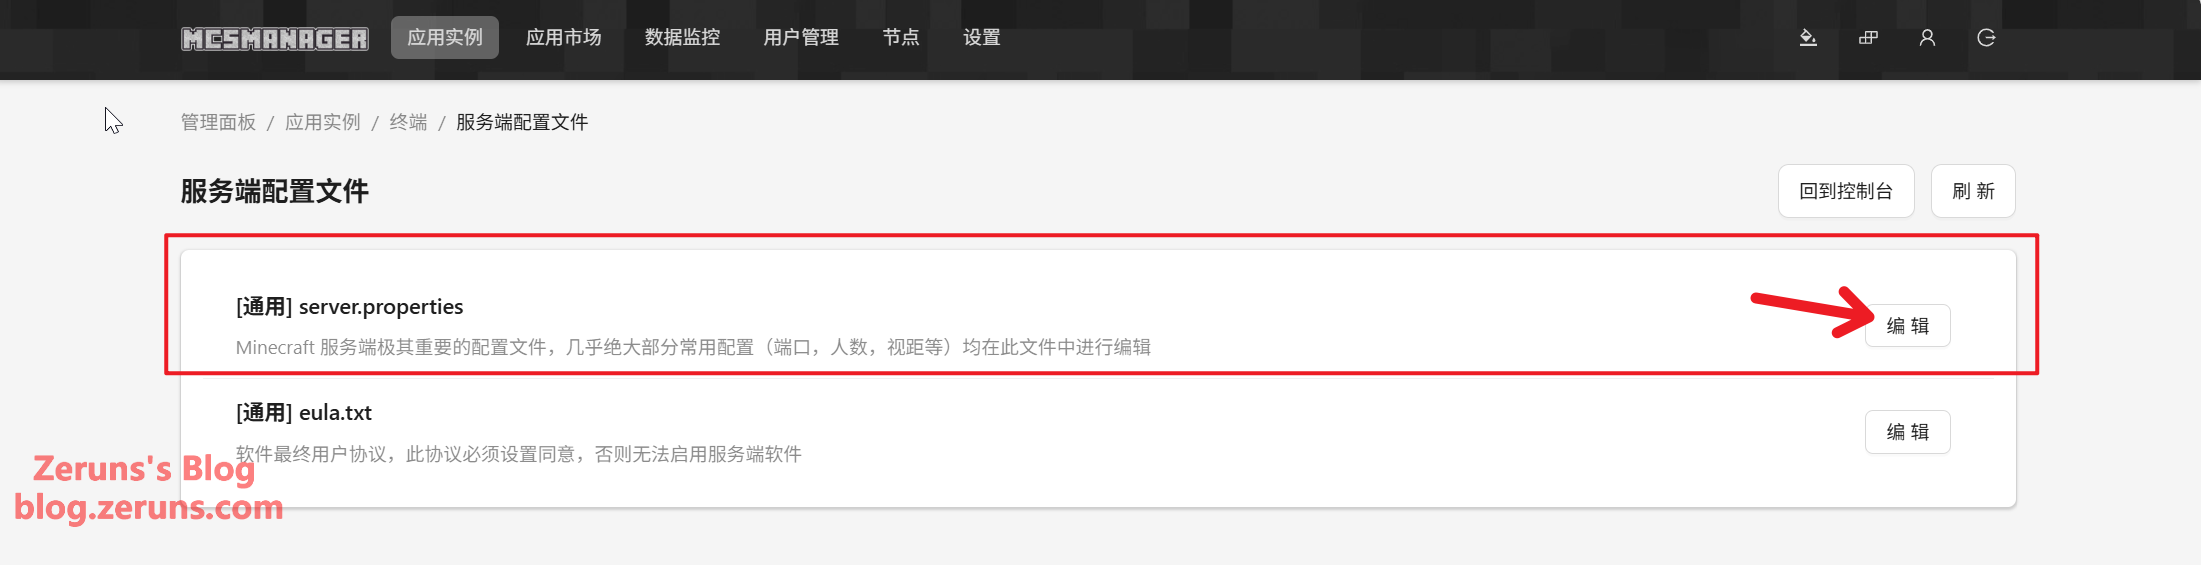
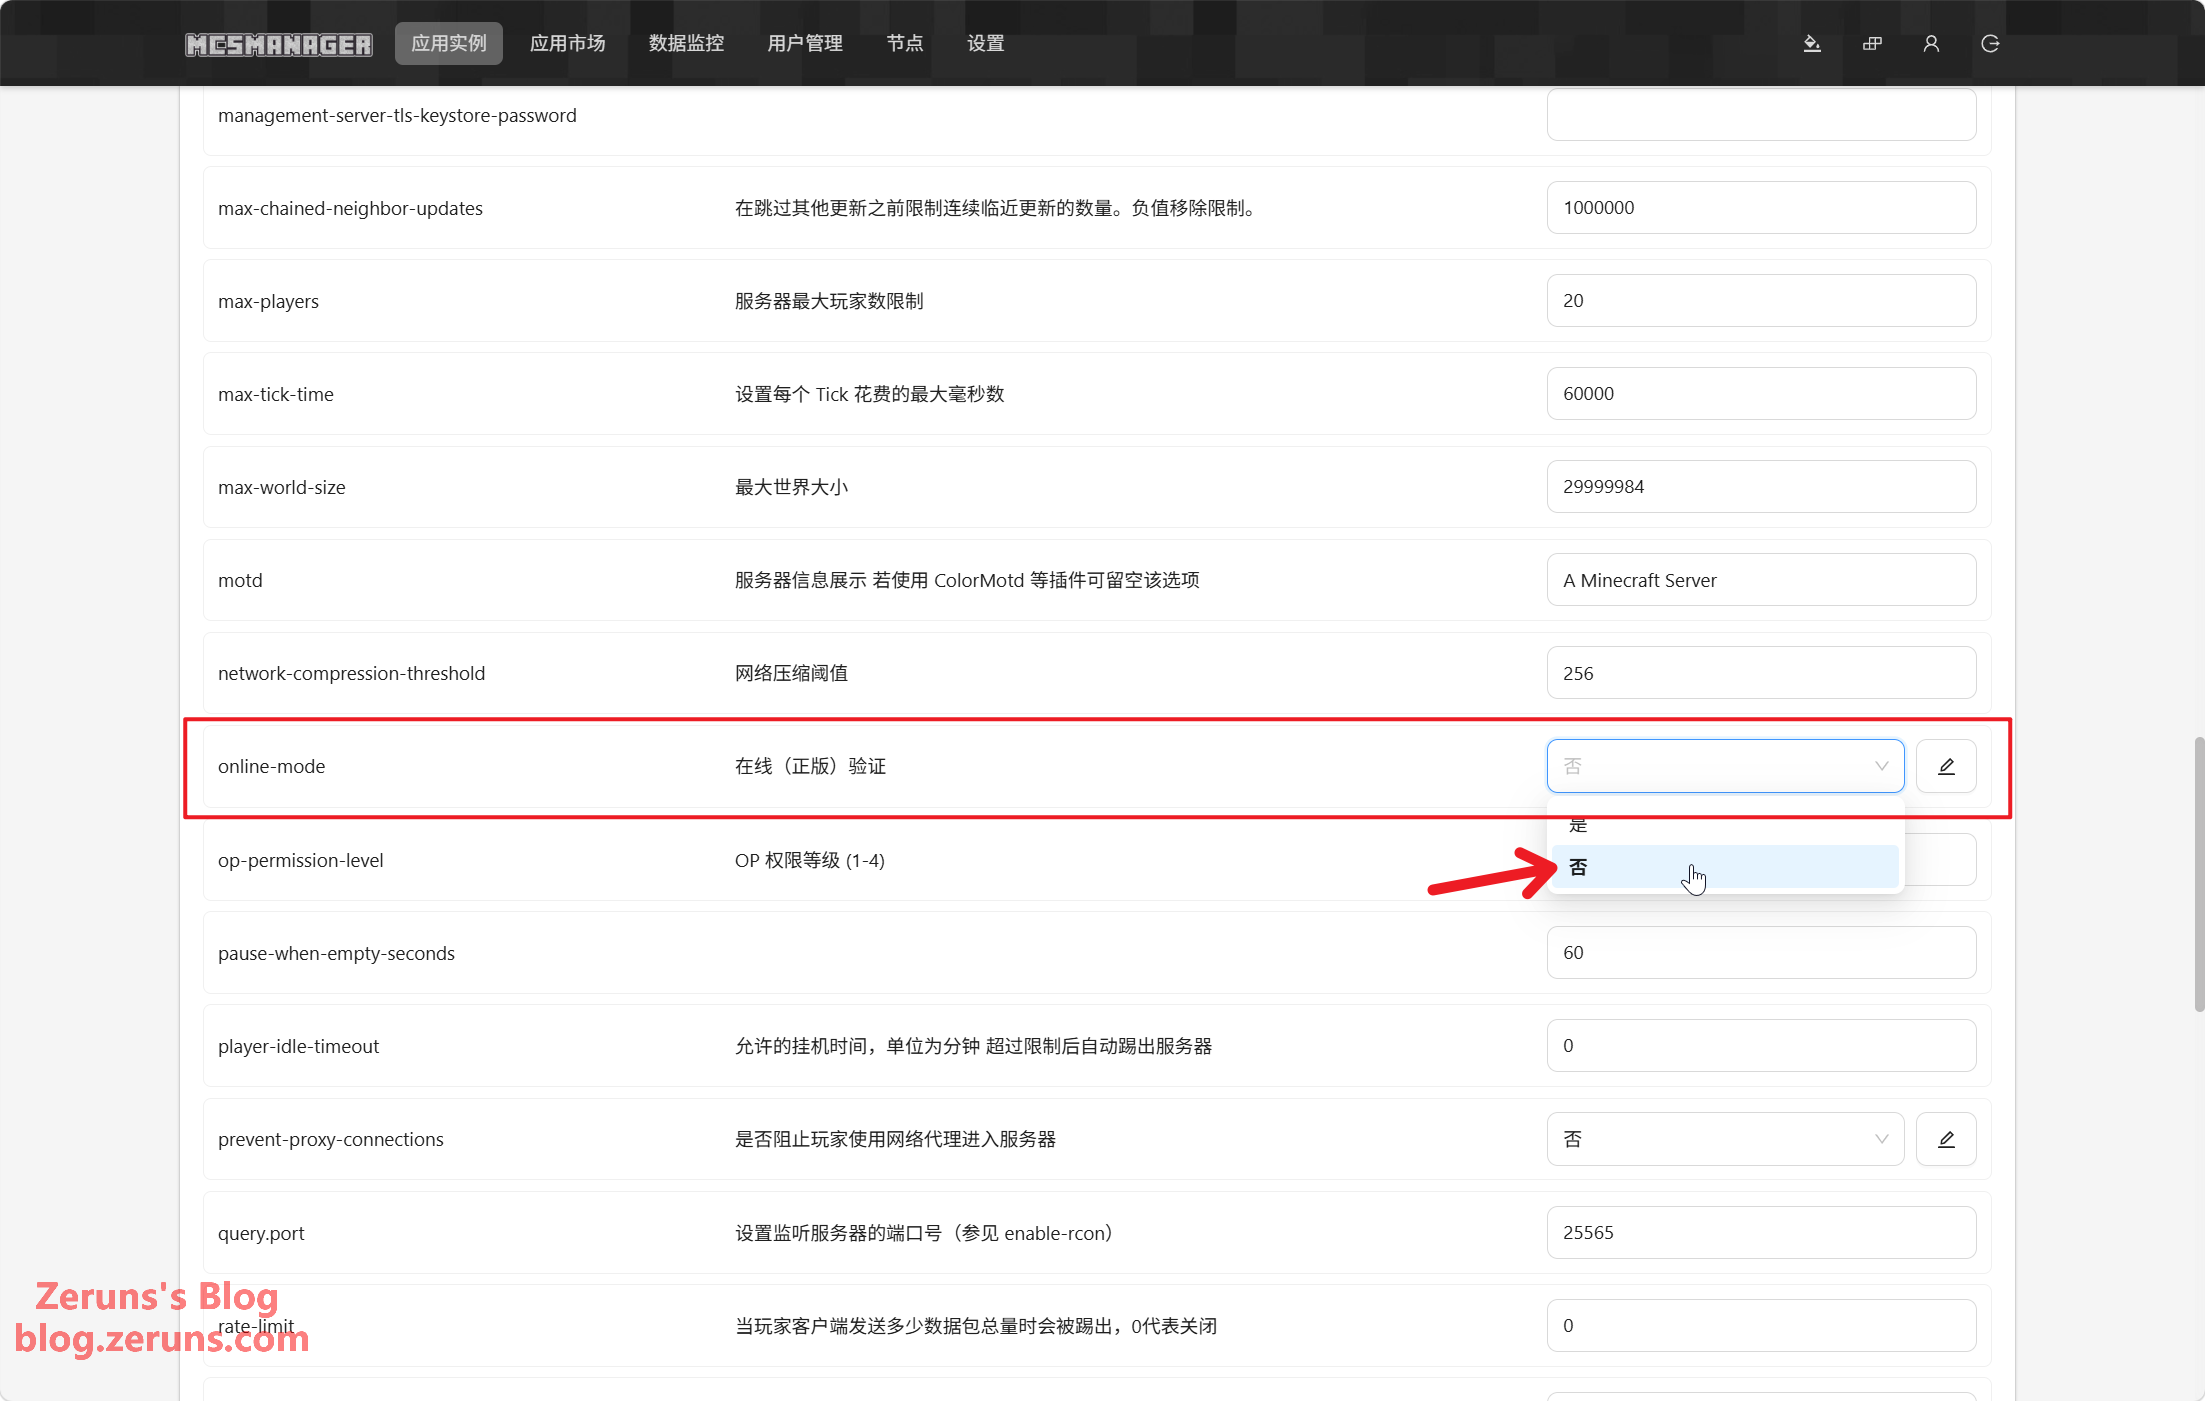
If you don't have a legitimate Minecraft account, you can turn off the server's online-mode verification. Click Server Config Files, hit Edit next to server.properties, find the online-mode setting, flip it from true to false, then Save. (Restart the server instance for the change to take effect.)
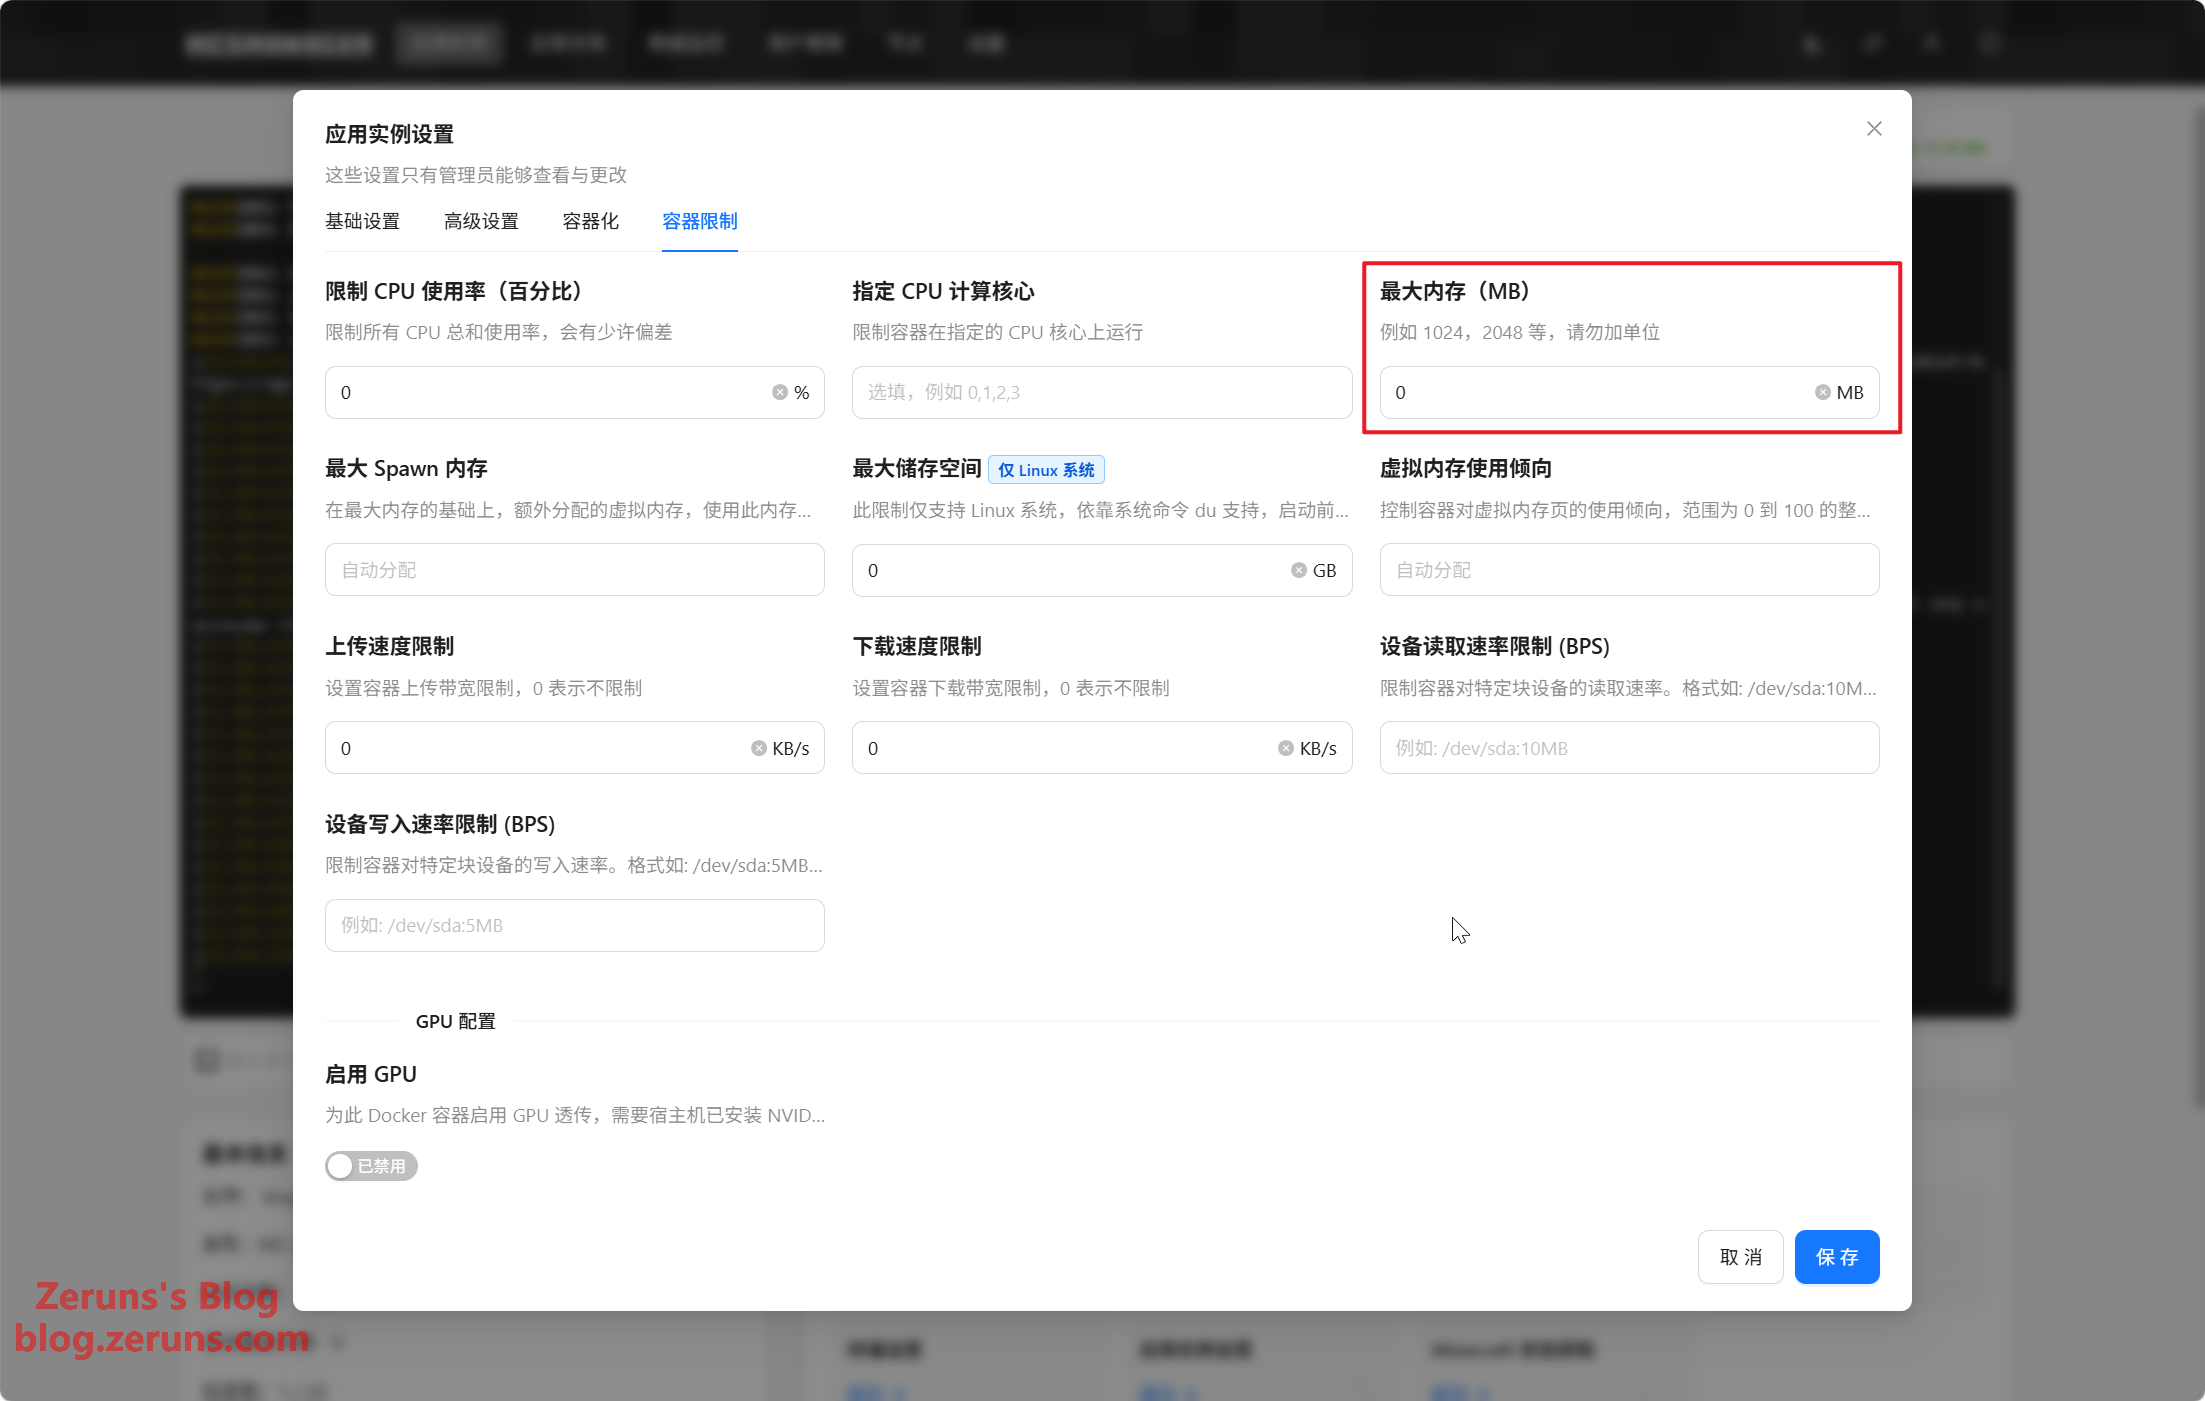
Under Application Instance Settings → Container Limits, you can also cap the maximum memory the container is allowed to use.
Connecting from the Client
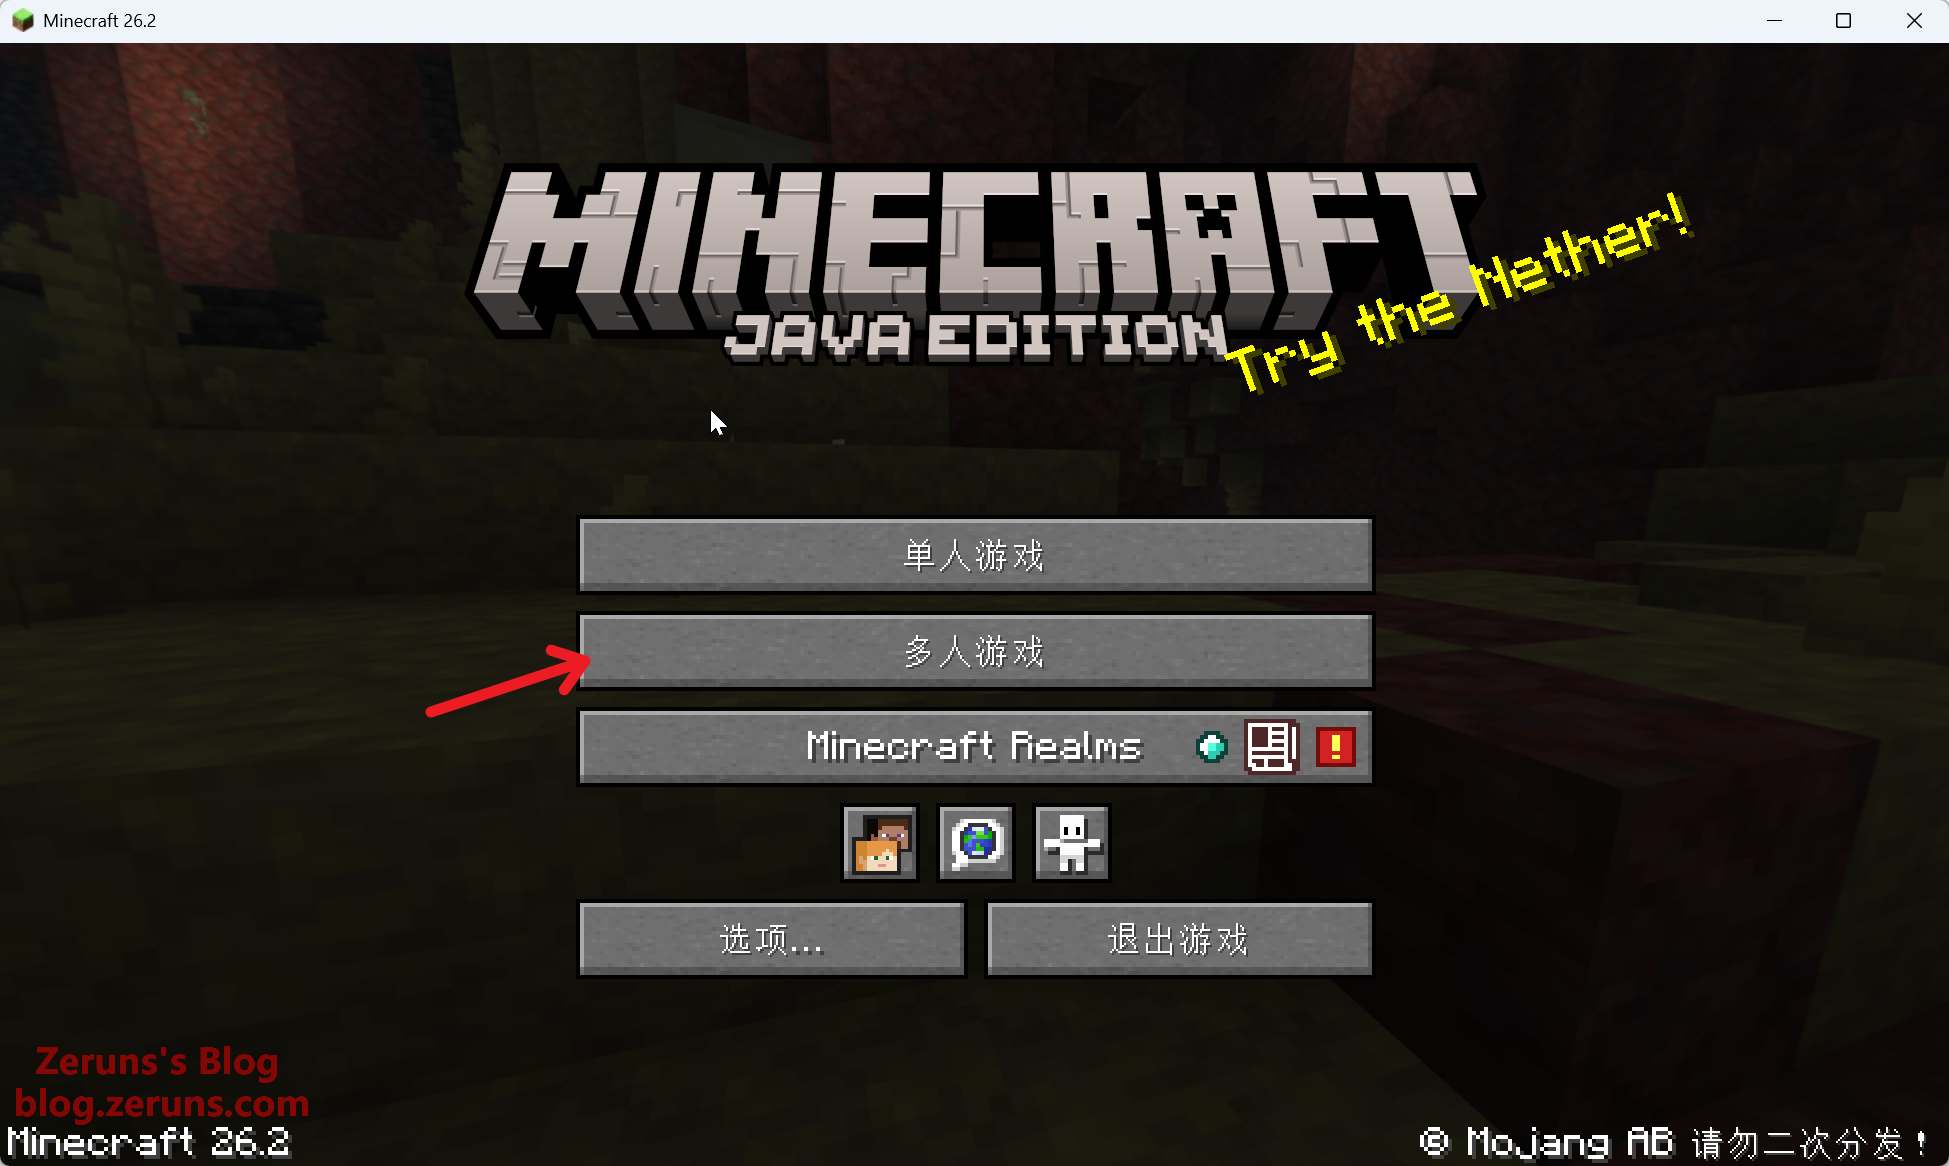
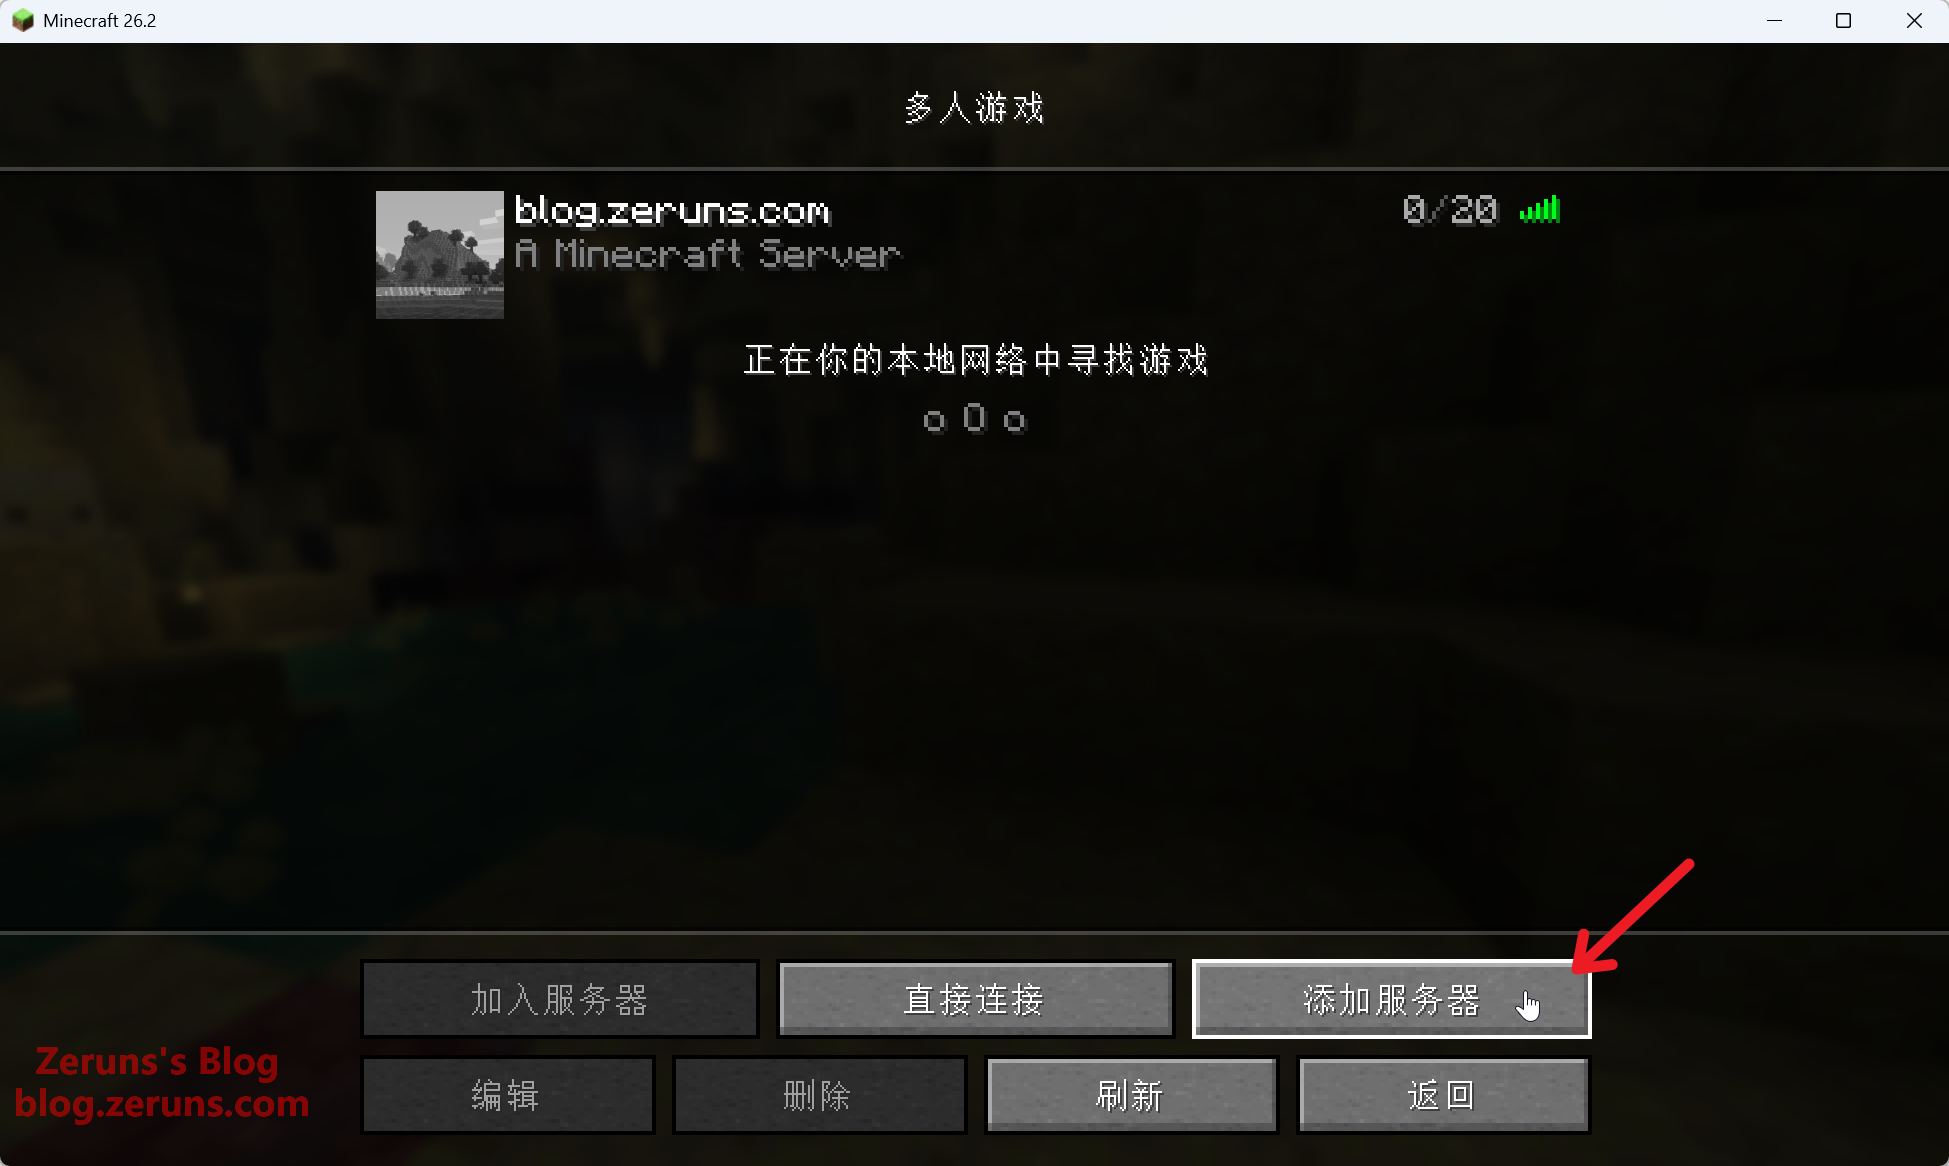
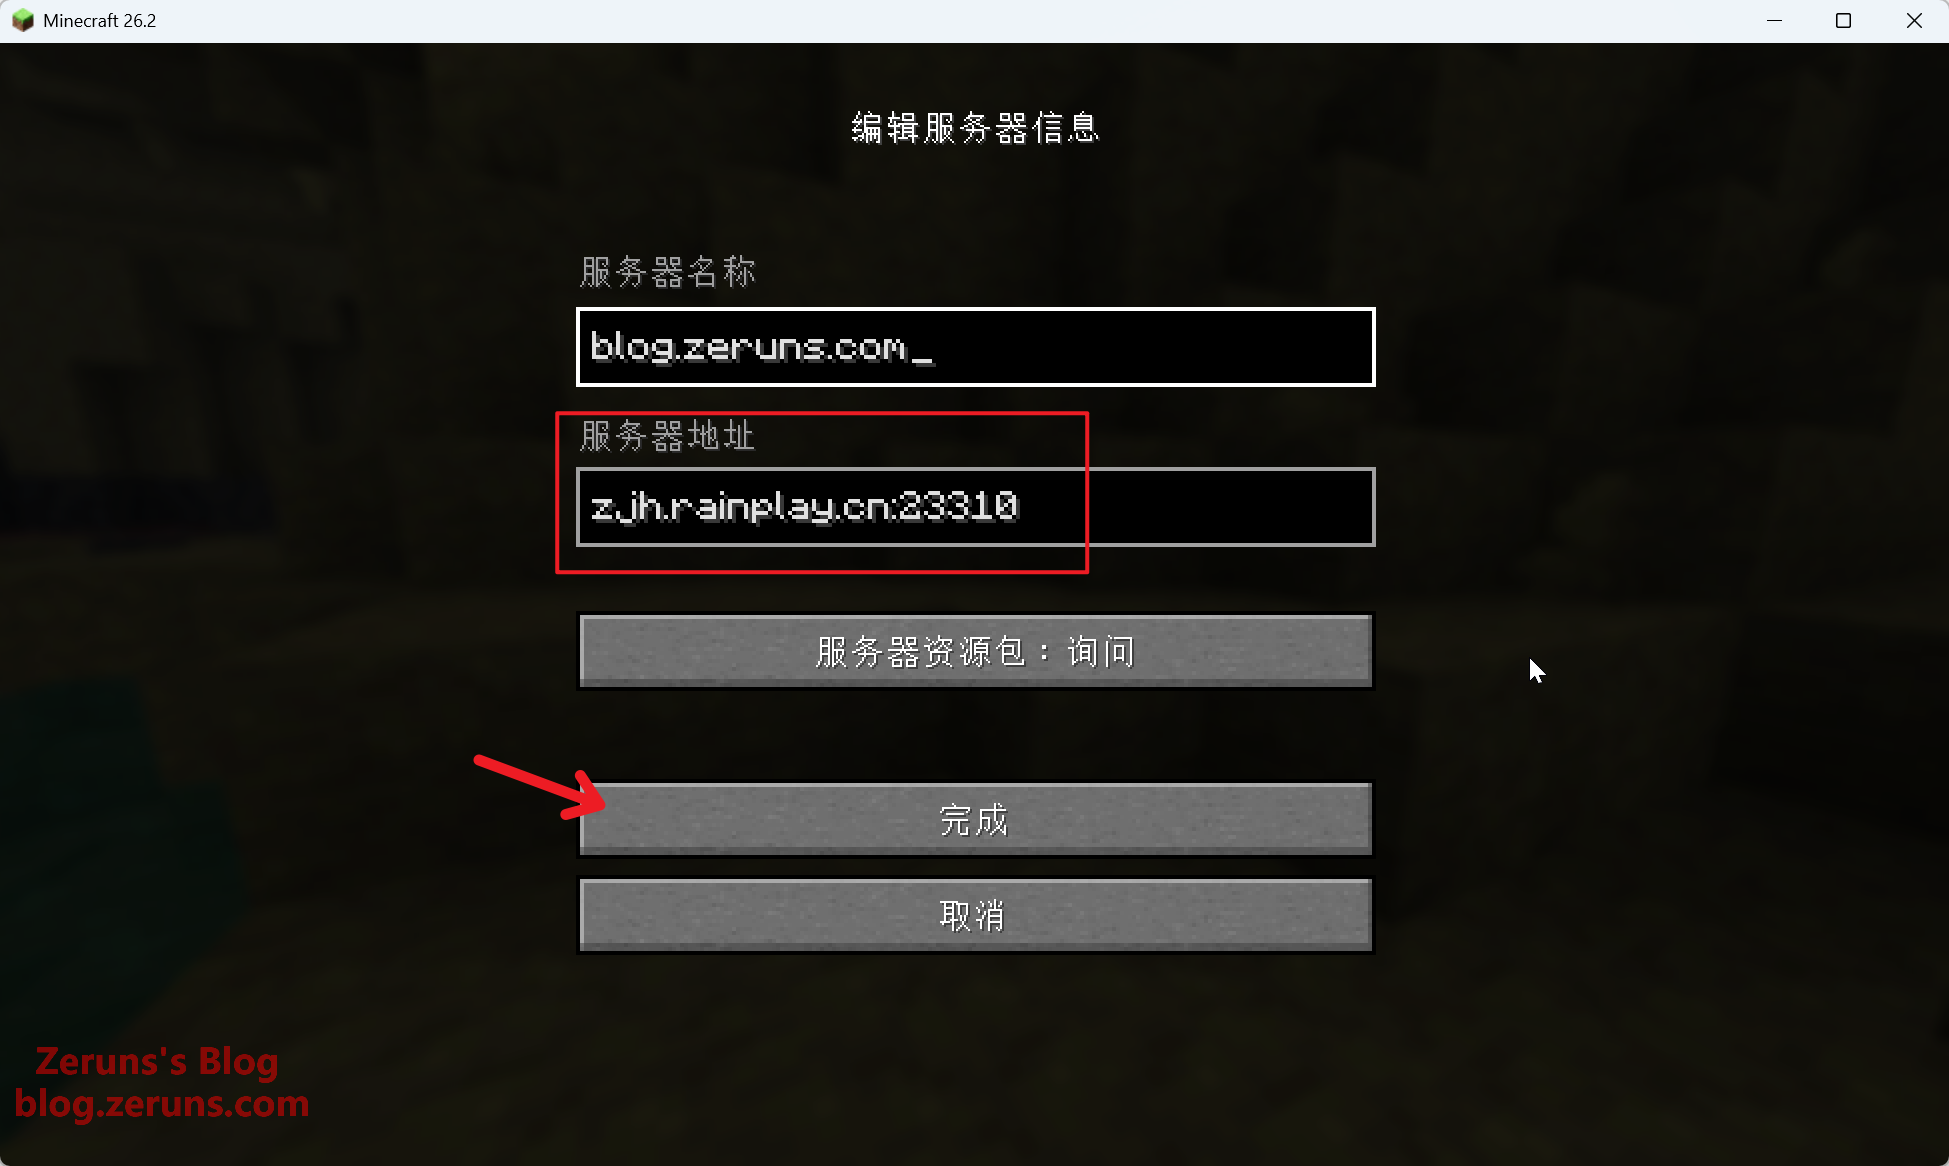
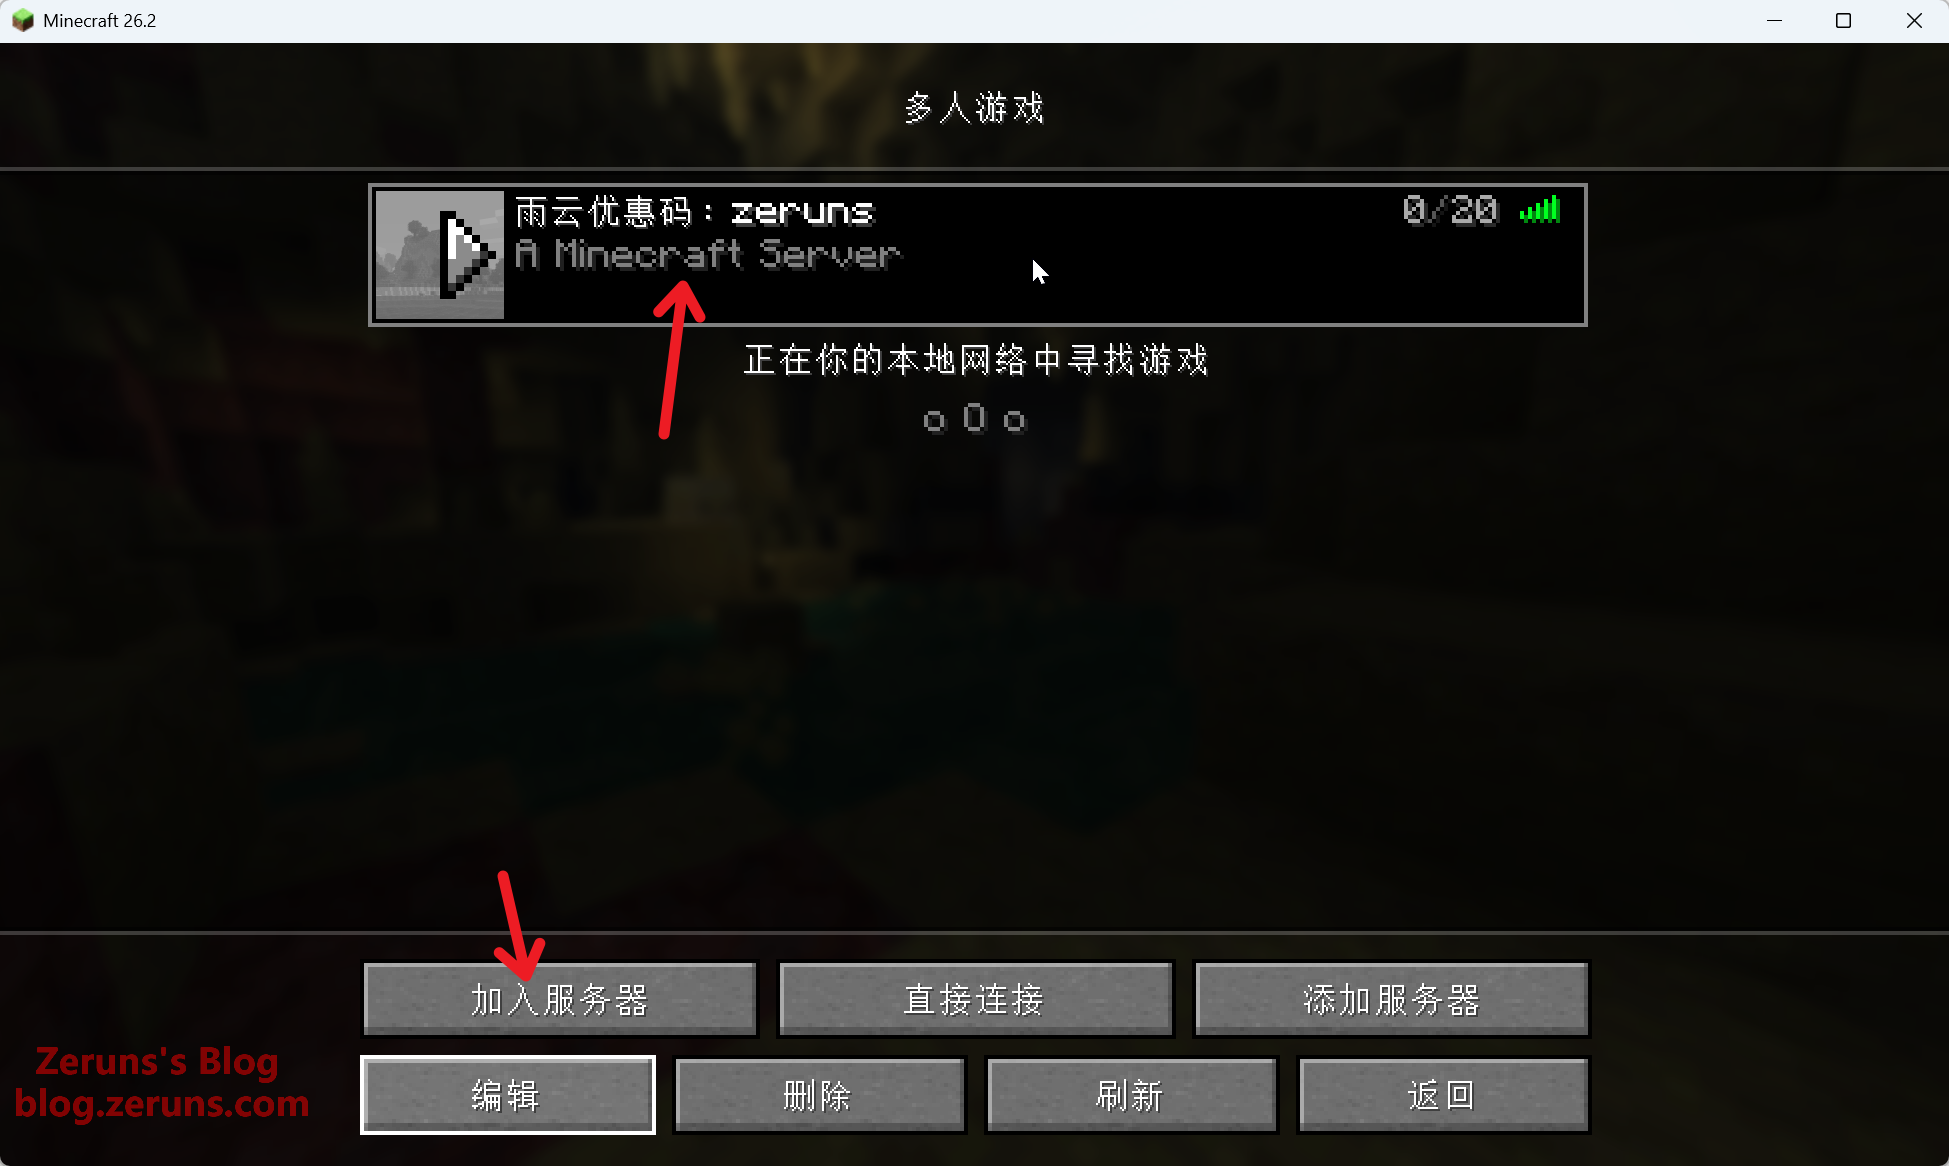
Open your Minecraft Java Edition client, click Multiplayer → Add Server, and type in your server's public IP followed by the port number — use the public port mapped from 25565. Separate the IP and port with a colon (:), as shown below (use your own values — don't copy mine).
Mine, for example: zjh.rainplay.cn:23310
Minecraft 26.2 game client download: https://1826574343.share.123pan.cn/123pan/2Y9Djv-0FK3H
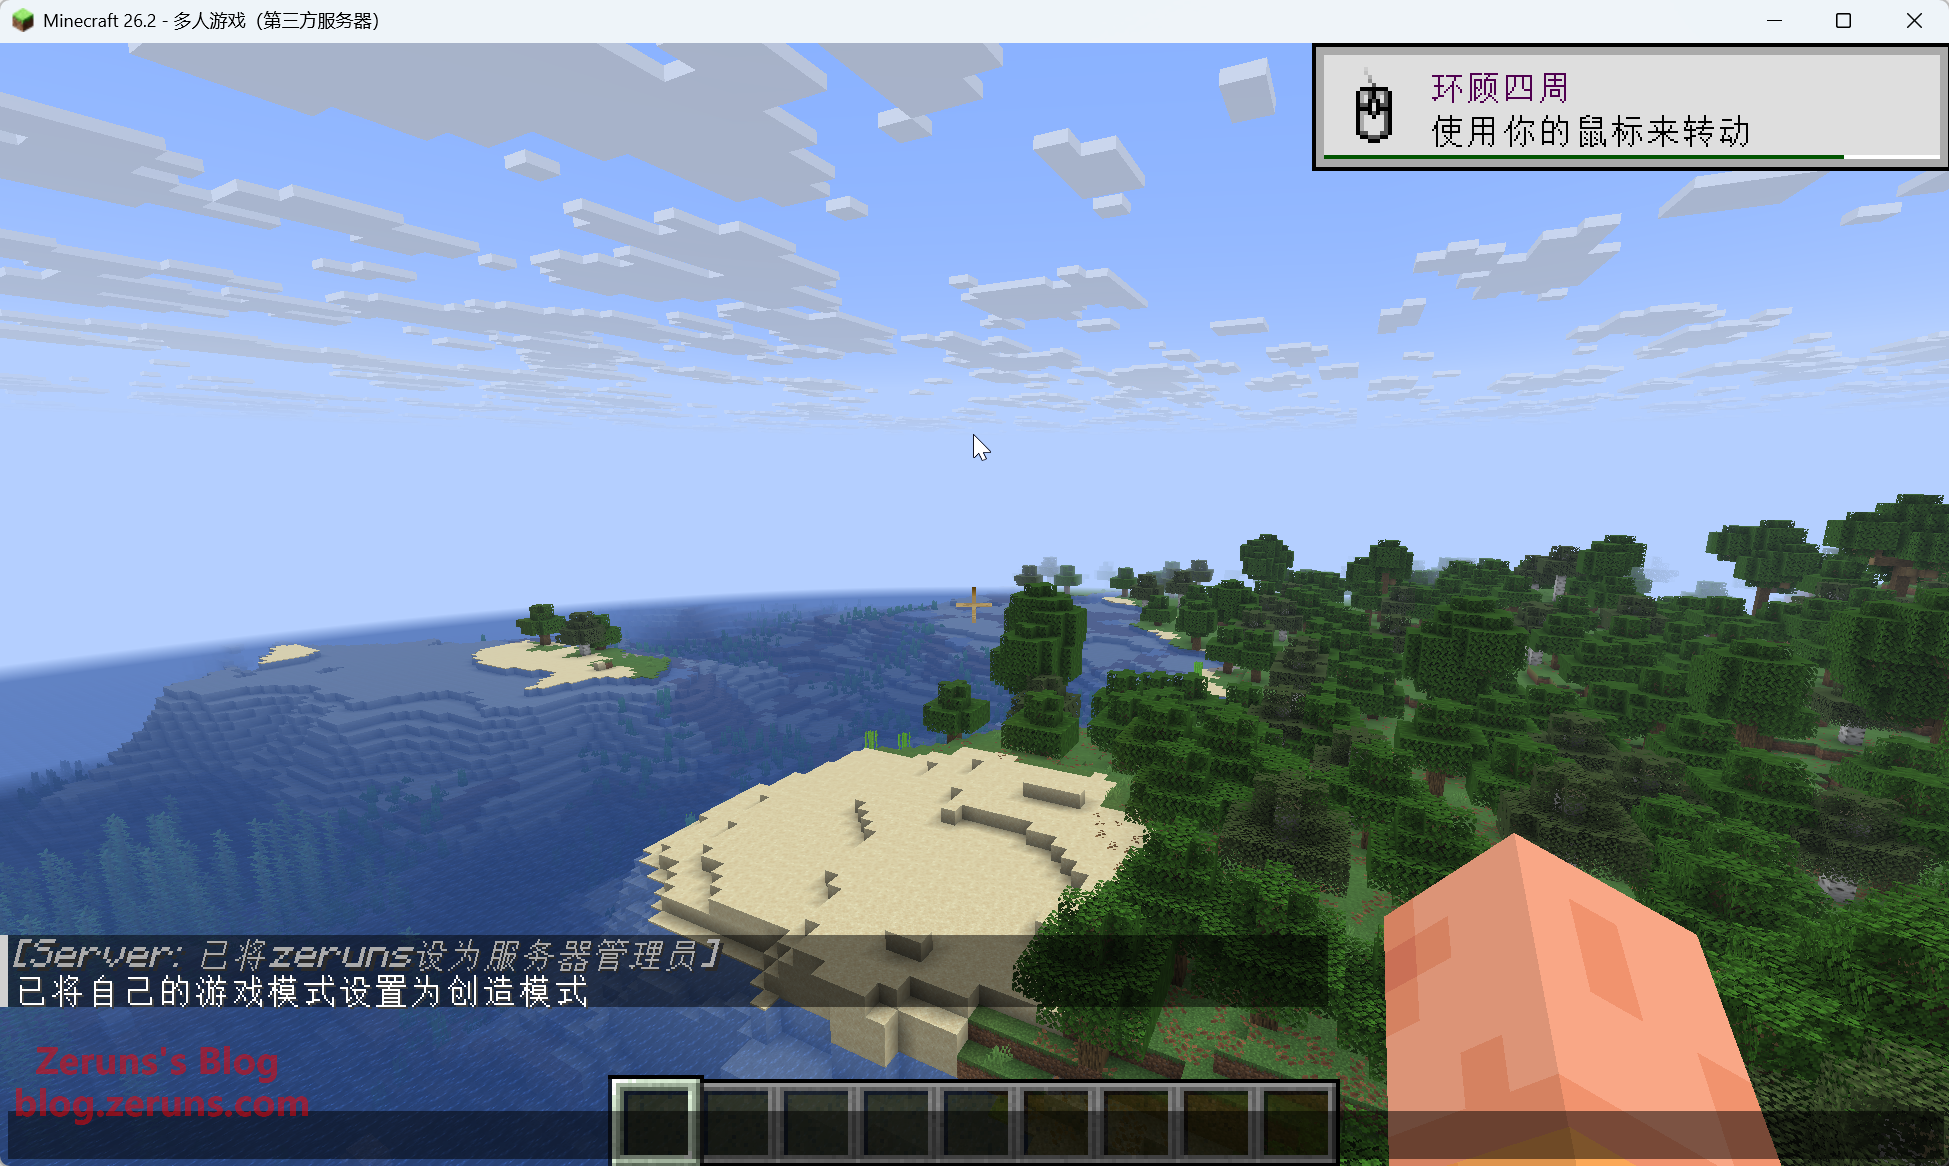
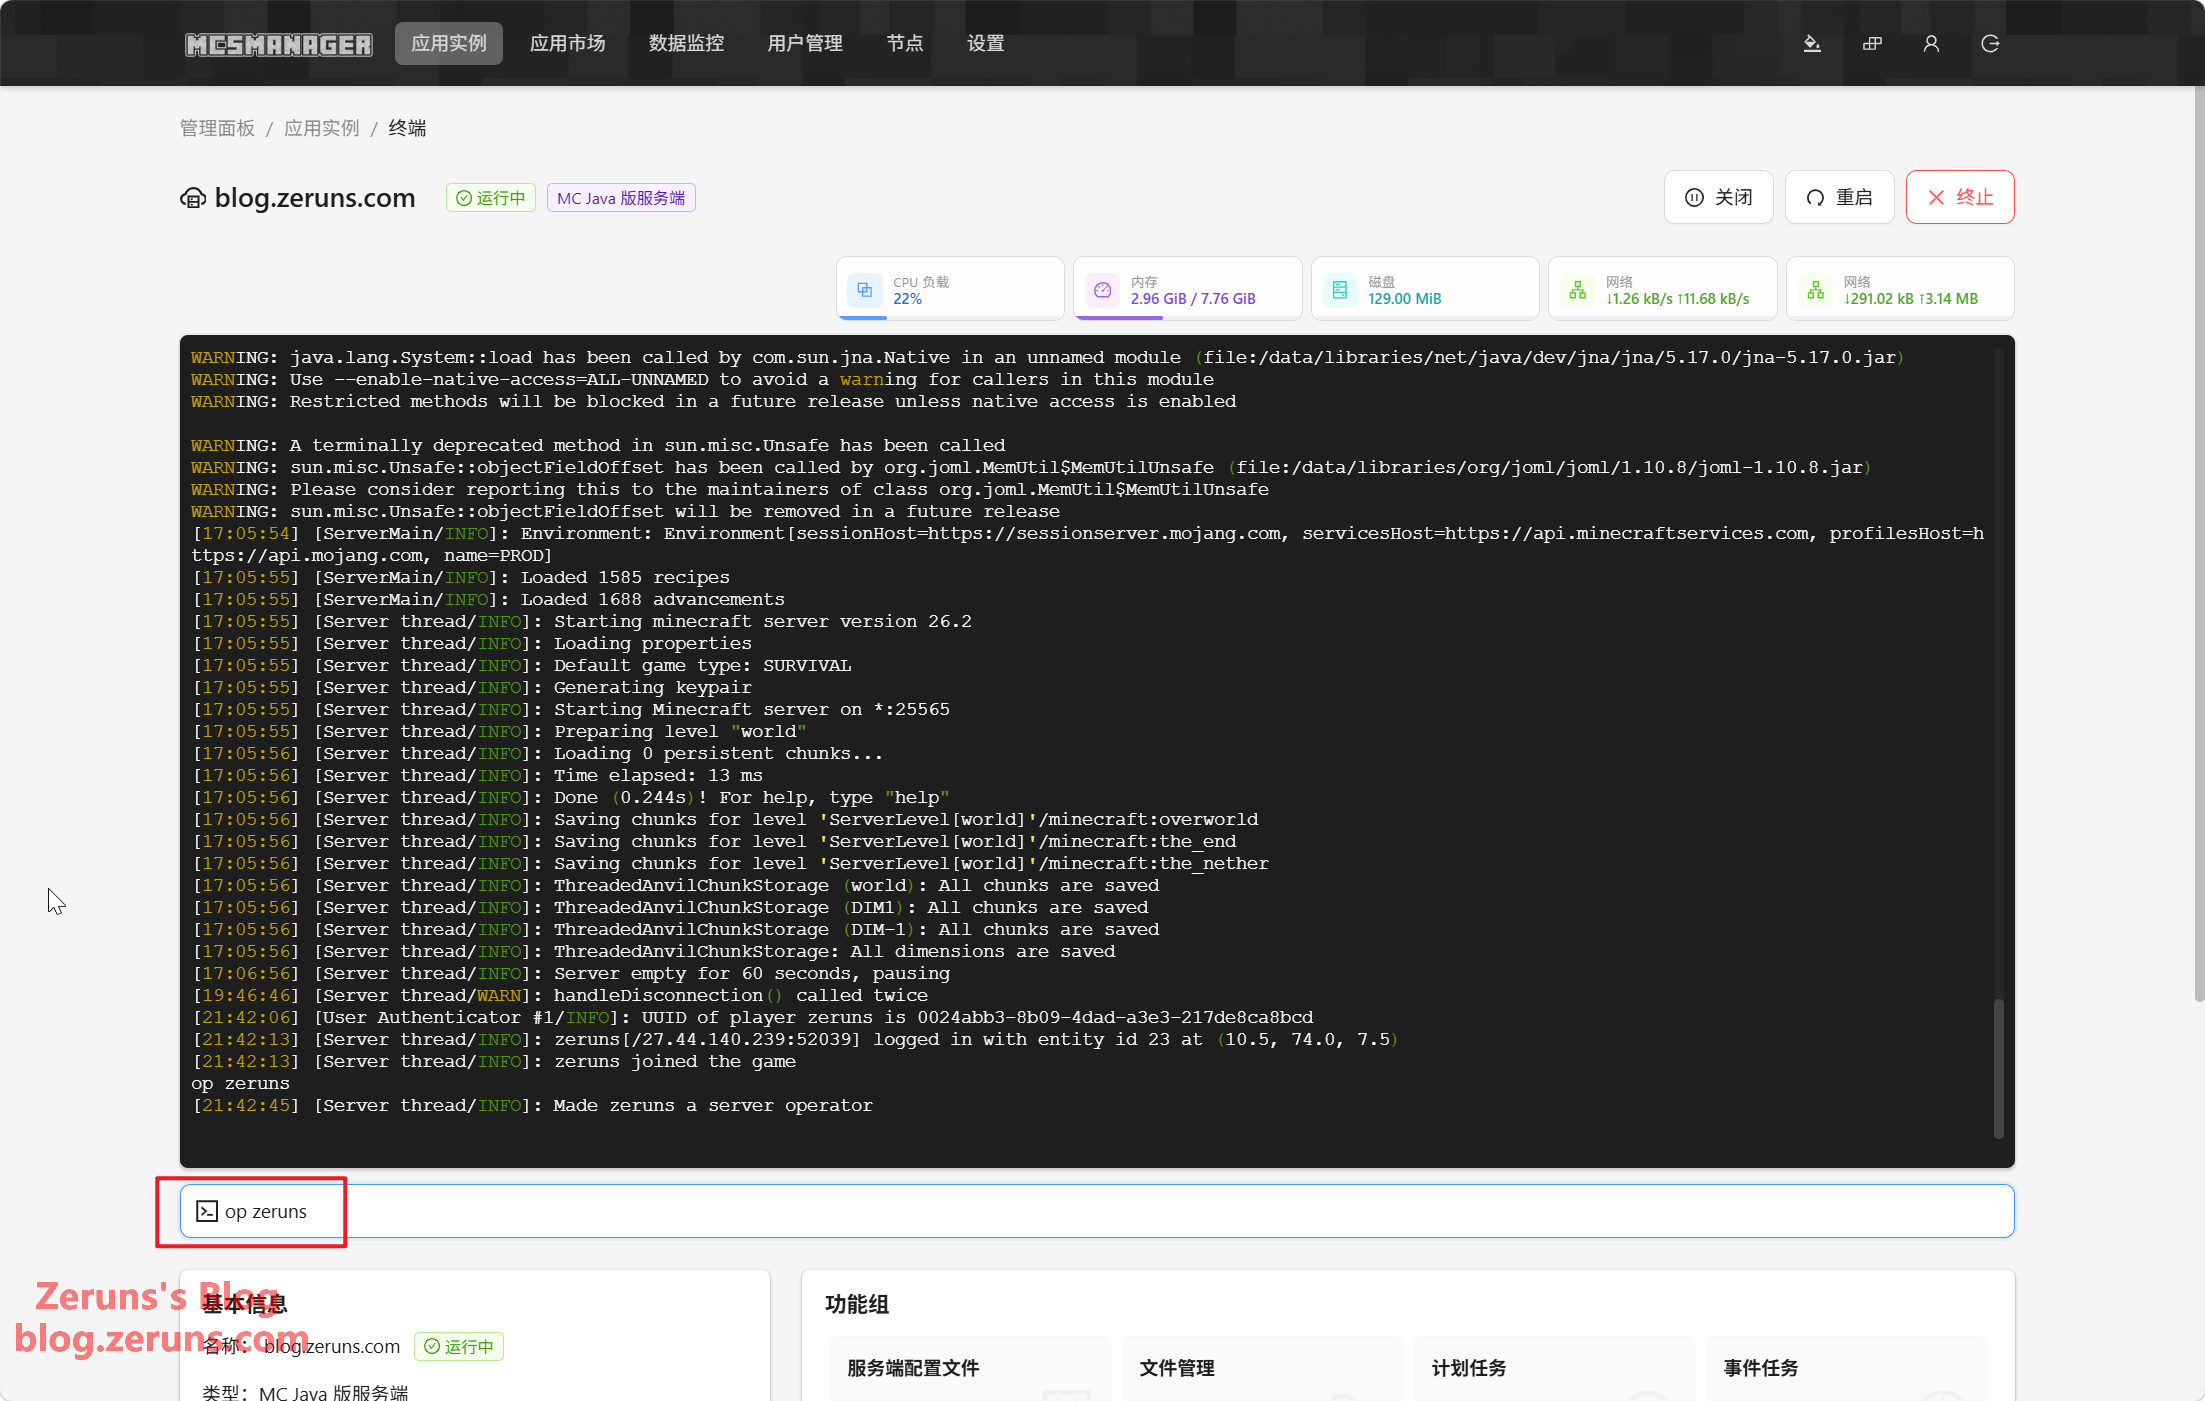
In the input box at the bottom of the MCSM panel terminal, type op username and press Enter to grant that player operator (server owner) privileges.
That's the end of the guide.
Recommended Reading
- Affordable & high-value VPS / cloud server recommendations: https://blog.zeruns.com/archives/383.html
- AI large model API platform recommendations and overview: https://blog.zeruns.com/archives/947.html
- Minecraft server setup tutorials: https://blog.zeruns.com/tag/mc/
- Hermes Agent deployment guide — set up your first AI assistant step by step: https://blog.zeruns.com/archives/939.html
- Ugreen DXP4800Pro NAS unboxing, review, and teardown: https://blog.zeruns.com/archives/949.html
- Hong Kong travel journal and photo sharing: https://blog.zeruns.com/archives/945.html
评论