


All in SSL is an open-source, free platform for automated SSL certificate management. This tutorial on Installing and Using ALLinSSL covers two deployment methods (Linux server deployment and Rainyun RCA one-click deployment).
Tired of manually renewing and deploying SSL certificates on a regular basis? Then this guide is for you. Learn how to use ALLinSSL to automatically apply for and renew wildcard SSL certificates, and automatically deploy them to servers and CDNs!
🚀 Rainyun RCA Cloud Apps currently offer a 15-day free trial for new users (free resources capped at 8 cores and 8 GB RAM)!
Video tutorial: https://www.bilibili.com/video/BV16KMJzbE2d/
Website deployment articles: https://blog.zeruns.top/categories/web
Introduction to the ALLinSSL Project
Official website of the ALLinSSL project: https://allinssl.com/
ALLinSSL is developed by the team behind the BT Panel: https://www.bt.cn/u/tbUafD
Background: The Pain Points of SSL Certificate Management
SSL/TLS certificates are essential for secure communications on websites and online services—an indispensable part of the modern internet. However, managing these certificates can be a cumbersome and error-prone task, especially for users managing multiple servers, domains, or complex cloud environments:
- Scattered and disorganized: Certificates are deployed across various servers, cloud platforms, CDNs, or load balancers with no unified view.
- Complex configurations: The manual process of applying, verifying, configuring, and deploying certificates requires technical expertise and is prone to errors.
- Renewal challenges: Certificates have limited validity; forgetting to renew or failing to do so correctly can lead to service disruptions and security risks.
- Lack of monitoring: It is difficult to track expiration dates, certificate health, and deployment status in real time.
- Cost considerations: Commercial SSL management tools or services can be powerful but often come with hefty price tags, especially for managing a large number of certificates.
ALLinSSL: A Purpose-Built Solution
To address these challenges and fill the gap in automated SSL management, we developed ALLinSSL—a comprehensive, open-source, and free platform for centralized SSL certificate management.
Our goal: Transform HTTPS security management from a "technical burden" into a "low-barrier, automated" process.
Key Advantages
- One-stop management: Centrally manage all SSL/TLS certificates on a single platform, regardless of where they are deployed.
- Fully automated workflows: Automate the entire lifecycle from issuance and validation to deployment and renewal, saving time and effort.
- User-friendly interface: Provides an intuitive web UI and dashboard—no need to memorize complex CLI commands.
- Broad compatibility: Supports free CAs like Let's Encrypt and works with a wide range of DNS providers, cloud platforms (Tencent Cloud, Alibaba Cloud), server deployment methods (SSH, BT Panel, 1Panel), and services like CDNs and WAFs.
- Open-source and free: Core features are completely free under the AGPL-3.0 license, encouraging community participation and contributions.
- Flexible extensibility: Use the workflow engine to customize complex deployment logic, meeting individual needs.
Compared to command-line-only tools like Certbot or acme.sh, ALLinSSL offers a more user-friendly experience. And compared to proprietary, paid solutions, ALLinSSL provides better value and transparency.
Introduction to Cloud Apps
🚀 Cloud Apps (RCA, Rain Cloud Apps) is a container application platform developed by Rainyun based on Kubernetes. It offers a new way to develop, deploy, and use containerized apps. Carefully designed, it features high availability, flexibility, and ease of use. Cloud Apps includes modules for apps, websites, and databases, along with a built-in app store featuring hundreds of applications, and support for third-party marketplaces like 1Panel. This allows you to deploy popular apps like Alist and Cloudreve without buying a server, with easy updates, file management, and settings—all in one click.
🚀 Billed by the hour, scalable configurations, and removable at any time. Simply put, it’s a Docker container rental/hosting platform.
- Rainyun promotional registration link:https://www.rainyun.com/zeruns_?s=blog-en
- Promo code: zeruns (Bind your WeChat account after registering with the promo code to receive a 50% discount coupon)
- Tutorial for deploying PHP websites on Rainyun RCA Cloud Apps (K8s-based): https://blog.zeruns.com/archives/869.html
Introduction to Kubernetes
Kubernetes (K8s) is an open-source container orchestration platform developed by Google and maintained by the Cloud Native Computing Foundation (CNCF). It’s designed to simplify the deployment, management, and scaling of containerized applications. As a cornerstone of the cloud-native tech stack, it ensures efficient app operations through automation and supports large-scale clusters across single or multi-cloud environments.
Its core capabilities include: automated deployments and rolling updates to ensure continuous availability; elastic scaling to optimize resource usage based on load; service discovery and intelligent load balancing for inter-container communication; and self-healing to automatically recover from failures, enhancing system reliability. Kubernetes also provides a declarative API that allows users to define infrastructure and app states via config files, reducing operational complexity.
With its modular architecture and open ecosystem, Kubernetes is the preferred choice for microservices, CI/CD, edge computing, and more. It empowers organizations—whether startups or large enterprises—to build flexible, scalable modern application infrastructures and accelerate digital transformation.
Linux Server Deployment
Preparation
First, you need a server running a Linux system (CentOS 7+, Ubuntu 18.04+, Debian 9+ recommended) to set up ALLinSSL. You can also use your website server as long as it meets the Linux OS requirements above.
Here, we use a lightweight application server from Haoliang Cloud Engine for demonstration:
- Haoliang Cloud Engine promo registration link: https://www.haoliangyun.com/?source=blog-en&aff=zeruns
- Haoliang Cloud Engine invitation code:
zeruns(register using the link or code to receive 50% and 20% discount coupons) - Alibaba Cloud lightweight instance 2-core 2GB RAM 200Mbps bandwidth, first year only ¥38: https://www.aliyun.com/minisite/goods?userCode=jdjc69nf
Other high cost-performance servers recommended:https://blog.vpszj.cn/archives/41.html
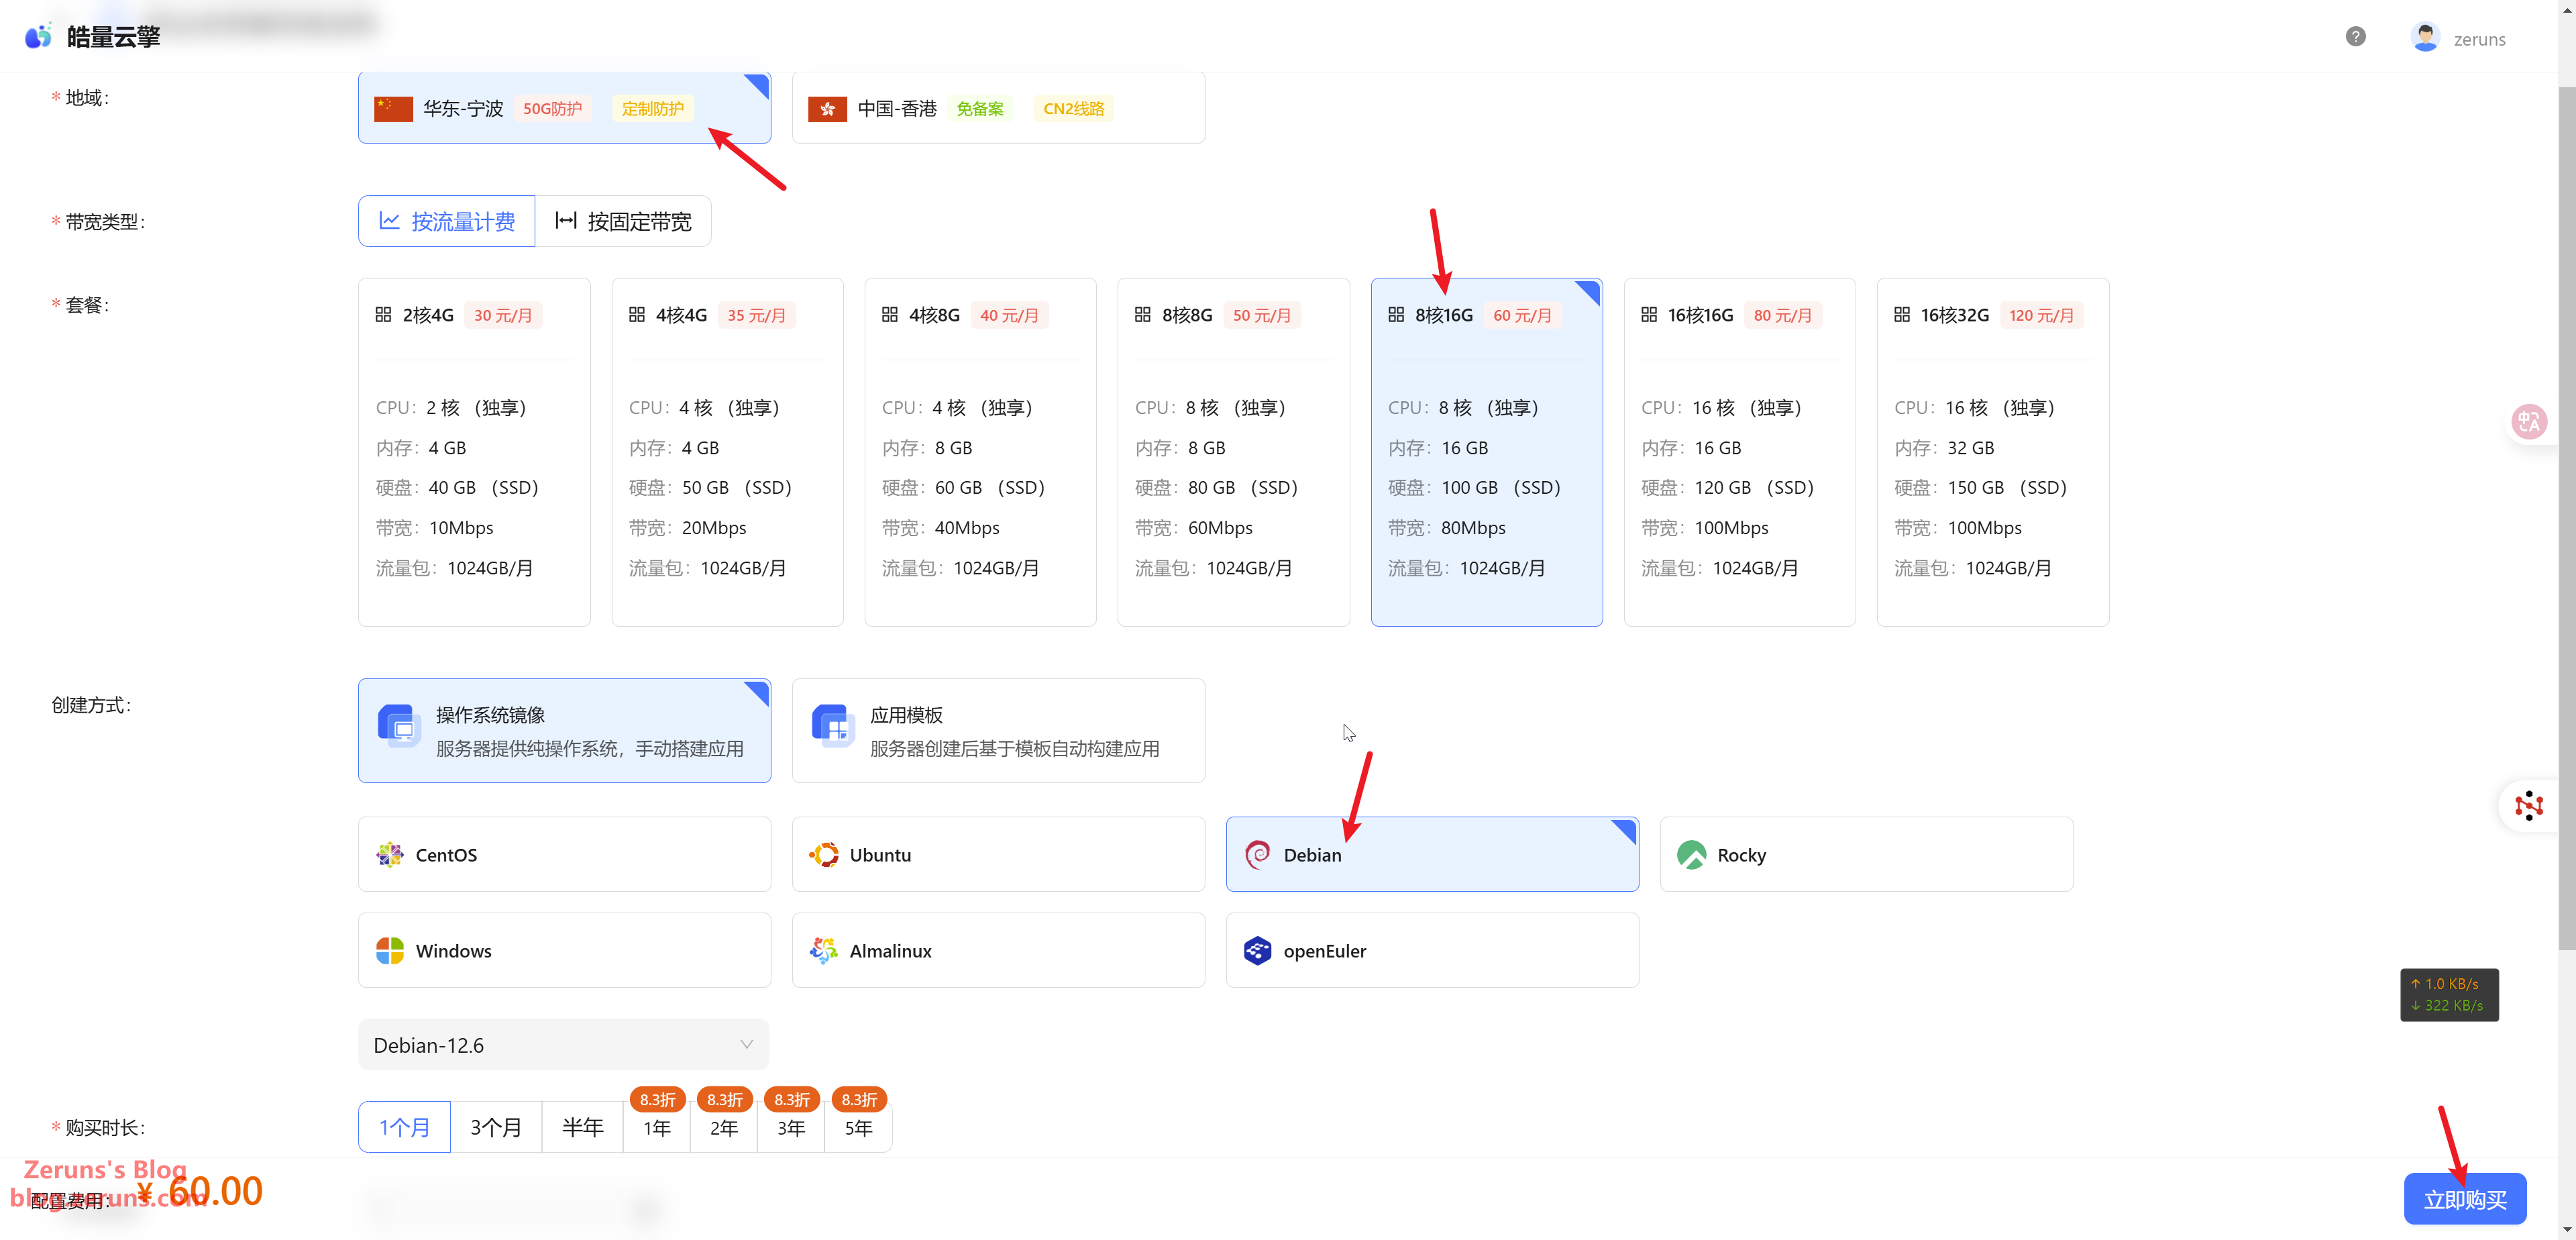
After registration, enter the console and click Lightweight Application Server → Buy Now.
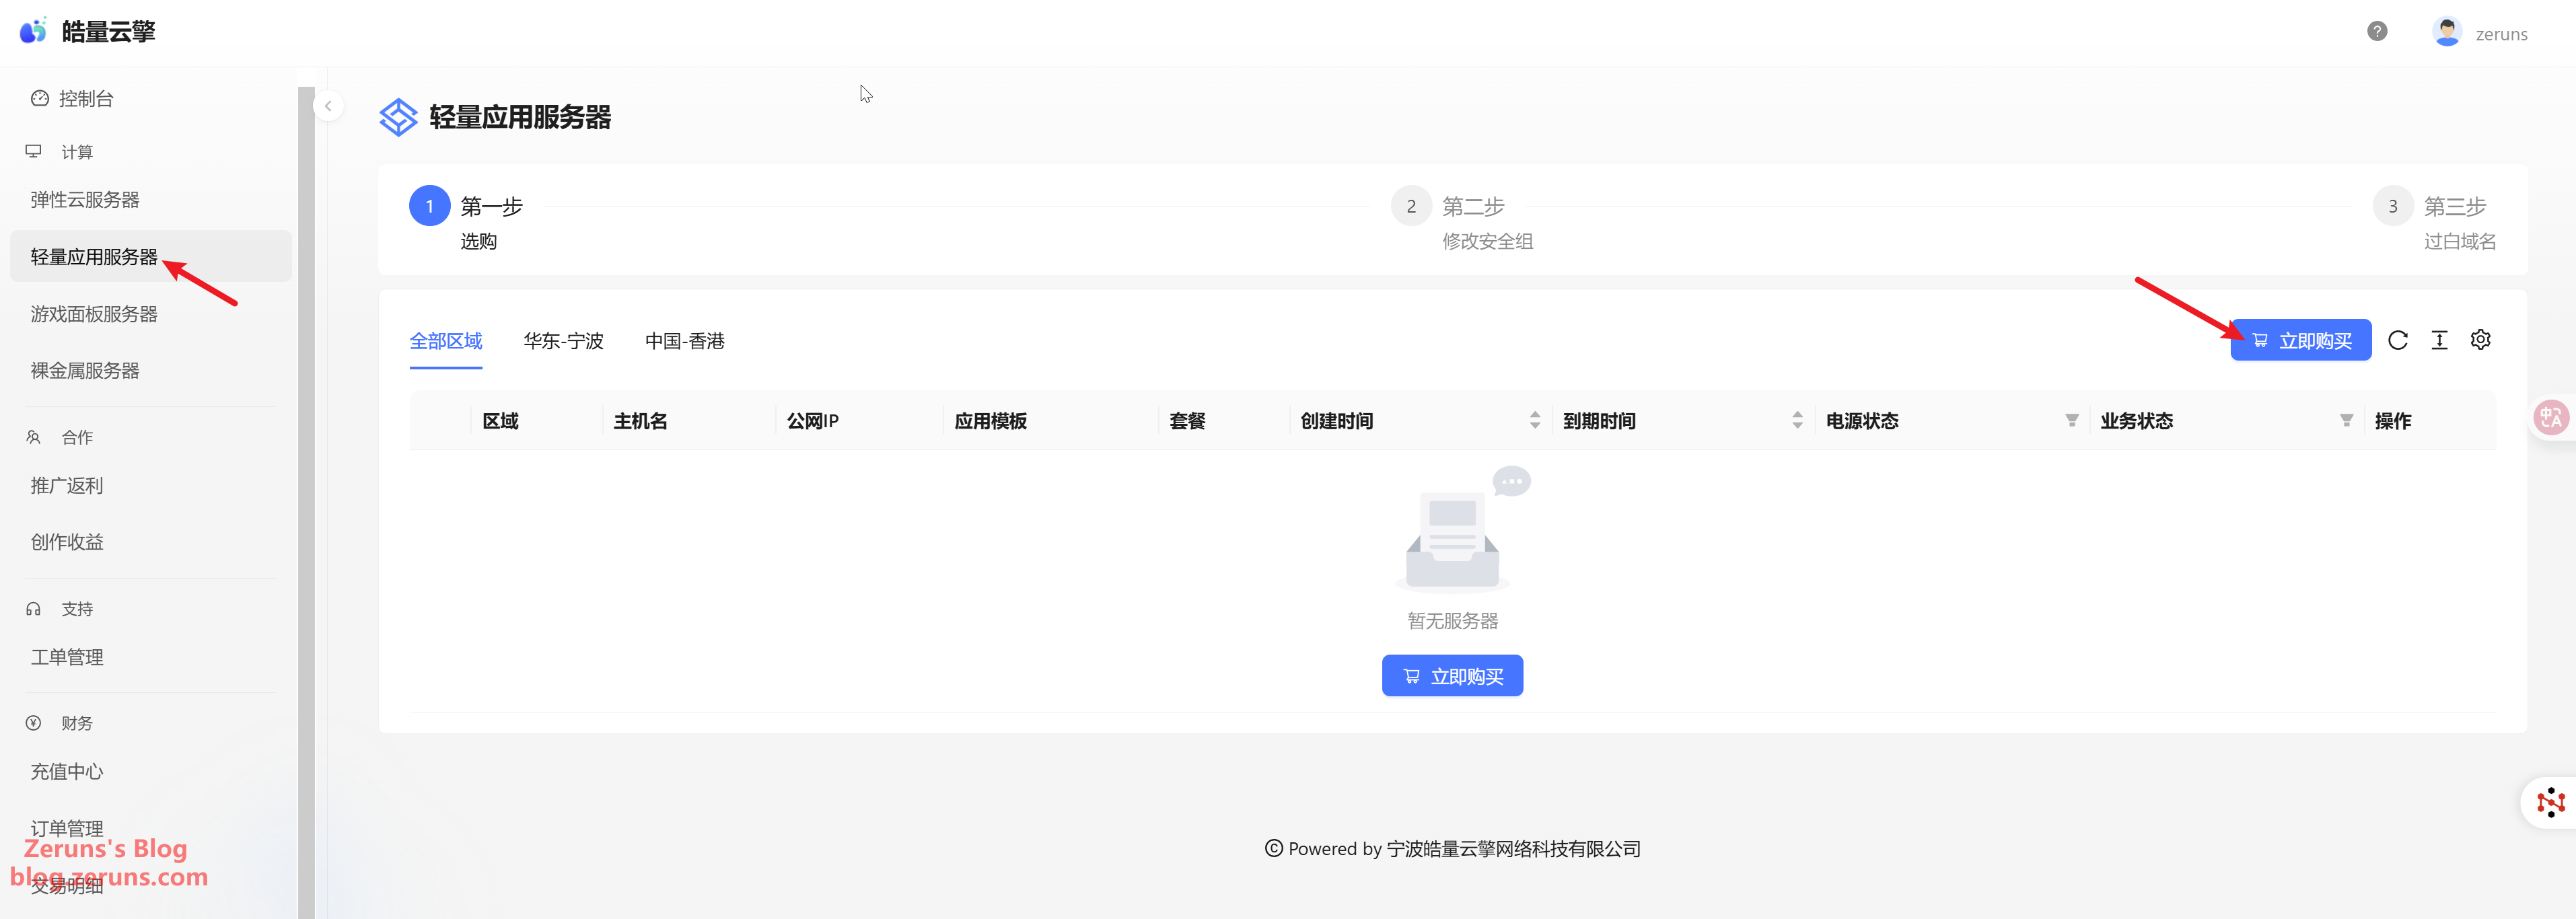
Choose the region according to your needs. If you need to apply for Google certificates, an overseas server is required. I'm using ZeroSSL, so selecting Ningbo is also fine. I chose a configuration of 8 cores, 16GB RAM, and 80Mbps bandwidth (the minimum specs would be sufficient), at only ¥60/month. Set the OS to Debian 12, then click Buy Now. (Haoliang’s Ningbo server comes with 50Gbps DDoS protection)
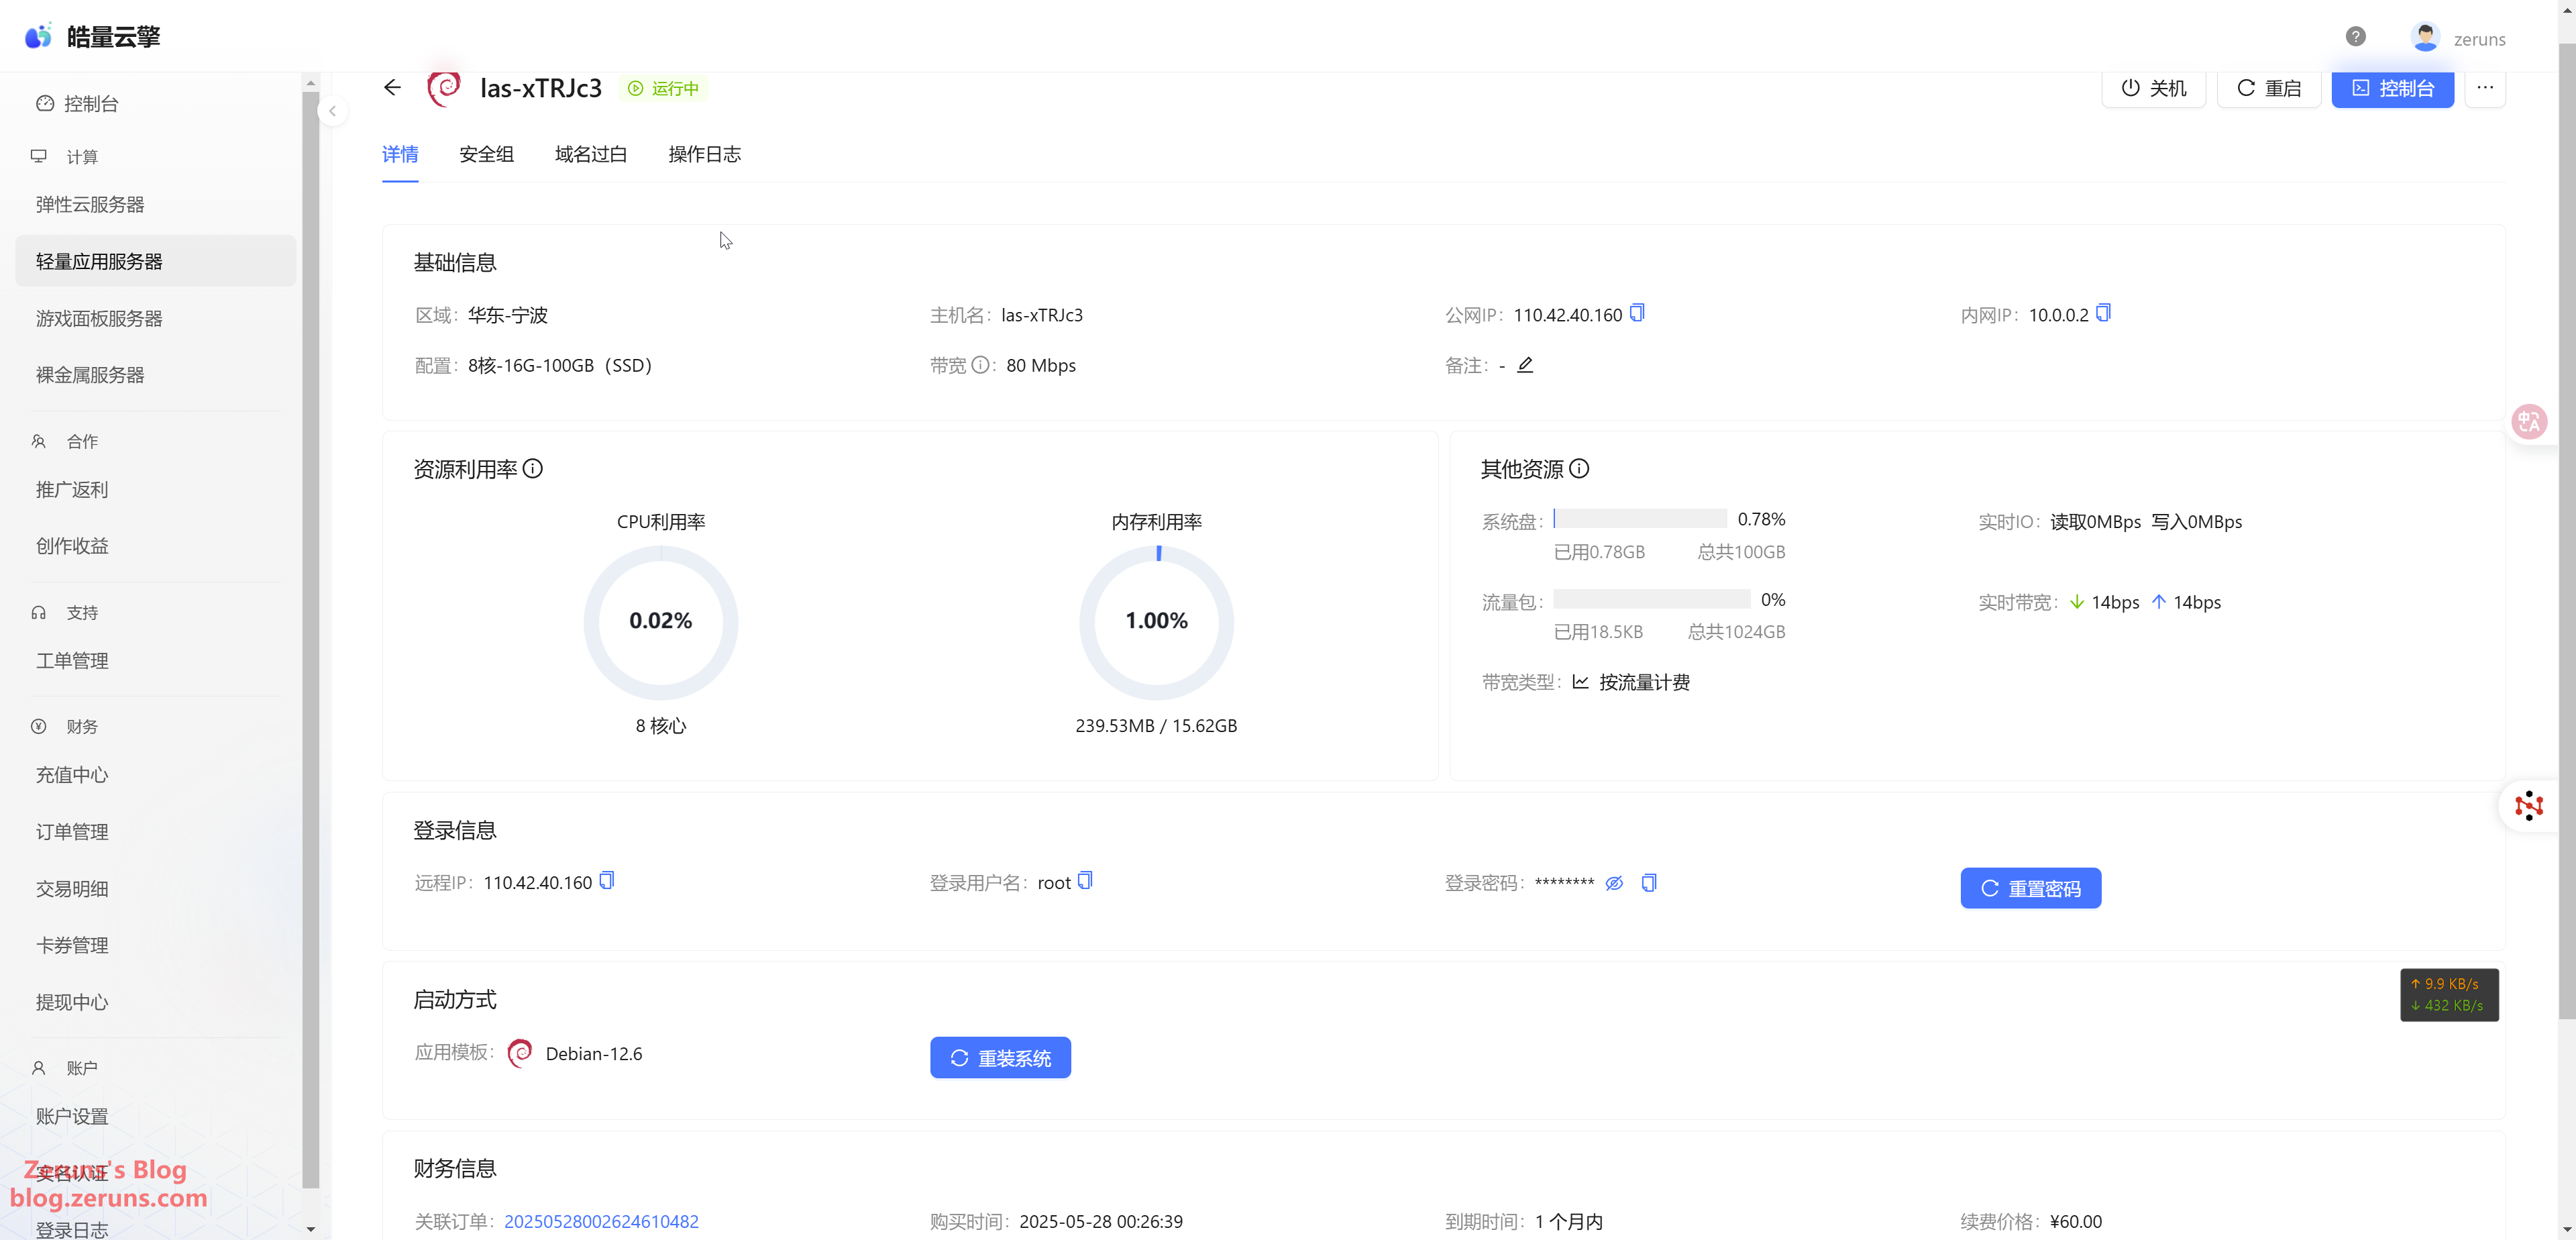
Once the server is created, click Manage to enter the server console. Here you can view server details, reinstall or switch OS, etc.
Connecting to the Server
Download and open an SSH client. We recommend PuTTY or MobaXterm.
SSH client download: https://www.123pan.com/ps/2Y9Djv-UAtvH.html
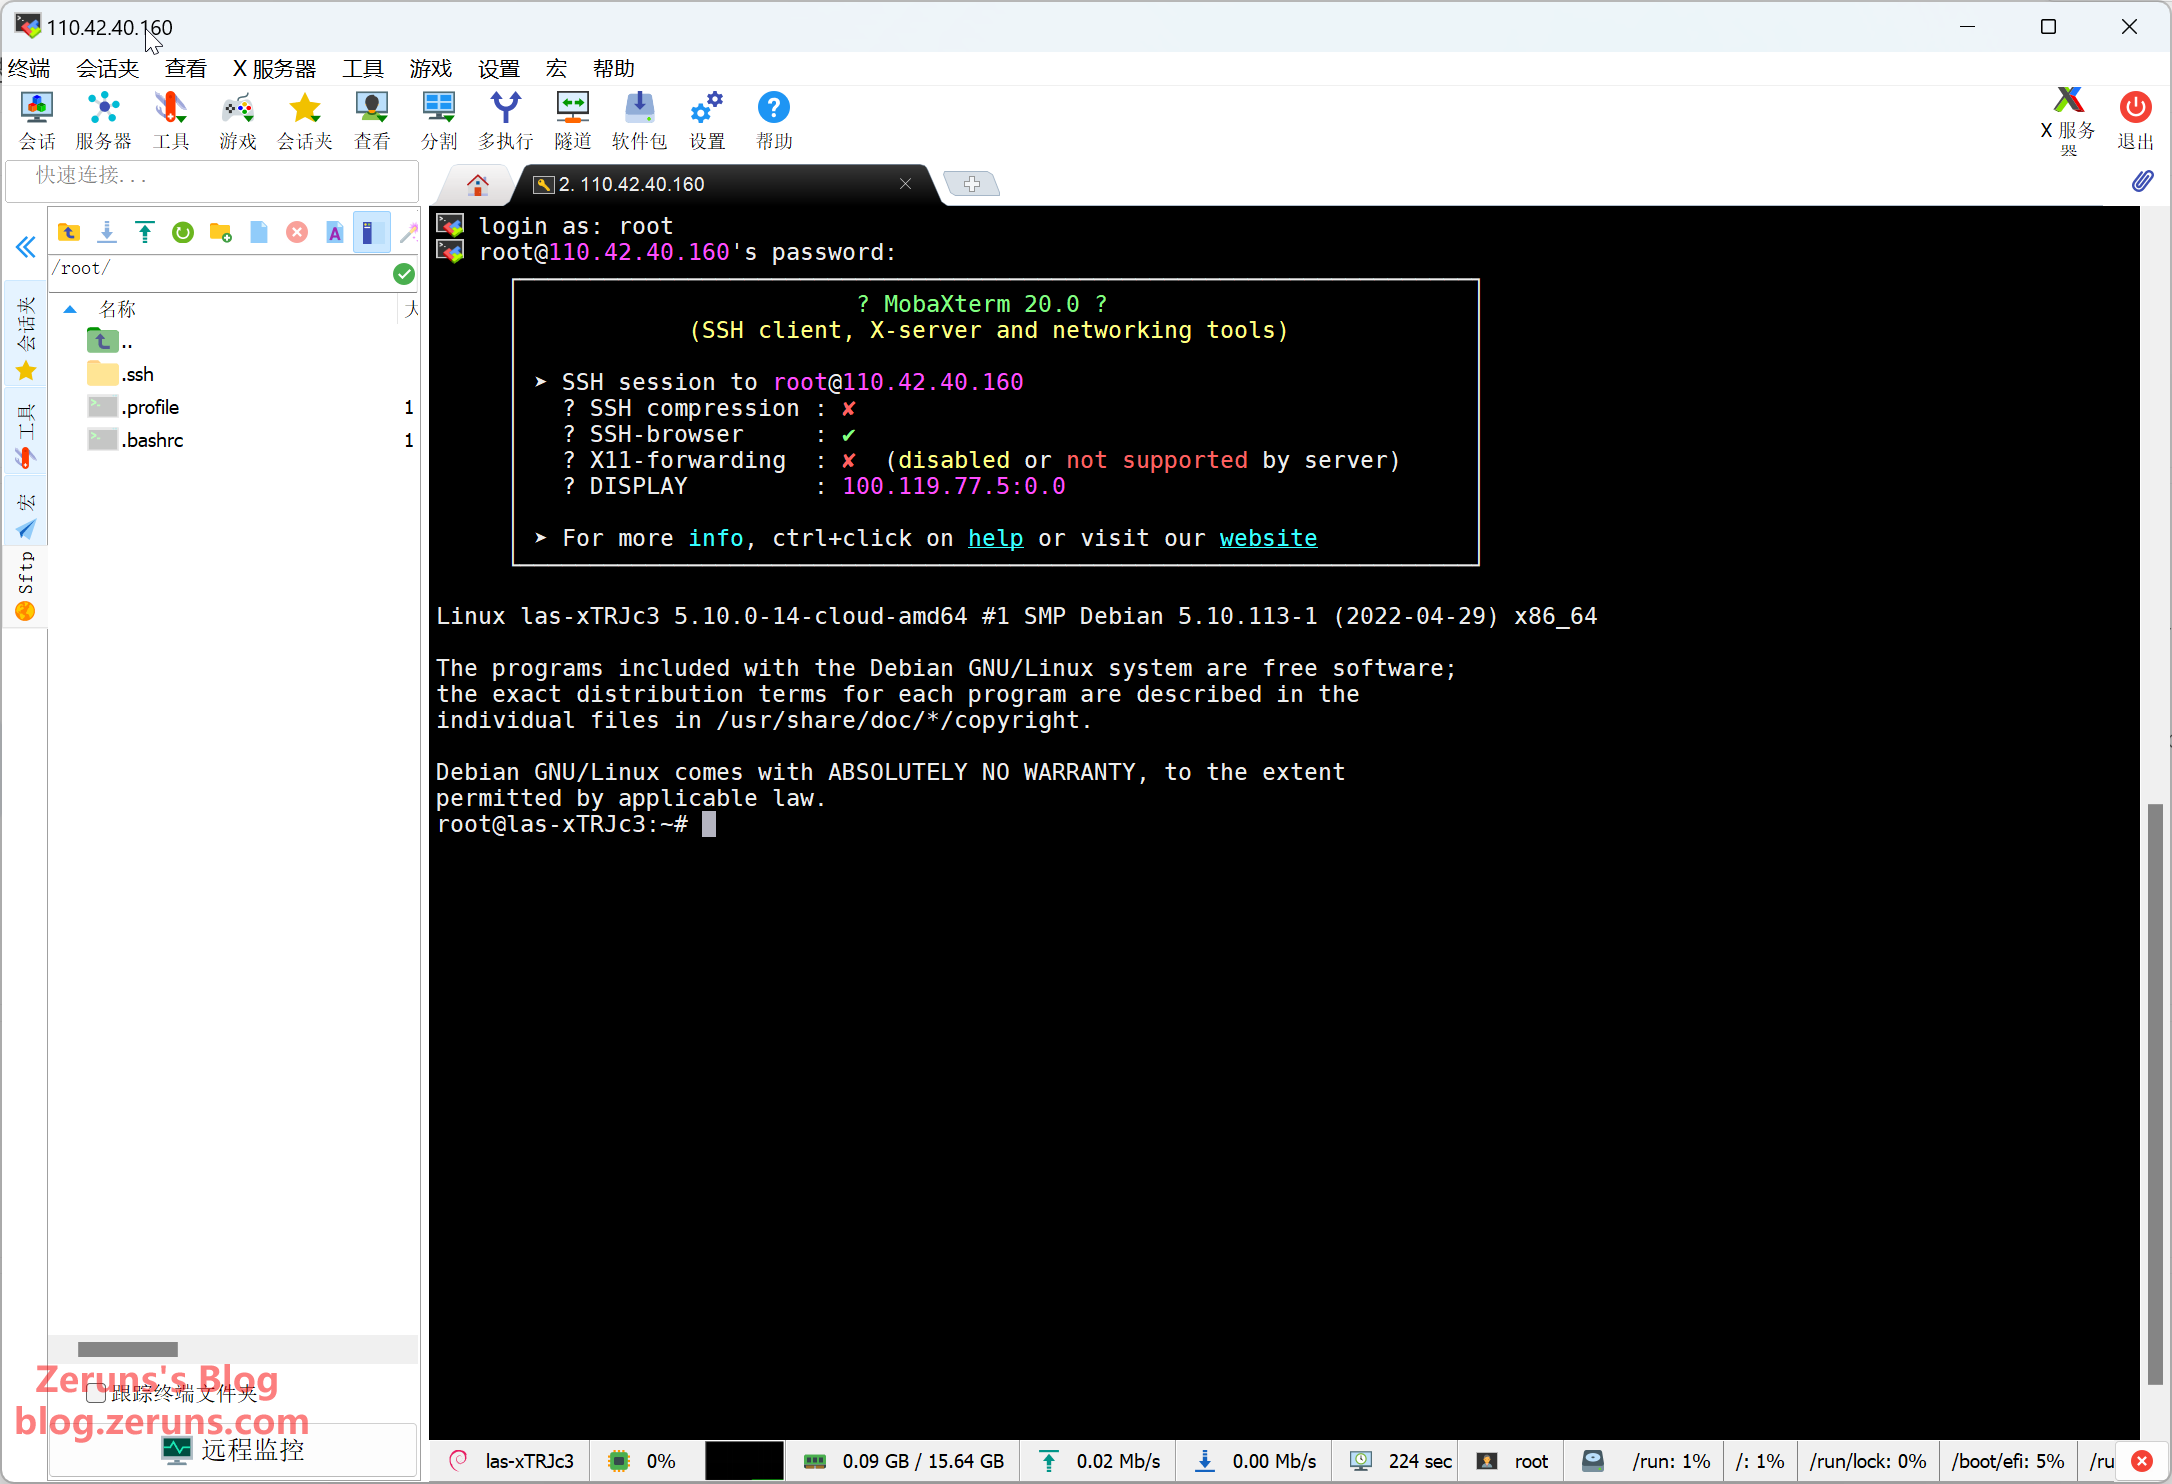
We're using MobaXterm here. Enter your server's IP address (found in the console) and SSH port (default is 22), then click OK or Open.
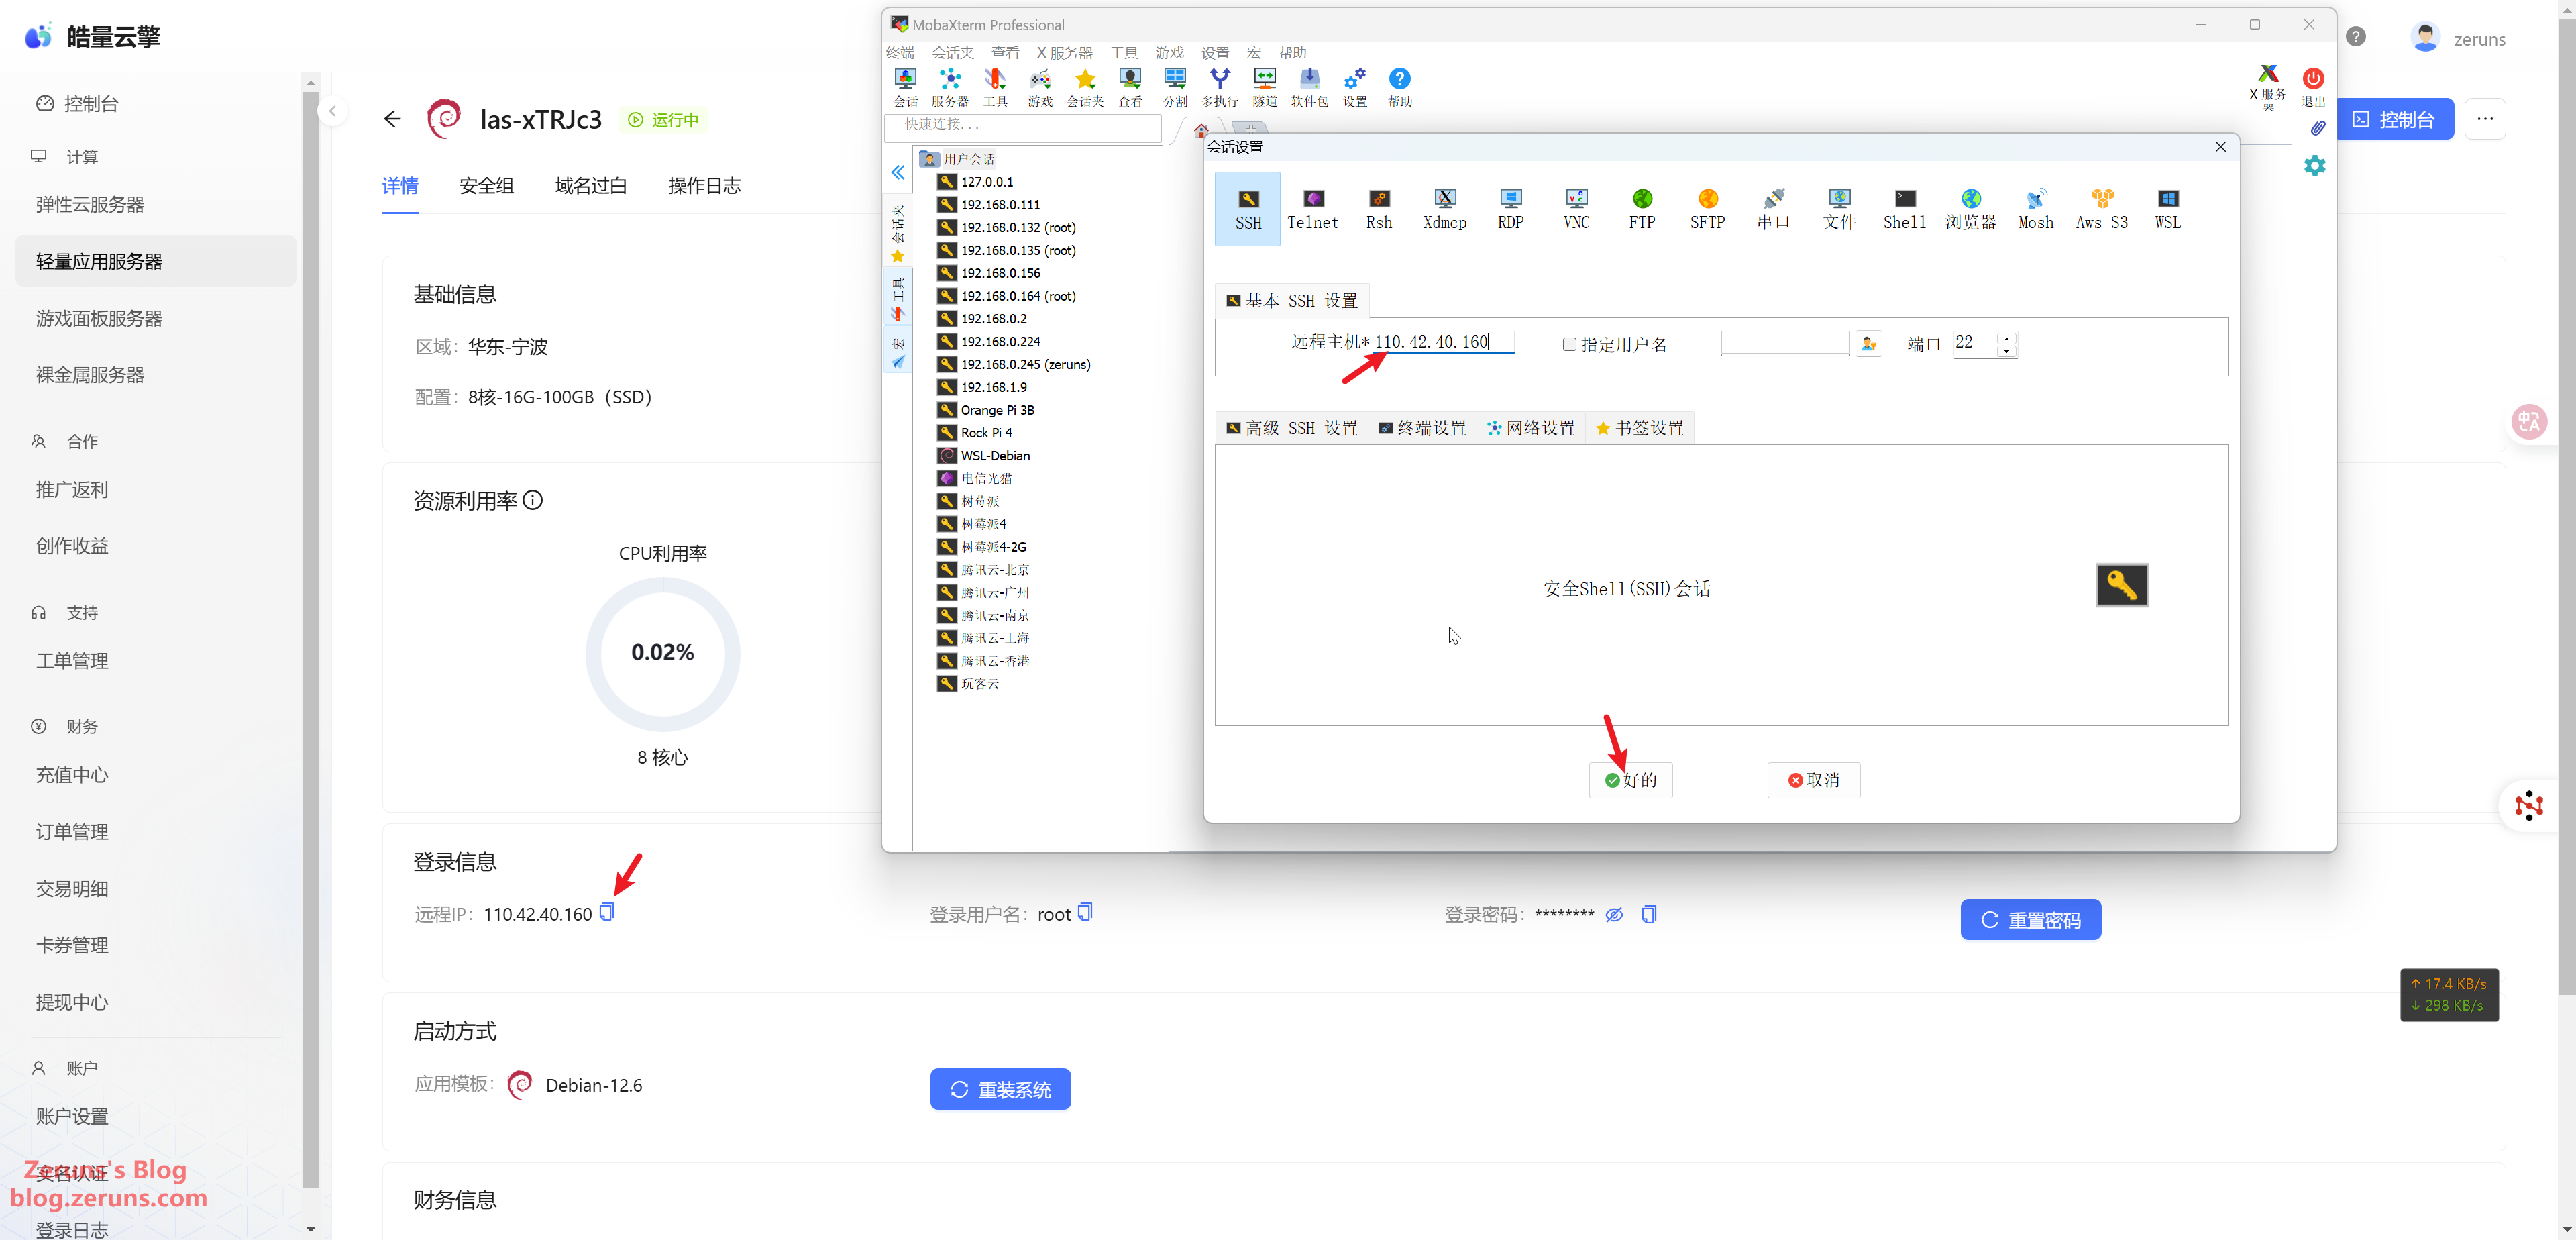
Enter the username and press Enter. The default is usually root. Then input the password (found in the console) and press Enter. The password will not be displayed as you type.
Tip: In the SSH terminal, hold the left mouse button to select text, then release and click anywhere to copy. Right-click in the terminal to paste.
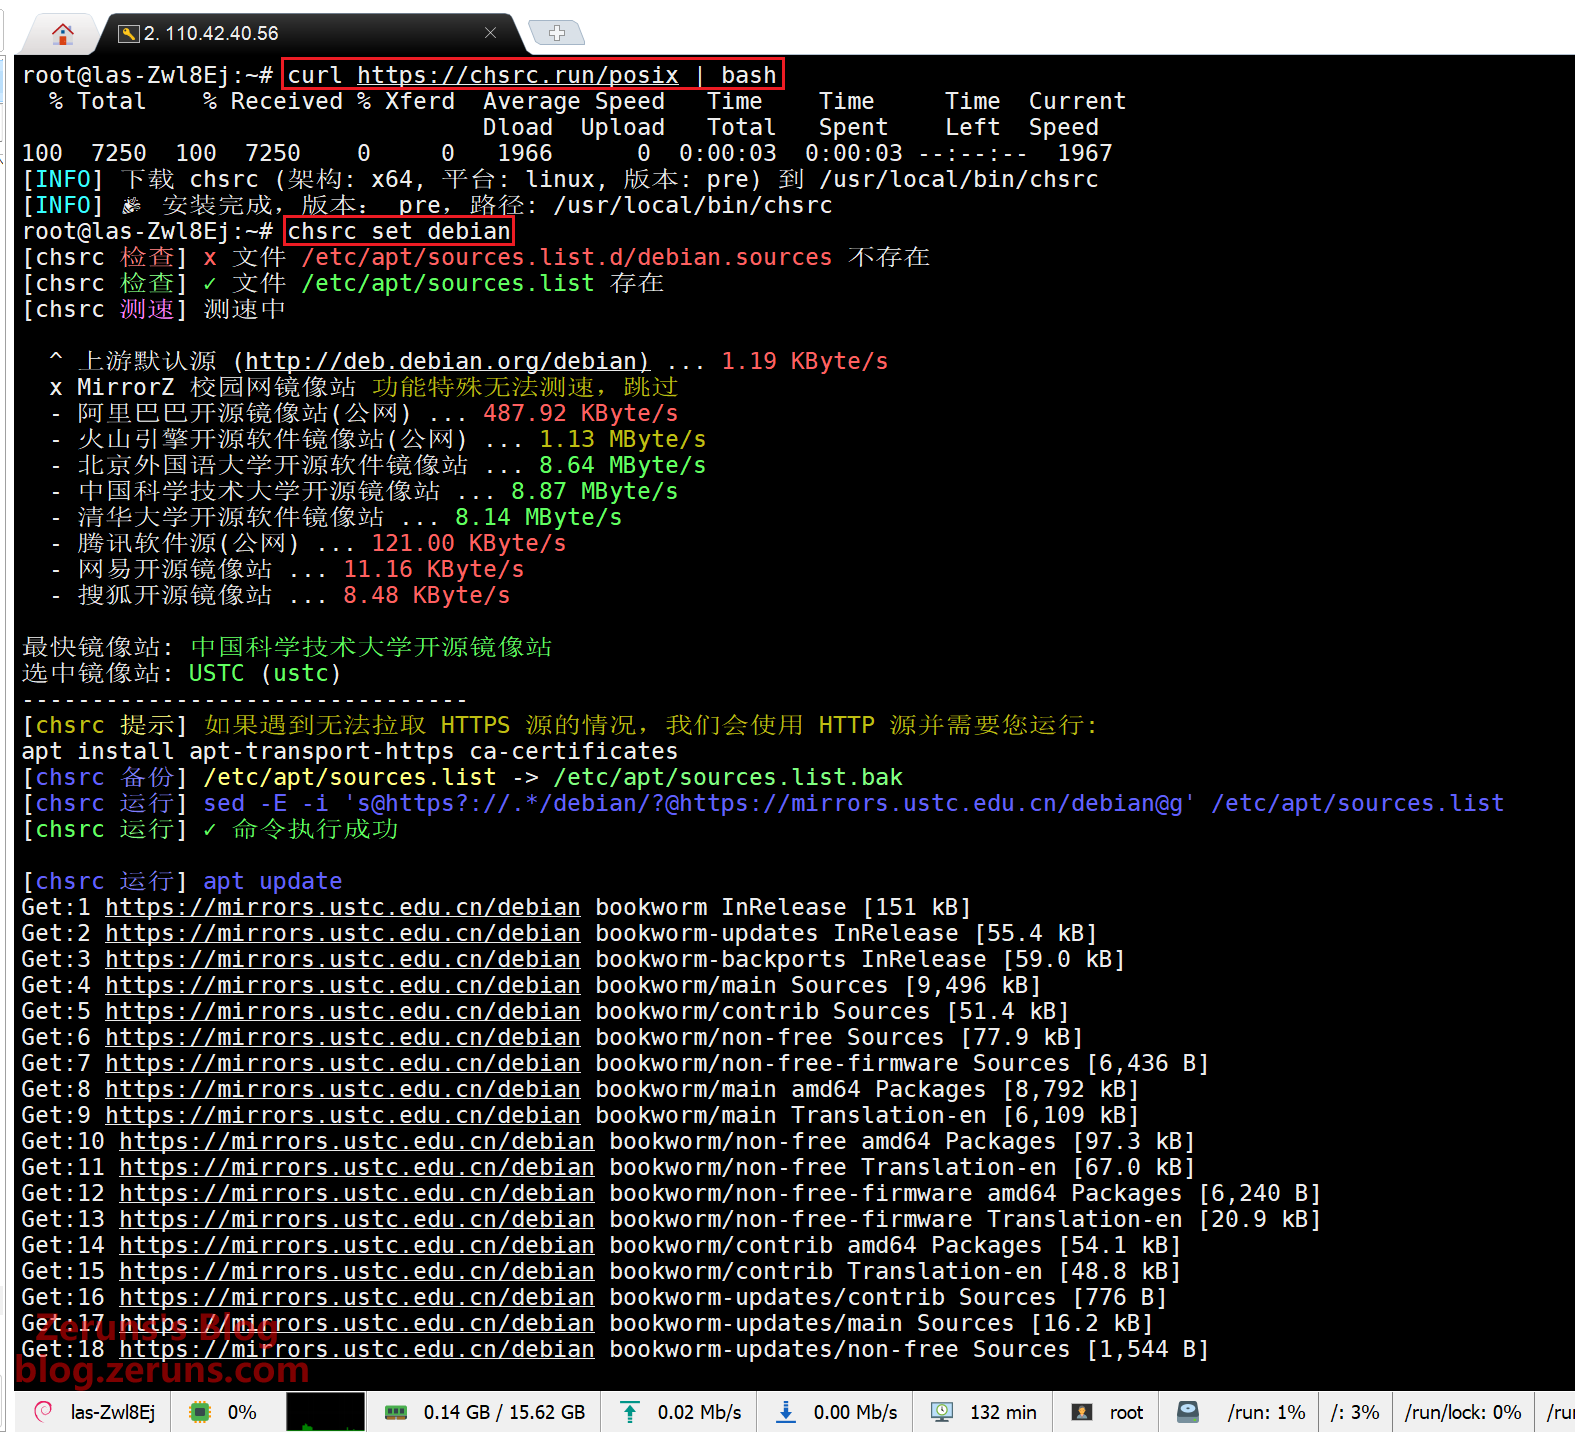
APT Mirror Update (Skip this step if using overseas server)
By default, APT uses foreign mirrors. Use chsrc to switch to domestic mirrors.
In the SSH terminal, input the following commands (lines starting with # are comments):
# Install chsrc
curl https://chsrc.run/posix | bash

# Auto-test and switch to the fastest mirror
chsrc set debian
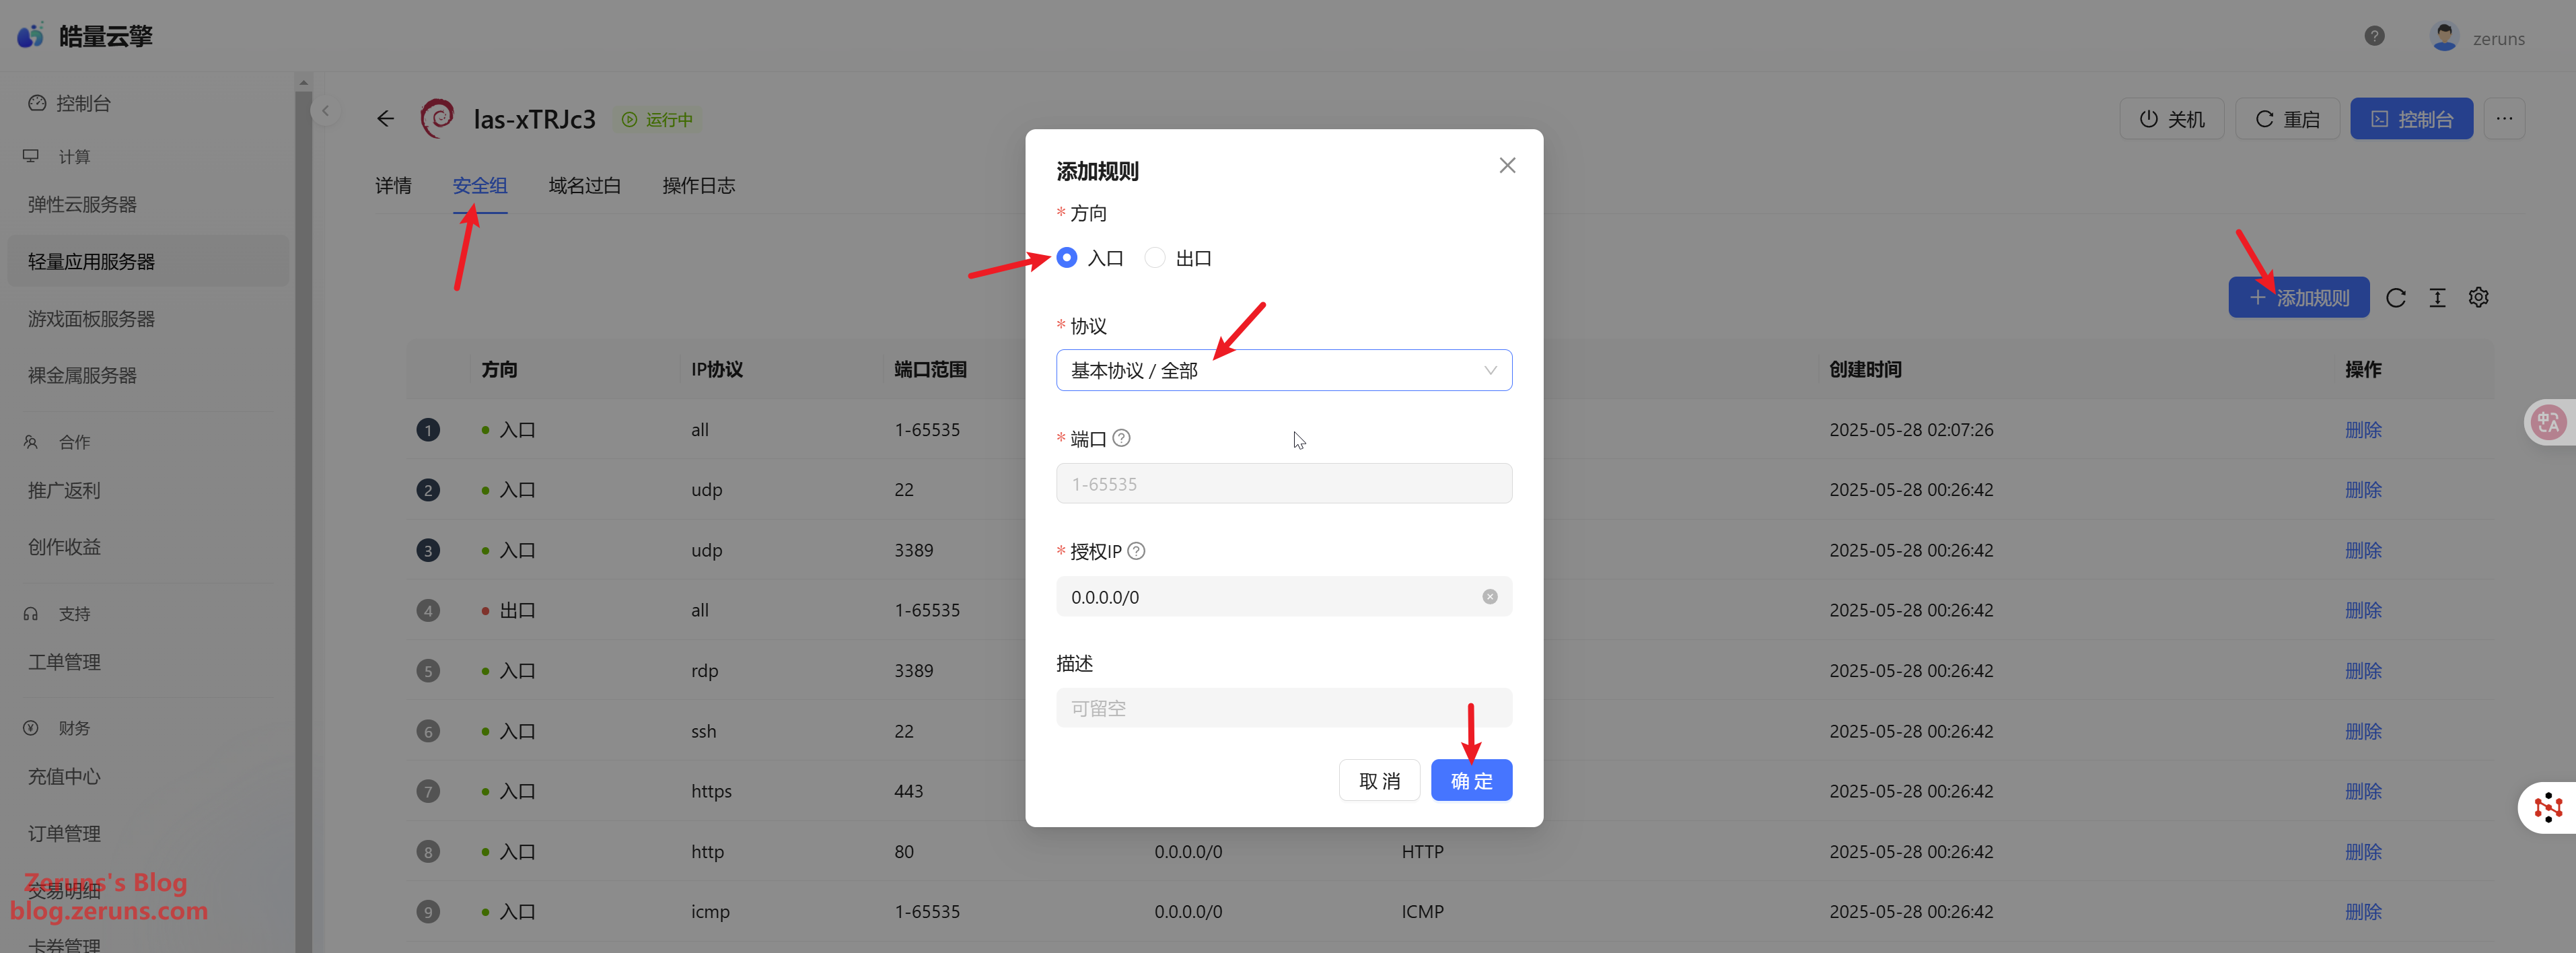
Opening Ports
In the server console's Security Group or Firewall settings, open all ports as shown below:
Installing ALLinSSL
One-click installation script – copy and run the command below in your SSH terminal:
curl -sSO http://download.allinssl.com/install_allinssl.sh && bash install_allinssl.sh allinssl
After installation, the SSH terminal will display ALLinSSL login credentials. Save this information safely.
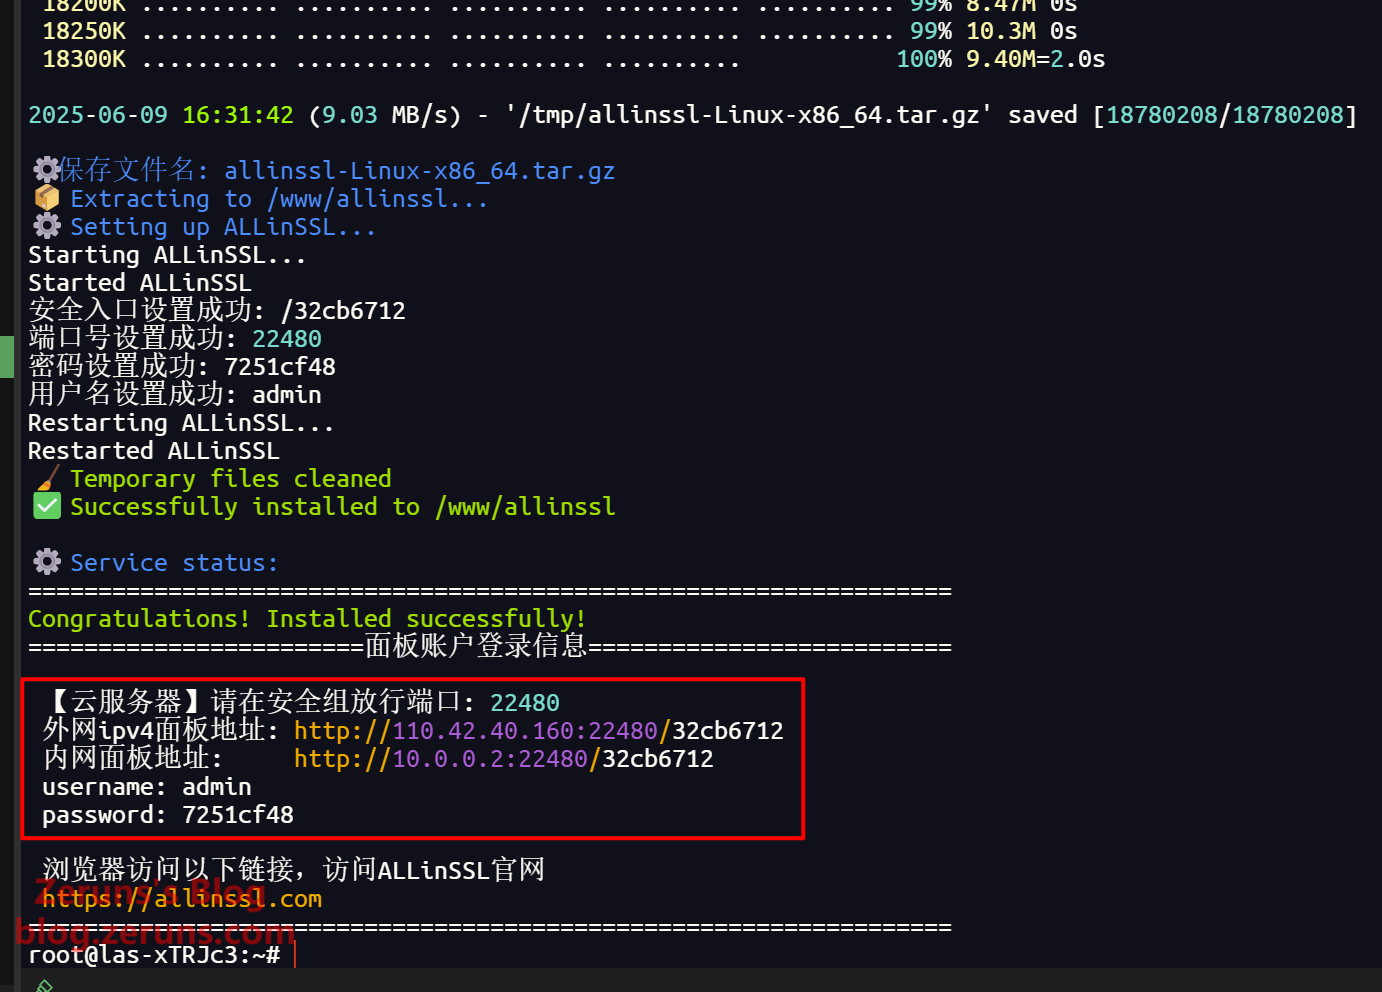
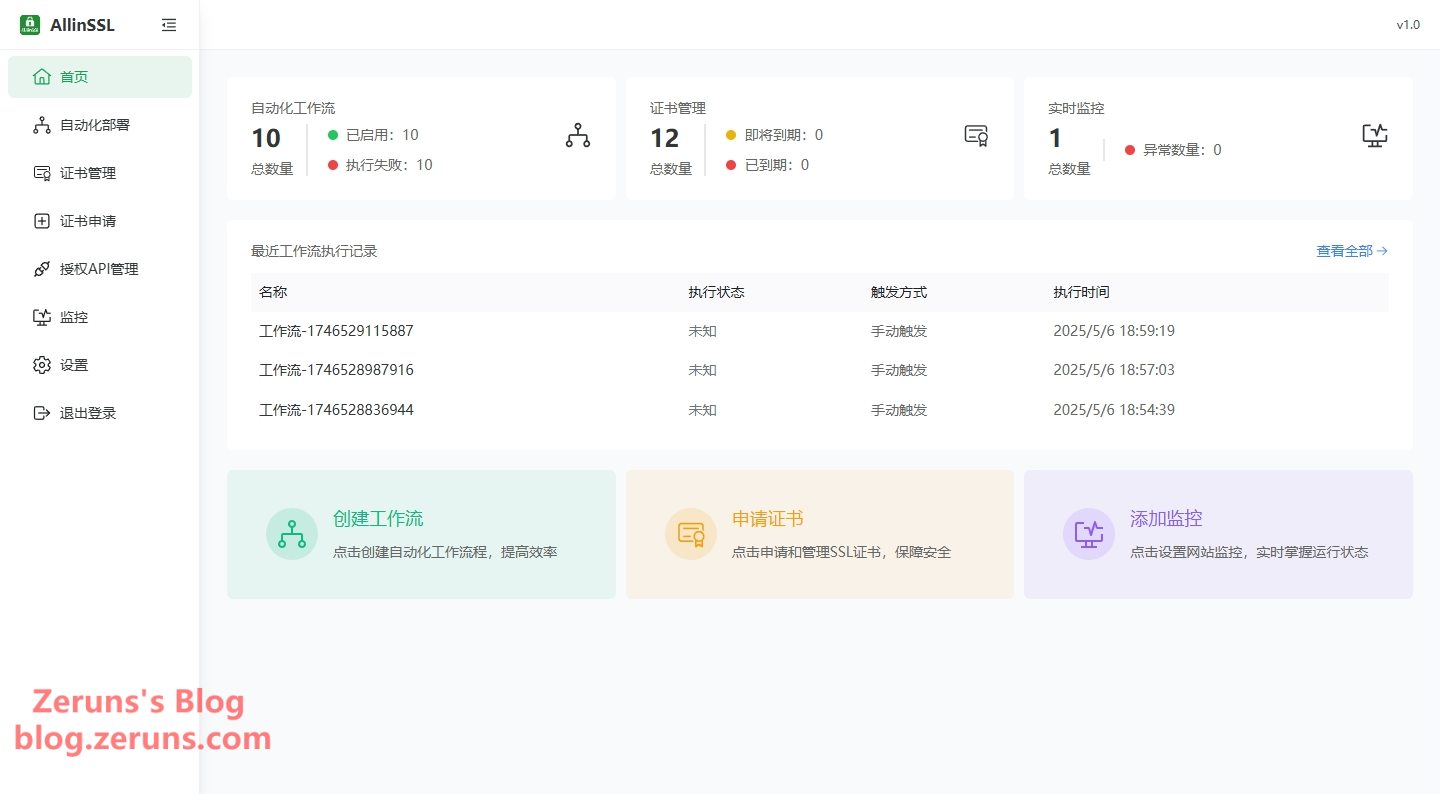
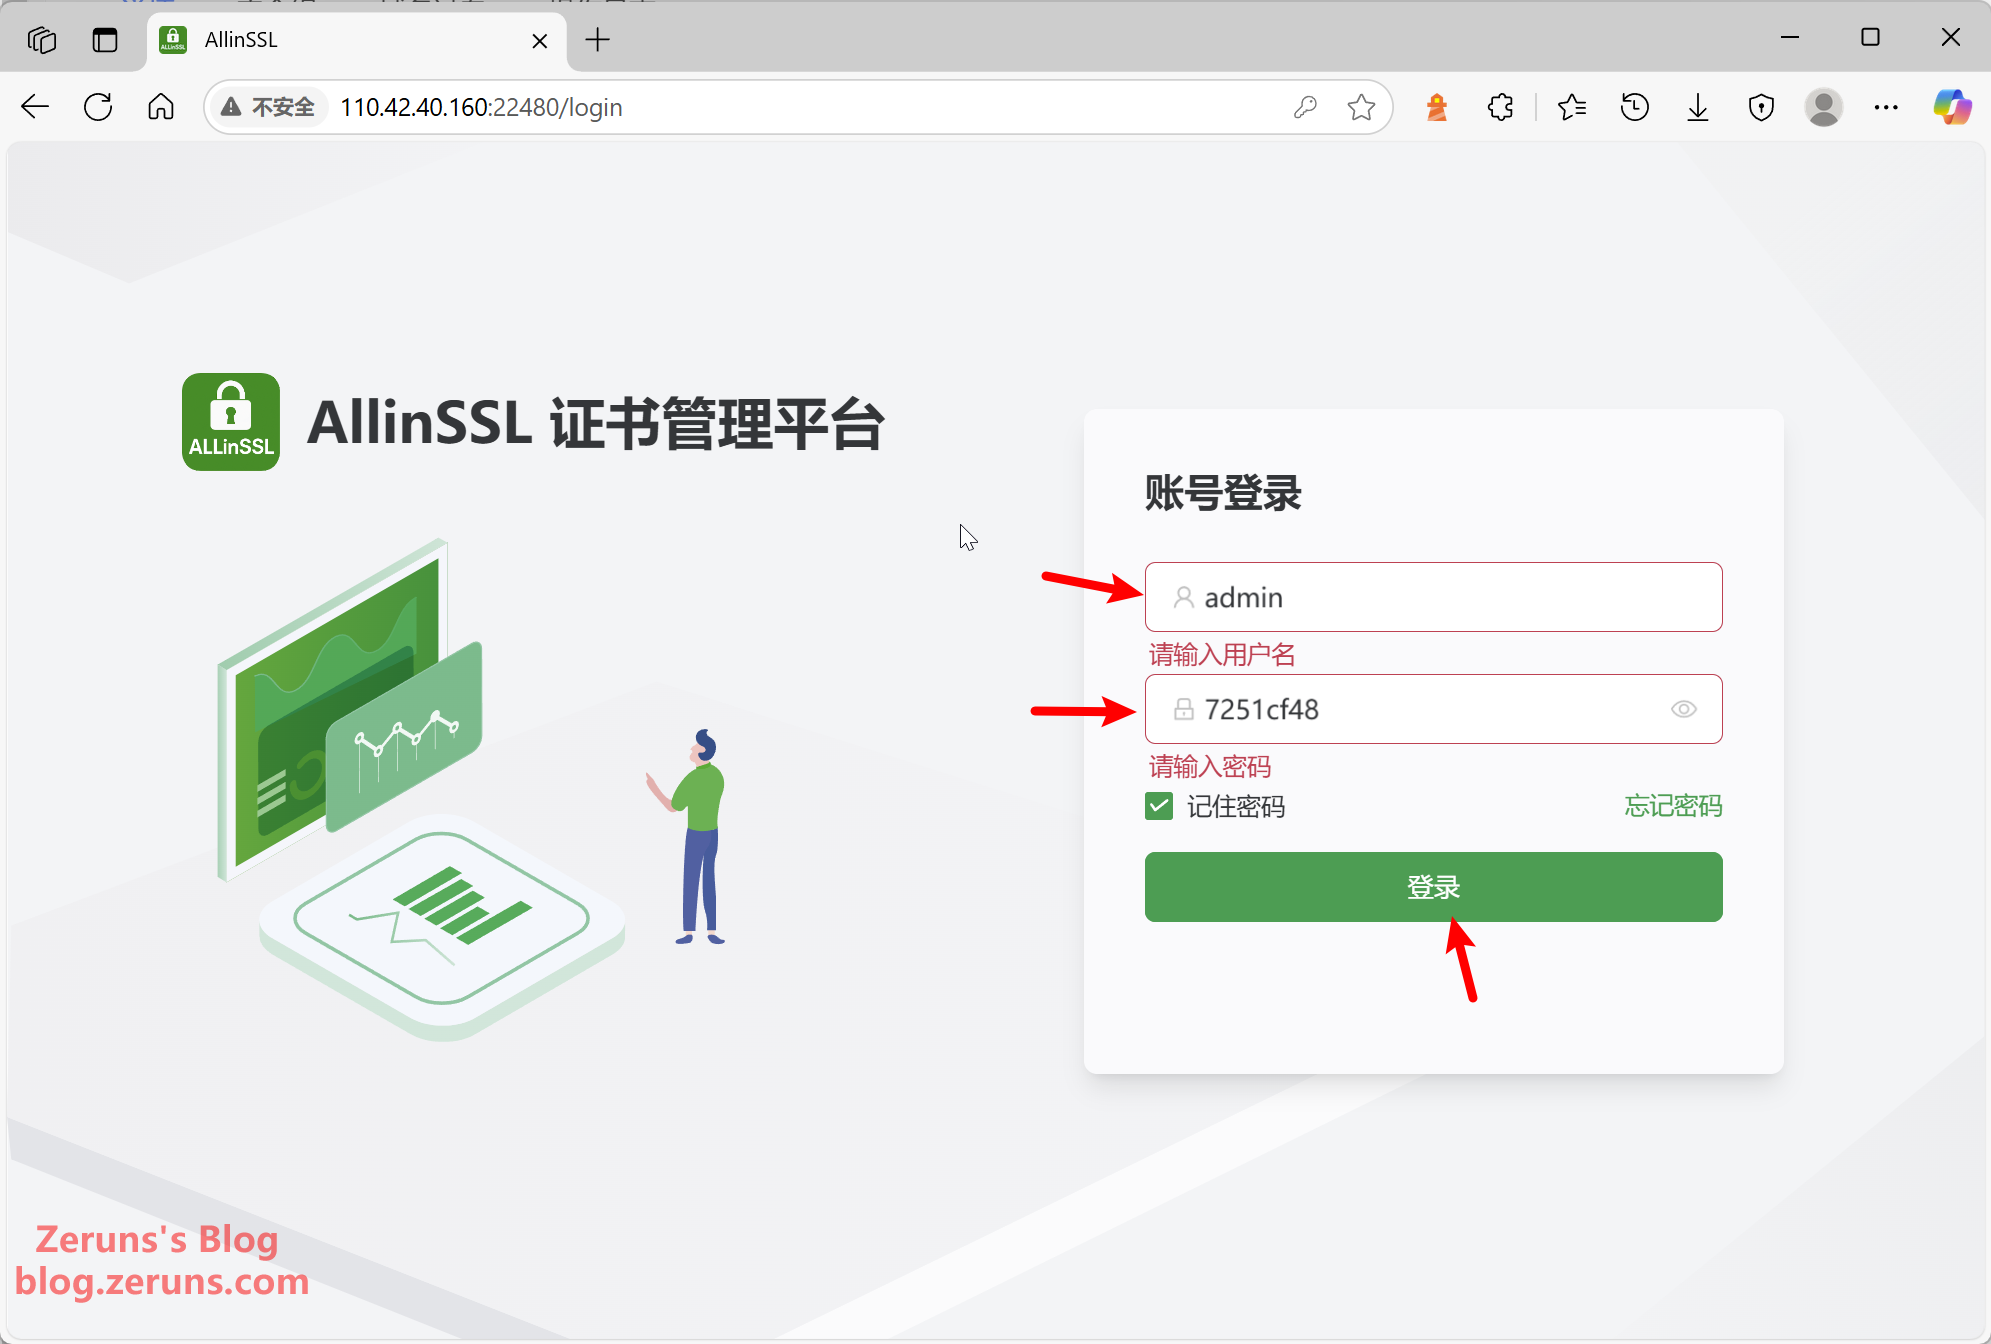
In your browser, enter the panel address (external IPv4 shown in the terminal) to access the ALLinSSL web UI. Log in using the credentials displayed after installation.
You can change your password after logging in.
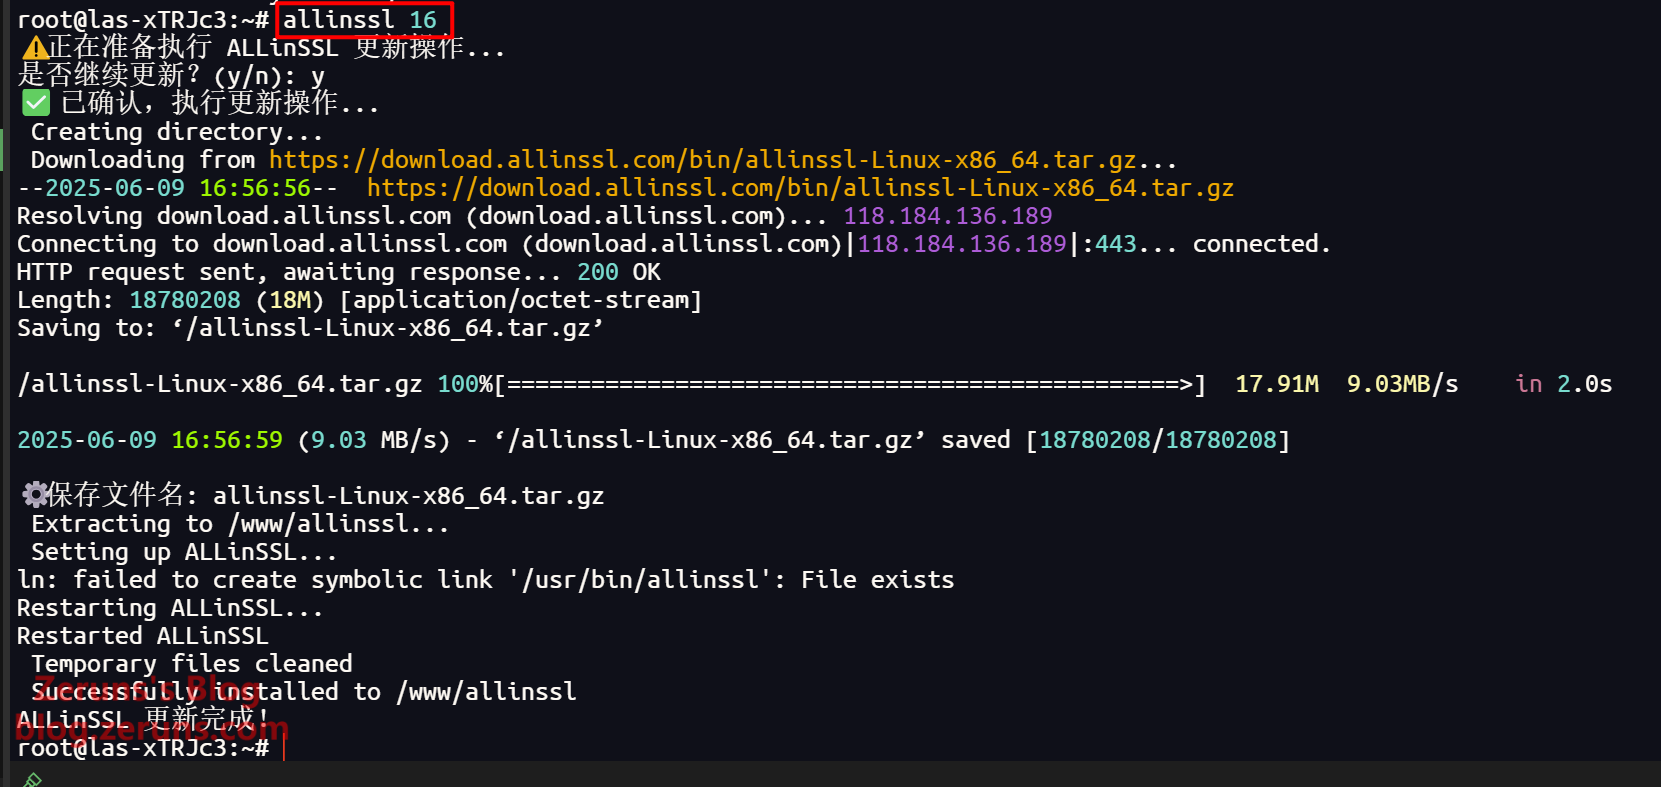
ALLinSSL Management Commands
For example, to update ALLinSSL, run allinssl 16 in the SSH terminal.
# Basic operations
allinssl 1: Start service 🚀
allinssl 2: Stop service ⛔
allinssl 3: Restart service 🔄
allinssl 4: Change secure entry 🔐
allinssl 5: Change username 👤
allinssl 6: Change password 🔑
allinssl 7: Change port 🔧

# Web service management
allinssl 8: Disable web service 🌐➖
allinssl 9: Enable web service 🌐➕
allinssl 10: Restart web service 🌐🔄

# Background task management
allinssl 11: Disable background scheduler 📻⛔
allinssl 12: Enable background scheduler 📻✅
allinssl 13: Restart background scheduler 📻🔄

# System management
allinssl 14: Disable HTTPS 🔓
allinssl 15: Get panel address 📋
allinssl 16: Update ALLinSSL to the latest version (overwrite install) 🔄⬆️
allinssl 17: Uninstall ALLinSSL 🗑️
Continue to the next section for usage instructions!
One-Click Cloud Application Deployment
First, you need to register for a Rainyun account:
- Rainyun Discount Registration Link: https://www.rainyun.com/zeruns_?s=blog-en
- Promo Code: zeruns (Register with this code and bind your WeChat account to receive a 50% discount coupon)
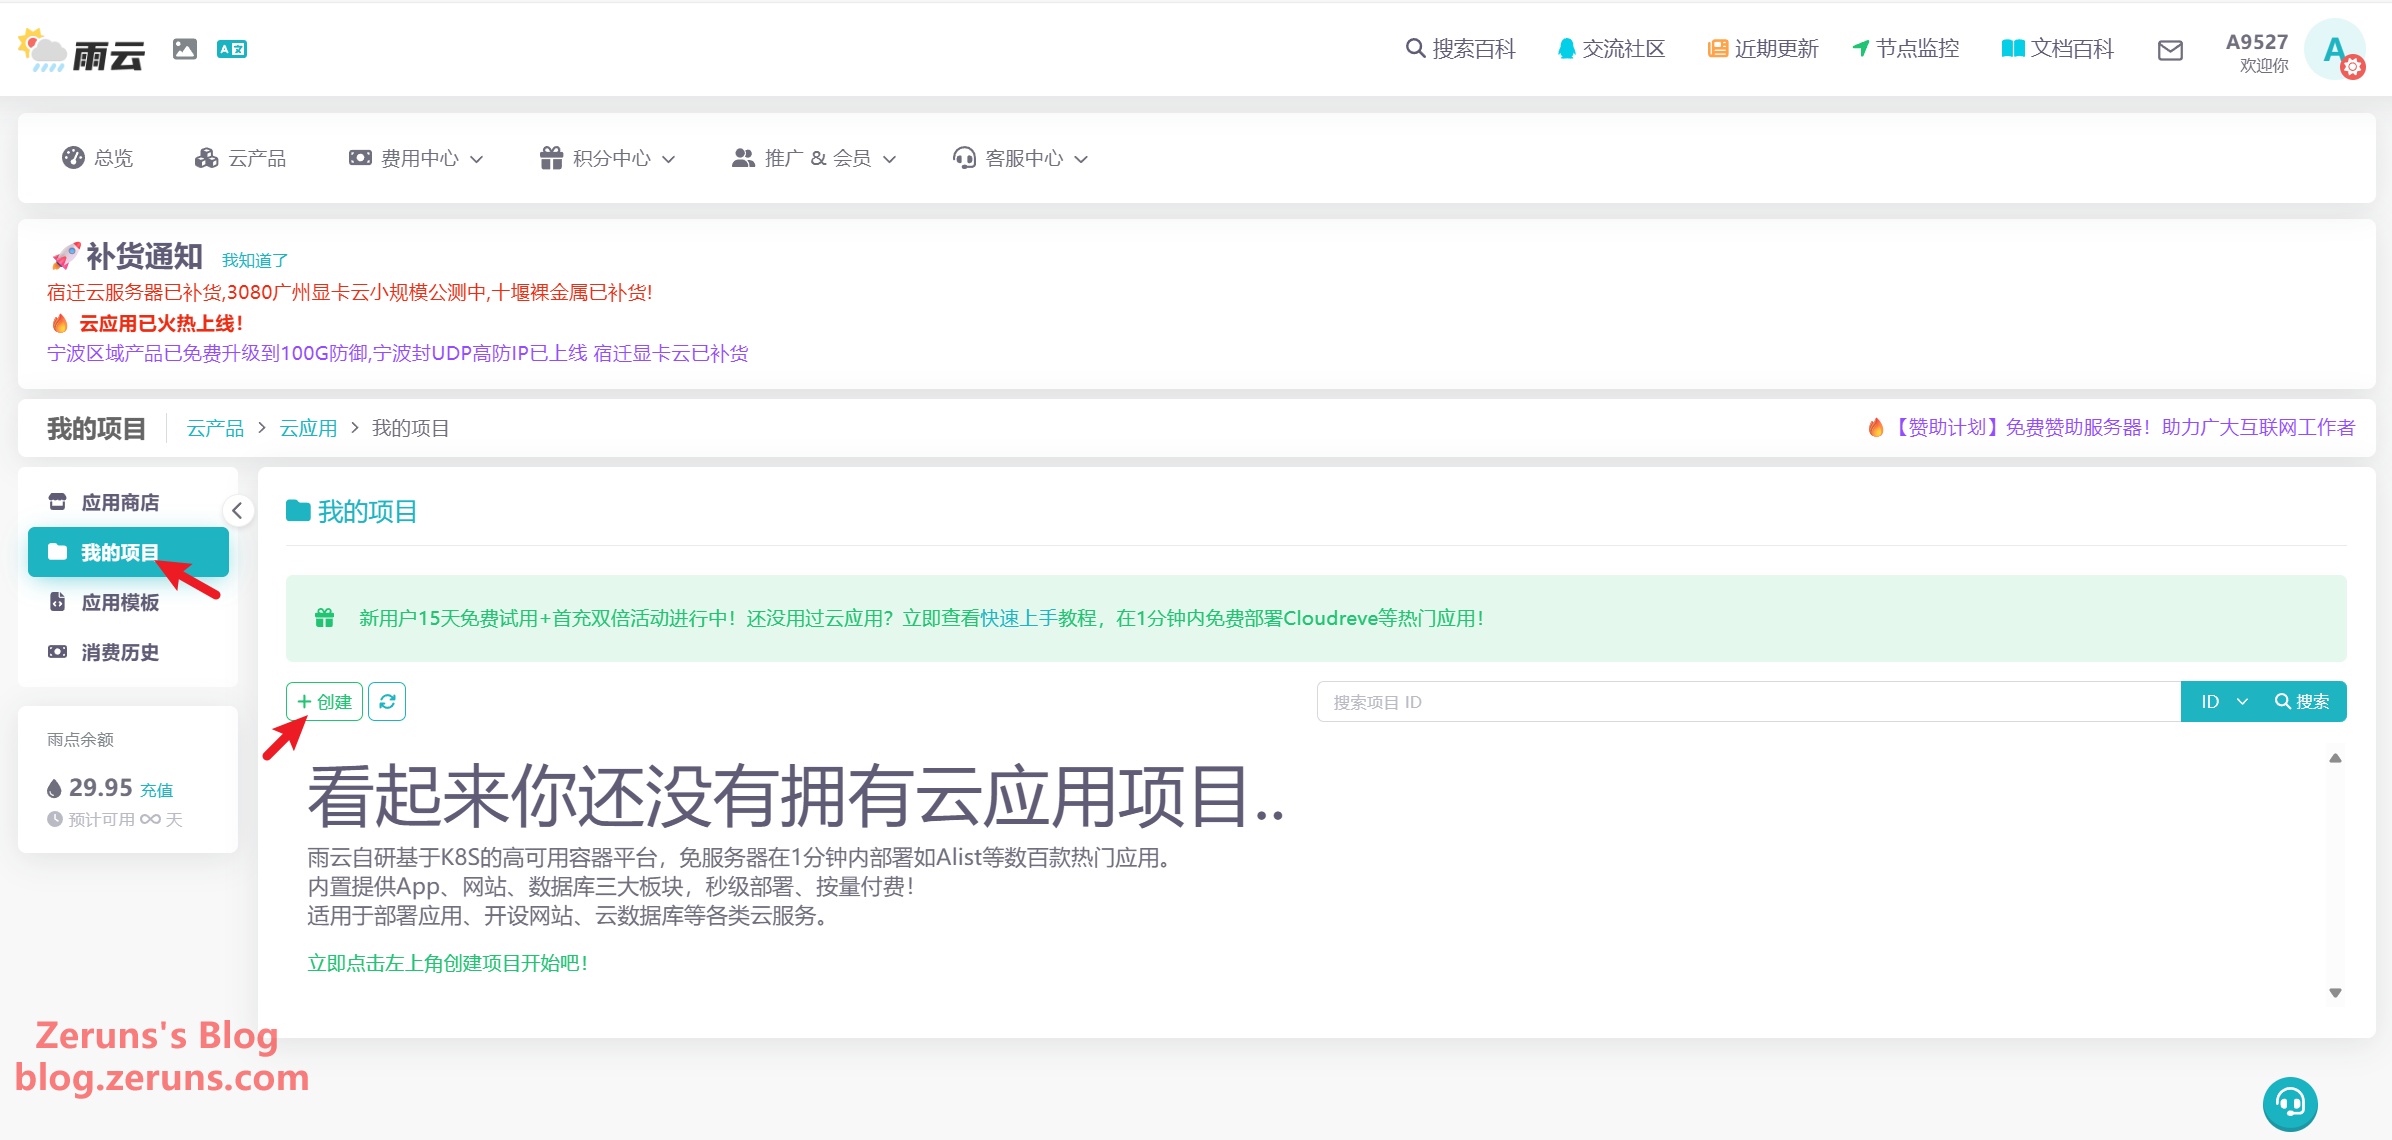
After registering a Rainyun account, go to the Rainyun console and click Cloud Products → Cloud Apps

Click My Projects → Create
Set a name for your project, the default 1GB disk size is usually sufficient. You can expand it later if needed. Finally, click Create Project.

Click the project you just created to enter the project management page.

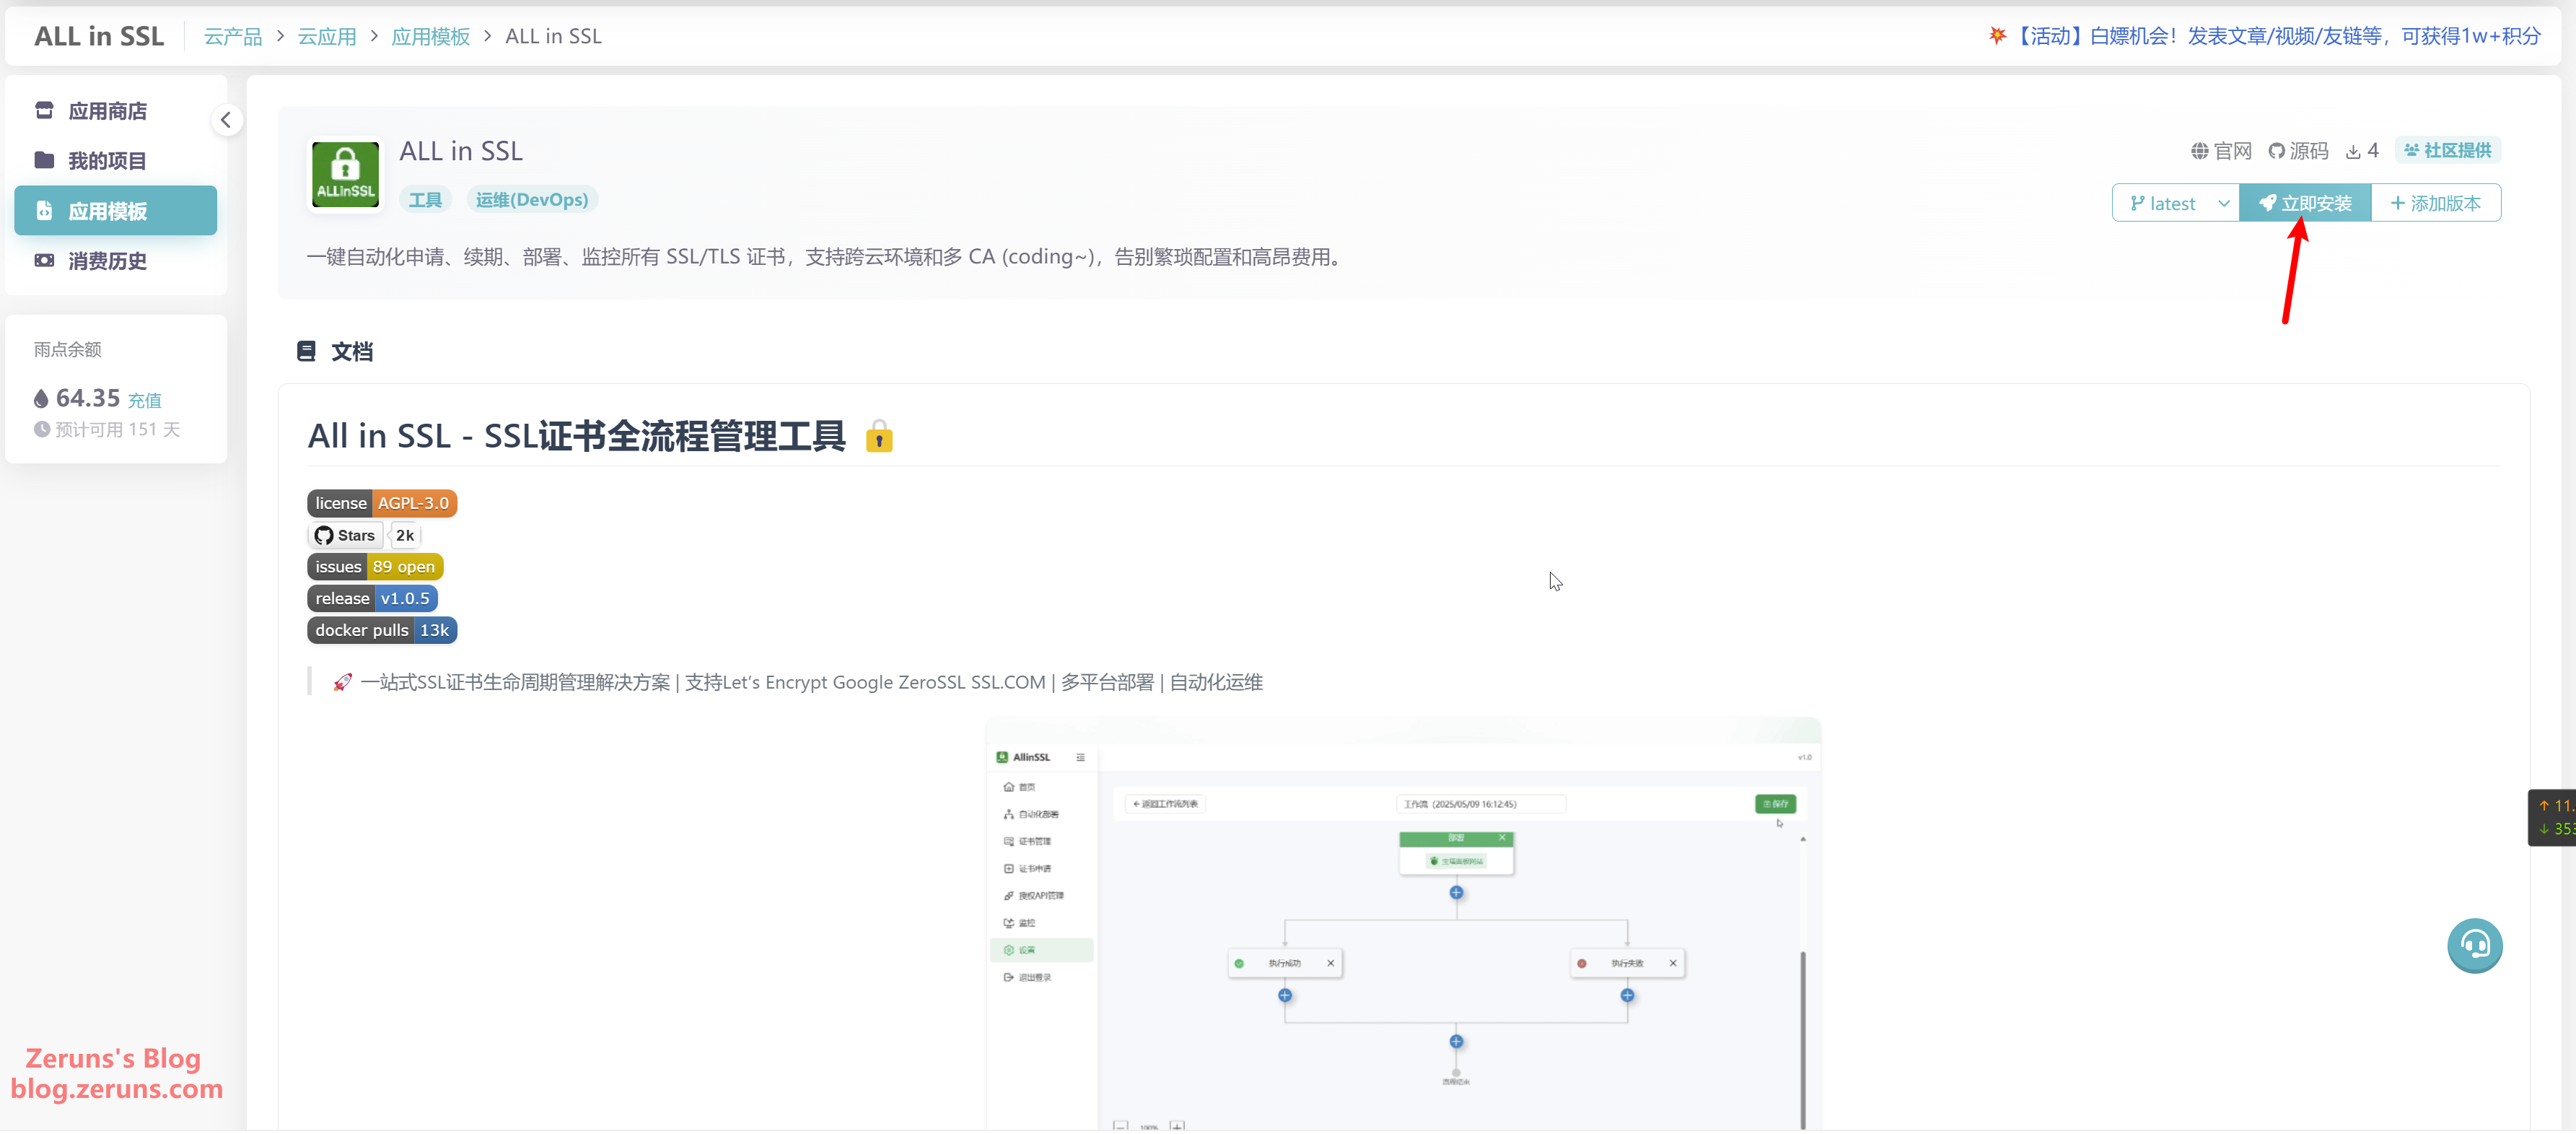
Access this link to go directly to the ALLinSSL application installation page: https://app.rainyun.com/apps/rca/store/6450/zeruns_?s=blog-en
You can also find the app in the App Store and click Install Now.
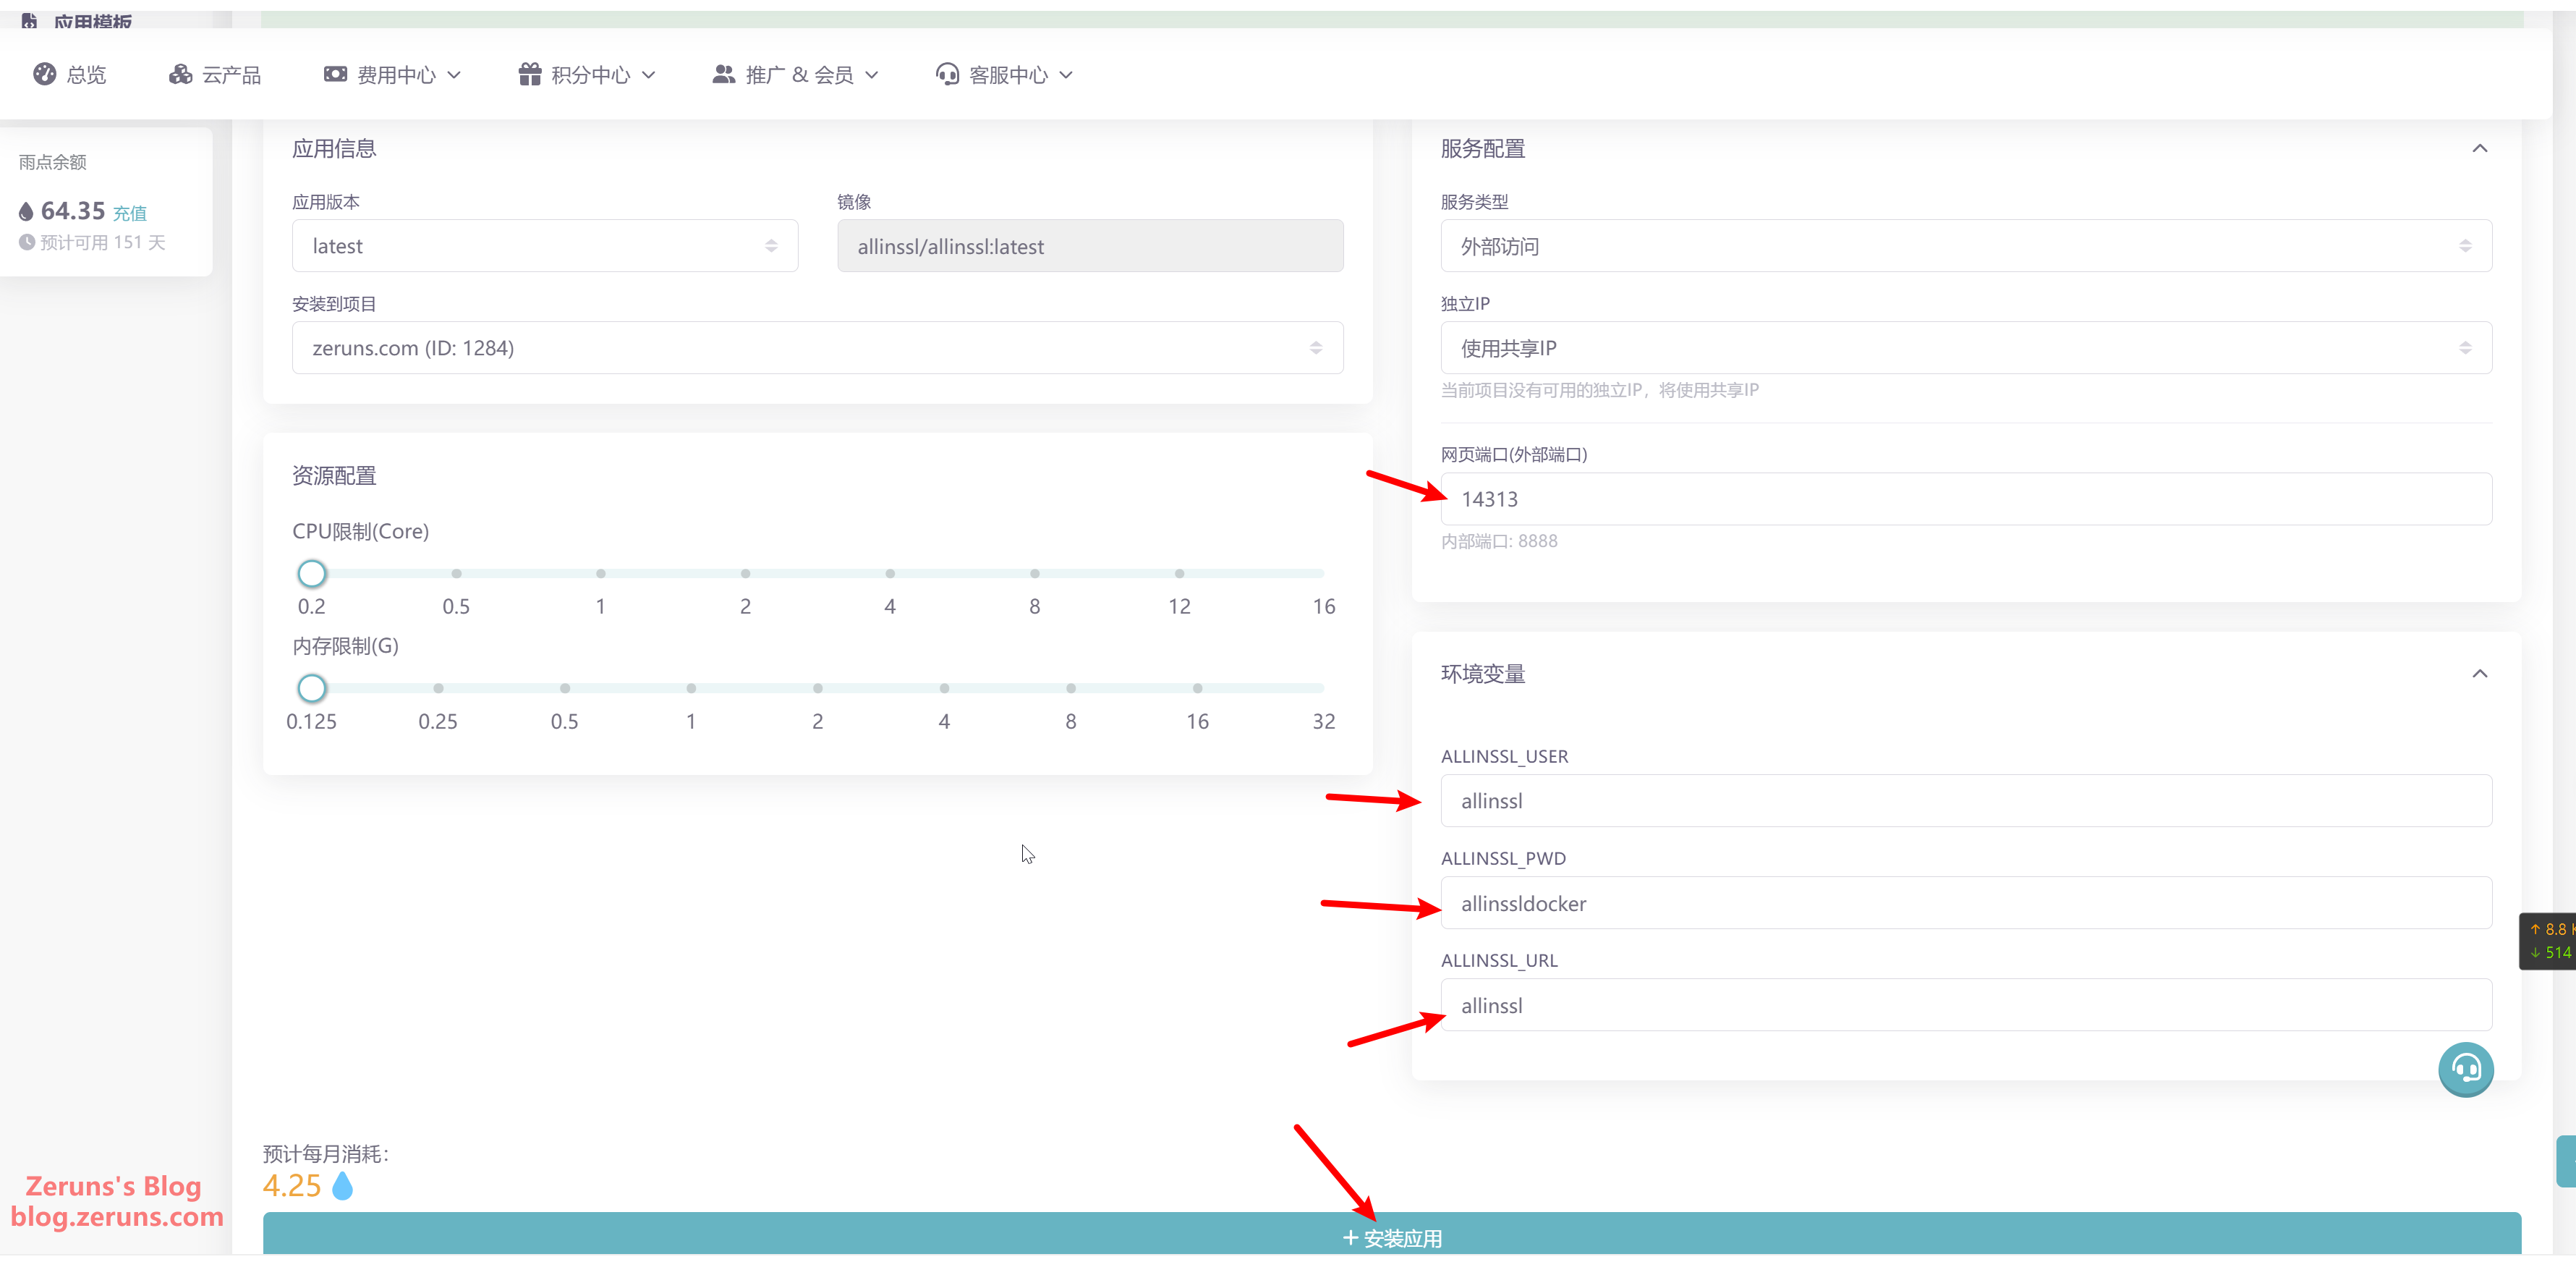
The default resource configuration is usually sufficient. The web port will be randomly generated, but you can modify it manually. To change the username, modify the environment variable ALLINSSL_USER. To change the login password, modify ALLINSSL_PWD. To change the secure path, modify ALLINSSL_URL. Finally, click Install App. (It's recommended to change the default password)
- Default Username:
allinssl - Password:
allinssldocker - Secure Path:
allinssl - Default Access URL:
http://<Cloud App IP>:<Web Port>/allinssl
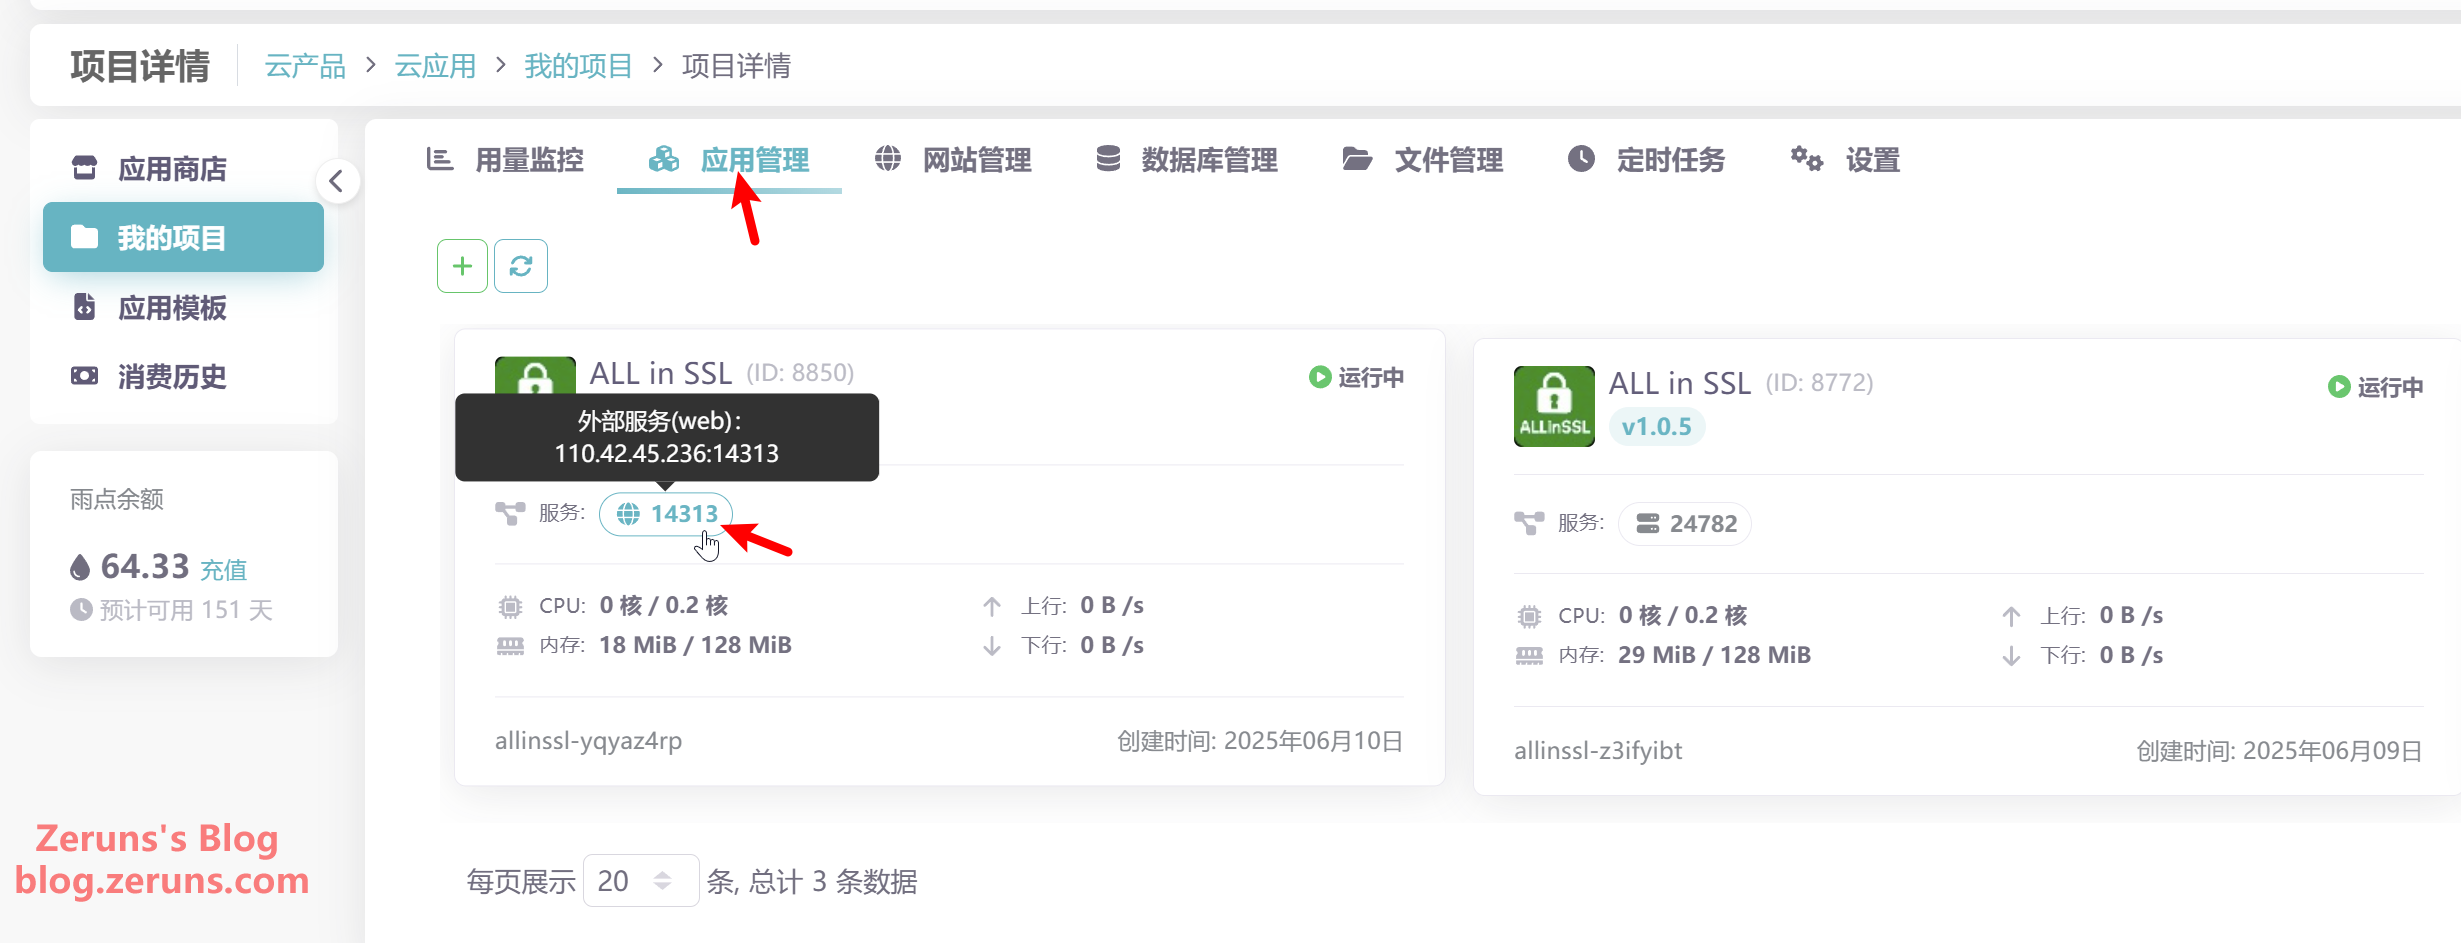
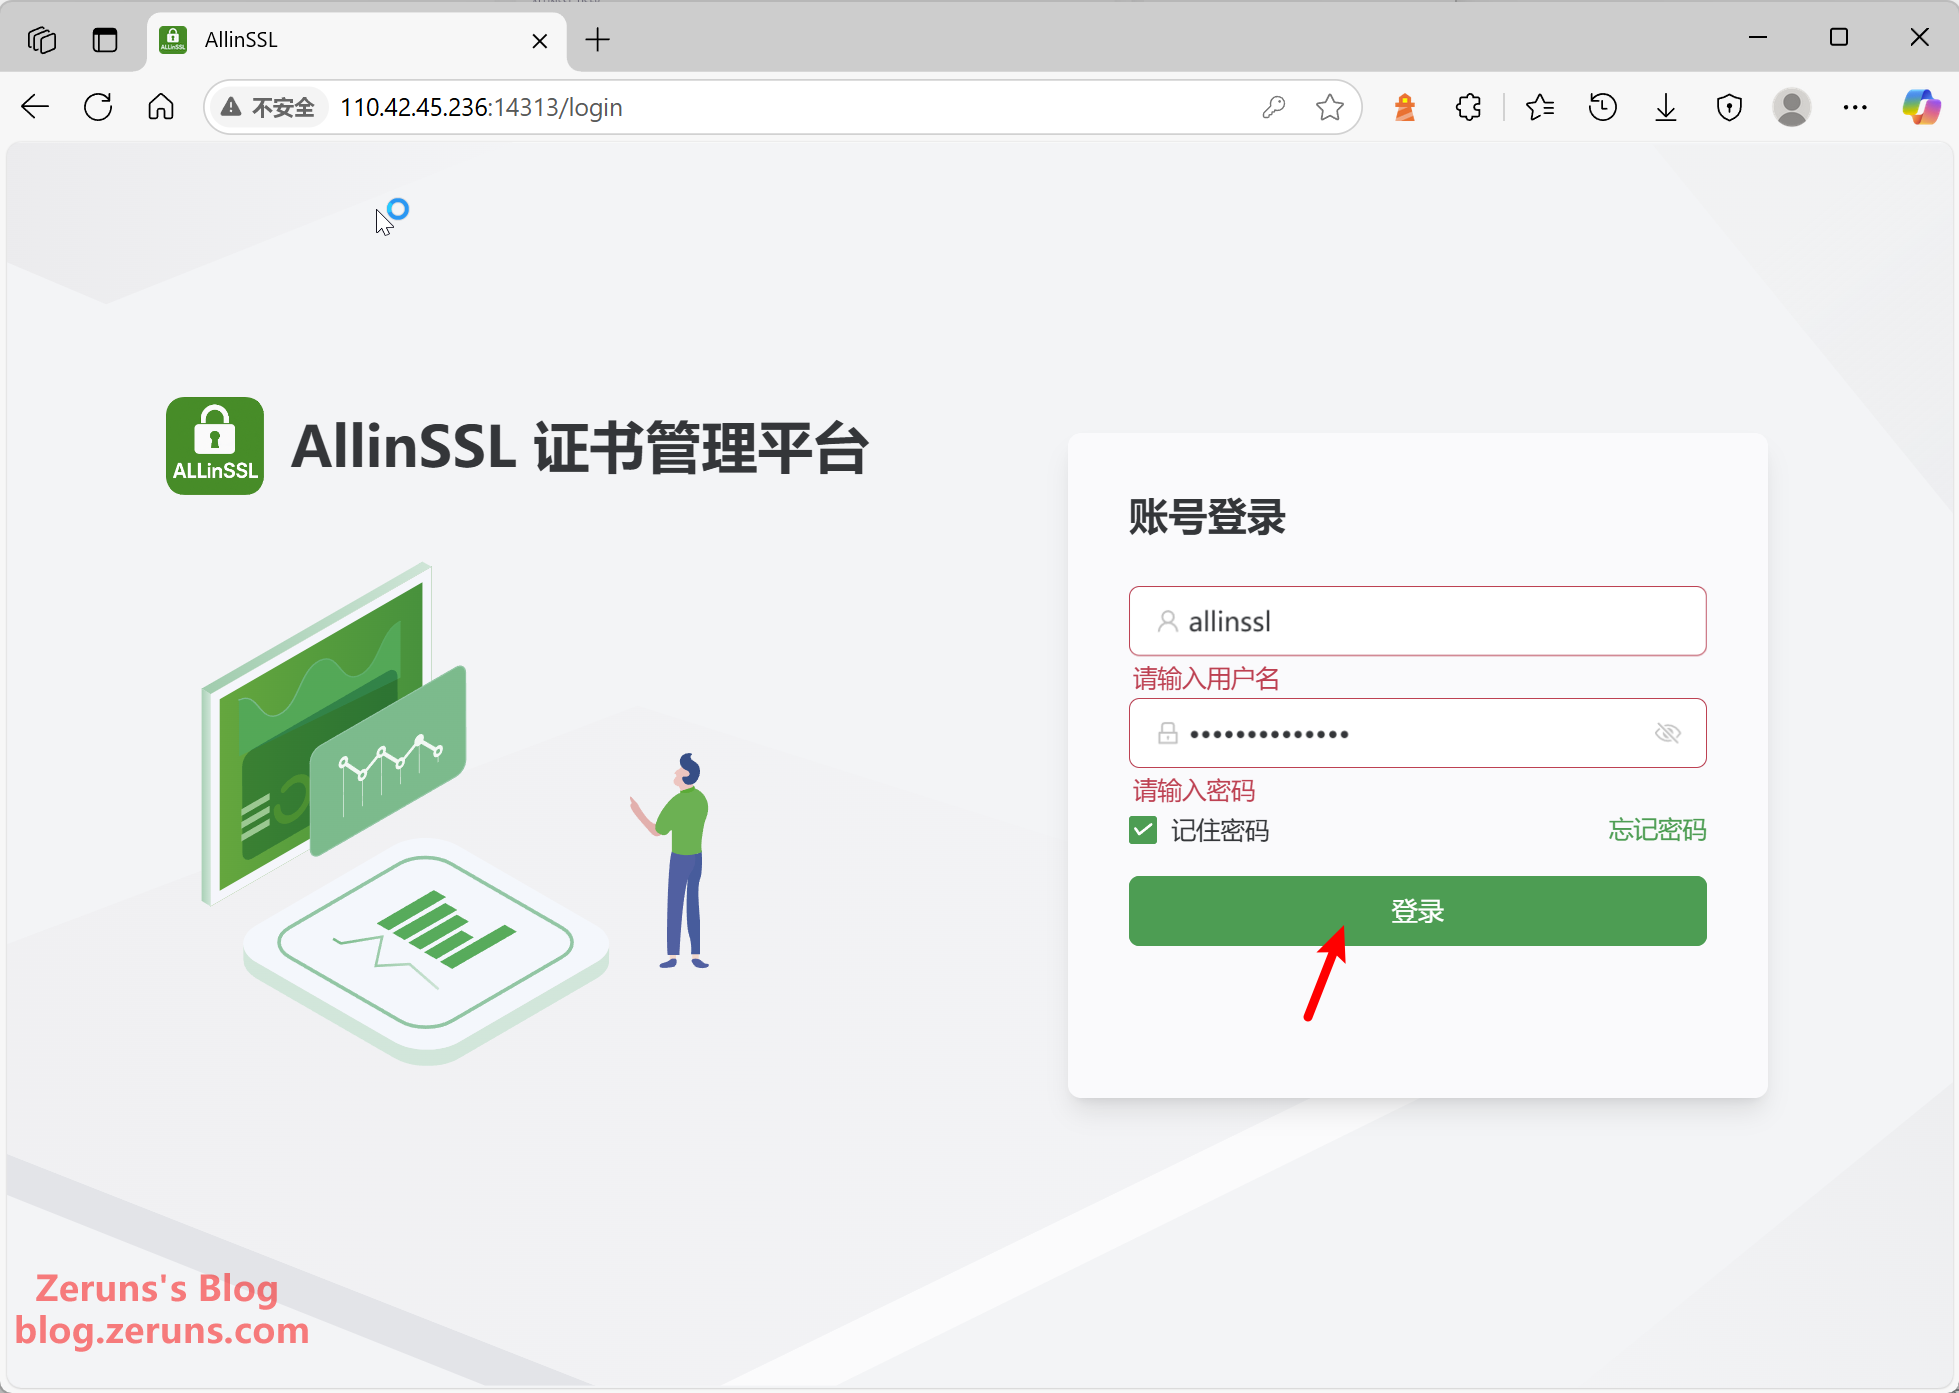
In the Application Management section of your project, under the ALLinSSL app, click the port number under Services to copy the IP + port of your cloud application. Then paste it into your browser's address bar, append the secure path, and you can access the web panel. For example: http://110.42.45.236:14313/allinssl
You'll be taken to the web panel. Just enter your configured username and password to log in.
ALLinSSL User Guide
For this tutorial on SSL certificate request and deployment, I built a Flarum website as a test environment. You can find the Flarum installation guide here: https://blog.zeruns.com/archives/866.html
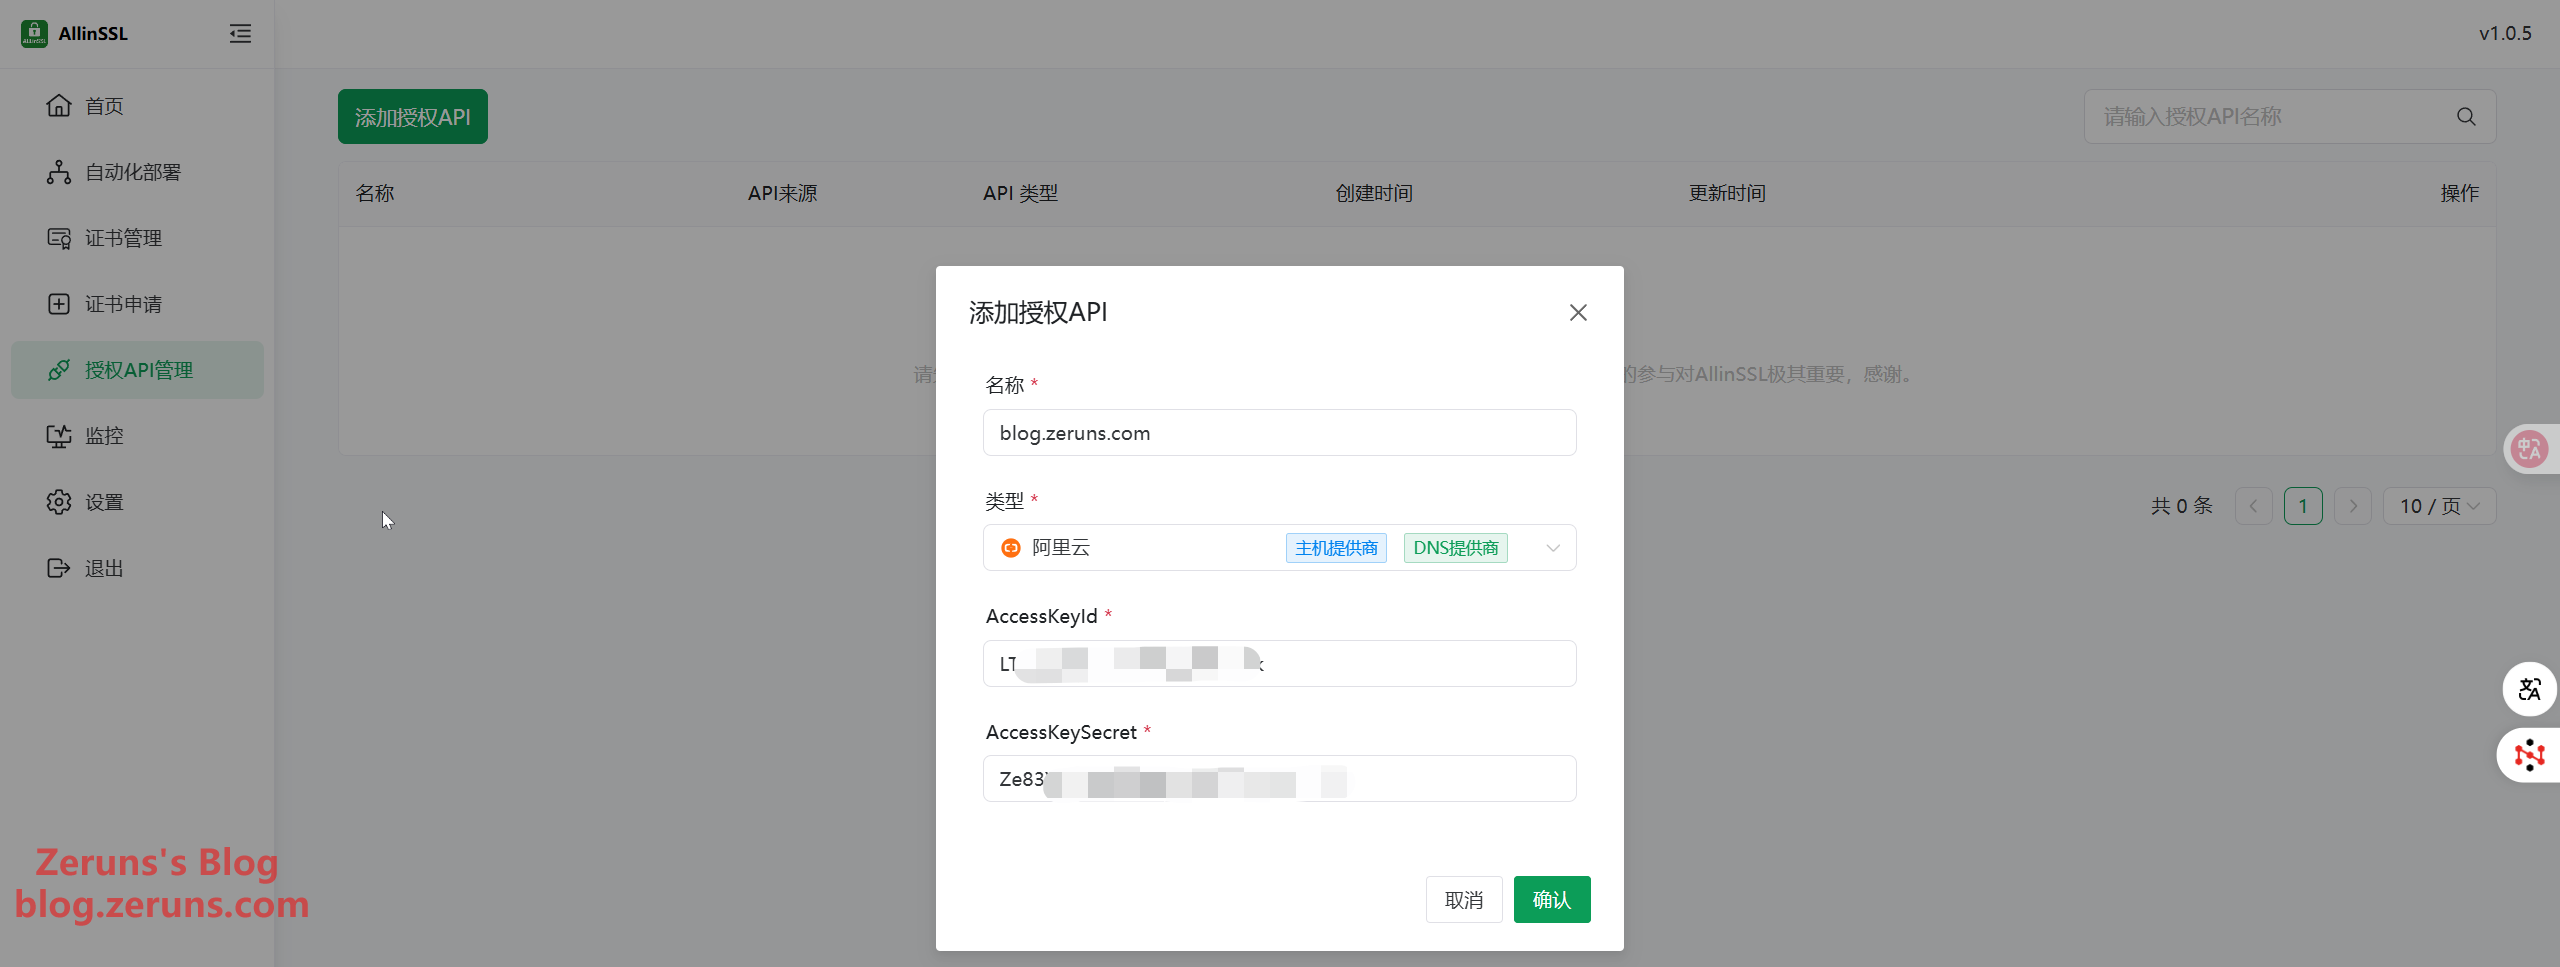
Once you've accessed the ALLinSSL web dashboard, click Authorization API Management → Add Authorized API. Set any name you like, choose the DNS provider associated with your domain name. I’m using Alibaba Cloud DNS, so I selected Alibaba Cloud. Then, go to Alibaba Cloud Console under AccessKey to obtain your AccessKeyId and AccessKeySecret, and enter them here. Finally, click Confirm.
Requesting an SSL certificate requires setting a DNS record to verify domain ownership. API access to your DNS provider is required for automation.
If your CDN provider is also Alibaba Cloud, you only need to add this AccessKey once, as it can be reused.
After adding, you can click the test button on the right to verify if the configuration is successful.
If you're using a CDN, you don't need to deploy the SSL certificate on your origin server. You can authorize the CDN's API and deploy the certificate there instead, using HTTP back to the origin. Of course, you're free to deploy the certificate on both ends if you prefer.
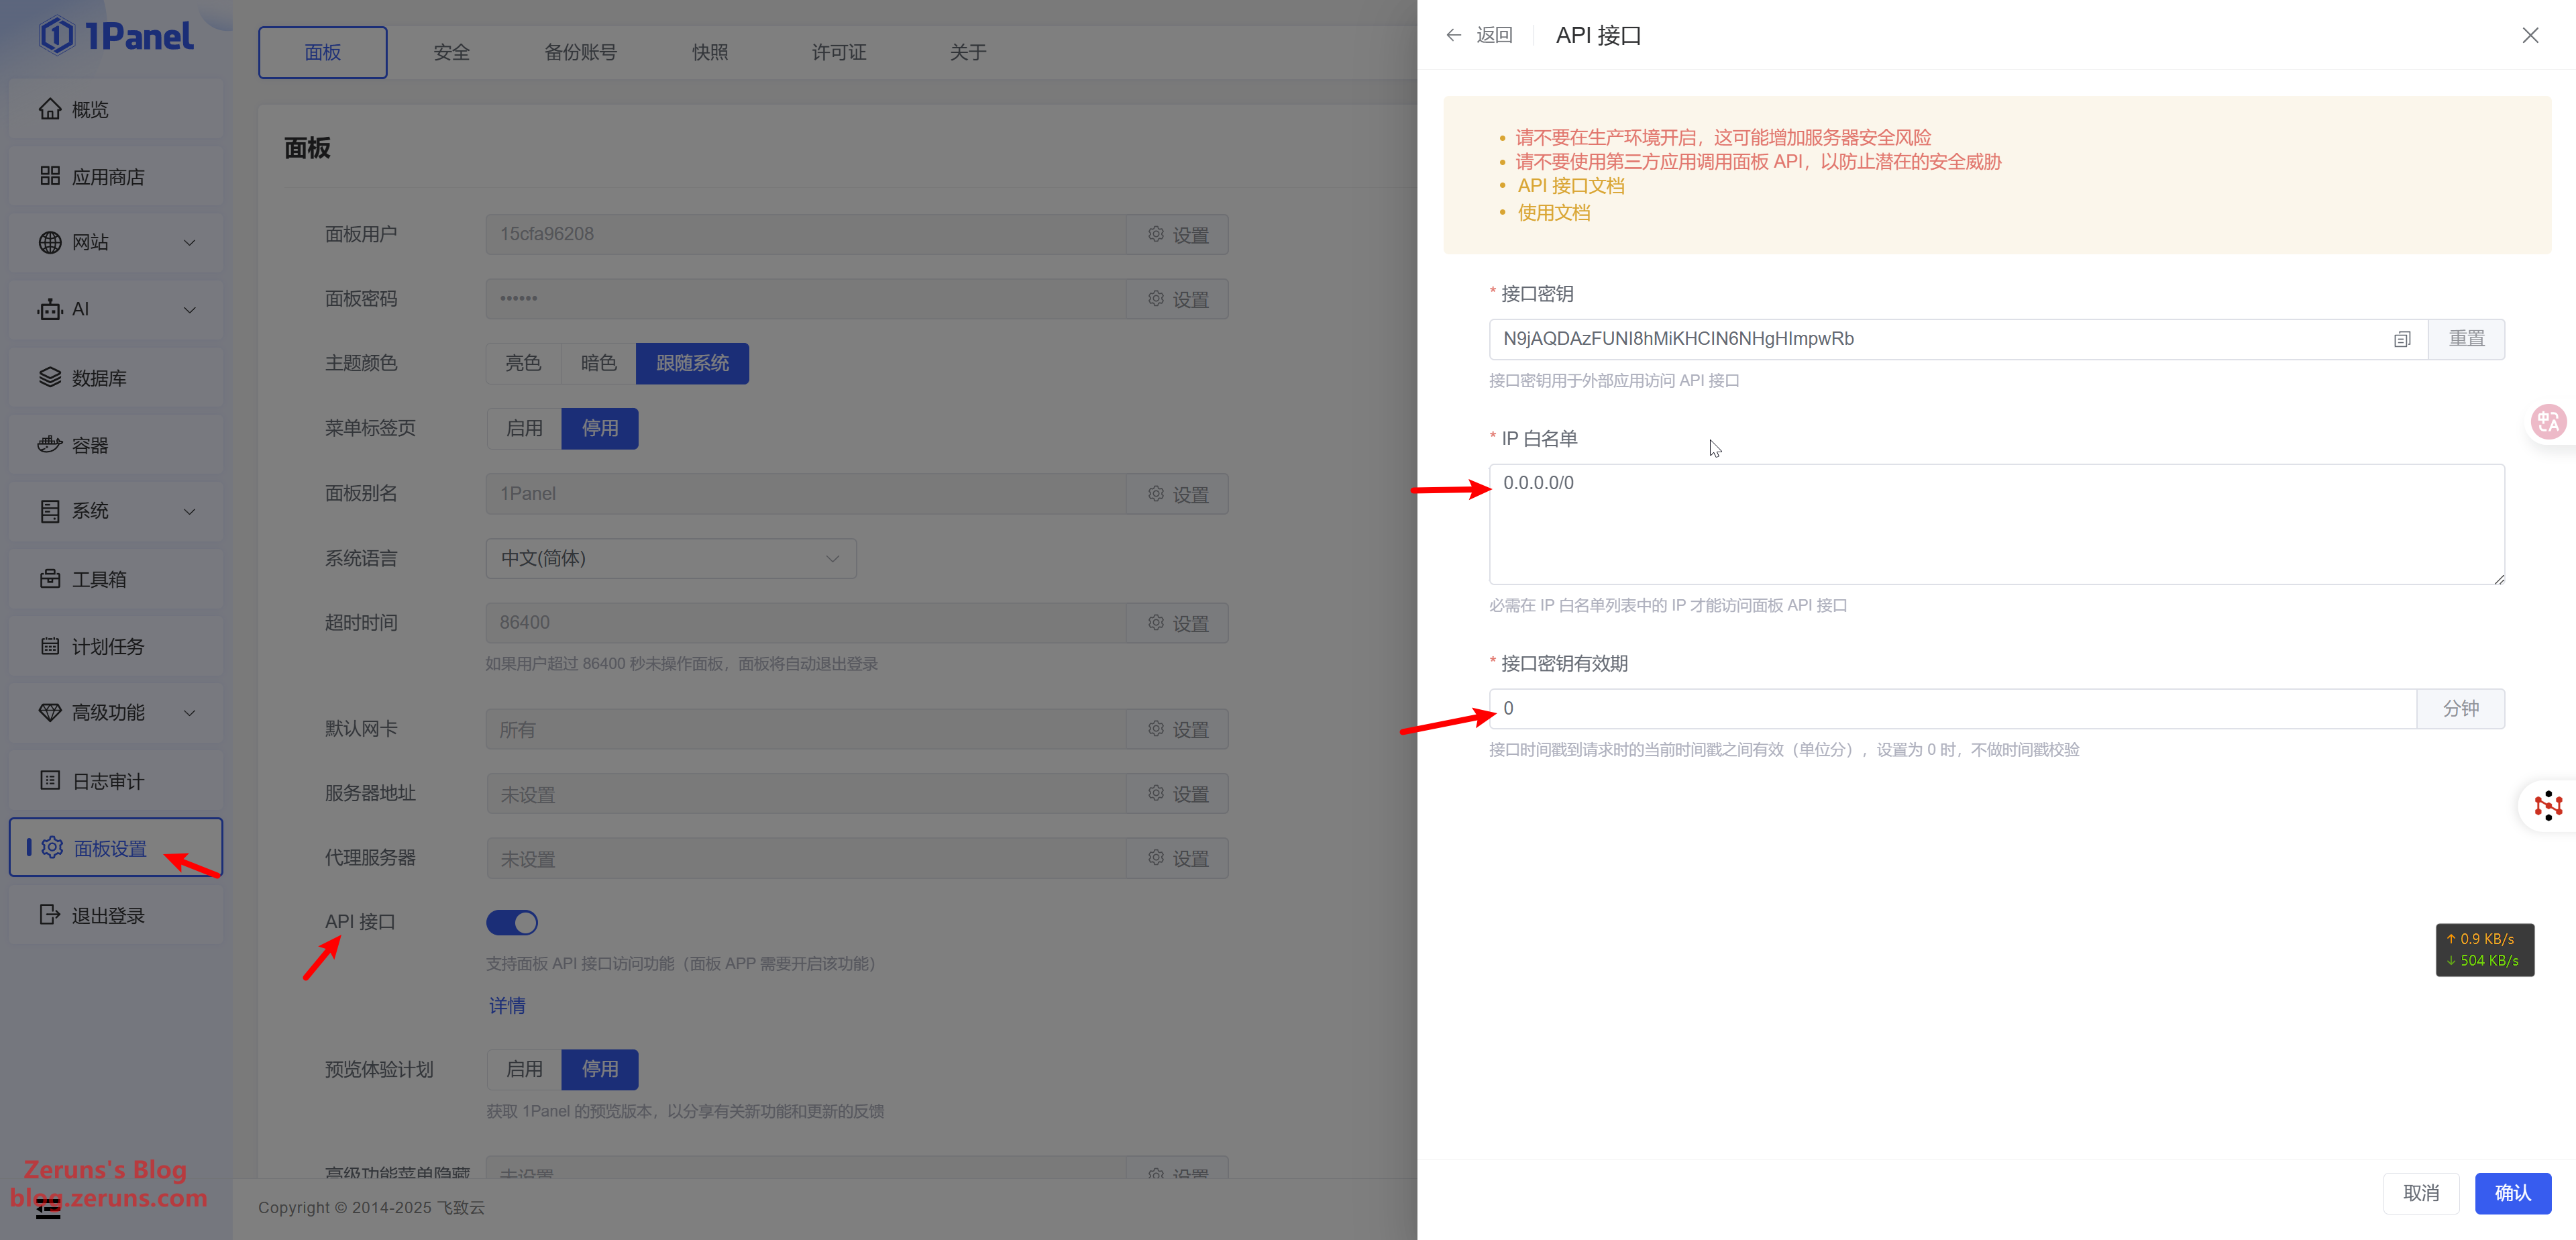
In this example, the origin server is managed via 1Panel, so you’ll need to add the 1Panel API. In your 1Panel dashboard, go to Panel Settings and enable the API interface. For IP Whitelist, input your cloud application's IP or use 0.0.0.0/0 to allow all IPs. Set API Key Validity Period to 0 for permanent validity, then copy the API key.
Back in the ALLinSSL panel, continue by adding an authorized API. Name it as you like, choose 1Panel as the type, input your 1Panel URL, paste the API key you just copied, and click Confirm. Again, use the test button to confirm success.

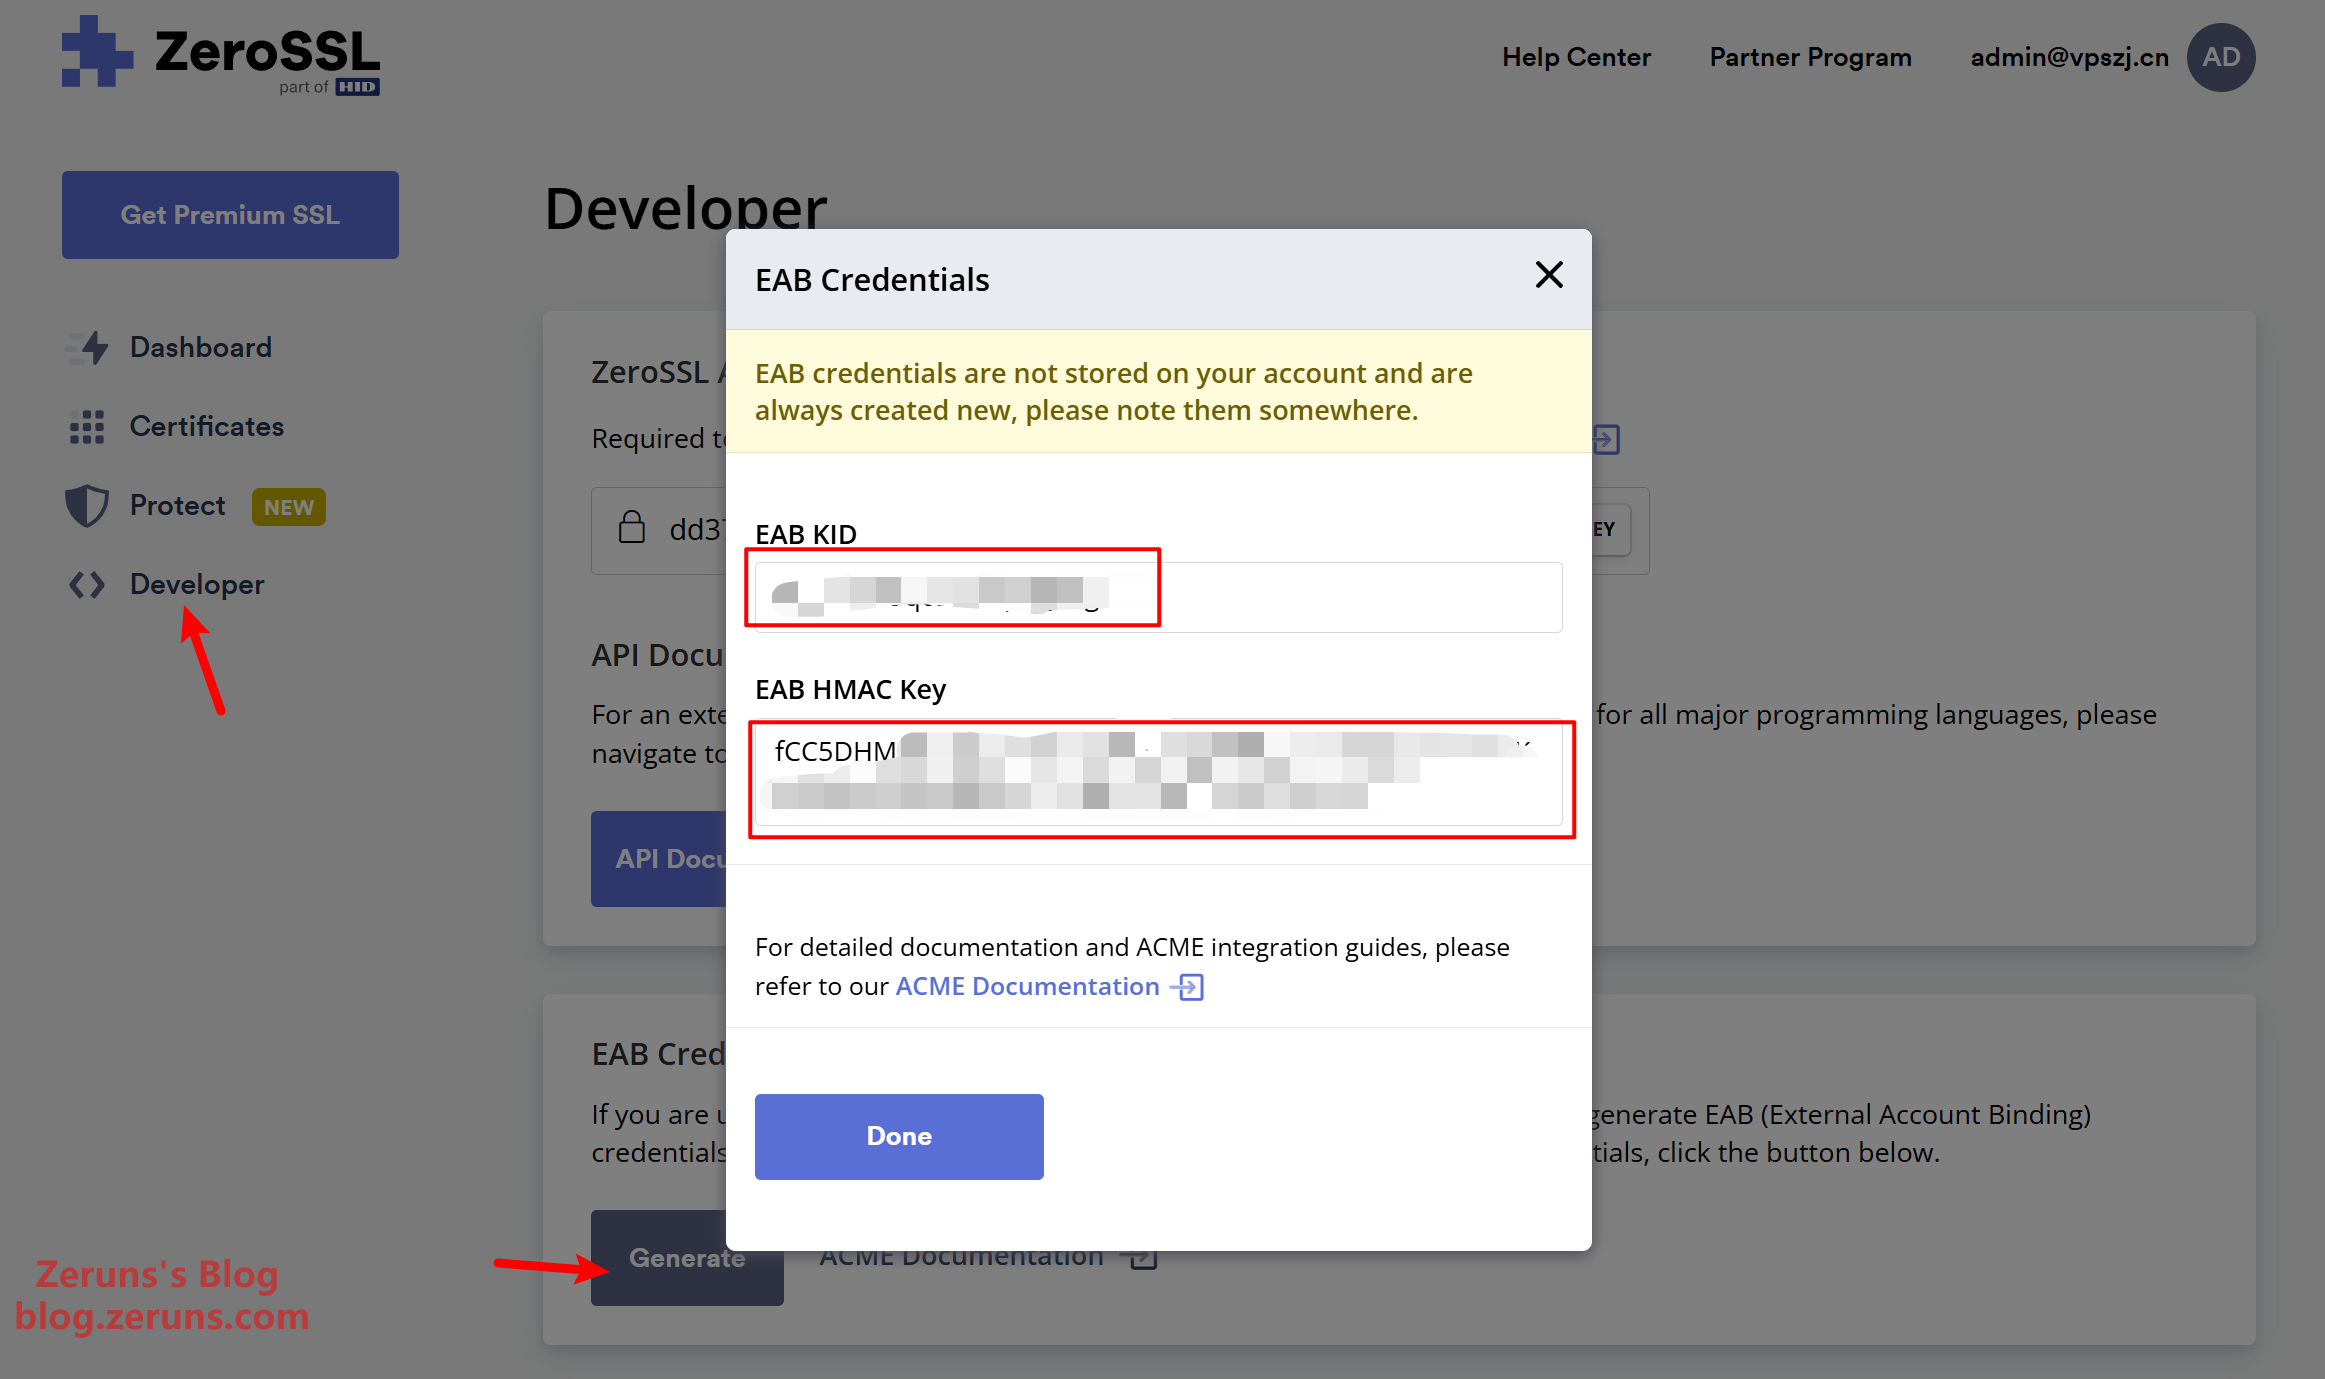
For this tutorial, I’ll use a ZeroSSL certificate, so we need to add a CA authorization. Go to the ZeroSSL website to register and retrieve credentials. If you only need Let's Encrypt certificates, you can skip this. Note: wildcard certificates (used for all subdomains) are only available through ZeroSSL or Google CA.
ZeroSSL official website: https://zerossl.com/
After registering and logging in, navigate to Developer → Generate to obtain your EAB KID and EAB HMAC Key.
Return to the ALLinSSL dashboard and go to Automated Deployment → CA Authorization Management → Add CA Authorization. Choose any name, input the email you used for ZeroSSL, select ZeroSSL as the CA provider, then paste in the ACME EAB KID and ACME EAB HMAC Key. Click Confirm.

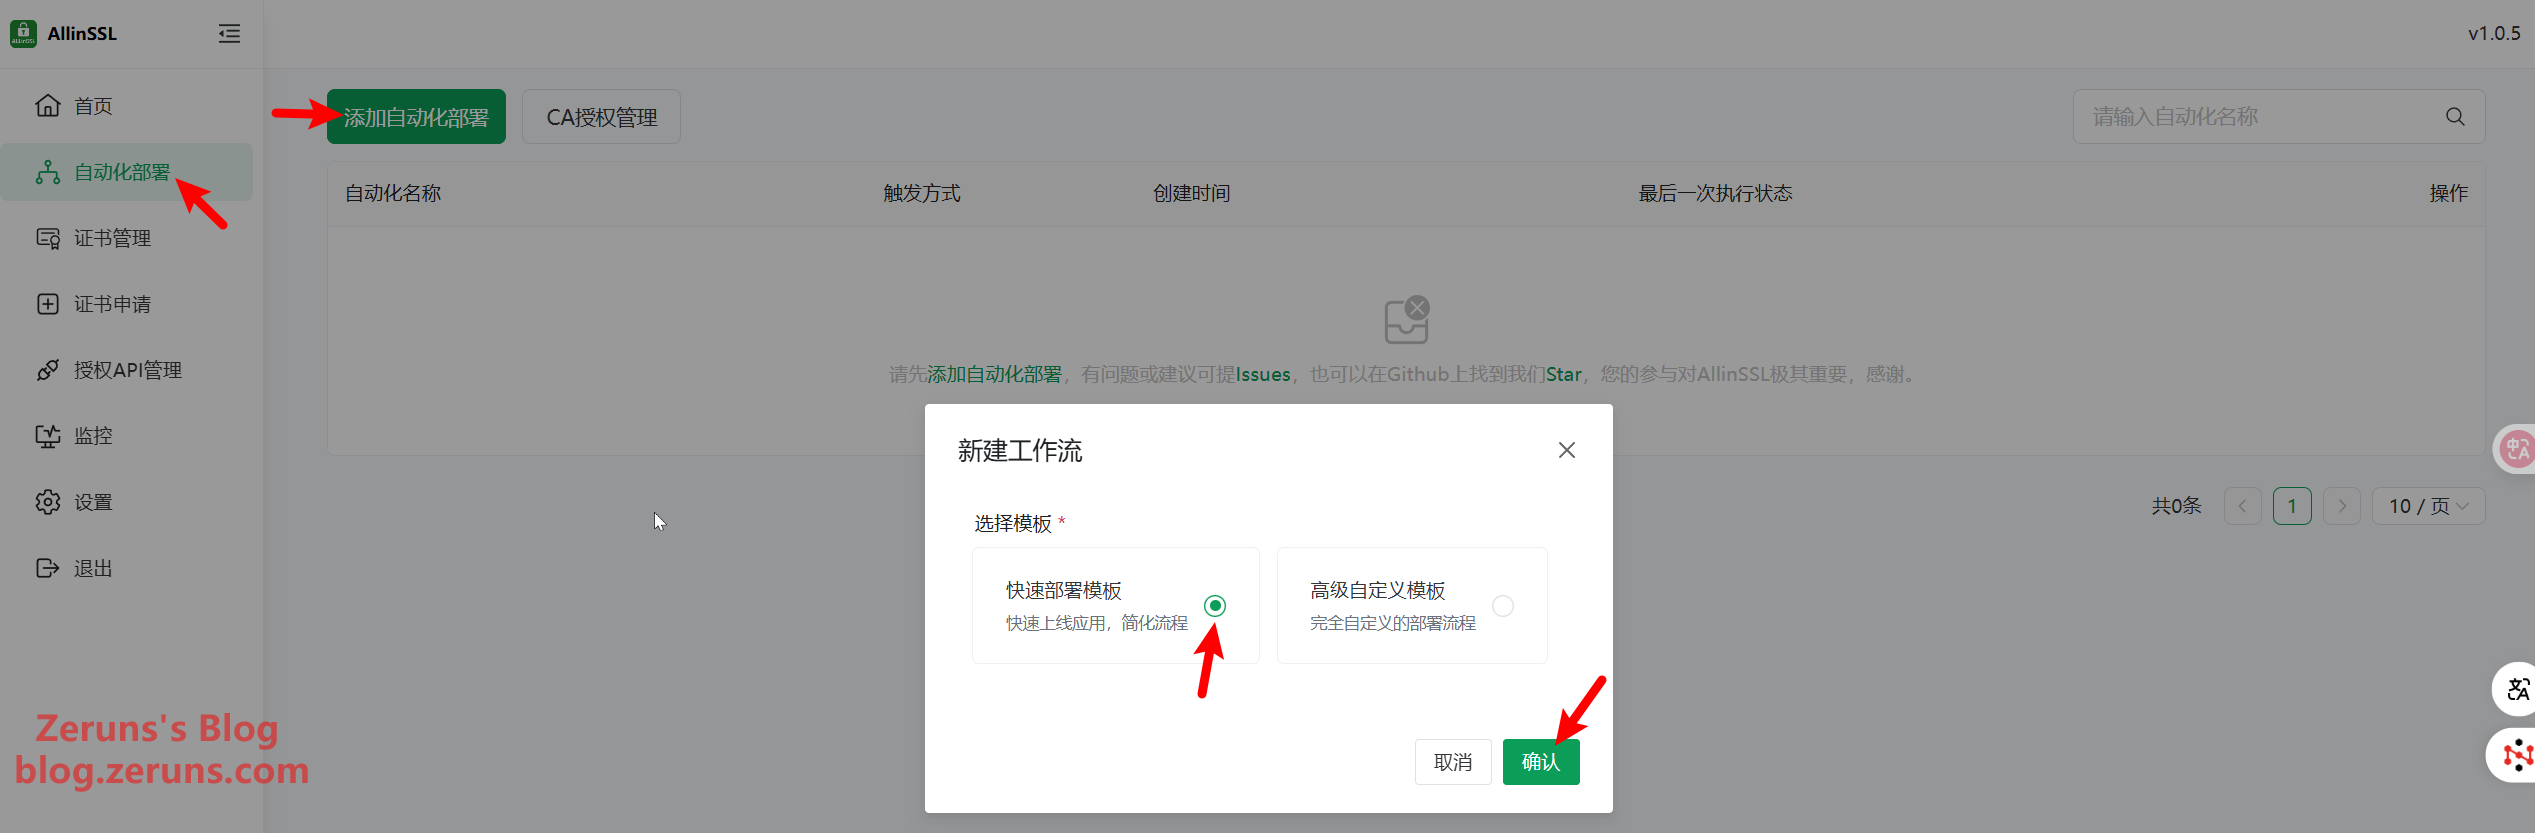
Next, we’ll create a new workflow for requesting and deploying the SSL certificate. Go to Automated Deployment → Add Automated Deployment → Quick Deployment Template → Confirm.
Click Start Execution Mode to choose whether the workflow runs automatically or manually, and to set the execution frequency. By default, it runs daily.
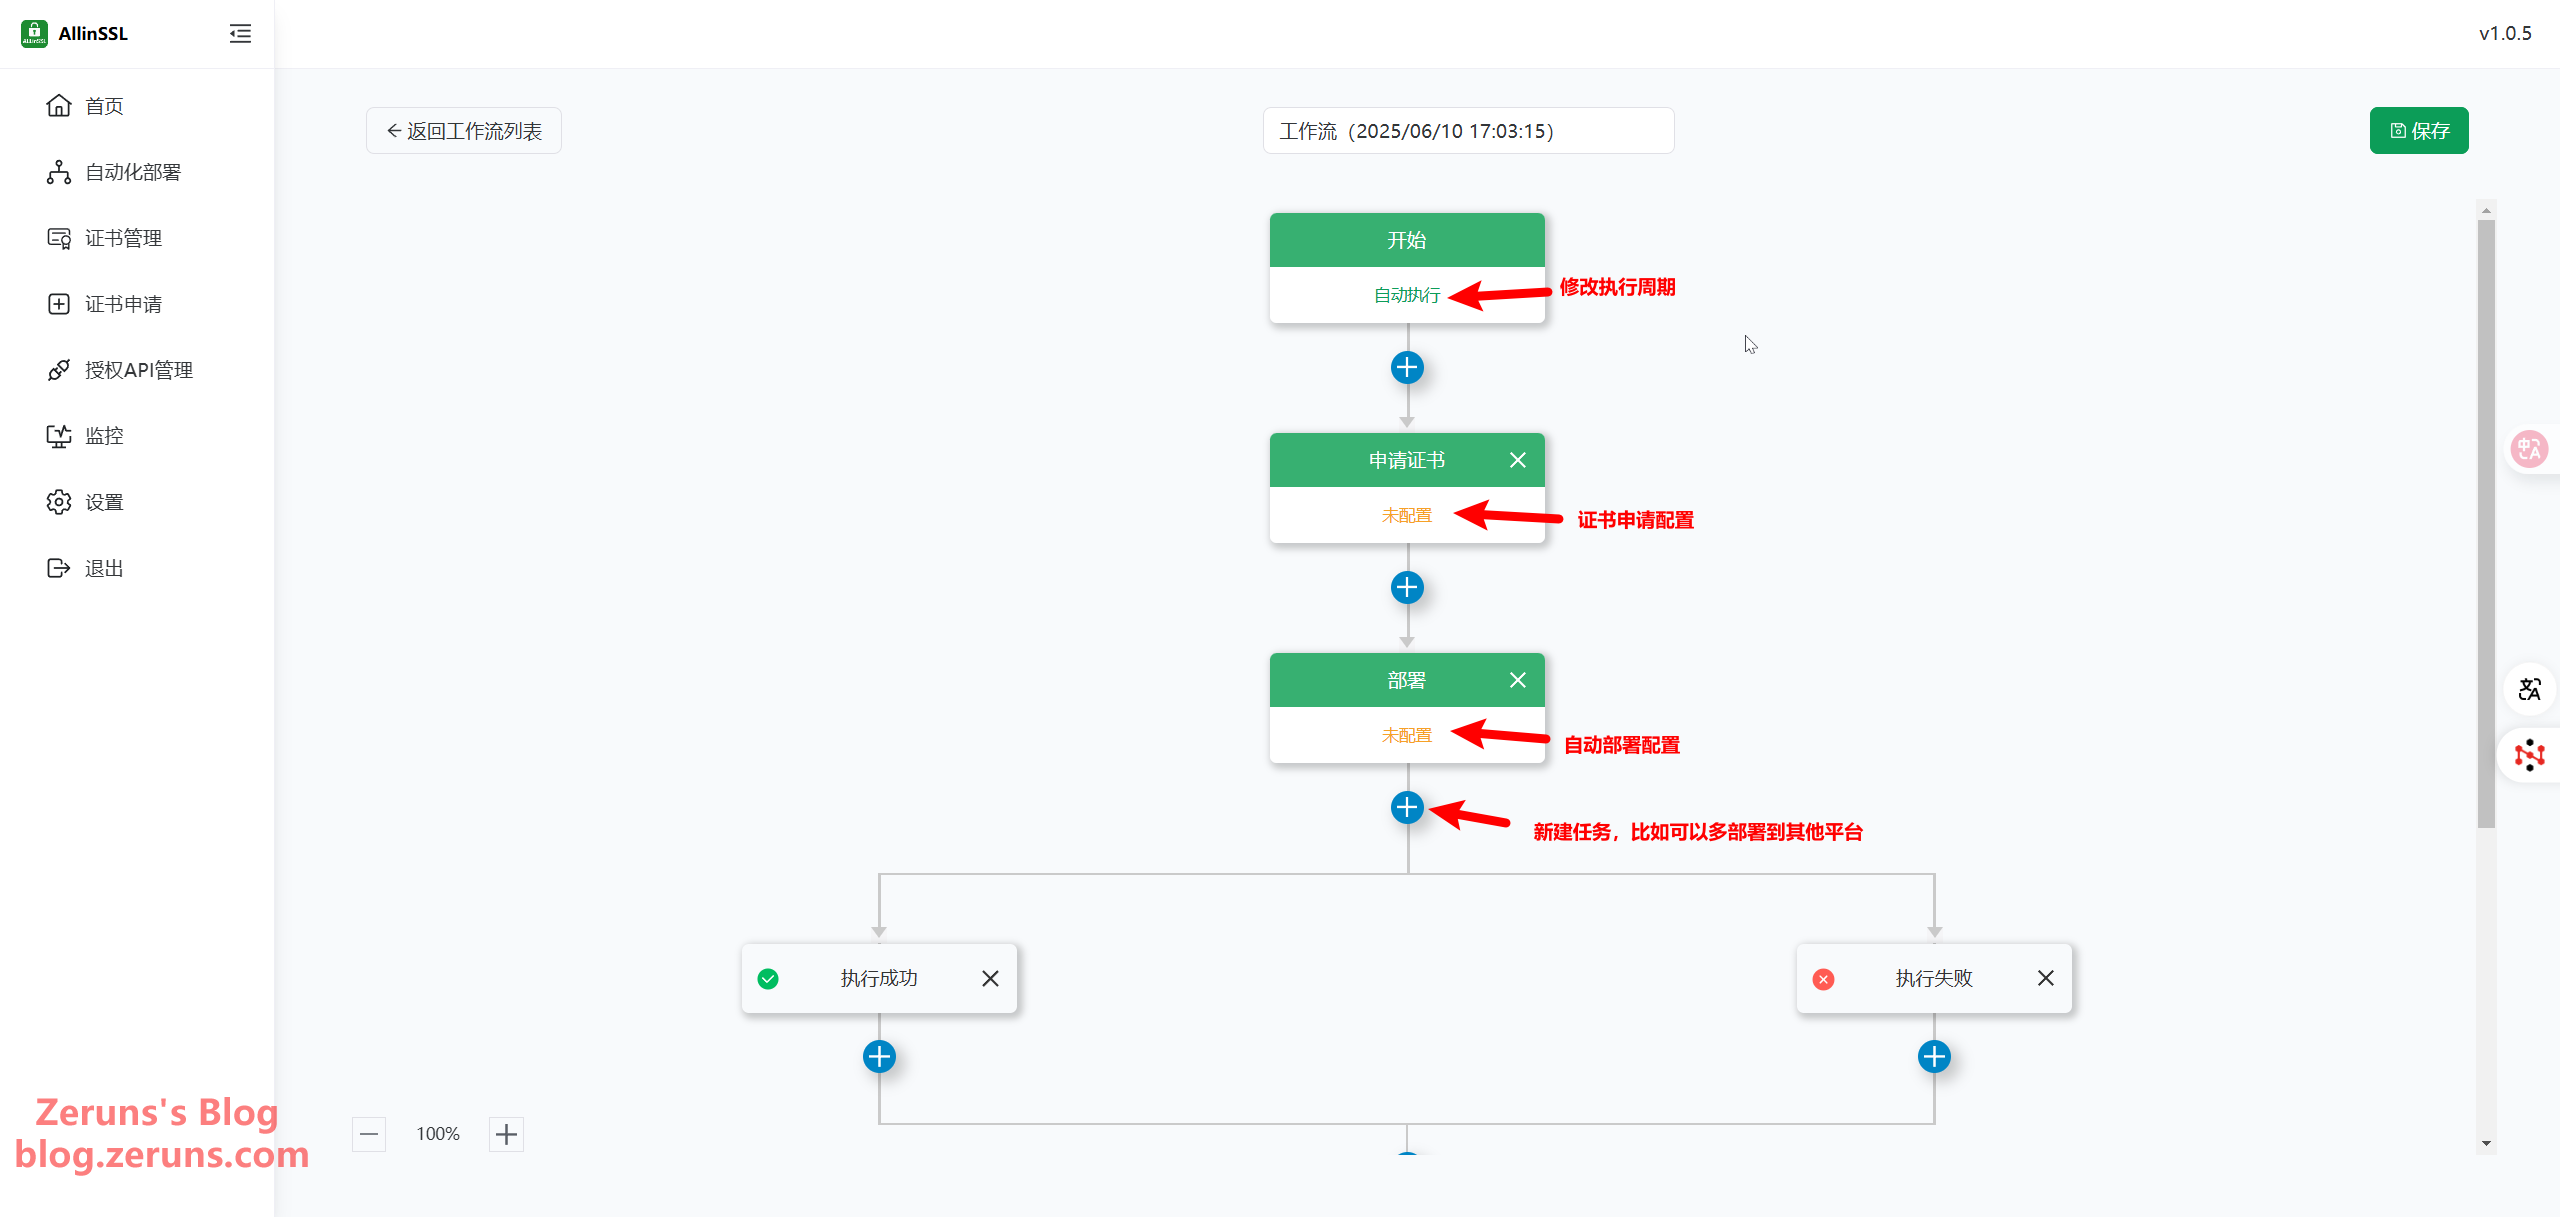
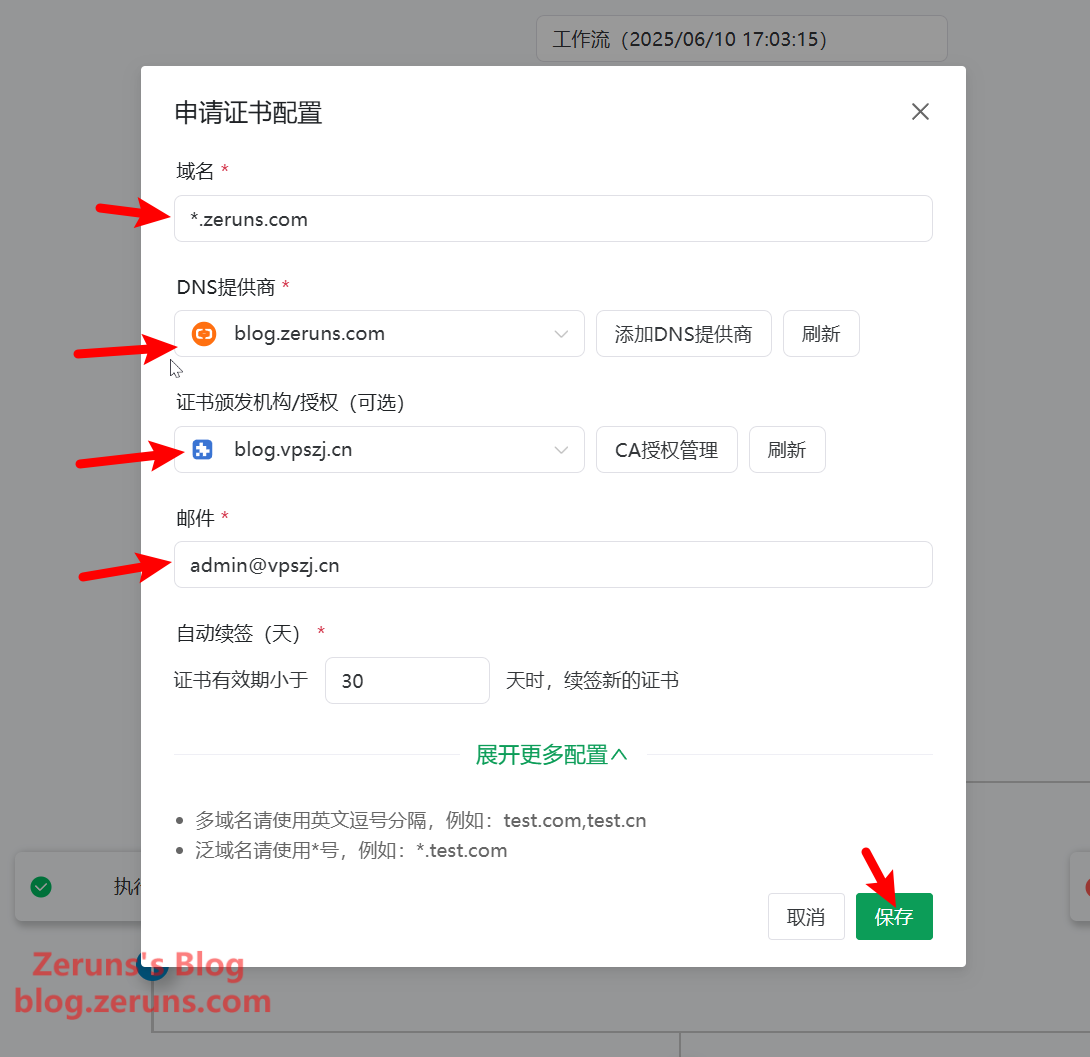
Click the "Not Configured" section under Request Certificate to set up your certificate request. Enter your domain name, and since I’m using ZeroSSL with wildcard support, I input *.zeruns.com. Choose your DNS provider, select the CA authorization you added earlier, and input your email. Leave other settings as default and click Save.
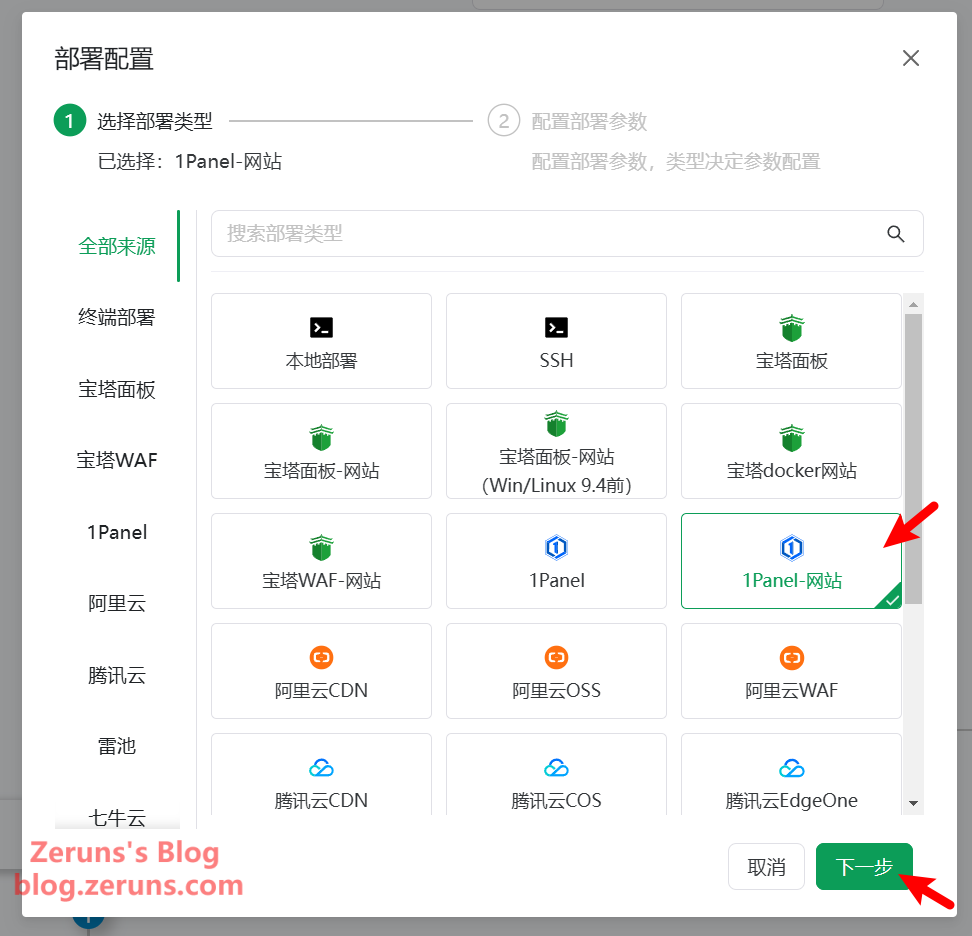
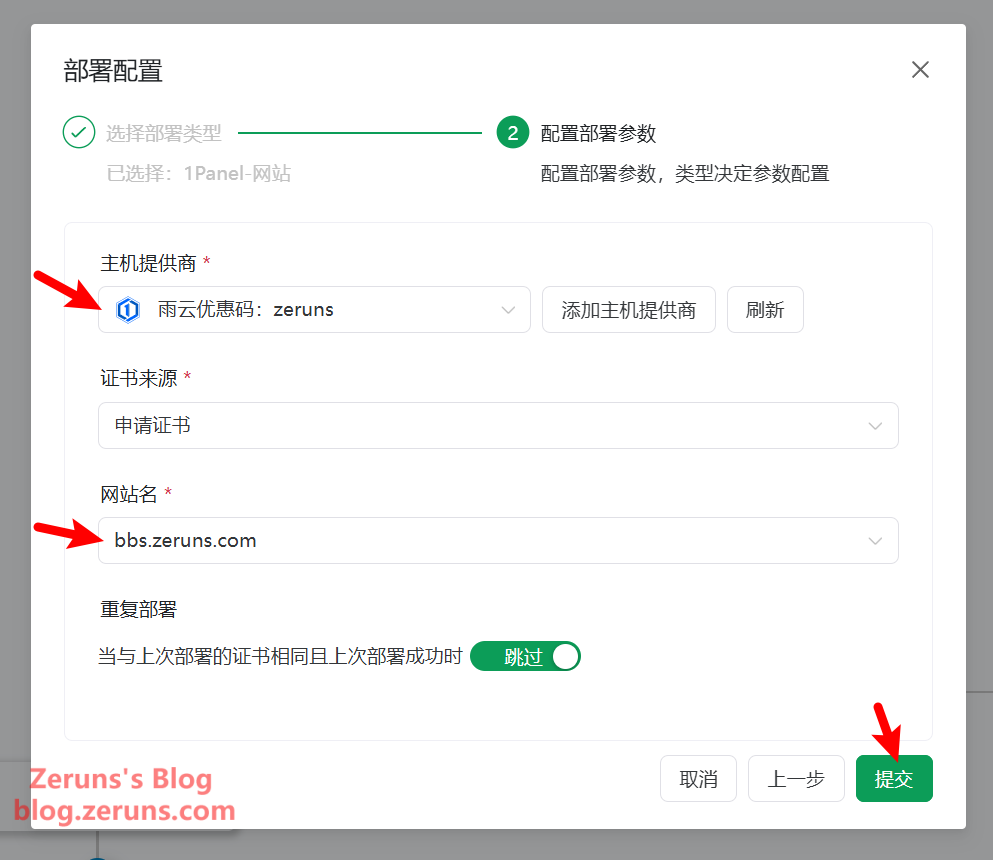
Click the "Not Configured" section under Deploy to configure certificate deployment. Choose the platform where you want to deploy the certificate. If you're using a custom server, select SSH to upload the certificate via SFTP and execute a restart command. In my case, since I’m using 1Panel, I choose 1Panel - Website, then click Next.
Select the hosting provider you added earlier, choose the site to deploy to, then click Submit.
Delete the default notification task at the bottom, or configure your own notification preferences based on success or failure. Then click Save.
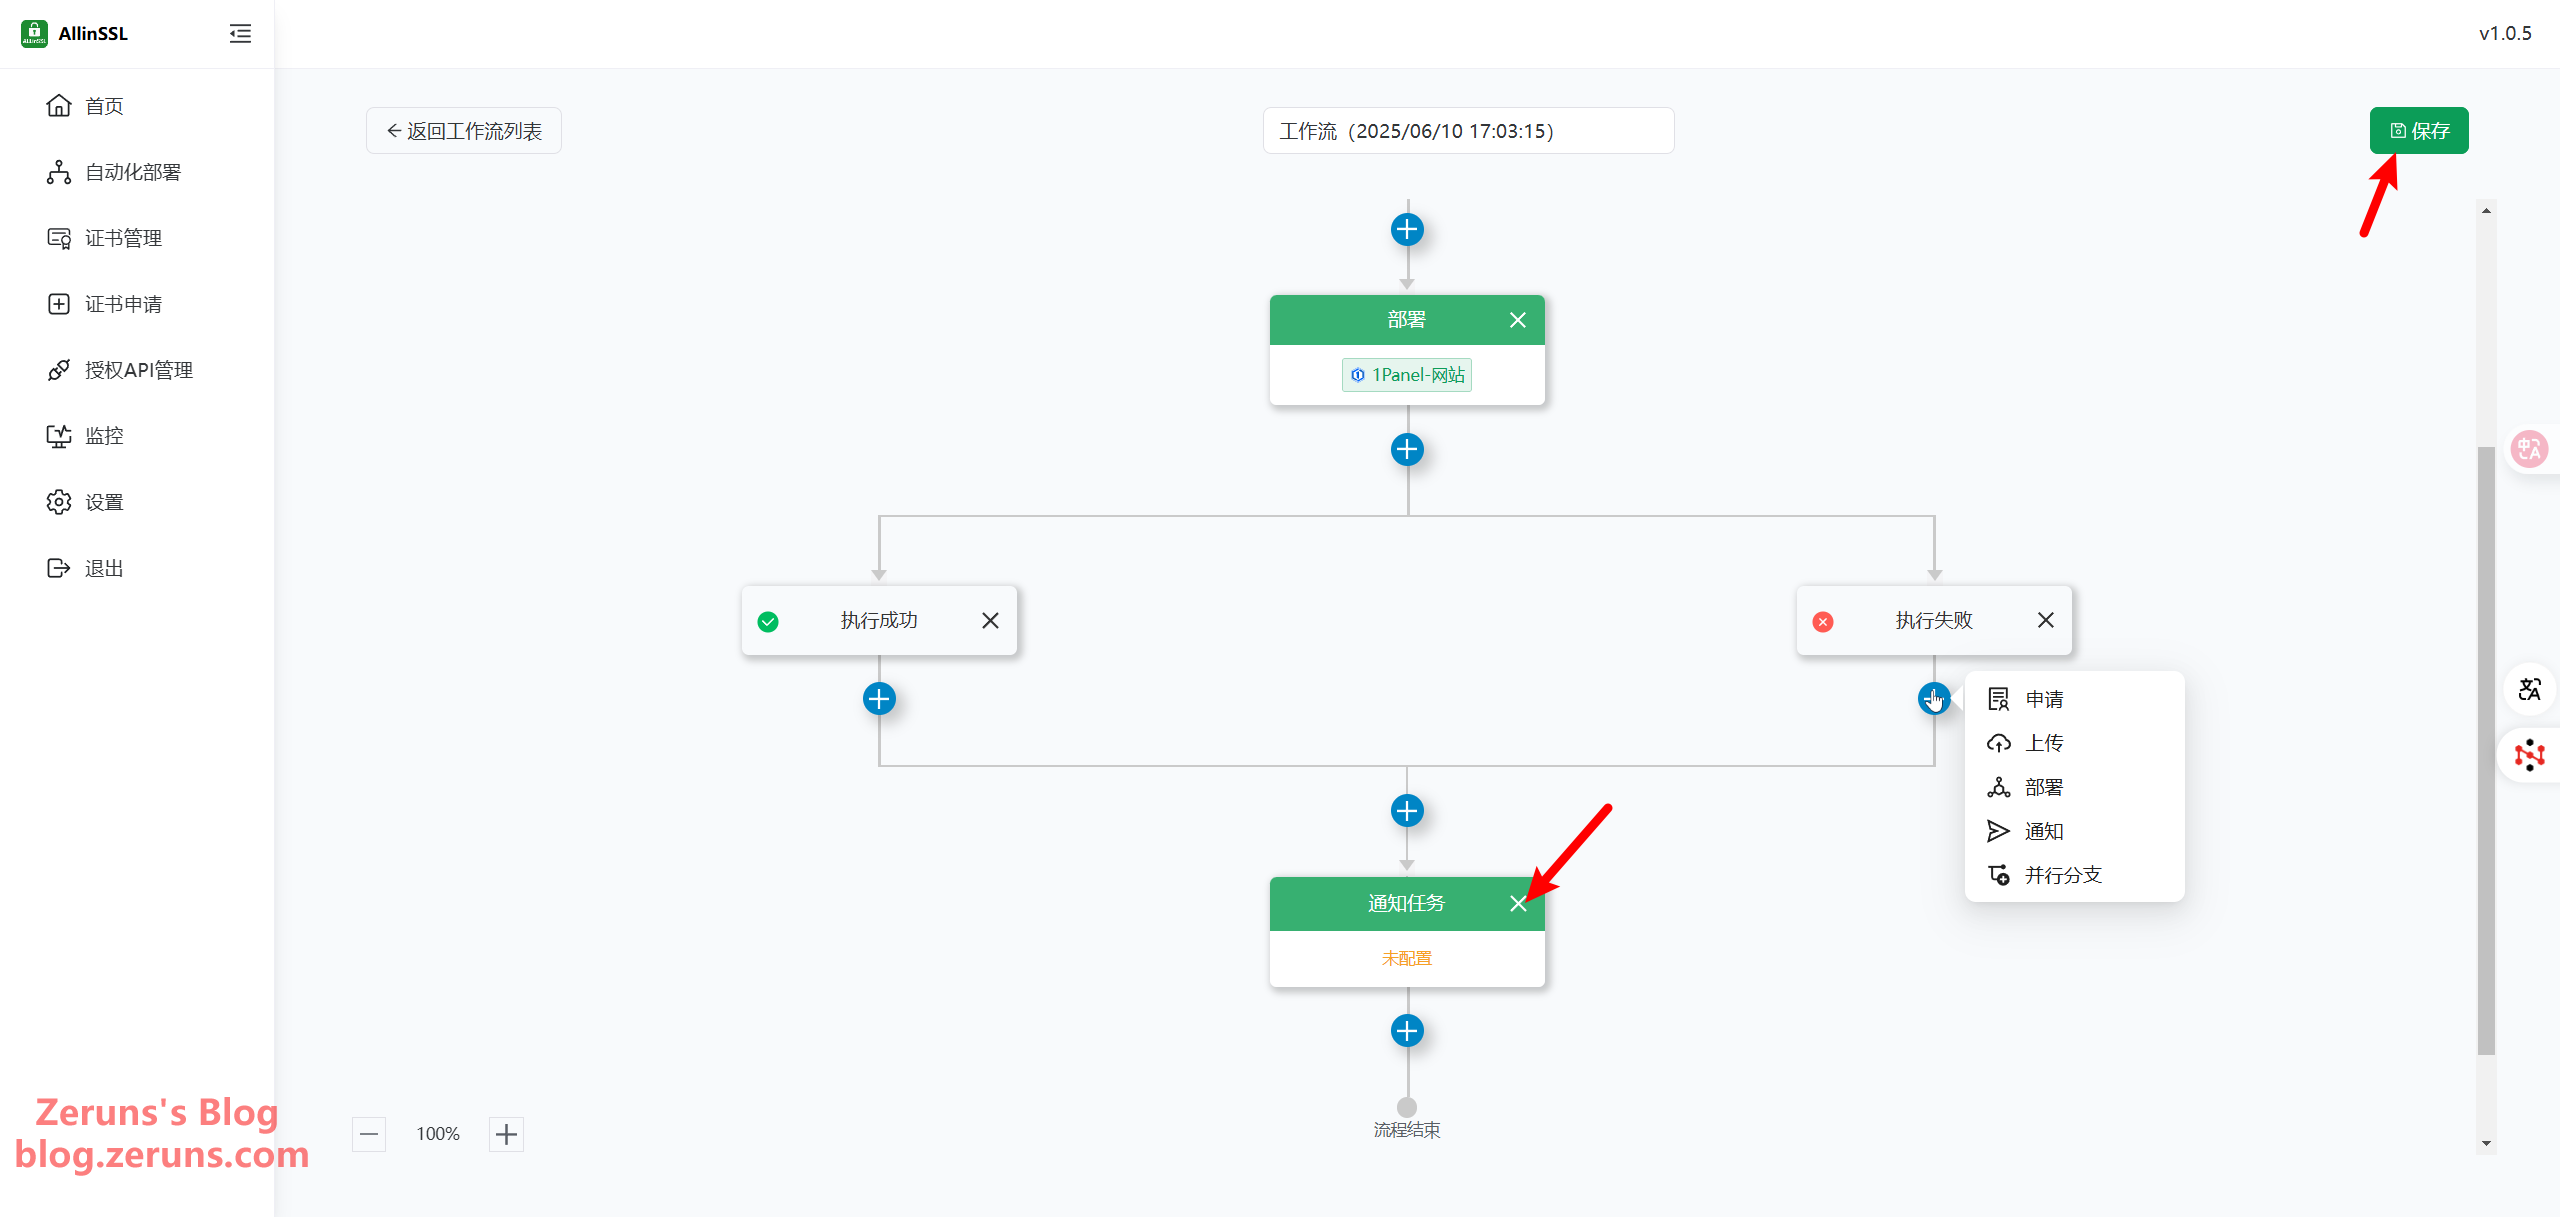
Now click Execute to run the workflow manually.

You can view the execution log under Execution History.
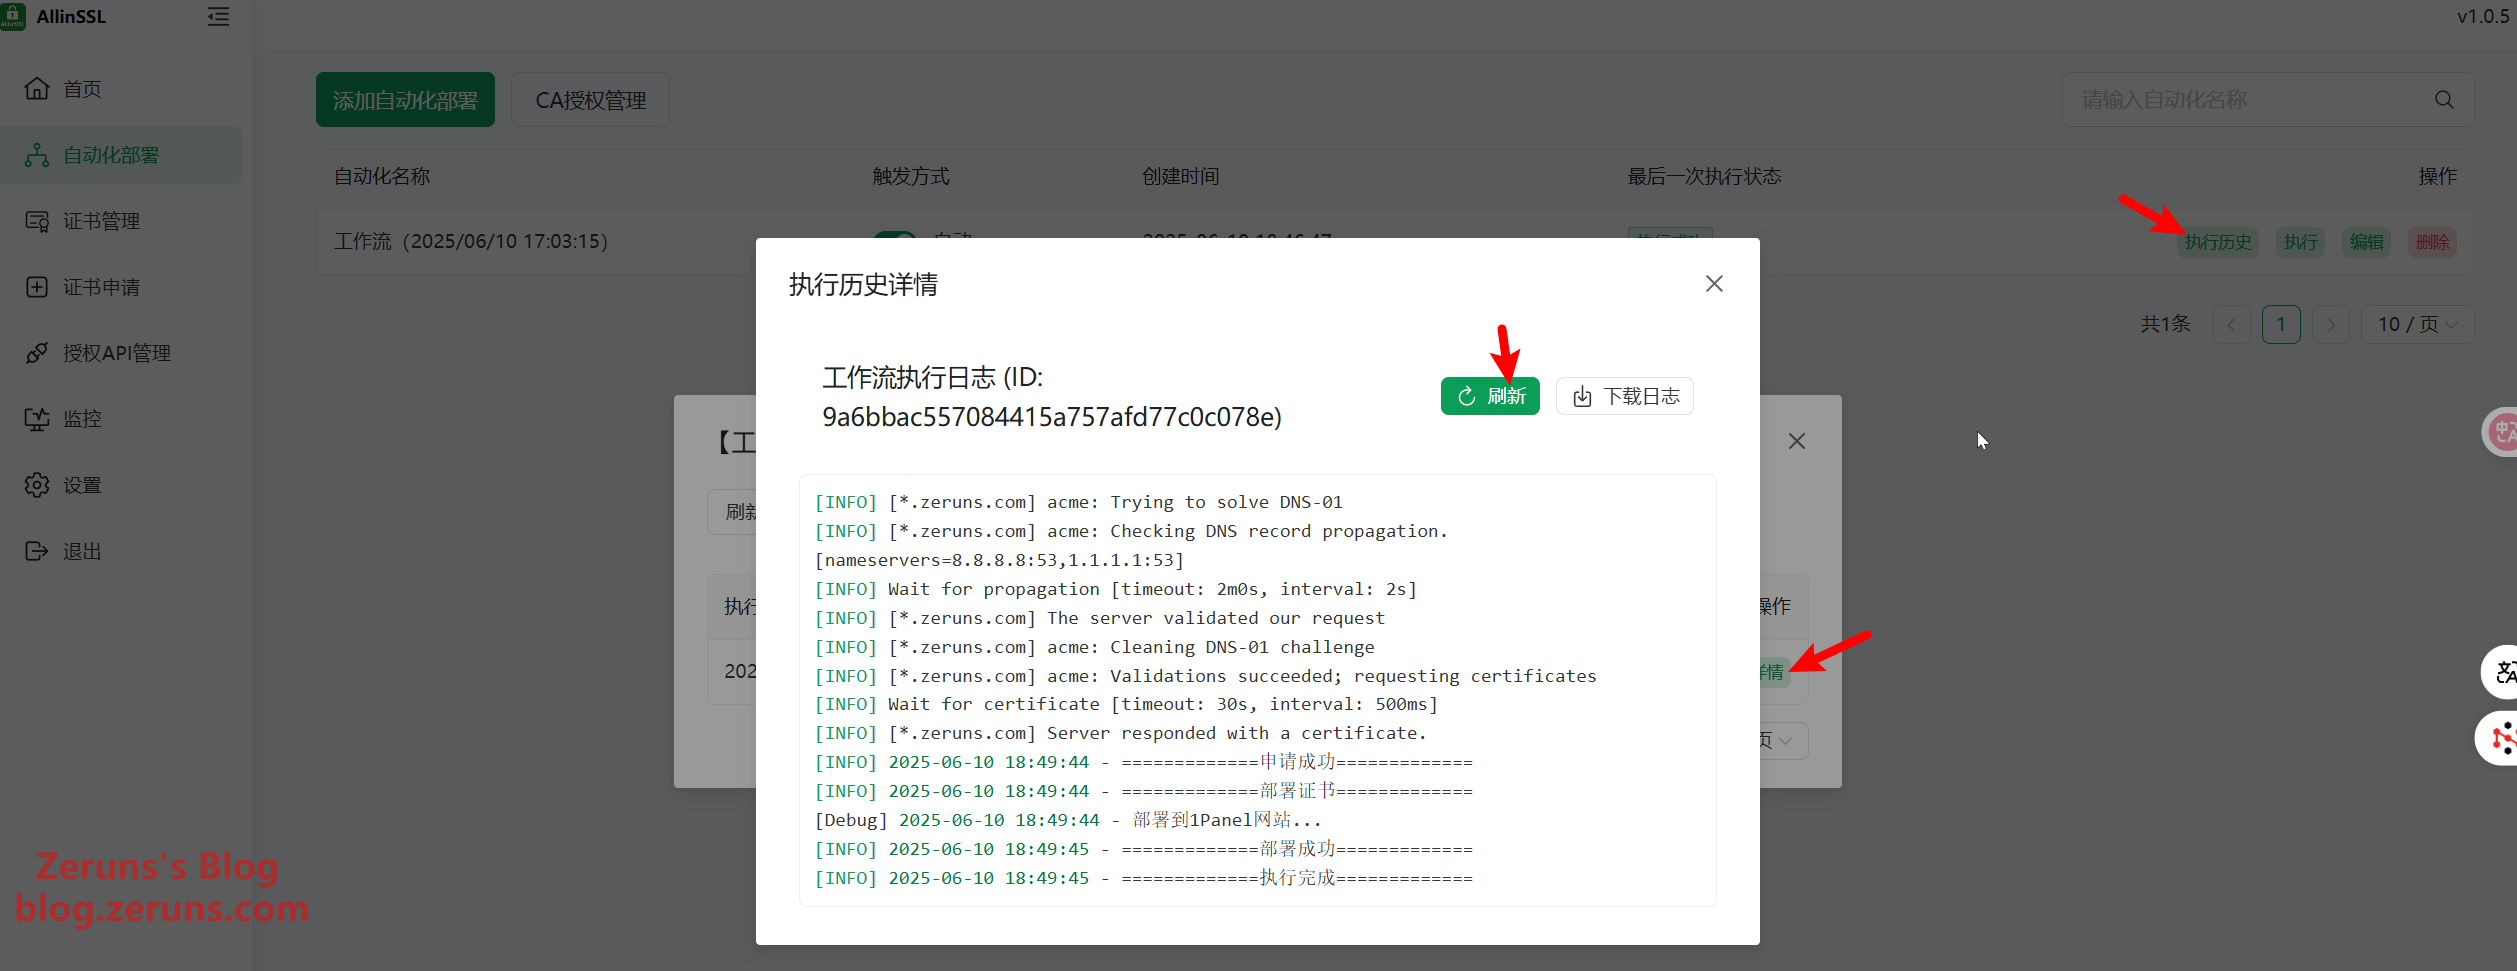
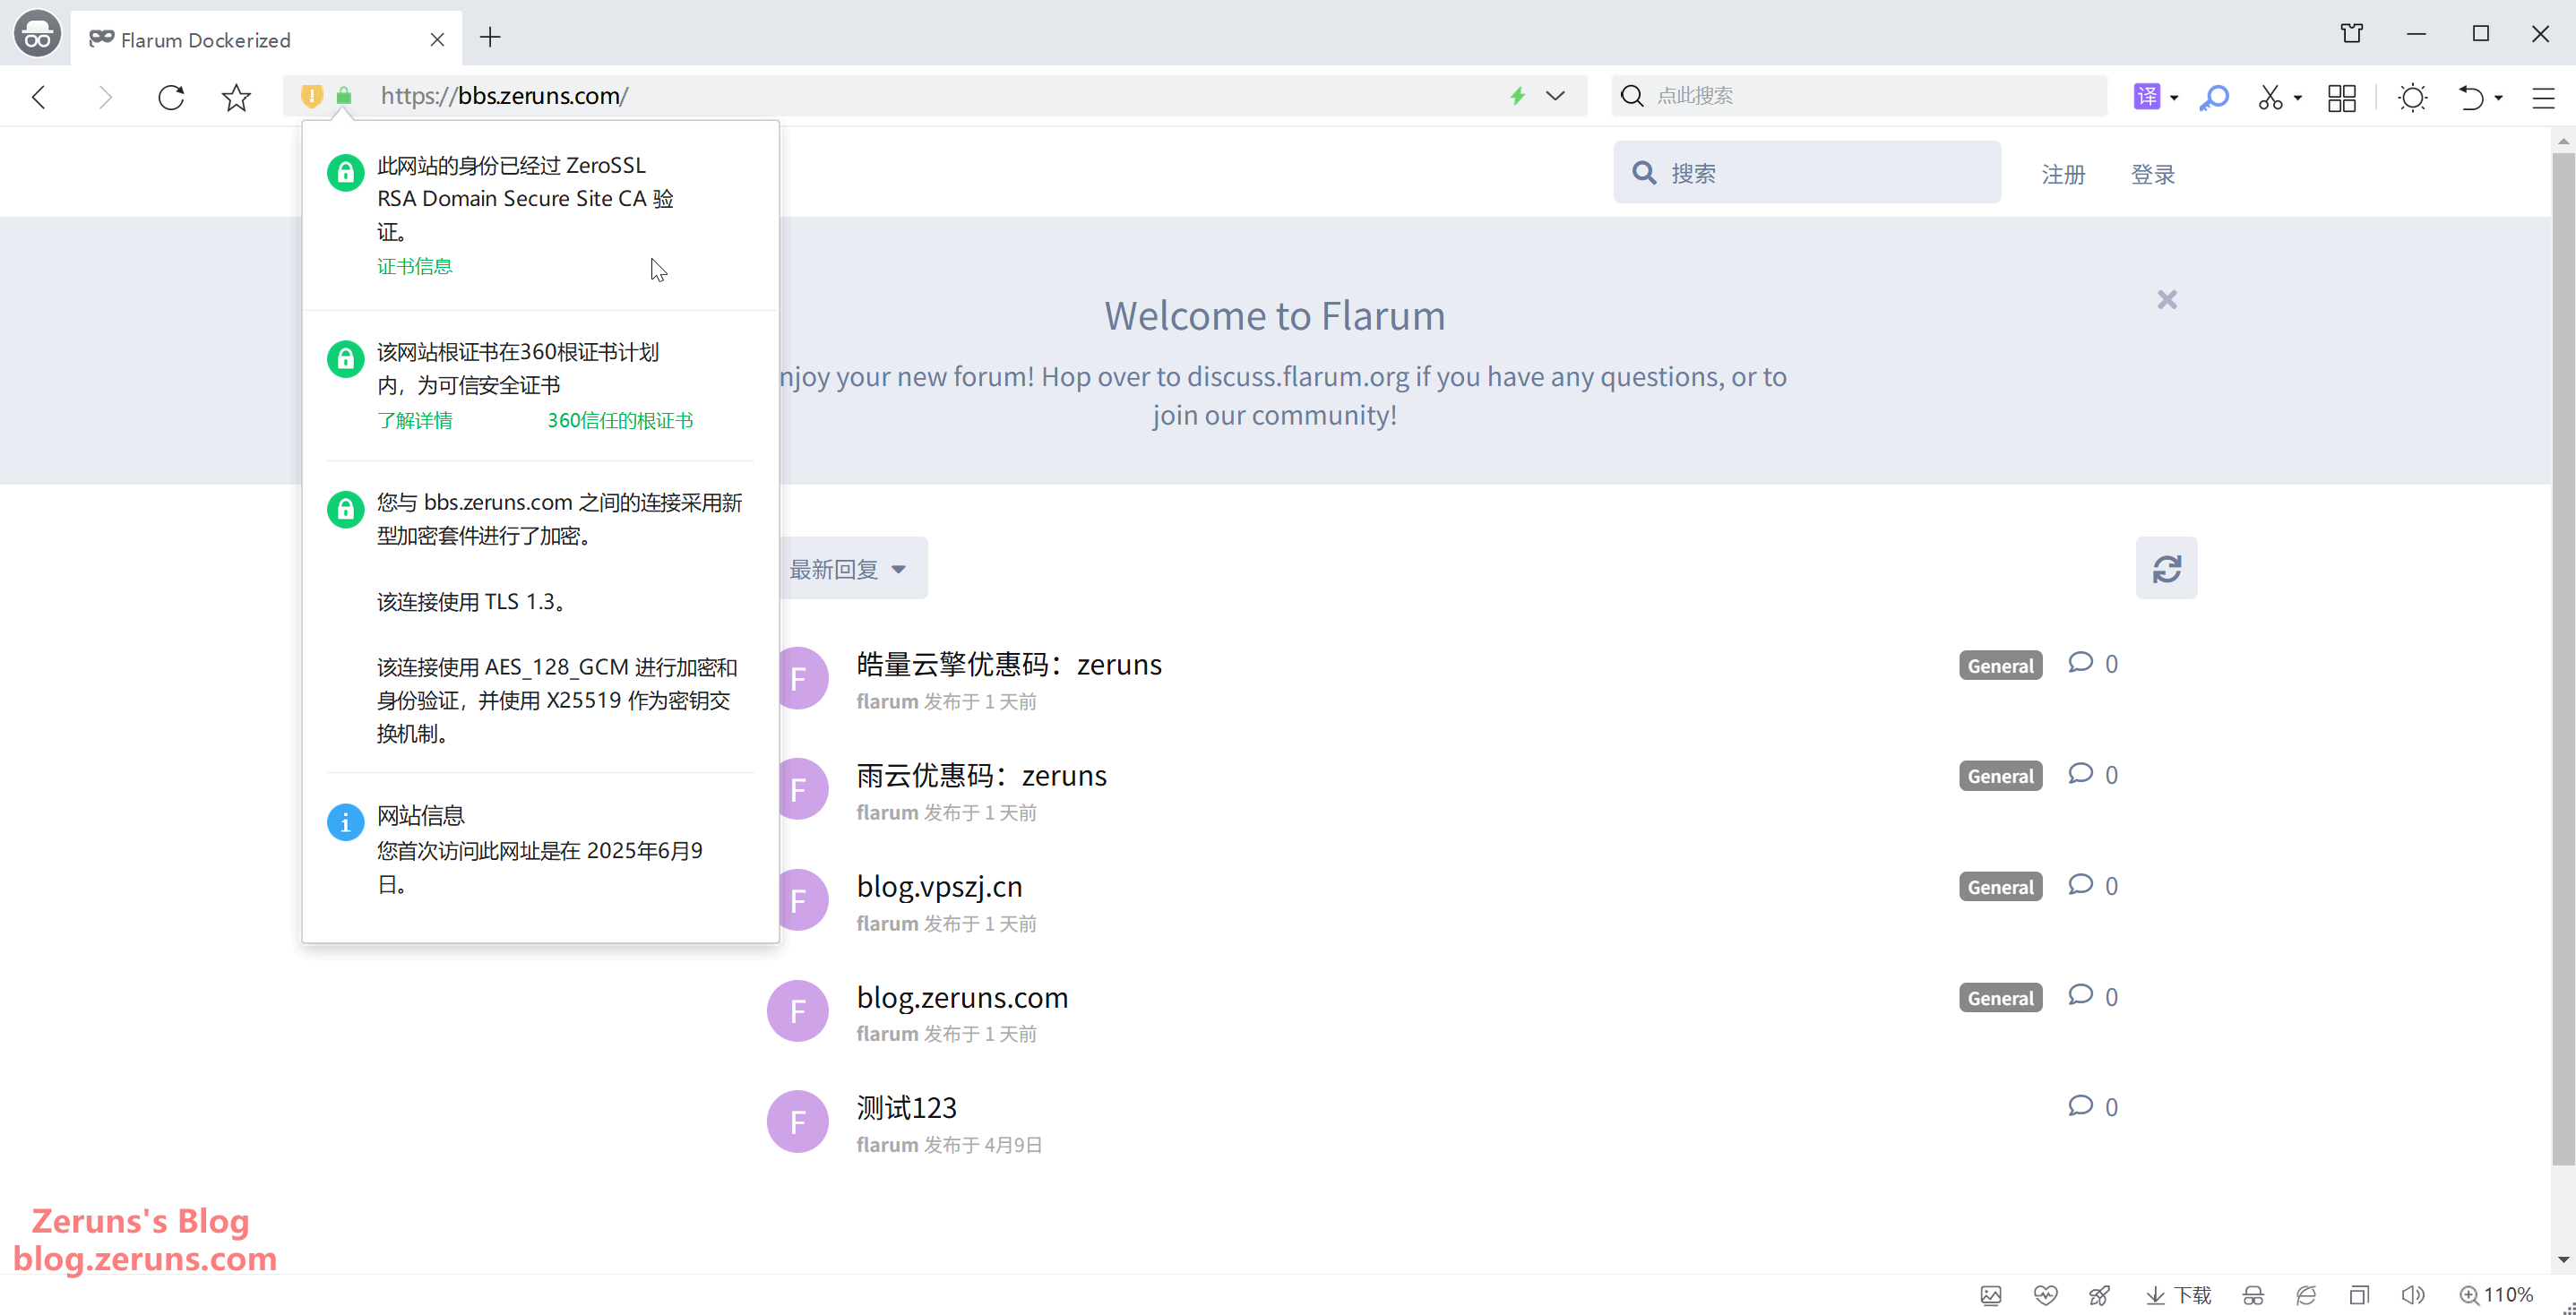
Reload your site, and it should now be accessible via HTTPS. The certificate has been deployed successfully. The system will automatically check the certificate validity daily, and if it's under 30 days, it will renew and redeploy the certificate automatically.
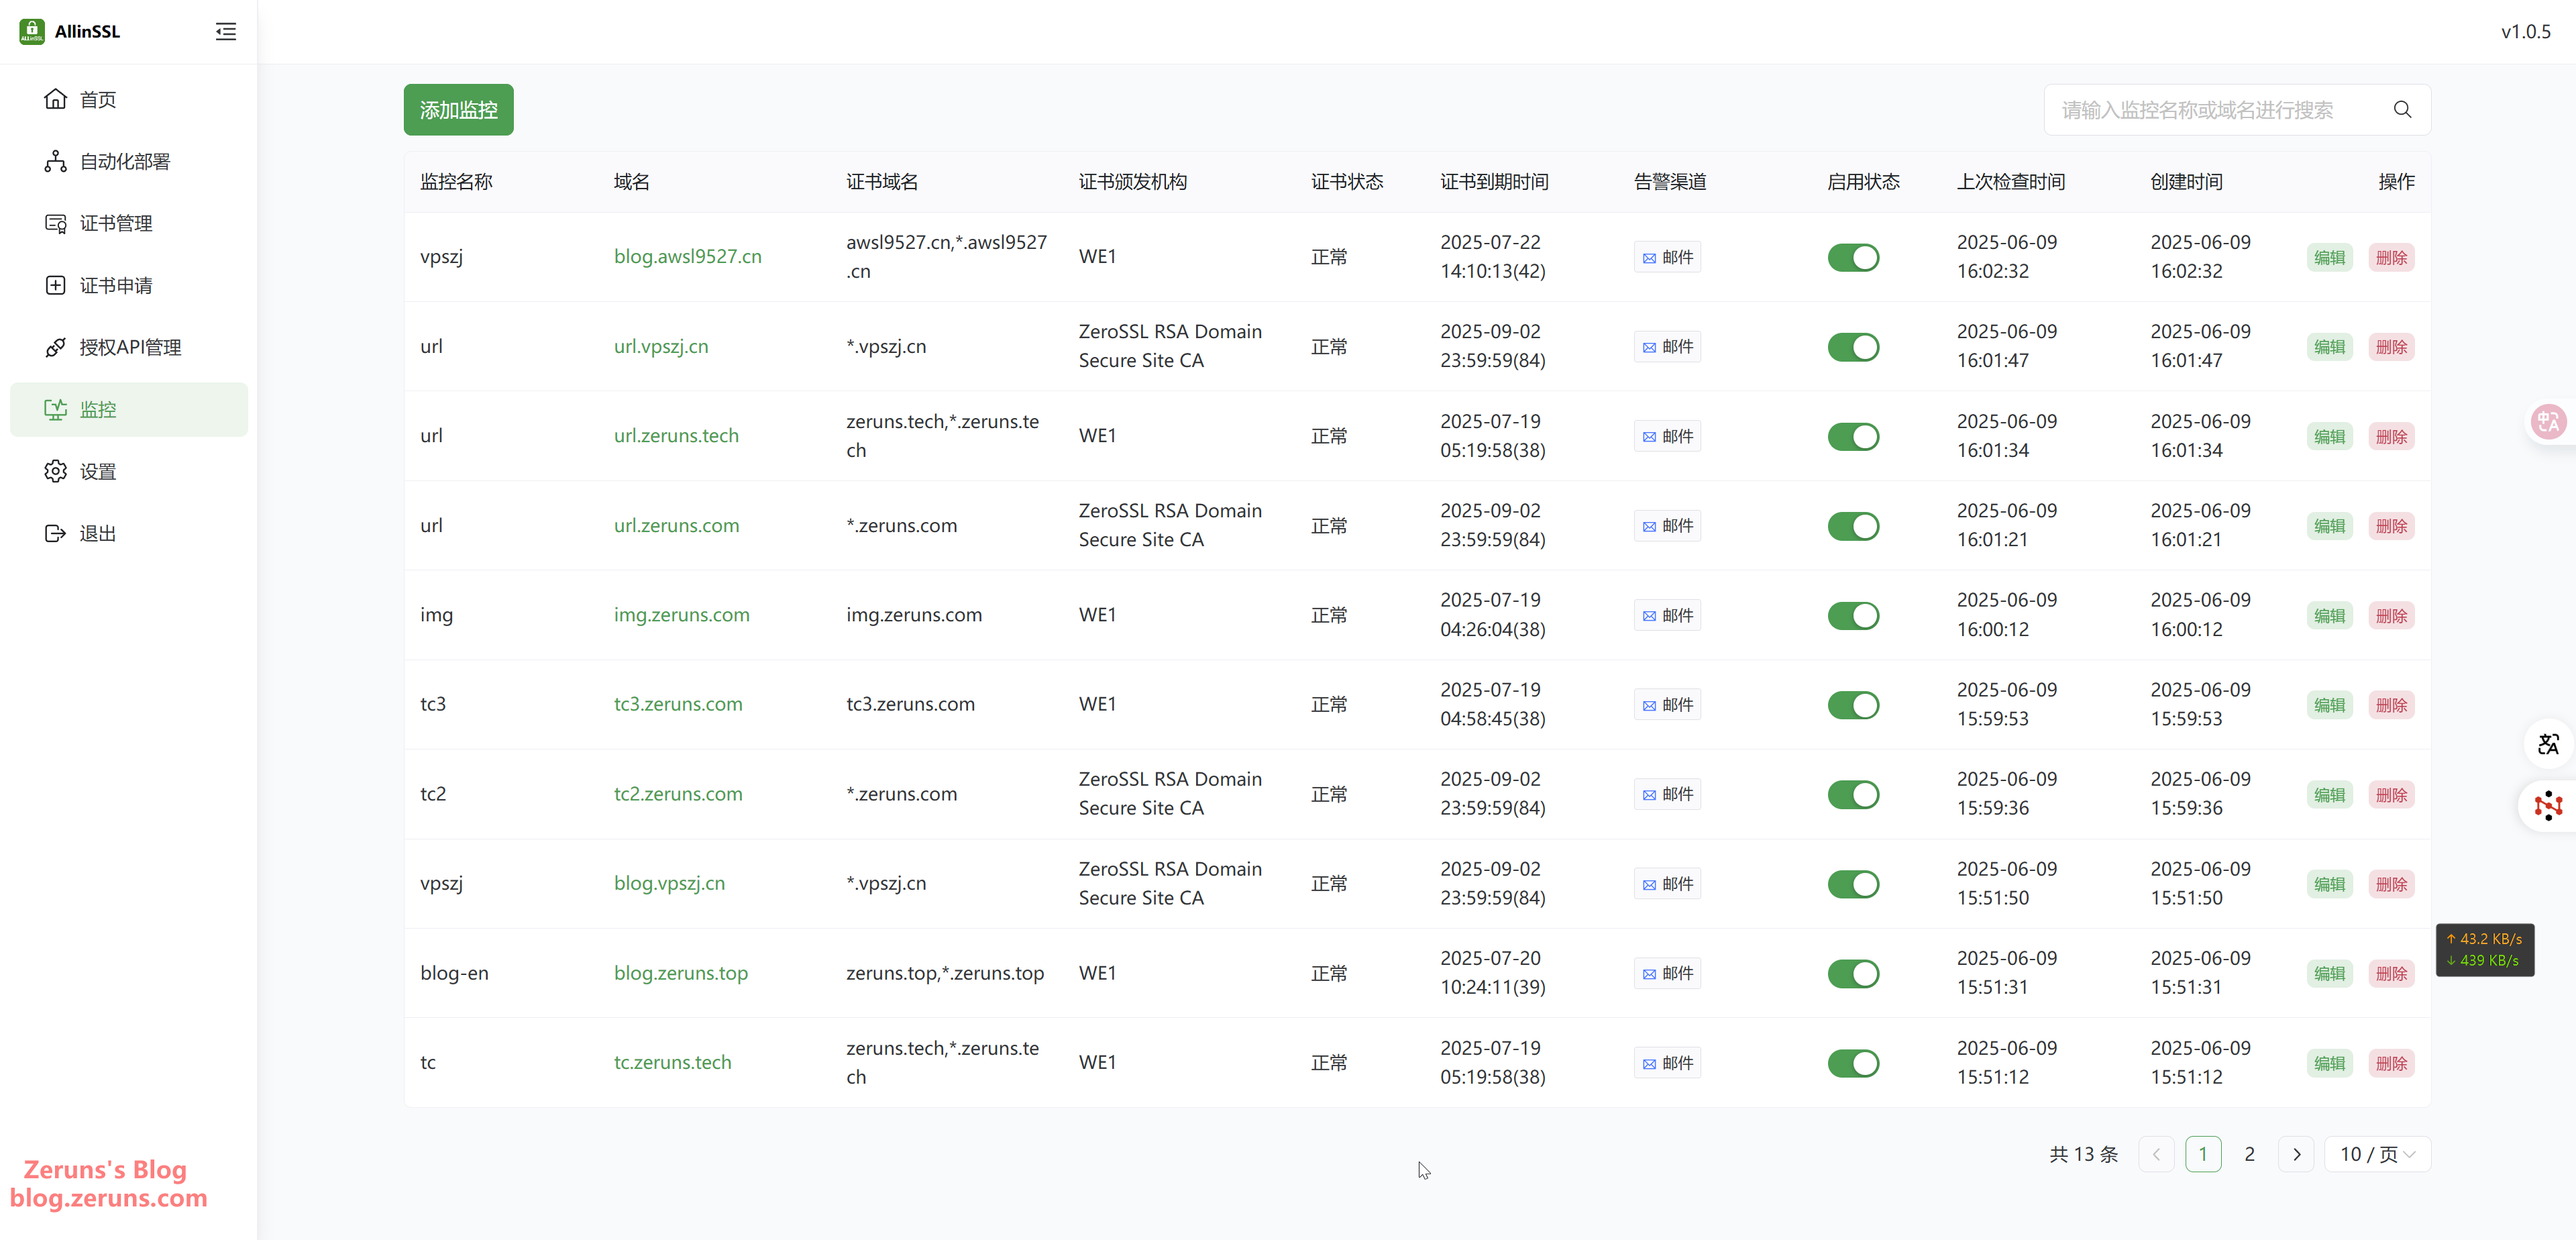
You can also enable certificate monitoring to track the validity of SSL certificates across your domains and receive alerts in case of issues.
Recommended Reading
- Cost-effective VPS/Cloud Server Recommendations:https://blog.zeruns.com/archives/383.html
- Minecraft Server Setup Guide: https://blog.zeruns.com/tag/mc/
- BT Cloud WAF Setup and Usage Guide: https://blog.zeruns.top/archives/56.html
- My DIY Solar Station: 3 Panels, 4kWh Daily Output: https://blog.zeruns.top/archives/55.html
- Open-source Type-C Dock with 4x 10Gbps USB-A + 2.5G NIC + Card Reader: https://blog.zeruns.top/archives/53.html
- One-click Minecraft Bedrock Server Deployment on Rainyun (K8s-based): https://blog.zeruns.top/archives/57.html


Comment Section