


A tutorial on building a personal blog website using Linux+Docker+1Panel+Halo. A guide for setting up a website without ICP filing. A completely beginner-friendly, step-by-step guide to launching your blog site. With just a theme change, it can also serve as a corporate website!
No programming skills required | Containerized deployment | Fully open-source solution | Supports HTTPS
Video Tutorial: https://www.bilibili.com/video/BV11nPMeKEdK/
Other Website Setup Tutorials Recommended:
- Setting Up a Personal Typecho Blog on a Cloud Server – A Comprehensive Tutorial: https://blog.zeruns.com/archives/749.html
- Quick Setup of a Personal Blog on a Cloud Server with Baota Panel + Gridea: https://blog.zeruns.com/archives/783.html
- How to Set Up Your Own Domain Email Server? A Poste.io Email Server Setup Guide: https://blog.zeruns.com/archives/822.html
- Quickly Build a Cloudreve File Hosting Website on a YuYun Server and Mount YuYun Object Storage: https://blog.zeruns.com/archives/743.html
- Setting Up a Discuz Forum on Linux – A Website Setup Tutorial: https://blog.zeruns.com/archives/681.html
Introduction
What Is a Personal Blog?
A personal blog is a platform for publishing one's own articles, images, videos, and other content on the internet. Although it is primarily text-based, it can also include other media.
The uses of a personal blog are vast. It can serve as a diary for the blogger's daily life, a medium to share knowledge and experiences, a showcase for one's work and skills, and a forum for expressing personal opinions and viewpoints. Through a personal blog, the blogger can connect with readers, share insights and experiences, and also receive feedback and suggestions.
The term "blog" originated from "weblog"—a combination of the words "web" and "log," literally meaning "online diary." Later, enthusiasts deliberately altered its pronunciation to "we blog," thus coining the term "blog." In Chinese, it is known as 网志 or 网络日志, though in mainland China, both "Blog" and "blogger" (i.e., the blog author) are often transliterated as “博客.”
A personal blog is the "digital diary" of the internet era. Through continuous content output, it can achieve:
- 💡 Accumulation of knowledge and sharing of experiences
- 💰 Monetizing personal branding (via advertising or paid content)
- 🚀 An ideal testing ground for technical practice
- 📈 A tool for acquiring SEO traffic
Webmaster Discussion Group: 767557452
Introduction to Halo
Halo is a domestically developed, open-source website building tool based on Spring Boot. It supports reactive programming (WebFlux) and is compatible with multiple databases (such as H2 and MySQL). Its core positioning is as a lightweight, user-friendly, and fully featured blog framework, offering the following advantages:
- Out-of-the-Box Usability: Comes with a built-in Markdown editor, category/tag management, and multi-theme switching (supporting development with the Freemarker template engine), enabling you to set up a dynamic blog without complex configurations.
- Highly Extensible: Supports plugin-based extensions (such as comment systems and gallery management) and integrates with third-party storage services like Qiniu Cloud and Alibaba Cloud OSS.
- Flexible Deployment: Provides both Docker images and native Java deployment options, is compatible with Linux servers, and supports domain access through Nginx reverse proxy.
- Secure and Efficient: Utilizes container isolation, an RBAC permission model, and a reactive architecture to ensure stability in high-concurrency scenarios.
It is well-suited for personal blogs, technical documentation, and other lightweight sites, especially for users who want to set up quickly with some degree of customization.
Halo Official Website: https://www.lxware.cn?code=zeruns (Use this link or the discount code zeruns to receive 20% off the professional edition, though the free version is generally sufficient.)
Halo Documentation: https://url.zeruns.com/halo_docs
My English blog is built using Halo. Check it out: https://blog.zeruns.top/
Introduction to 1Panel
1Panel is a modern, open-source Linux server operations and management panel based on Docker container technology, designed to simplify server management and website deployment. Its core features include rapid site creation, efficient management, robust security, and one-click backup and restore, making it ideal for beginners and developers looking to quickly set up personal or corporate websites.
Key Features:
- One-Click Website Creation: Deeply integrates popular website builders like WordPress and Halo, supports domain binding and automatic SSL certificate configuration, and allows users to install directly from the app store without manually setting up the environment.
- Visual Operations Management: Offers a web-based graphical interface that supports file management, database operations, container orchestration, and real-time monitoring (CPU, memory, disk, etc.), thereby reducing the reliance on Linux command line operations.
- Security and Extensibility: Ensures security by minimizing vulnerability exposure, configuring firewalls, and employing container isolation techniques; also supports reverse proxy, static website deployment, and multi-language runtime environments (PHP/Java/Python, etc.) to meet diverse requirements.
- Cross-Platform Compatibility: Compatible with mainstream Linux distributions (such as Ubuntu and CentOS) and ARM architectures, supporting both cloud servers and local virtual machine deployments.
Applicable Scenarios: Ideal for setting up lightweight sites such as personal blogs, corporate websites, forums, etc.—especially for users seeking efficiency, security, and reduced operational complexity.
1Panel Official Website: https://www.lxware.cn?code=zeruns (Use this link or the discount code zeruns to receive 20% off the professional edition, though the free version is generally sufficient.)
Why Choose Linux+Docker?
- Linux: The mainstream server operating system, known for its low resource consumption and strong stability.
- Docker: Containerization technology that provides environment isolation, avoids dependency conflicts, and boosts deployment efficiency by 80%.
Overview of the Setup Process
- Register a domain name
- Purchase a cloud server
- Domain filing (can be ignored if not using mainland servers)
- Install the 1Panel control panel and Docker
- Create a Halo website
- Configure the website
Domain Name Registration
What Is a Domain Name?
A domain name is essentially the "address plate" of a website, used to replace the hard-to-remember string of IP numbers (such as 192.168.1.1). For example, by entering blog.zeruns.com, you can access a specific website without the need to memorize its server IP.
A domain name is structured into three parts:
- TLD (e.g.,
.com) – indicates the type of website - Main domain (e.g.,
zeruns) – a custom name - Subdomain (e.g.,
blog) – can be set freely
When a user inputs a domain name, the DNS system automatically converts it into the server's IP address to complete the connection. To register a domain name, you typically purchase it through platforms like Alibaba Cloud (around 50 CNY per year), and then bind the domain to your server's IP for resolution. A good domain name should be short and memorable; for instance, taobao.com leaves a lasting impression thanks to its catchy sound.
Registering a Domain Name
You can register your domain on platforms such as Tencent Cloud, Alibaba Cloud, or Rainyun. Alternatively, you can use Rainyun's free secondary domain.
- Tencent Cloud discount registration: https://curl.qcloud.com/rbDL8jYd
- Alibaba Cloud discount registration: https://www.aliyun.com/minisite/goods?userCode=jdjc69nf
- Rainyun discount registration: https://www.rainyun.com/zeruns_?s=blog-en
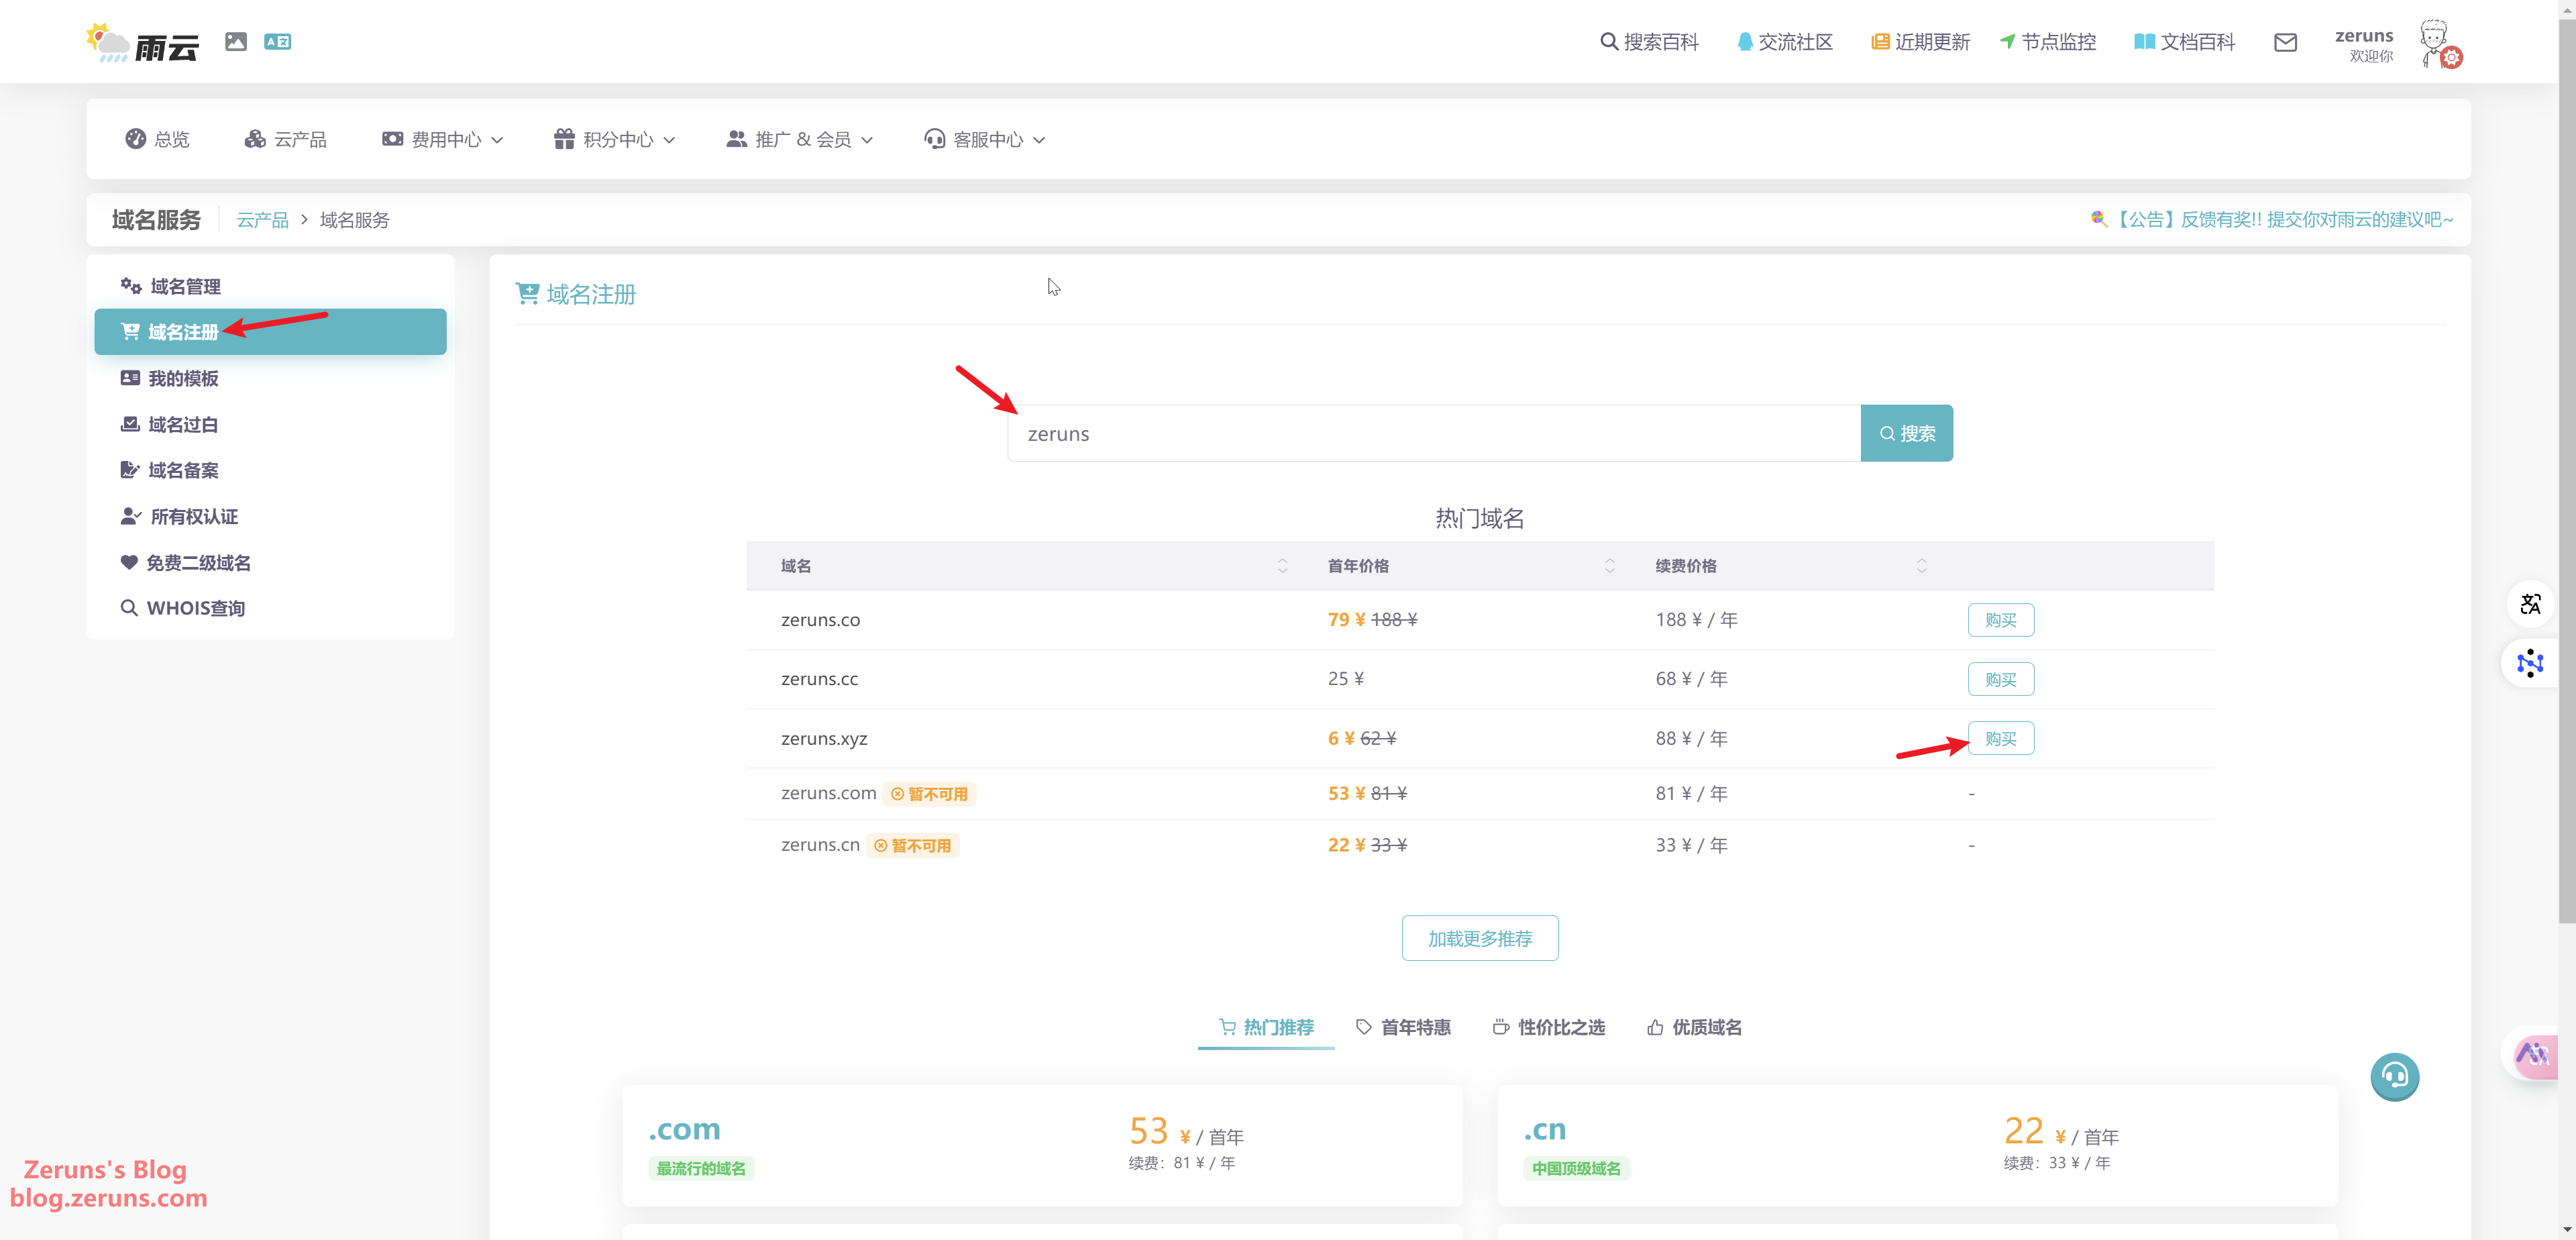
Below, we take Rainyun as an example to register the domain zeruns.xyz.
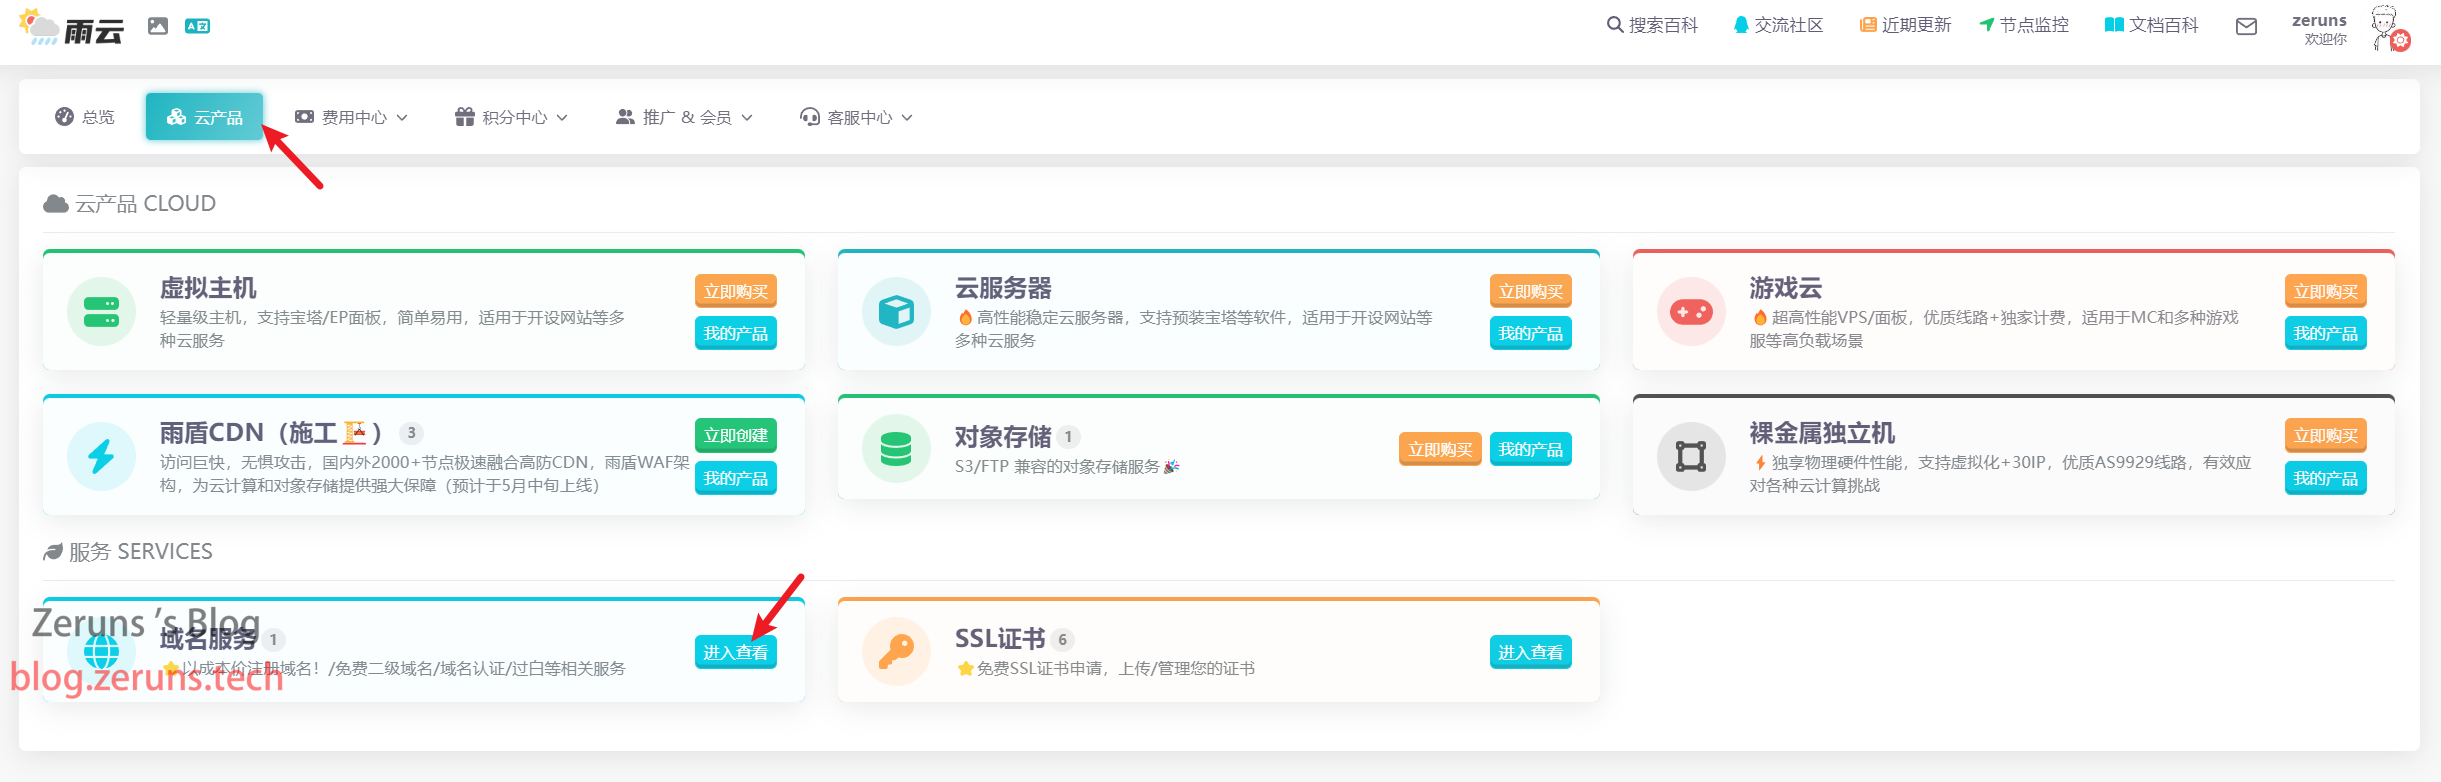
Locate the domain services in the cloud products section.
Click on Register Domain and search for the domain you want to register.
Follow the prompts and enter the required information.
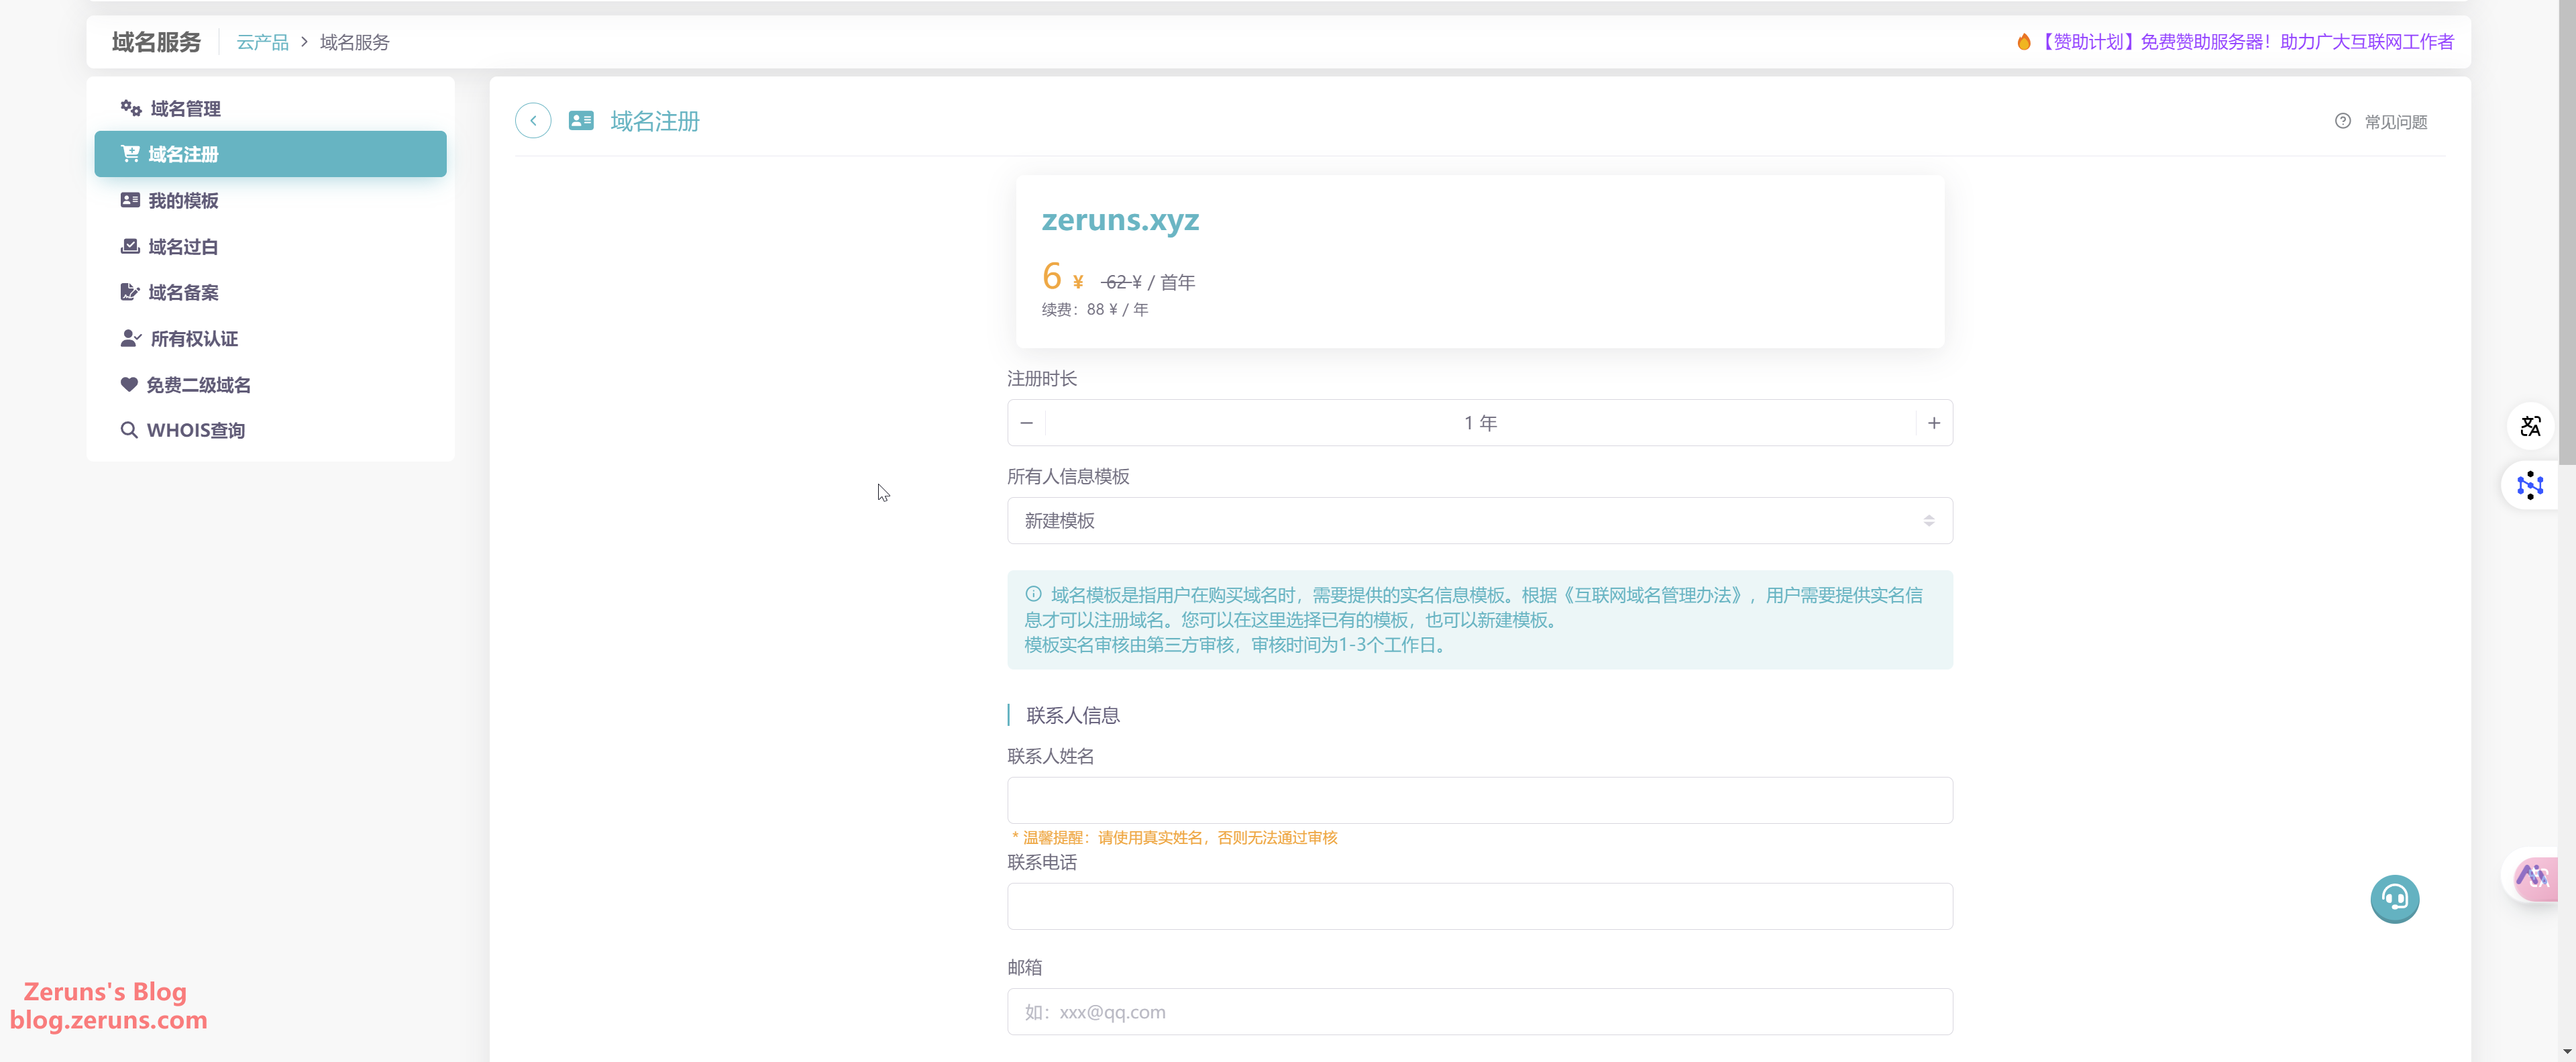
After filling in the information, click Register Now and wait for the approval process to complete.

If you are using a server located in mainland China, you will also need to complete domain filing.
The filing process won't be detailed here—you can look it up on your own.
Friendly Tip: Purchasing a cloud server from major providers such as Tencent Cloud or Alibaba Cloud for three months or longer often includes free filing services. Similarly, domestic servers from Haoliang Yunqing and Rainyun may also offer free filing assistance.
Preparation
First, you need a cloud server with a public IP. I recommend using Haoliang Yunqing:
Haoliang Yunqing discount registration: https://www.haoliangyun.com/?source=blog-en&aff=zeruns
Invitation Code: zeruns (using this link or invitation code will grant you 50% and 80% discount coupons)
Other cloud server recommendations: https://blog.zeruns.com/archives/383.html
For a performance review of Haoliang Yunqing's Hong Kong lightweight servers, check out this article: https://blog.vpszj.cn/archives/2540.html
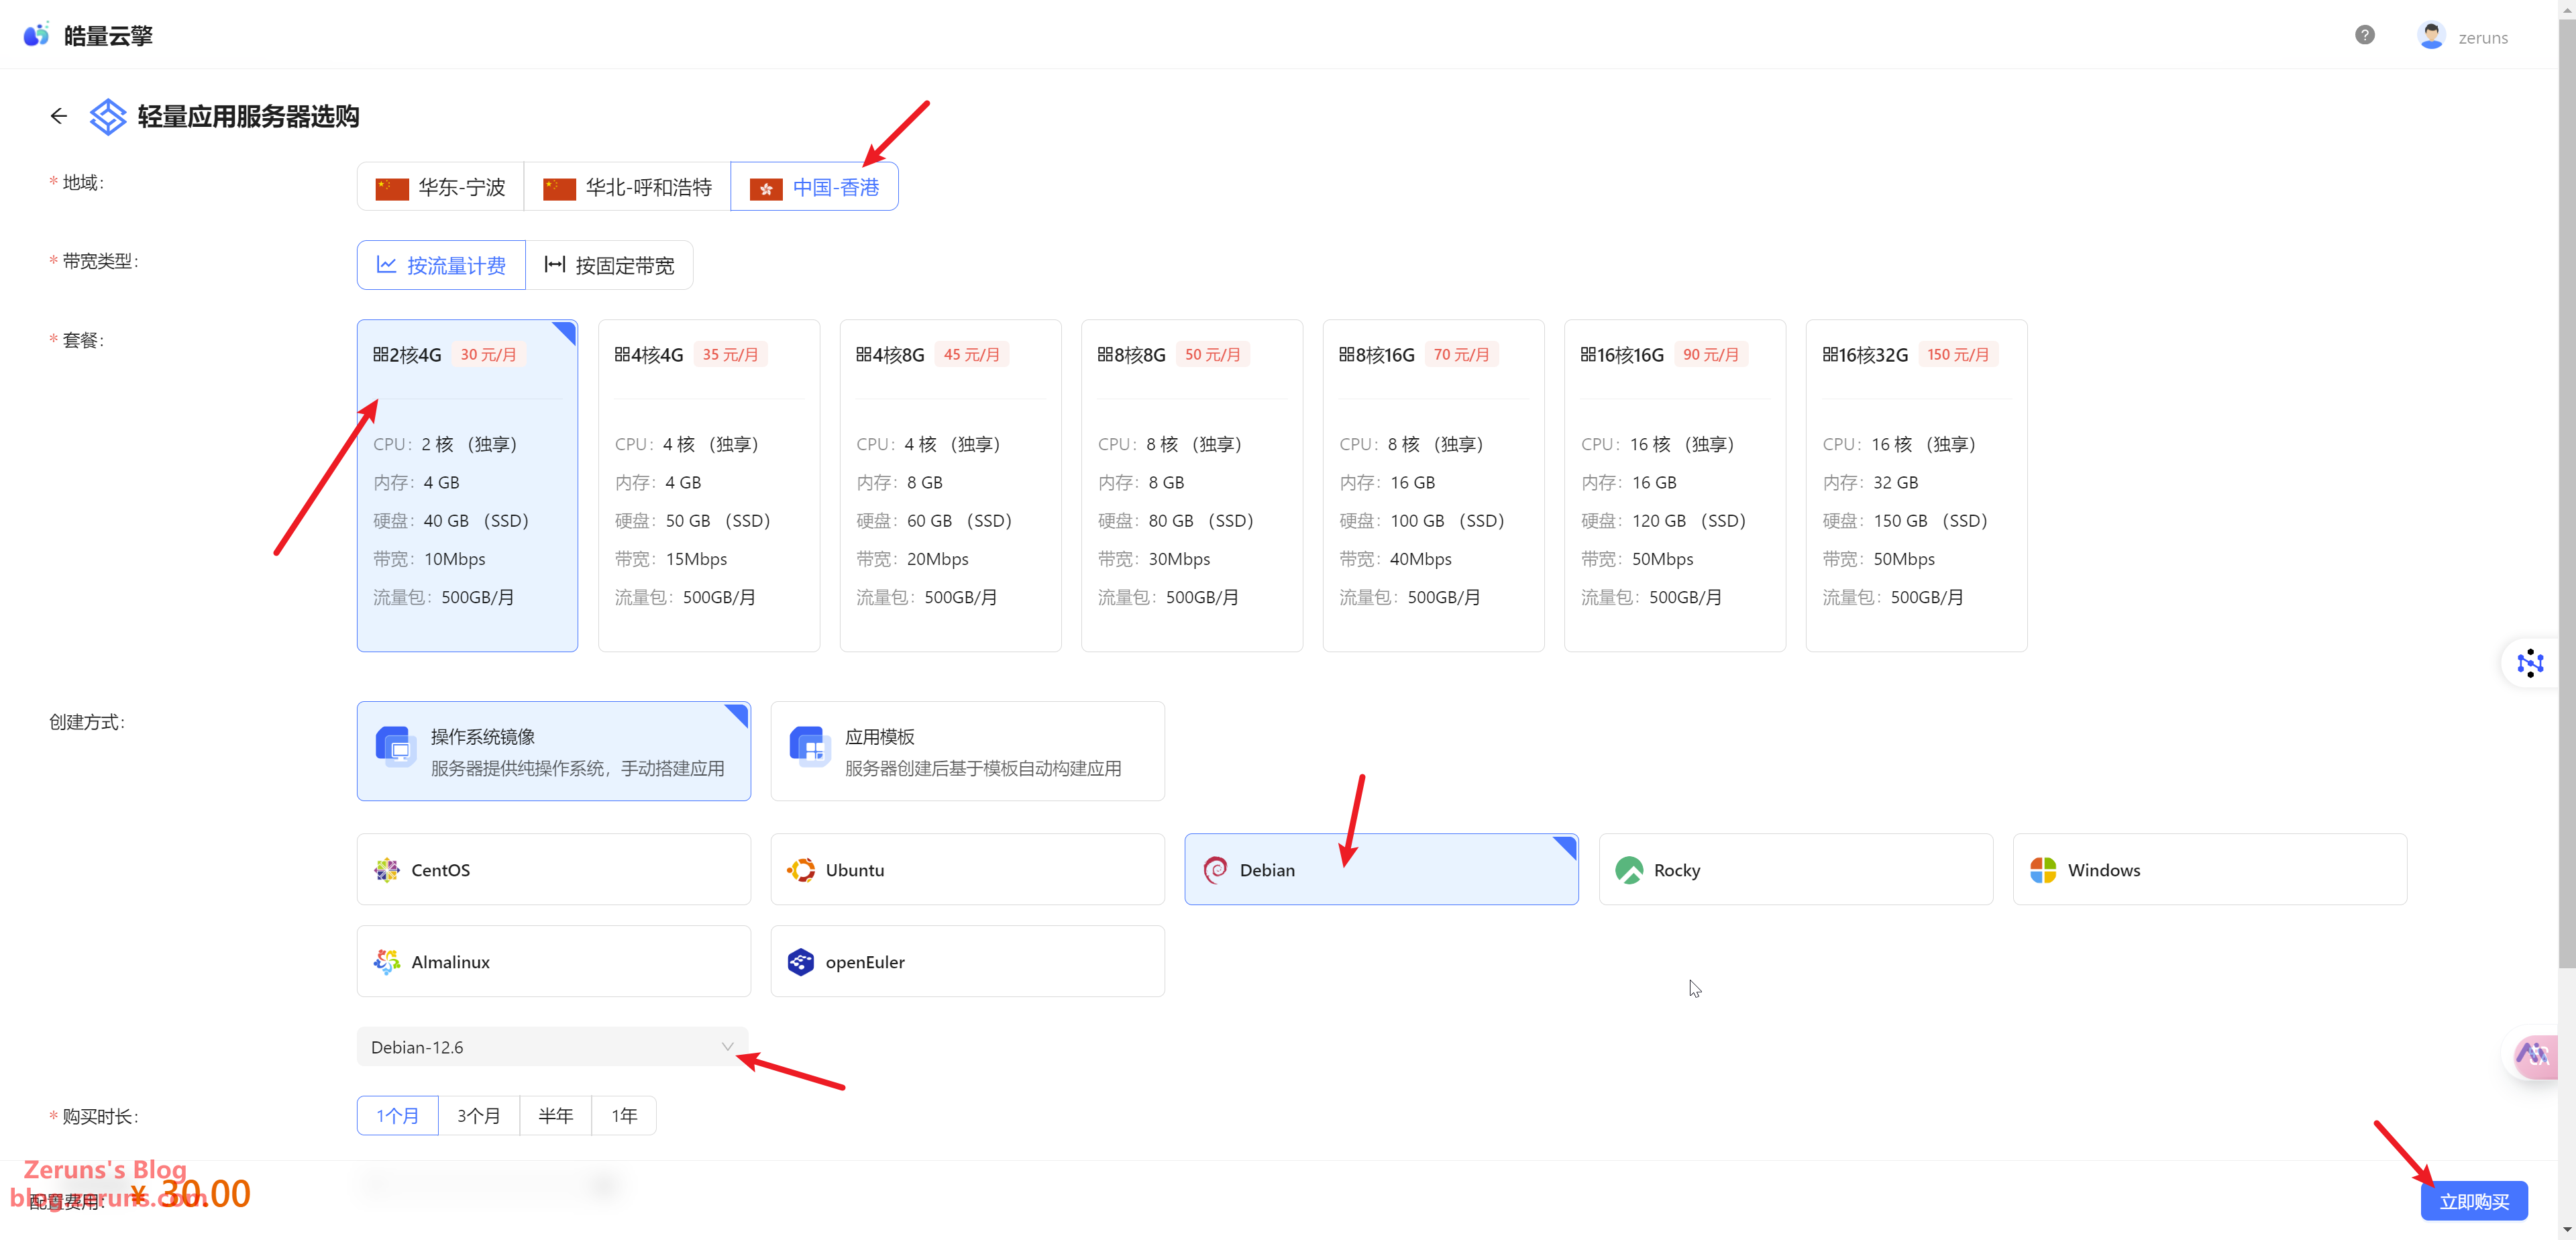
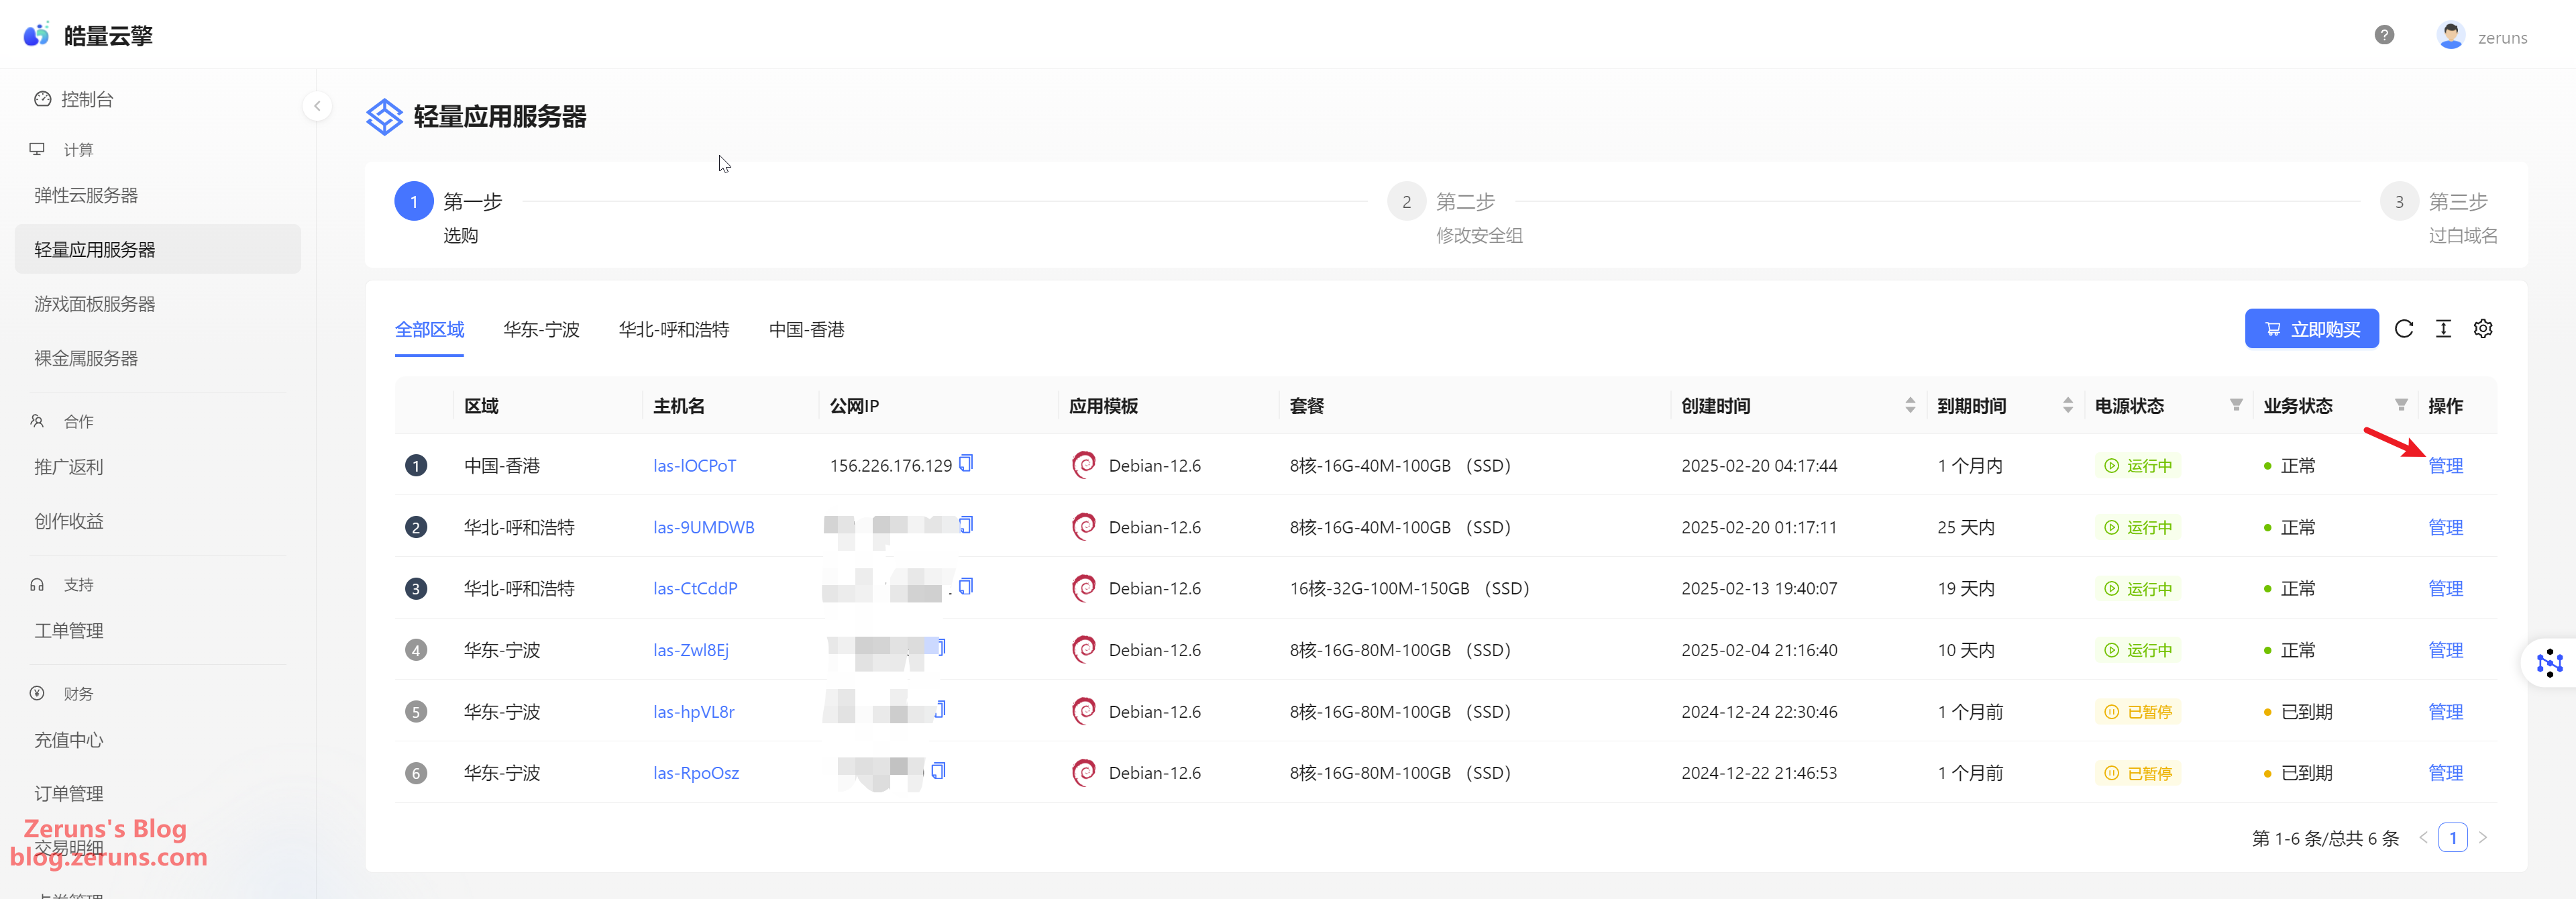
After registering an account, log in to the Haoliang Yunqing console. Click Lightweight Application Server → Buy Now, select the region Hong Kong, China (choosing a Hong Kong server means you do not need to complete domain filing, which is much more convenient. However, if your users are mainly from mainland China, it's recommended to choose a domestic server, such as one in Ningbo or Hohhot. Note that domestic servers require domain filing; you can contact customer support for assistance). For the package, select 2 cores, 4GB, choose Debian12 as the operating system, and then click Buy Now.
Click Manage to access the server console.
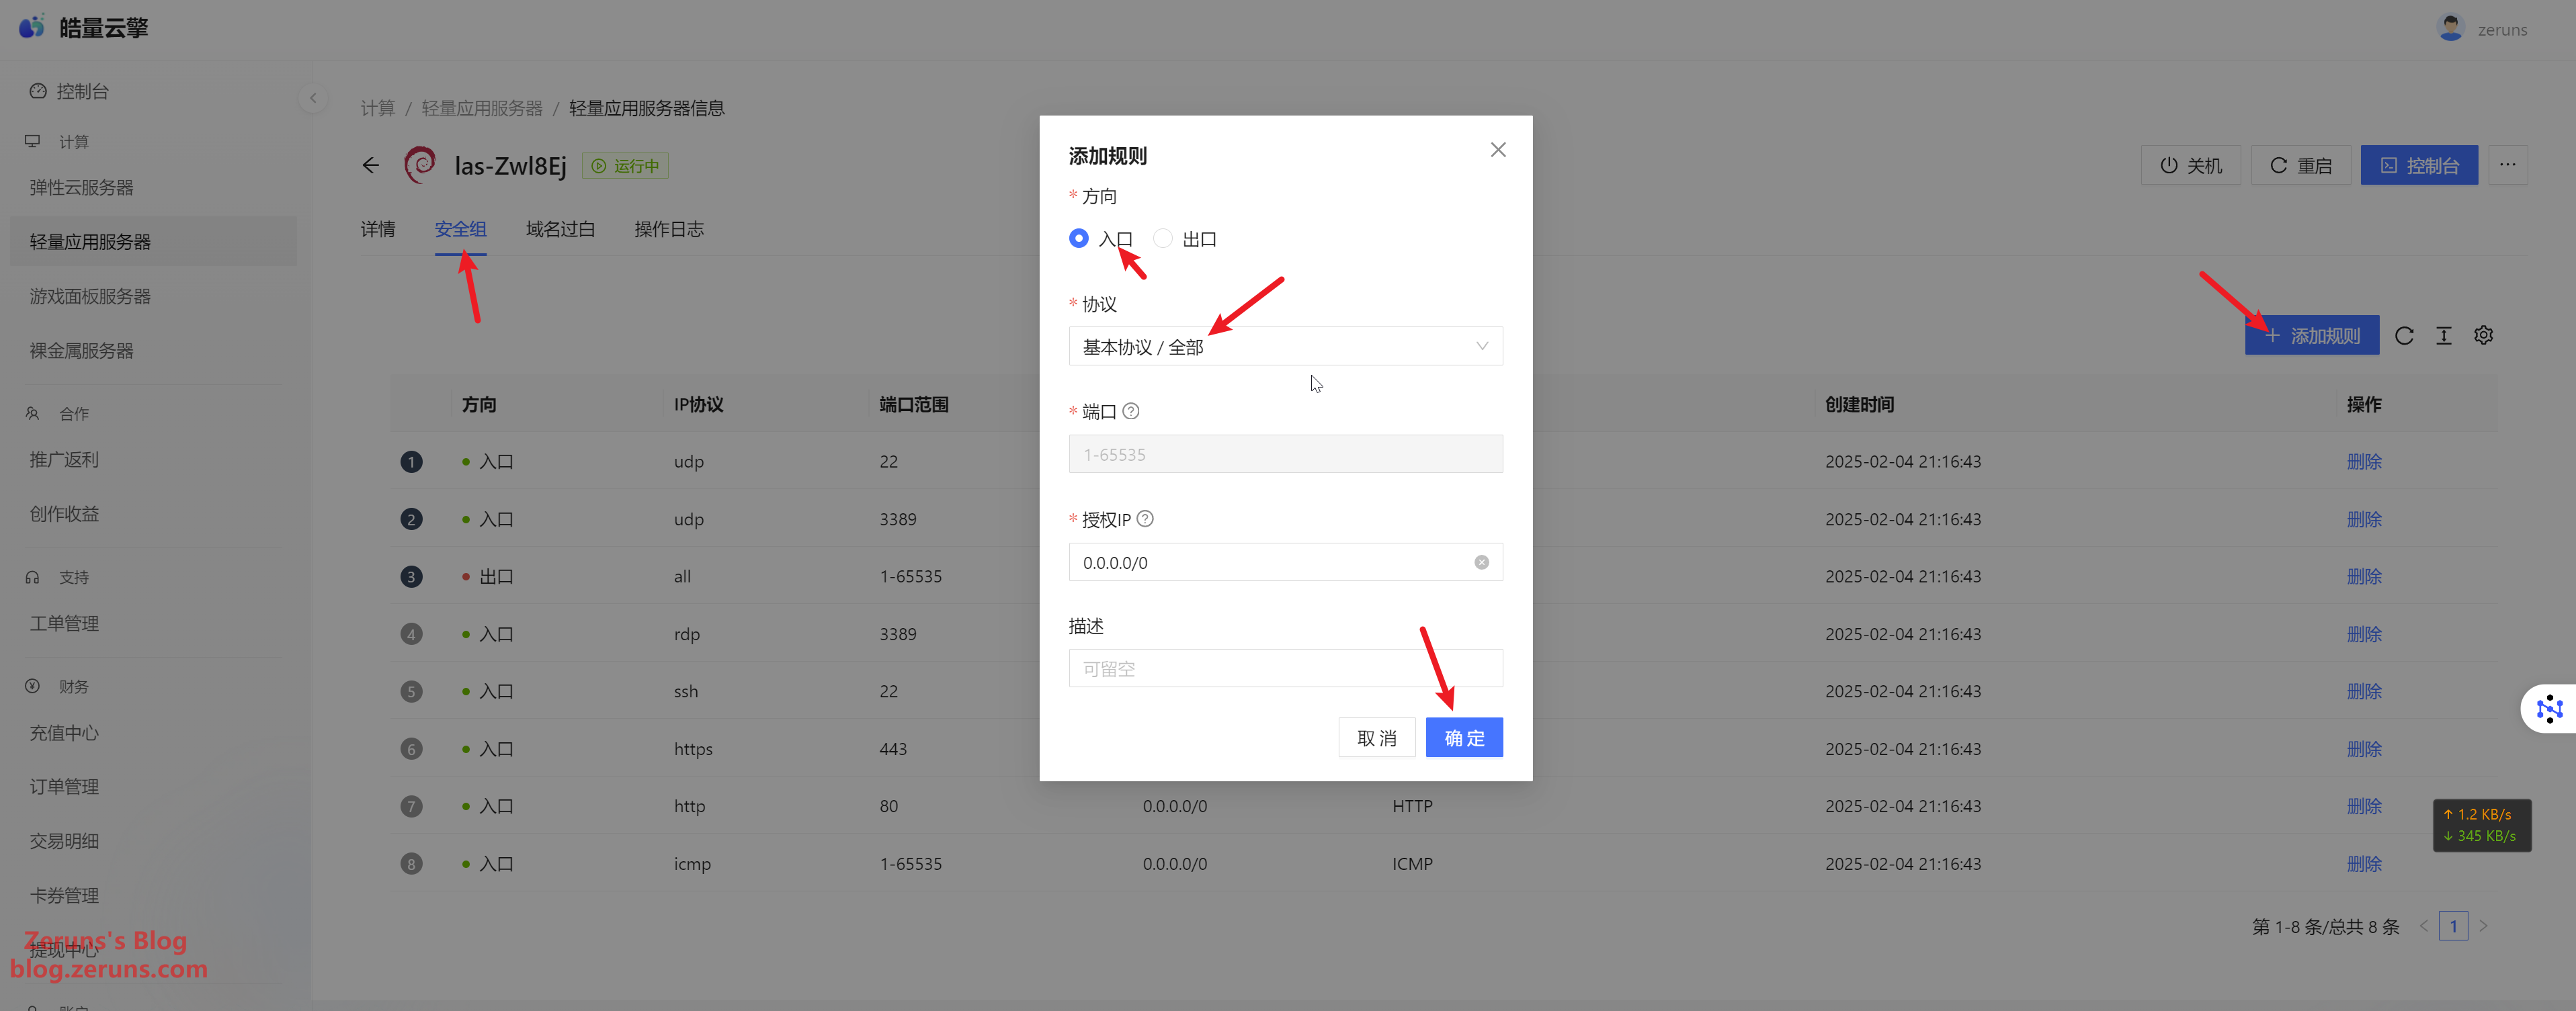
Next, click Security Group → Add Rule → Inbound and set it to open all ports (or only open the ports you will be using).
Connecting to the Server
Download and install an SSH client software. Recommended SSH clients include PuTTY or MobaXterm.
SSH client download link: https://www.123pan.com/ps/2Y9Djv-UAtvH.html
Here, I'm using MobaXterm. In the SSH client, enter your server's IP address (obtainable from the console) and the SSH port (default is 22), then click OK or Open.
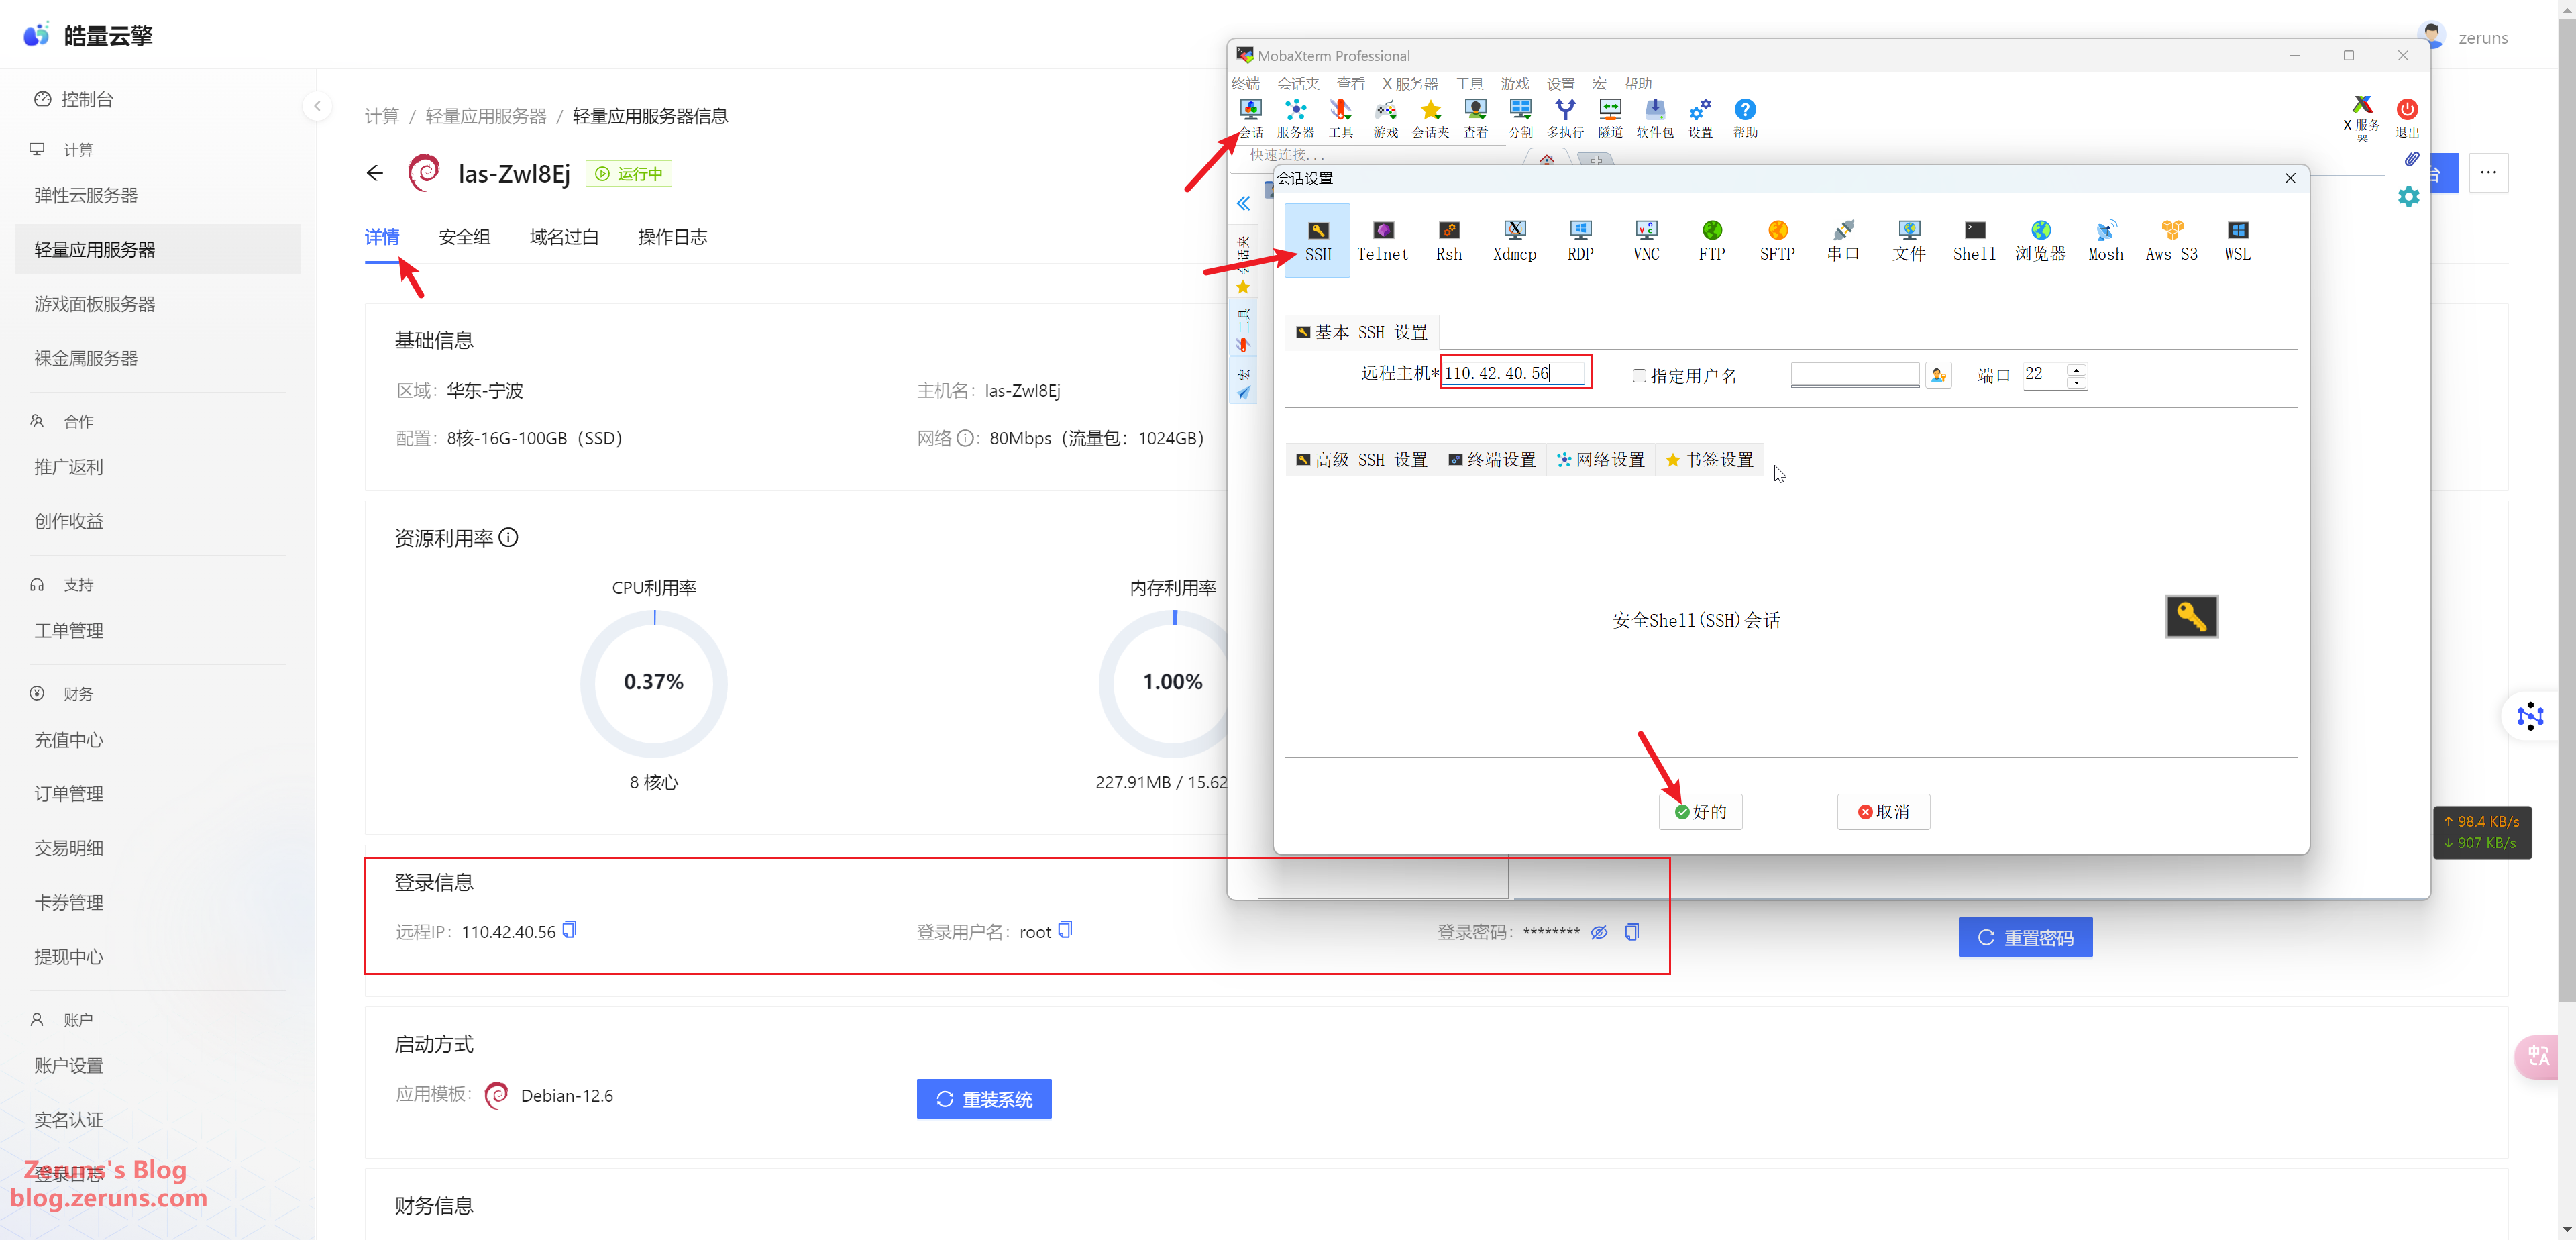
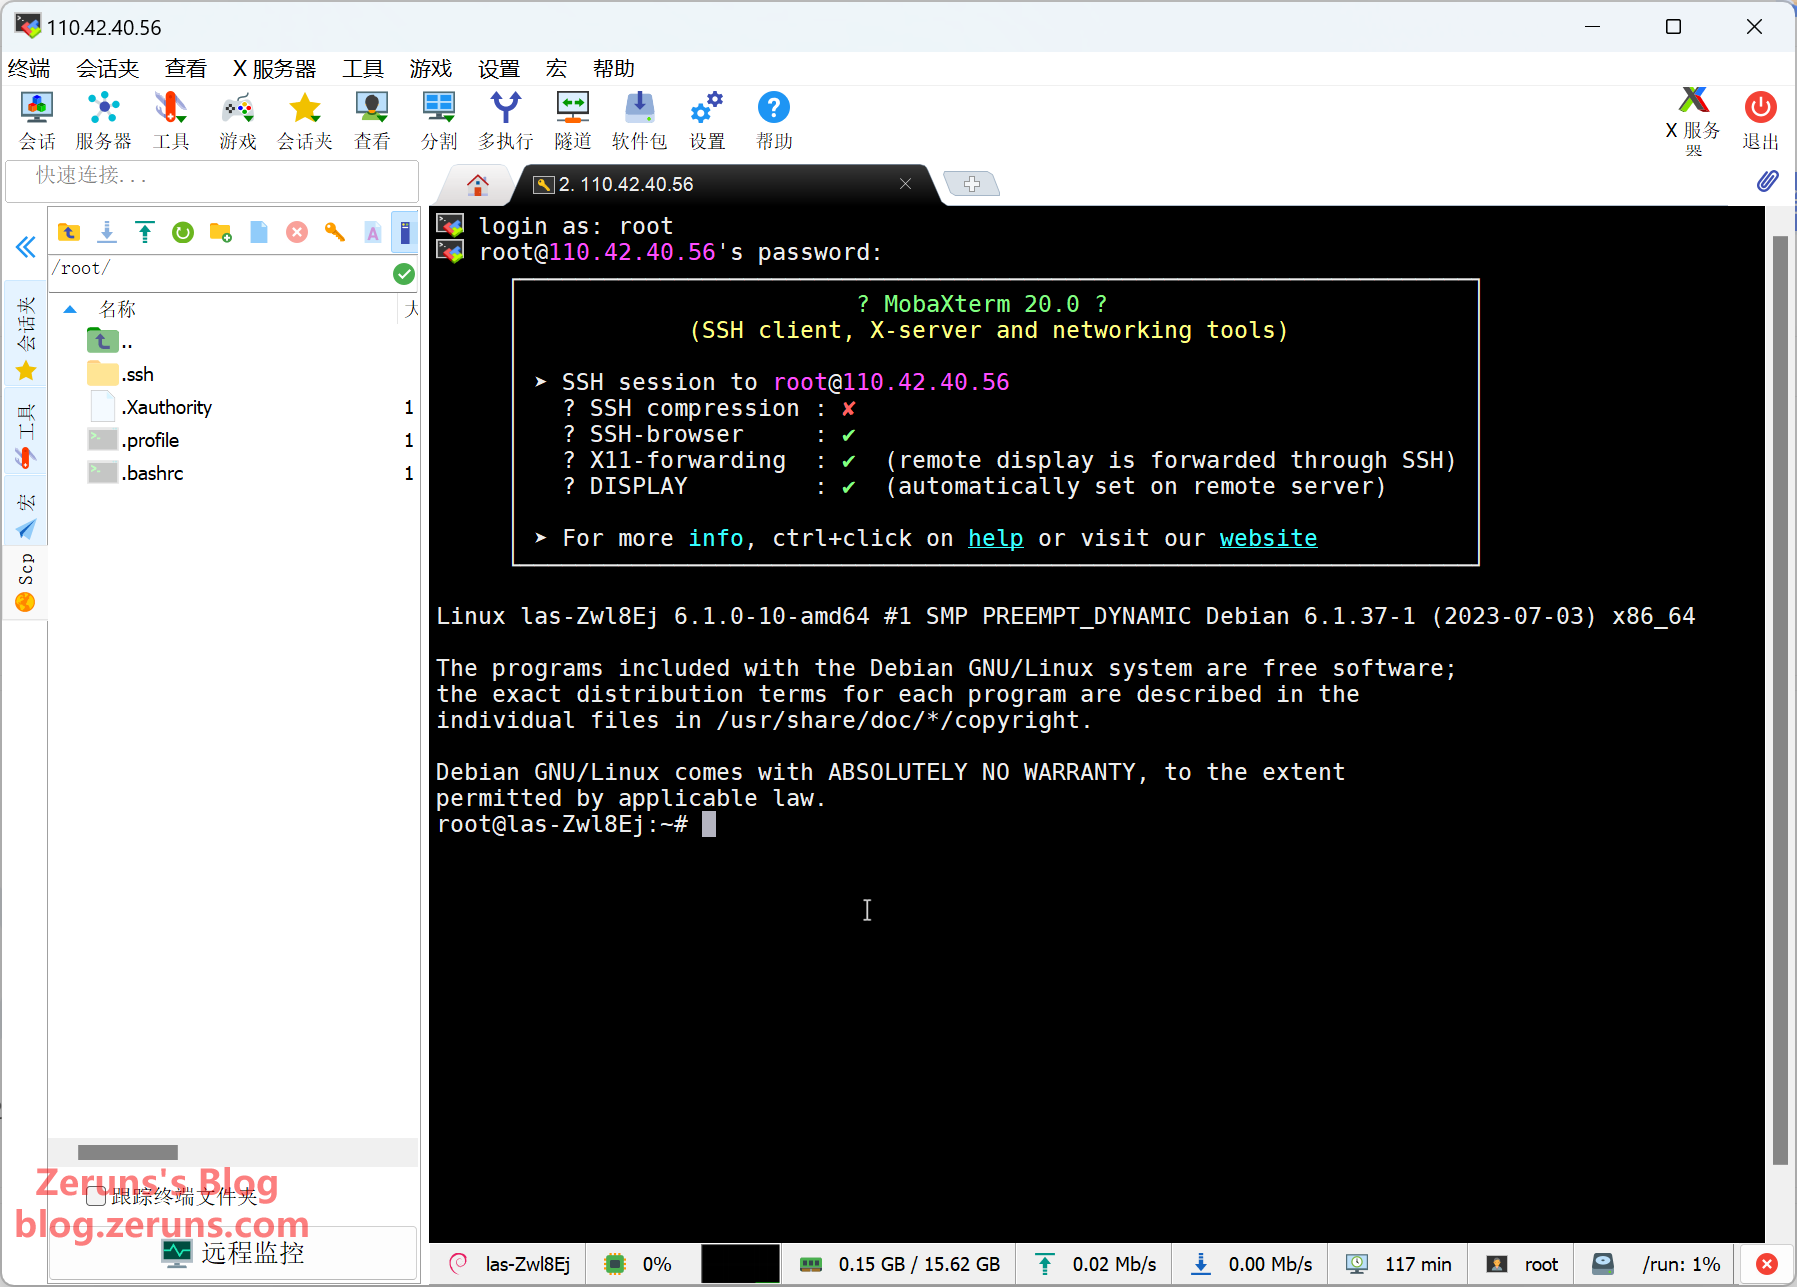
Next, enter your username and press Enter. The default username is usually root. Then, enter your password (found in the console) and press Enter. Note that the password will not be displayed as you type.
Pro Tip: In the SSH terminal, hold down the left mouse button to select text, then release and click on a blank area to copy the selected text; right-click in the terminal to paste.
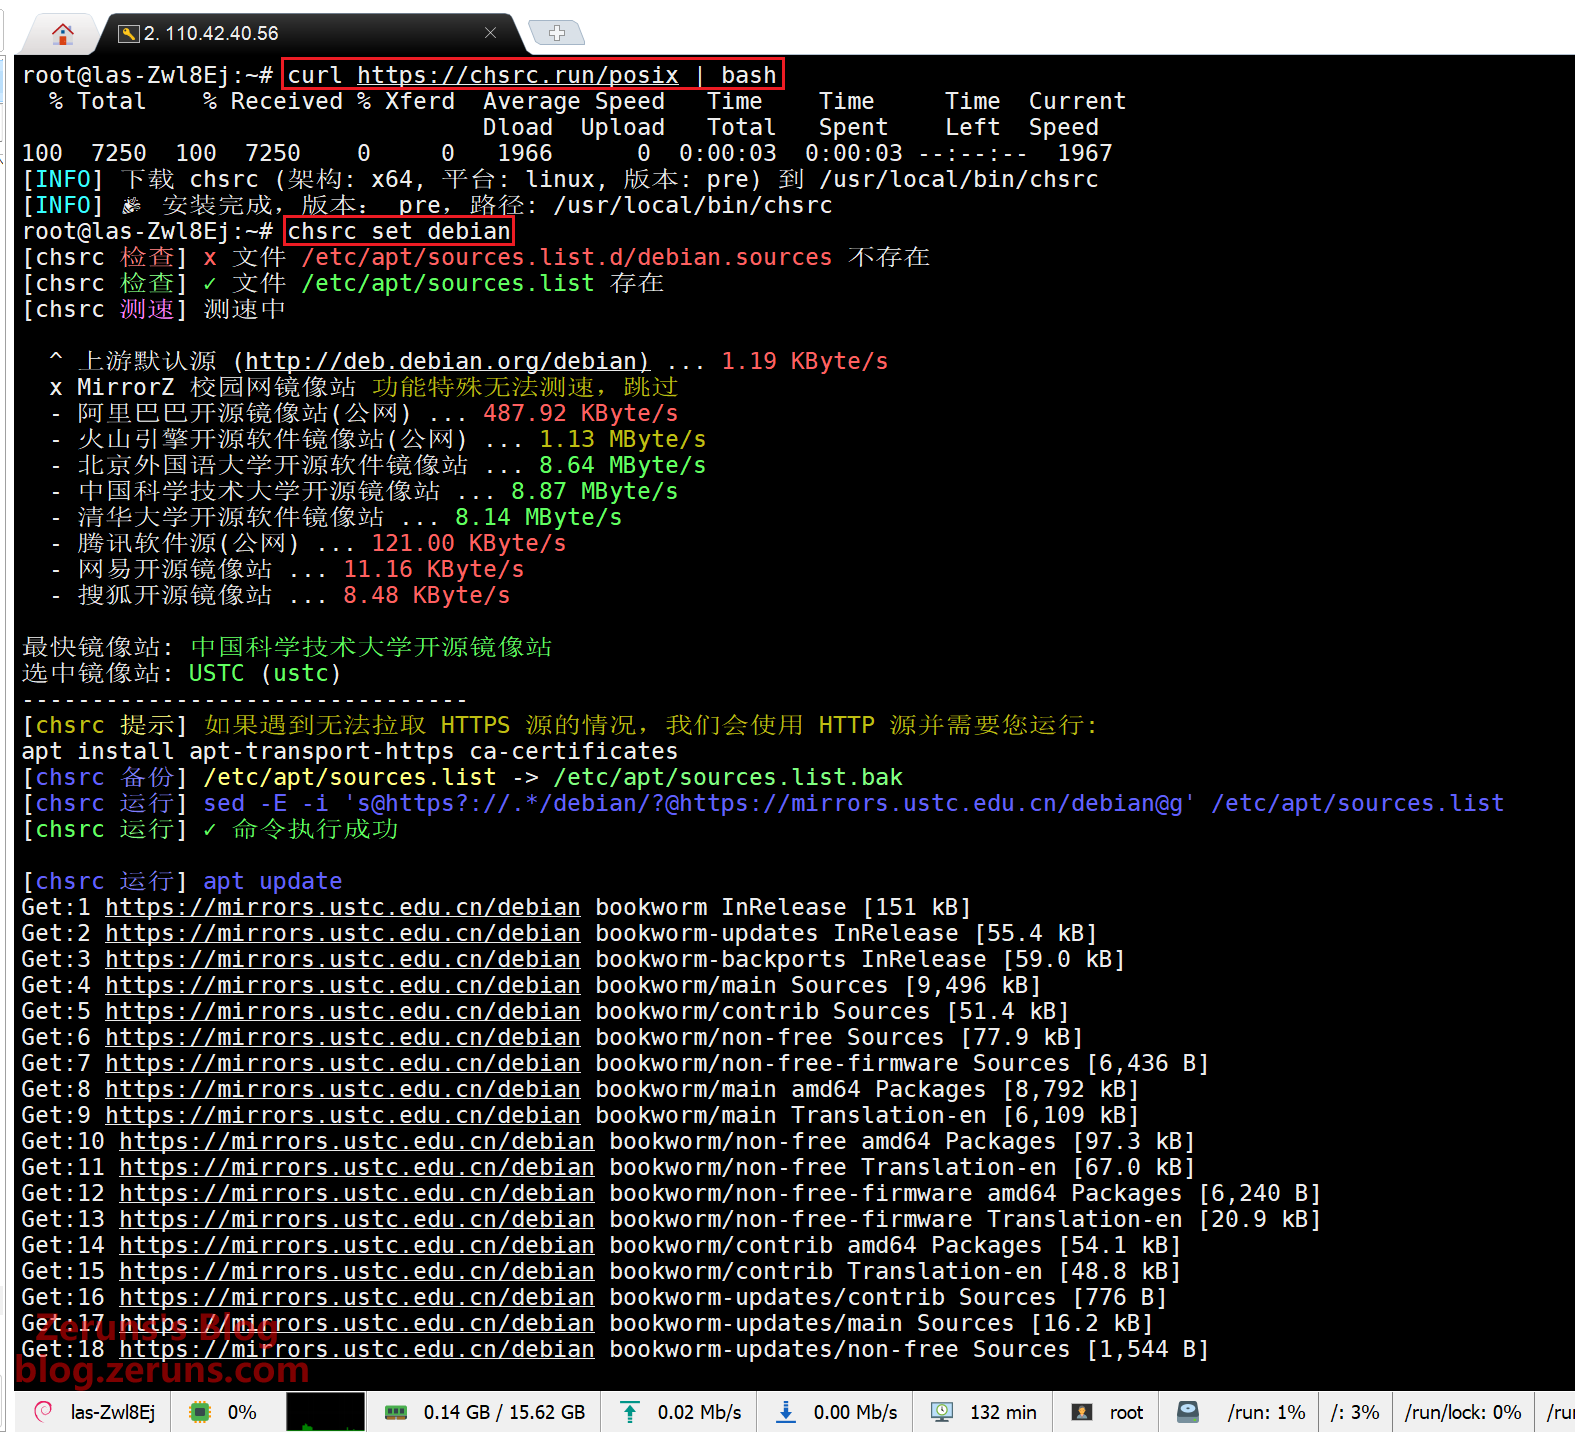
Changing APT Sources (Not Required for Overseas Servers)
The system's default APT repository is hosted on foreign servers, so you need to switch to a domestic mirror using chsrc.
In the SSH terminal, enter the following commands (lines beginning with # are comments and do not need to be entered):
# Download and install chsrc
curl https://chsrc.run/posix | bash

# Automatically test speeds, find the fastest mirror, and switch the source
chsrc set debian
Installing the 1Panel Control Panel and Docker
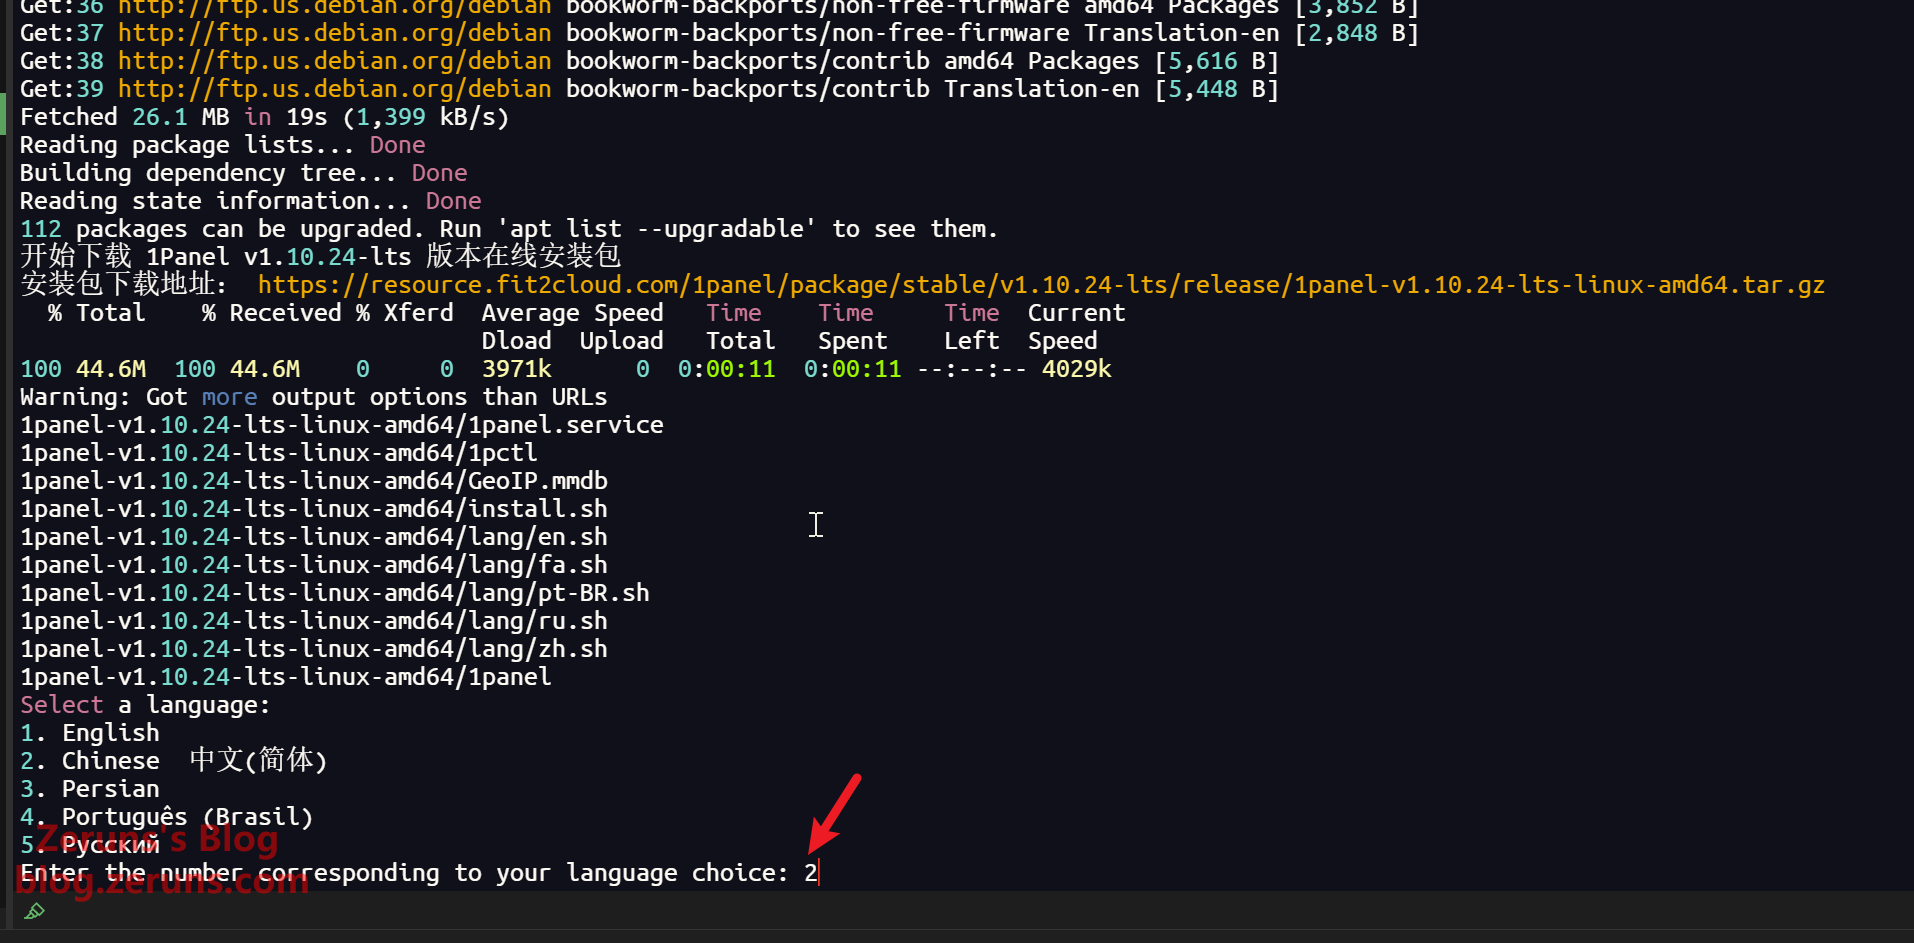
Run the following command in your SSH terminal. This is the 1Panel installation script, which will automatically install Docker as well:
apt update && curl -sSL https://resource.fit2cloud.com/1panel/package/quick_start.sh -o quick_start.sh && bash quick_start.sh
If you encounter a language selection prompt, simply follow the instructions by entering the corresponding number and pressing Enter. In my case, I selected 2. Chinese 中文(简体).
When prompted to set the installation directory, just press Enter to use the default /opt directory.
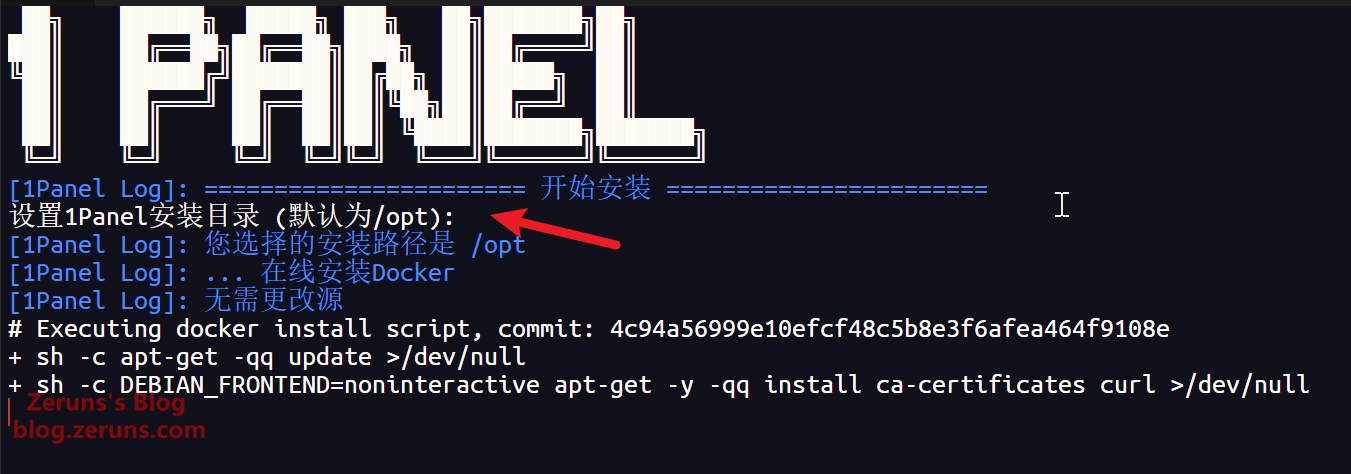
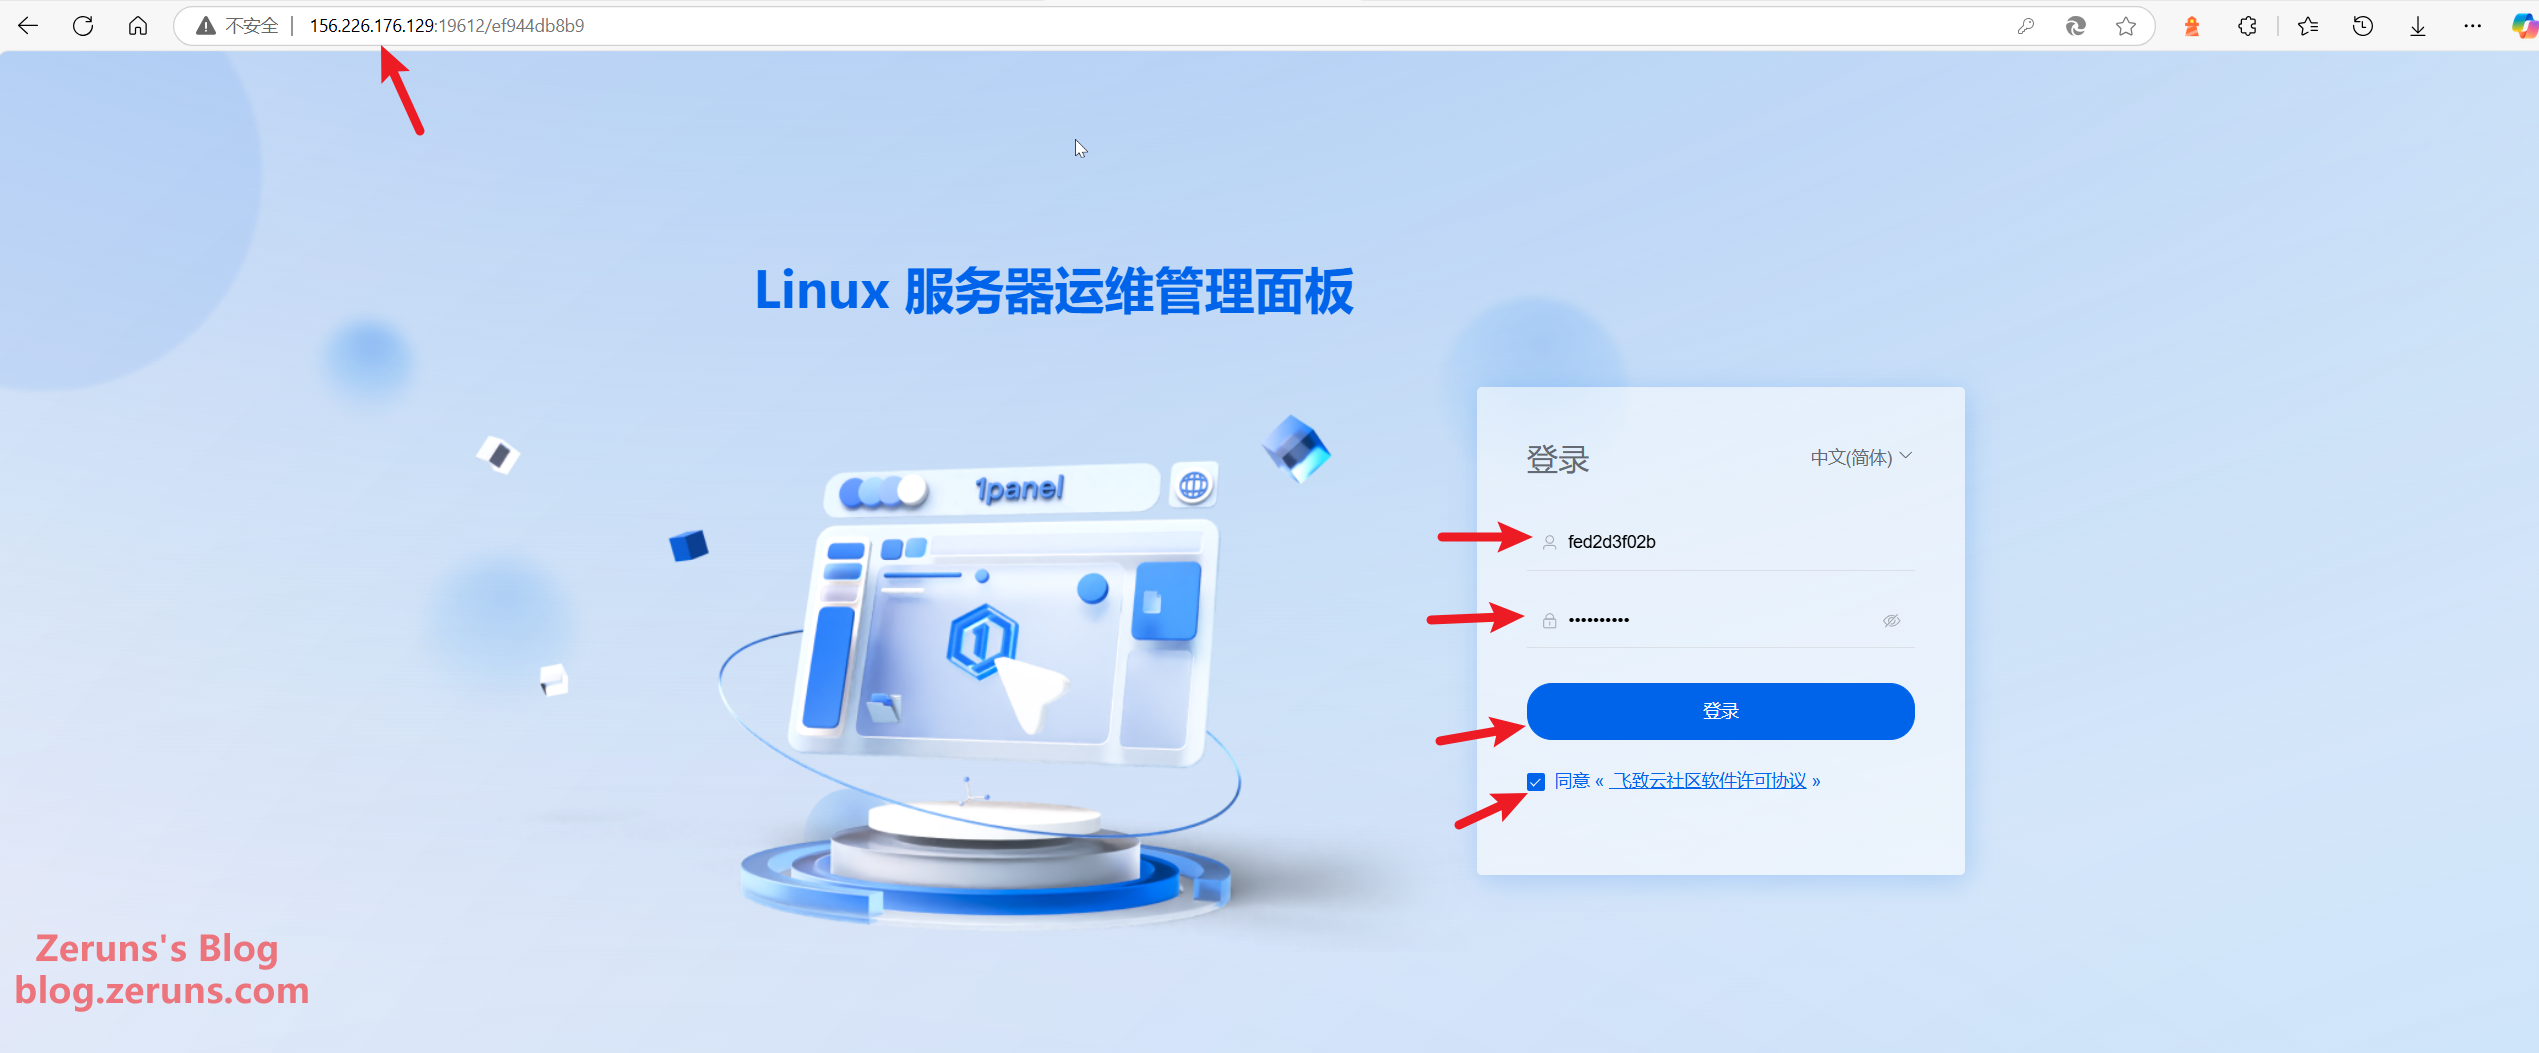
Next, you will be prompted to configure the panel's port and set up a username and password. Generally, the default settings work fine, but you can choose to enter your own credentials. After that, wait a few moments for the installation to complete. Be sure to remember the panel URL along with the username and password provided below.
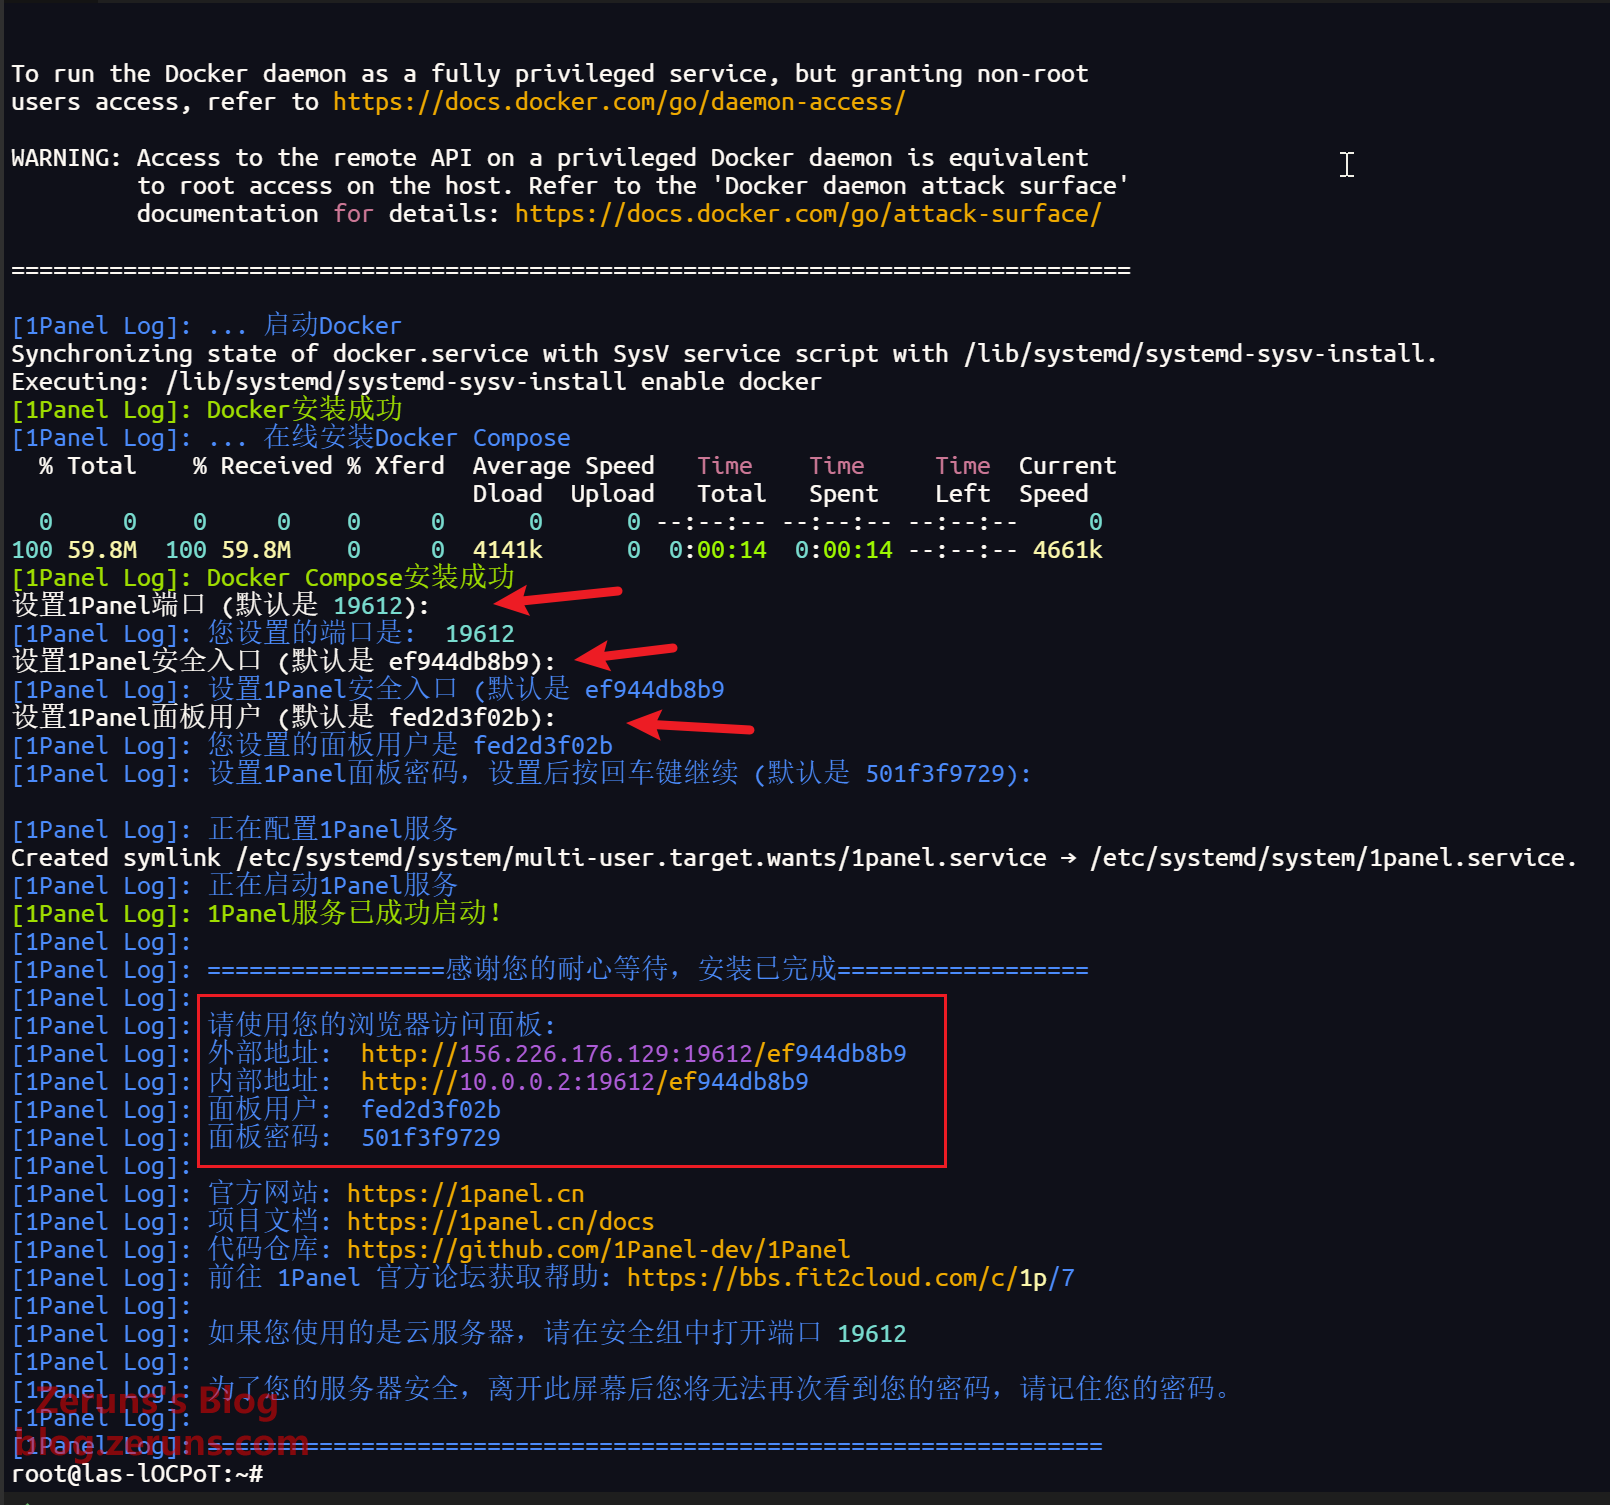
Then, open the panel URL in your browser's address bar to log in.
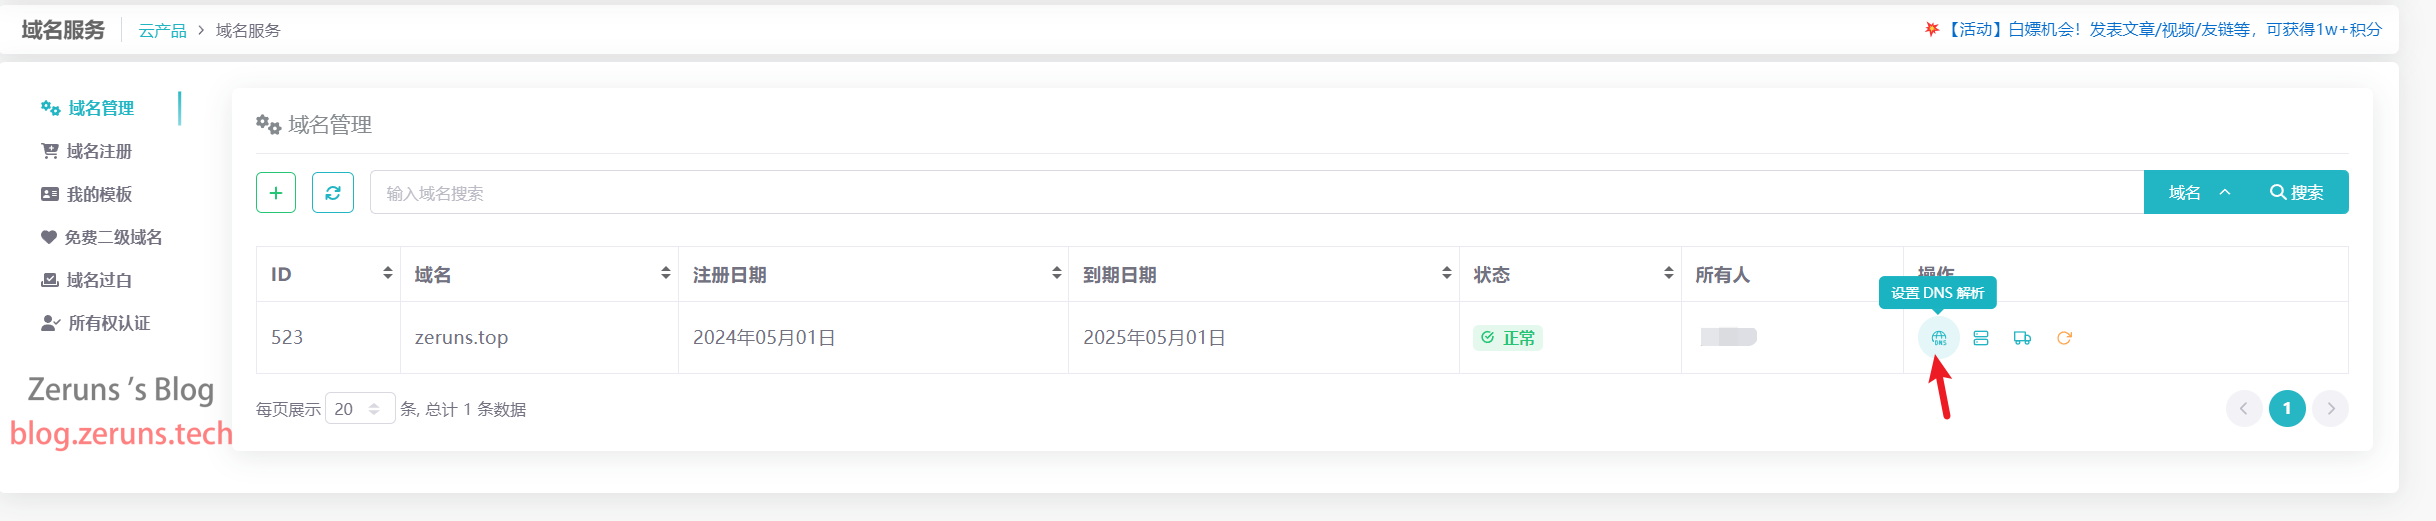
Configuring Domain Name Resolution
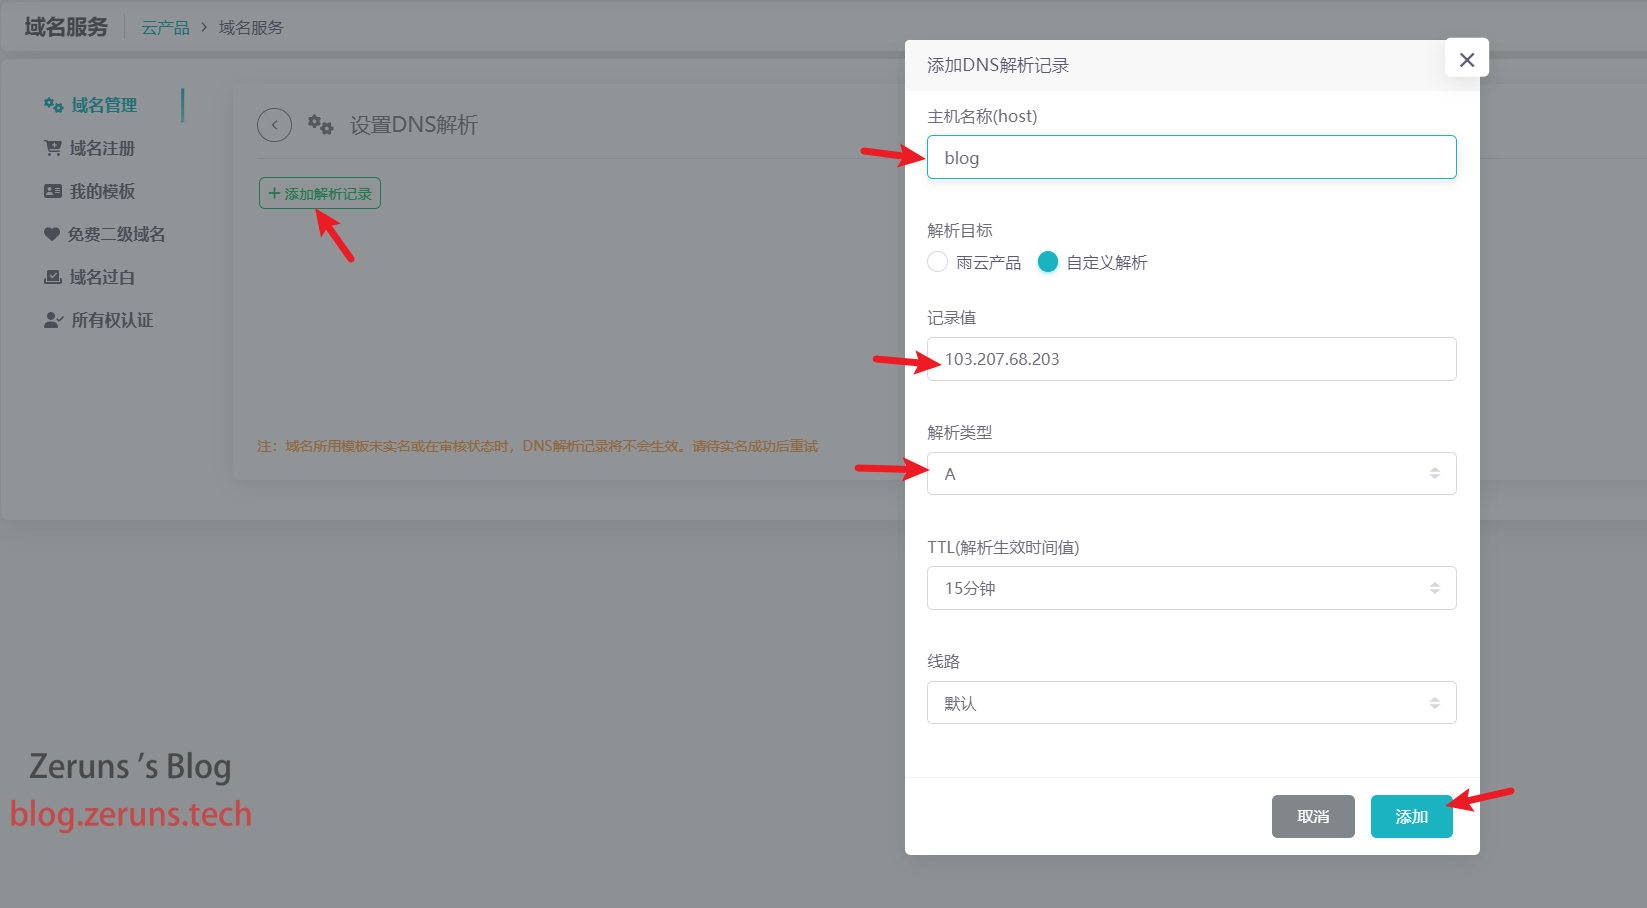
Head over to your domain resolution console and add a new record. For the hostname, you can enter a name of your choice—for example, entering "blog" means the website will be accessible at blog.zeruns.top. If you use @ as the hostname, the website will be accessible directly via zeruns.top. Set the record value to your server's IP address.
Installing OpenResty and MySQL
OpenResty is a high-performance web application server built on Nginx, integrating Nginx with the Lua programming language to offer powerful features and flexibility. In this setup, it is used to reverse proxy the Halo application.
MySQL is a popular open-source relational database management system (RDBMS) that provides a wealth of features suitable for a variety of applications.
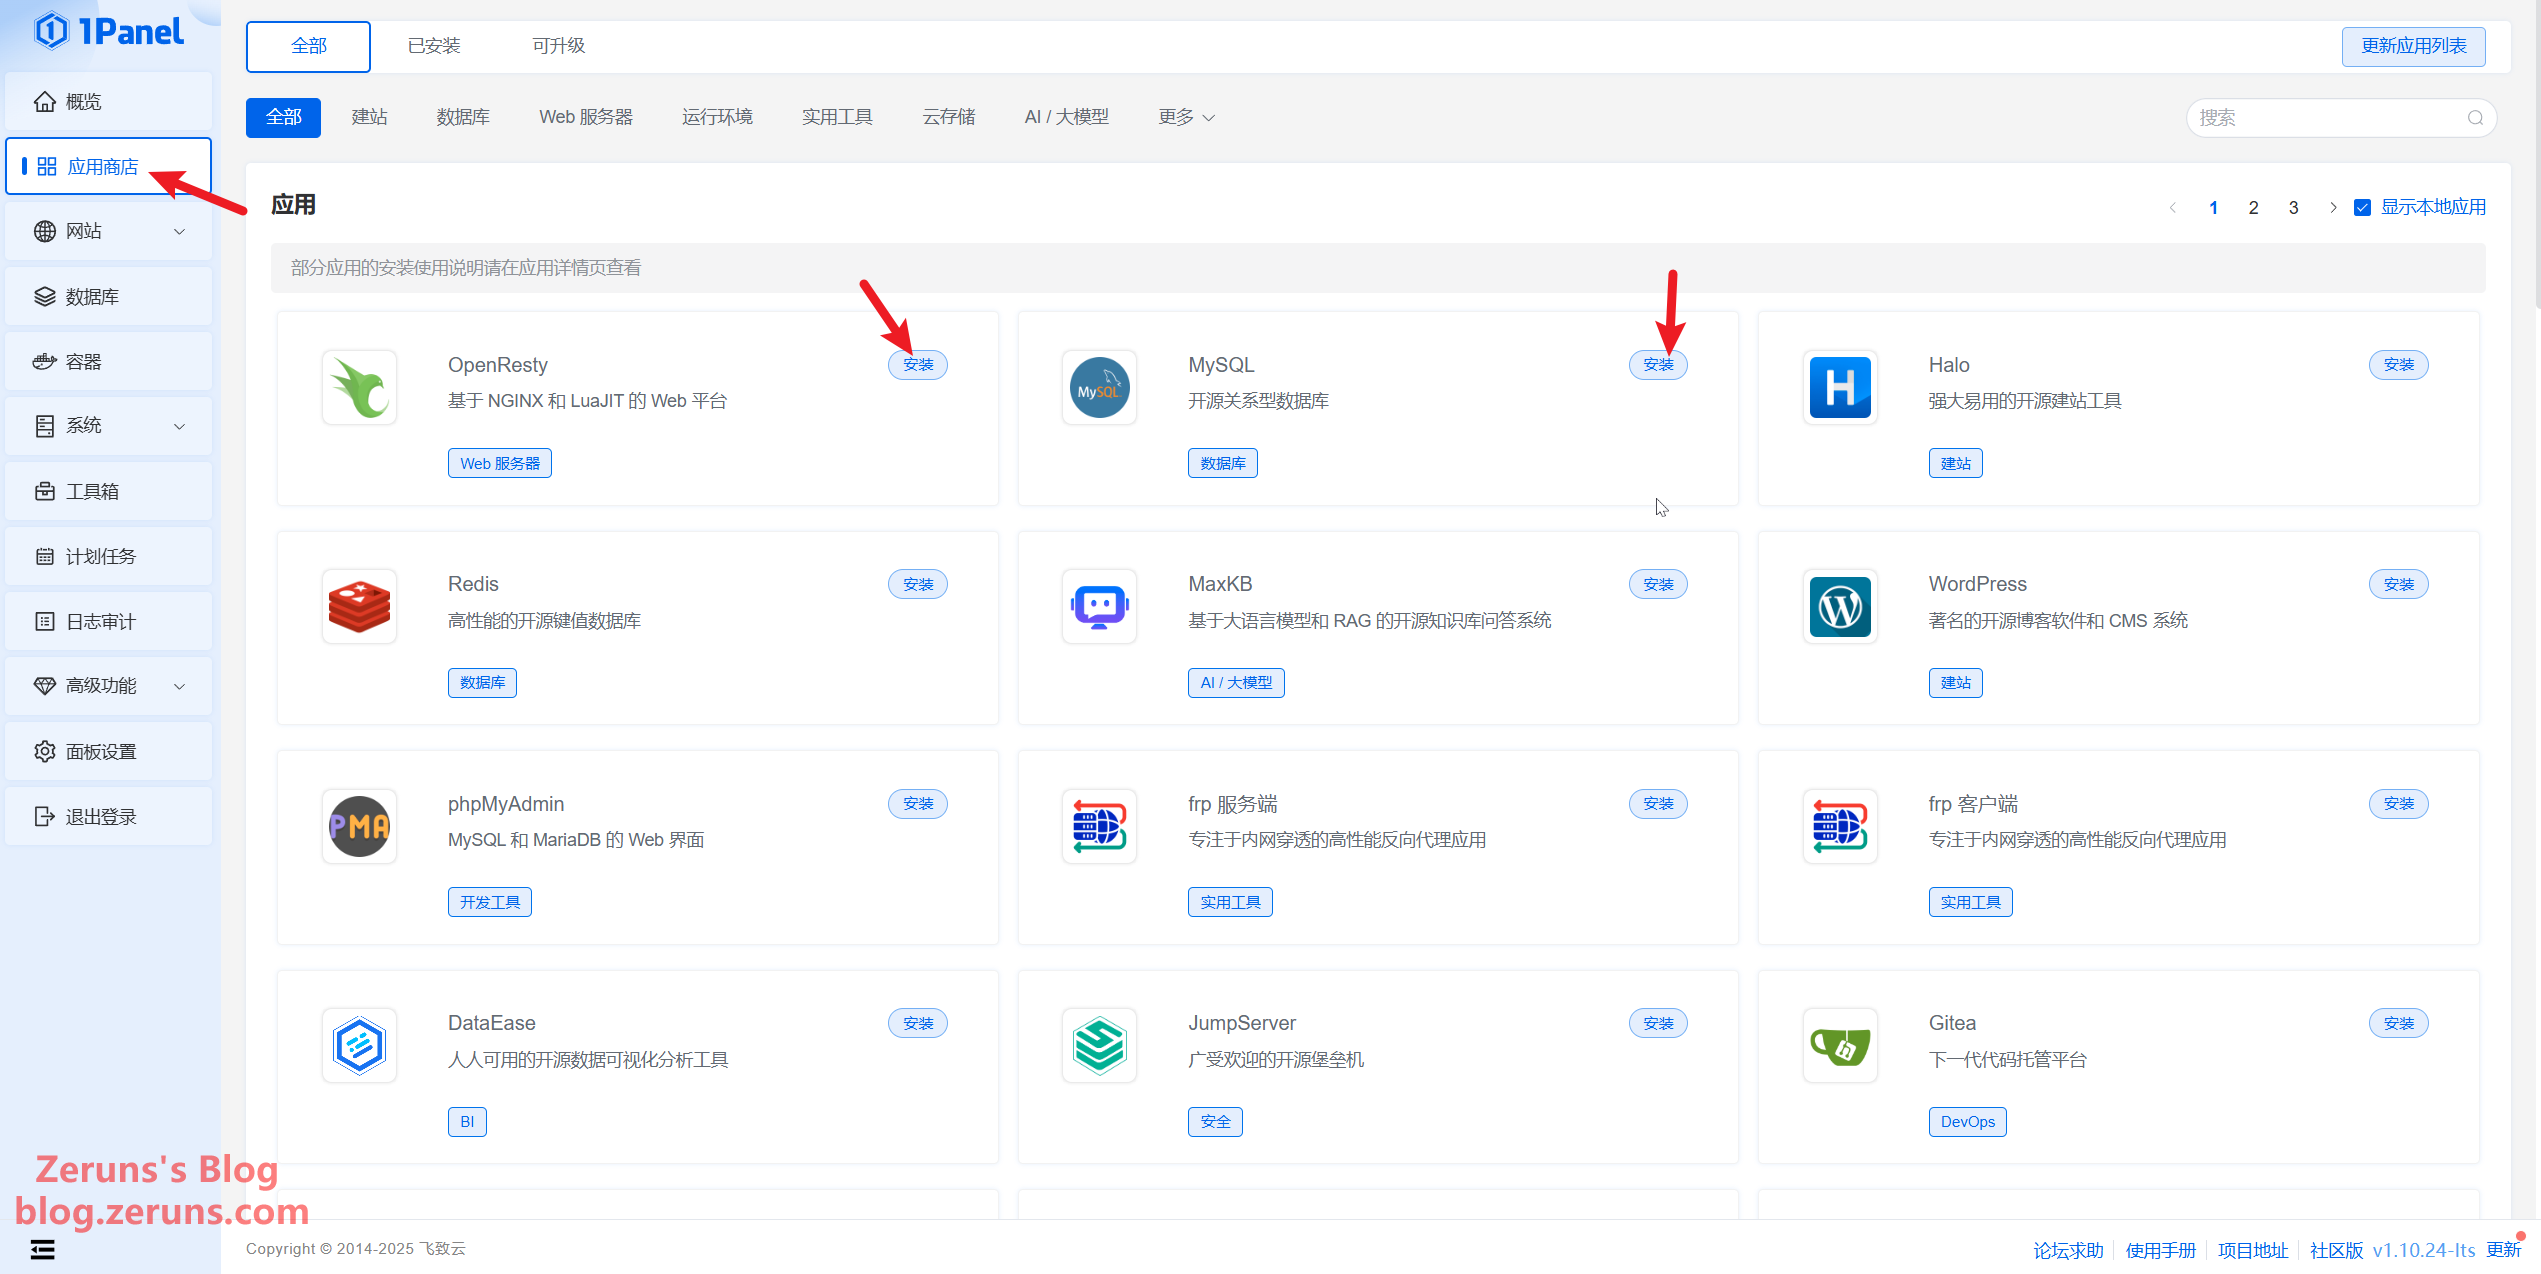
Note: If you're using a mainland server, first navigate to Container → Configuration and set up Image Acceleration (there's a documentation link provided in the settings to guide you).
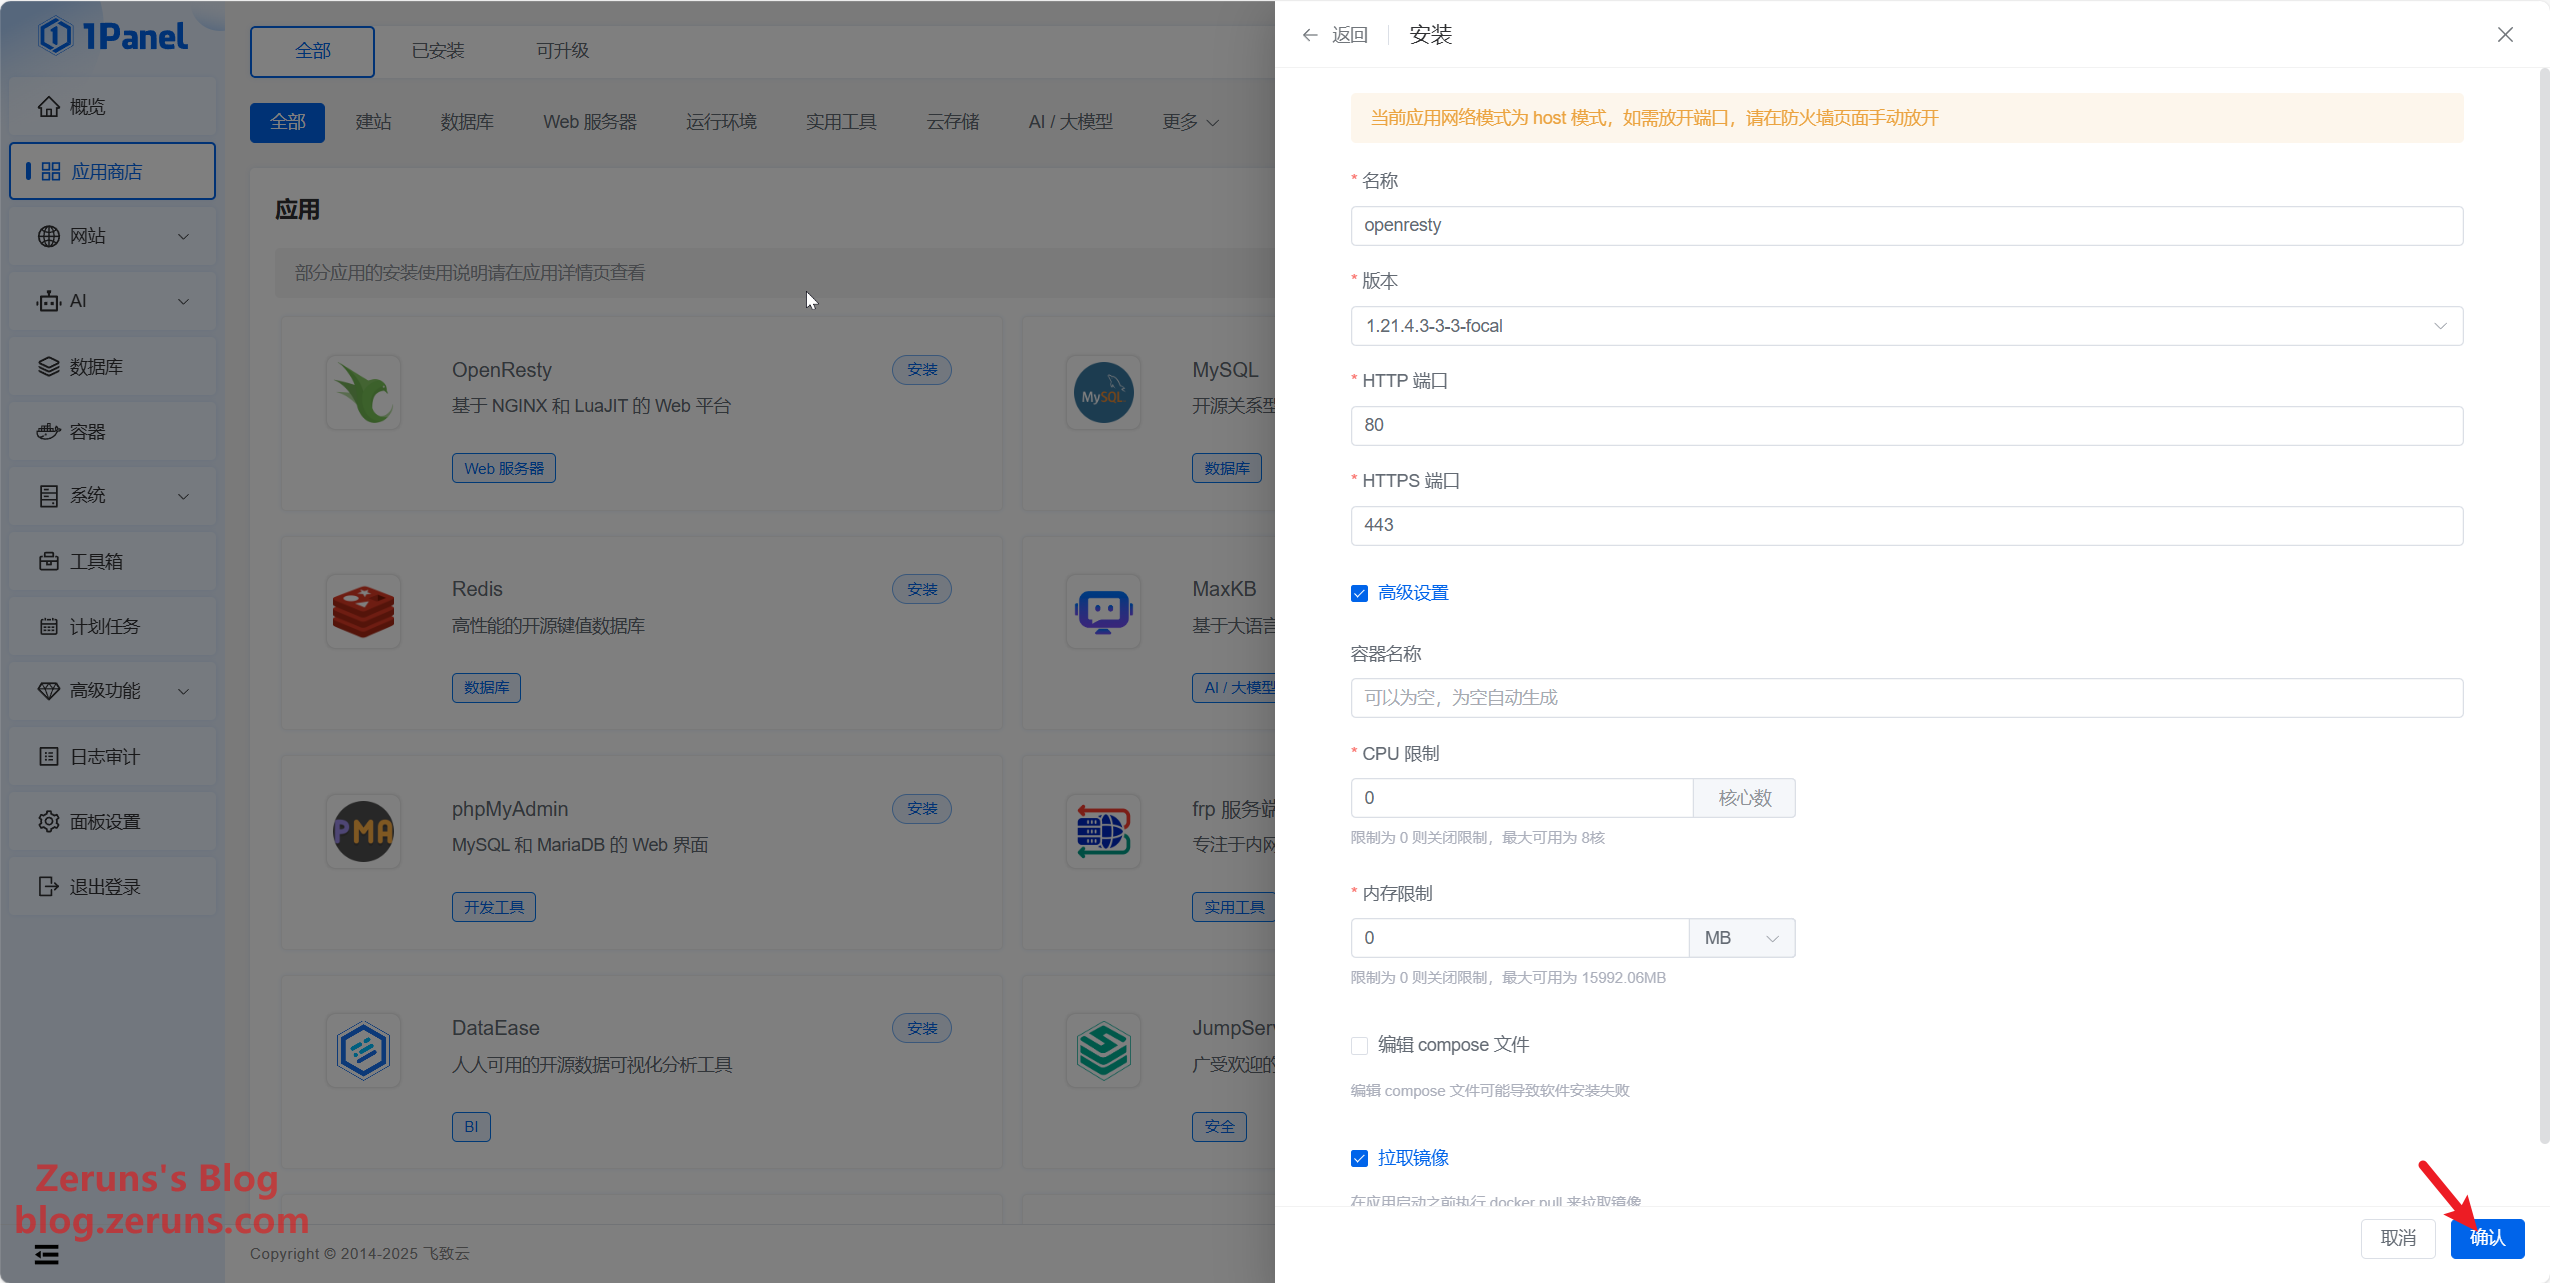
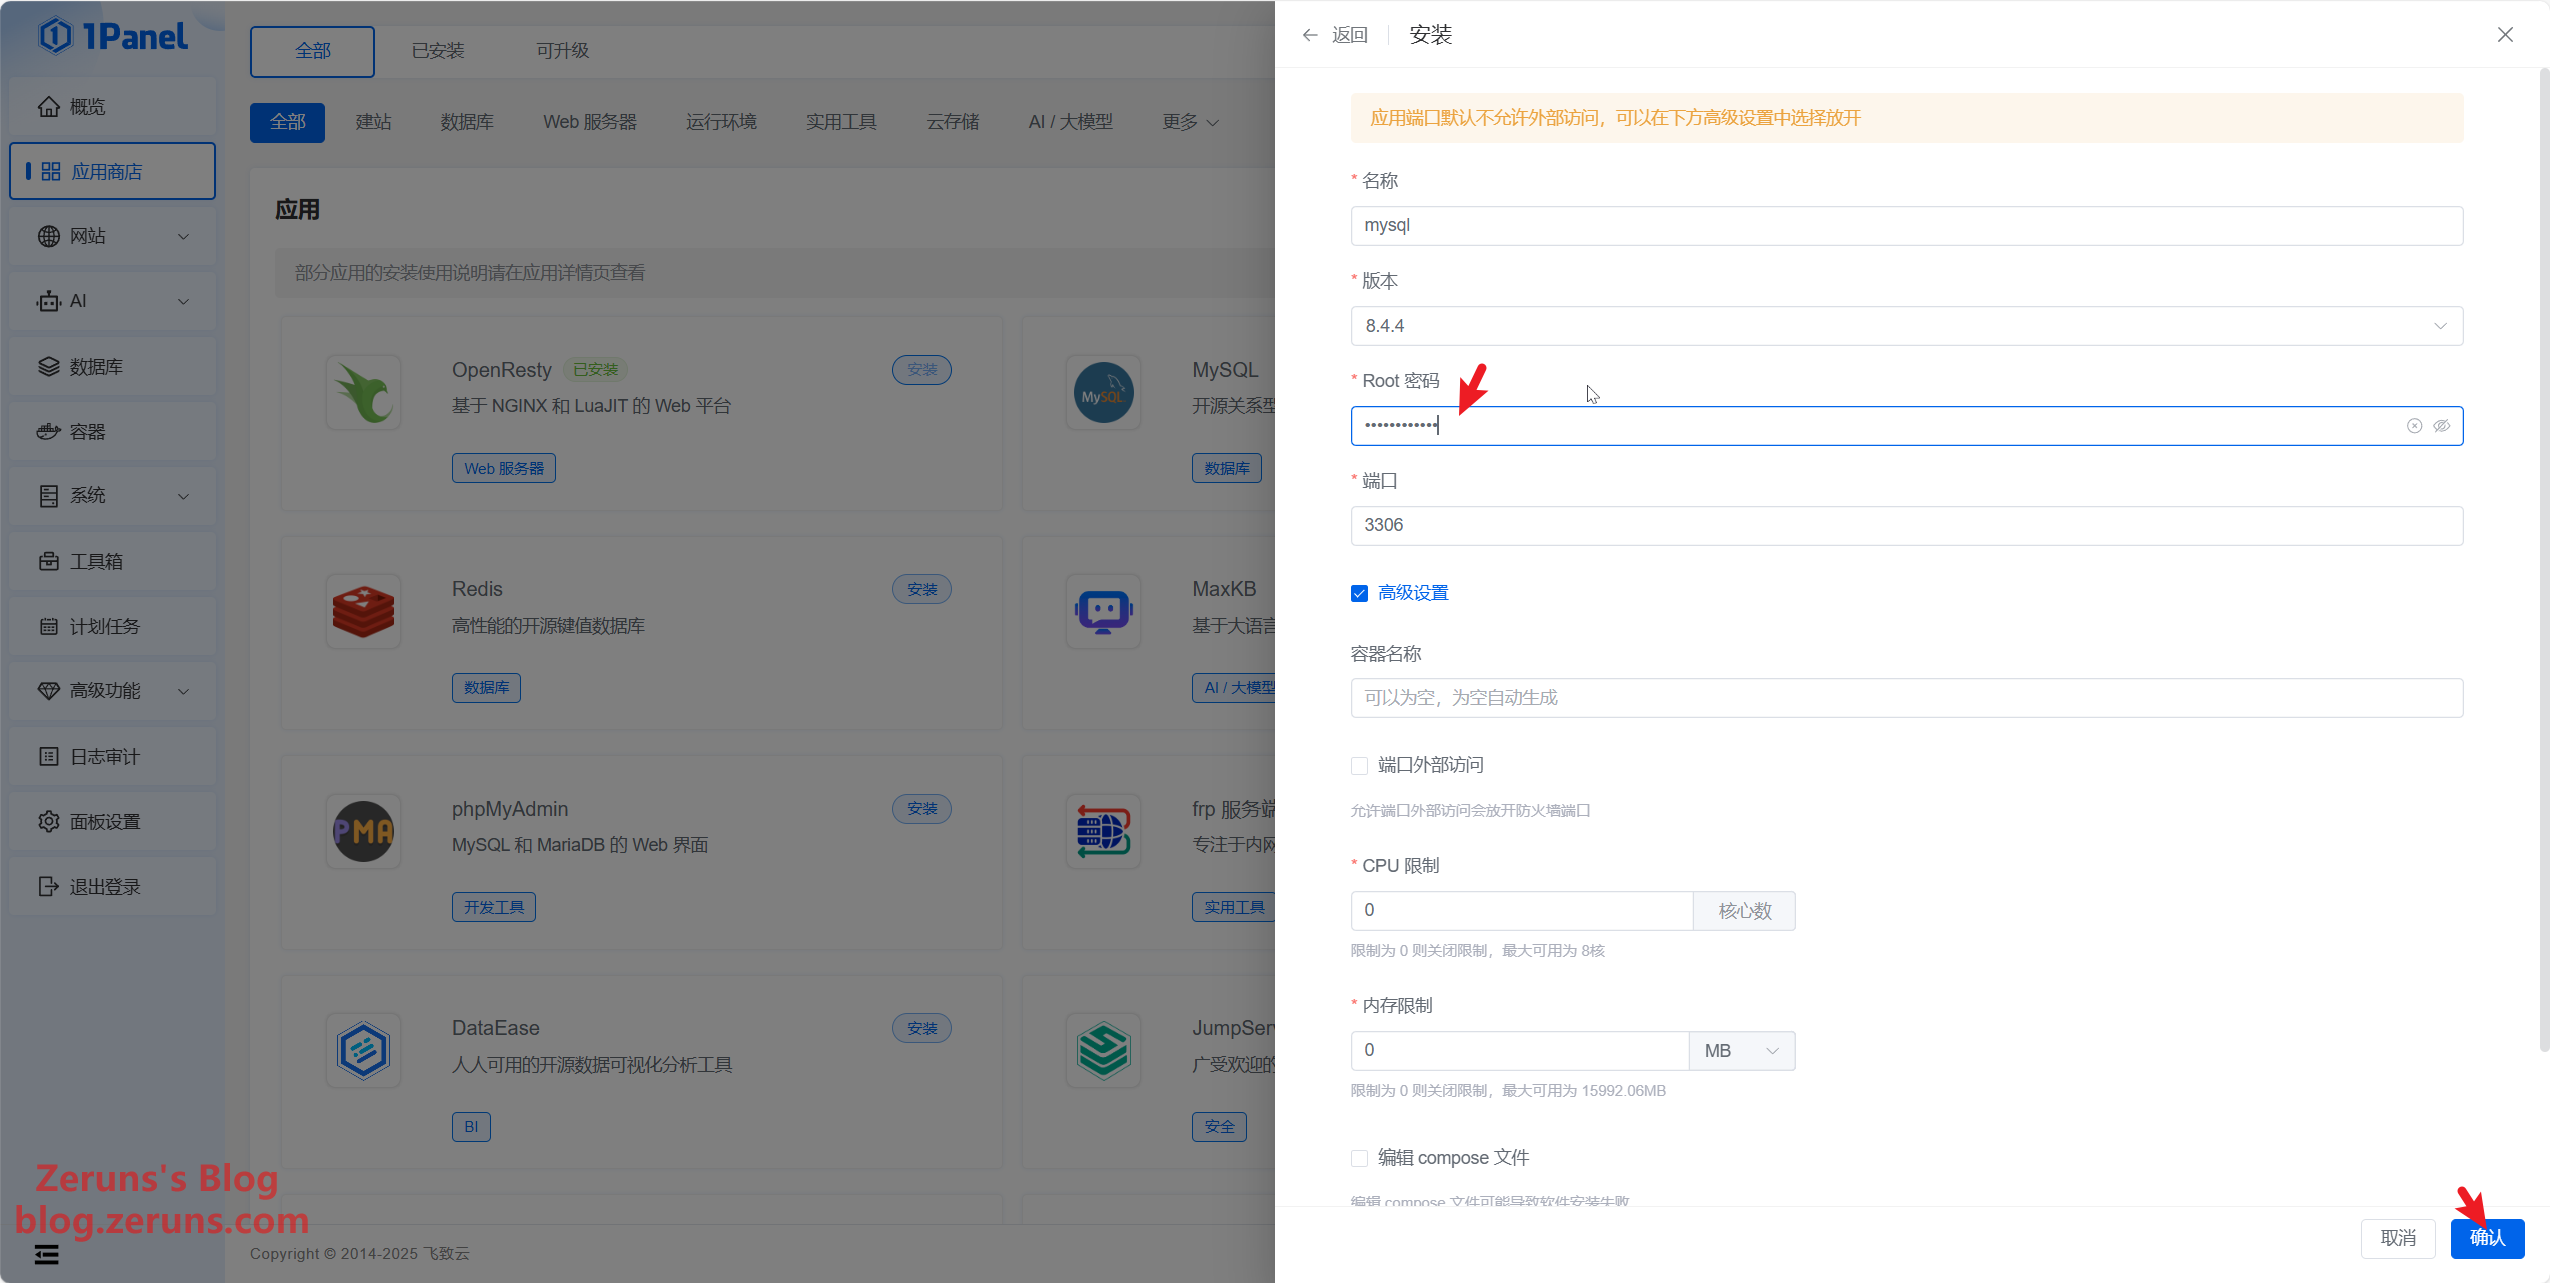
Next, click on App Store and install both OpenResty and MySQL, keeping the default settings.
For MySQL, you can set your own root password, but it is recommended to use the default randomly generated password.
Installing the Halo Application and Creating a Website
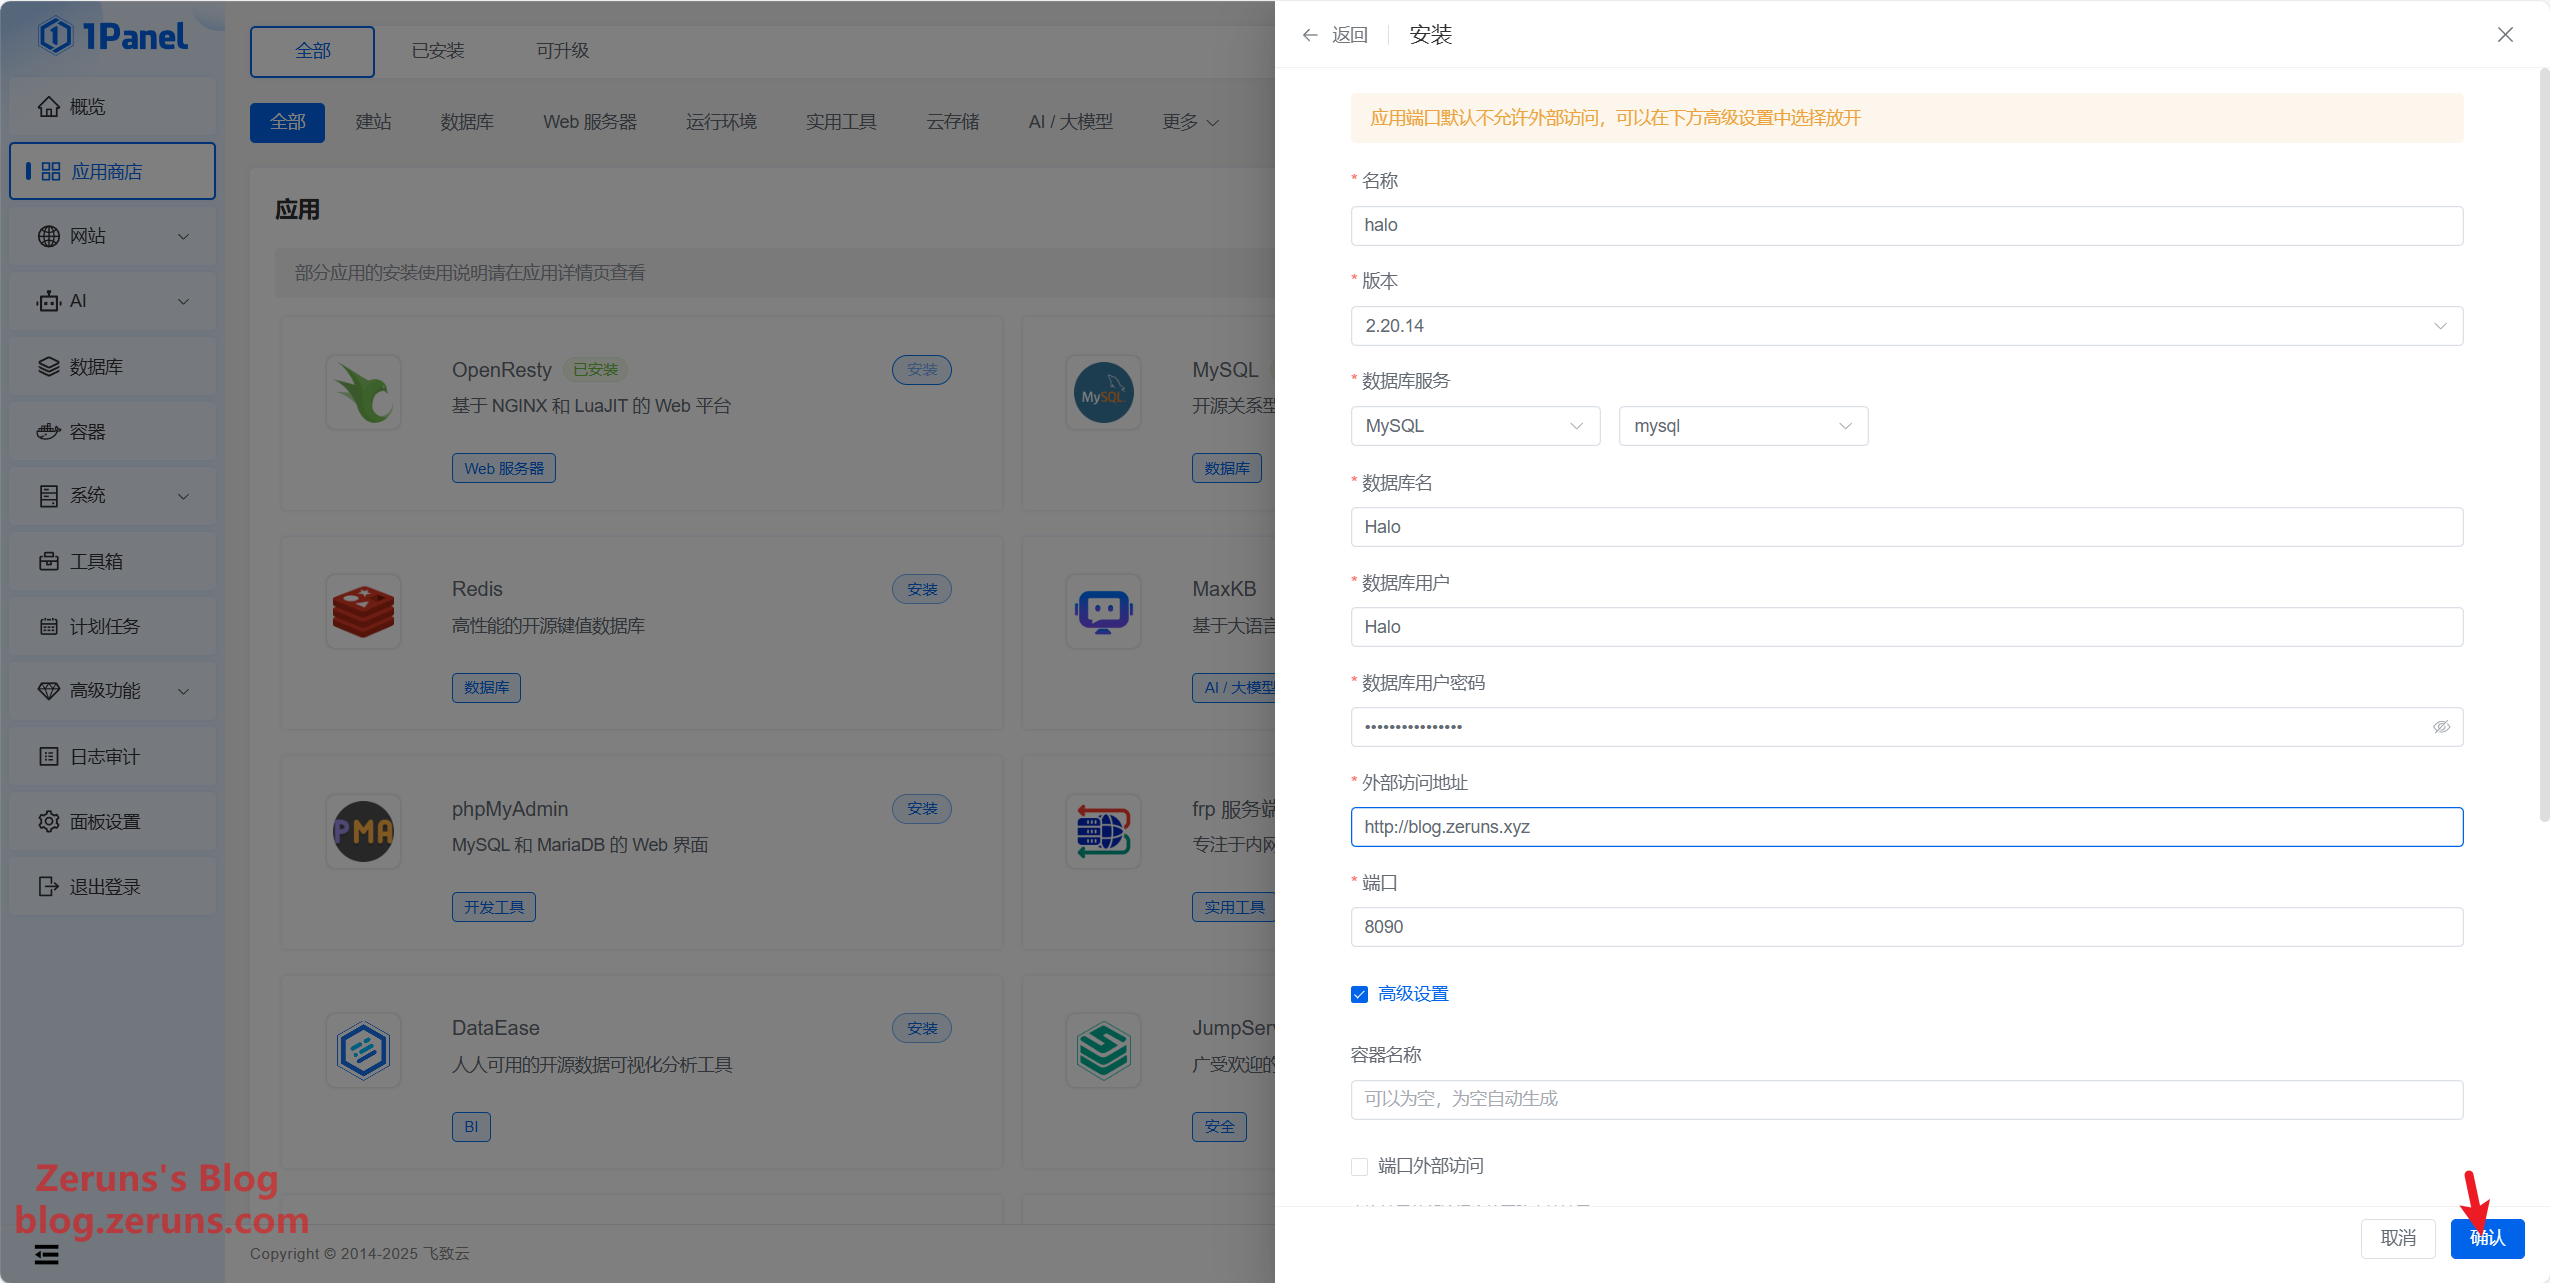
First, click on Database and create a new database for your Halo blog. You can set the database name, username, and password as you prefer.

Return to the App Store and click to install Halo.

When prompted, change the database name, database user, and database password to the ones you just created. Also, update the external access URL to your registered domain (for example, in my case it is http://blog.zeruns.xyz).
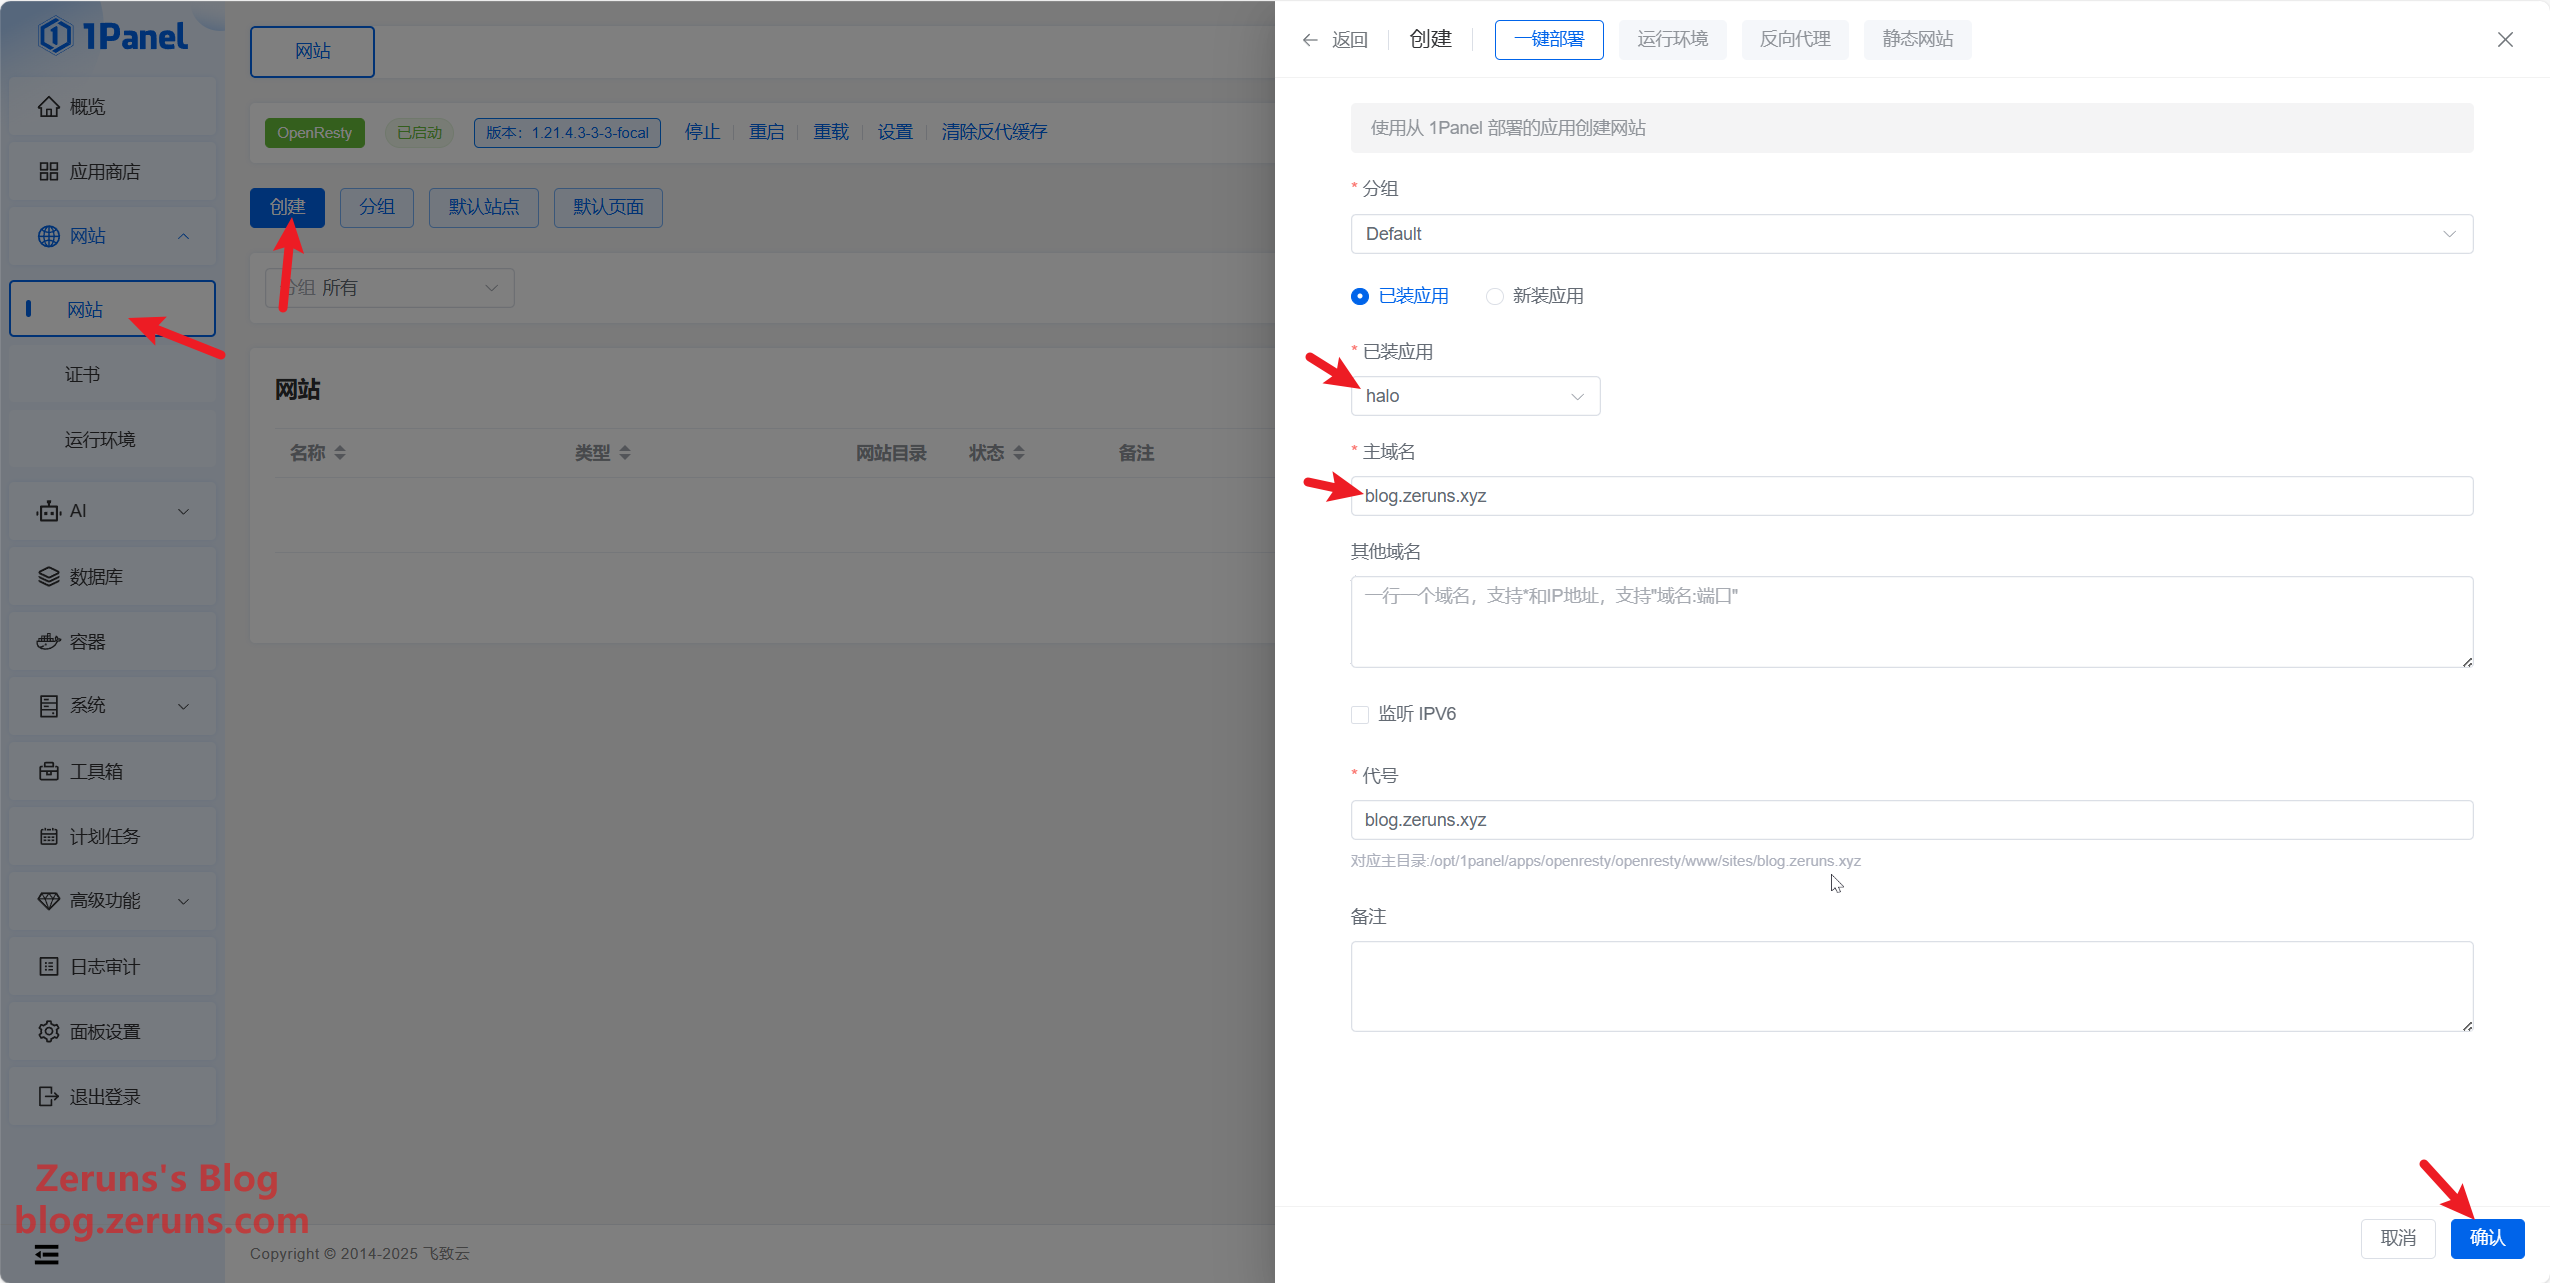
Once the Halo application installation is complete, it will not automatically create a website. You need to manually create a website and then bind the Halo application to it to enable domain access.
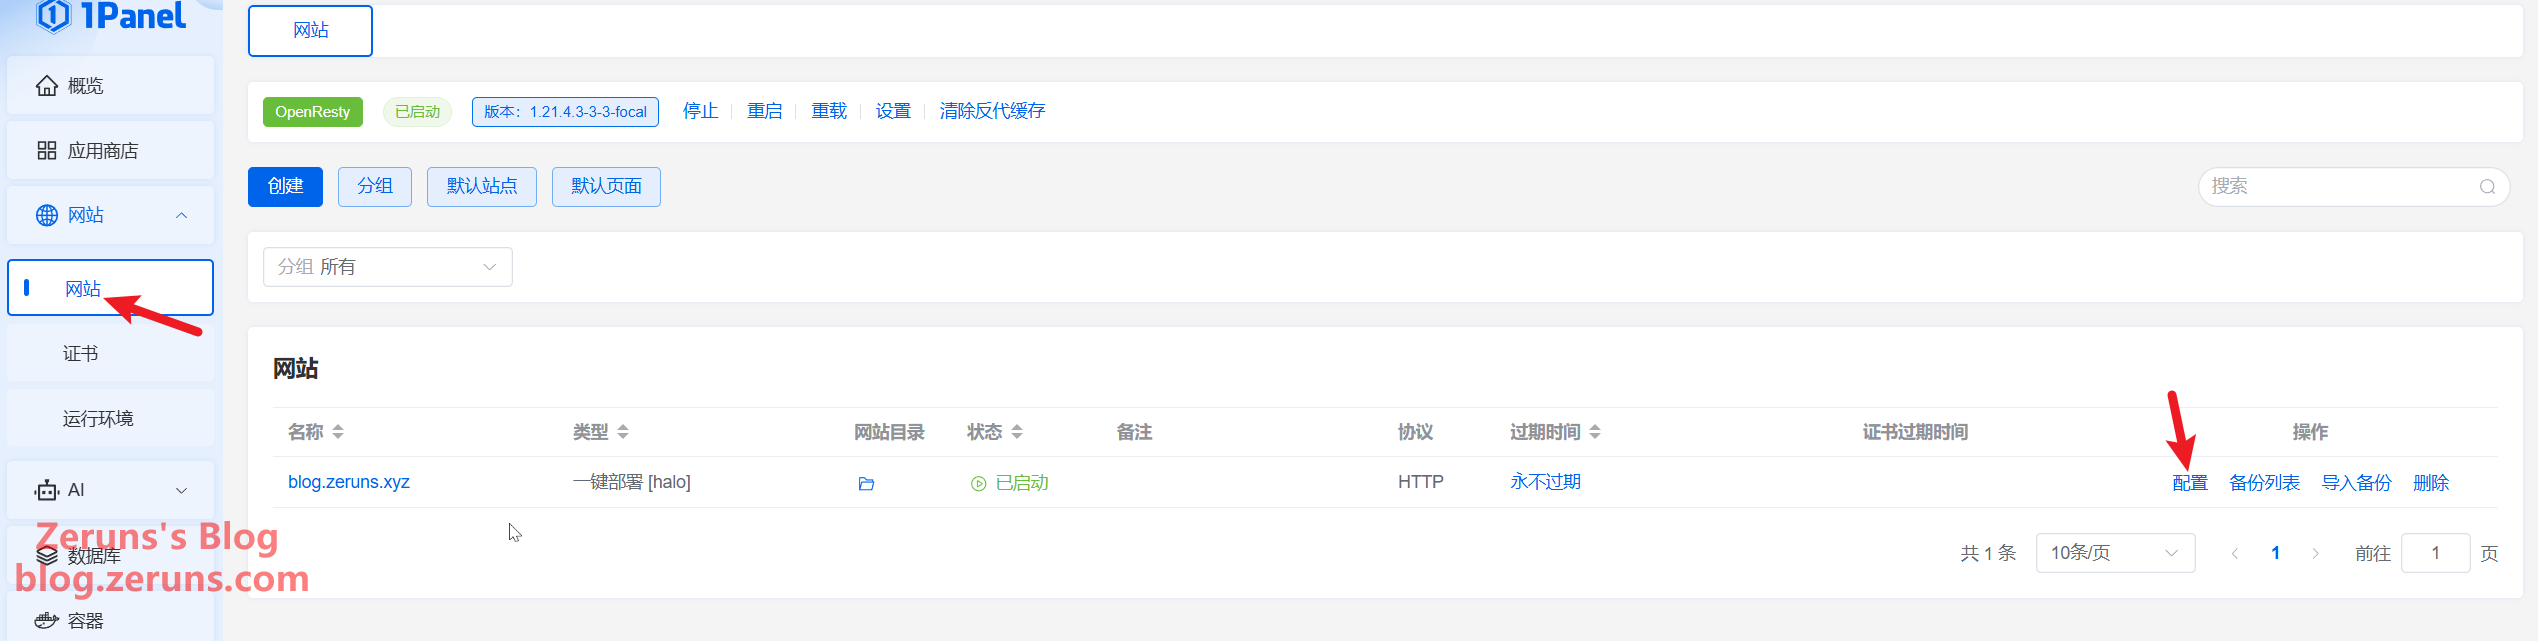
Click on Website in the 1Panel menu to go to the website list page, then click the Create Website button.
- From the list of installed applications, select the Halo application you just set up.
- Fill in the primary domain correctly (in my case,
blog.zeruns.xyz). Note that your domain should already be pointing to your server's IP address.
Finally, click the confirmation button and wait for the website creation to finish. You can then visit the site to begin the initialization process.
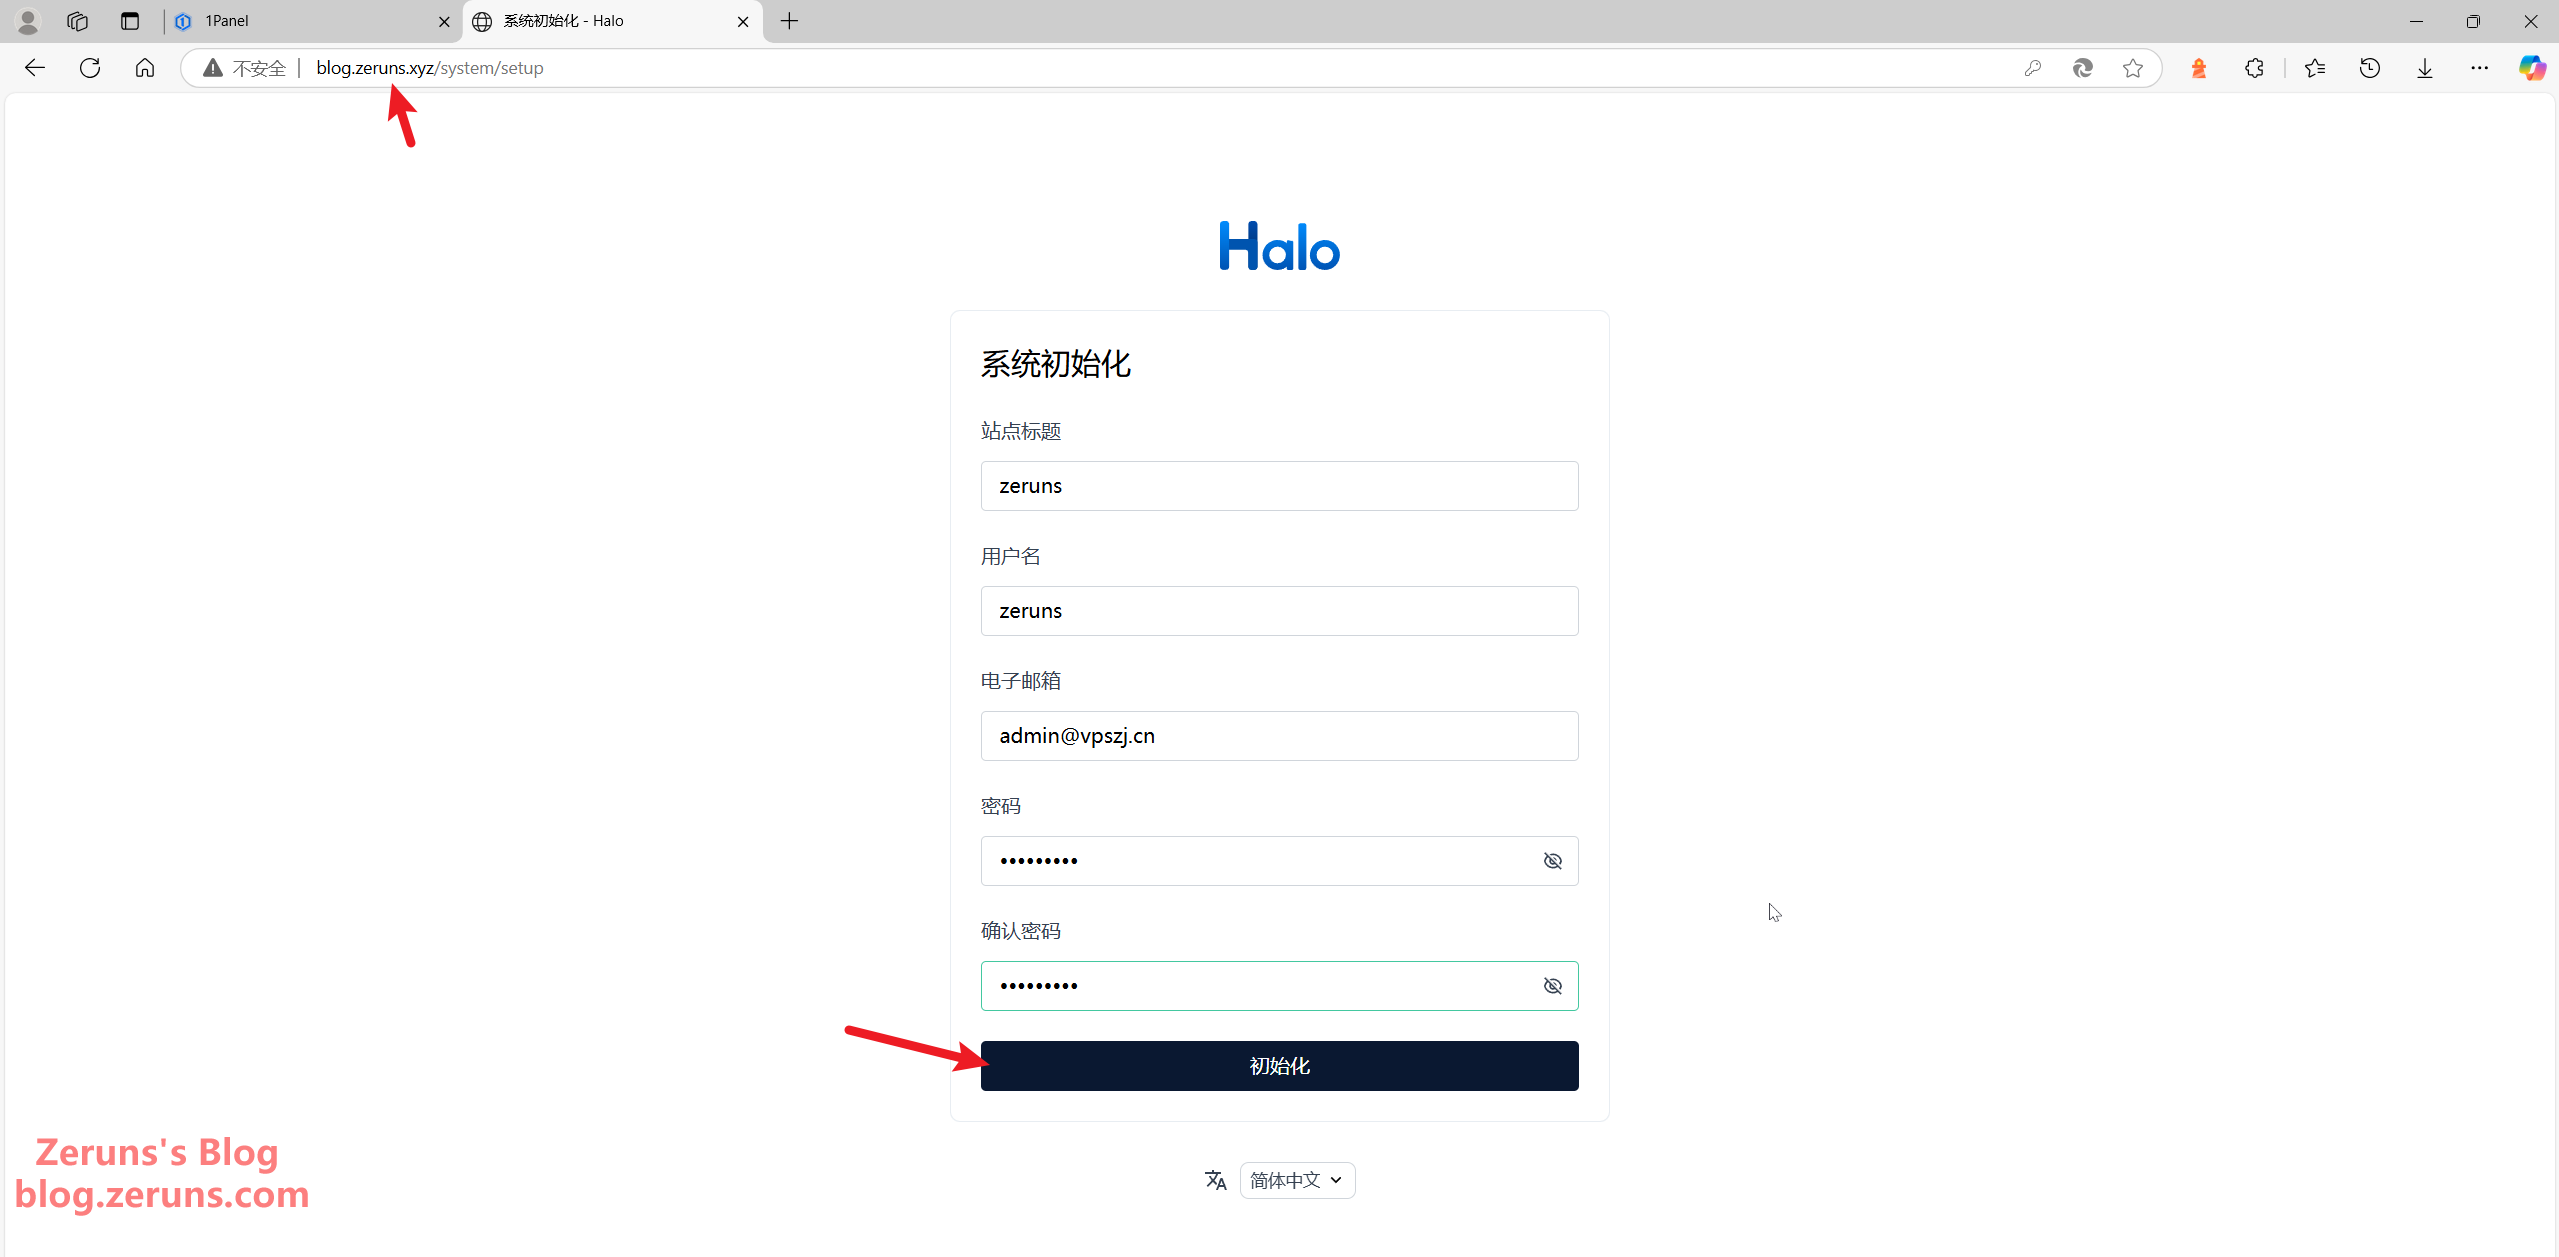
Once Halo is successfully installed, entering your website domain in a browser will automatically redirect you to the initialization page. You must complete this step to use Halo properly.
Form Field Explanations:
- Site Title: The name of your website, which will appear in the browser tab.
- Username: The username for the initial administrator.
- Email: The email address for the initial administrator.
- Password: The password for the initial administrator.
- Confirm Password: Re-enter the password to confirm it matches.
After filling out the form, click the Initialize button to complete the setup. Once initialization is complete, you will be redirected to the login page where you can sign in using the username and password you set earlier.
After initialization, the Halo backend login page will appear. Simply enter the administrator username and password you set during initialization to log in to the blog backend.
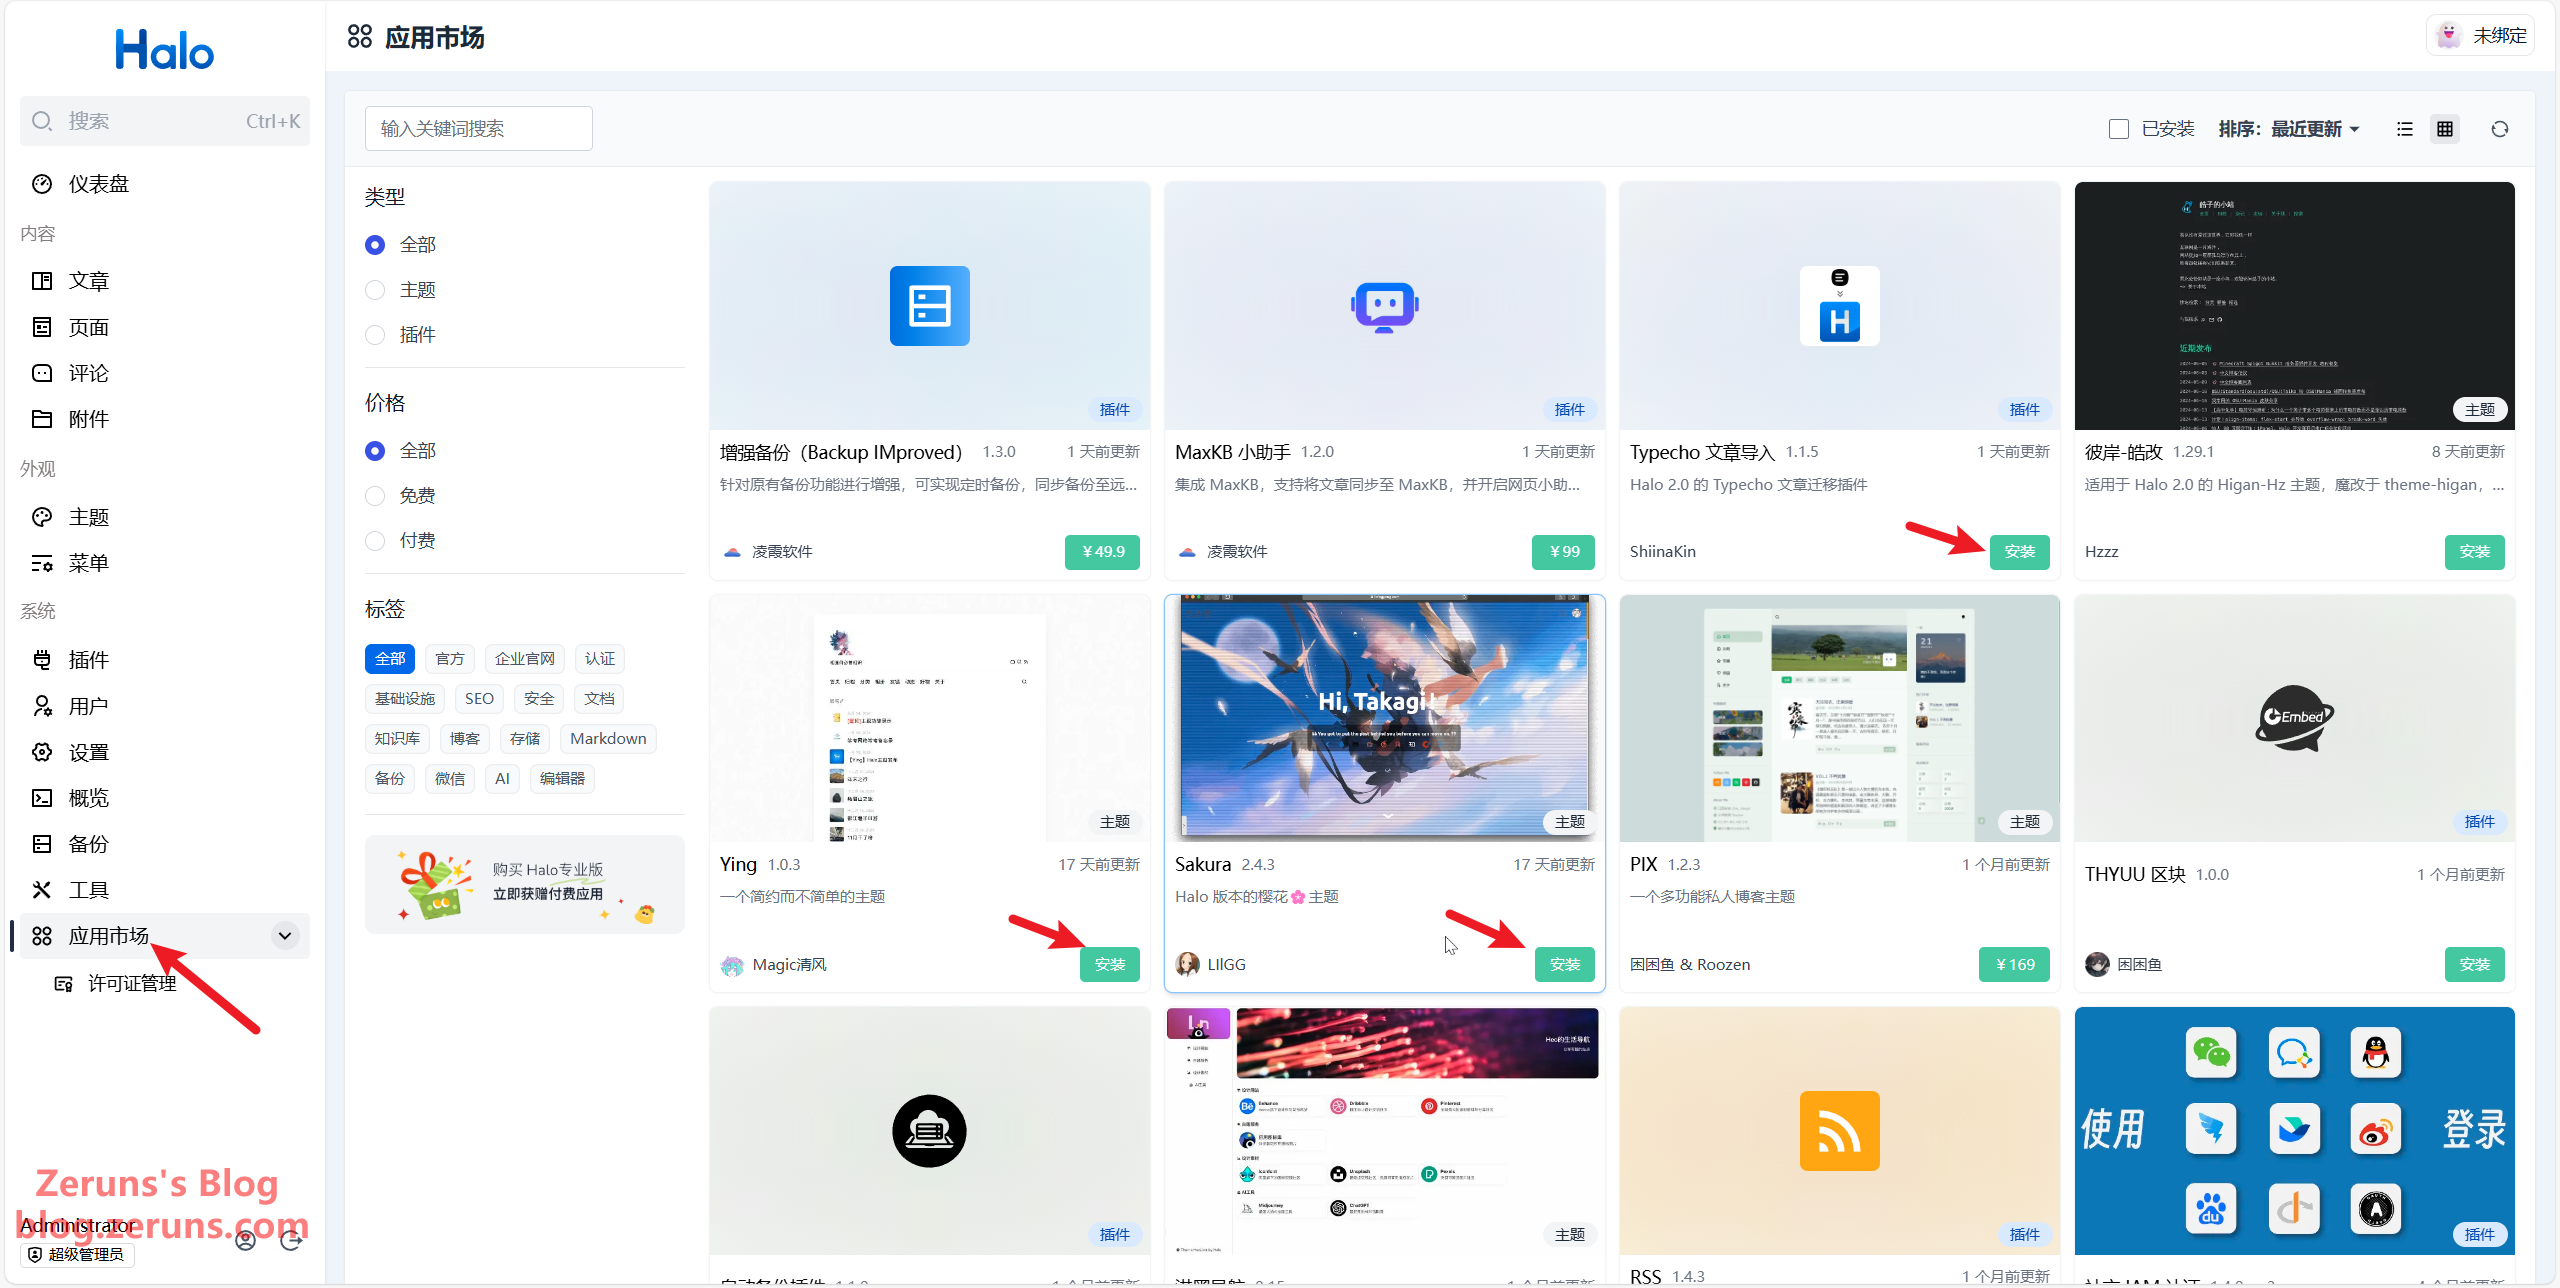
Changing Blog Themes and Installing Plugins
In your blog's backend App Market, choose the themes and plugins you like and simply click Install.
Then, click Theme → Theme Management to switch and configure your themes.

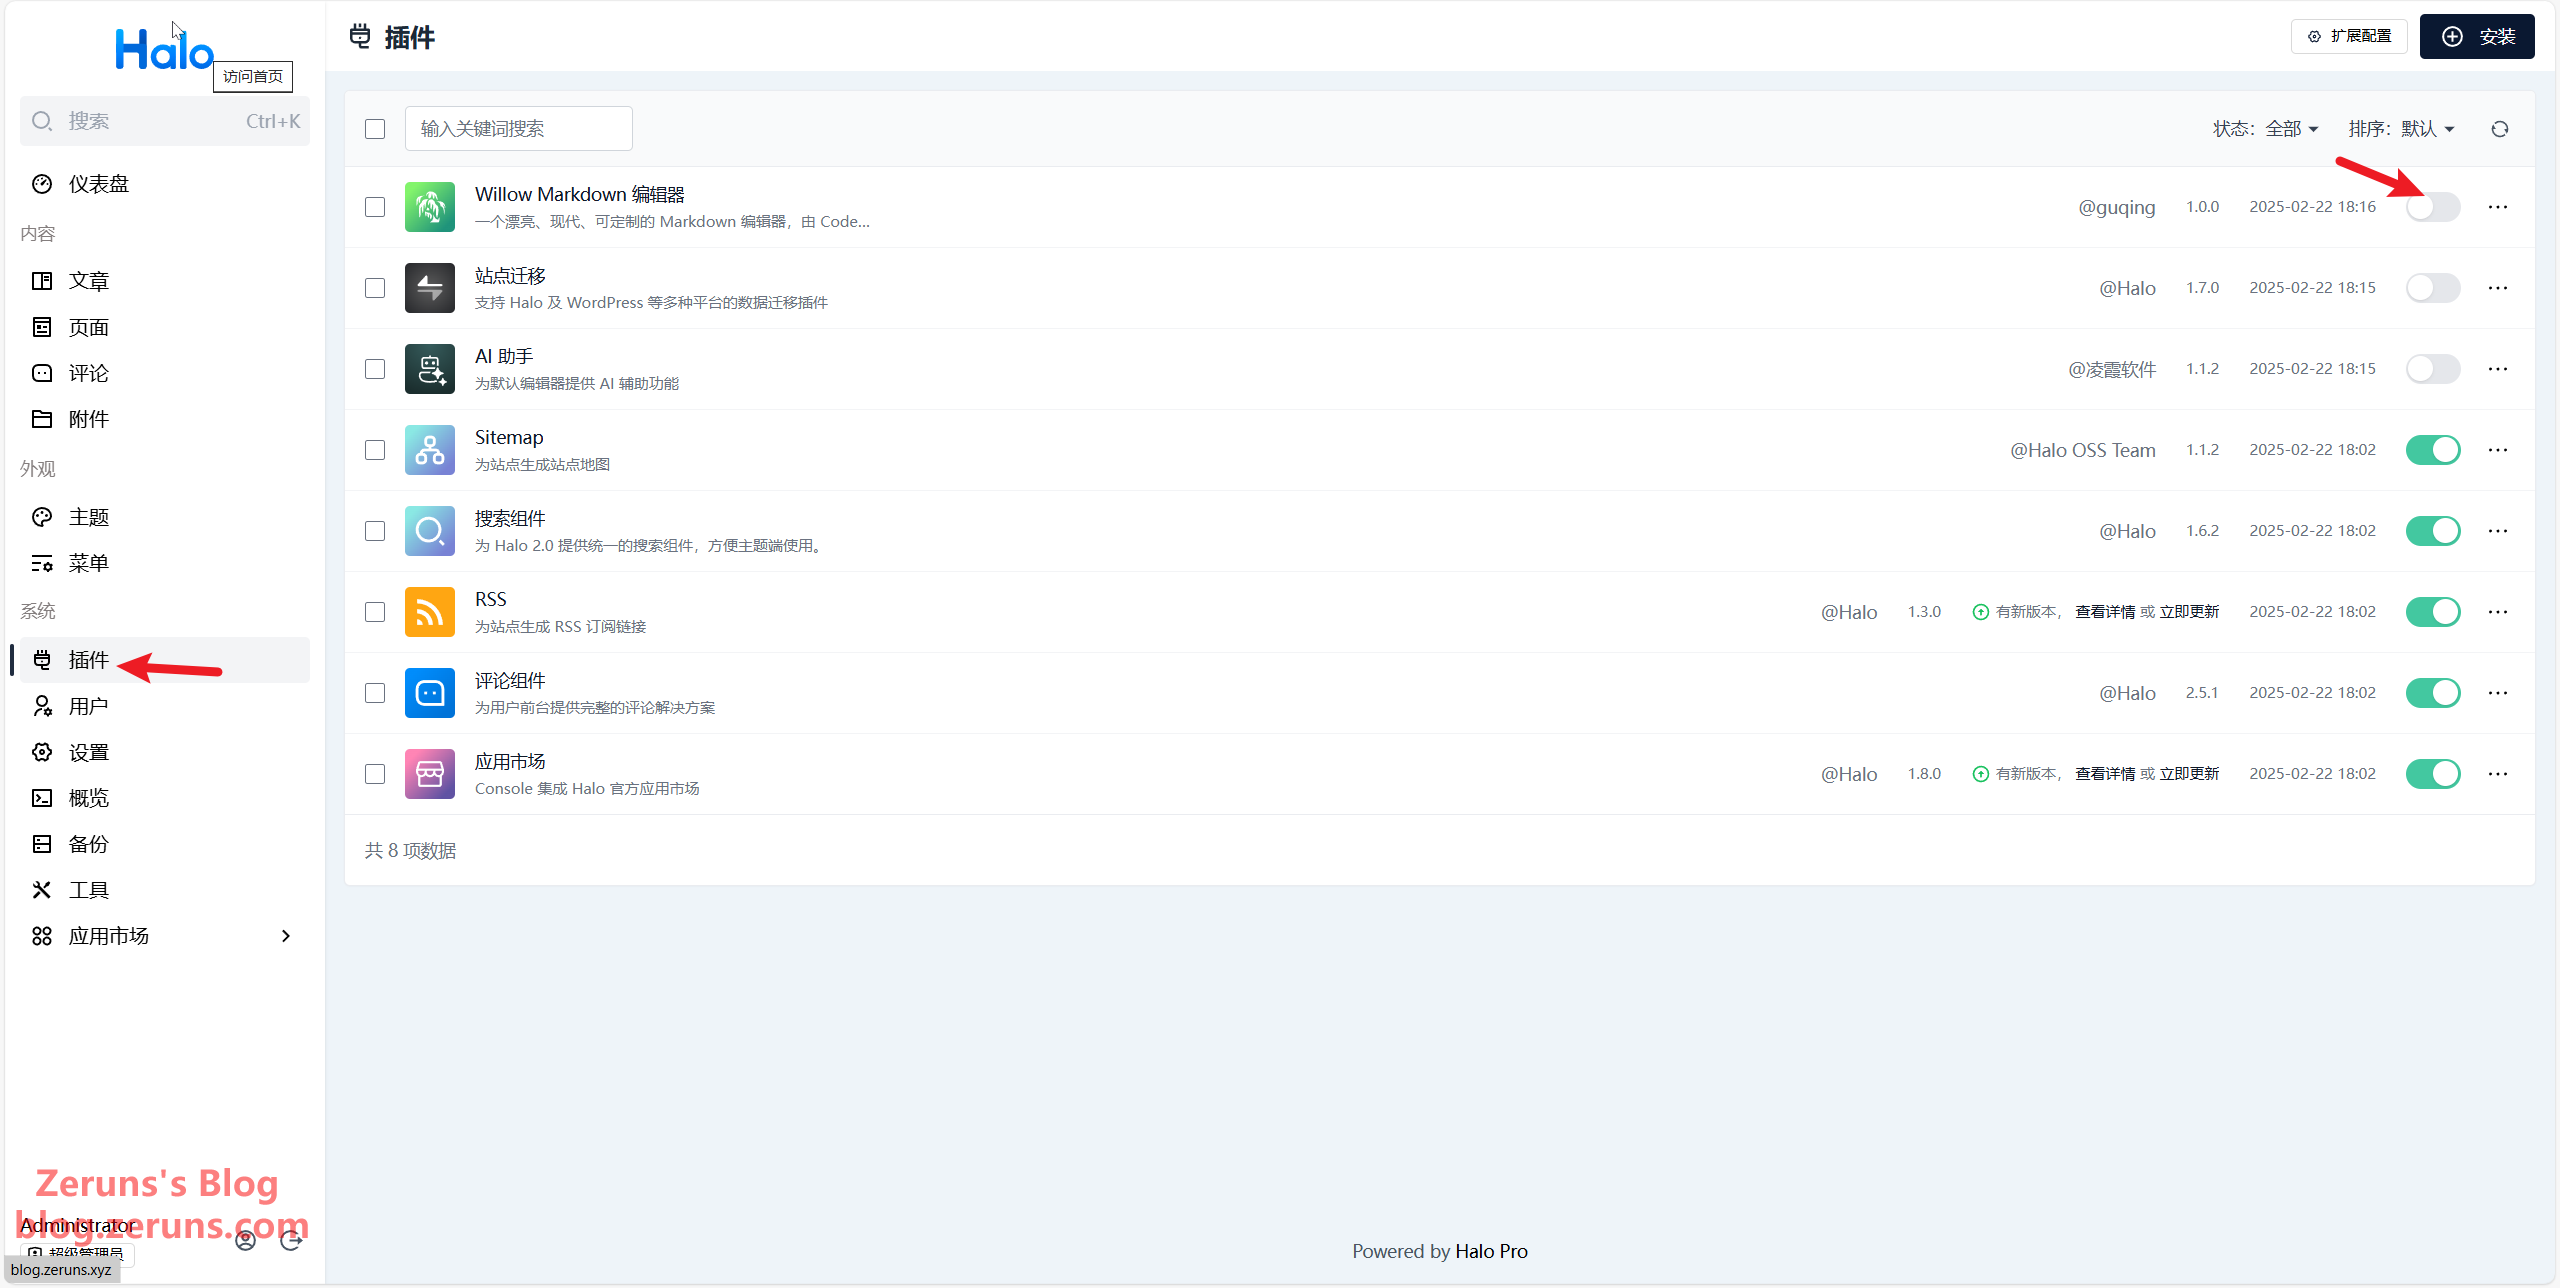
Next, click Plugins to enable or disable plugins and configure them (by clicking on a plugin's title, you can access its settings page).
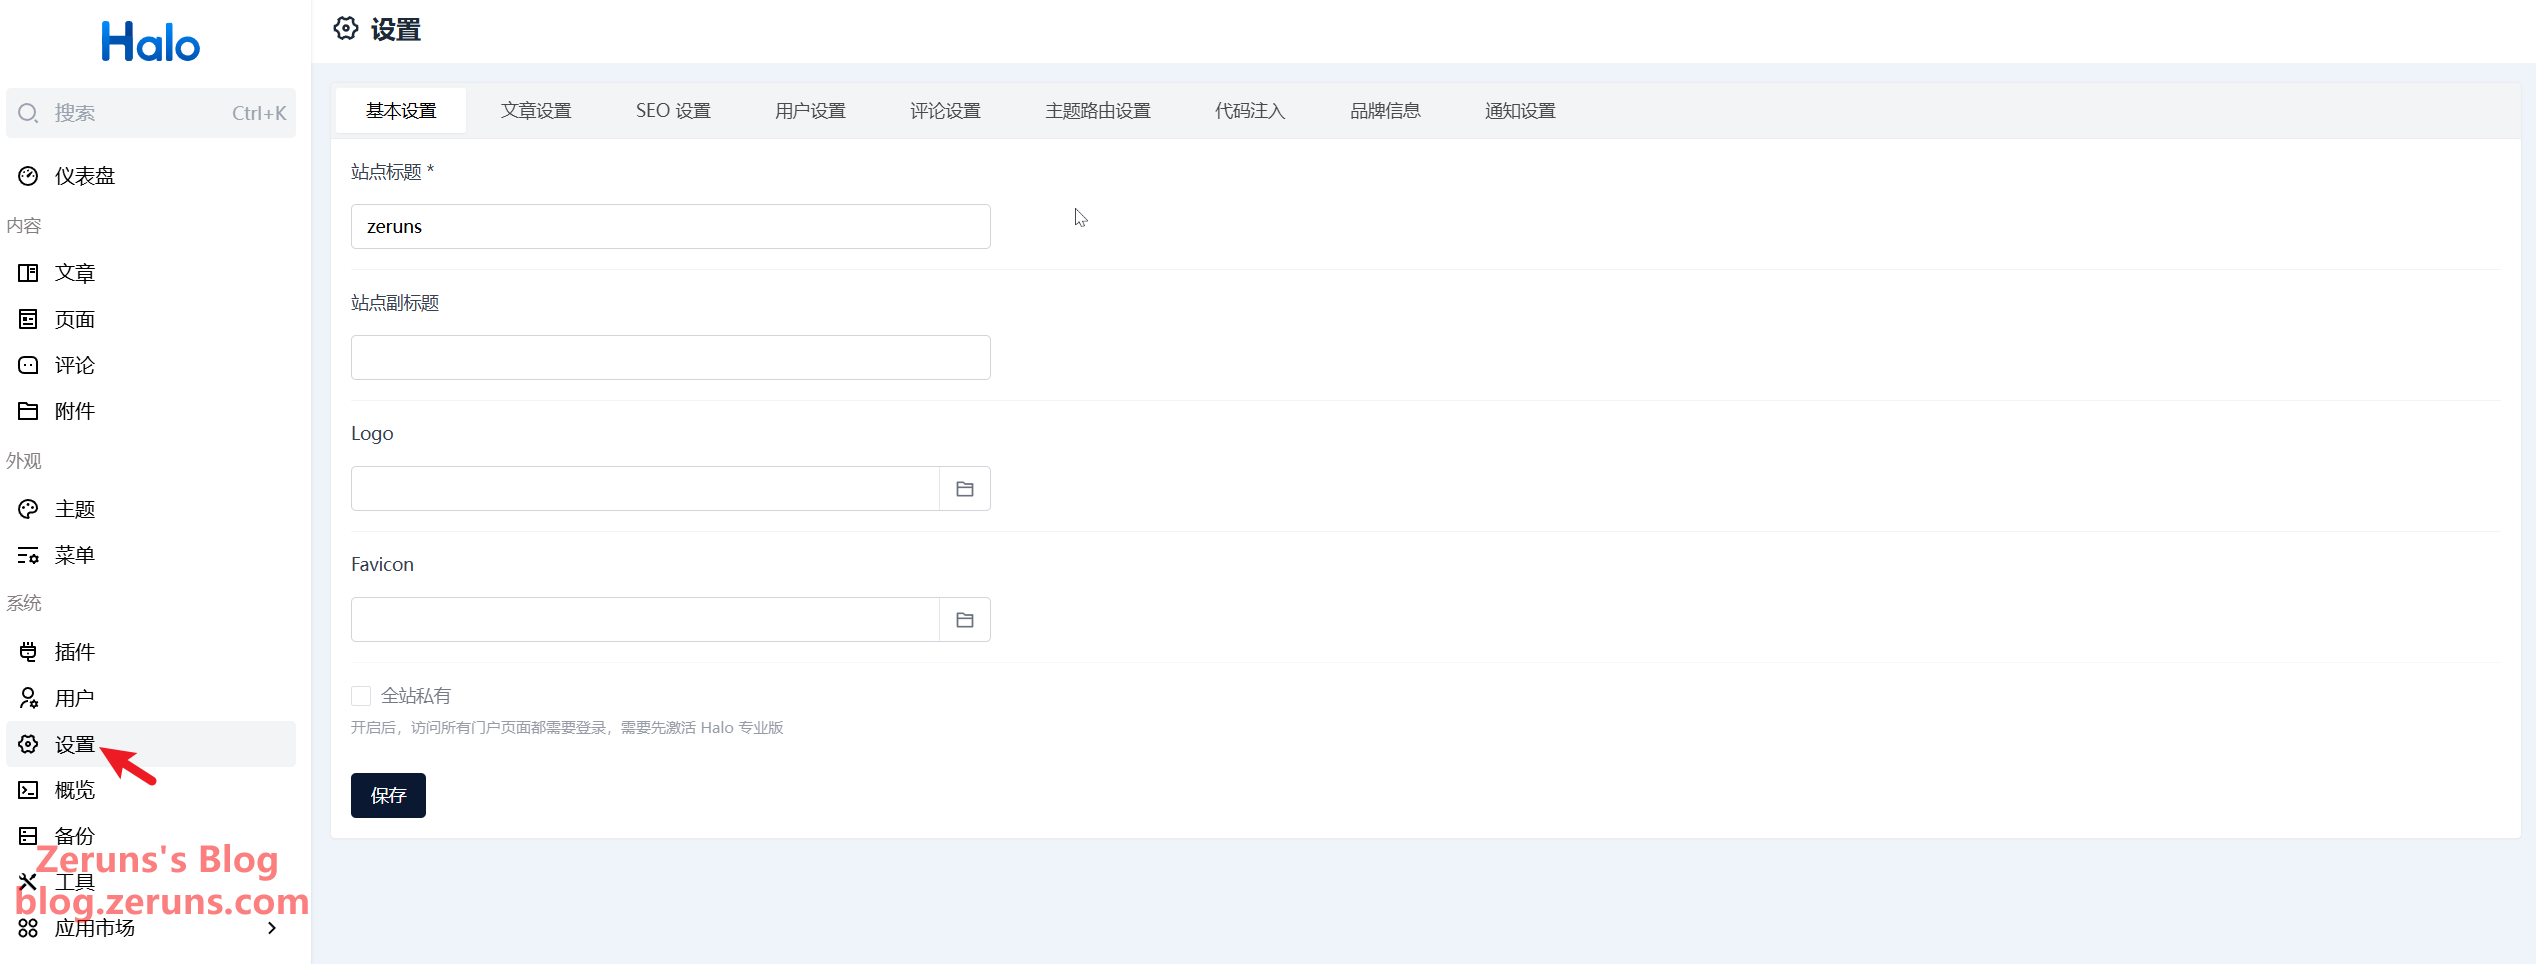
In the settings area, you can modify your website's title, logo, SEO, and more.
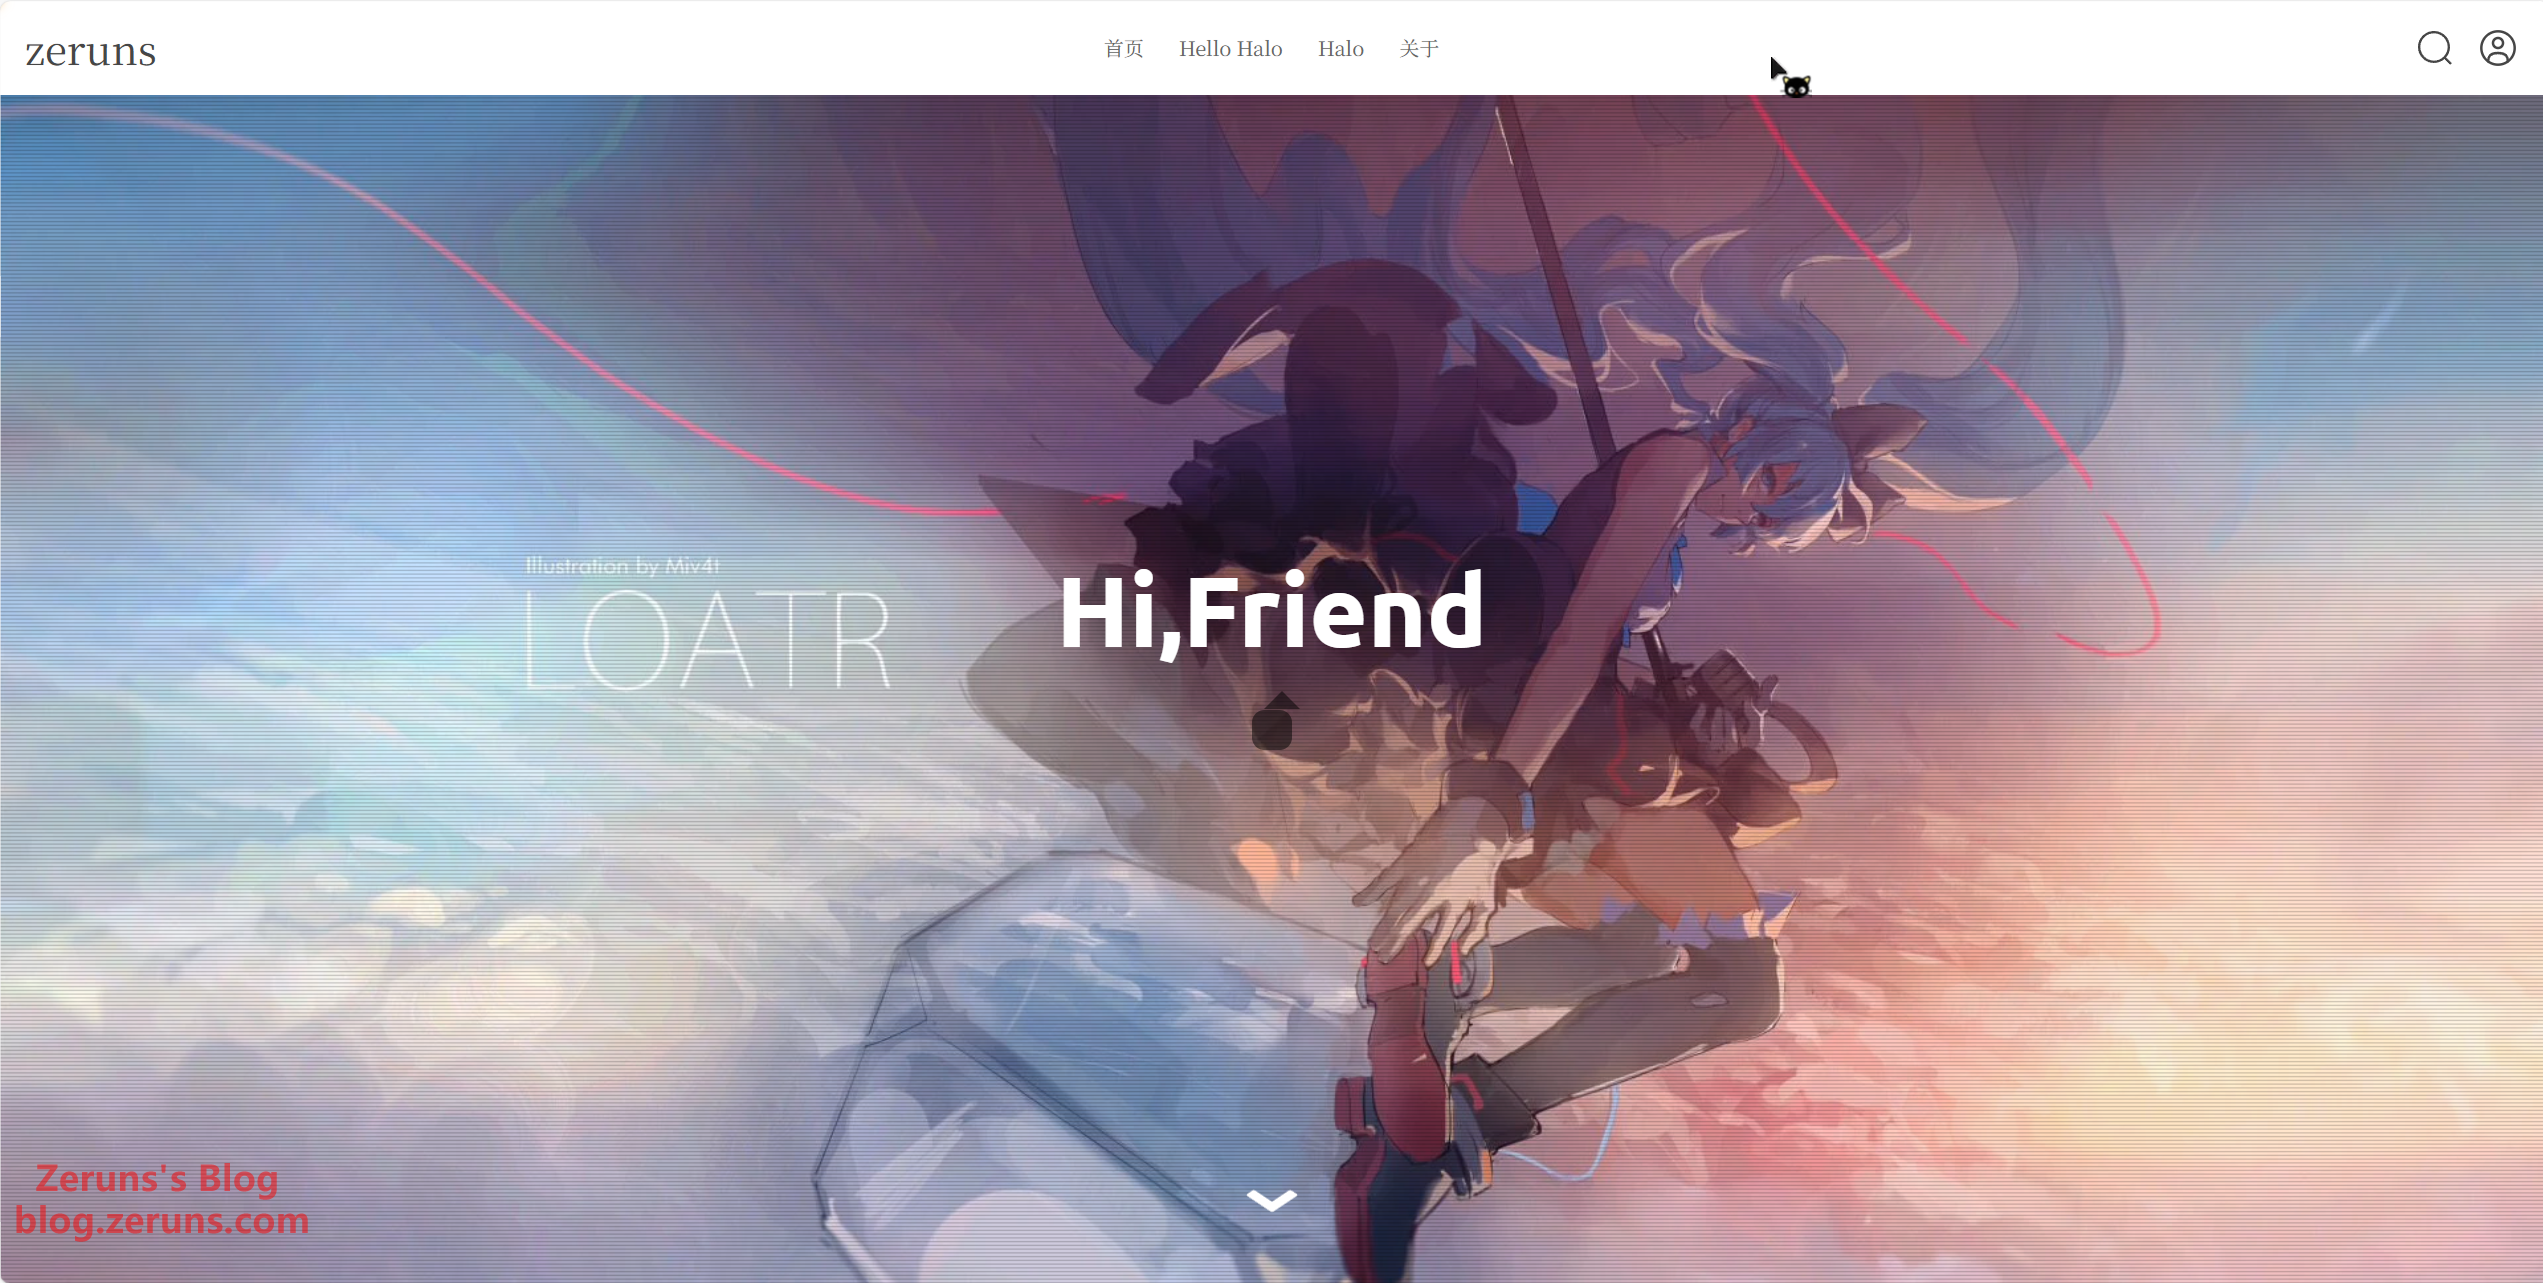
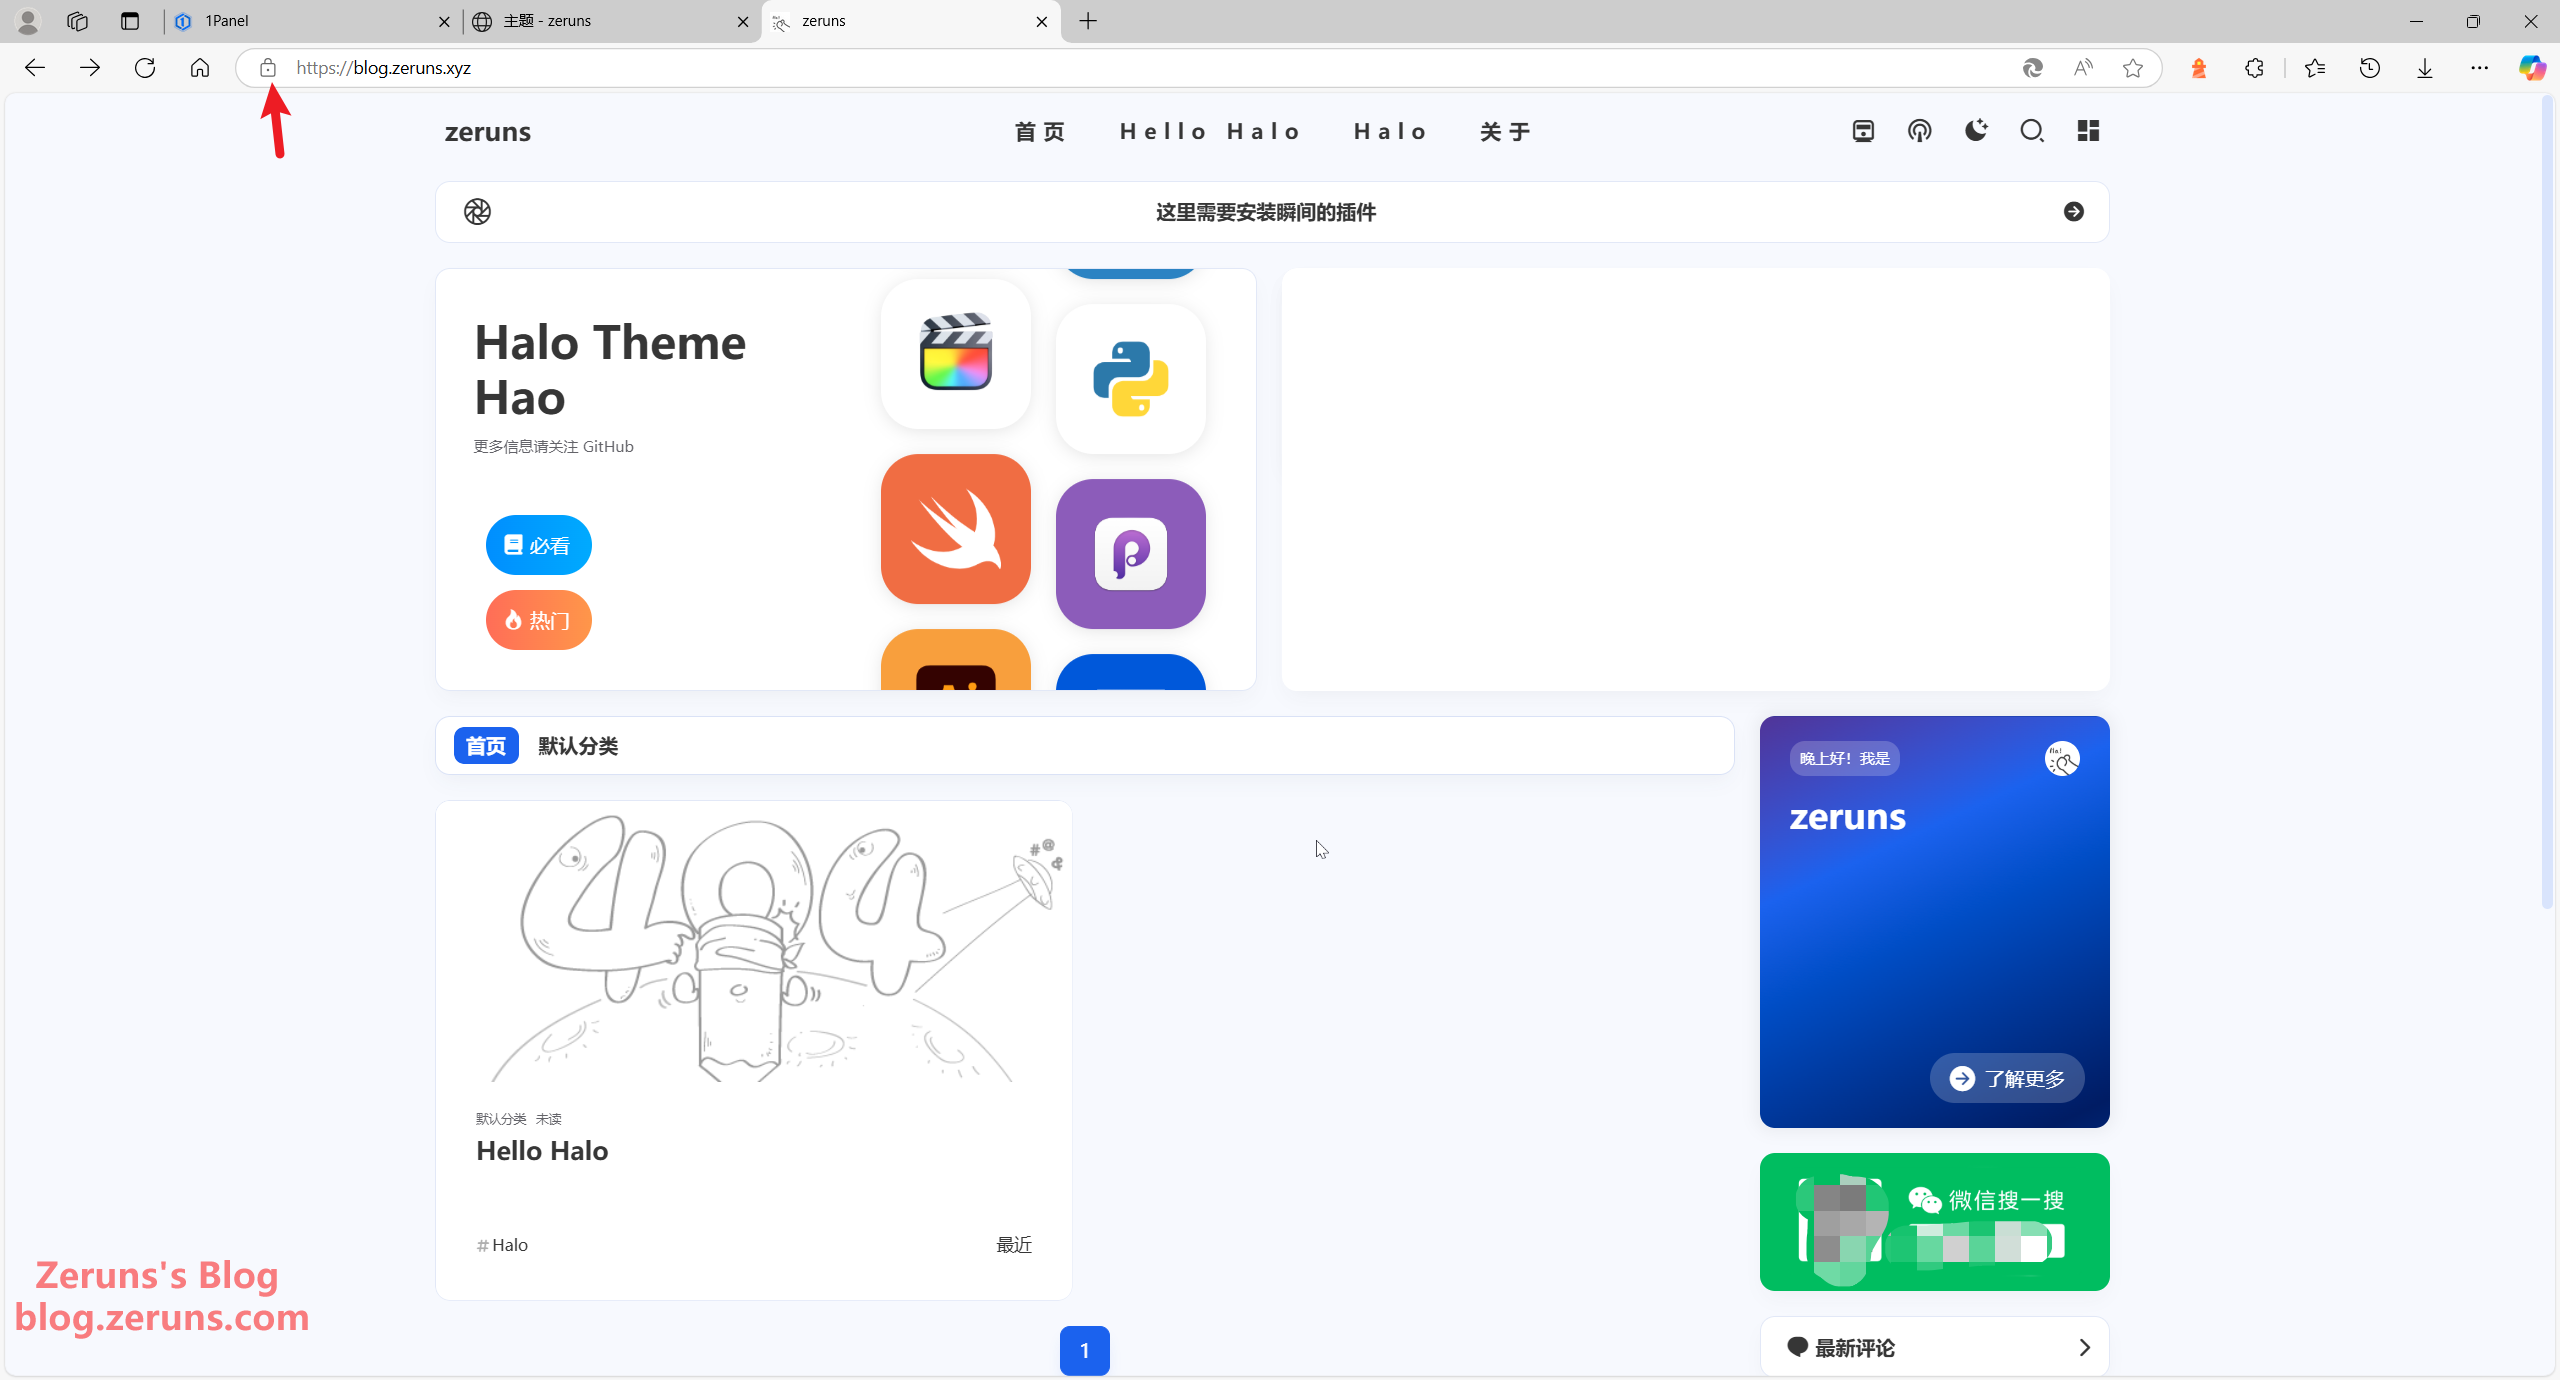
After switching to the Sakura theme, the homepage appears as follows:
Enabling HTTPS/SSL
Once SSL is enabled, your website can be accessed via https, and all communications will be encrypted—this prevents browsers from marking your site as insecure.
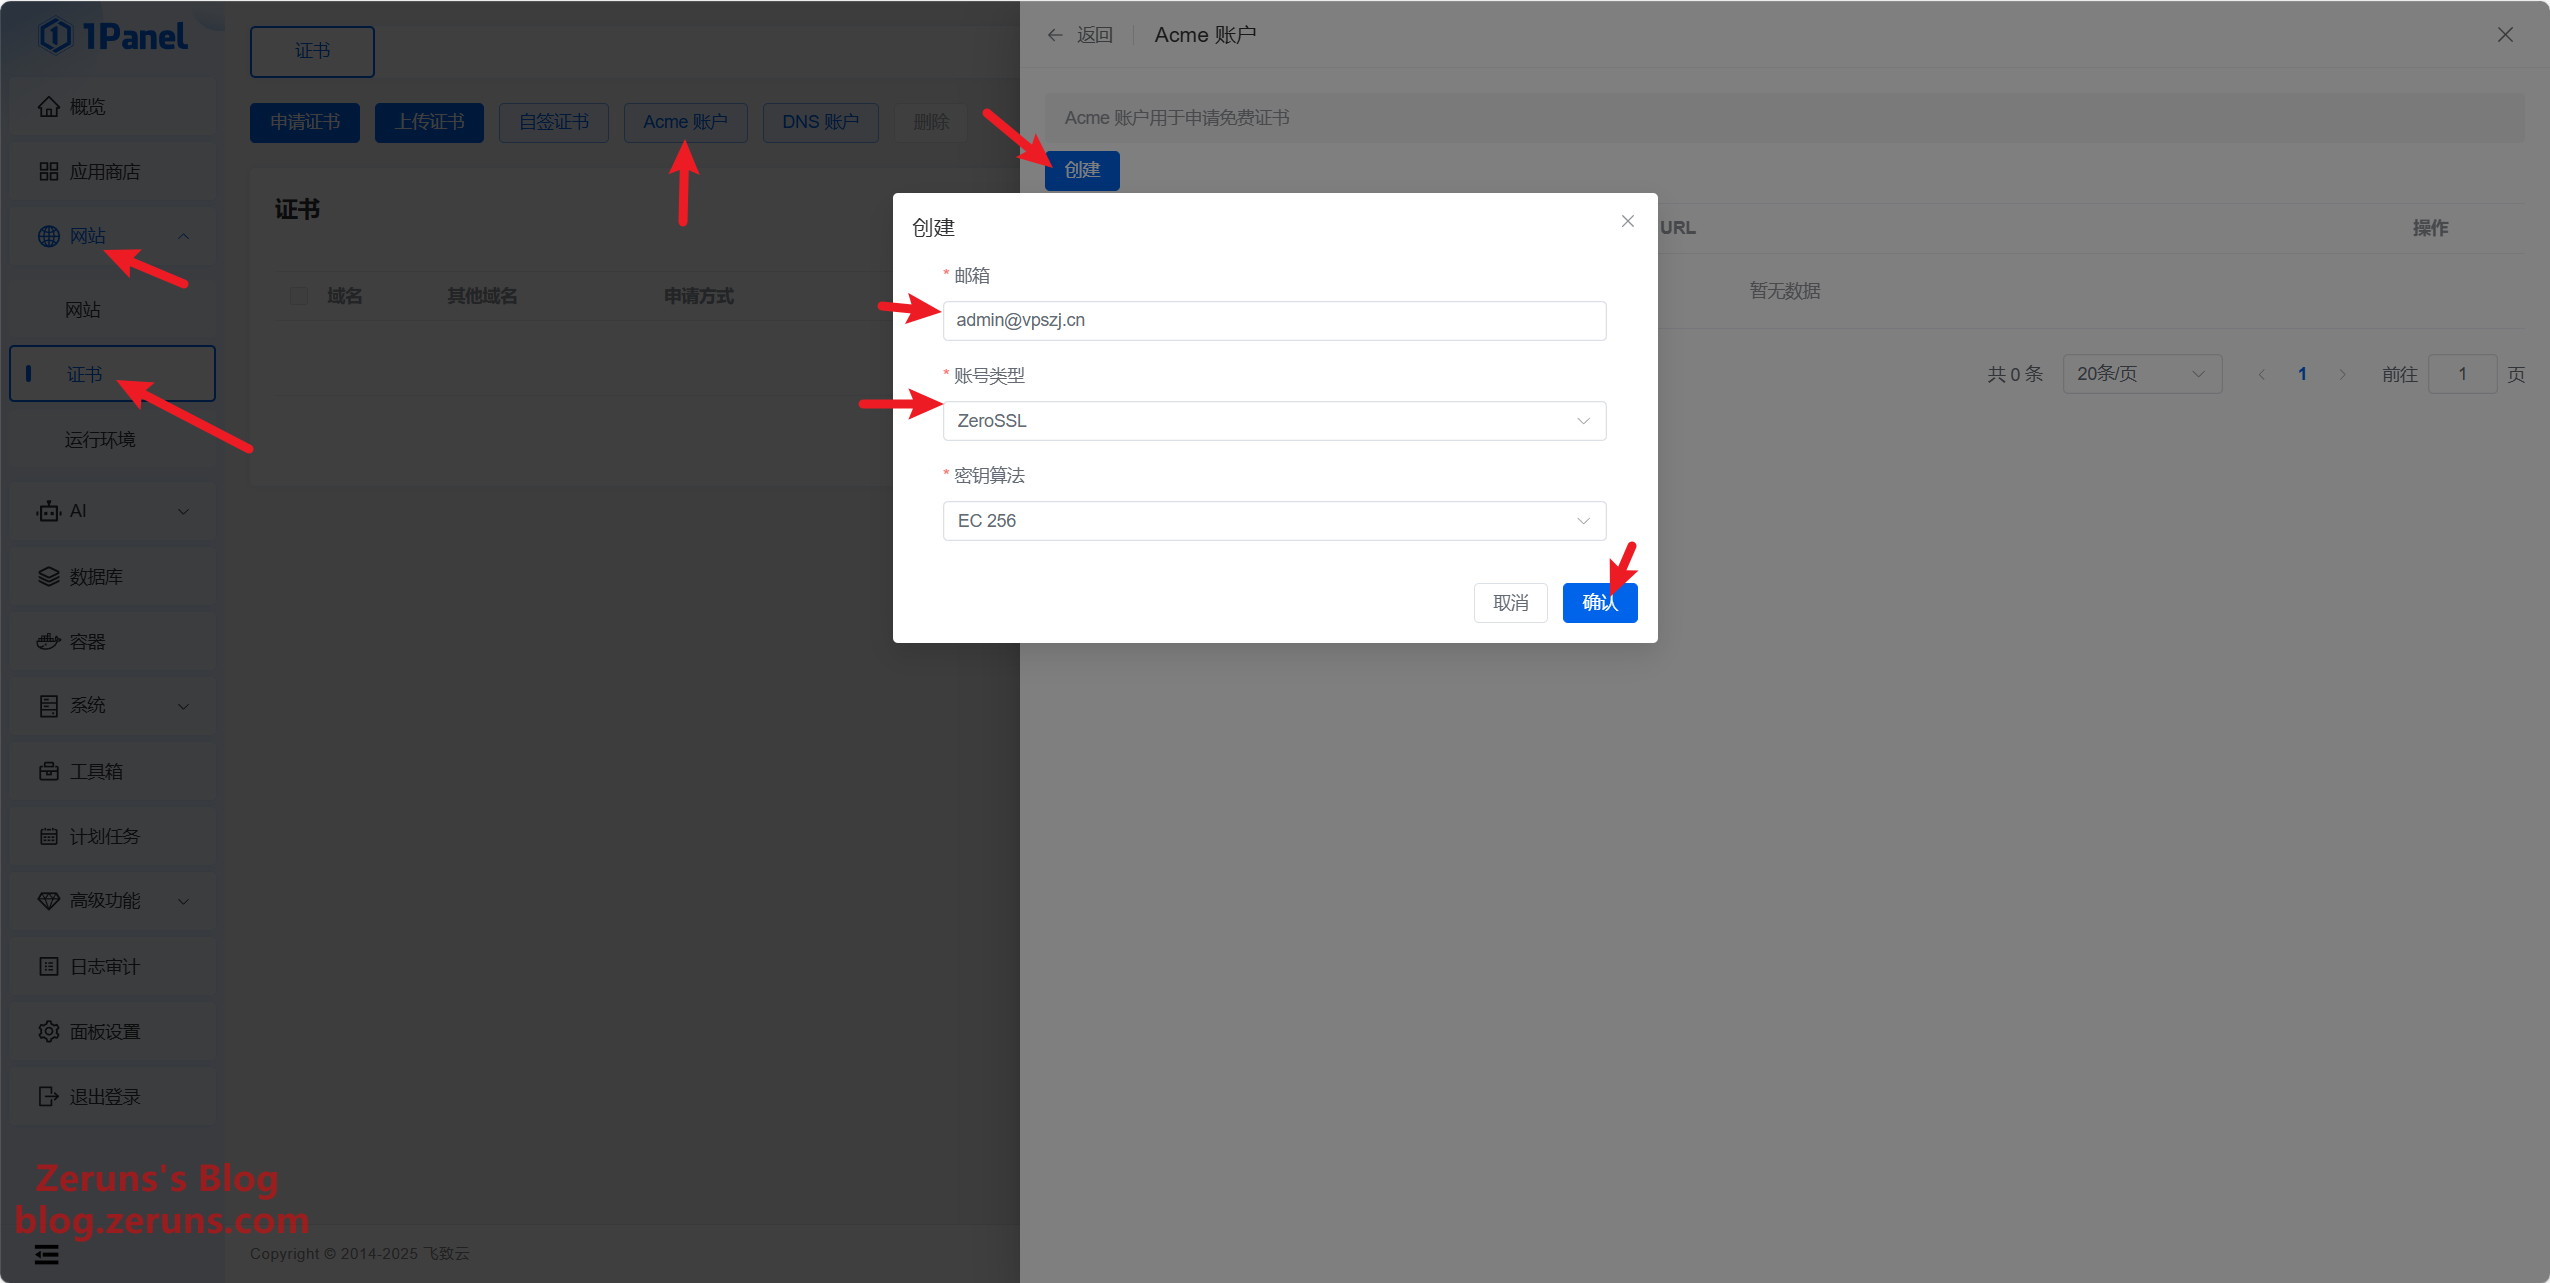
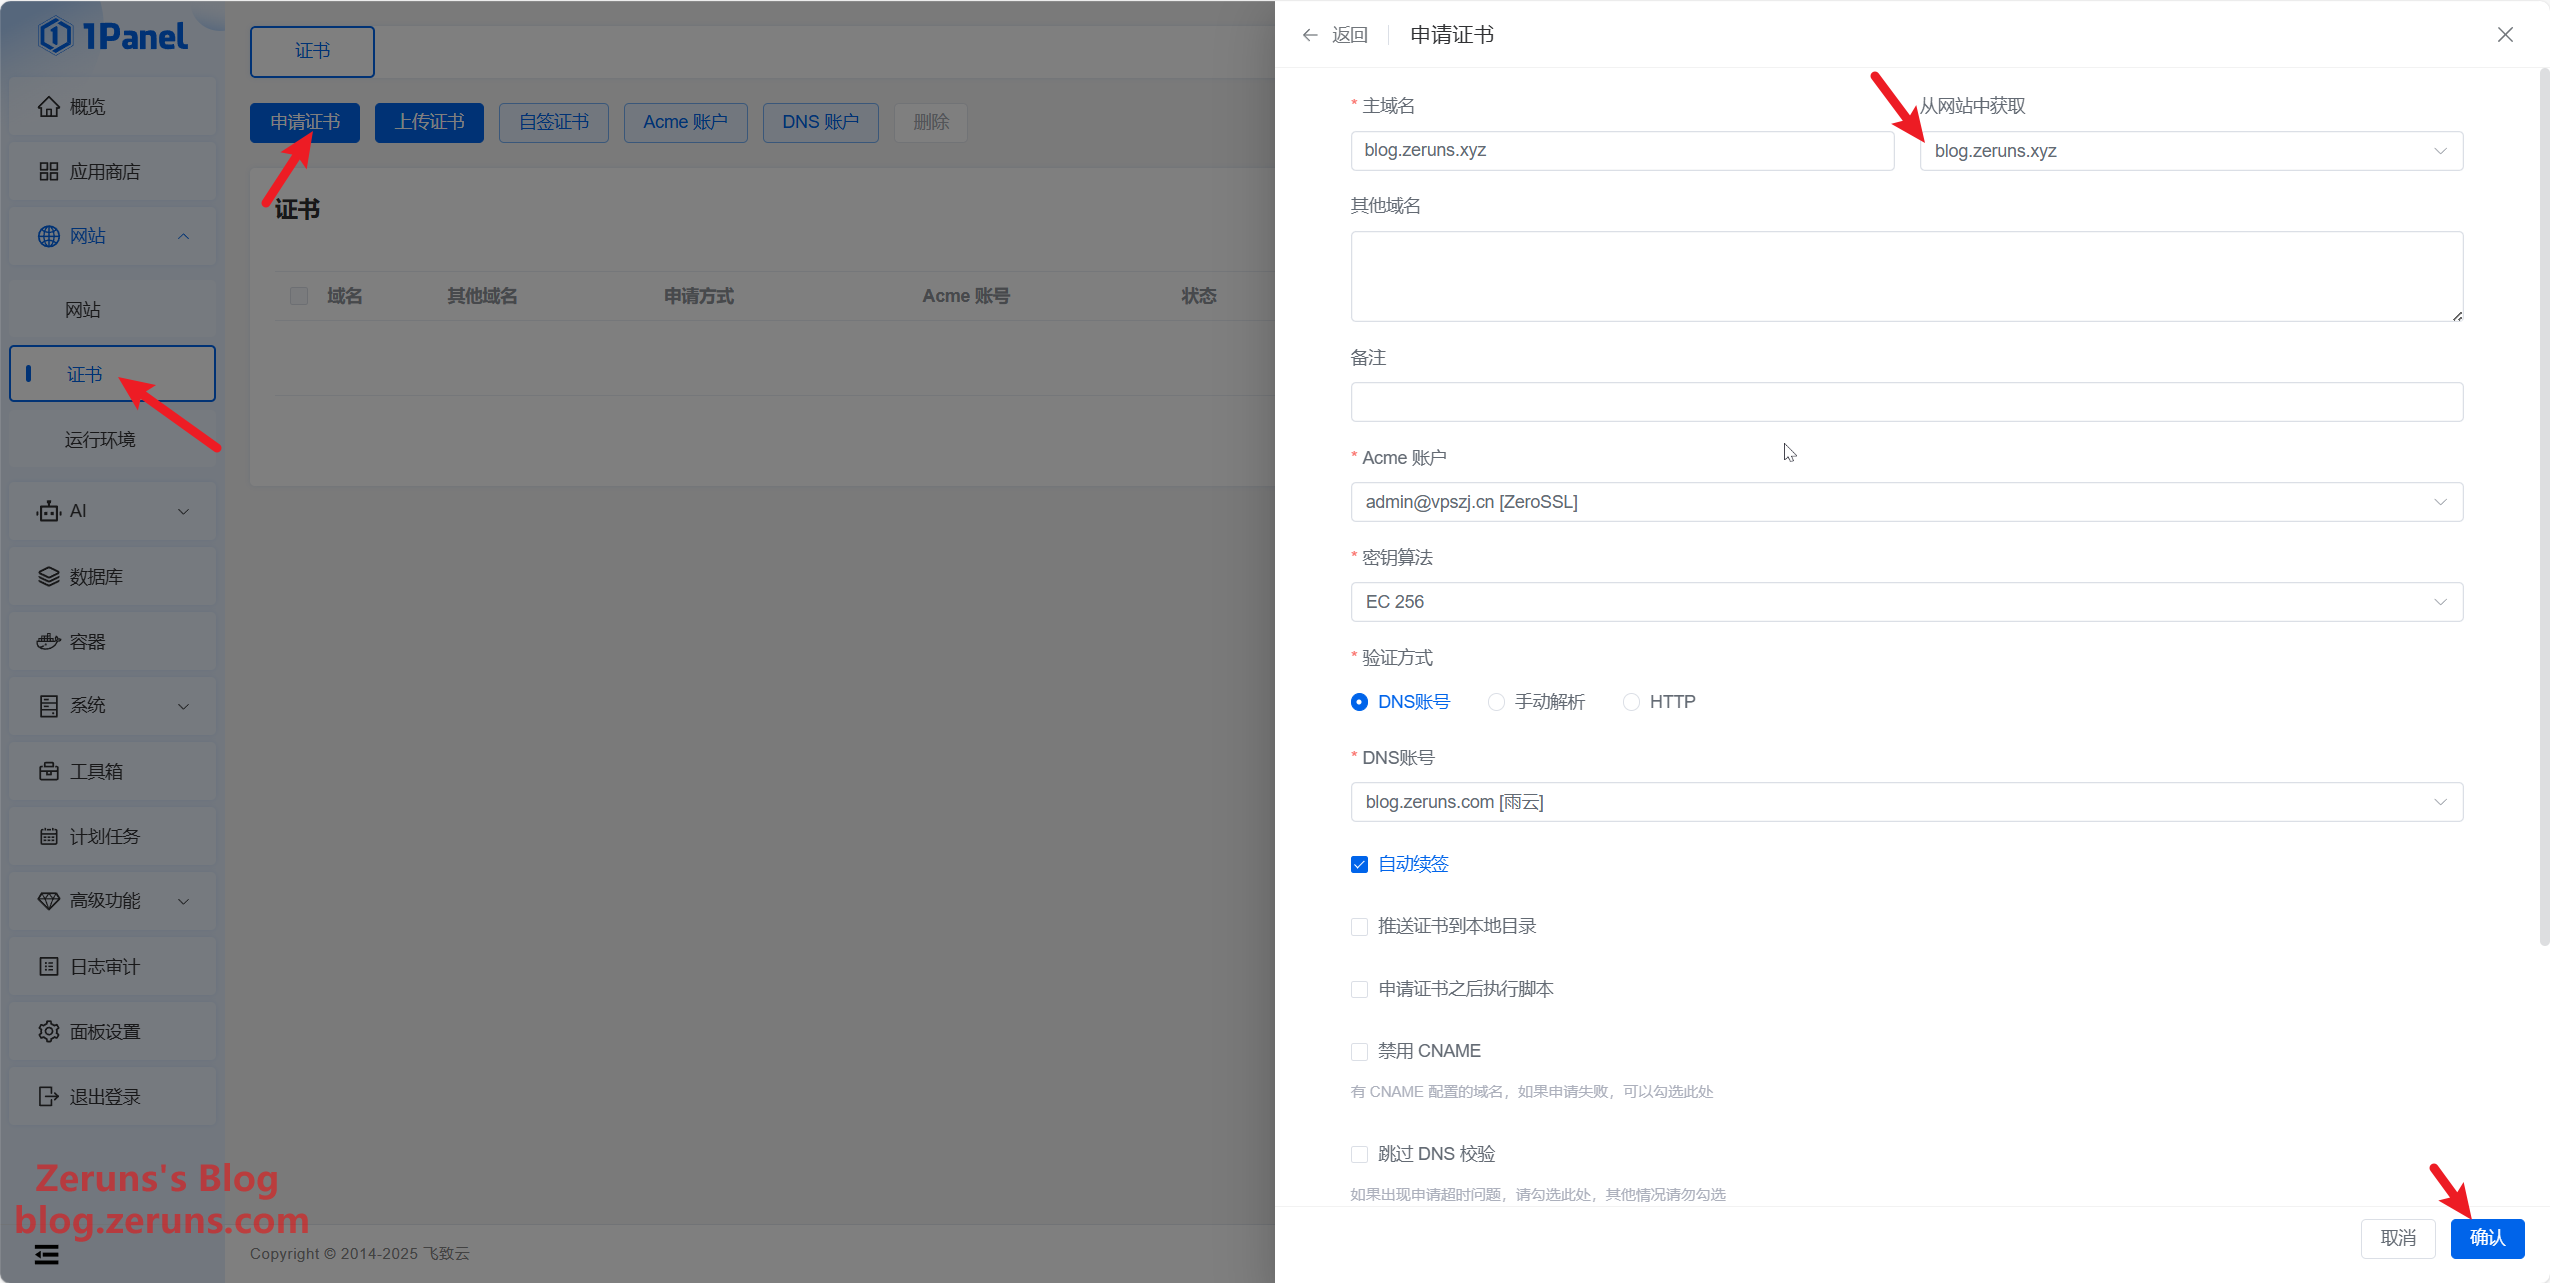
As shown below, within the 1Panel Control Panel, locate Certificates and click on Acme Account. Then, create an Acme account—select ZeroSSL as the account type (I personally prefer ZeroSSL certificates). Enter your email address and click Confirm.
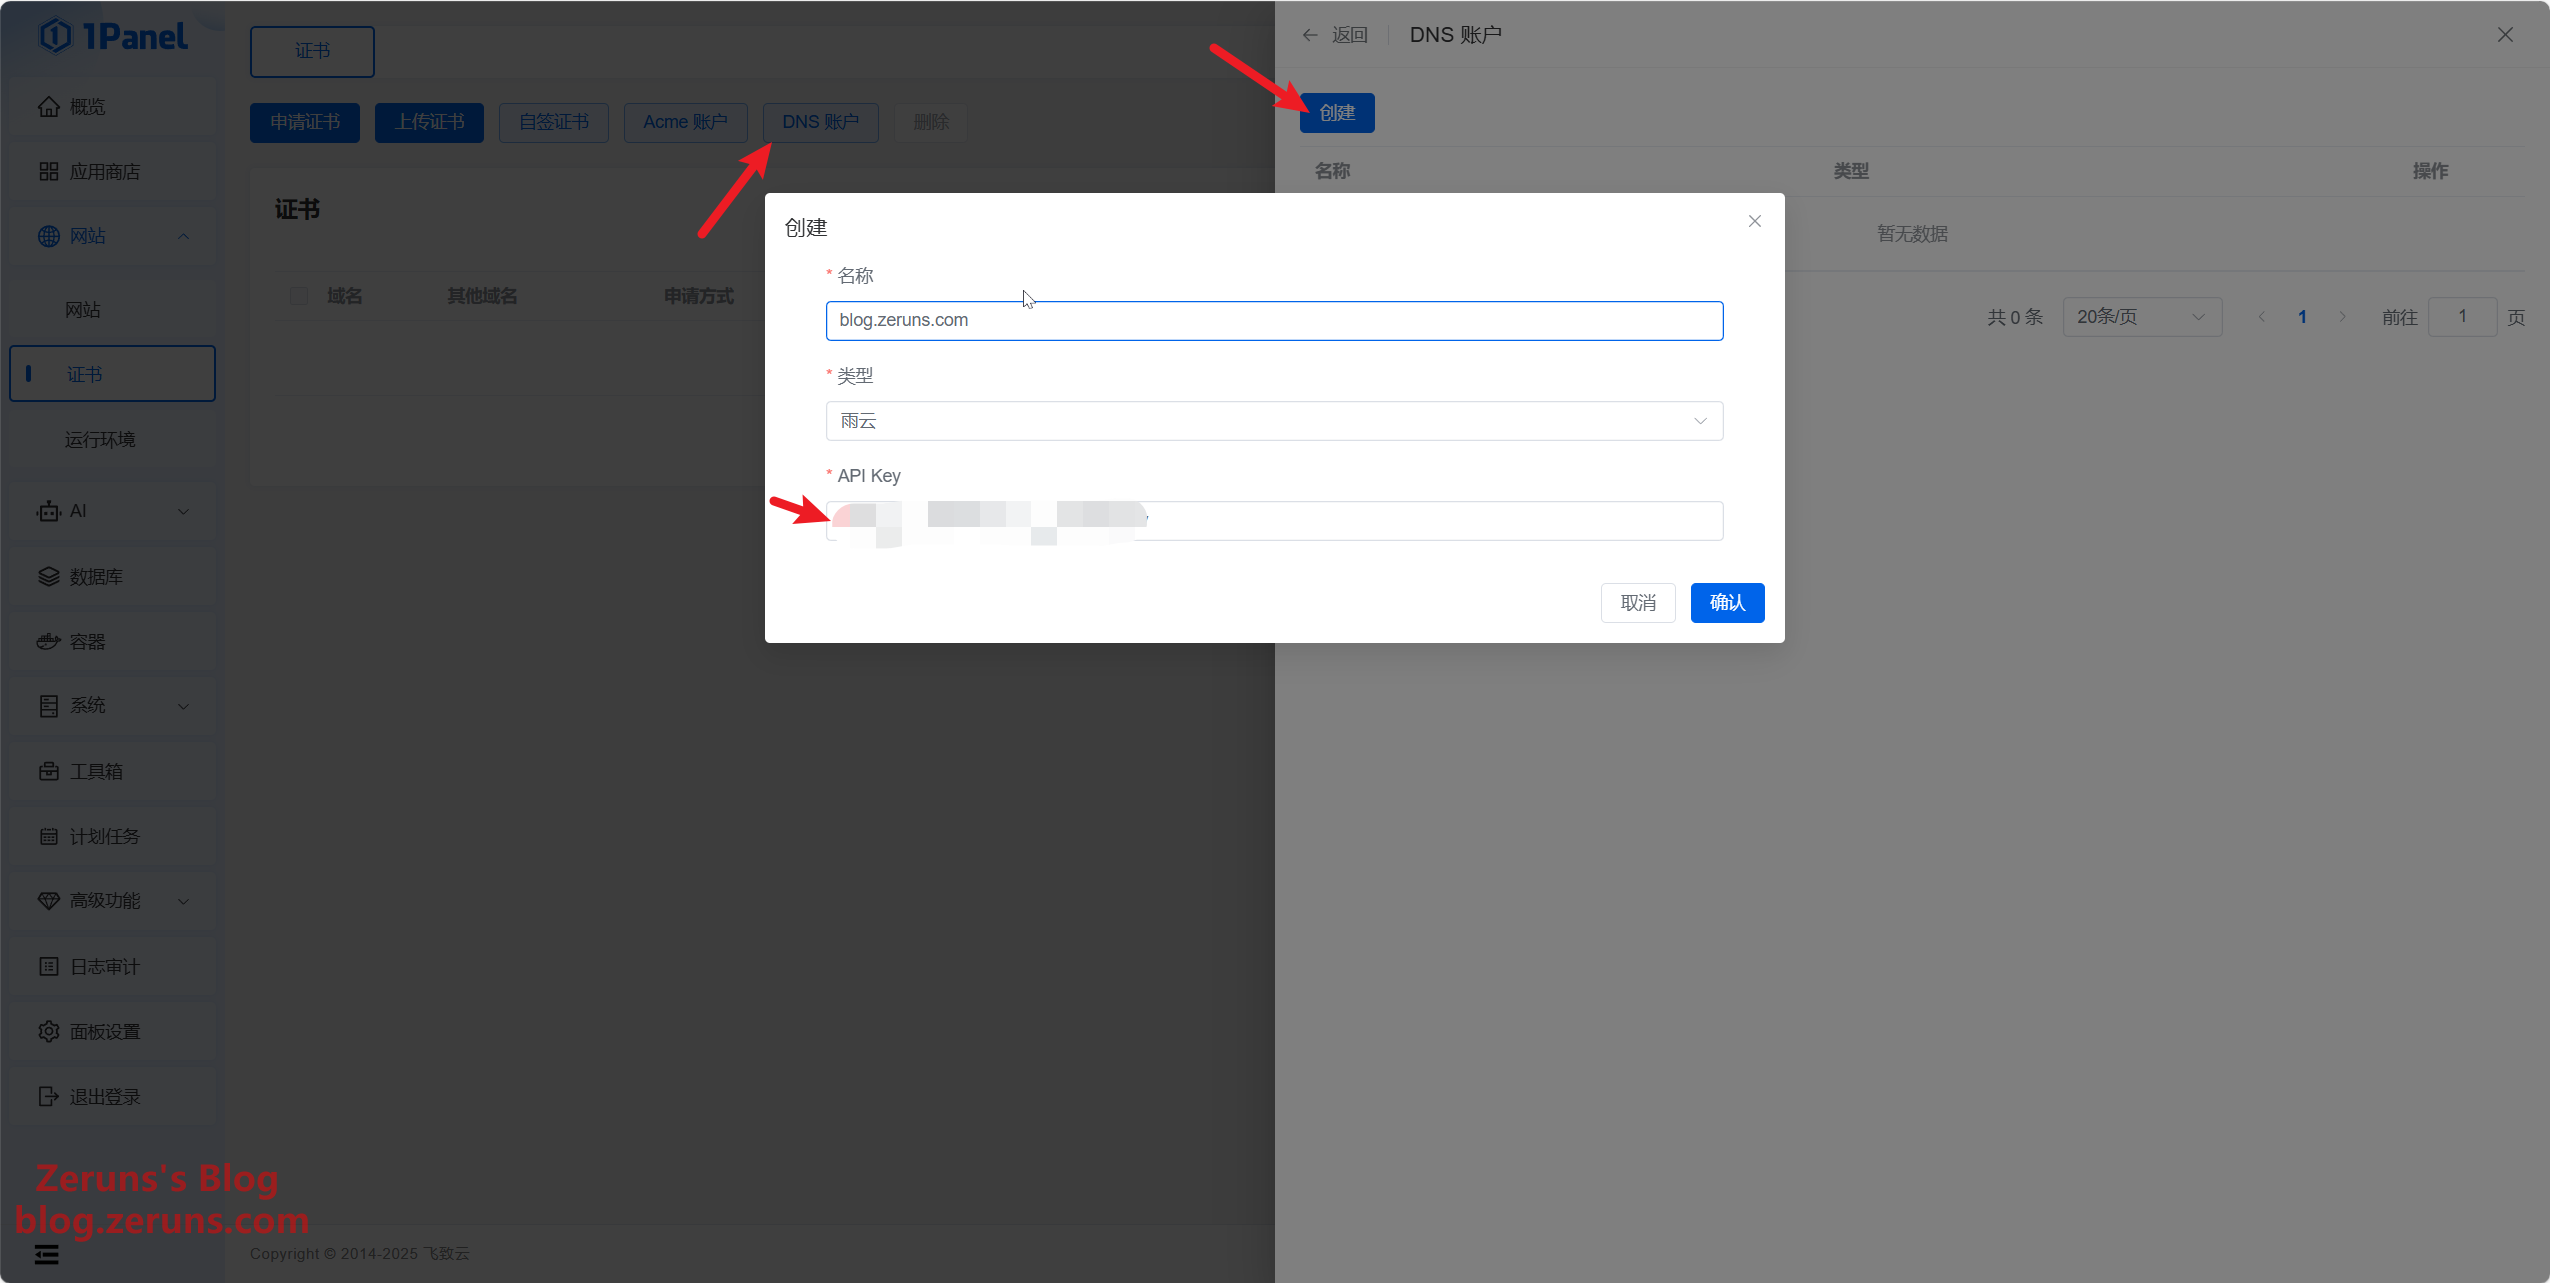
Next, in the DNS Account section, add Rainyun. This will automatically configure domain resolution, making it easier to renew your SSL certificate automatically. (Alternatively, you can skip this step and manually set up domain resolution in the Rainyun control panel when applying for the SSL certificate.)
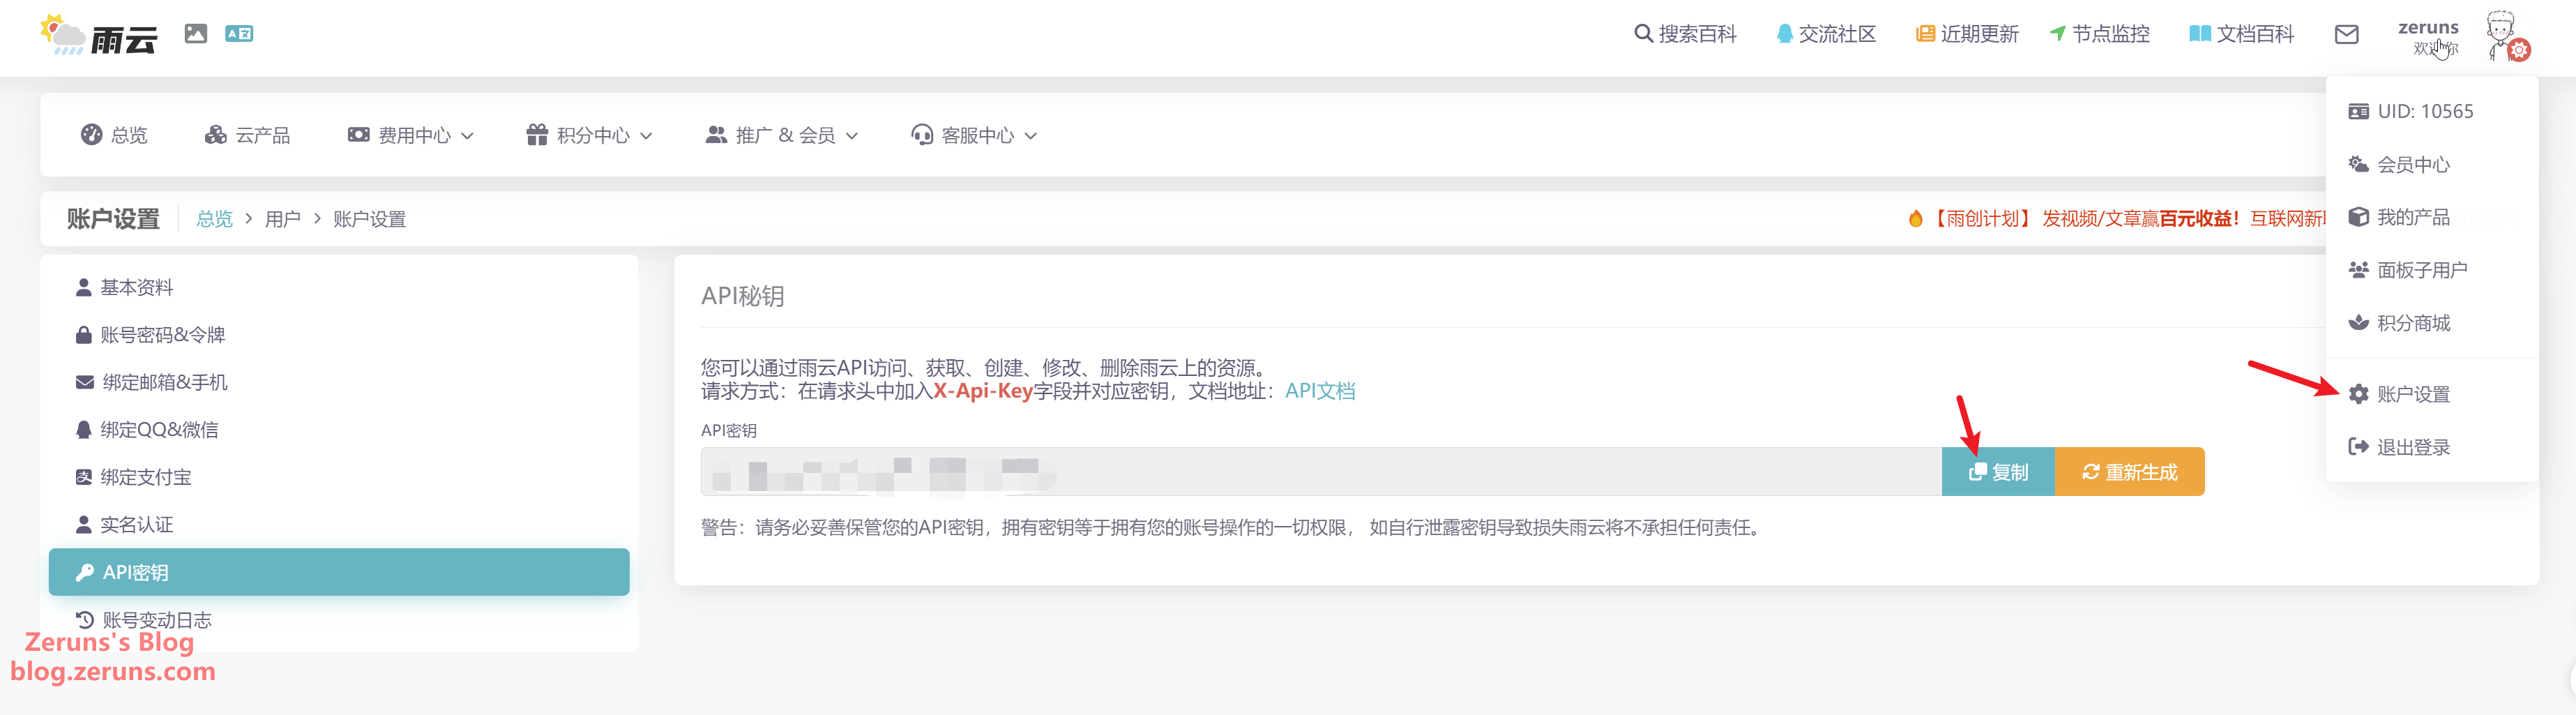
Go to the Rainyun Control Panel → Account Settings to obtain your API Key, then fill it in. The name can be anything you choose.
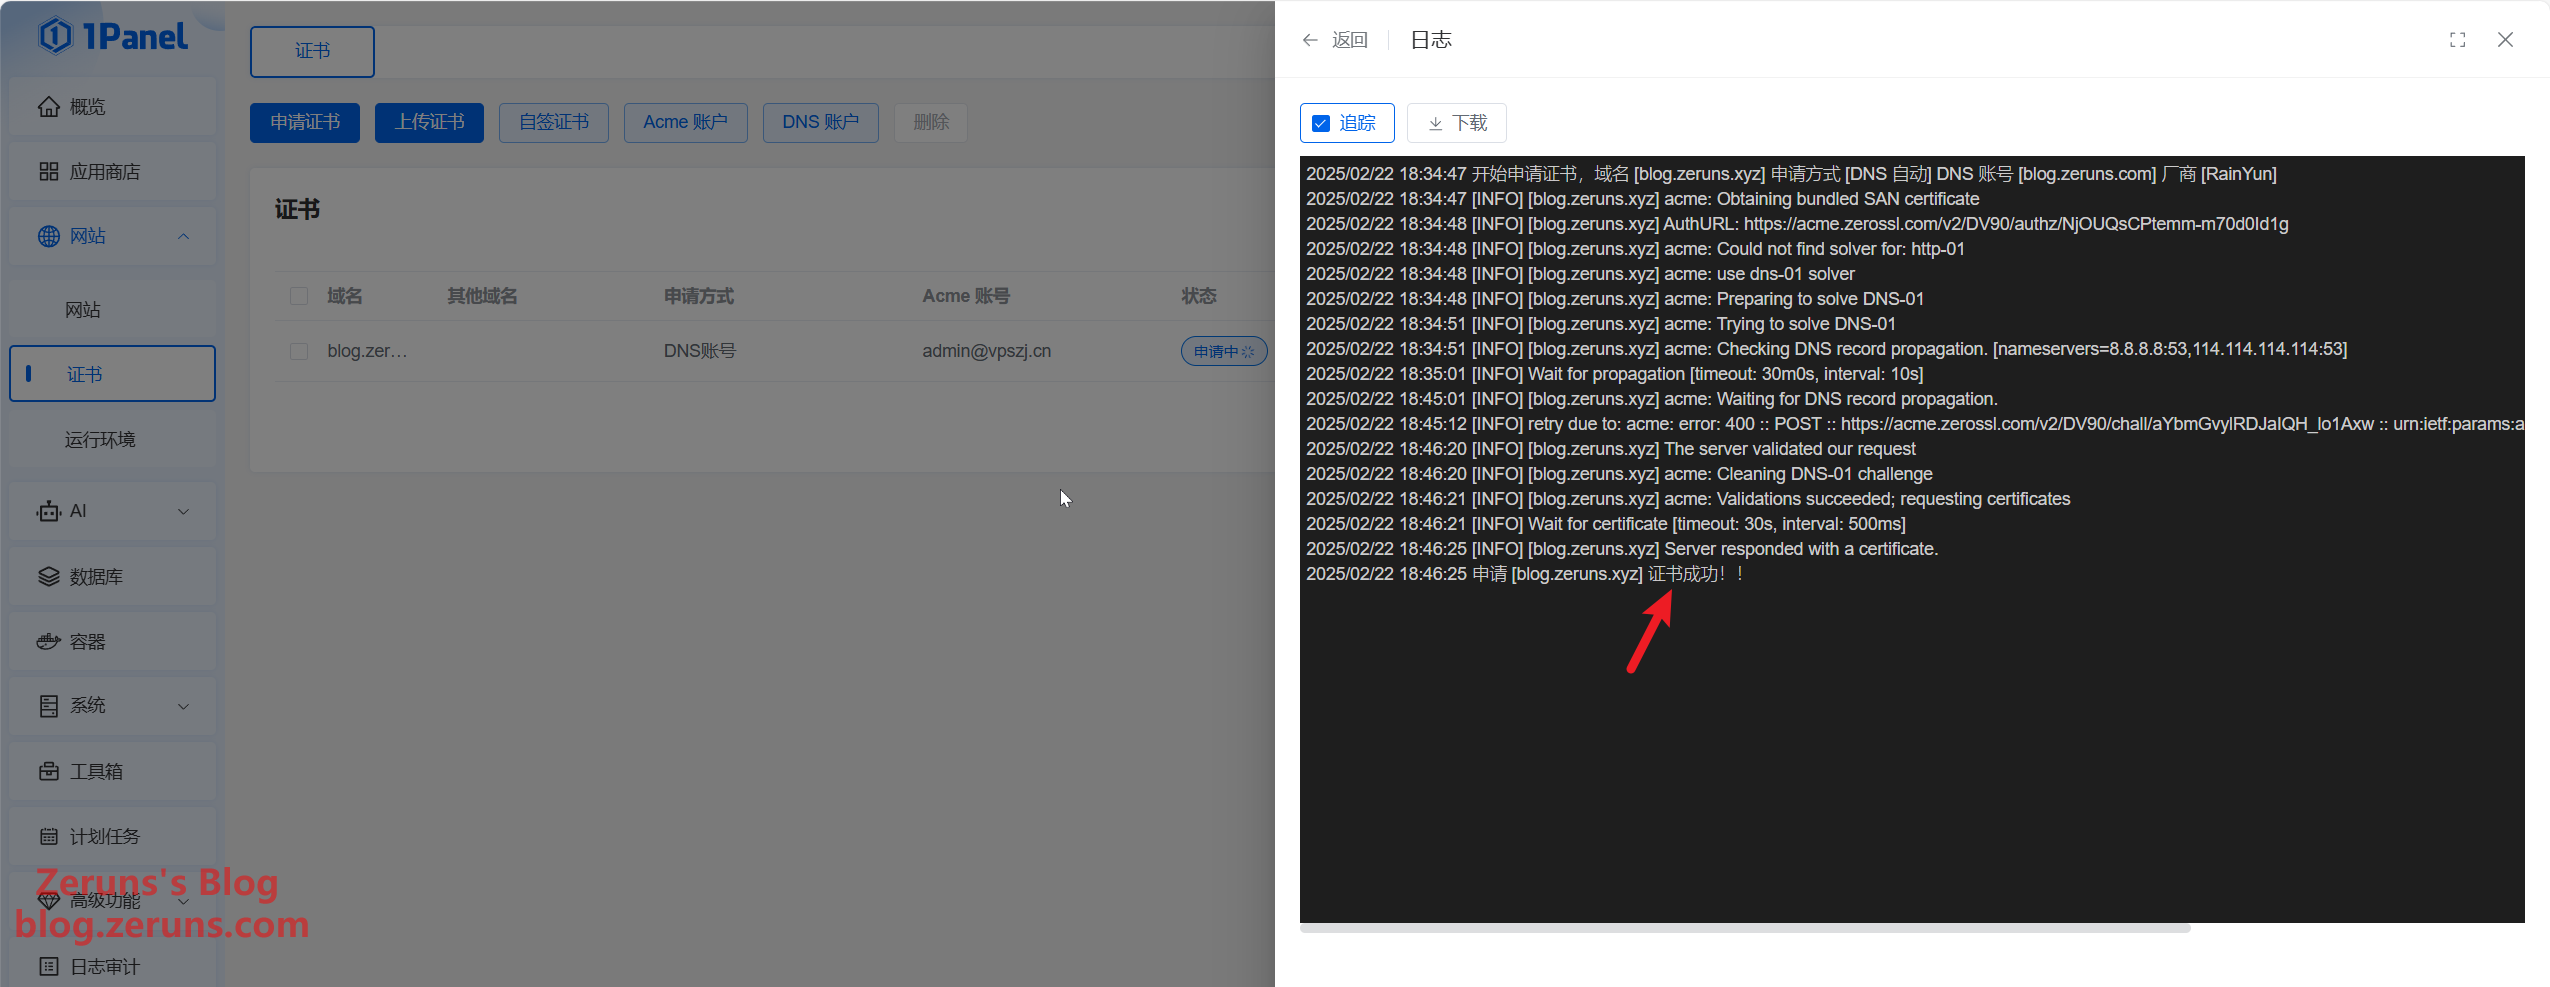
Then, click Apply for Certificate, choose the website you created earlier, and confirm. After a short wait, you should see that the certificate has been successfully applied.
Next, click Website → Configuration → HTTPS → Enable HTTPS, select the SSL certificate you just applied for, and then click Save.
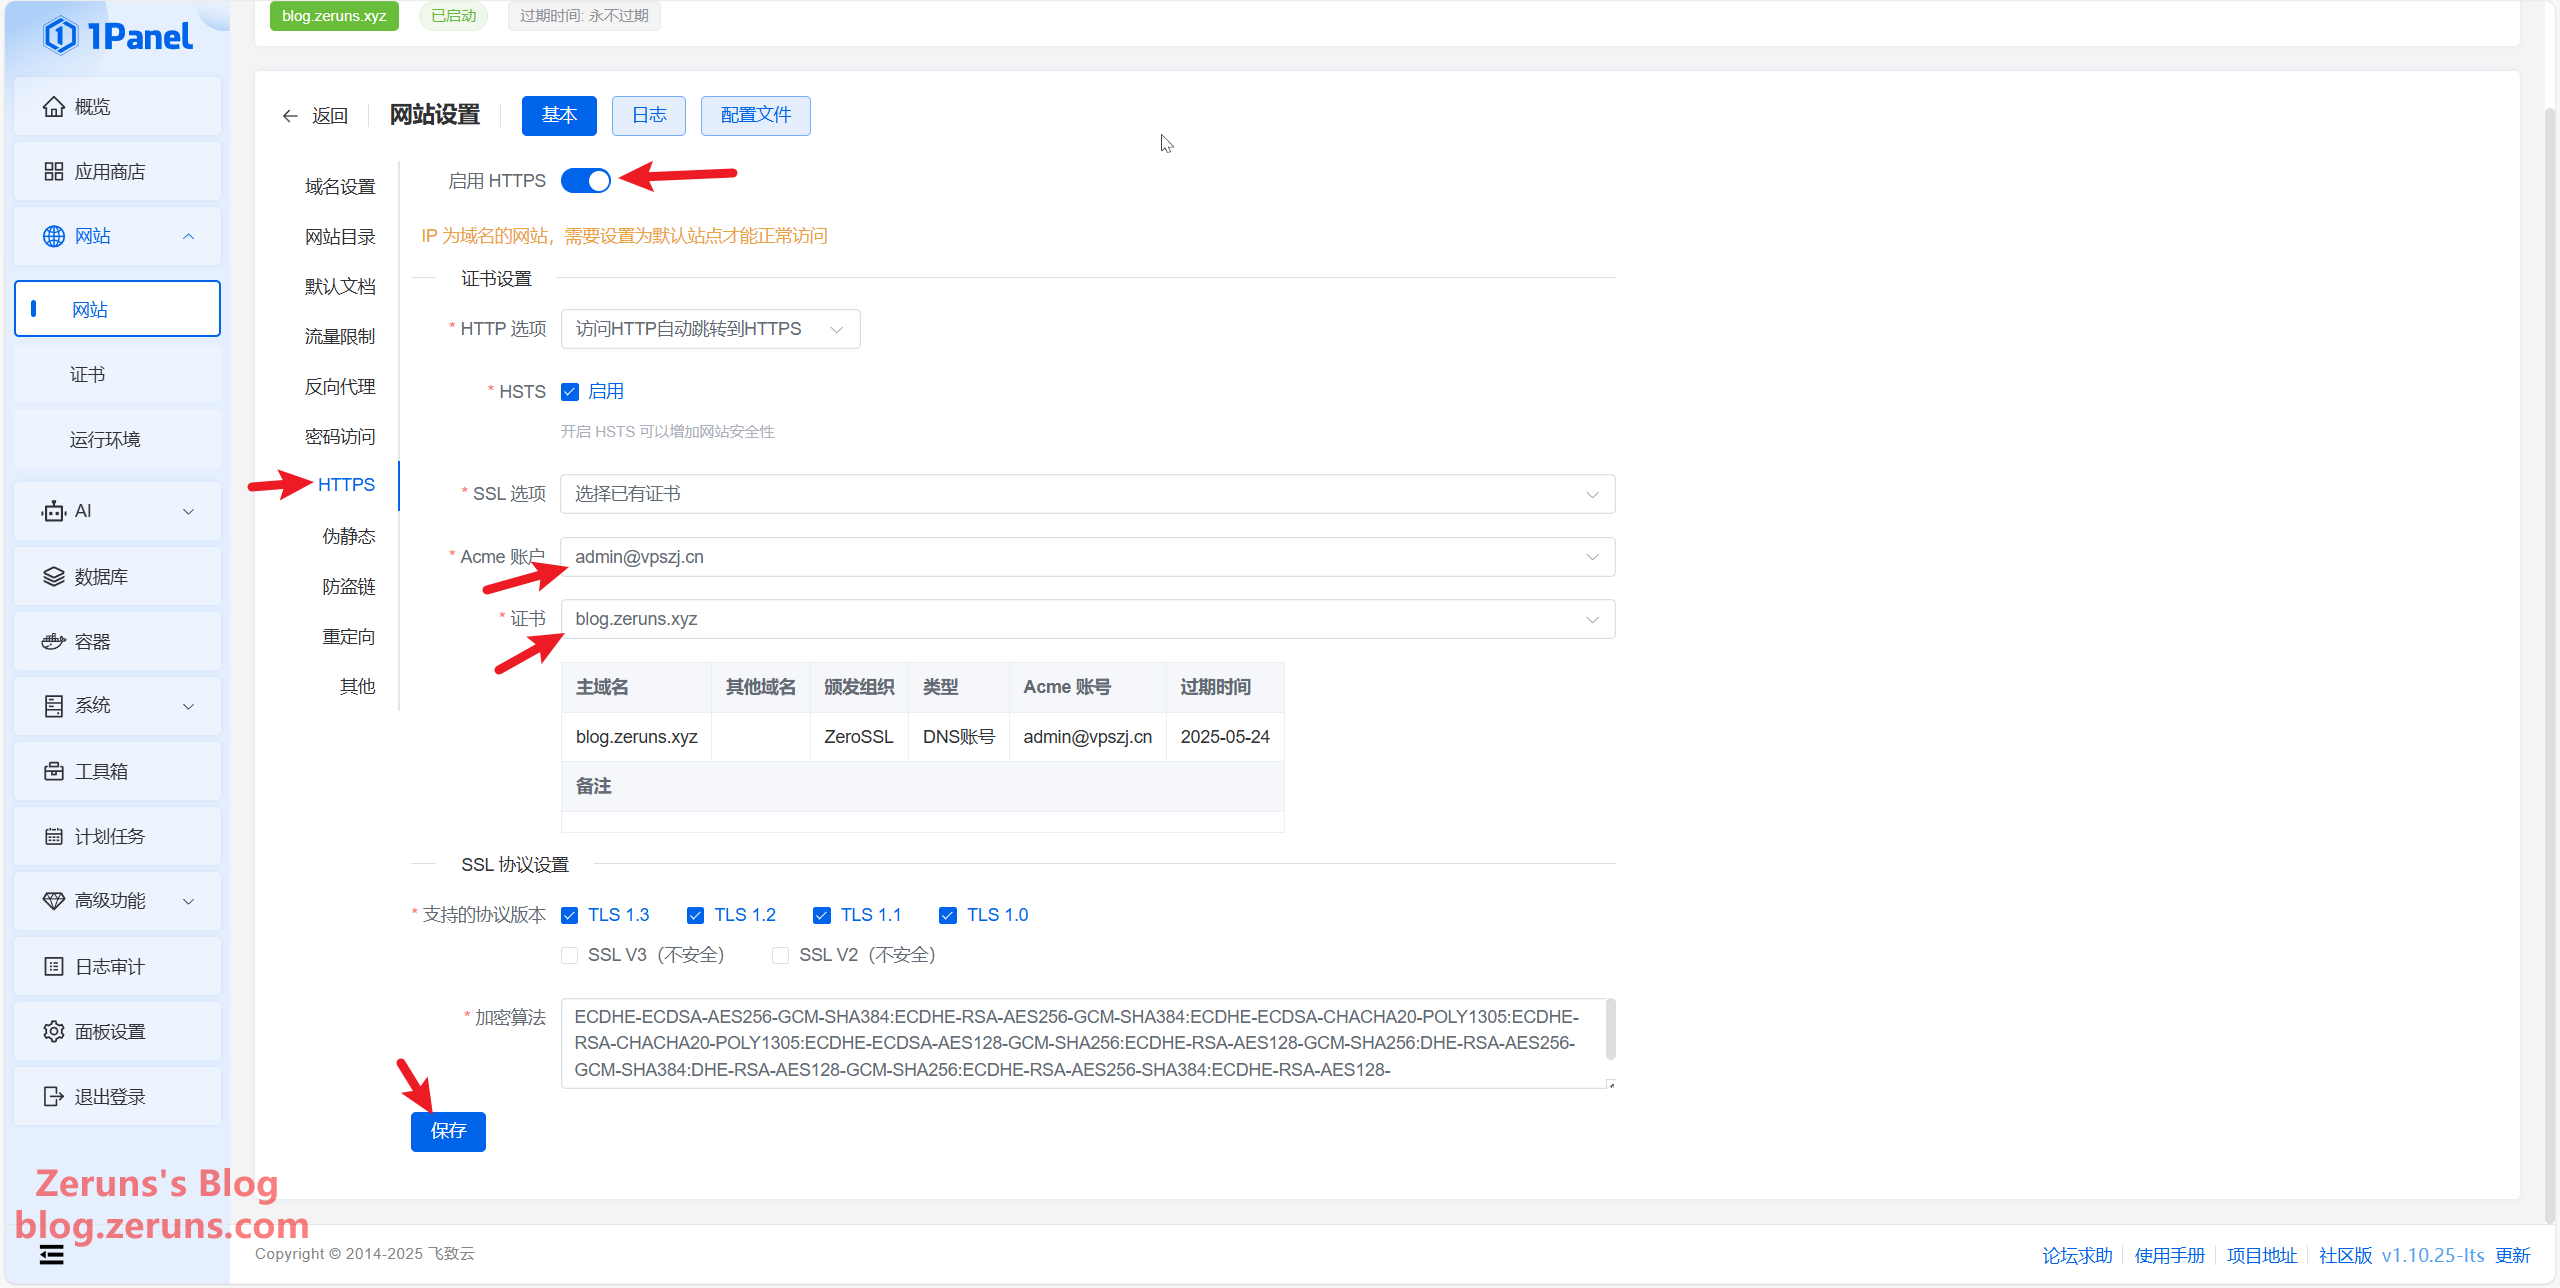
When you visit your blog again, you will see a small padlock icon in the address bar.
This concludes the tutorial. Feel free to explore the fun of website building on your own—for example, by using CDN services to accelerate site access.
Recommended Reading
- High Cost-Performance and Affordable VPS/Cloud Server Recommendations: https://blog.zeruns.com/archives/383.html
- Minecraft Server Setup Tutorial: https://blog.zeruns.com/tag/mc/
- DeepSeek-R1 Private Deployment Tutorial | Building an AI Large Language Model on a Linux Server: https://blog.zeruns.com/archives/853.html
- Open-Source Synchronous Rectification Buck-Boost Digital Power Supply Based on STM32: https://blog.zeruns.com/archives/791.html
- Open-Source 140W+65W Step-Up/Step-Down PD3.1 Fast Charging Module (2C+1A Ports), IP6557+IP6538: https://blog.zeruns.com/archives/801.html
- ACASIS TBU405Pro Thunderbolt 4/3 Hard Drive Enclosure + Western Digital SN7100 1TB SSD: A Simple Unboxing Review and Teardown: https://blog.zeruns.com/archives/857.html


Comment Section