


Quickly set up a lightweight forum website with Linux + Docker + 1Panel + Flarum. This beginner-friendly tutorial will walk you through every step of building your forum website. In this guide, Docker is used to rapidly deploy Flarum, eliminating the hassle of configuring the PHP environment. Additionally, there are tutorials on installing Flarum themes and plugins.
As the open source community continues to thrive, people's expectations for quality communities are increasing. The traditional BBS forum model can no longer meet modern users' demands for aesthetics, convenience, and interactive experiences. Building a modern, high-quality community has become an urgent need and a common challenge for many site administrators.
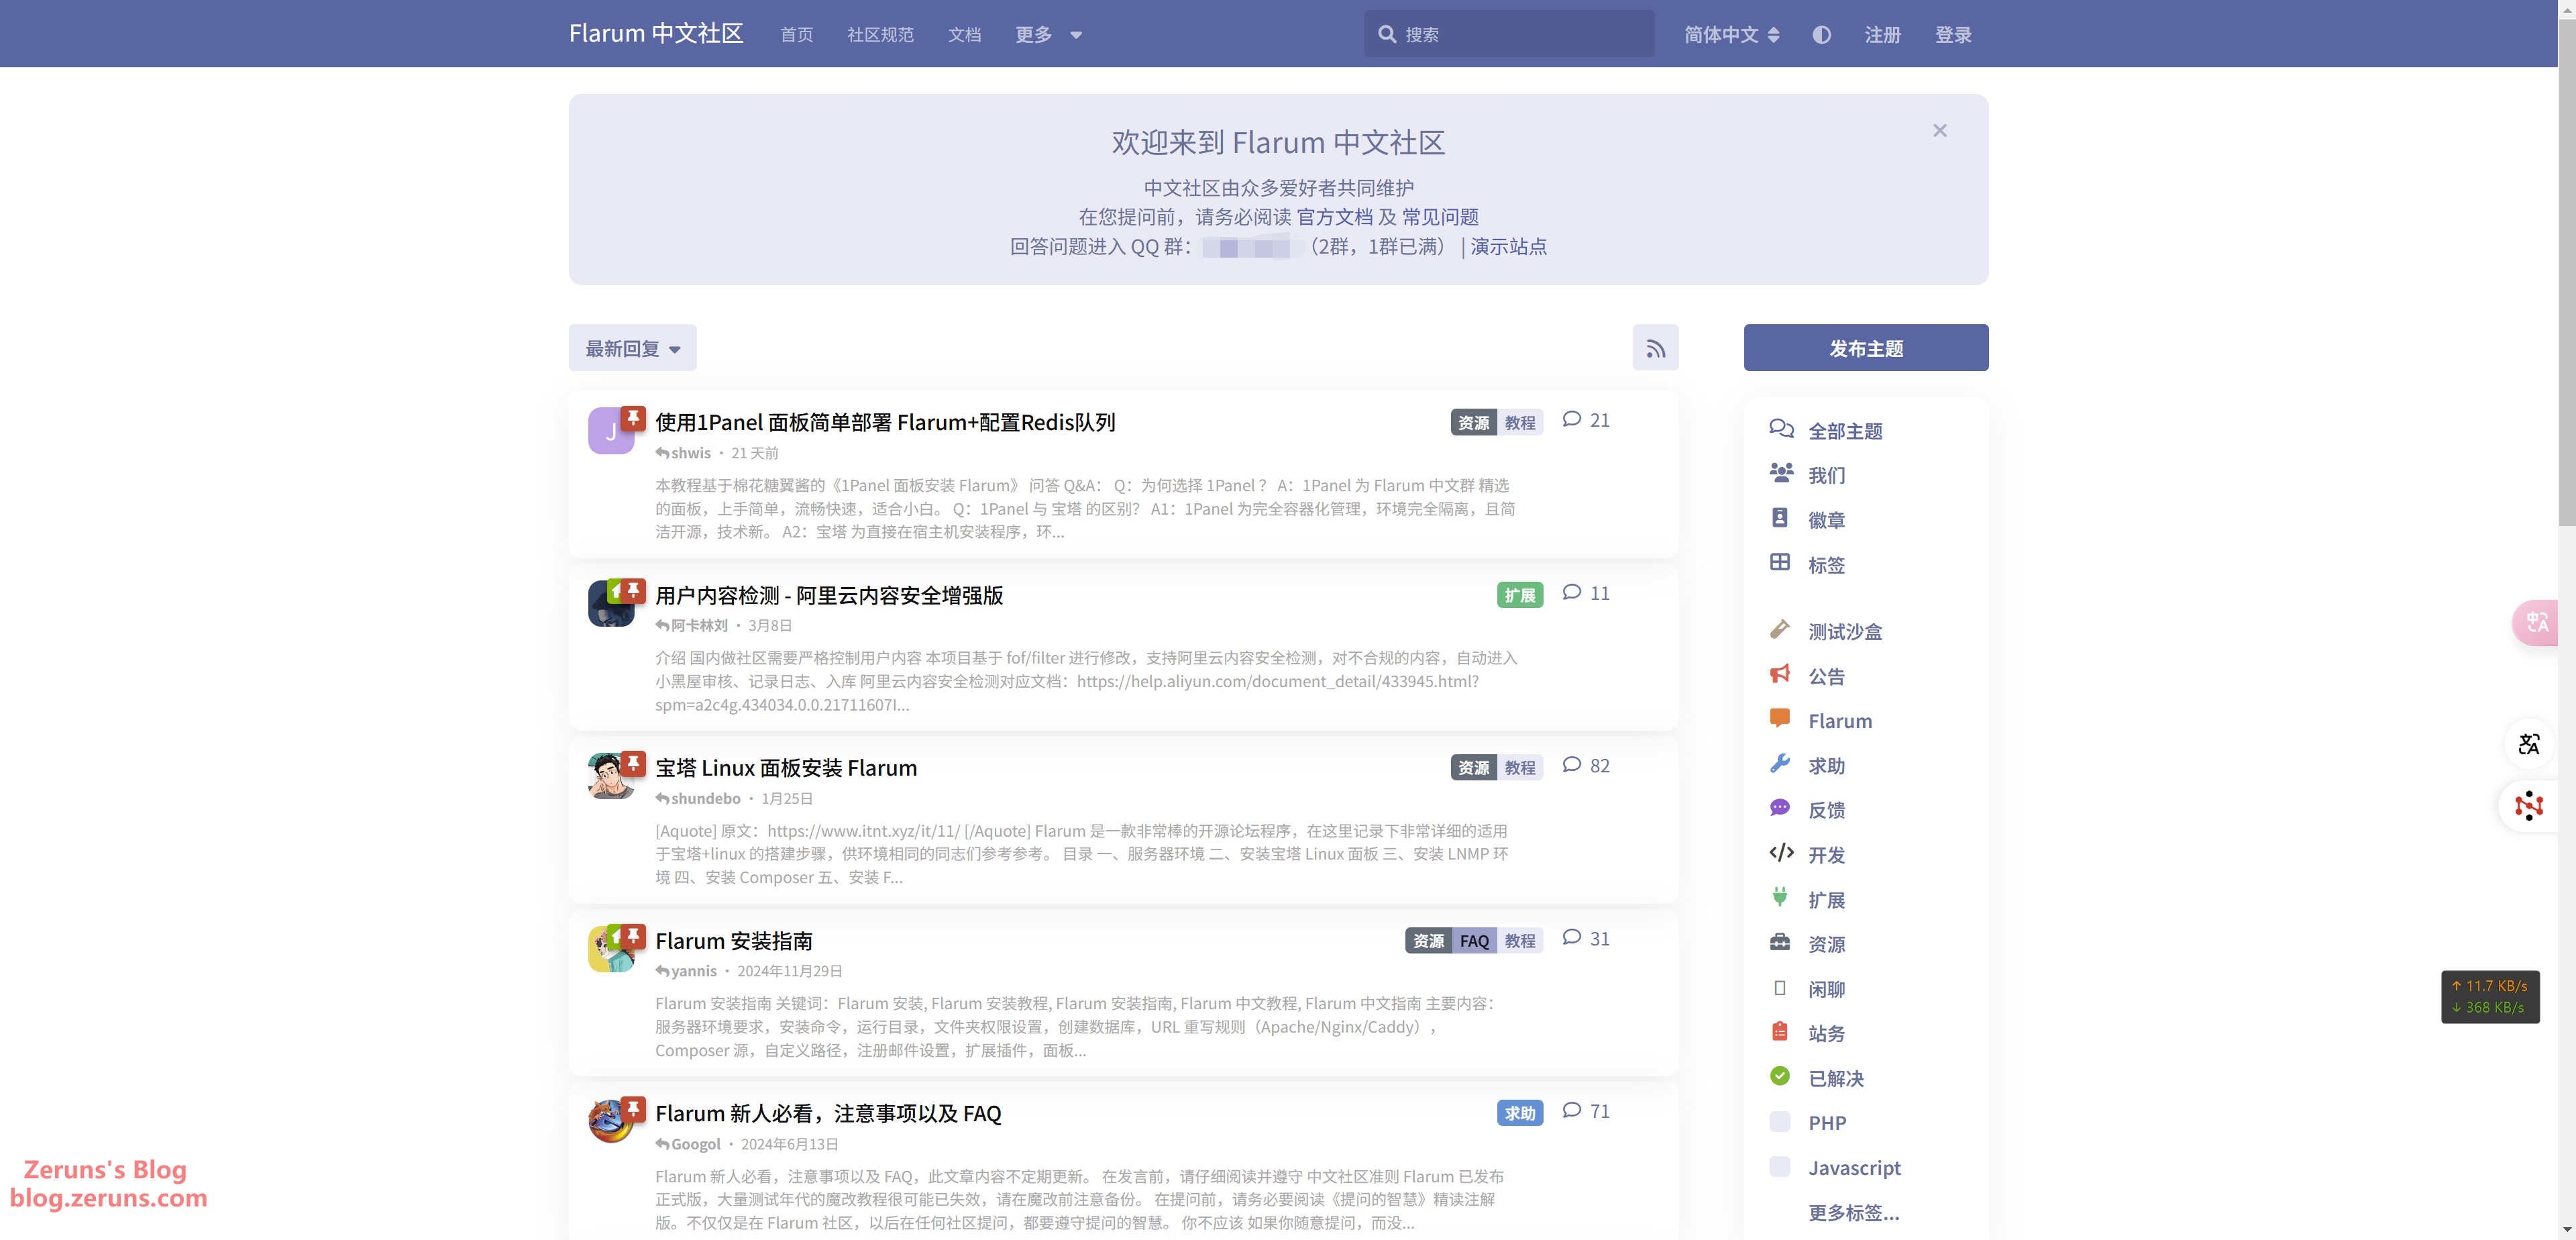
Today, we introduce a modern and elegant open source forum software – Flarum.
Video Tutorial: https://www.bilibili.com/video/BV1WgoFYxEf6/
Introduction
What is a Forum?
Forums have been one of the earliest forms of social interaction on the Internet, serving as virtual communities where users engage in in-depth discussions around specific topics. Traditional BBS forums (like Discuz!) are centered around tree-structured replies, categorization of sections, and hierarchical systems. In contrast, modern forums (such as Flarum) emphasize flat interactive design and a mobile-first experience. Unlike blogs, which offer one-way content delivery, forums provide stronger user co-creation—by initiating topics, engaging in multi-level replies, and utilizing features like likes and bookmarks, forums generate both knowledge accumulation and social networking value.
Administrator Community Group: 767557452
Introduction to Flarum
Flarum is an open source forum software project that was first conceived in 2014. Founders Toby Zerner and Franz Liedke aimed to create a modern, elegant forum system to address the shortcomings of traditional forum software in areas such as interface design, user experience, and scalability.
After two years of development, Flarum released its first public beta version in 2015, quickly capturing the attention of numerous developers and community managers. Since then, Flarum has undergone continuous iterations and updates, and its community has grown steadily, establishing itself as a rising star in the forum software arena.
Flarum's design philosophy can be summarized as "Modern, Minimalistic, and Elegant". It abandons the cumbersome and complex designs of traditional forum software, opting instead for a clean, straightforward interface layout and smooth, natural user interactions.
Flarum adopts a modern separation-of-front-end and back-end architecture. The back end is developed using PHP and the Laravel framework, providing RESTful API interfaces; meanwhile, the front end is written in JavaScript using the Mithril.js framework, achieving a single-page application (SPA) interface. This modern architectural design endows Flarum with improved performance, flexibility, and maintainability.
Key features of Flarum include:
- A flat, responsive interface design that adapts to devices of various sizes.
- An intuitive and simple user operation process that lowers the barrier to entry.
- Granular user permission management to meet the needs of community management.
- Rich social interaction functions, such as likes, @mentions, and real-time notifications.
- Powerful extensibility, supporting functional extensions through plugins and APIs.
- Support for 20+ mainstream languages including Chinese, English, French, Russian, and Japanese.
Flarum vs Traditional BBS Forums:
| Feature | Flarum | Traditional BBS Forums |
|---|---|---|
| Interface | ✅ Modern, minimalistic, attractive | ❌ Relatively outdated and complex |
| Mobile Adaptation | ✅ Responsive design automatically adapts to different screens | ❌ Largely not optimized for mobile |
| Social Interactions | ✅ Rich interactive features such as likes, @mentions, and internal notifications | ❌ More limited interaction methods |
| Real-Time | ✅ Nearly real-time content updates without page refreshes | ❌ Weaker real-time functionality |
| Extensibility | ✅ Modular design supporting plugin extensions | ❌ Relatively limited extensibility |
| User Permissions | ✅ Detailed user group permission settings | ✅ Generally, traditional forums also have well-established permission management |
| Feature Completeness | ❌ Relatively new and still evolving functionalities | ✅ Matured over years, with a wealth of features |
| User Habit | ❌ The modern interface and interaction may require users to adapt | ✅ Many users are already accustomed to traditional BBS usage |
Flarum Open Source Repository: https://github.com/flarum/flarum
Introduction to 1Panel
1Panel is a modern, open source Linux server operations management panel based on Docker container technology, aimed at simplifying server management and website deployment. Its core functions include rapid site creation, efficient management, security protection, and one-click backup recovery—making it especially suitable for beginners and developers looking to quickly set up personal or enterprise websites.
Key Features:
- One-Click Site Creation: Deeply integrated with mainstream site-building programs like WordPress and Halo, it supports domain binding and automatic SSL certificate configuration, allowing users to install directly from the app store without manually setting up the environment.
- Visualized Operations: Provides a web-based graphical interface supporting file management, database operations, container orchestration, and real-time monitoring (CPU, memory, disk, etc.), reducing the reliance on Linux command line operations.
- Security and Extensibility: Ensures security through minimal exposure of vulnerabilities, firewall configuration, and container isolation technologies; also supports reverse proxy, static site deployment, and multilingual runtime environments (PHP/Java/Python, etc.) to meet diverse needs.
- Cross-Platform Compatibility: Compatible with mainstream Linux distributions (like Ubuntu/CentOS) and ARM architecture, supporting deployments on cloud servers as well as local virtual machines.
Applicable Scenarios: Personal blogs, corporate websites, lightweight forum setups, and especially suitable for users who seek efficiency, security, and reduced operational complexity.
1Panel Official Website: https://www.lxware.cn?code=zeruns (Using this link or the promo code zeruns gives an 20% discount on the professional version; however, the free version is generally sufficient.)
Why Choose Linux + Docker?
- Linux: The mainstream operating system for servers, known for its low resource usage and high stability.
- Docker: Containerization technology that achieves environment isolation, avoids dependency conflicts, and increases deployment efficiency by 80%.
Other Site Building Tutorials Recommended:
- Tutorial for setting up a Typecho personal blog on a cloud server, a beginner-friendly guide: https://blog.zeruns.com/archives/749.html
- Tutorial for quickly setting up a personal blog using a cloud server + BaoTa Panel + Gridea: https://blog.zeruns.com/archives/783.html
- How to set up your own domain email server? Poste.io email server setup tutorial: https://blog.zeruns.com/archives/822.html
- Tutorial for quickly setting up a Cloudreve cloud drive website on a Raincloud server with Raincloud object storage mounted: https://blog.zeruns.com/archives/743.html
- Tutorial for setting up a Discuz forum website on Linux: https://blog.zeruns.com/archives/681.html
- Step-by-step guide to deploy the Halo blog with 1Panel in one click: https://blog.zeruns.com/archives/858.html
Overview of the Setup Process
- Register a Domain Name
- Purchase a Cloud Server
- Domain Name ICP Filing (can be skipped if using a non-mainland server)
- Install the 1Panel and Docker
- Install OpenResty and MySQL
- Install the Docker version of the Flarum forum application
- Set Up Reverse Proxy
- Configure the Website
Domain Name Registration
What is a Domain Name?
A domain name is the "address" of a website, used to replace the hard-to-remember string of IP numbers (e.g., 192.168.1.1). For example, entering blog.zeruns.com in a browser will take you directly to a specific website without needing to remember its IP address.
A domain name is structured into three parts:
- The suffix (such as
.com), which represents the type of website - The main domain (e.g.,
zeruns), which is a custom name - The subdomain (e.g.,
blog), which can be set freely
When a user enters a domain name, the DNS system automatically converts it into the corresponding server IP address to complete the connection. To register a domain name, you need to purchase it from platforms such as Alibaba Cloud (typically about 50 RMB per year, with some niche suffixes being even cheaper), and then bind the domain to your server's IP address to activate your website. A good domain name is short and easy to remember; for instance, taobao.com leaves a deep impression with its phonetic similarity.
Registering a Domain Name
You can register your domain name on platforms such as Tencent Cloud, Alibaba Cloud, and Rainyun, or you can use Rainyun's free subdomain service.
- Tencent Cloud Discount Registration: https://curl.qcloud.com/rbDL8jYd
- Alibaba Cloud Discount Registration: https://www.aliyun.com/minisite/goods?userCode=jdjc69nf
- Rainyun Discount Registration: https://www.rainyun.com/zeruns_?s=blog-en
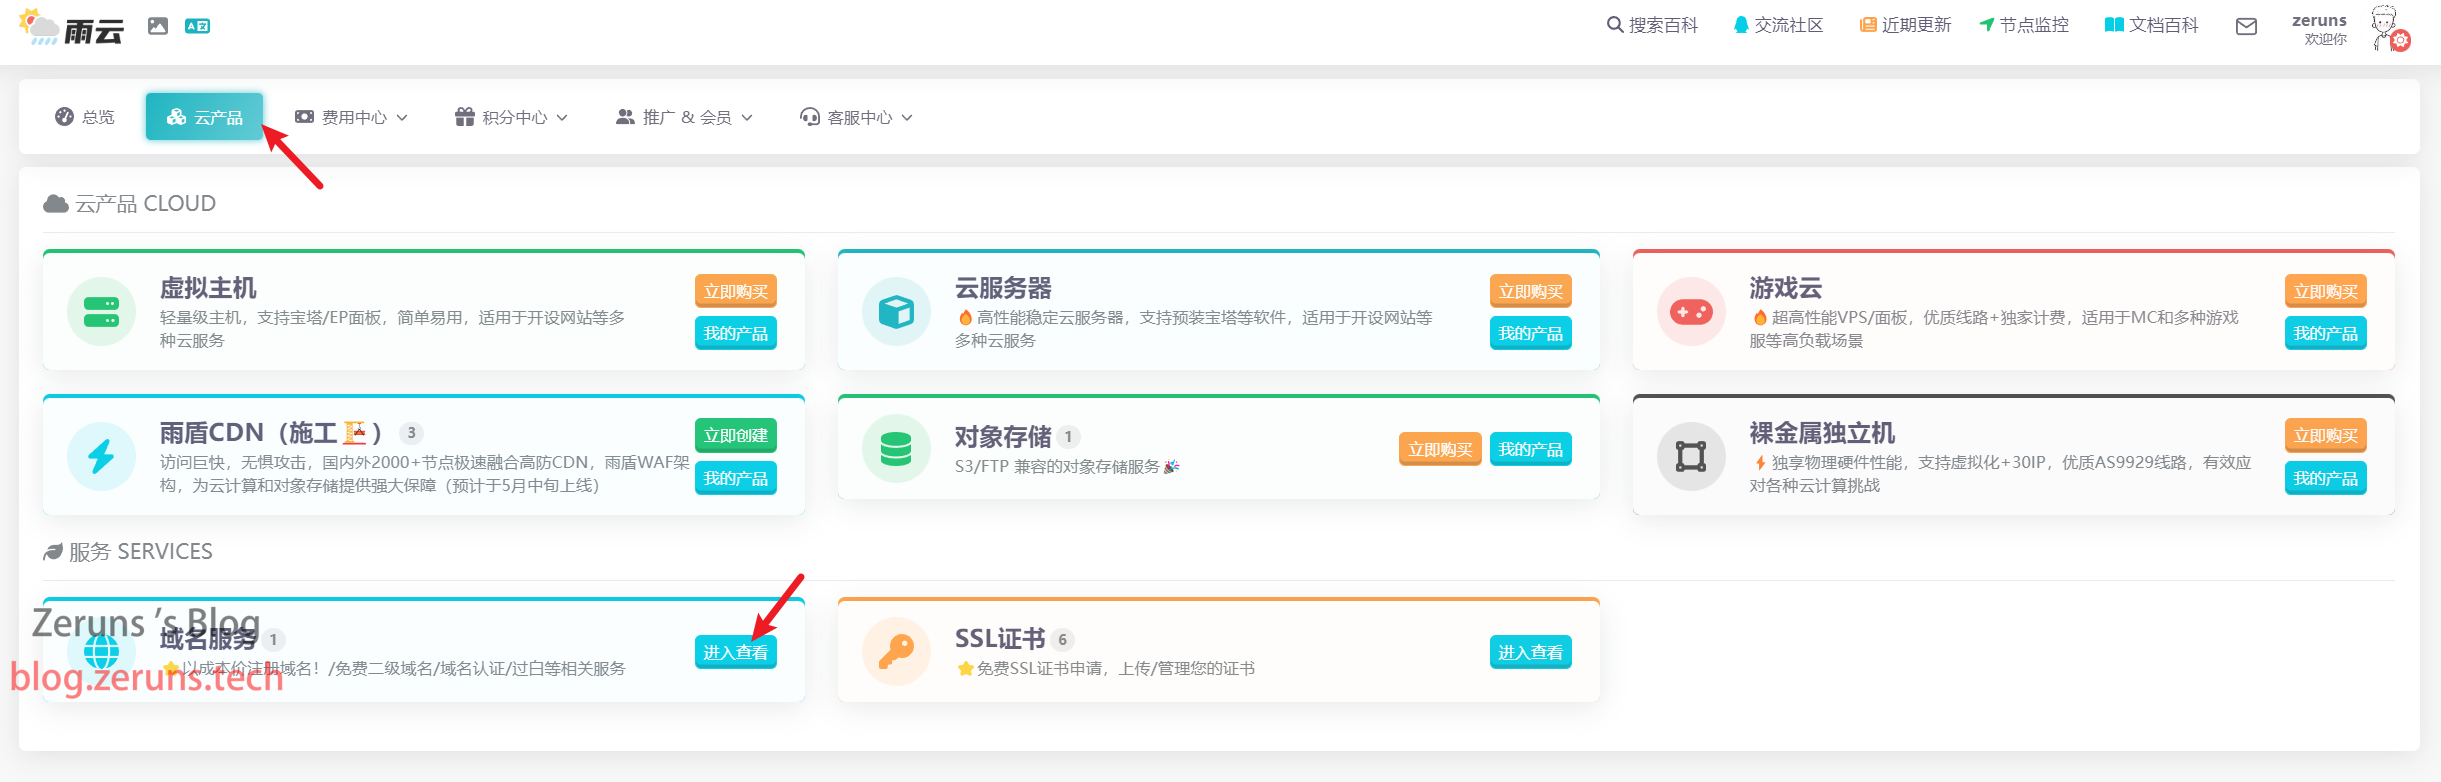
Below, we use Rainyun as an example to register a domain name, zeruns.xyz.
-
In the cloud products section, find the domain name service.
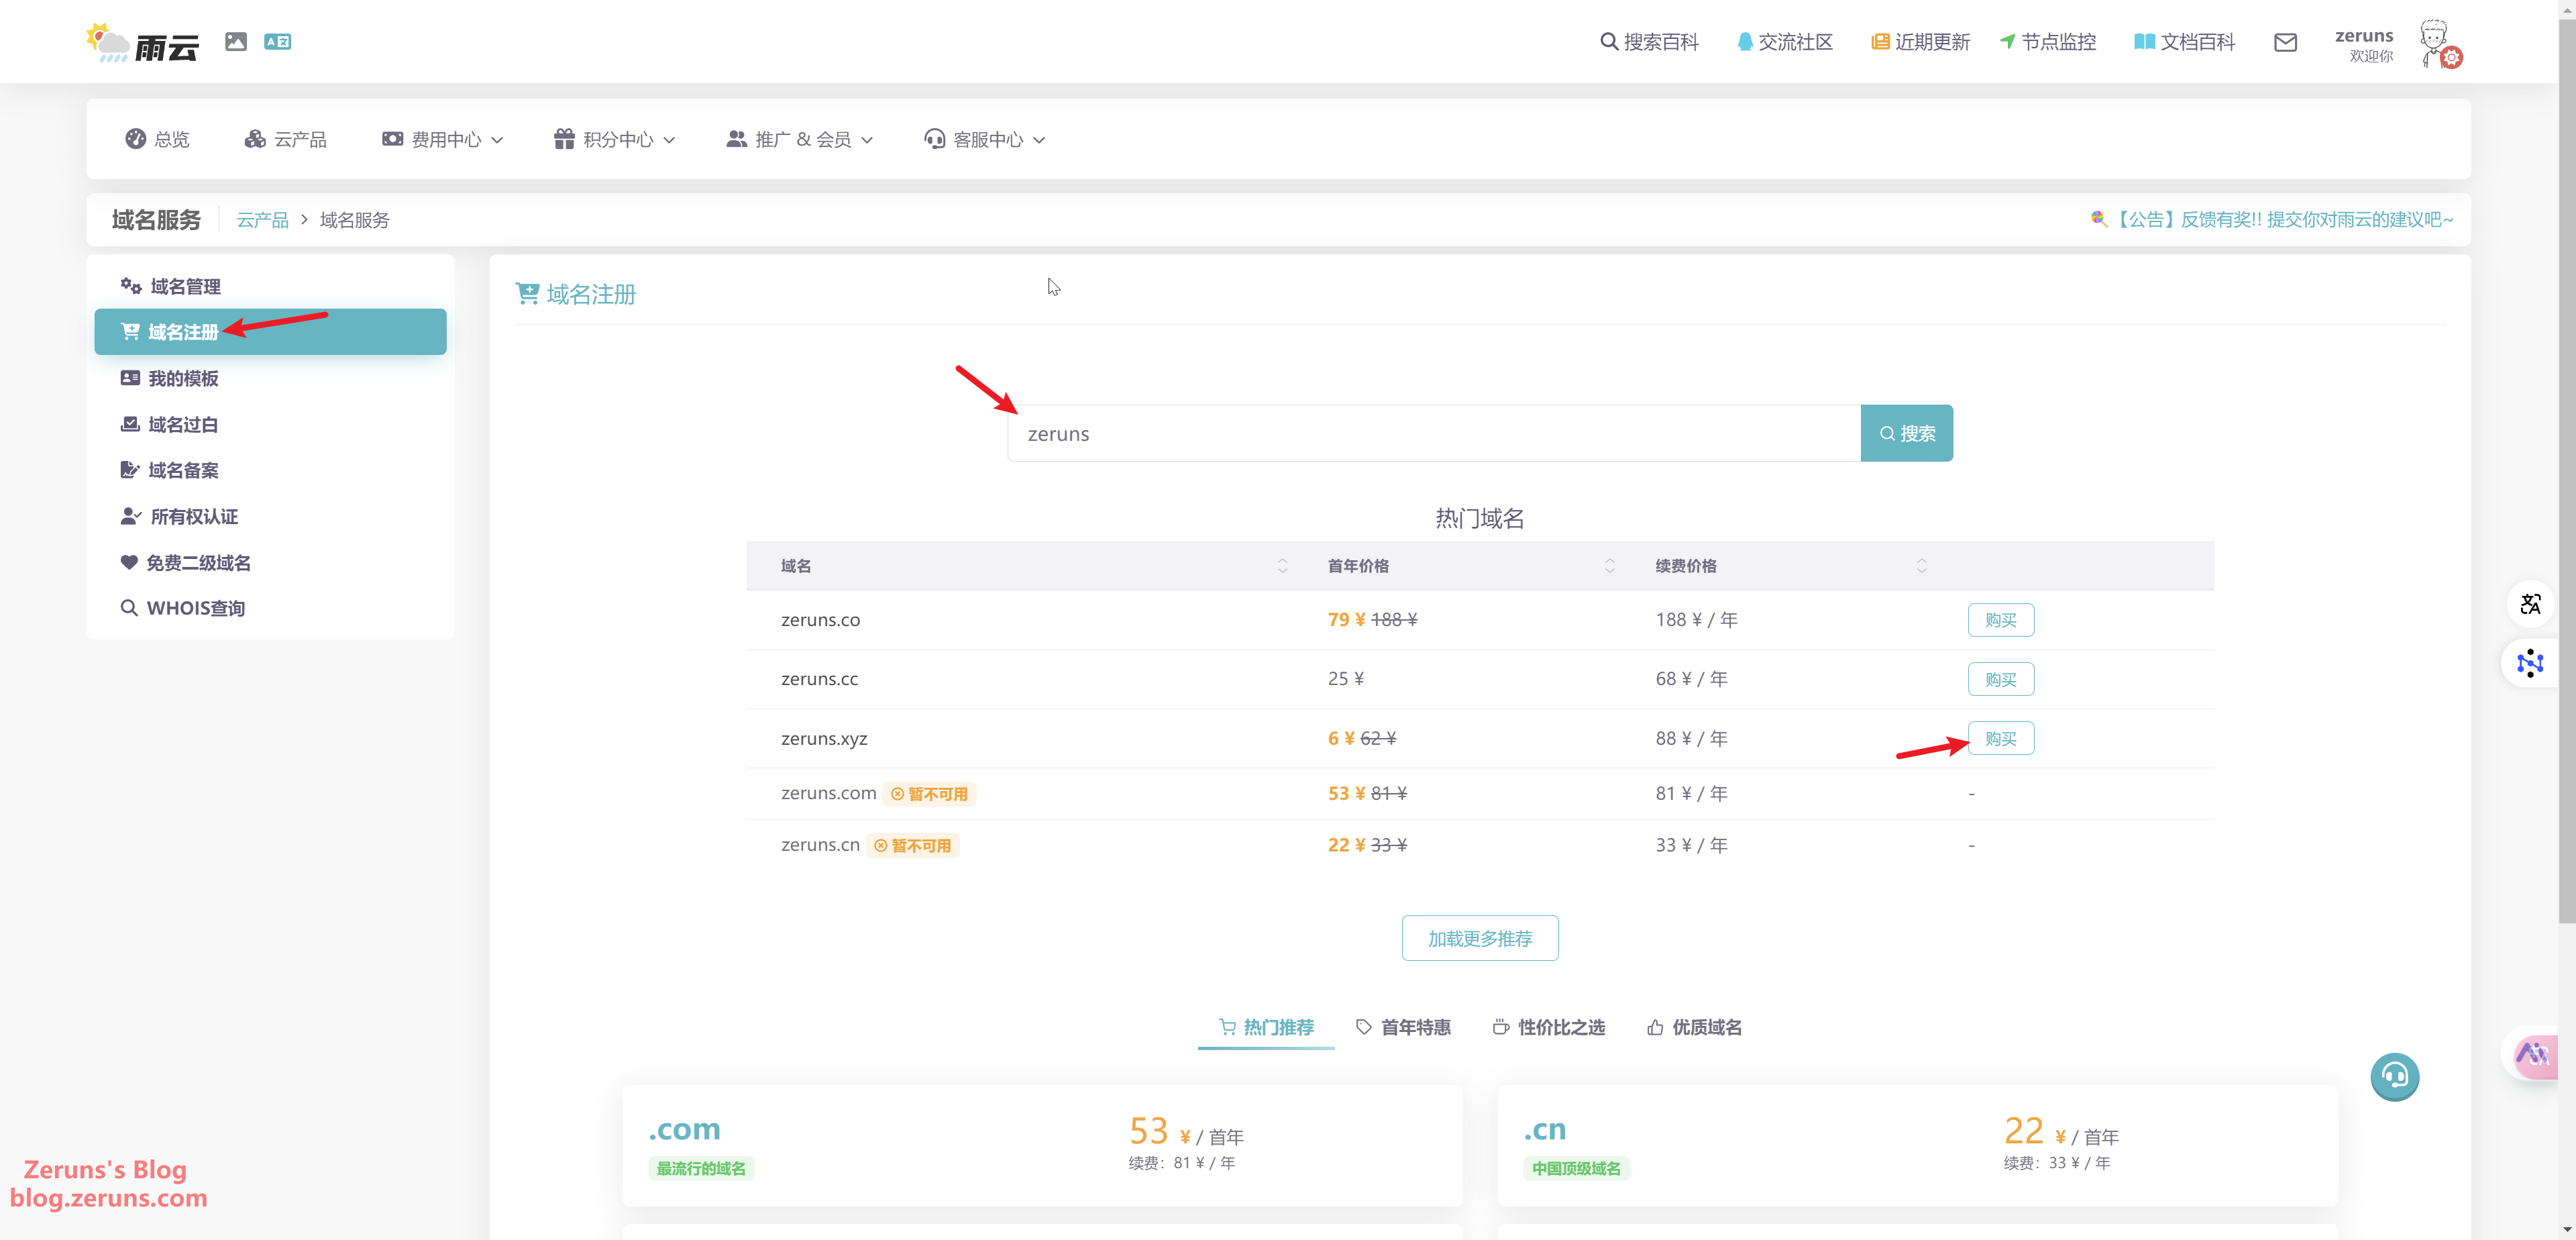
-
Click on "Register Domain" and search for the domain you wish to register.
-
Follow the prompts to enter your information.
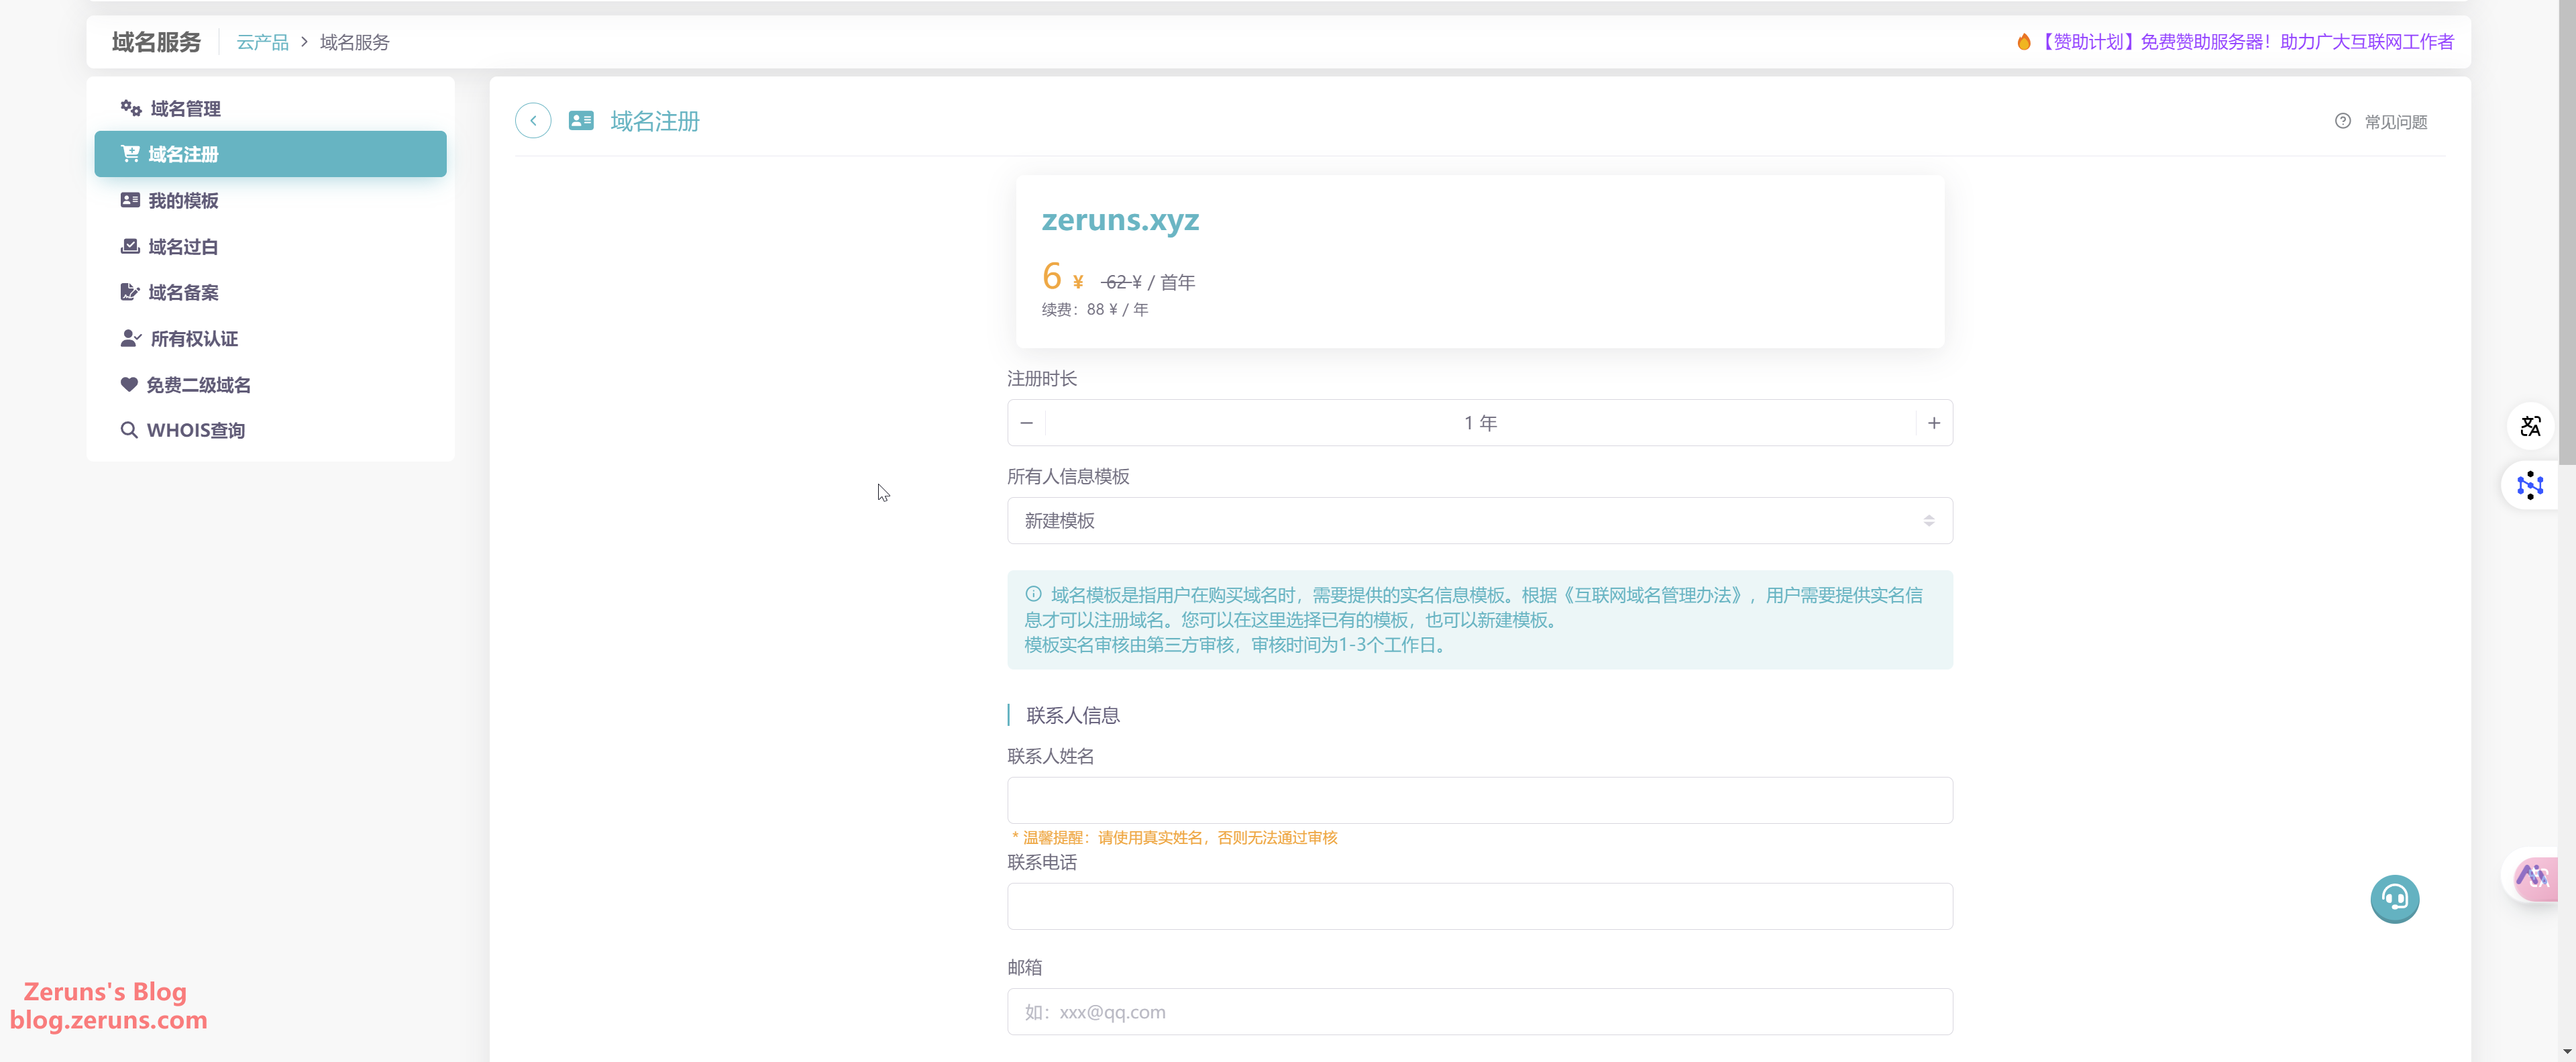
-
Once you have filled in your details, click "Register Now" and then wait for the review process to complete.

If you are using a server located in Mainland China, you will also need to complete ICP filing.
The filing process is not elaborated here—feel free to research it on your own.
Tip: When purchasing mainland cloud servers from major providers like Tencent Cloud or Alibaba Cloud for periods of over 3 months, free ICP filing services are often provided. The same applies for Rainyun's mainland servers purchased for over 3 months.
Preparation
First, you need a cloud server with a public IP. I recommend Rainyun:
Rainyun Discount Registration: https://www.rainyun.com/zeruns_?s=blog-en
Promo Code: zeruns
After registering with the promo code and binding with WeChat, you can receive a 50% discount coupon.
- Other cloud server recommendations: https://blog.zeruns.com/archives/383.html
- Haoliang Yunqing – Lightweight servers in Hong Kong with direct three-network connectivity, 8 cores, 16GB RAM, 40M bandwidth for 70 RMB/month: https://blog.vpszj.cn/archives/2540.html
- Rainyun – Hong Kong VPS review for 3 zones, 4 cores, 4GB RAM, 10M bandwidth for 69 RMB/month: https://blog.vpszj.cn/archives/2079.html
- Tencent Cloud – Korean lightweight VPS performance review, 2 cores, 1GB RAM, 200M unlimited traffic for 35 RMB/month: https://blog.zeruns.com/archives/844.html
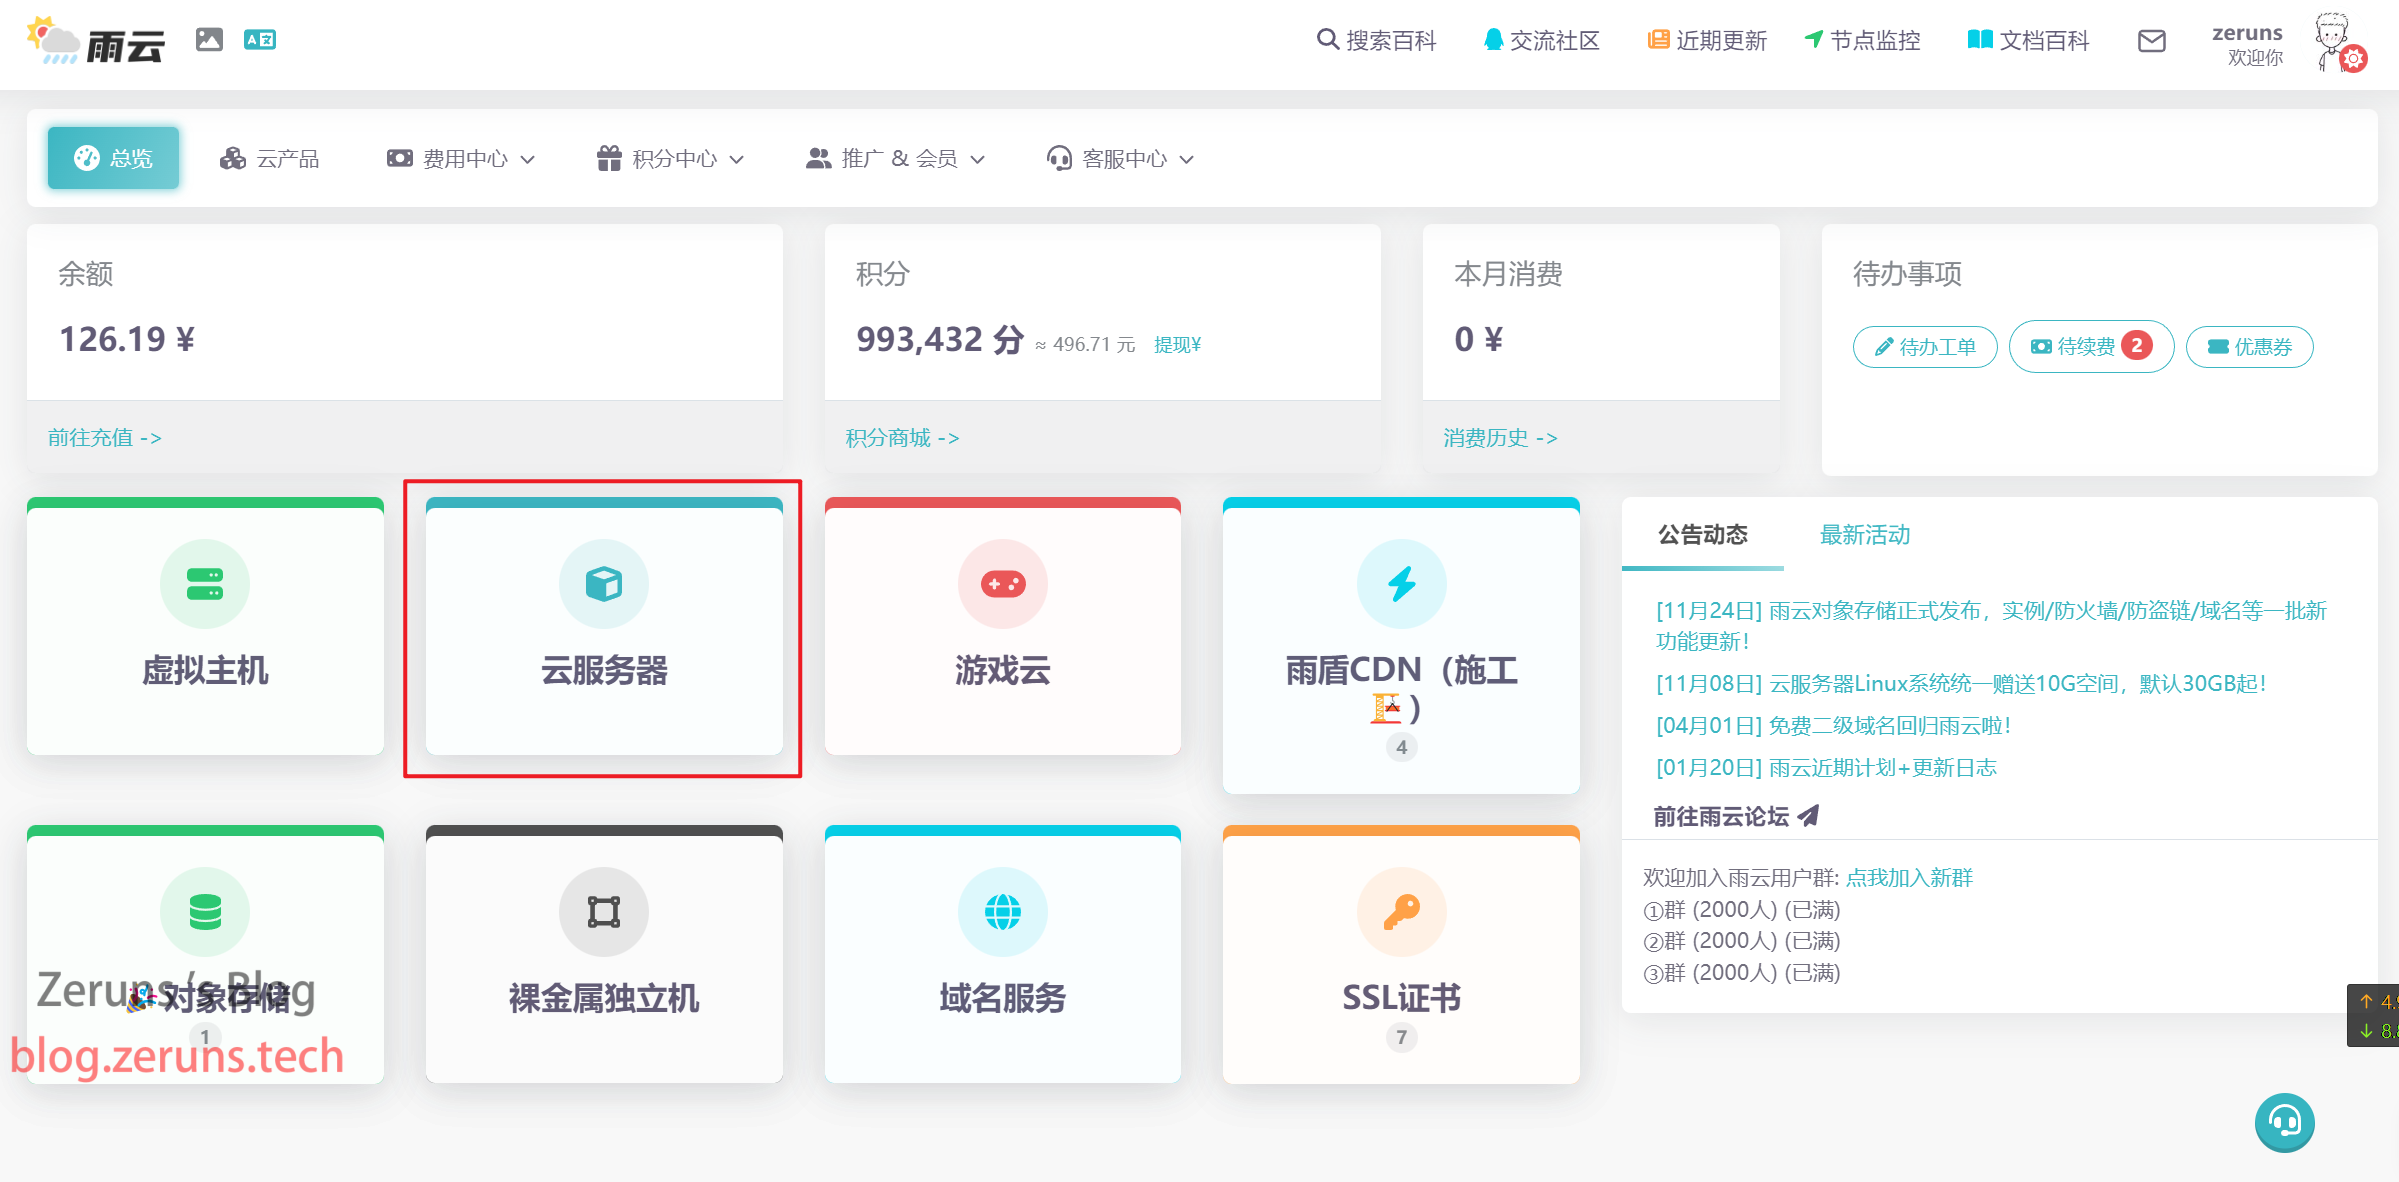
After registering an account, go to the Rainyun control panel. The Cloud Server entry can be found in both the Overview and the Cloud Products sections of the backend.
Click Purchase Cloud Server, then choose the server region. For domestic users, it is recommended to choose servers located within the mainland. However, if you do not have an ICP filed domain, it is advisable to choose servers in Hong Kong or the USA (Hong Kong is recommended due to lower latency).
I have chosen a server in Hong Kong's Zone 3.
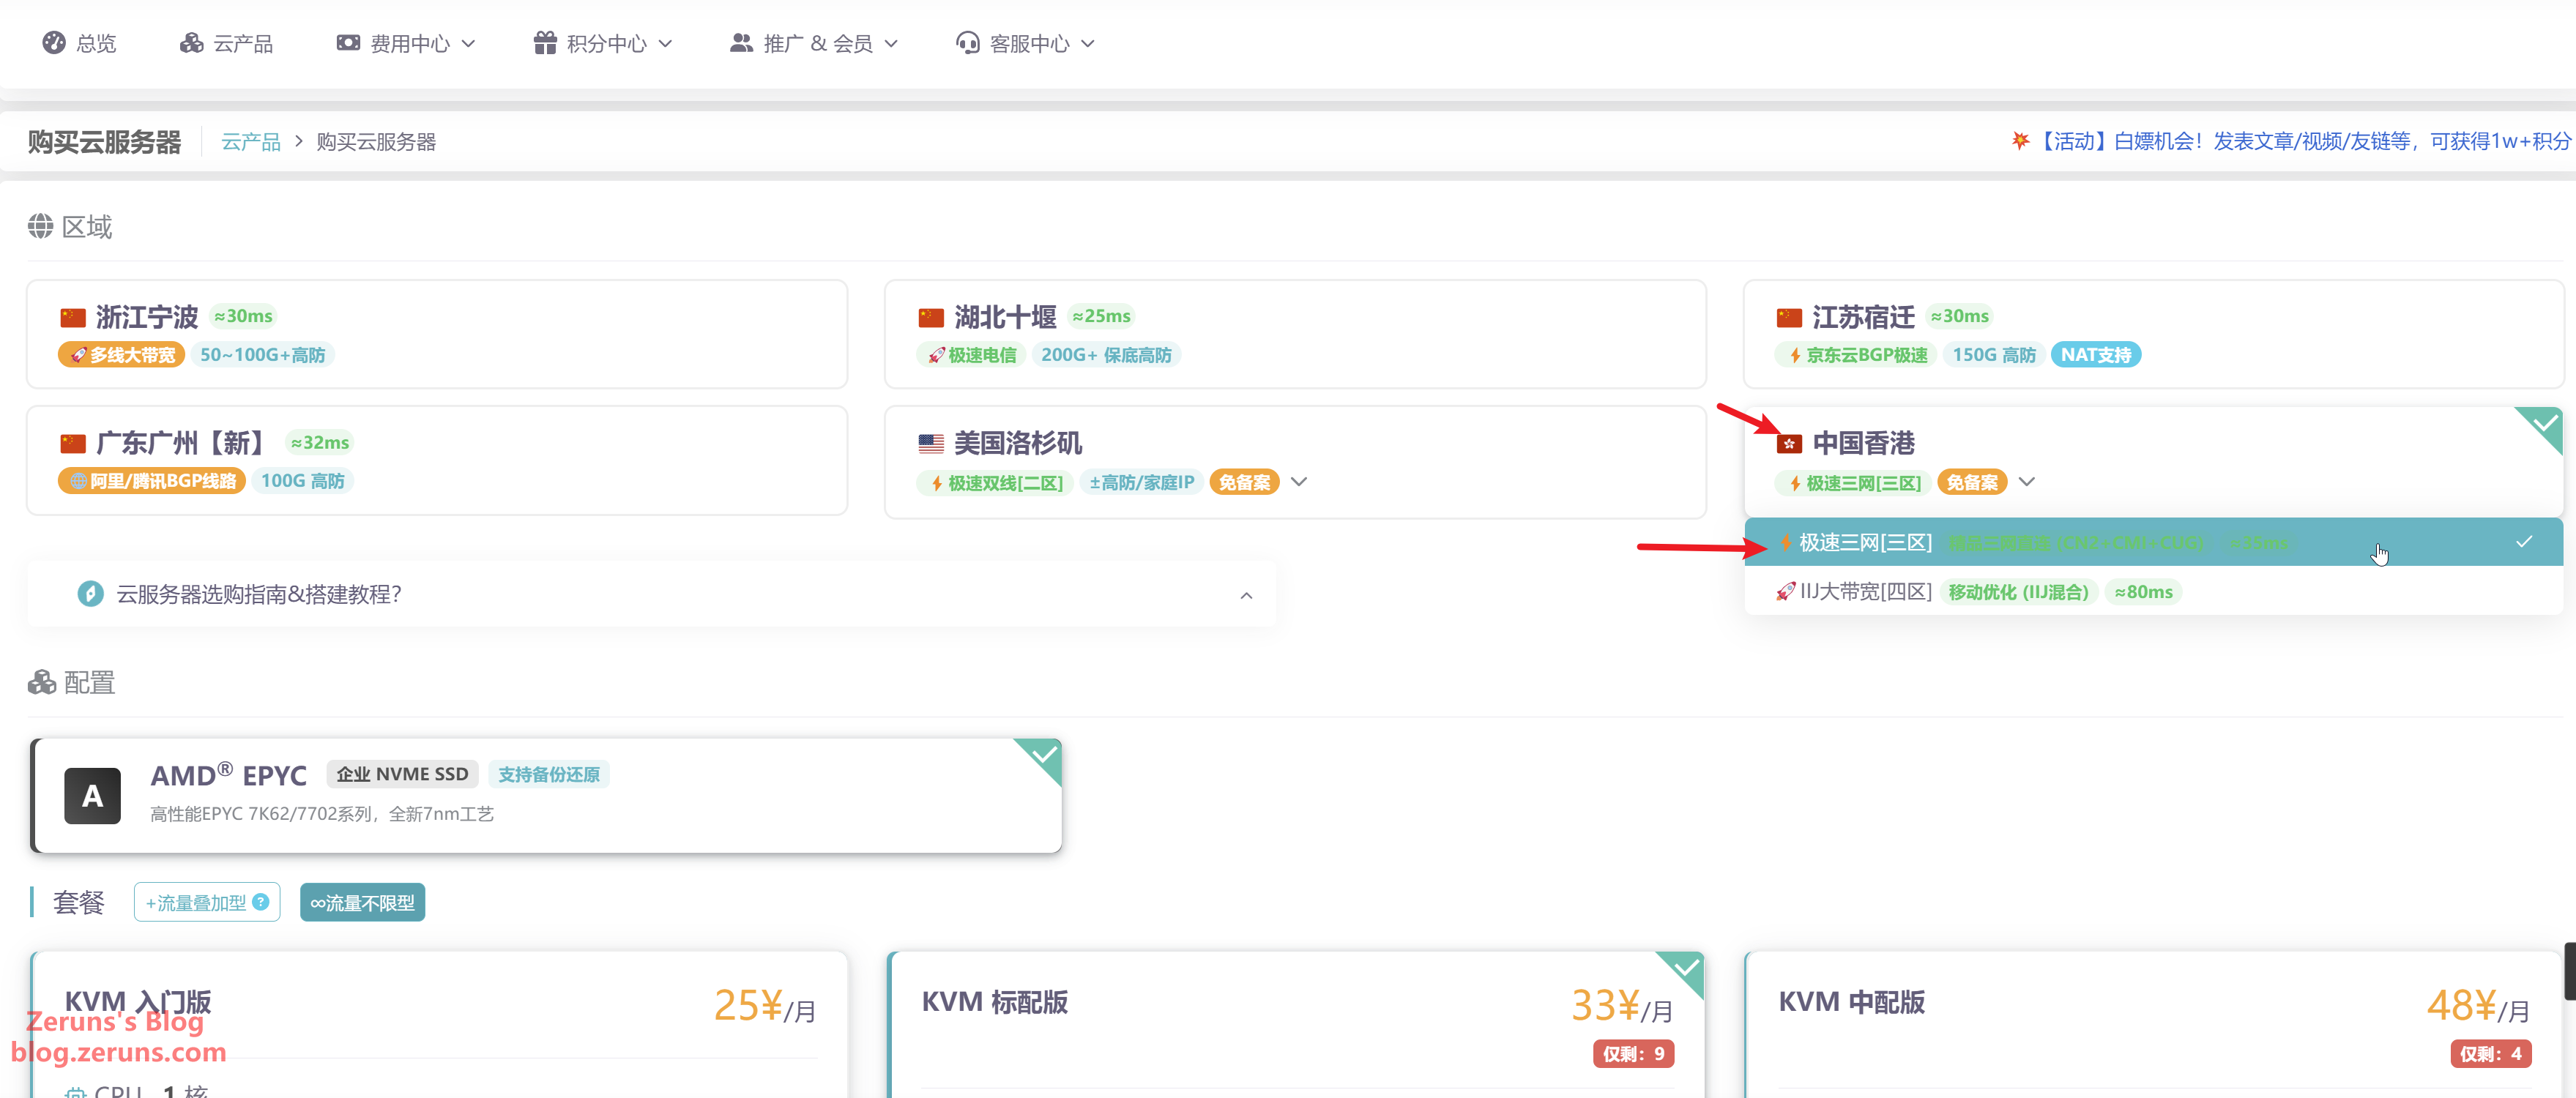
Choosing a configuration of 2 cores and 2GB of memory is generally sufficient; if your website has many users, opt for a higher configuration, as you can always upgrade later.
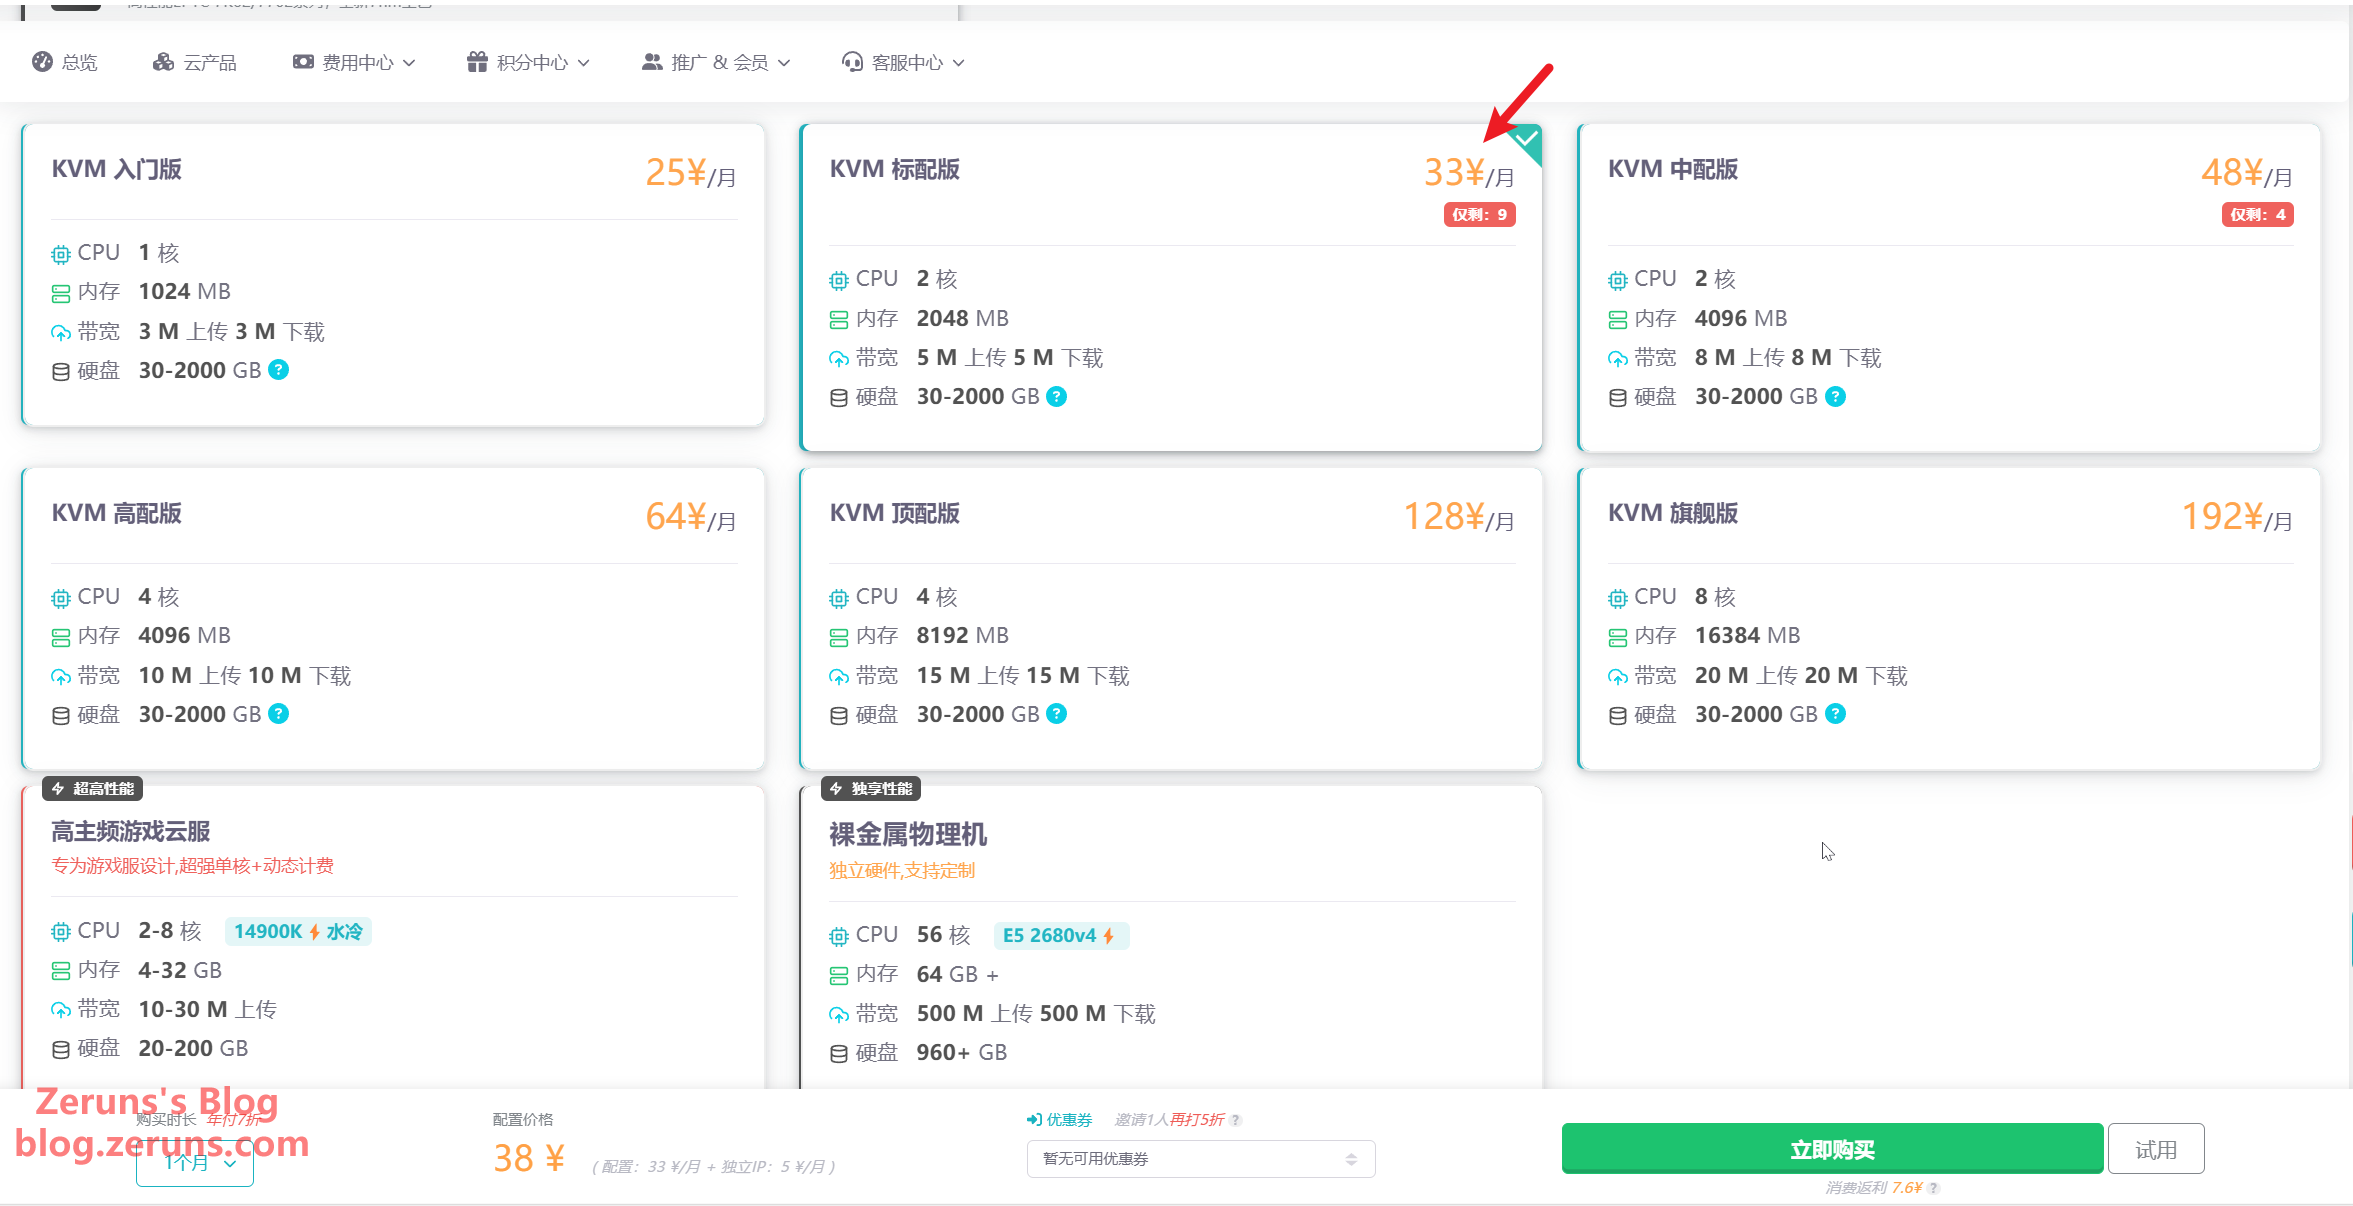
Select the Debian12 operating system, then click "Buy Now" once everything is set. You can also choose a 1 yuan trial for one day.

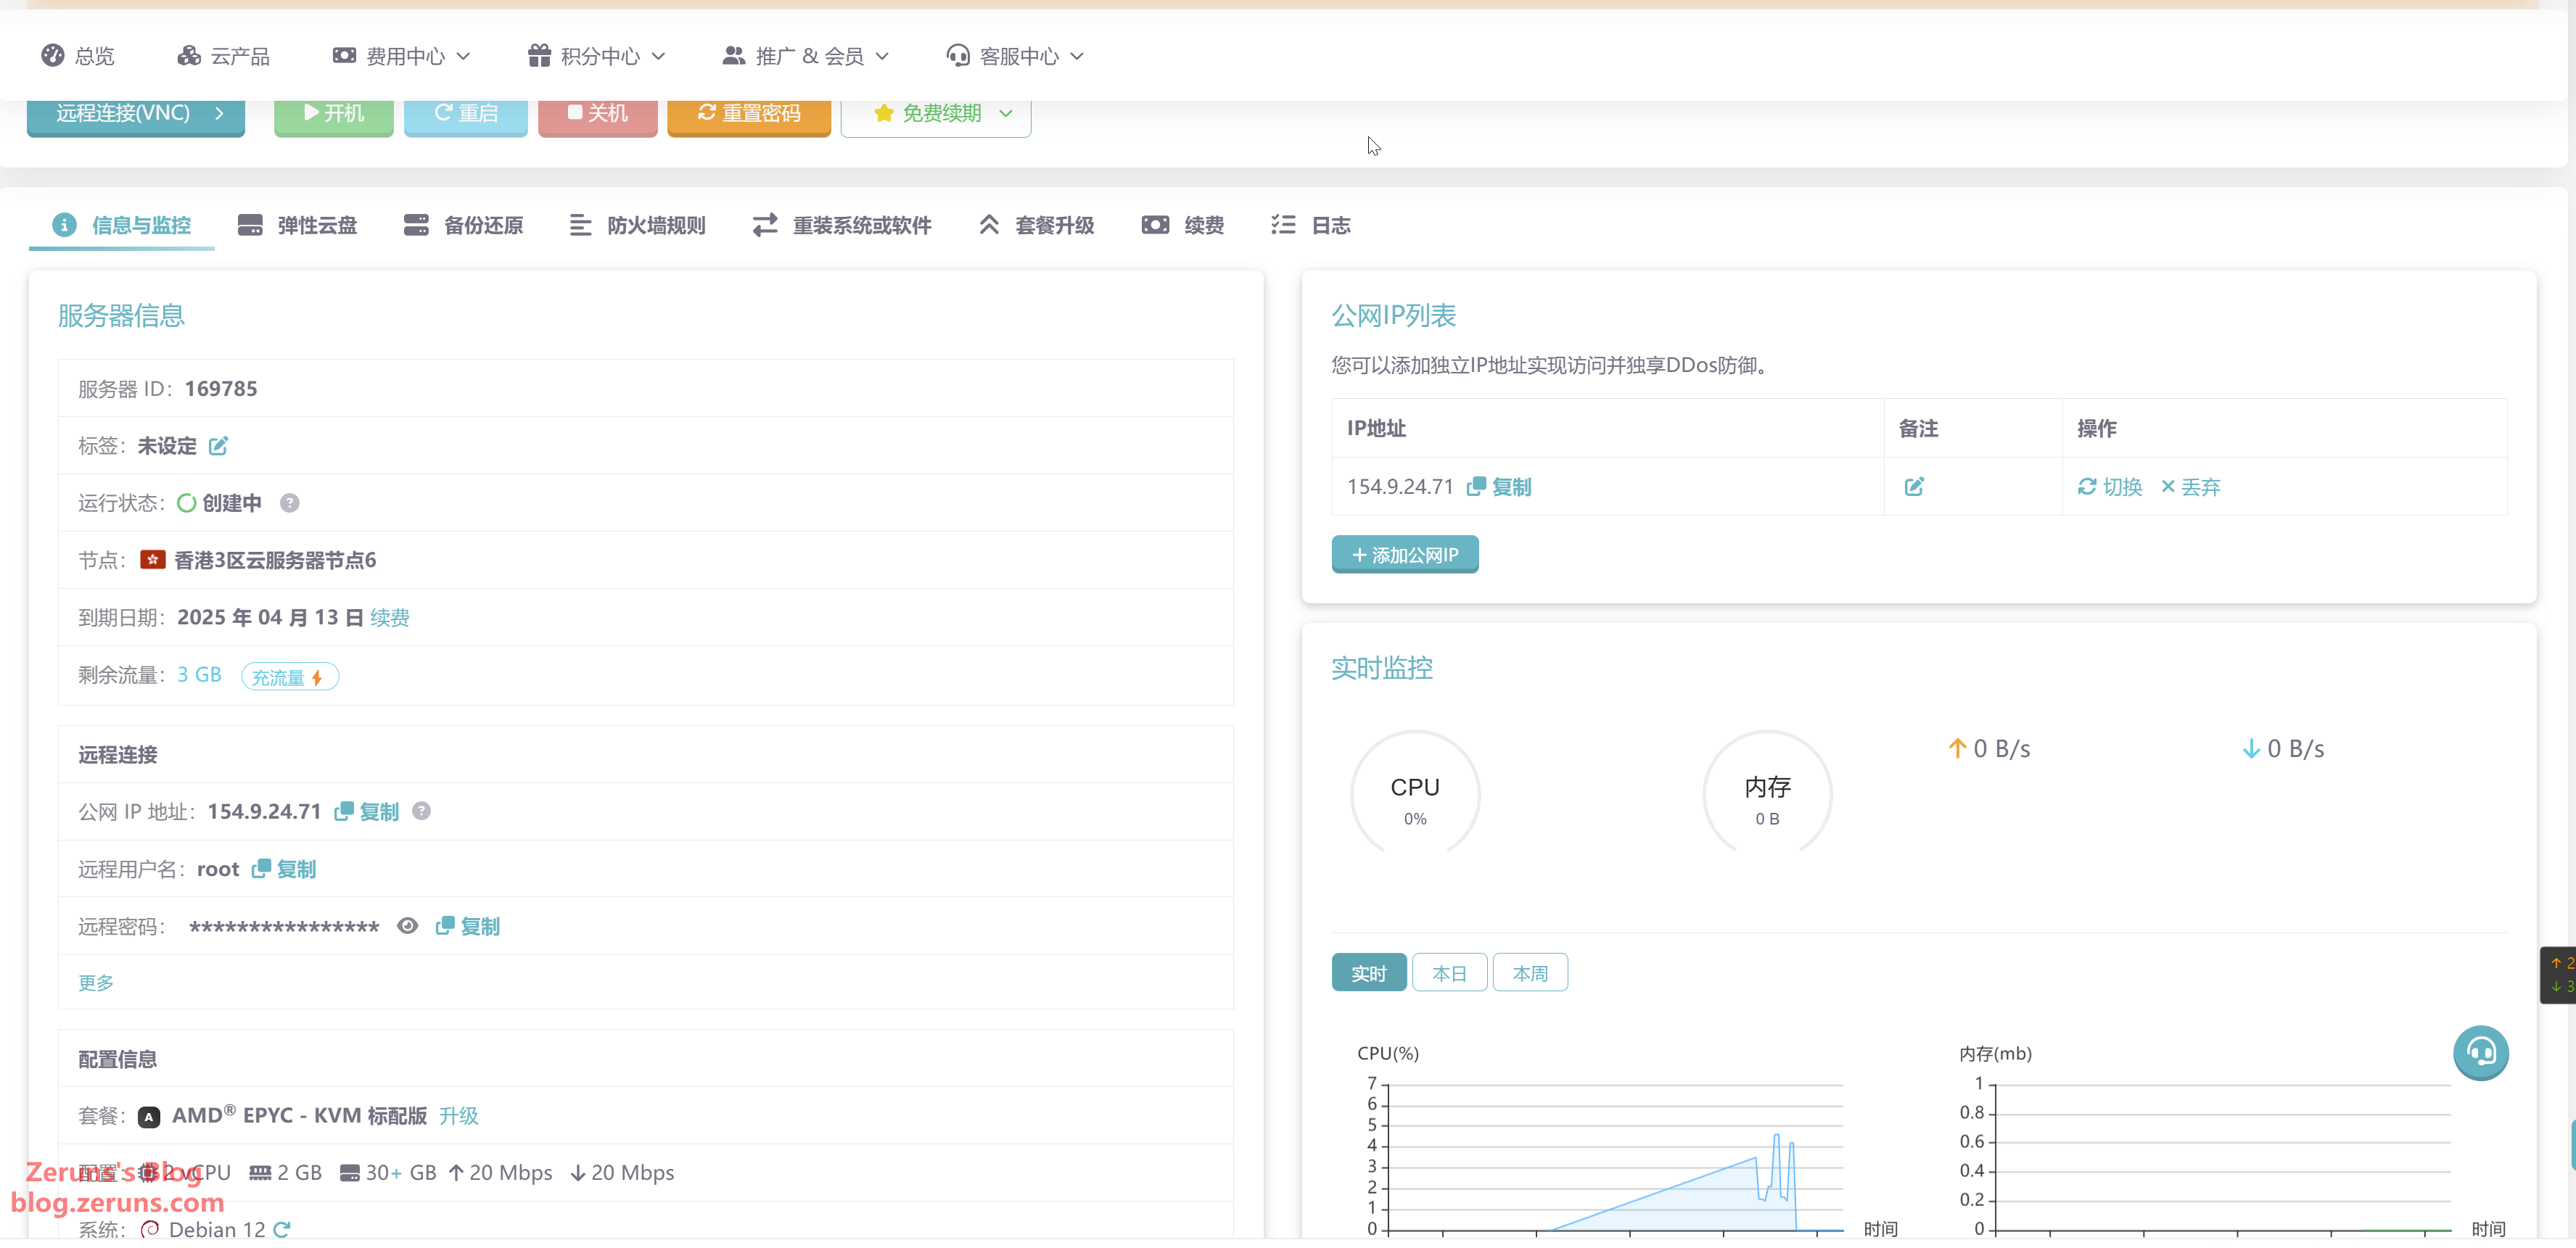
After purchasing, your newly bought cloud server will appear in "My Cloud Servers". Click Manage.
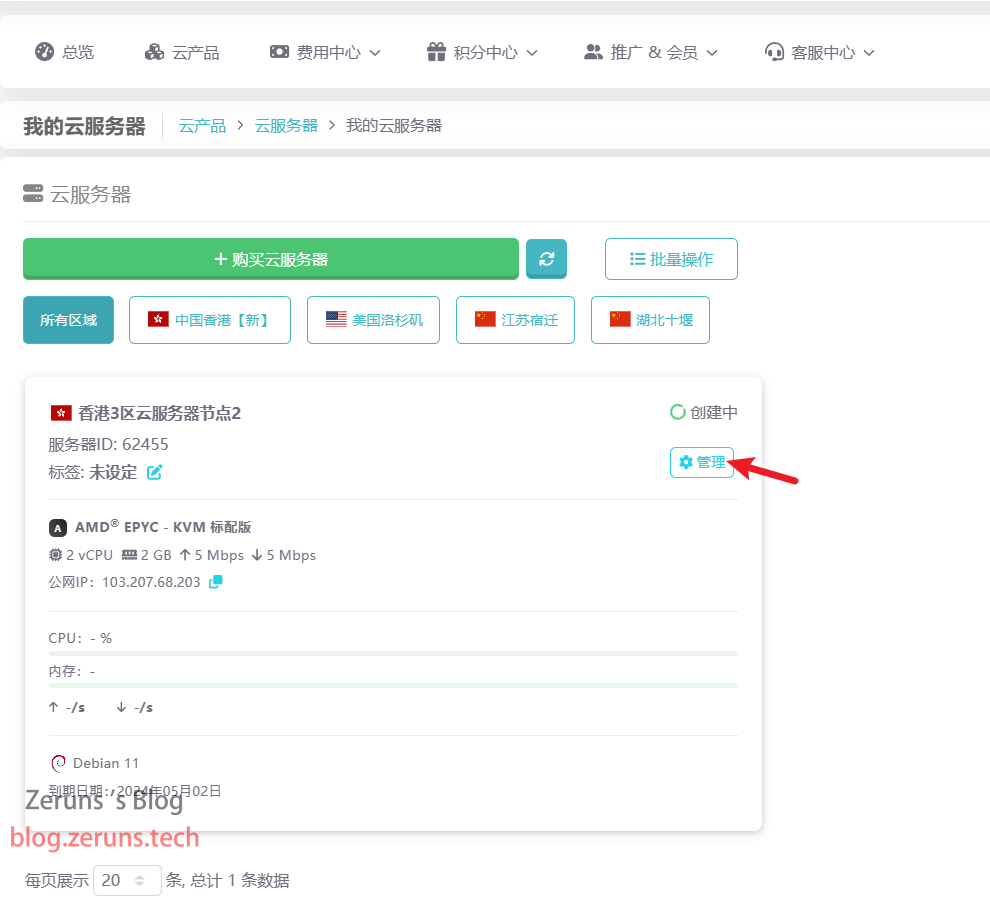
You will then see the server details. Here, you can reinstall or switch the OS, and also upgrade the configuration. Wait for the server to be fully created before proceeding to the next step.
Connecting to the Server
Download, install, and open an SSH client software. Recommended SSH clients include PuTTY or MobaXterm.
Download link for an SSH client: https://www.123pan.com/ps/2Y9Djv-UAtvH.html
I'm using MobaXterm here. In the SSH client, enter your server's IP address (which can be obtained from the control panel), along with the SSH port (default is 22), then click "OK" or "Open".
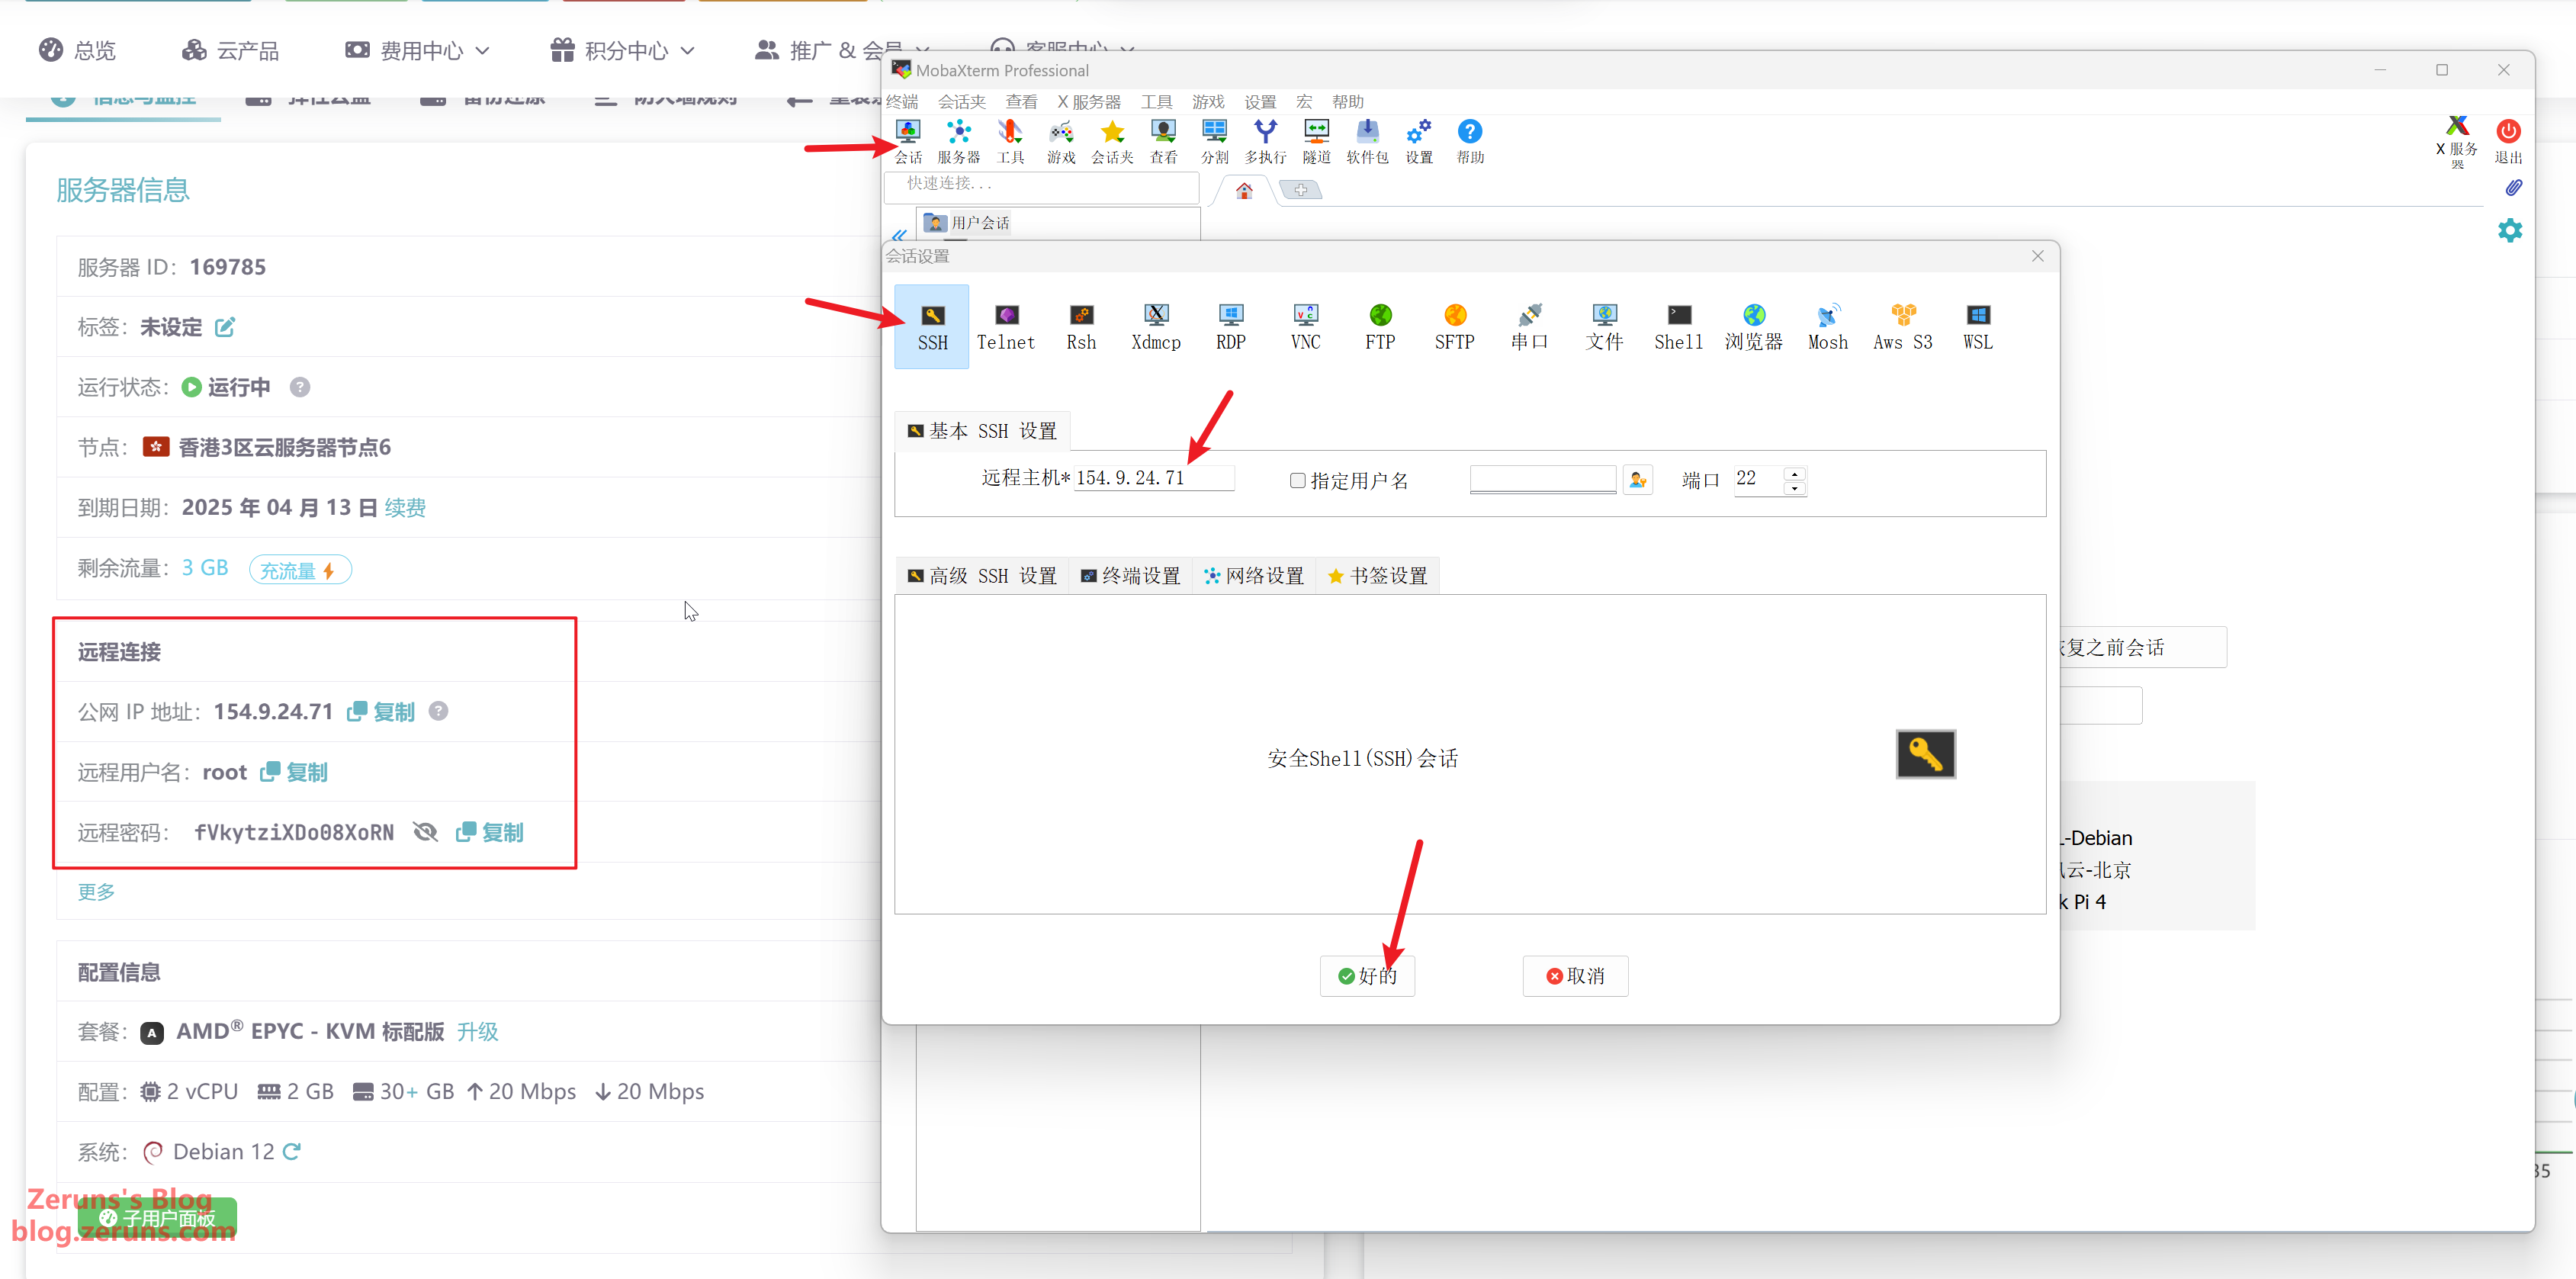
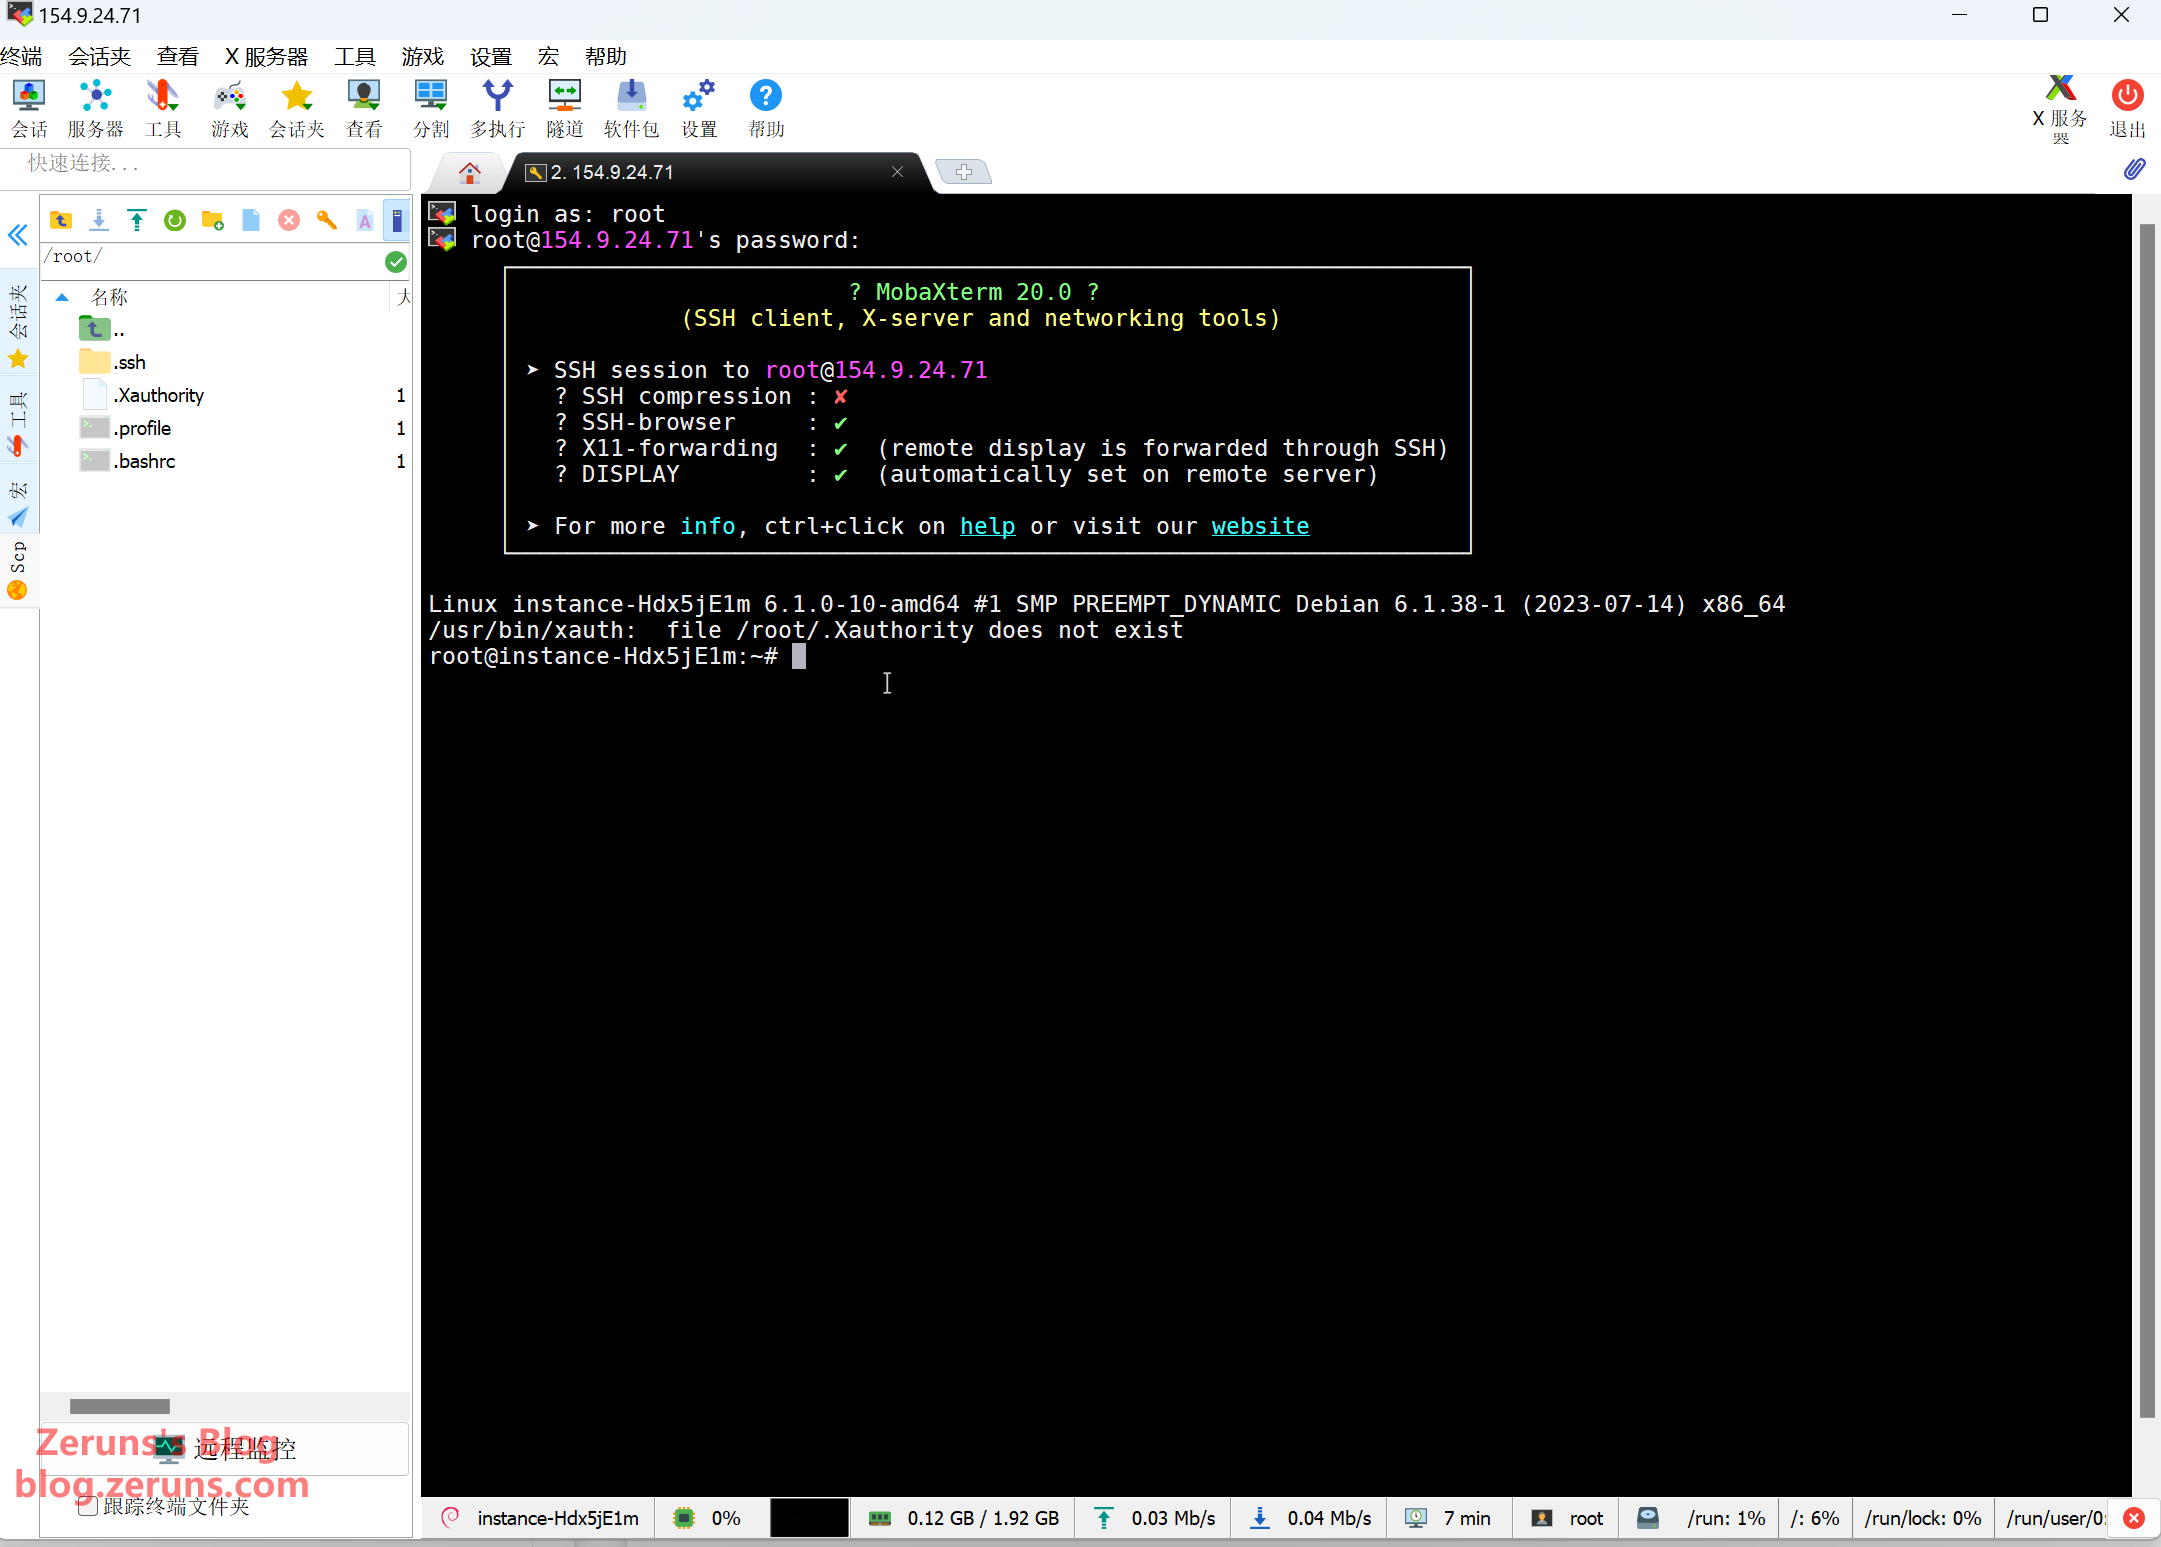
Next, enter your account (usually the default is root), then press Enter. After that, enter your password (which can be found in the control panel) and press Enter. The password will not be displayed as you type.
Tip: In an SSH terminal, hold down the left mouse button to select text, then release and click once in an empty area to copy the selected text; right-clicking in the SSH terminal will paste it.
Switching APT Sources (Skip this step for overseas servers)
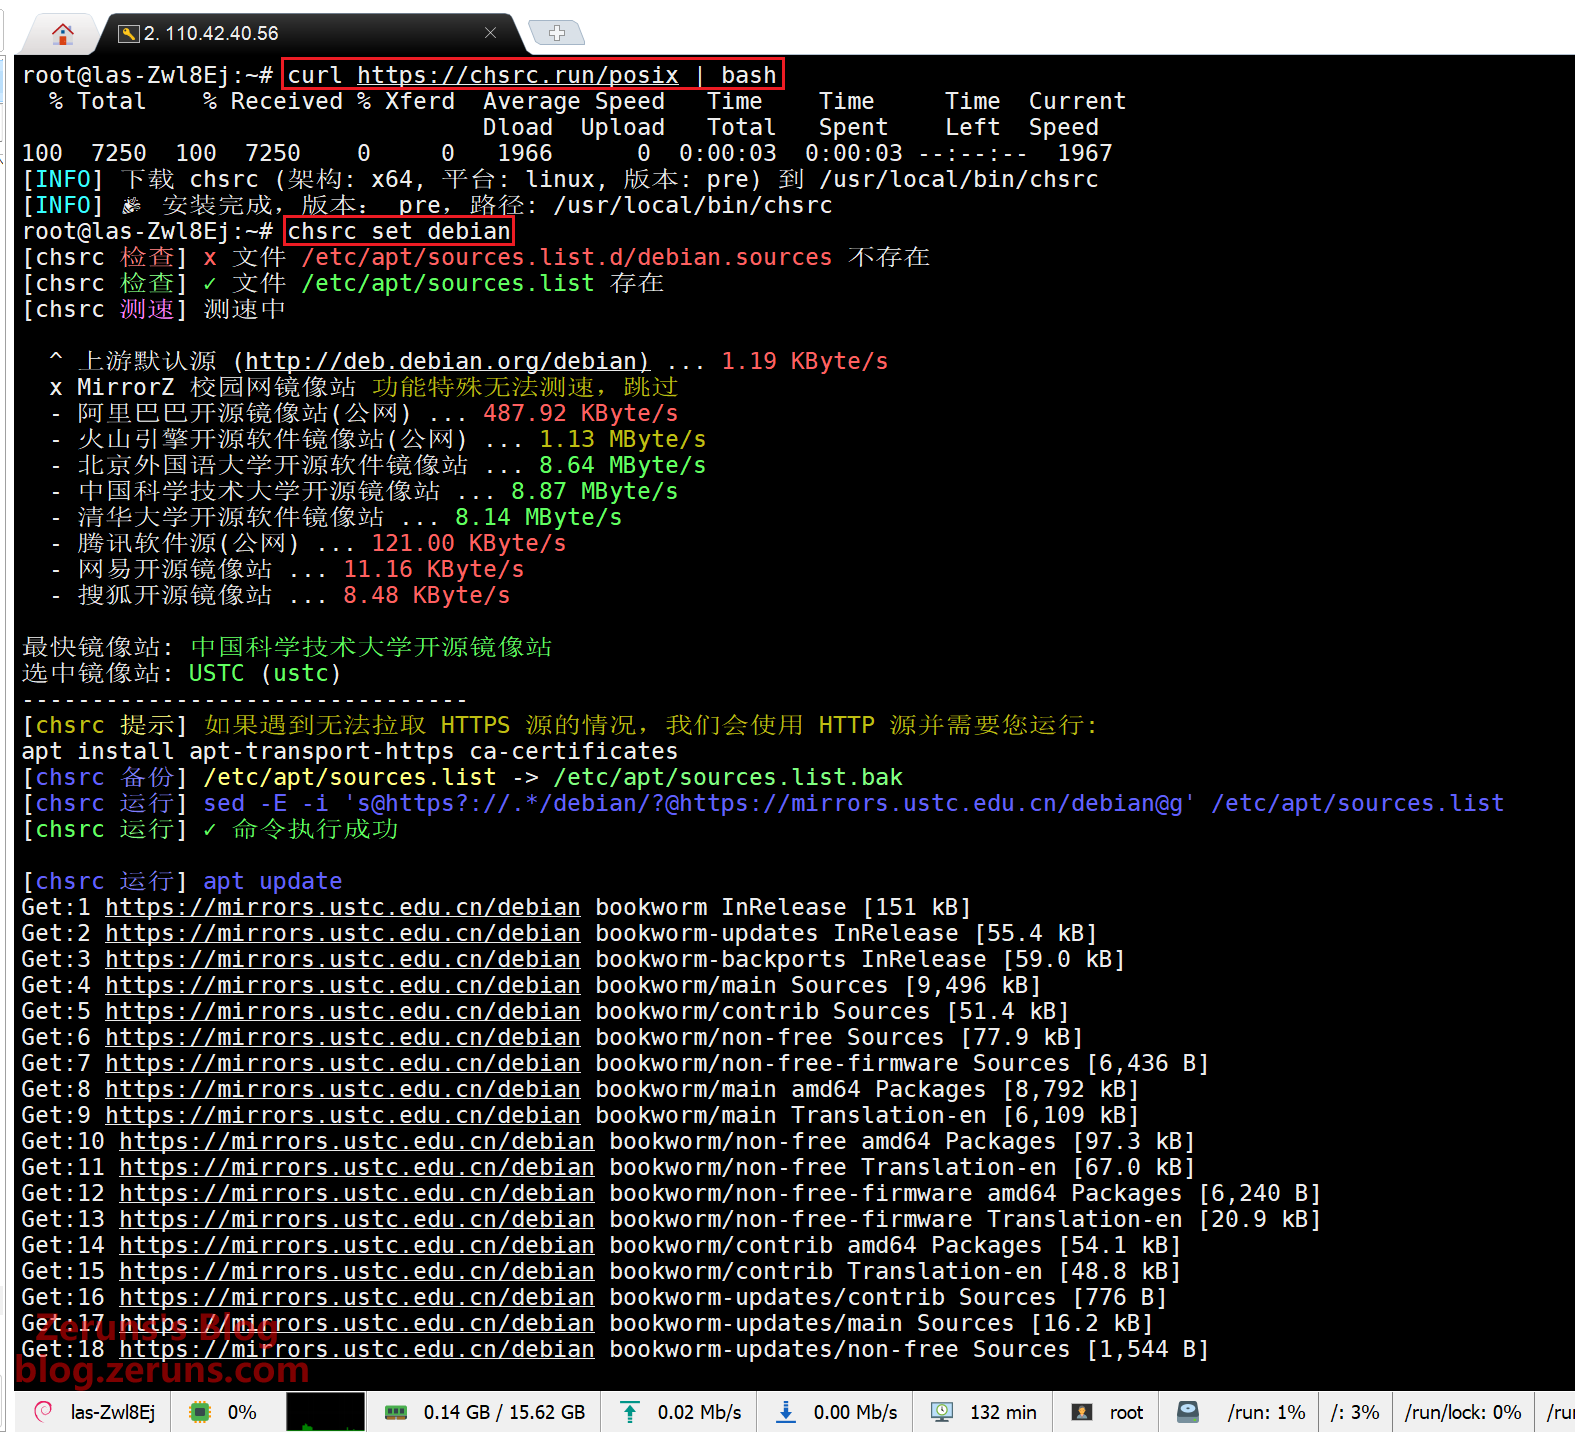
The system's default apt package download sources are based on foreign servers, so you need to switch to domestic mirror sources by using chsrc.
In the SSH terminal, enter the following commands (lines starting with # are comments and should not be entered):
# Download and install chsrc
curl https://chsrc.run/posix | bash

# Automatically test speeds, choose the fastest mirror, and switch sources
chsrc set debian
Installing the 1Panel and Docker
In the SSH terminal, run the following command. This is the 1Panel installation script, and it will automatically install Docker as well:
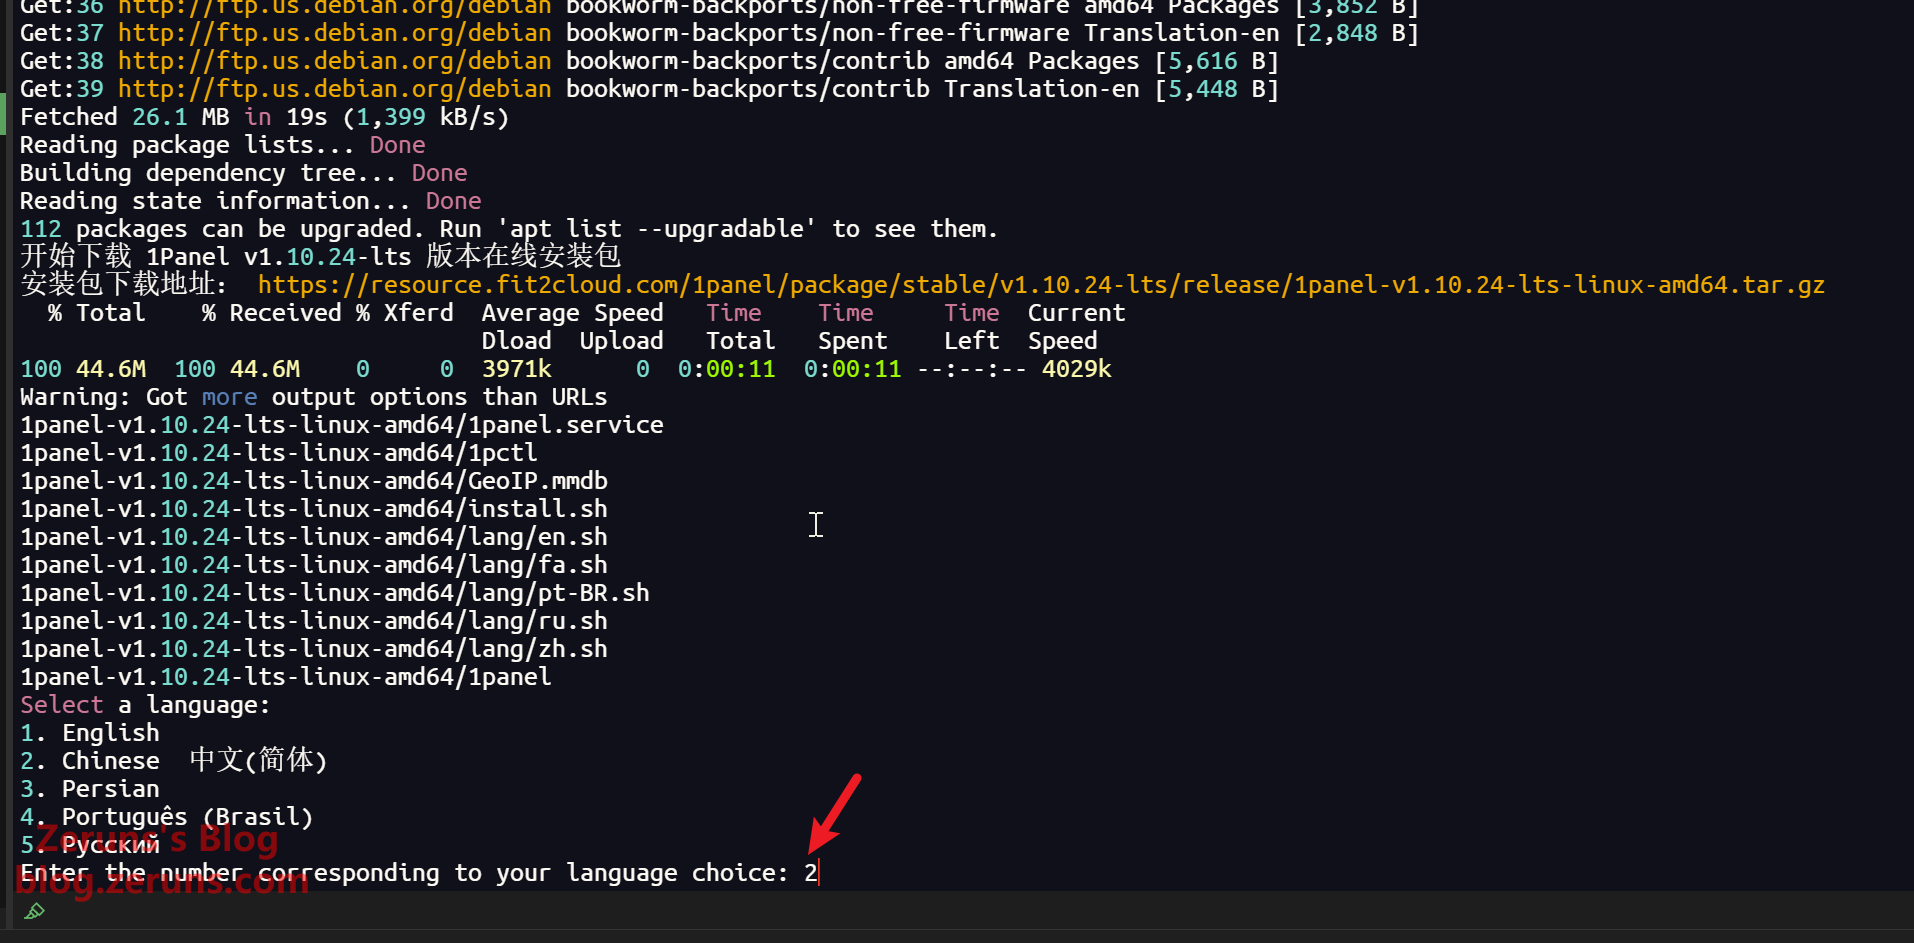
apt -y update && curl -sSL https://resource.fit2cloud.com/1panel/package/quick_start.sh -o quick_start.sh && bash quick_start.sh
If you see a language selection prompt, simply follow the instructions and enter the corresponding number. Here, I chose 2. Chinese 中文(简体).
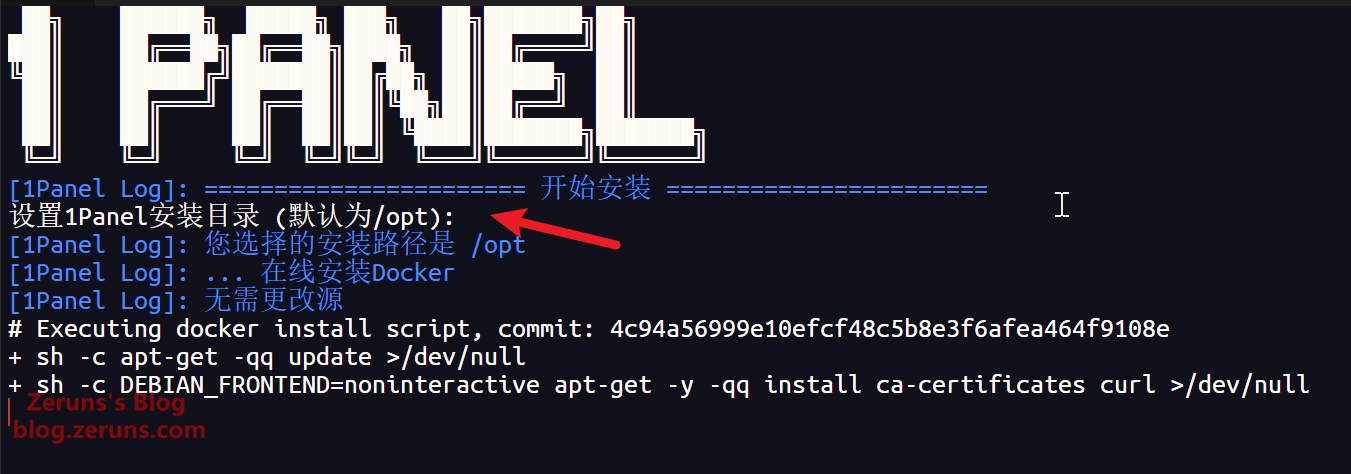
When prompted to set the installation directory, just press Enter to use the default /opt directory.
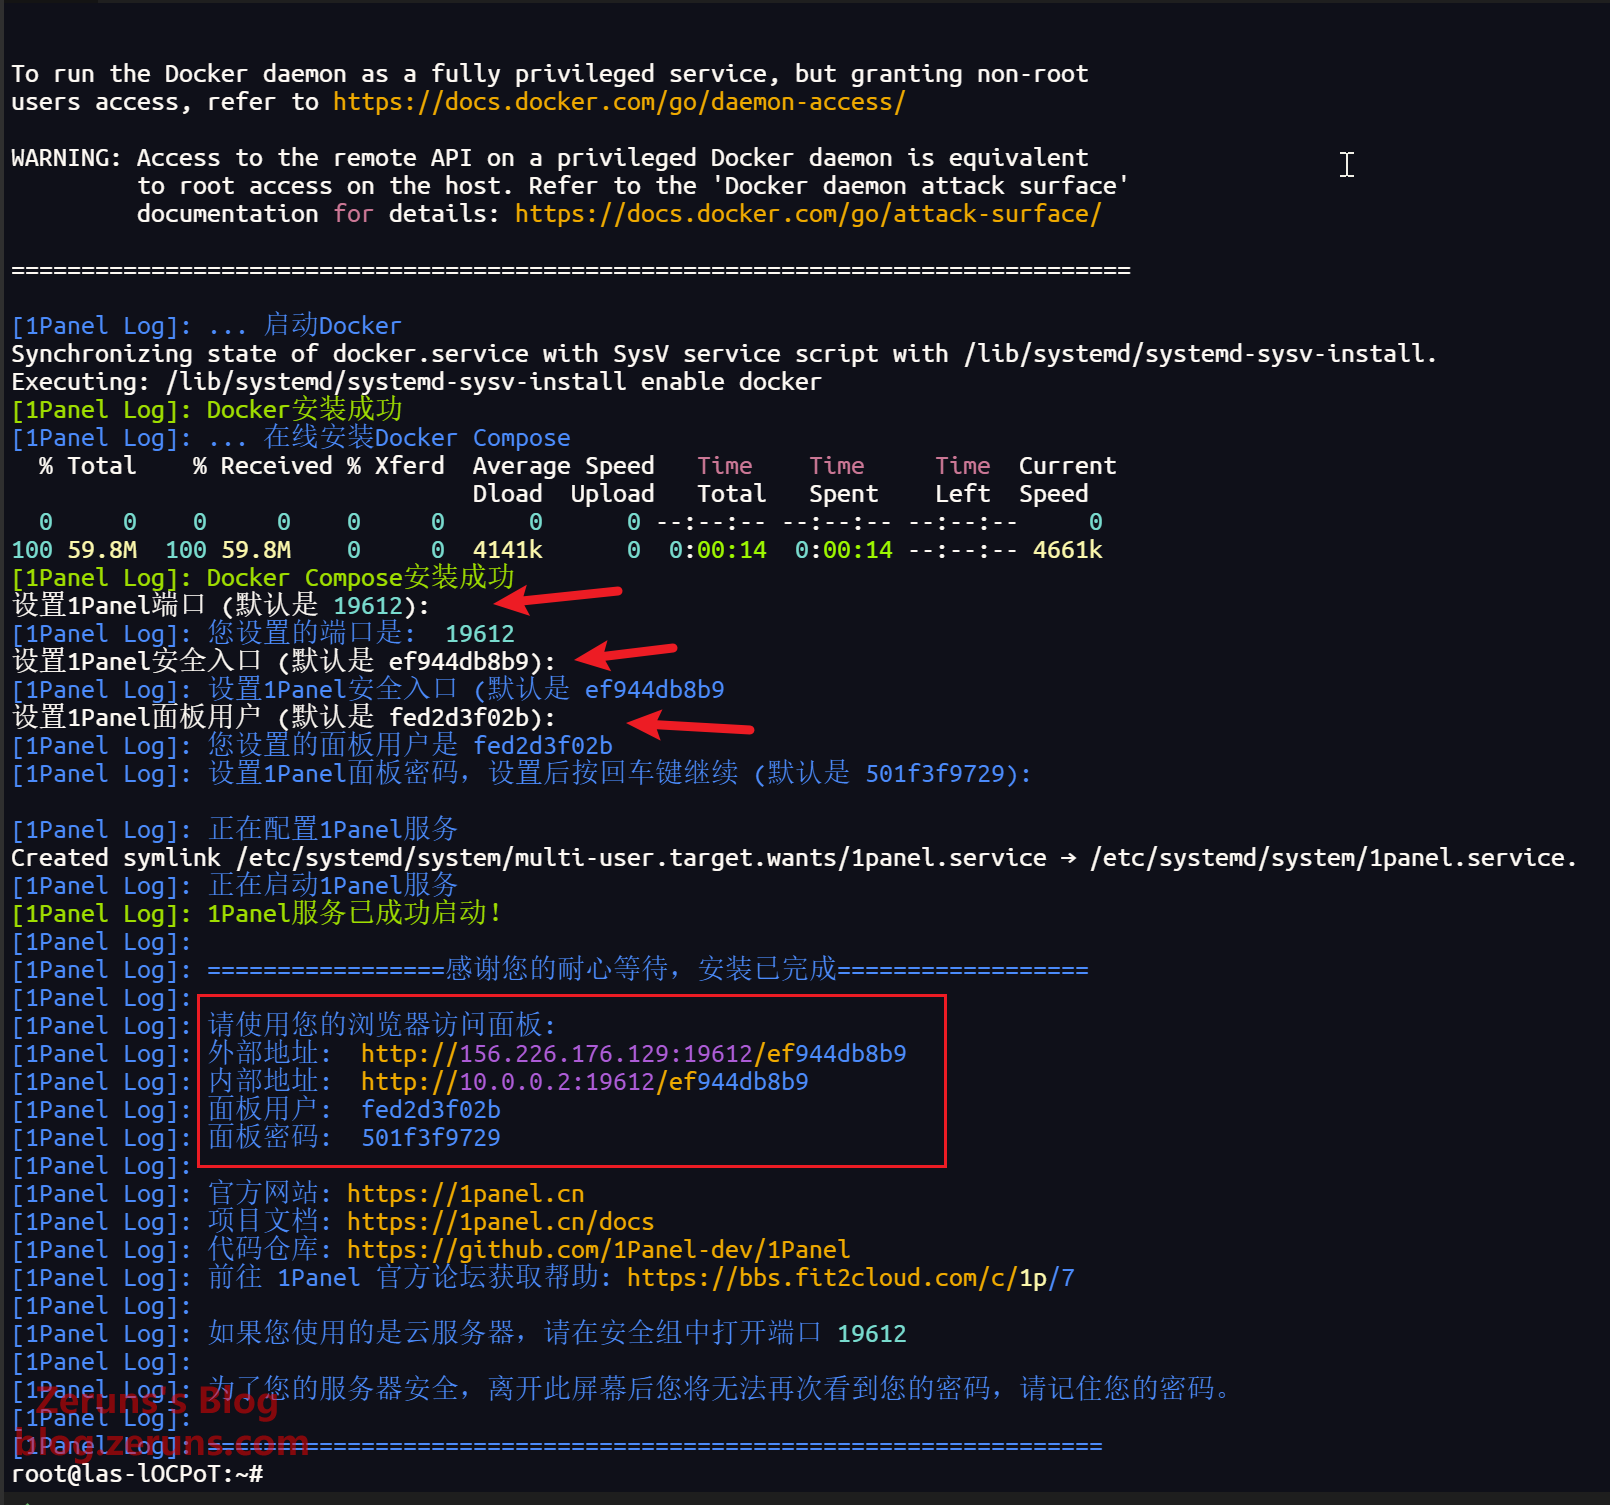
Next, you'll be prompted to set the panel port and create an account with a password. Generally, you can use the default settings; however, you can enter a custom username and password if you wish. Wait a moment for the installation to complete, and remember the panel address along with your account credentials.
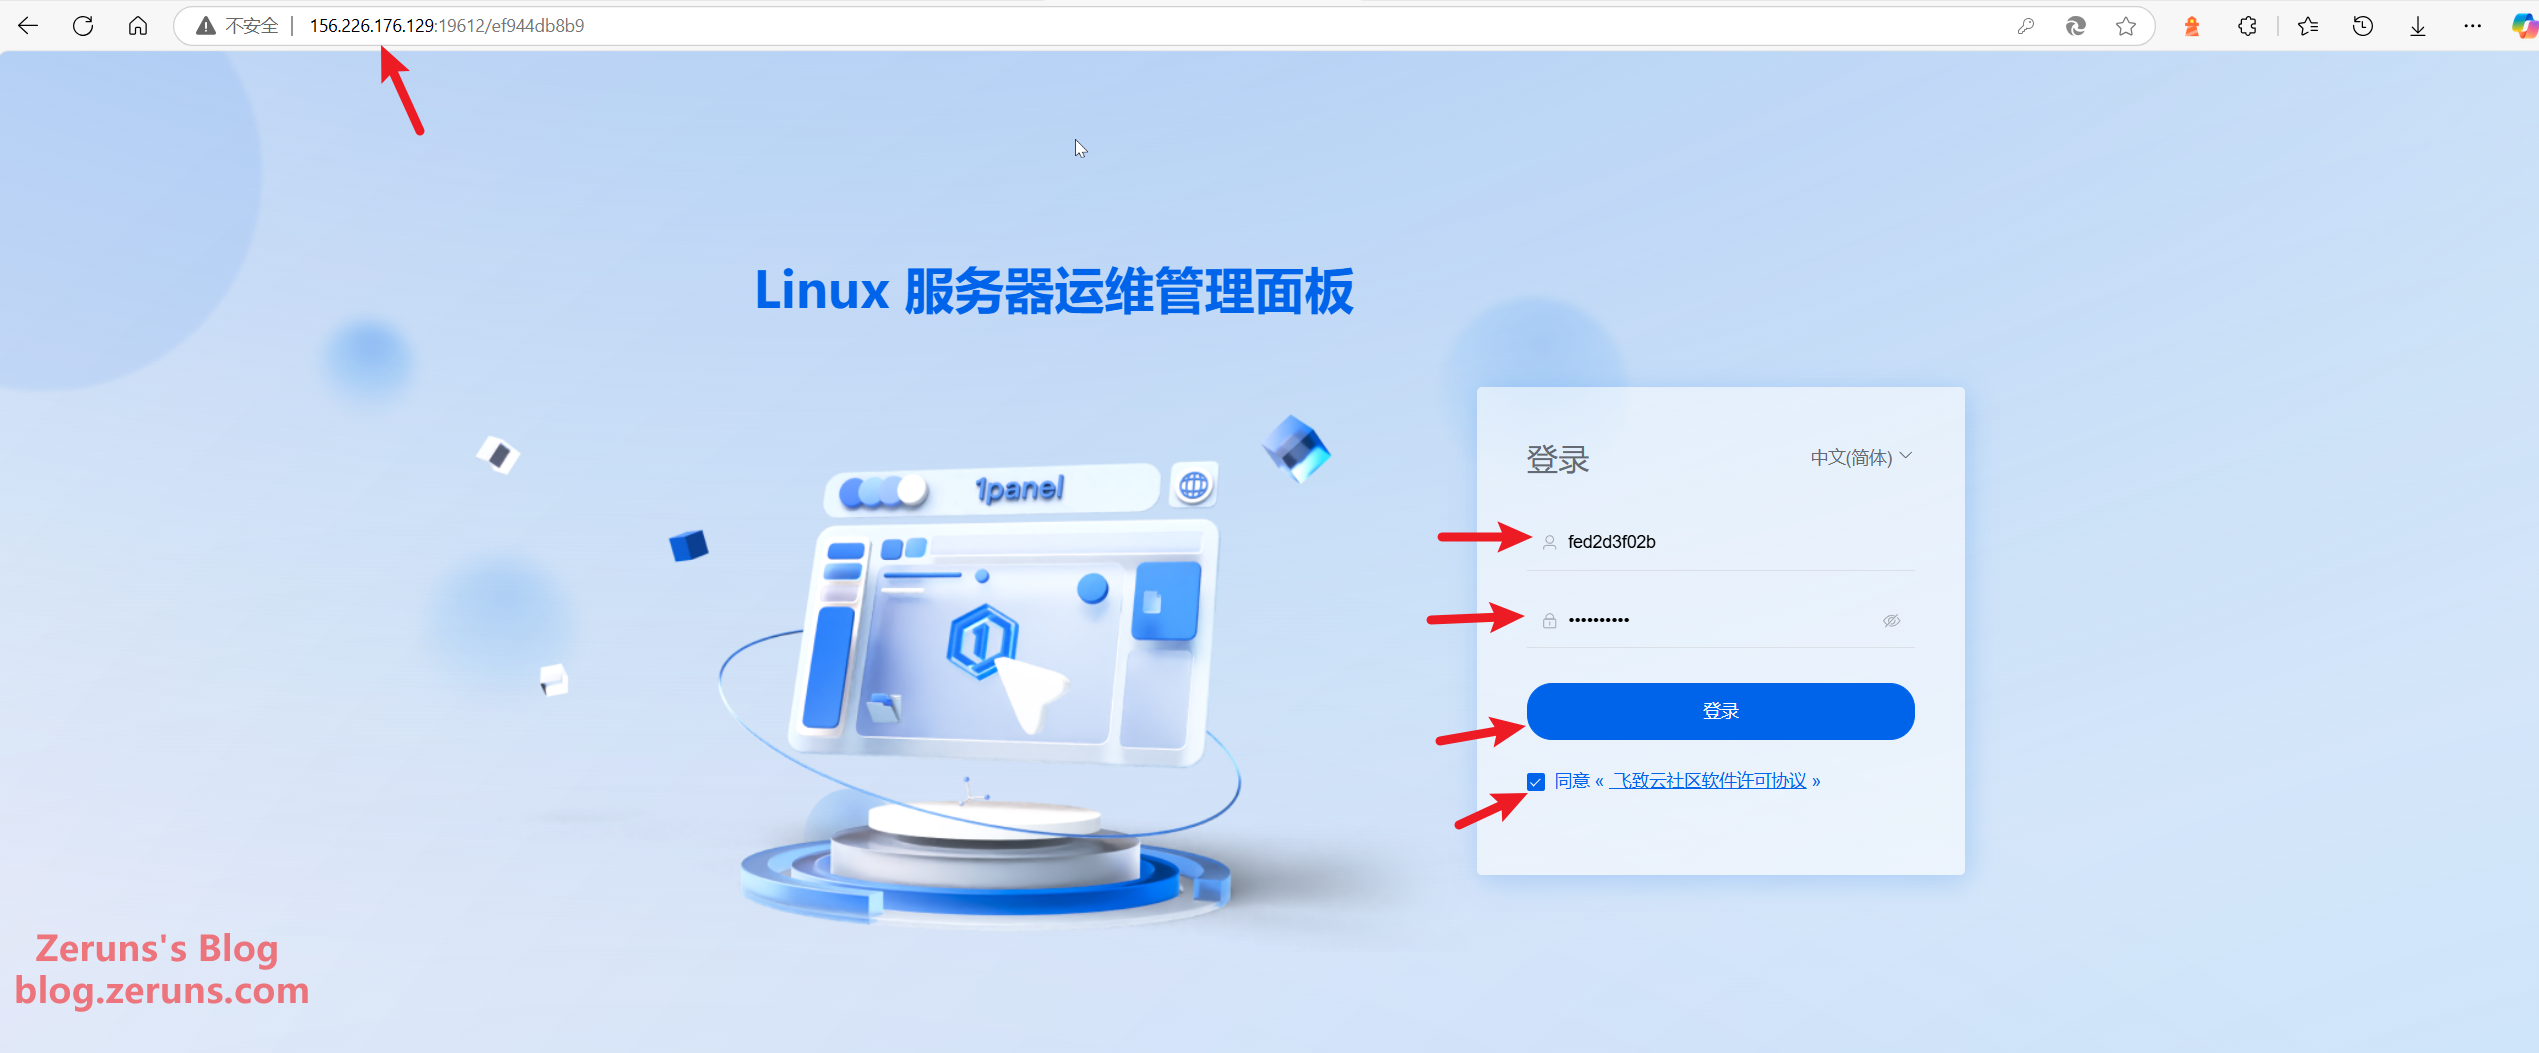
Then, enter the panel address in your browser's address bar to log in.
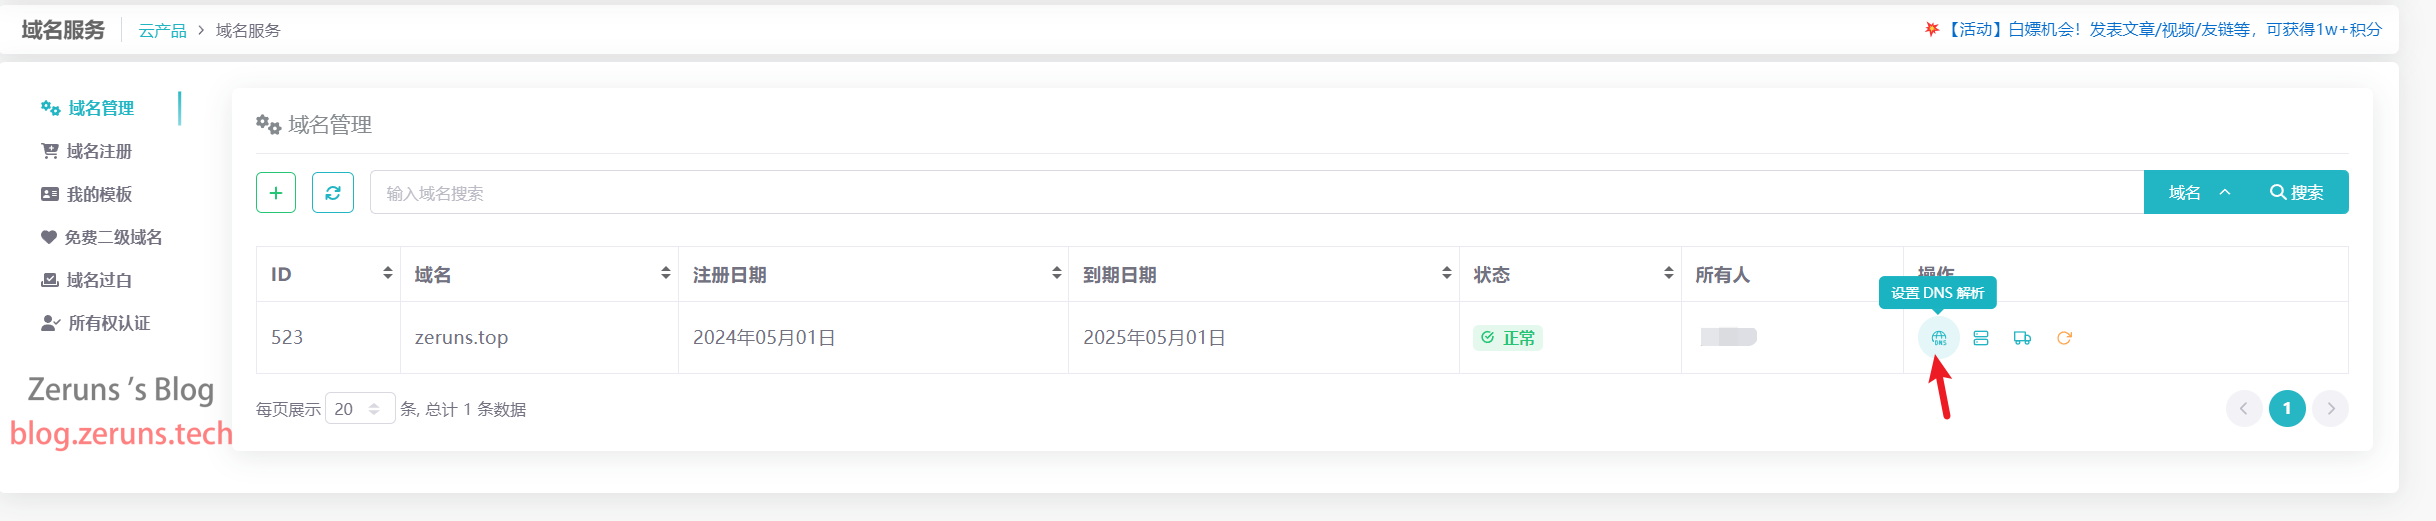
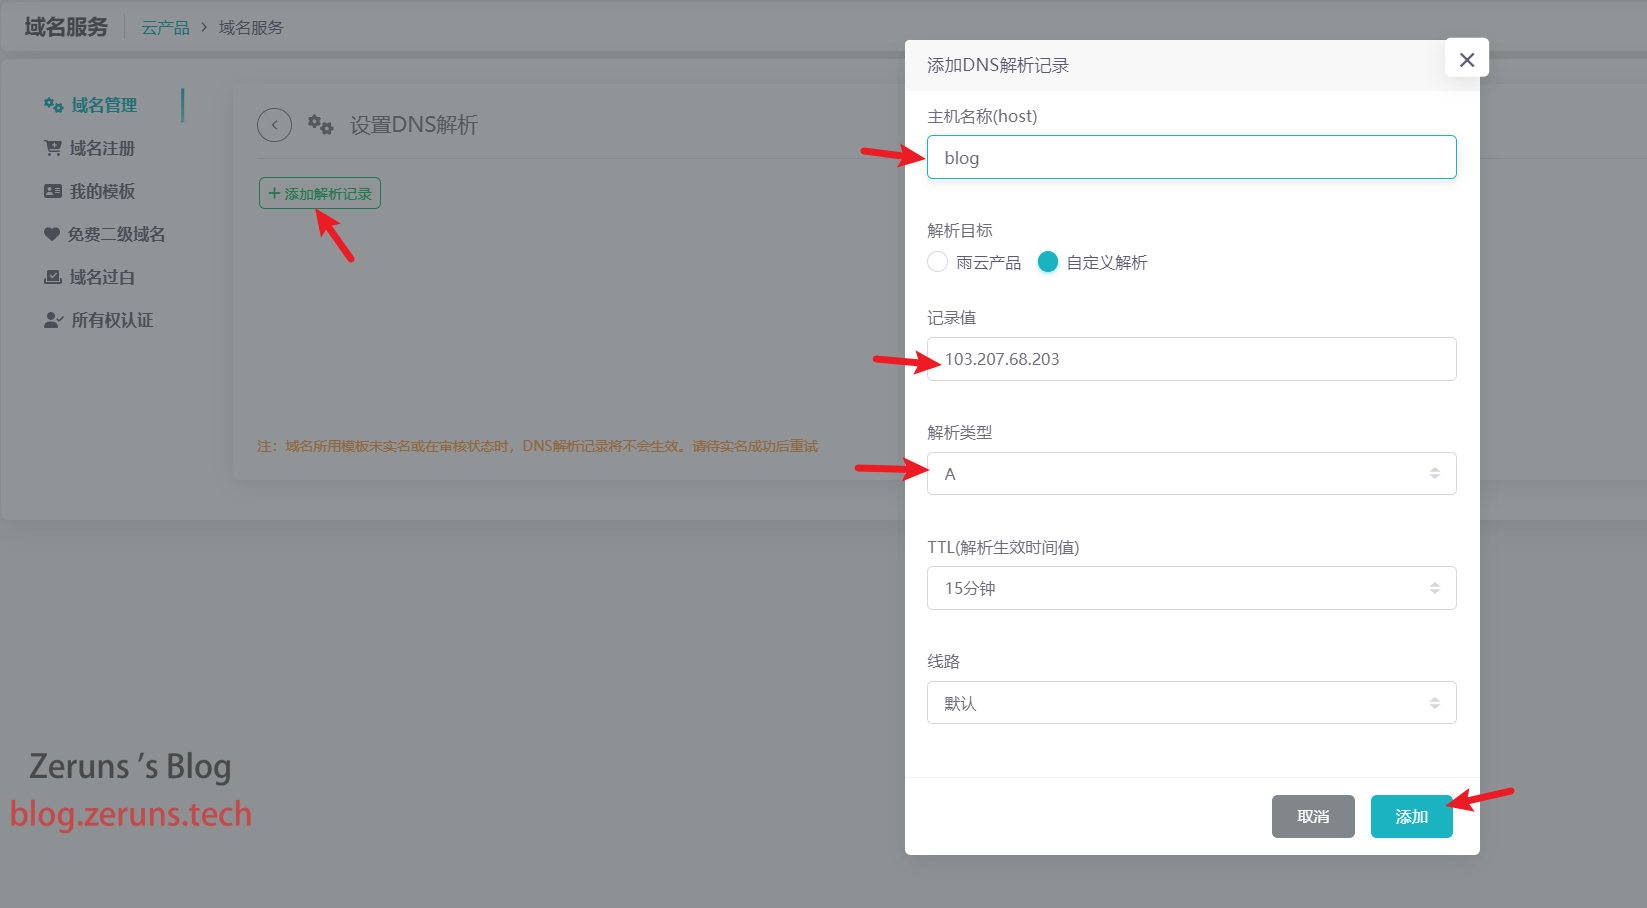
Configuring Domain Name Resolution
Head to your domain DNS management console and add a new record. For the host name, you can type a name of your choice; for example, entering blog will make the website accessible via blog.zeruns.top. If you enter @, the domain will point directly to zeruns.top. For the record value, enter the IP address of your server.
Installing OpenResty and MySQL
OpenResty is a high-performance web application server based on Nginx. It integrates Nginx with the Lua programming language, offering powerful features and flexibility. Here, it is used as a reverse proxy for the Halo application.
MySQL is a popular open source relational database management system (RDBMS). It is feature-rich and suitable for a variety of applications.
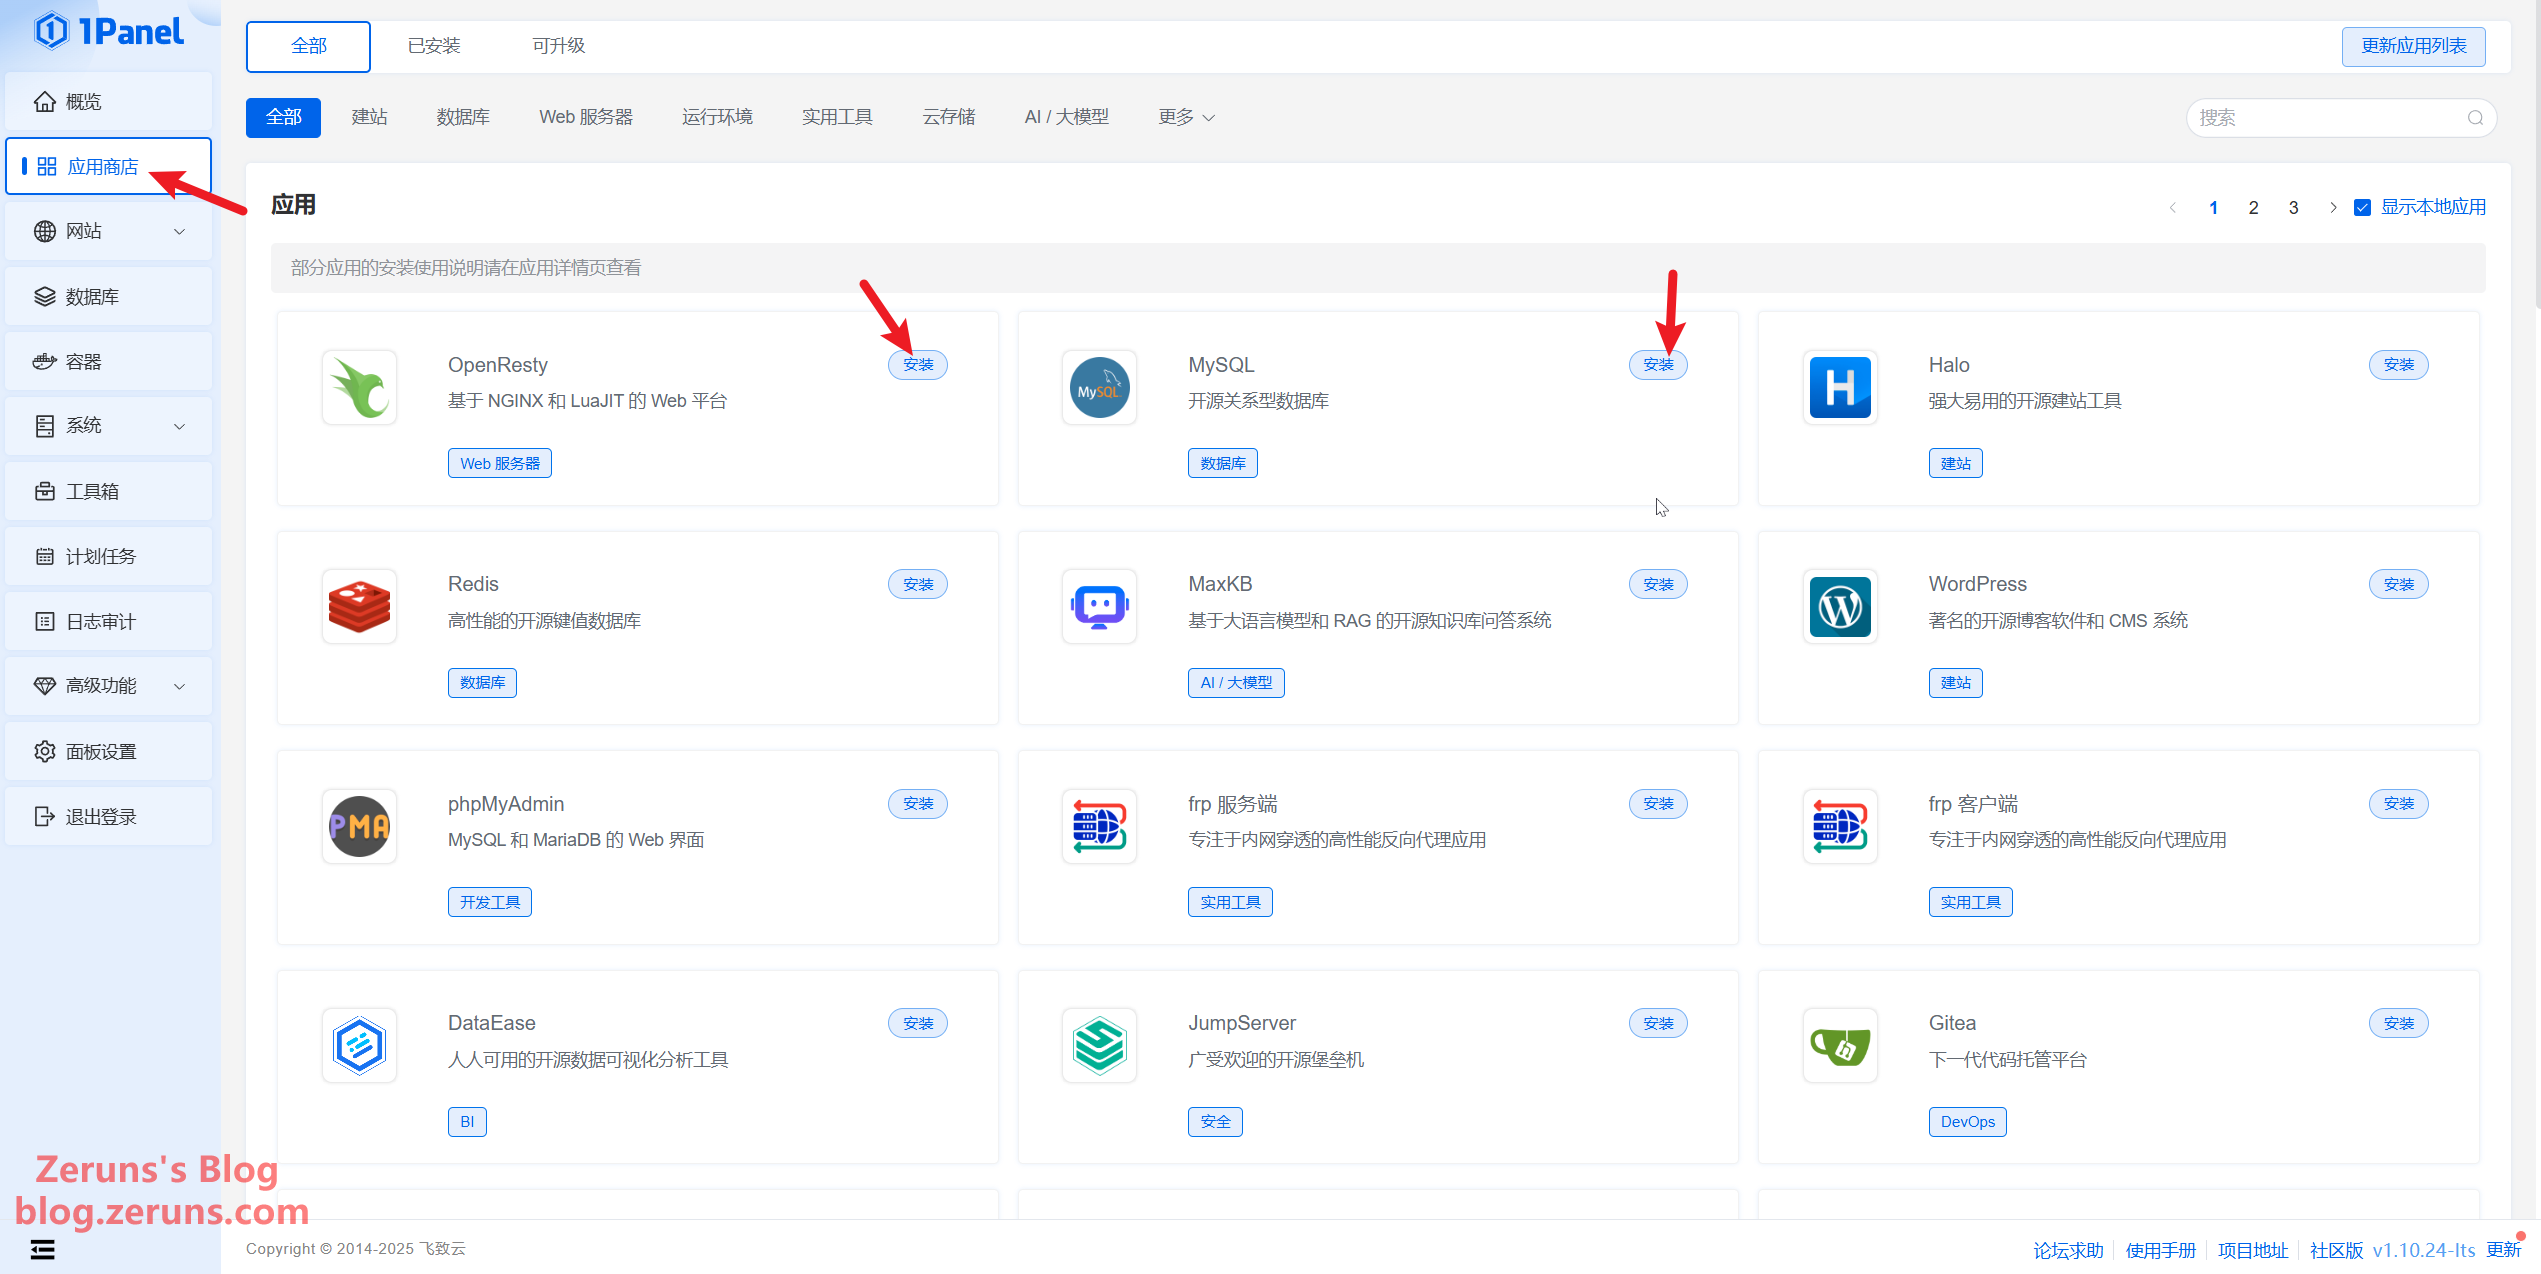
Note: If you are using a server located in Mainland China, make sure to first go to Container → Configuration and set up the Image Acceleration (there are documentation links in the settings that explain how to do this).
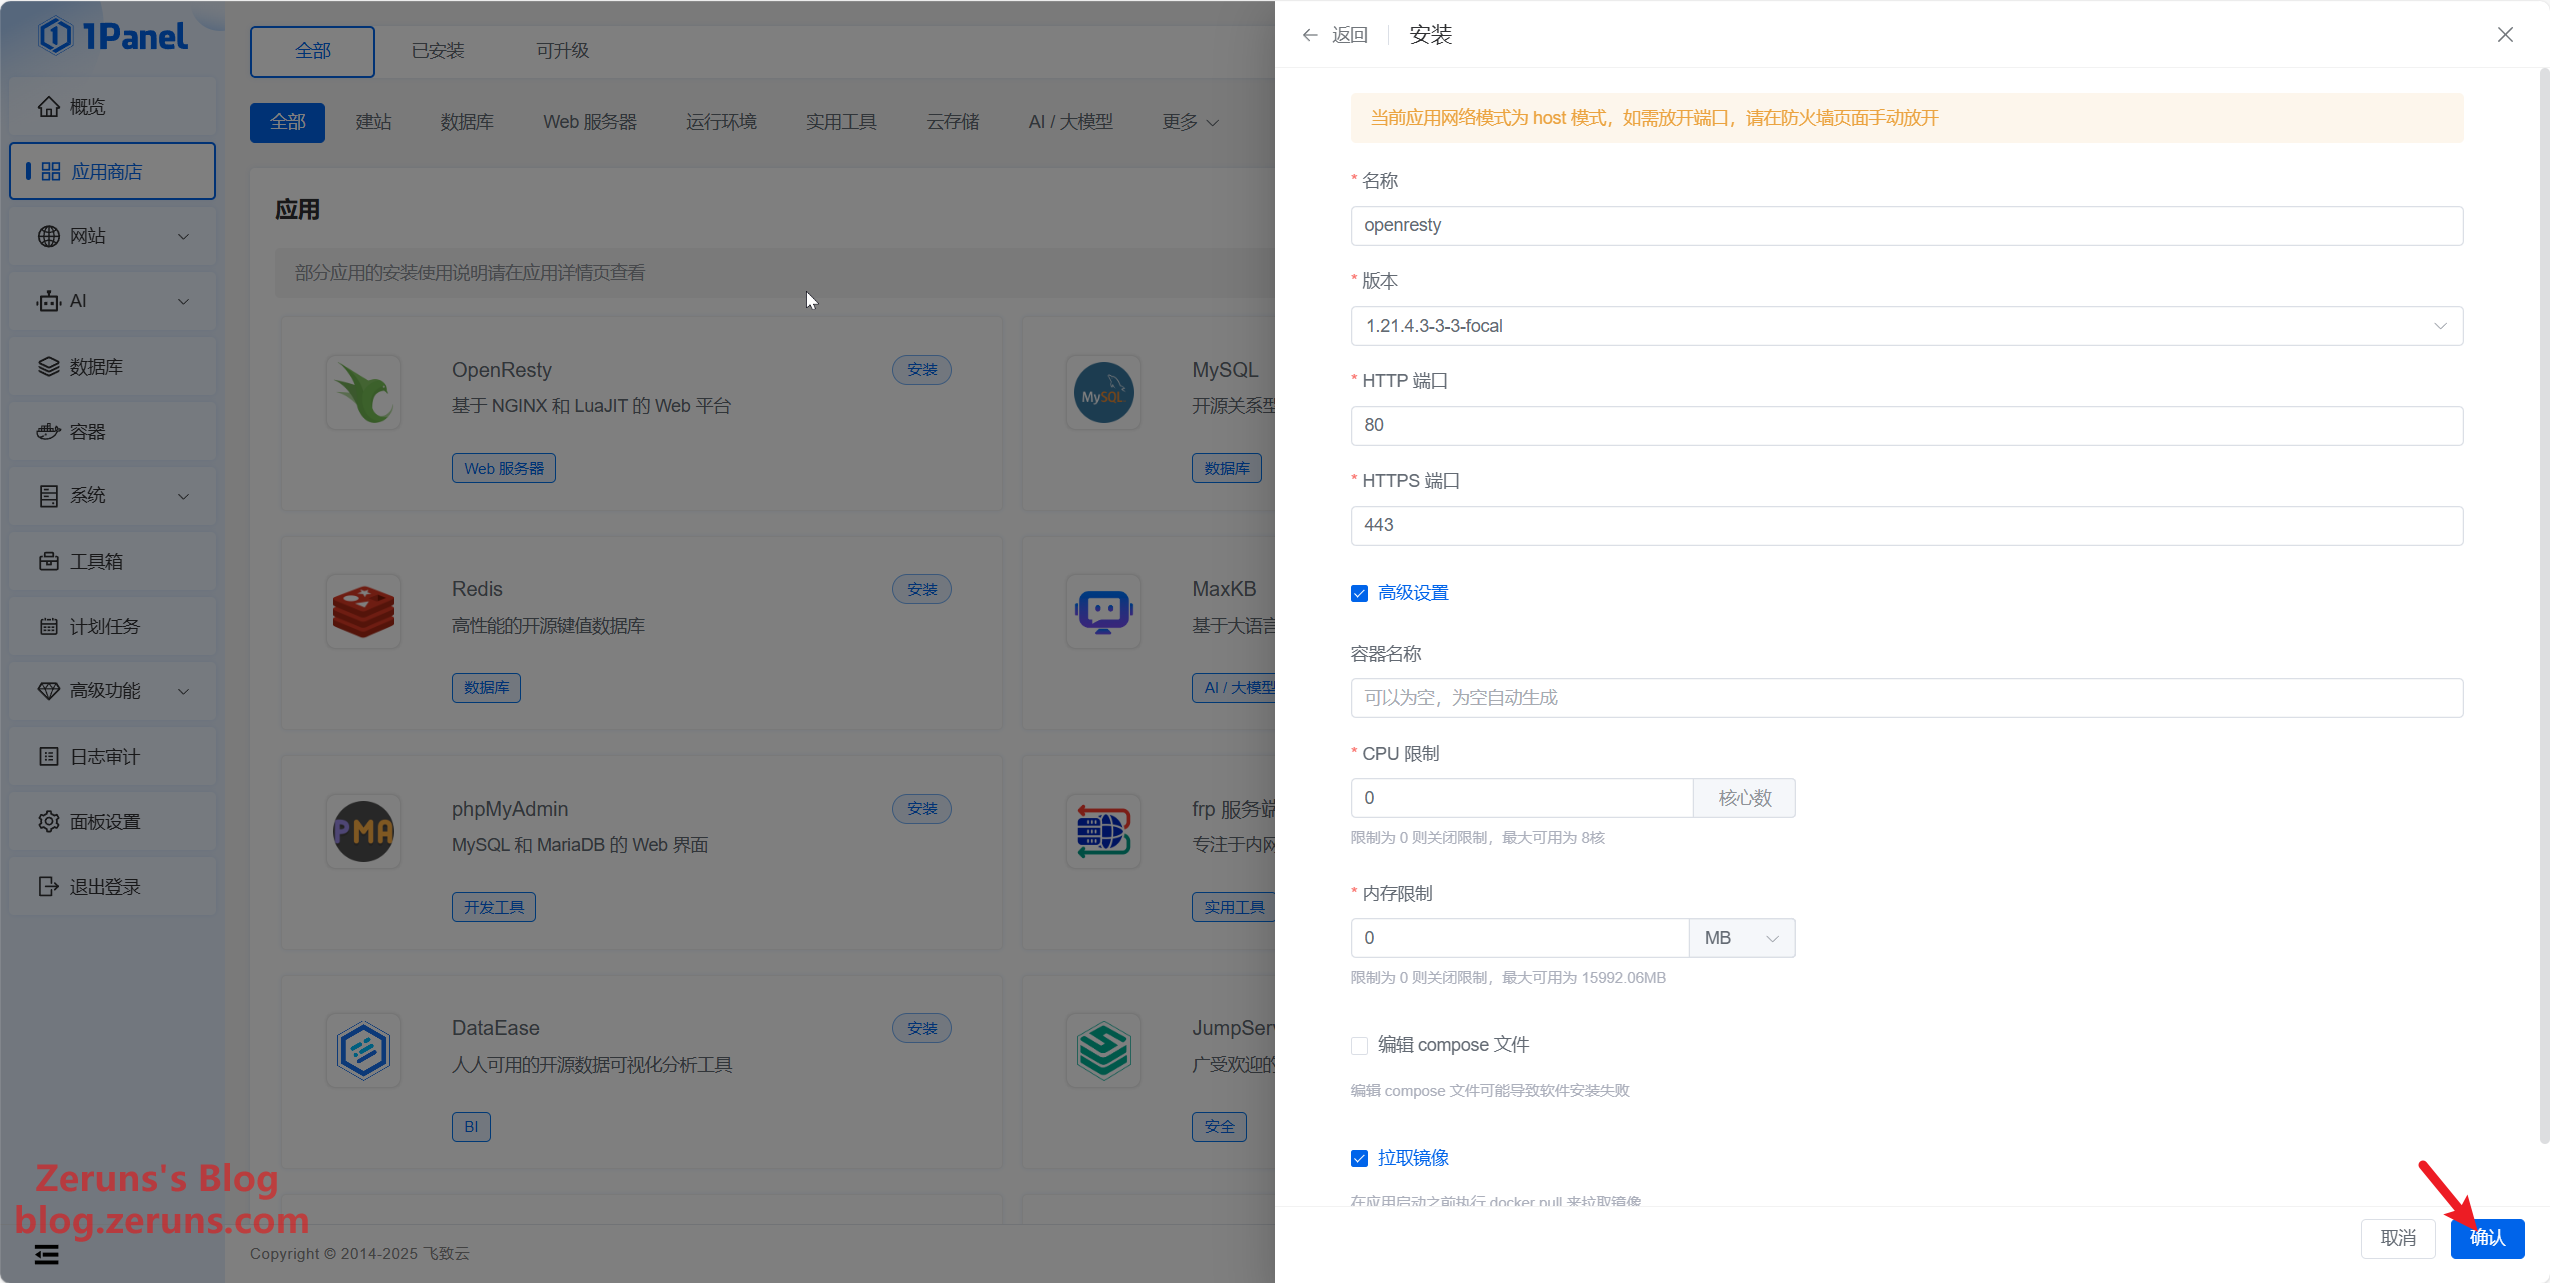
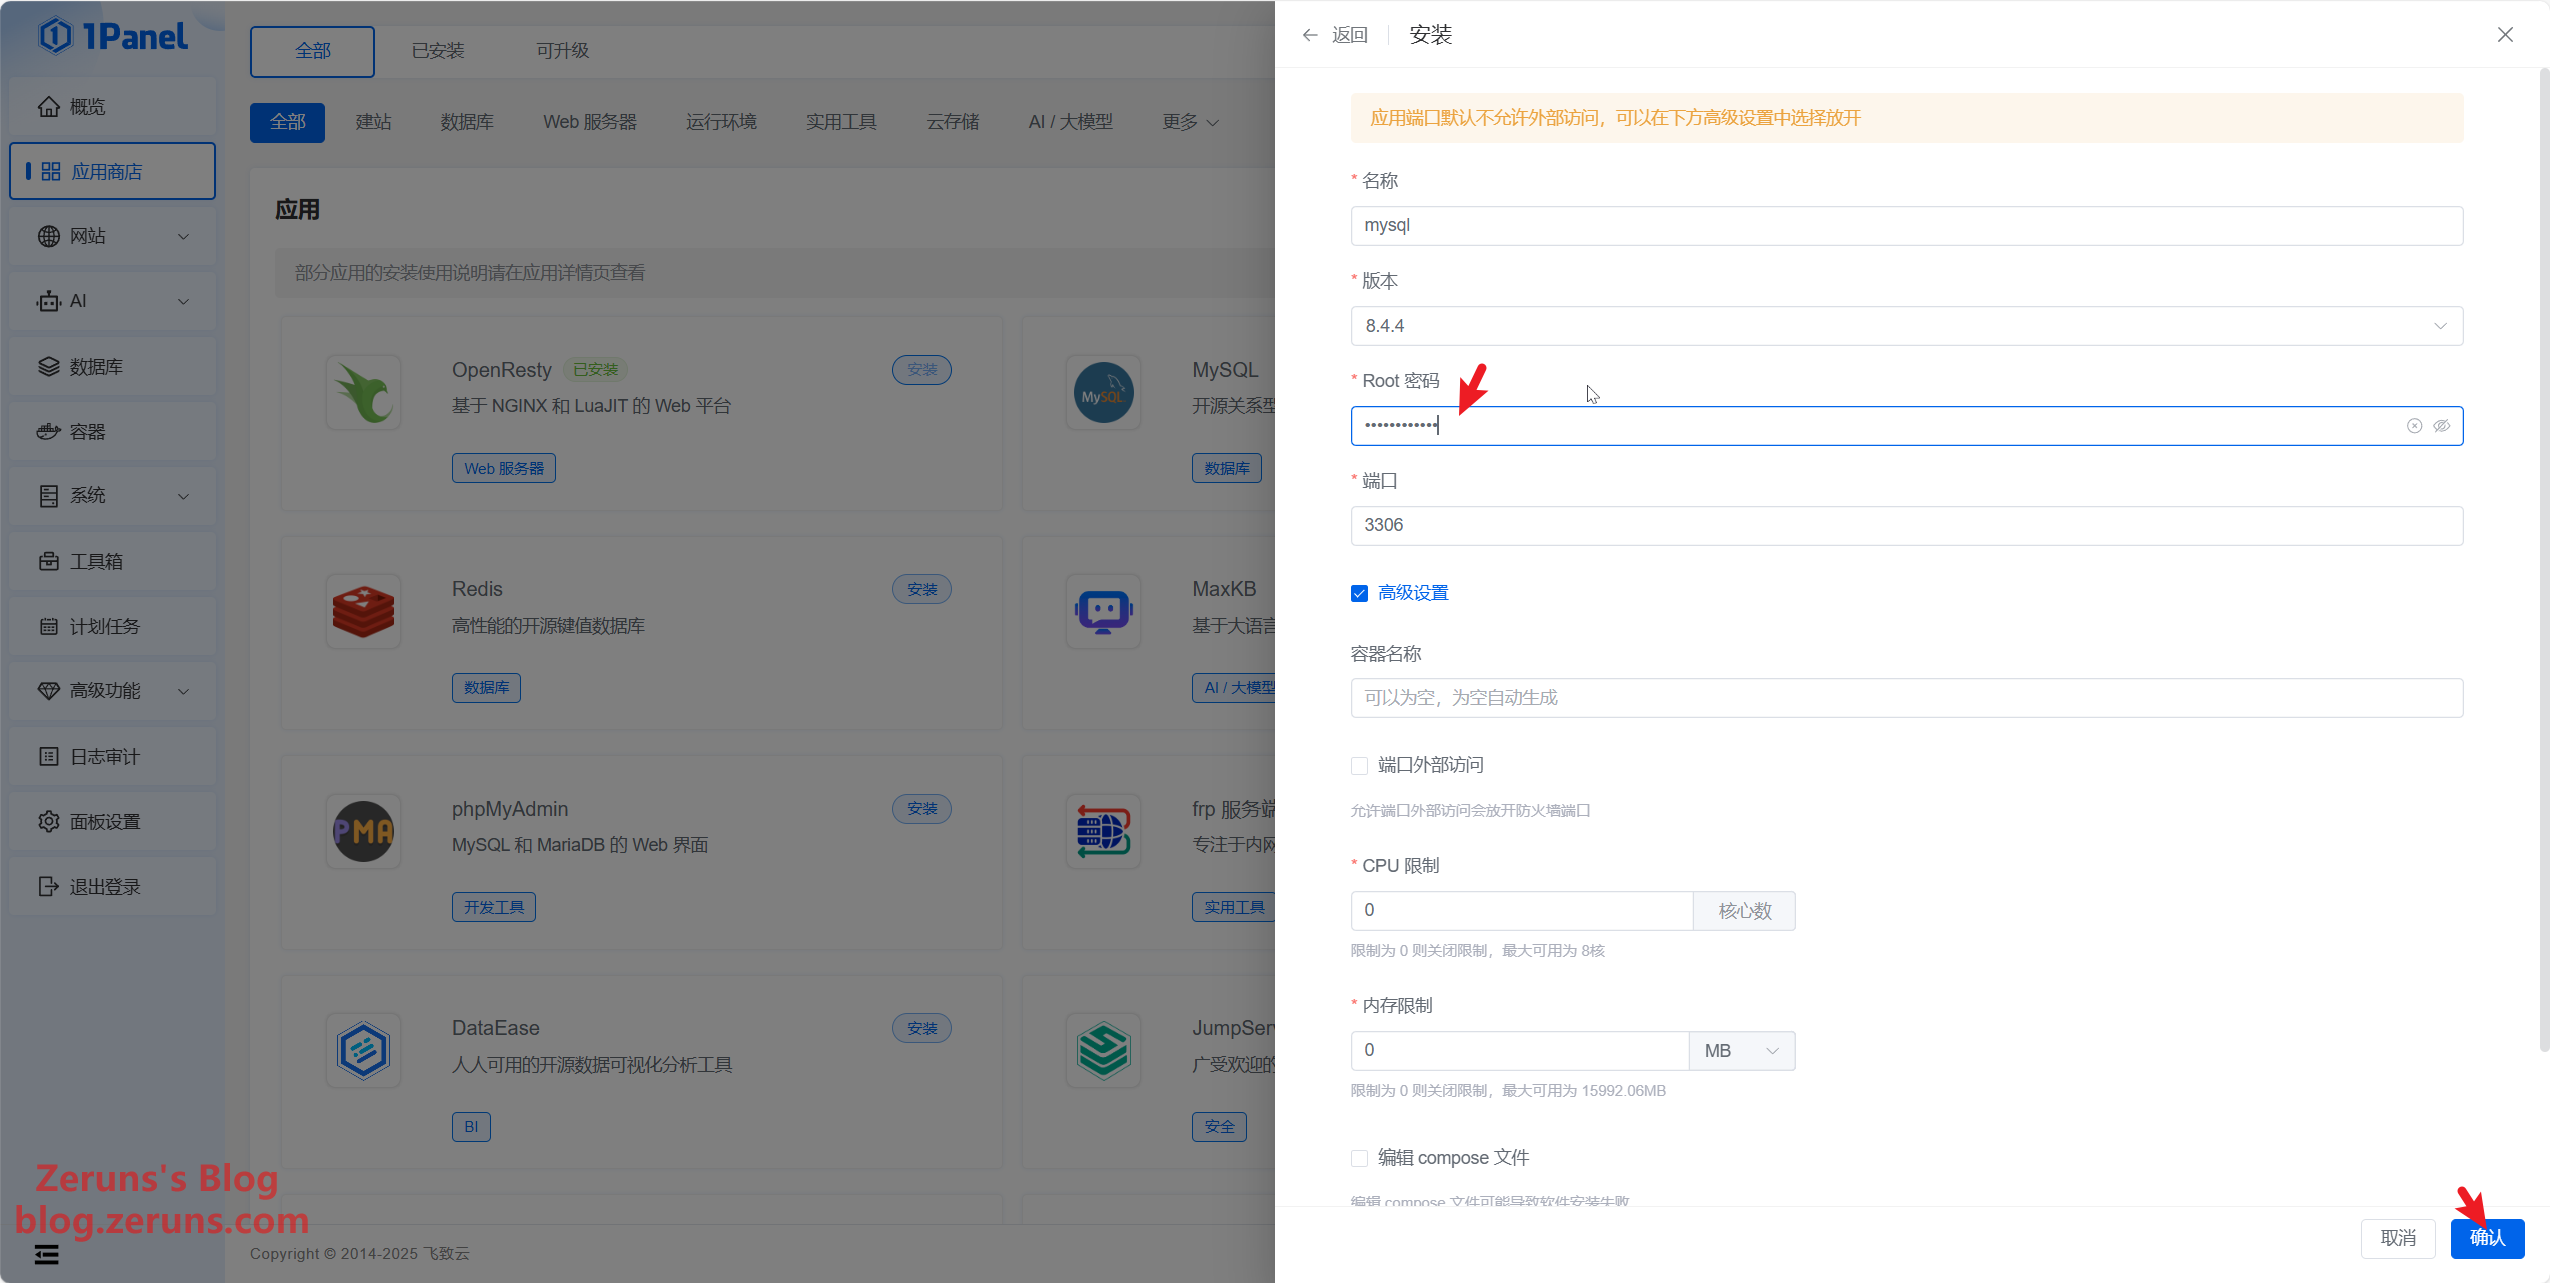
Click on the App Store and install both OpenResty and MySQL. The default settings should suffice.
You can set a custom root password for MySQL, but it is recommended to use the randomly generated password by default.
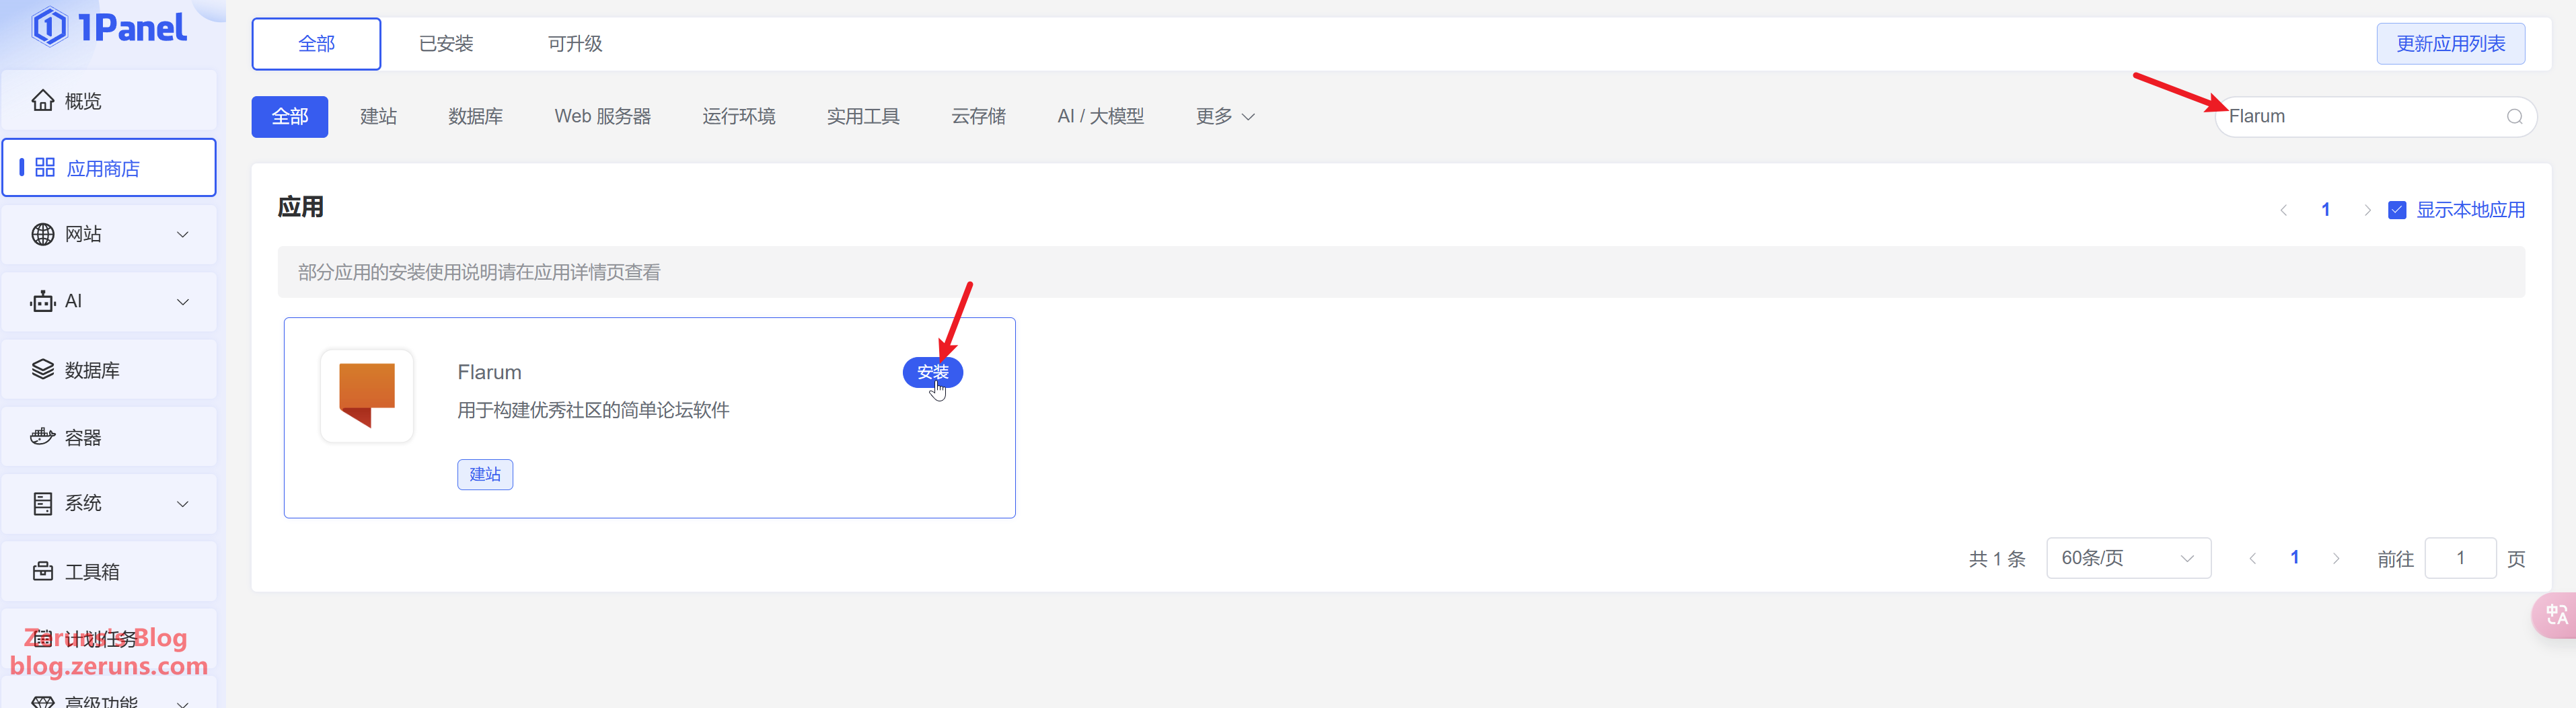
Installing Flarum
Return to the App Store and install Flarum. In the top right search bar, type Flarum and hit Enter. When Flarum appears, click to install it.
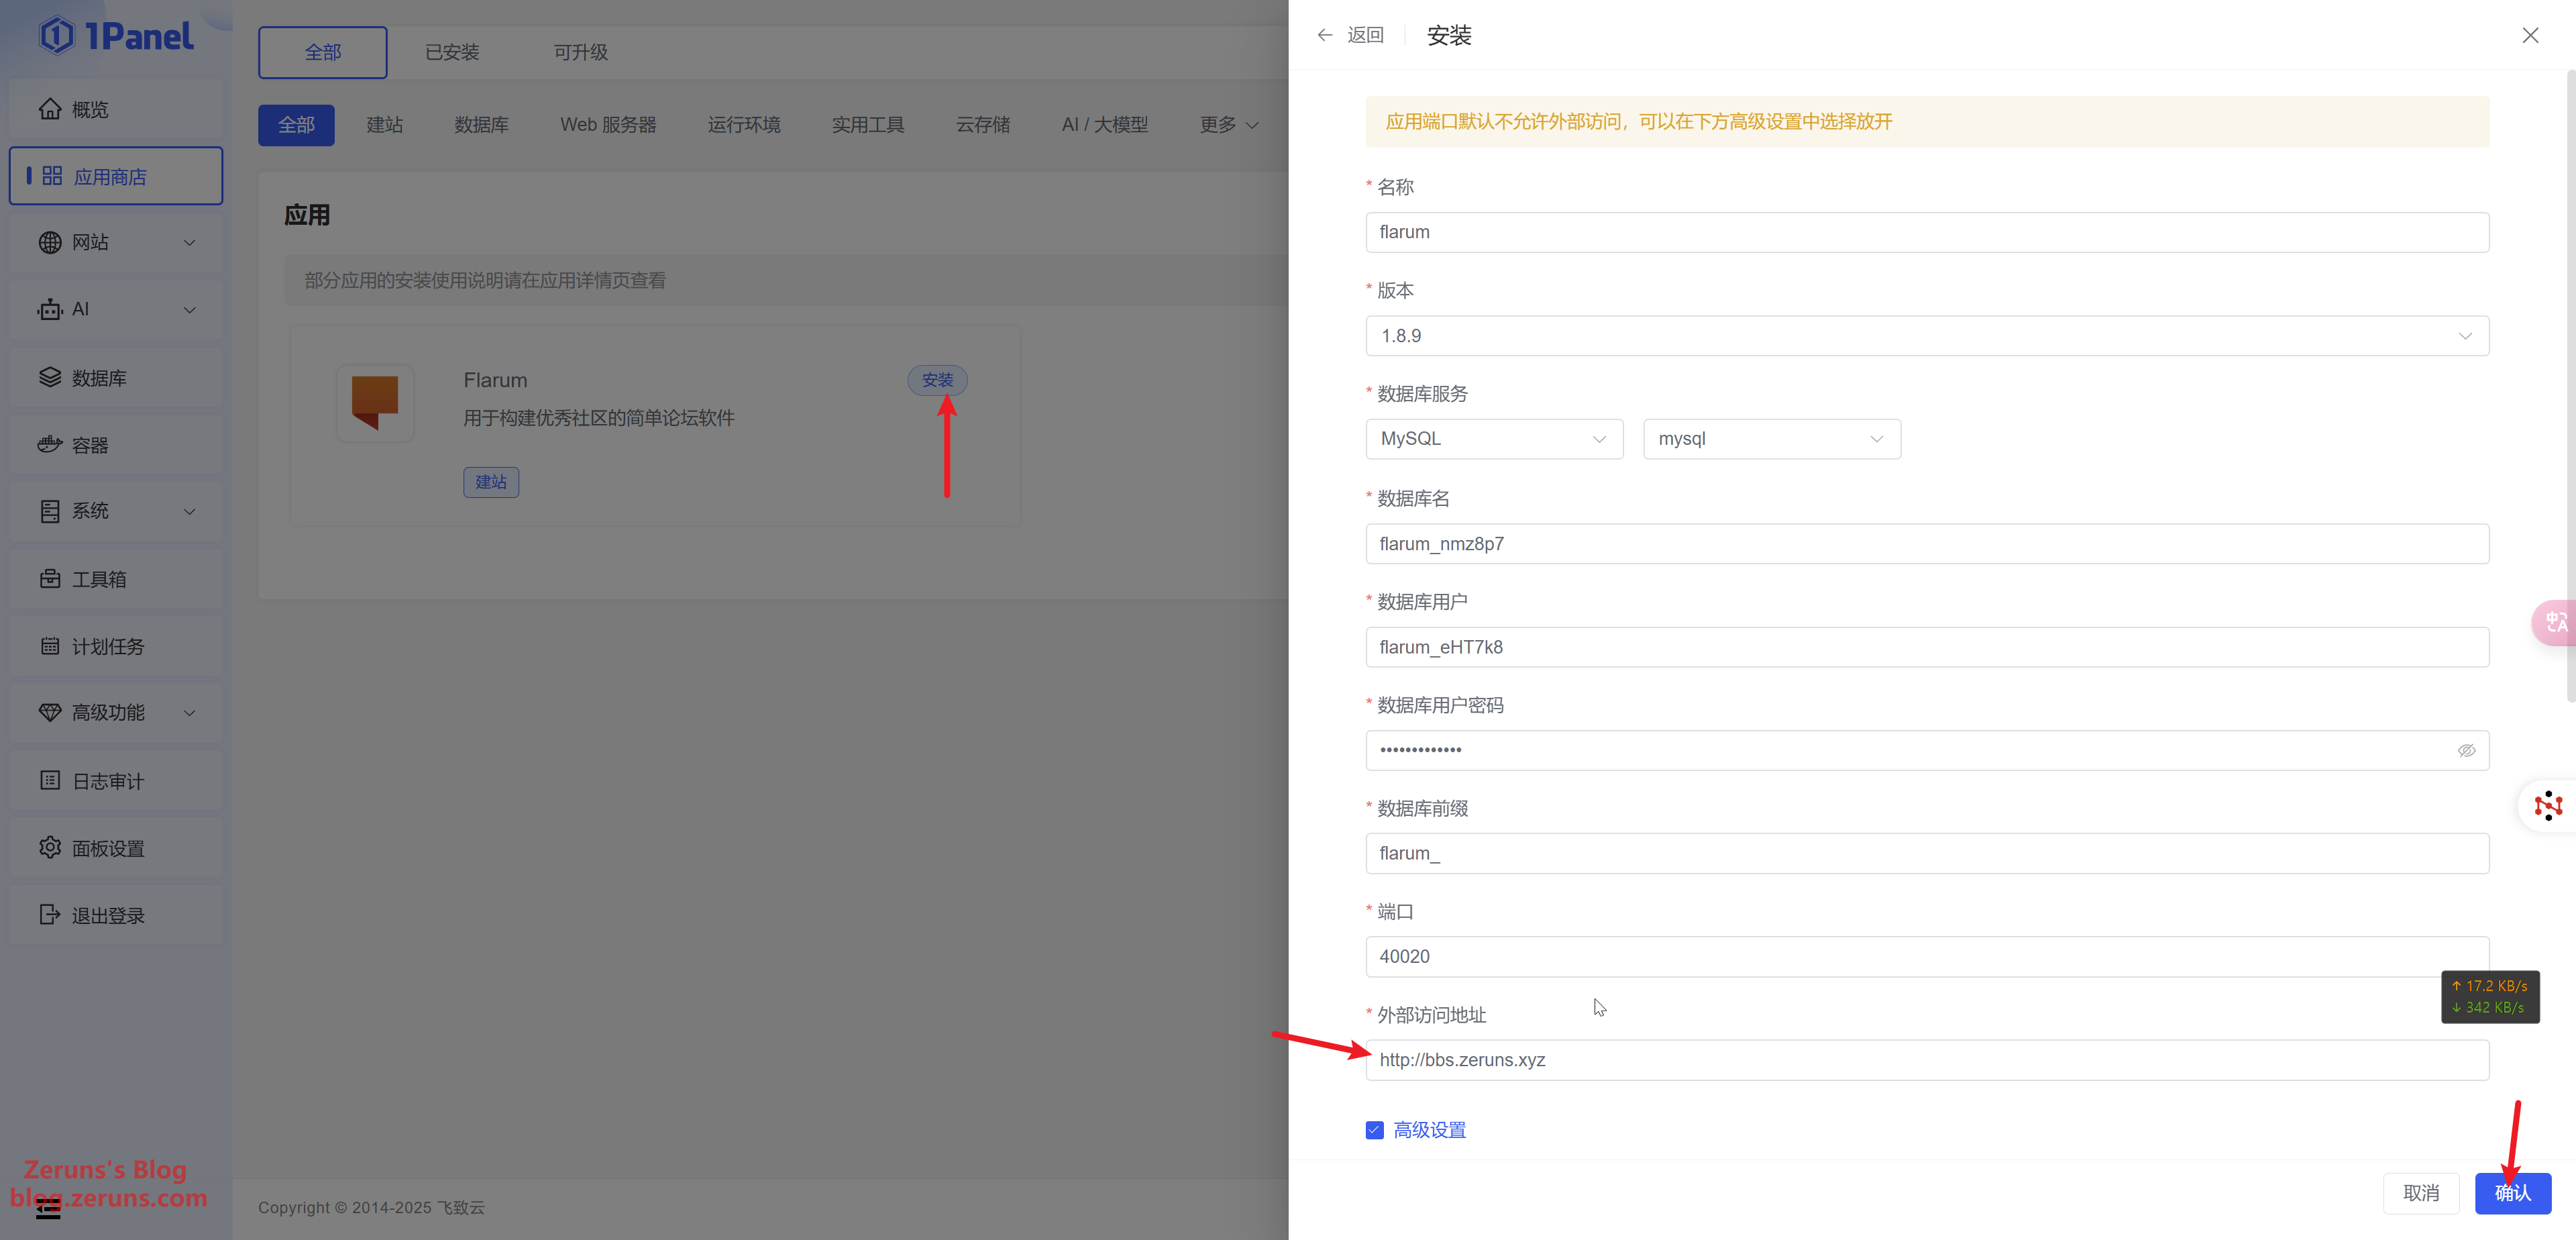
Choose the latest version by default, select MySQL for the database service, and leave the database name, username, and password as default (or modify them if necessary; the corresponding database will be automatically created—if you have created a database manually, then use those settings). The port remains the default. For the external access address, replace it with your own domain, for example, http://bbs.zeruns.xyz (make sure not to omit the http://). After adjusting the settings, click Confirm and wait for the installation to complete.
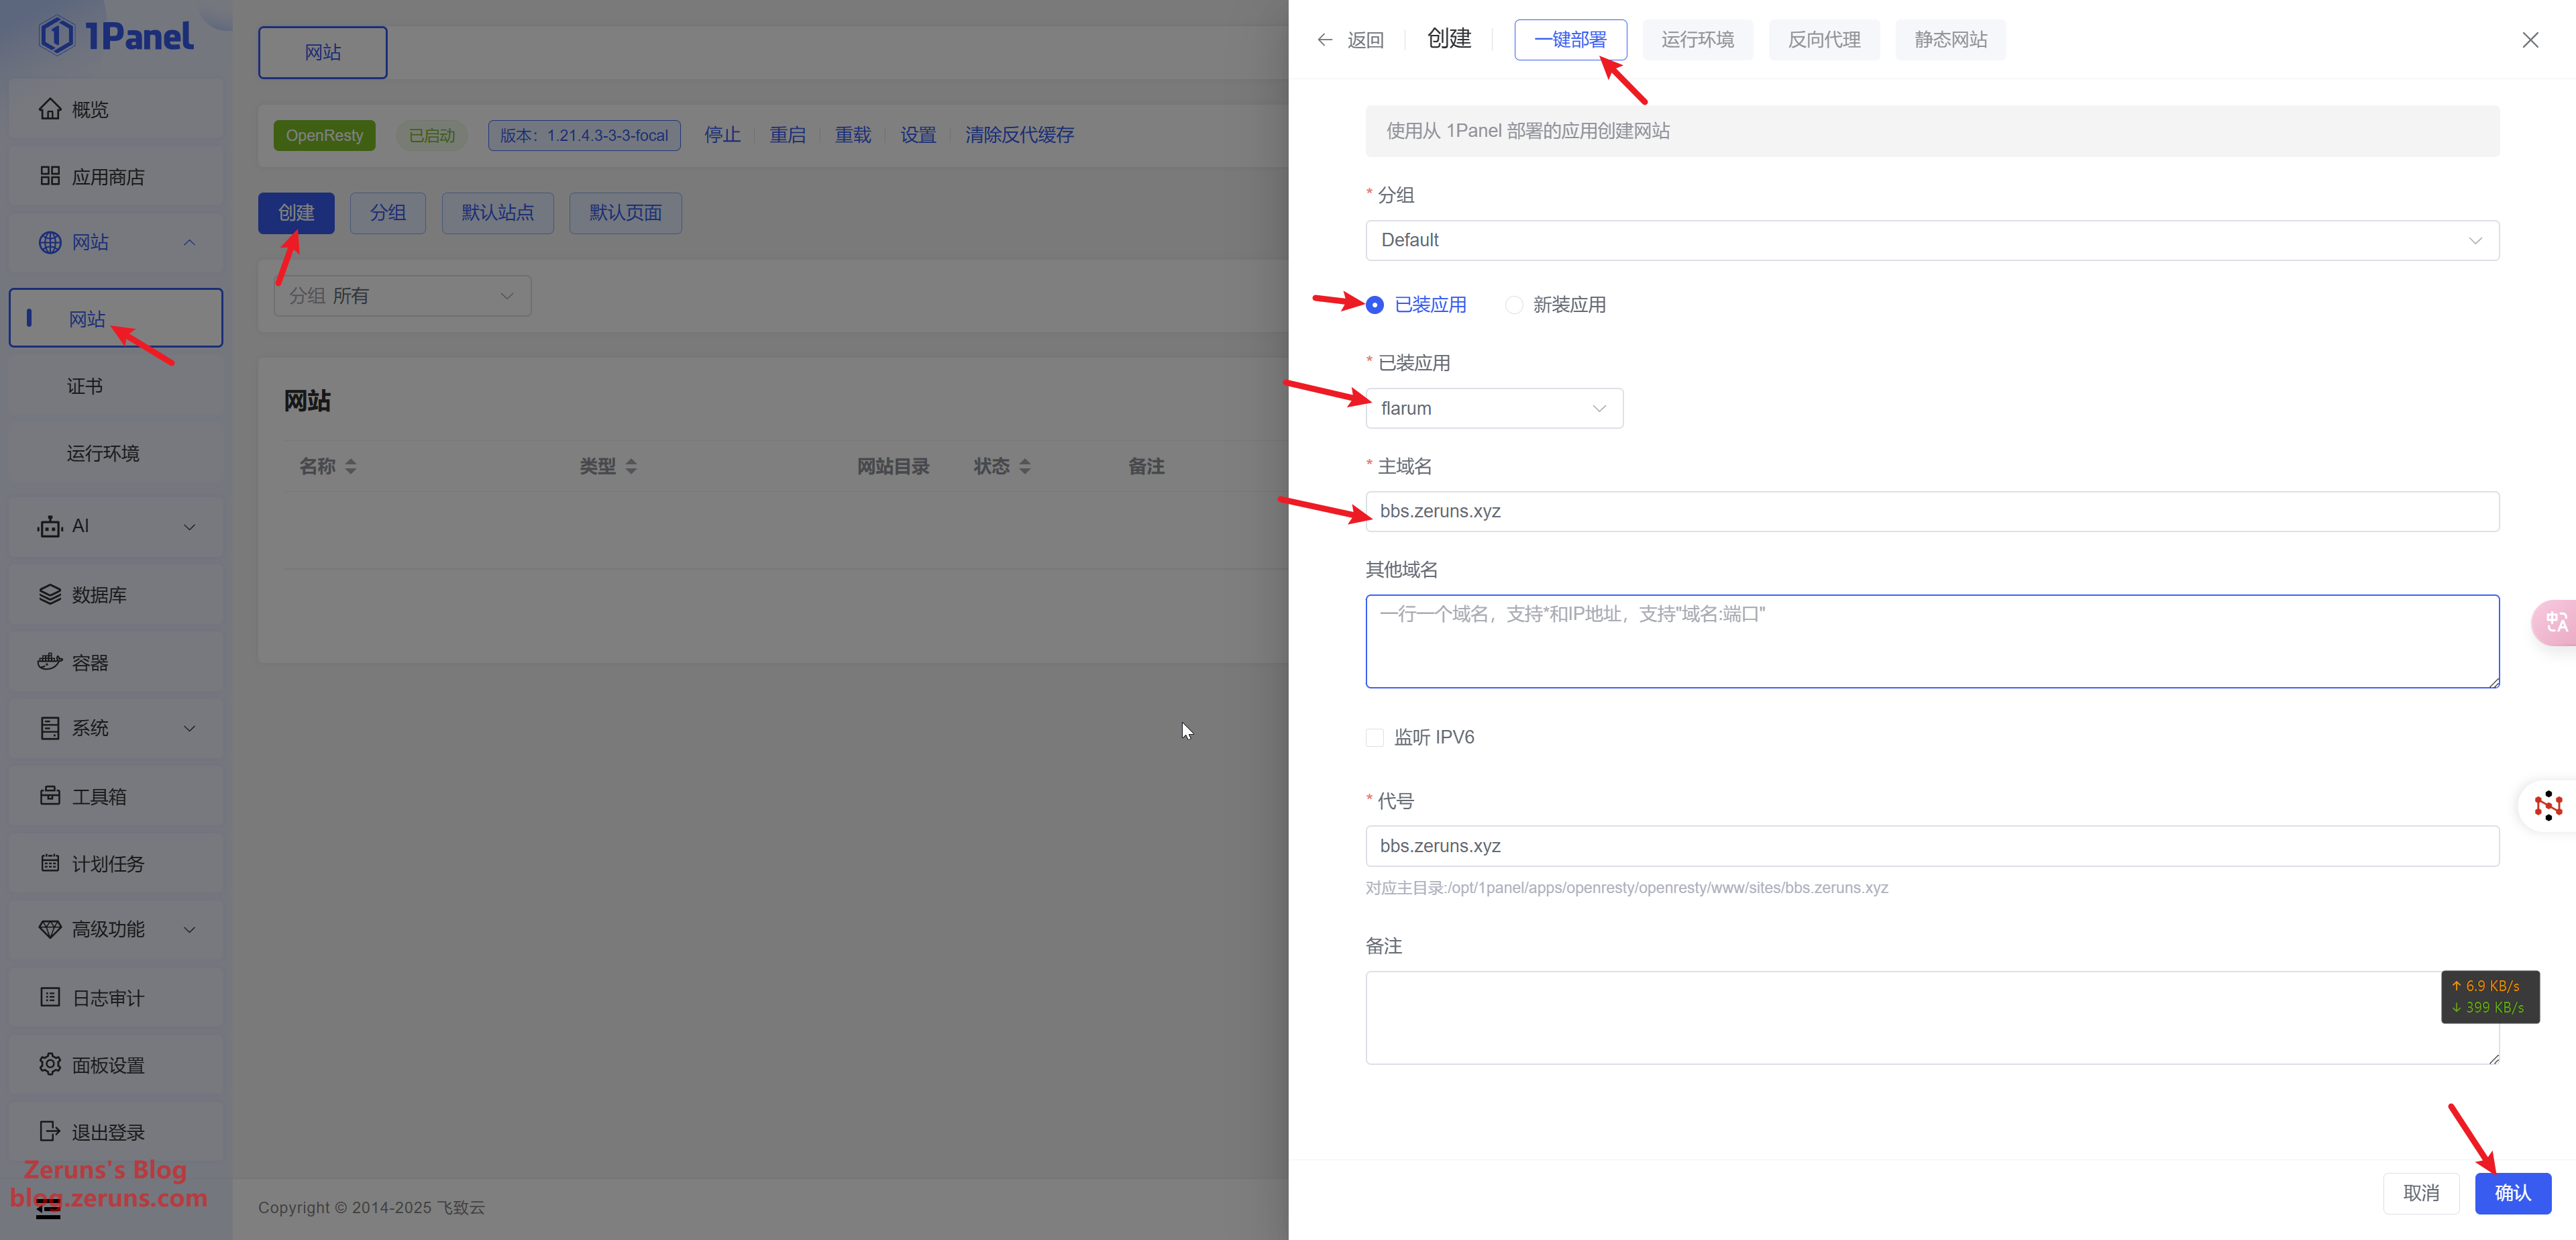
After Flarum has been installed through the app, a website is not automatically created. You need to manually create a website and bind the Flarum application to it in order to access it via your domain (this essentially sets up a reverse proxy).
Click on Websites in the 1Panel menu to go to the website list page, then click the Create Website button.
- In the list of installed applications, select the Flarum application you just set up.
- Properly fill in the primary domain name (in my case, it's
bbs.zeruns.xyz). Make sure that the domain has been resolved to the server's IP address in advance.
Finally, click the Confirm button and wait for the website creation to complete. Once finished, you can visit the website to begin initialization.
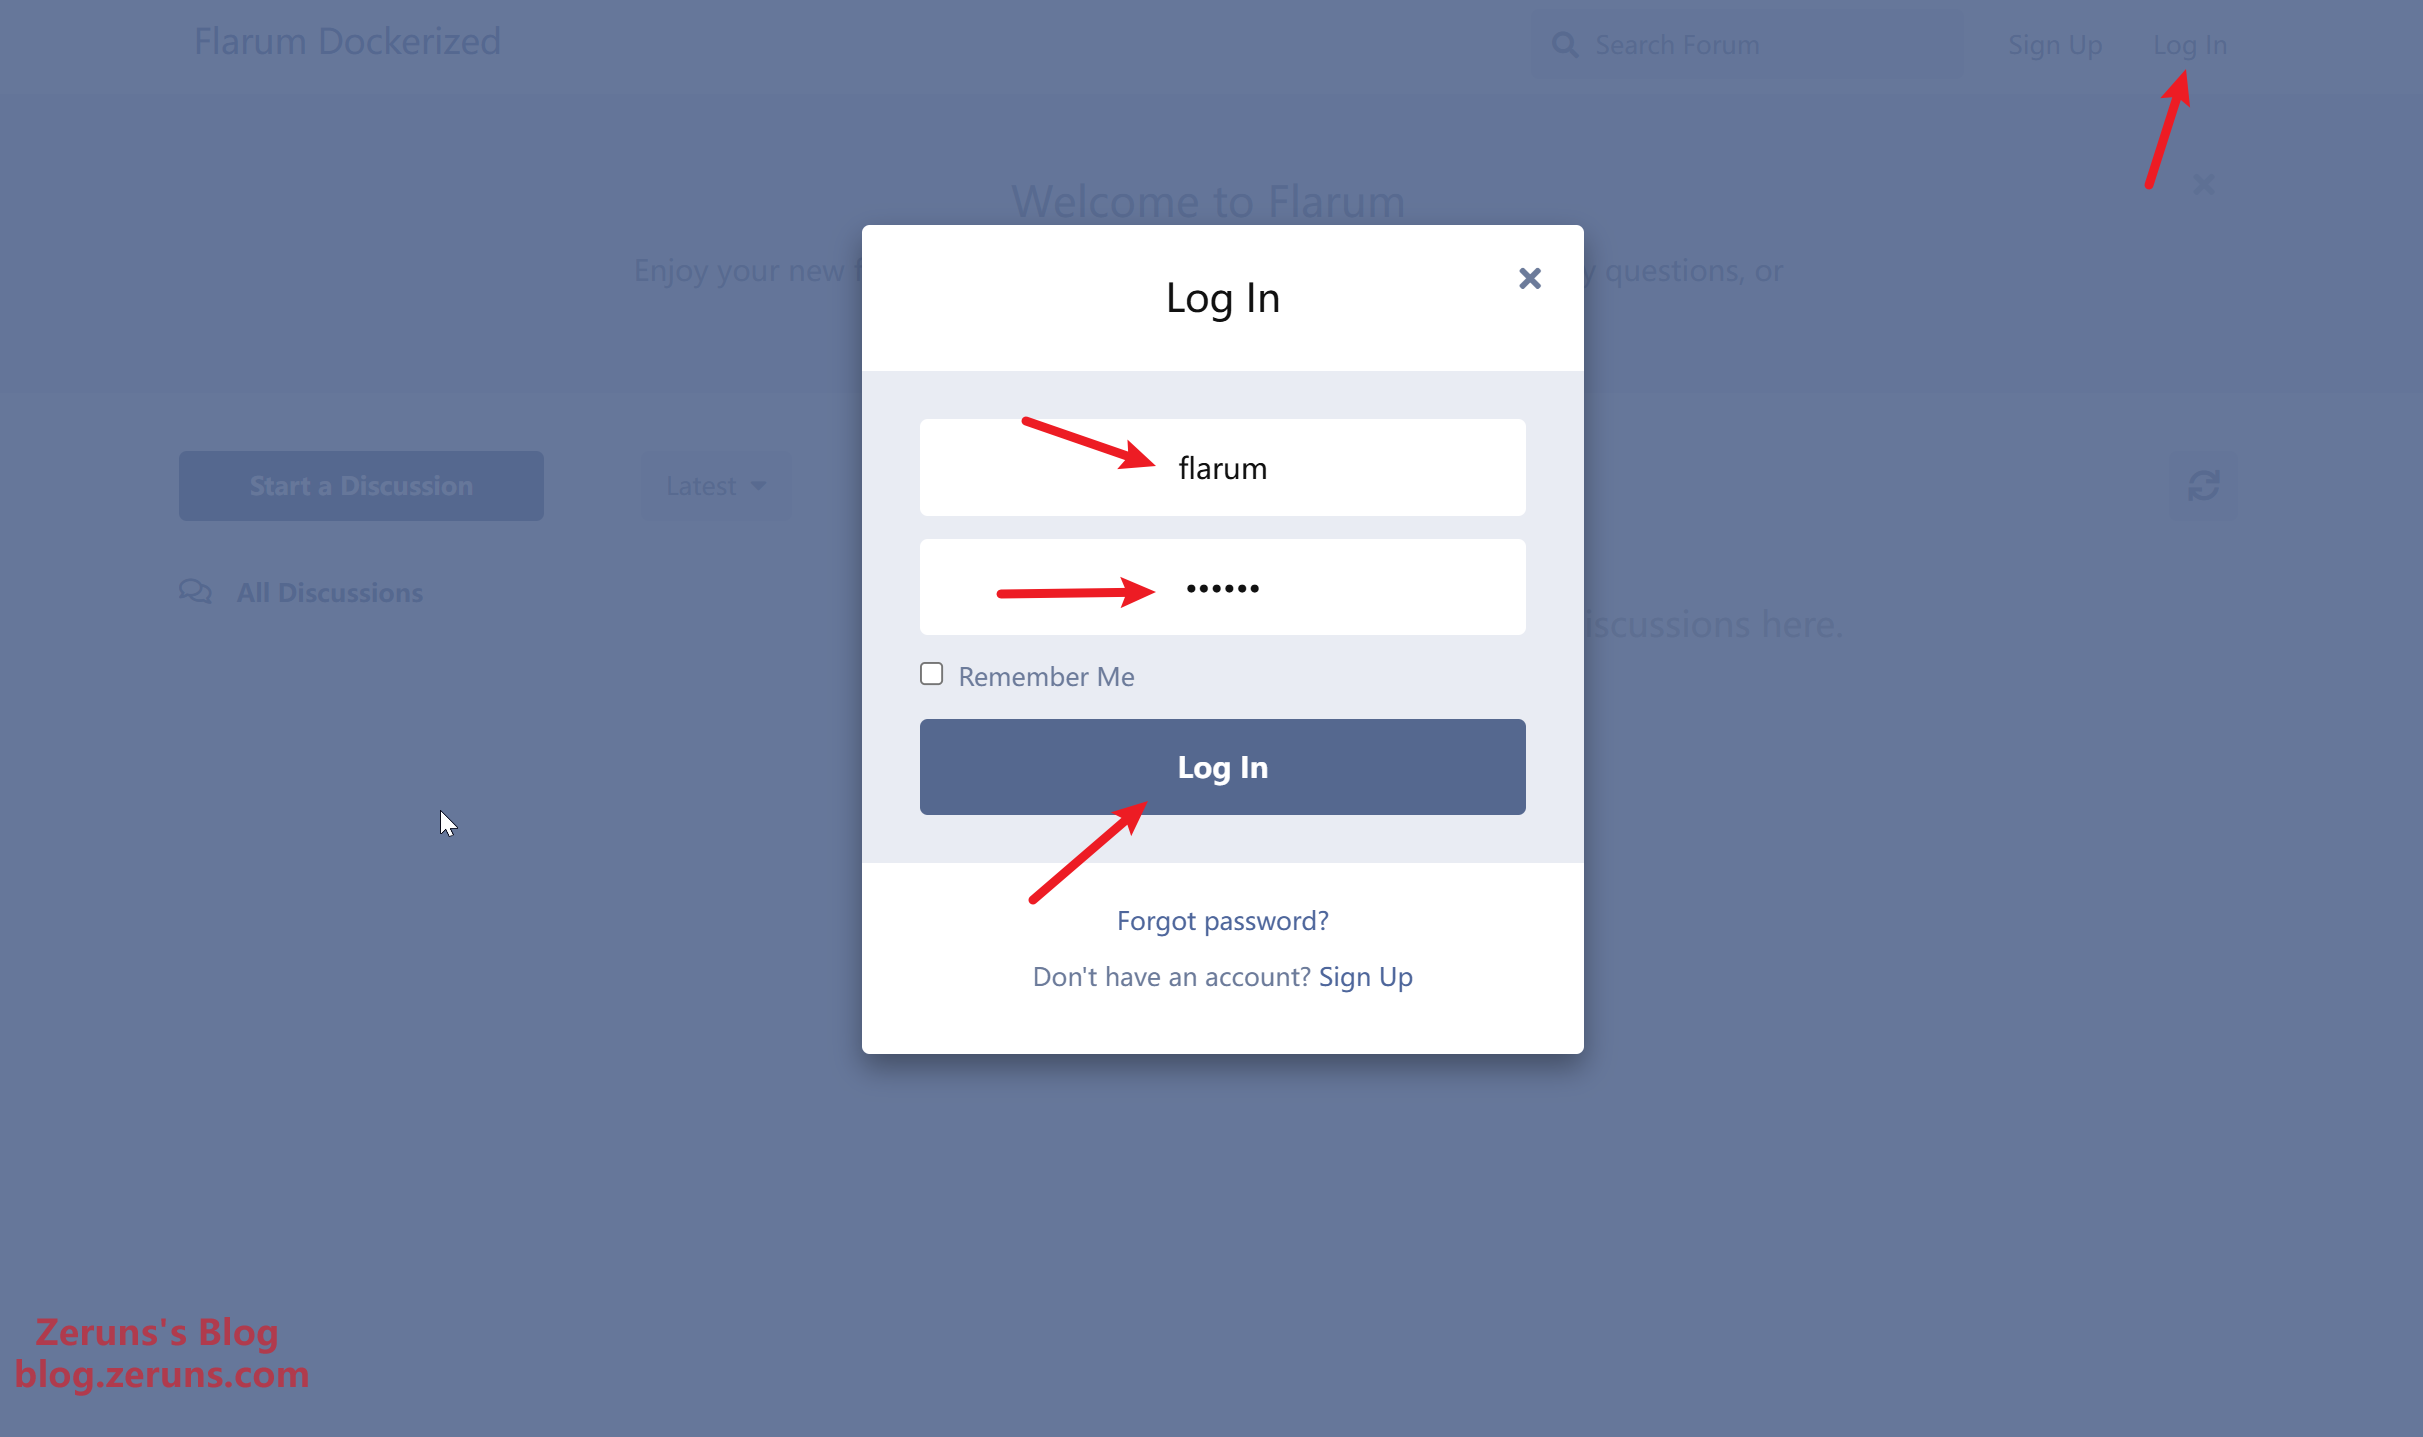
By entering your domain in the browser's address bar and pressing Enter, you will reach the homepage of your newly set-up forum. Then click the Log In button at the top right to sign in; the default administrator username and password are both flarum. (Note: the default interface is in English—you will later see how to switch to Chinese.)
Click on the username at the top right, then select Administration to open the admin dashboard, where you can customize various settings for your forum.

Modifying the Flarum Software Source (Skip this step for overseas servers)
Click App Store → Installed → flarum → Settings → Advanced Settings.
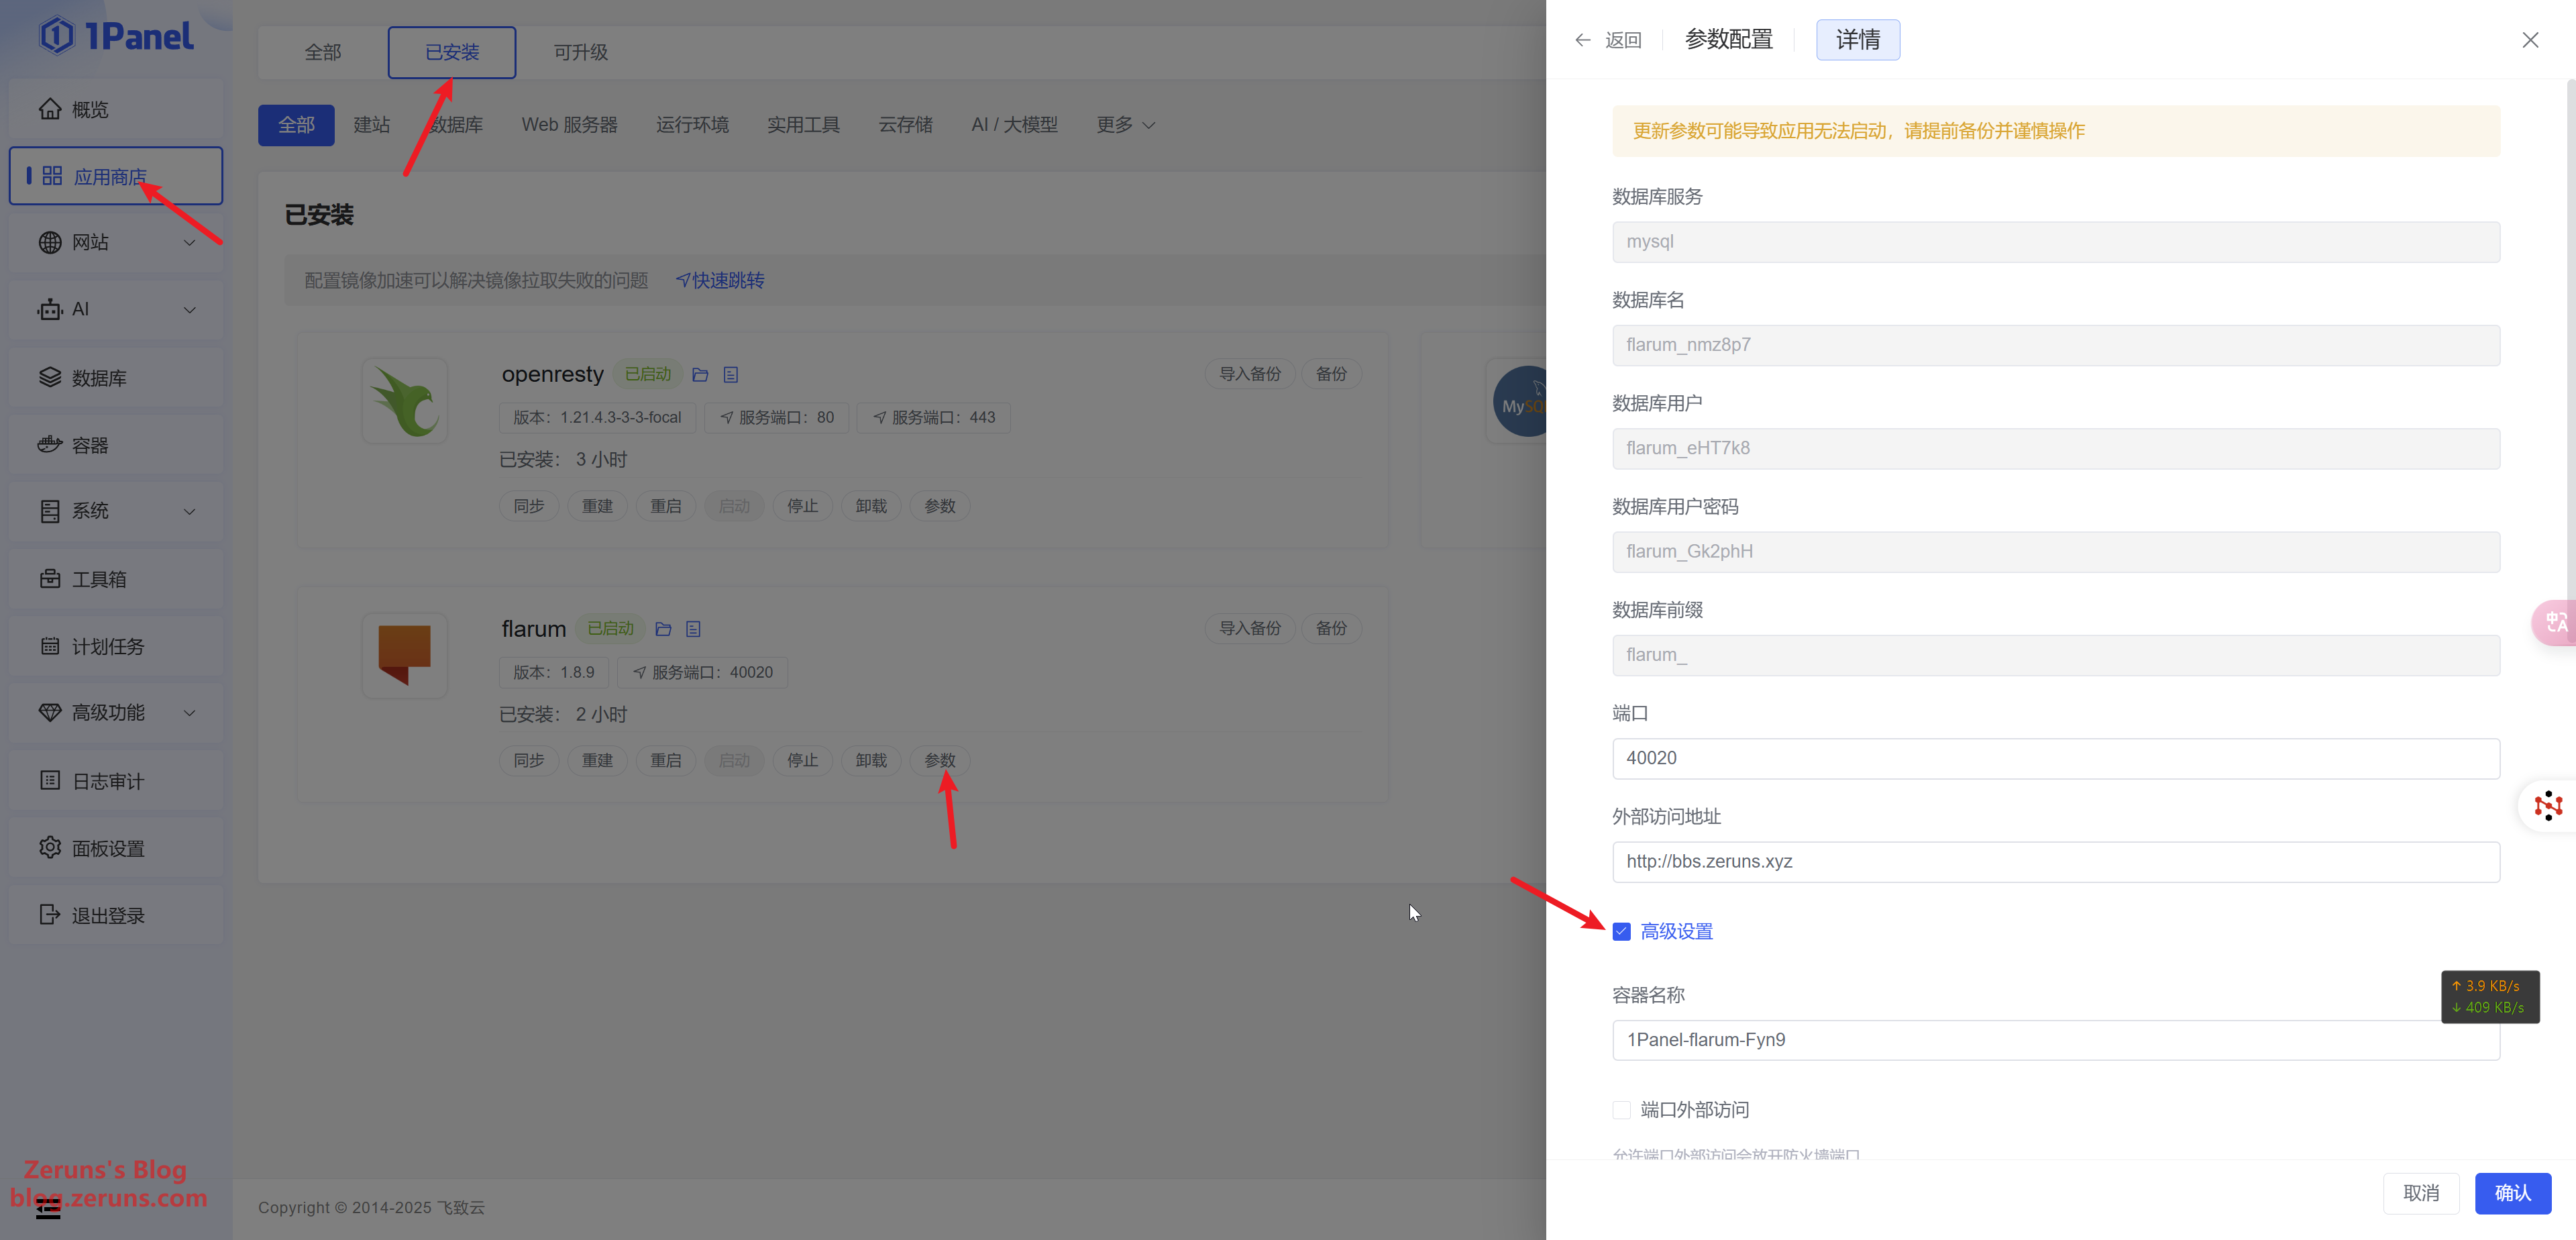
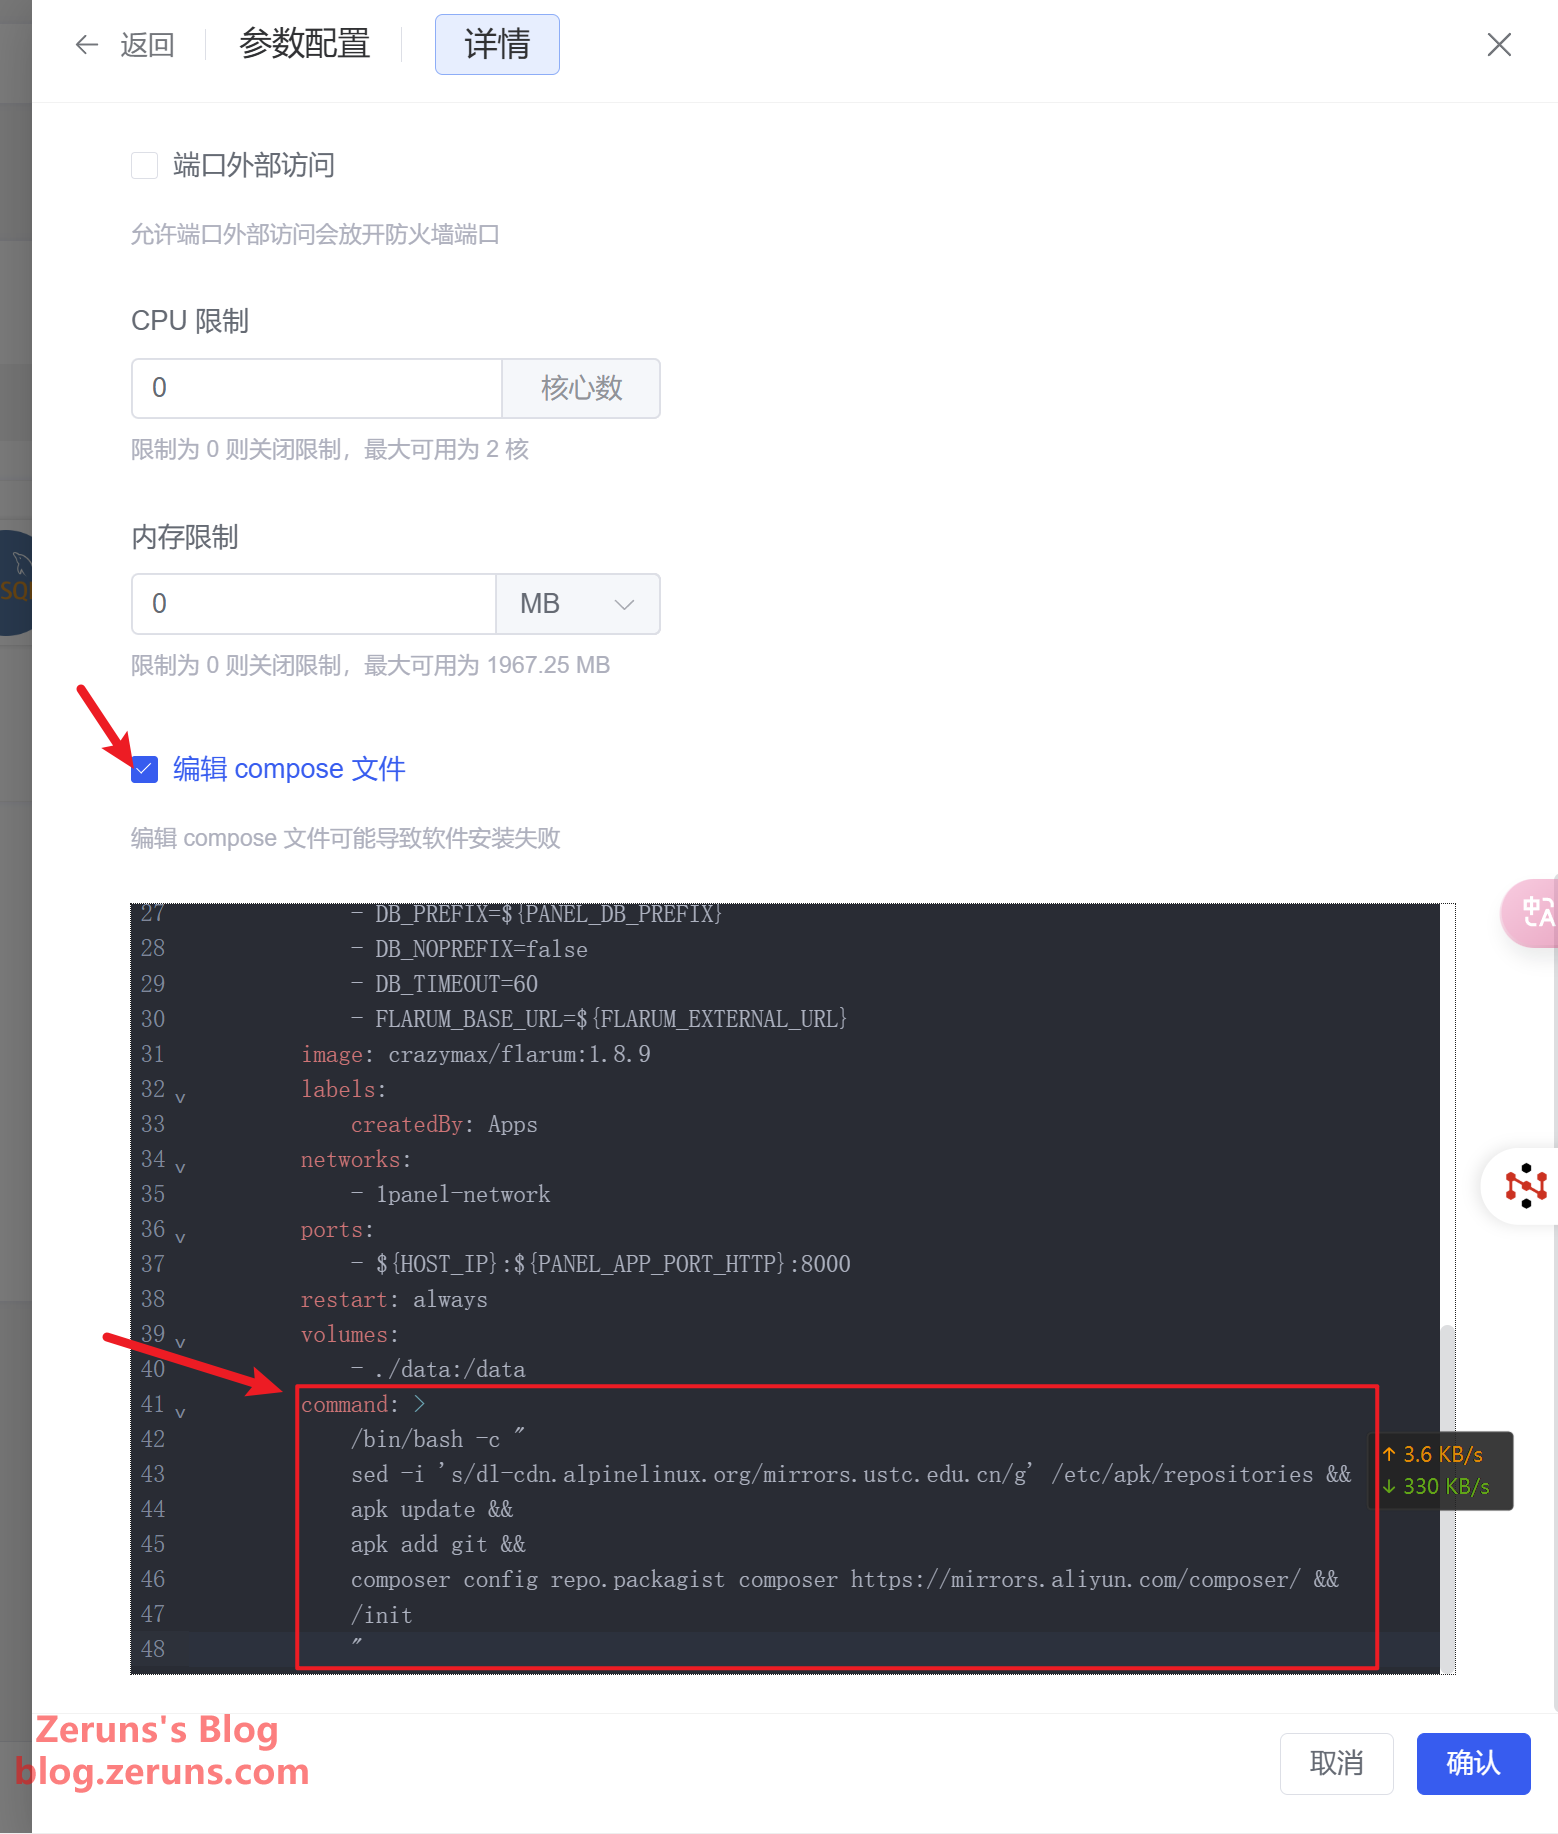
Scroll all the way down and click Edit compose file. At the very bottom of the input box, paste in the following command (be careful with the indentation), then click Confirm, as shown in the image below:
command: >
            /bin/bash -c "
            sed -i 's/dl-cdn.alpinelinux.org/mirrors.ustc.edu.cn/g' /etc/apk/repositories &&
            apk update &&
            apk add git &&
            composer config repo.packagist composer https://mirrors.aliyun.com/composer/ &&
            /init
            "
Wait for the application to restart, then you can reopen the forum interface.
Personalization Settings
Through customizing the theme, you can give your forum a unique look that highlights your community's character. You can customize the color scheme, navigation bar style, logo, background image, and more.
But first, we need to install a Chinese language pack.
Installing the Chinese Language Pack
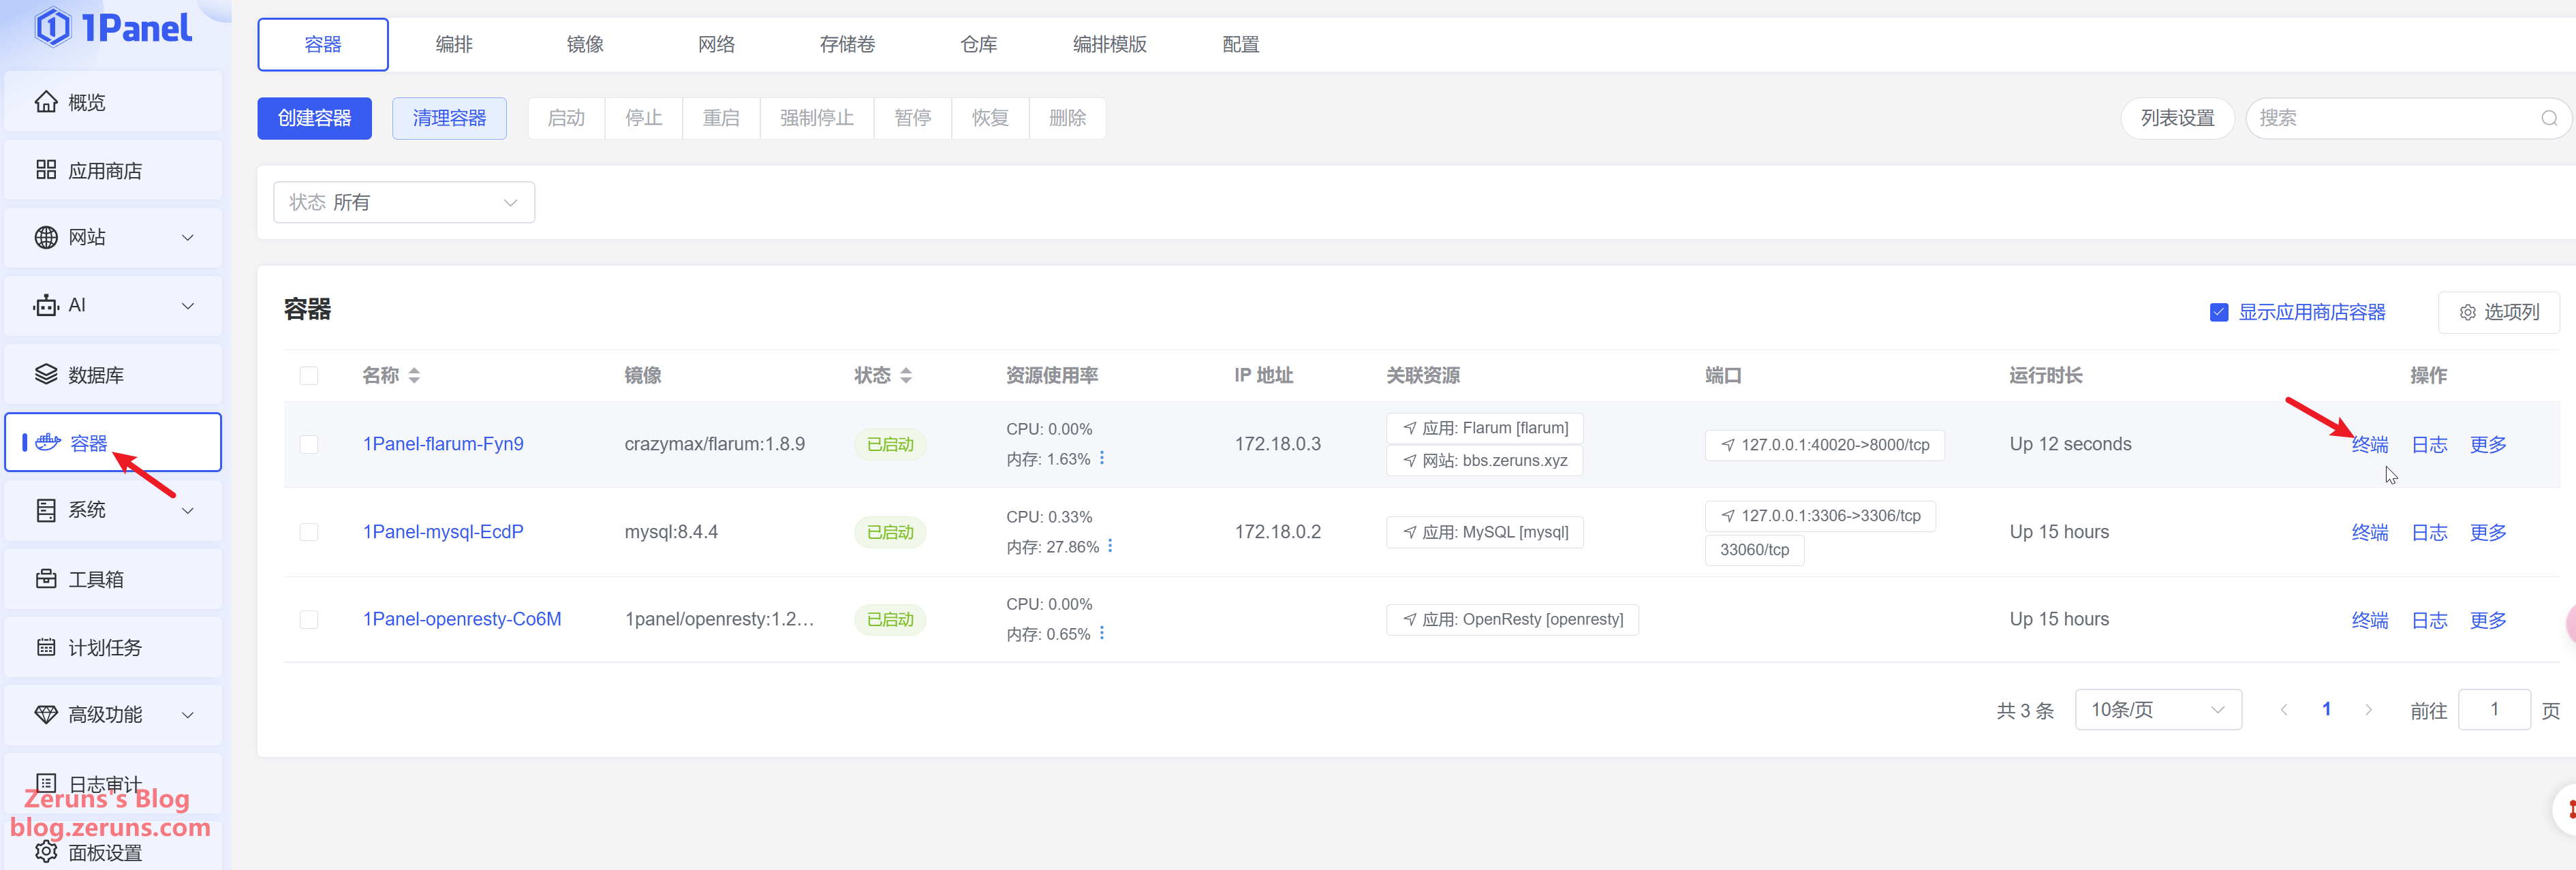
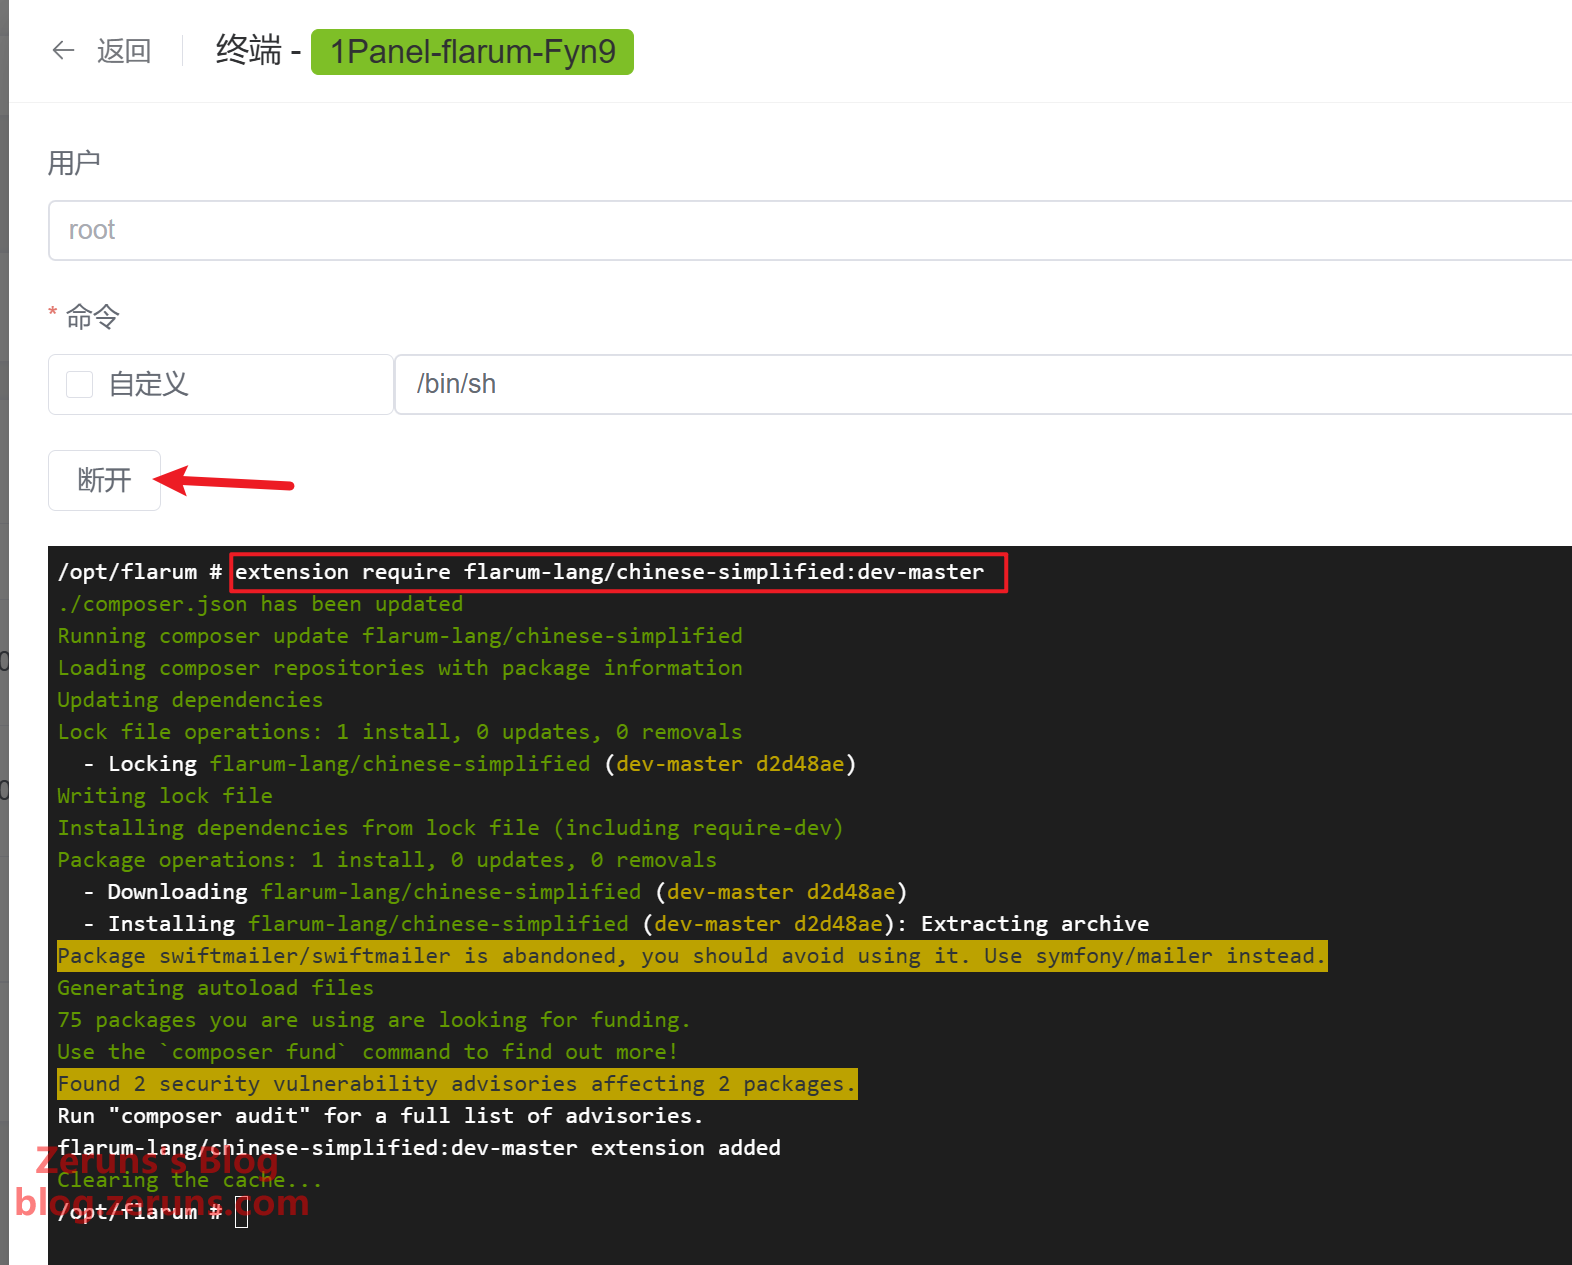
In the 1Panel dashboard, click Containers, locate the container corresponding to flarum, then click Terminal → Connect. Copy and paste the following command into the terminal and press Enter. After a short wait, the Chinese language pack will be installed.
extension require flarum-lang/chinese-simplified:dev-master
Enter the flarum administration dashboard and you will see an additional Chinese language option. Simply click it to enable Chinese:
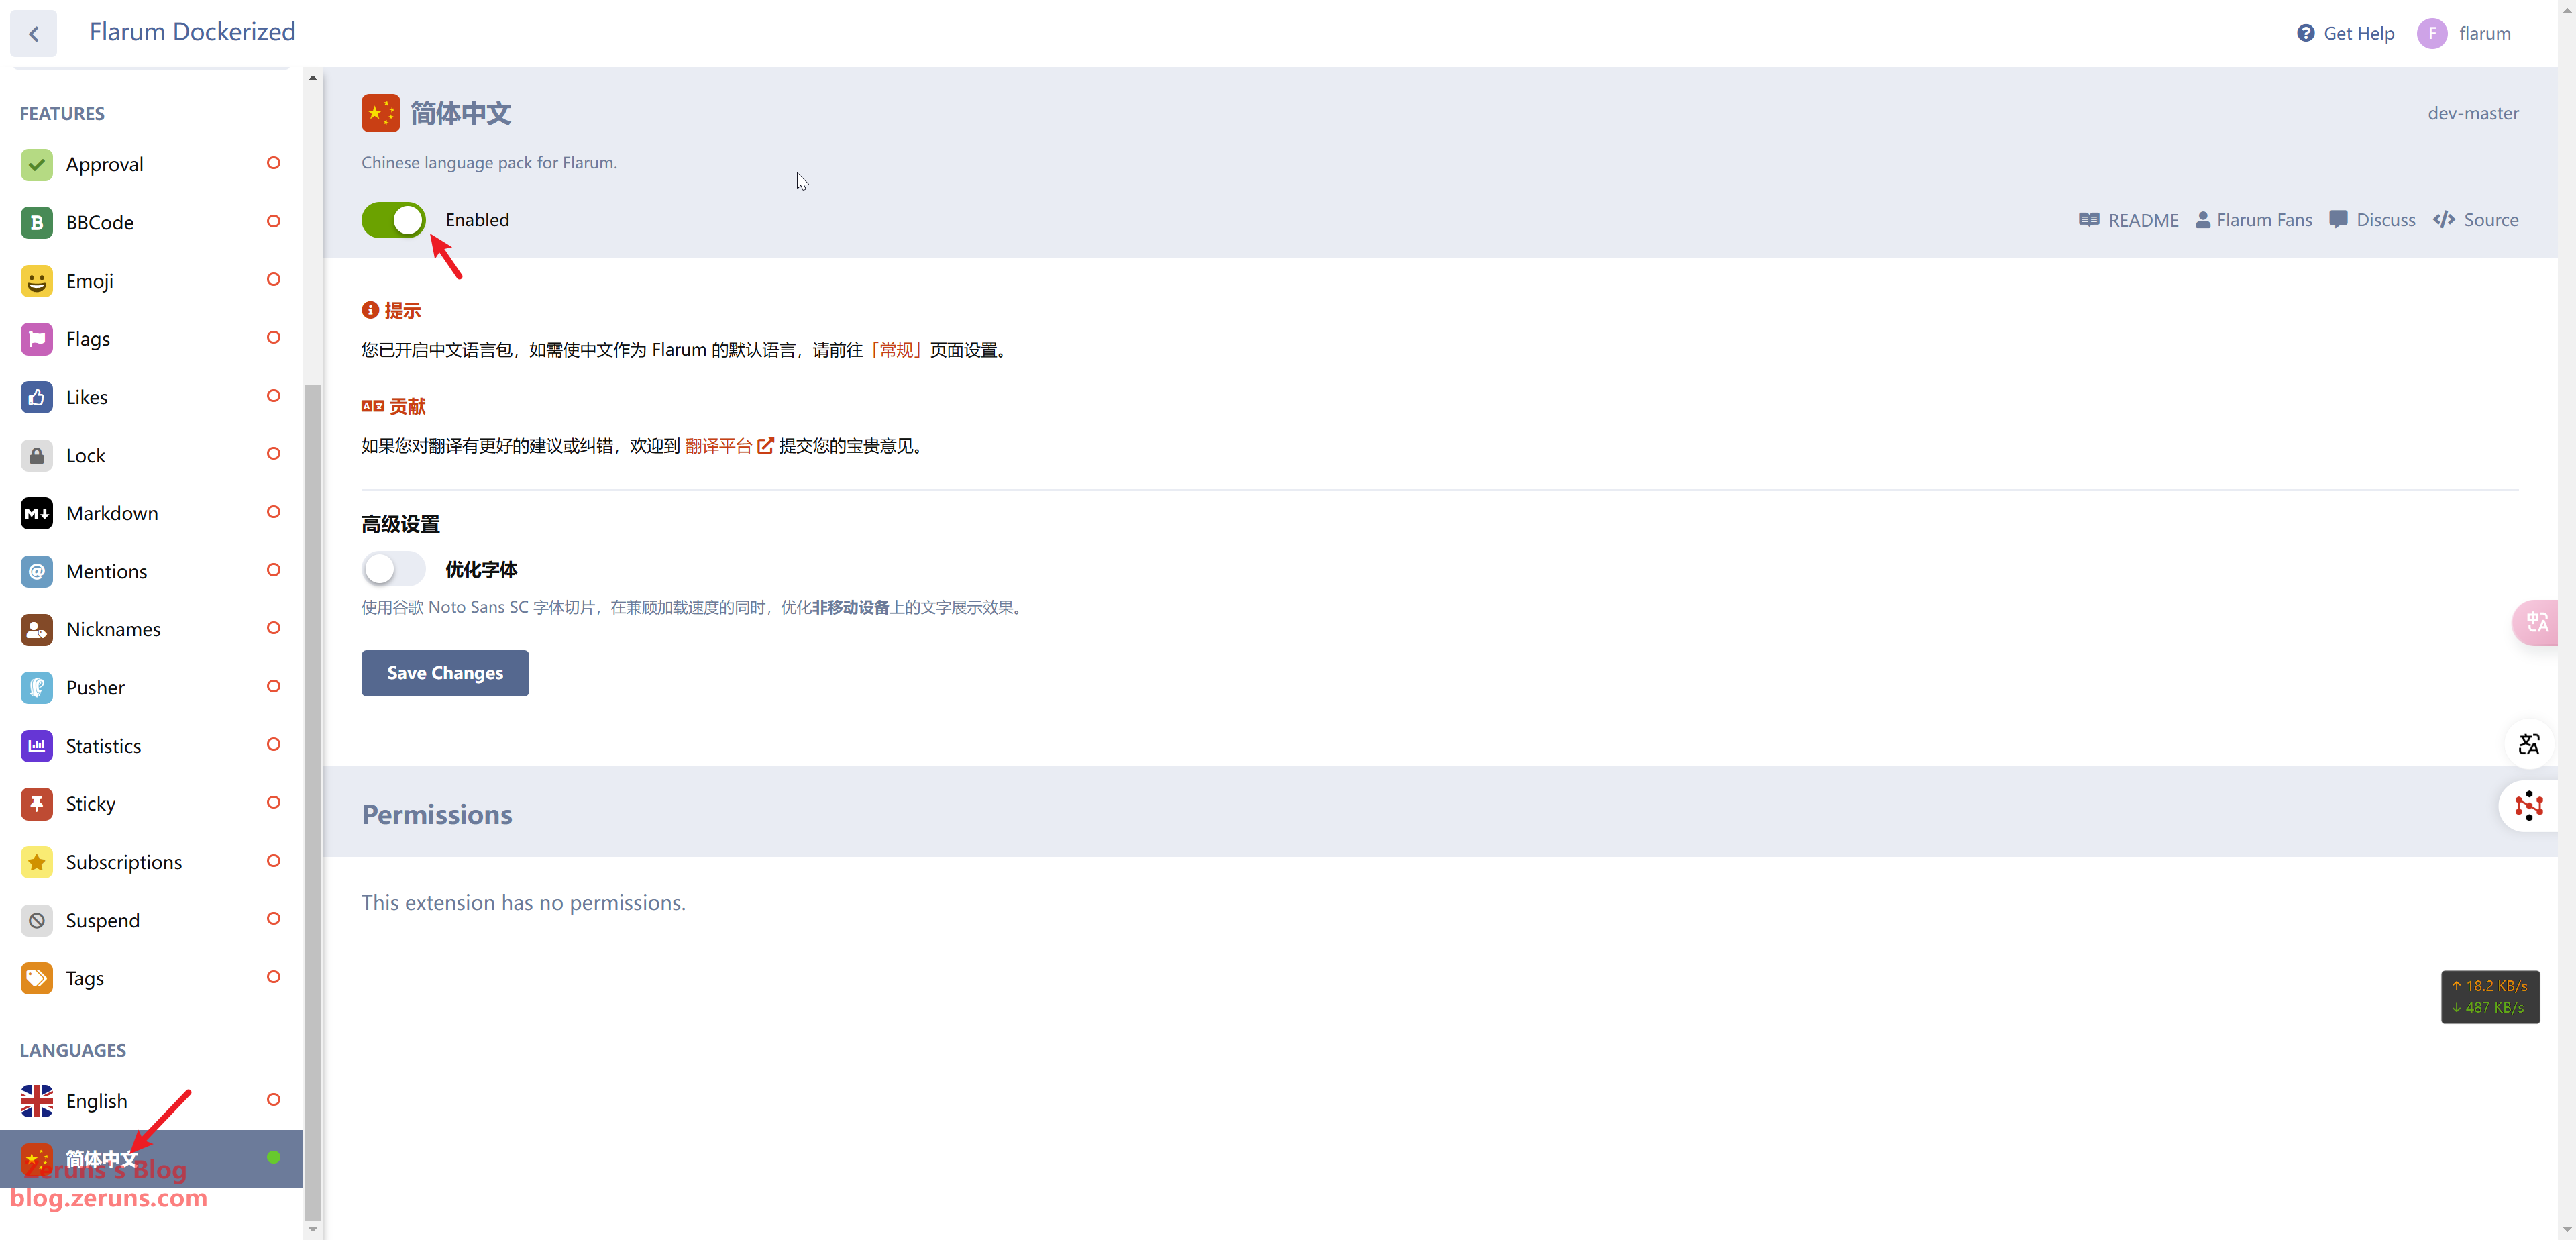
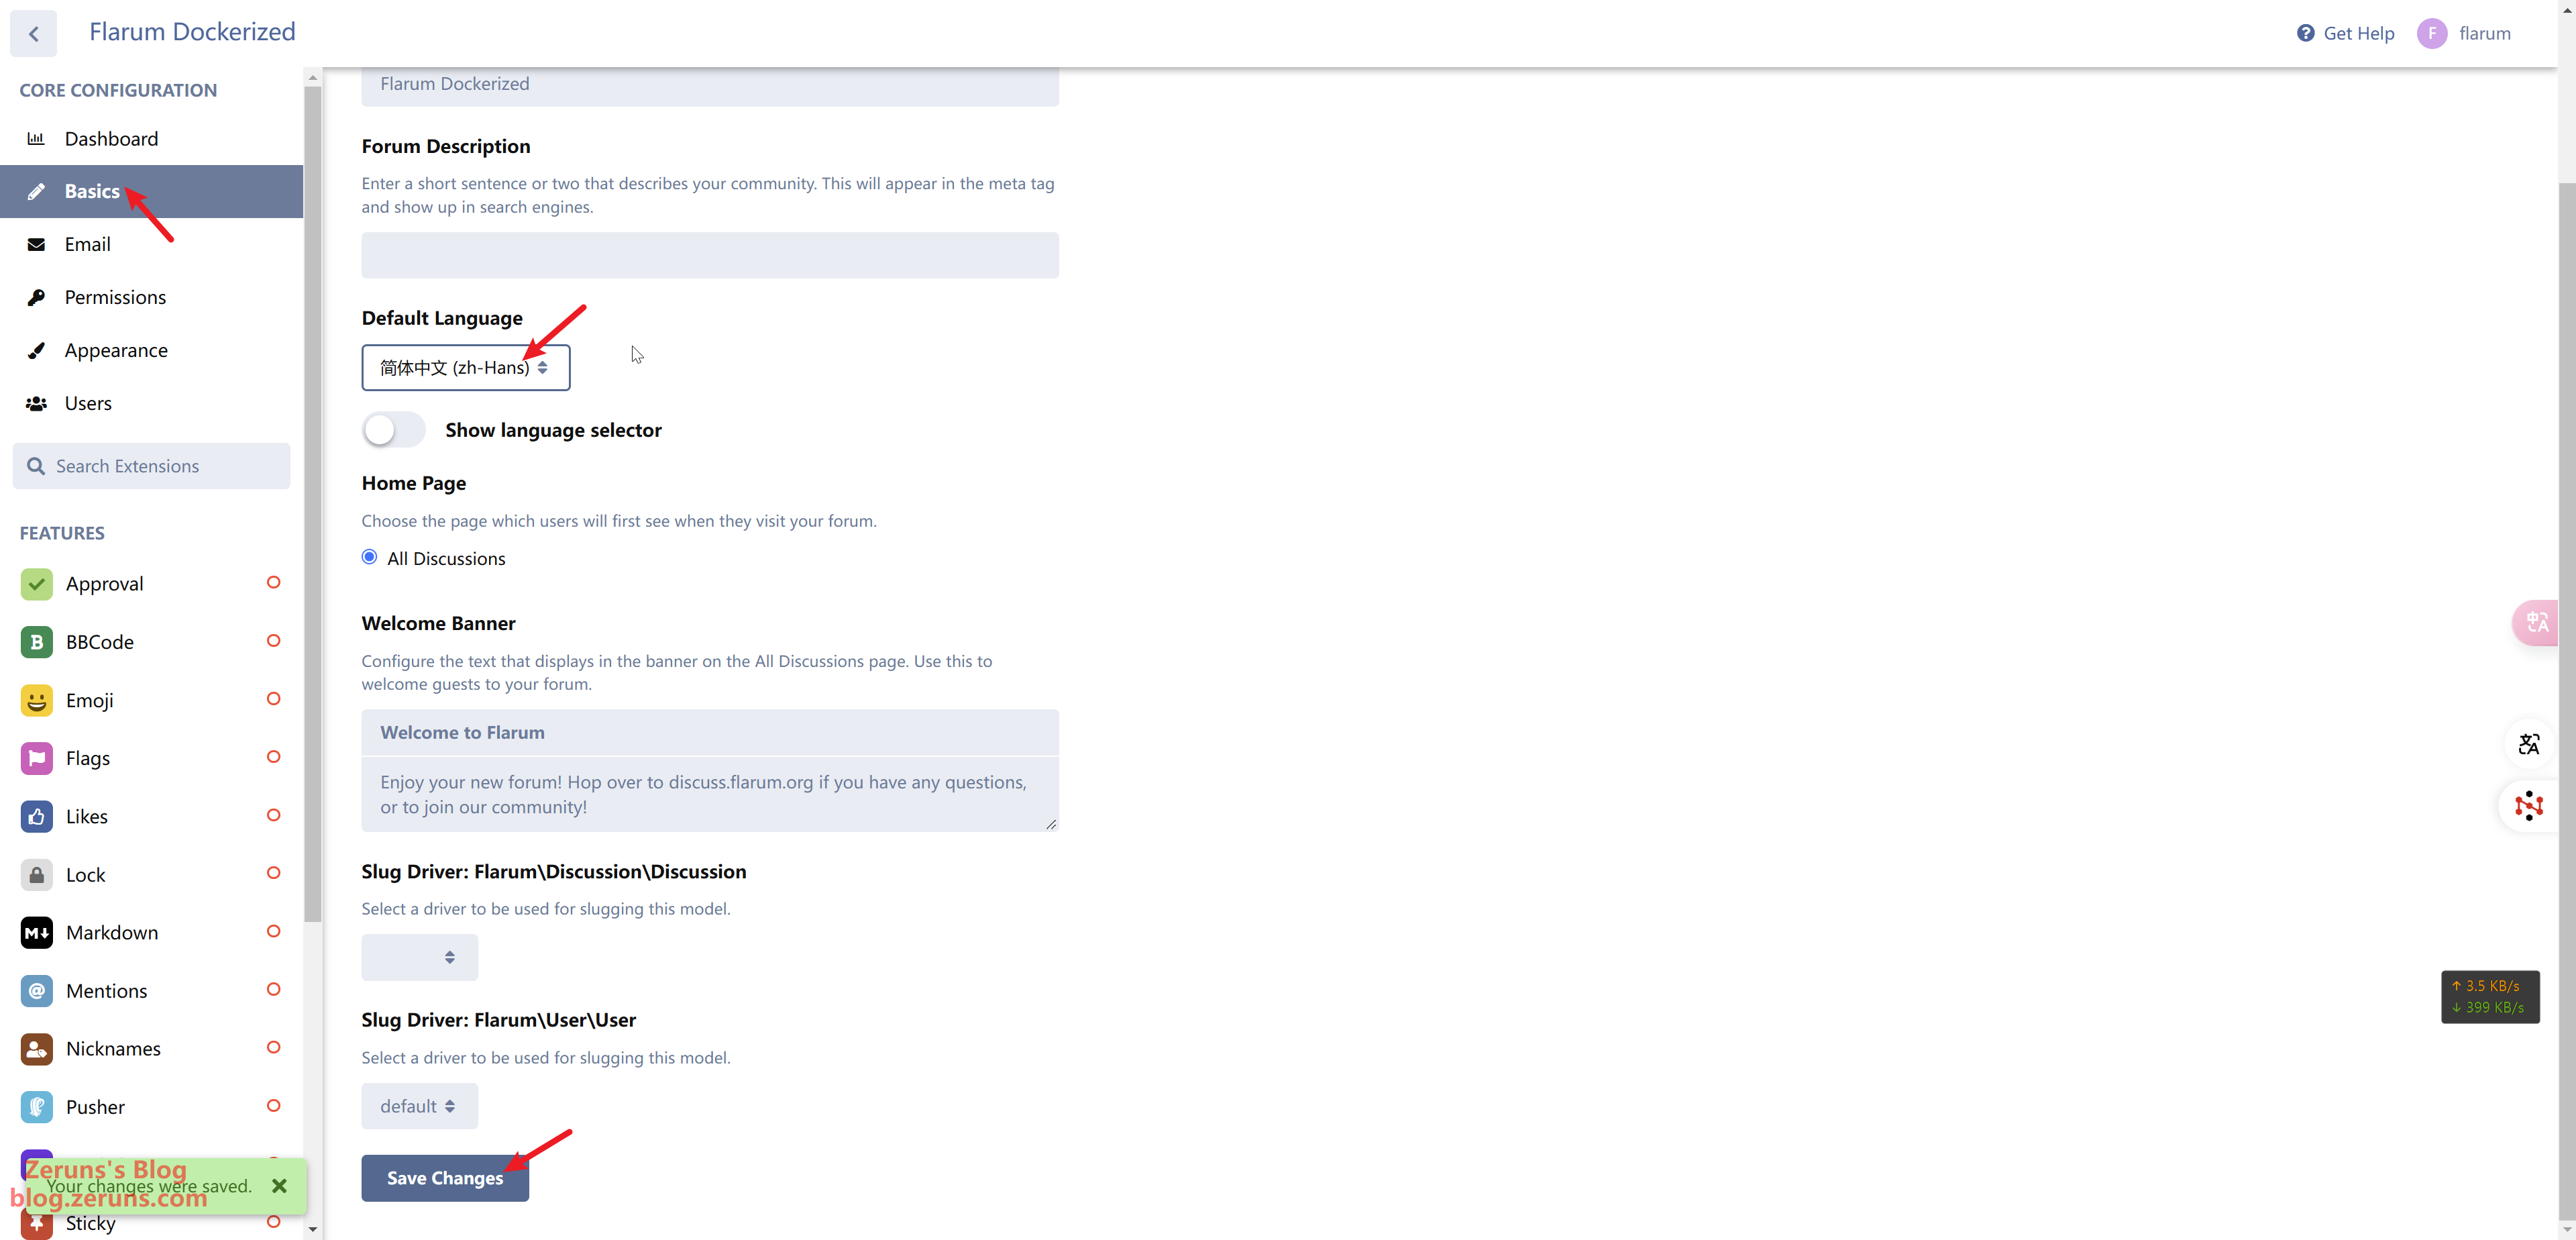
Then, click Basics and change the Default Language to Simplified Chinese. Finally, click Save Changes at the bottom. The forum's language will now be switched to Chinese. If it doesn't change immediately, just refresh the page.
General Settings
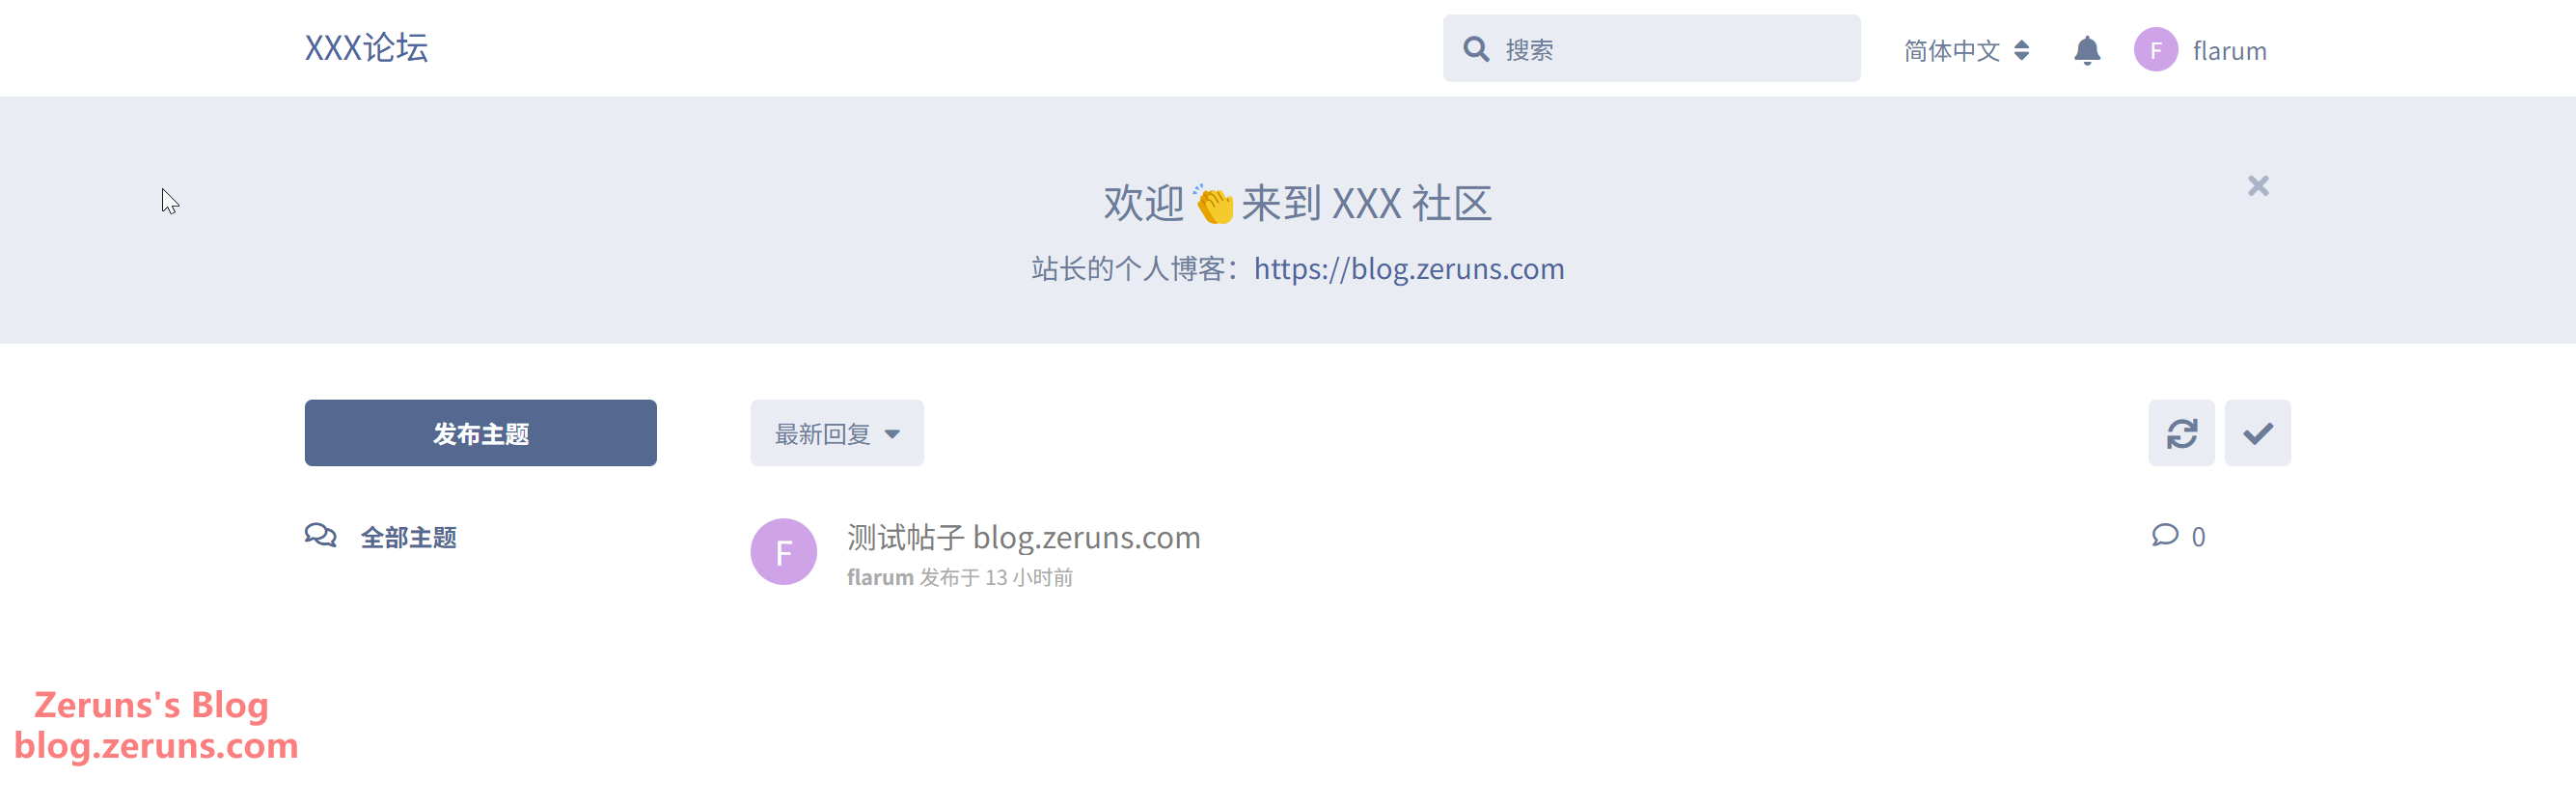
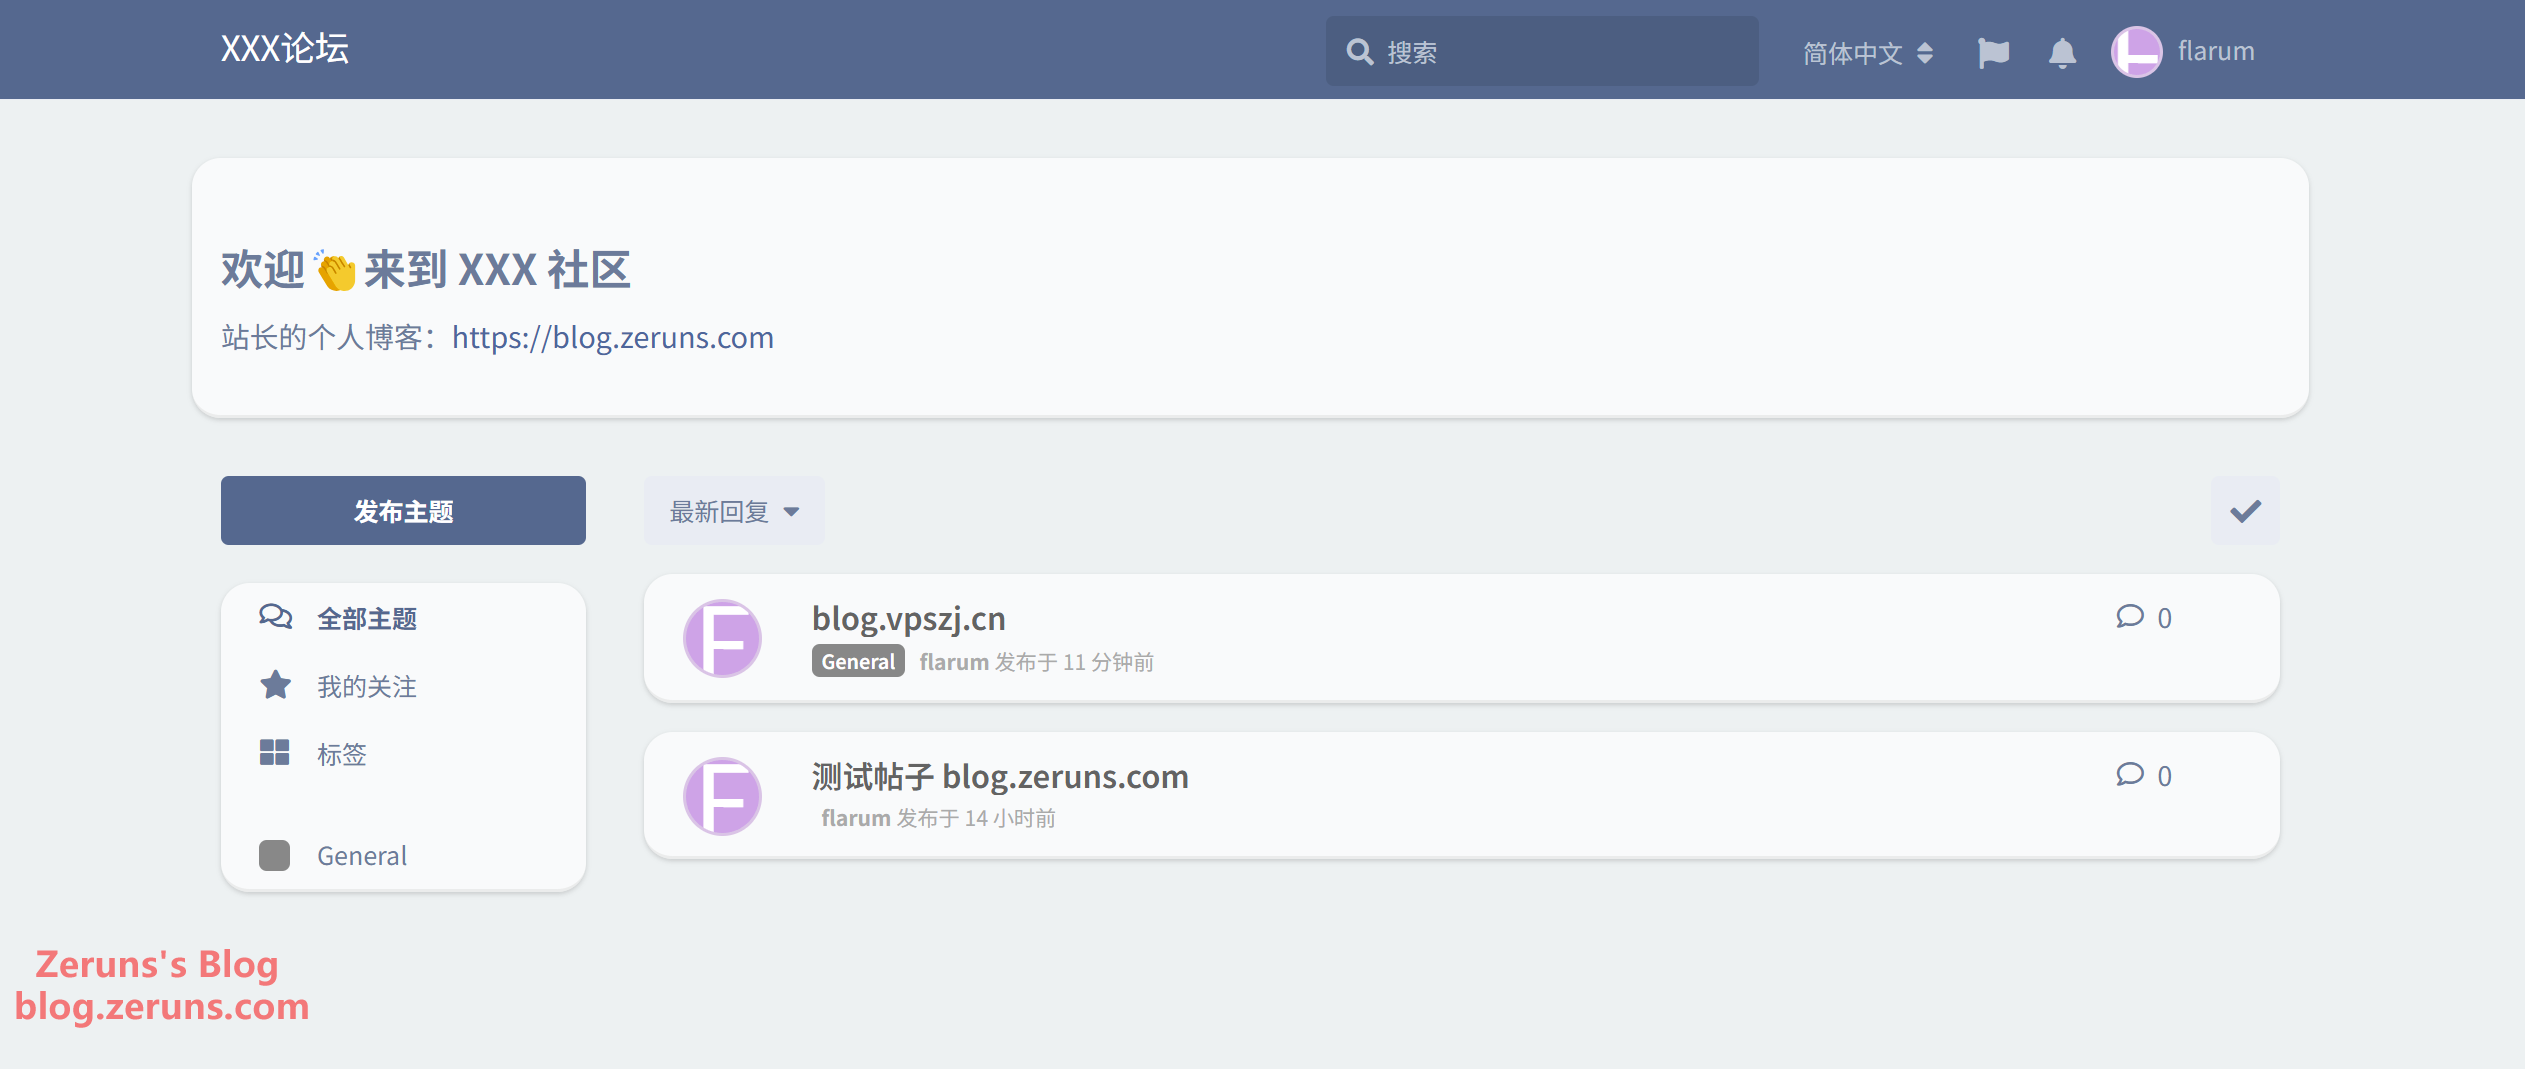
Next, you can perform some general configurations such as setting the forum name, description, welcome banner, etc.
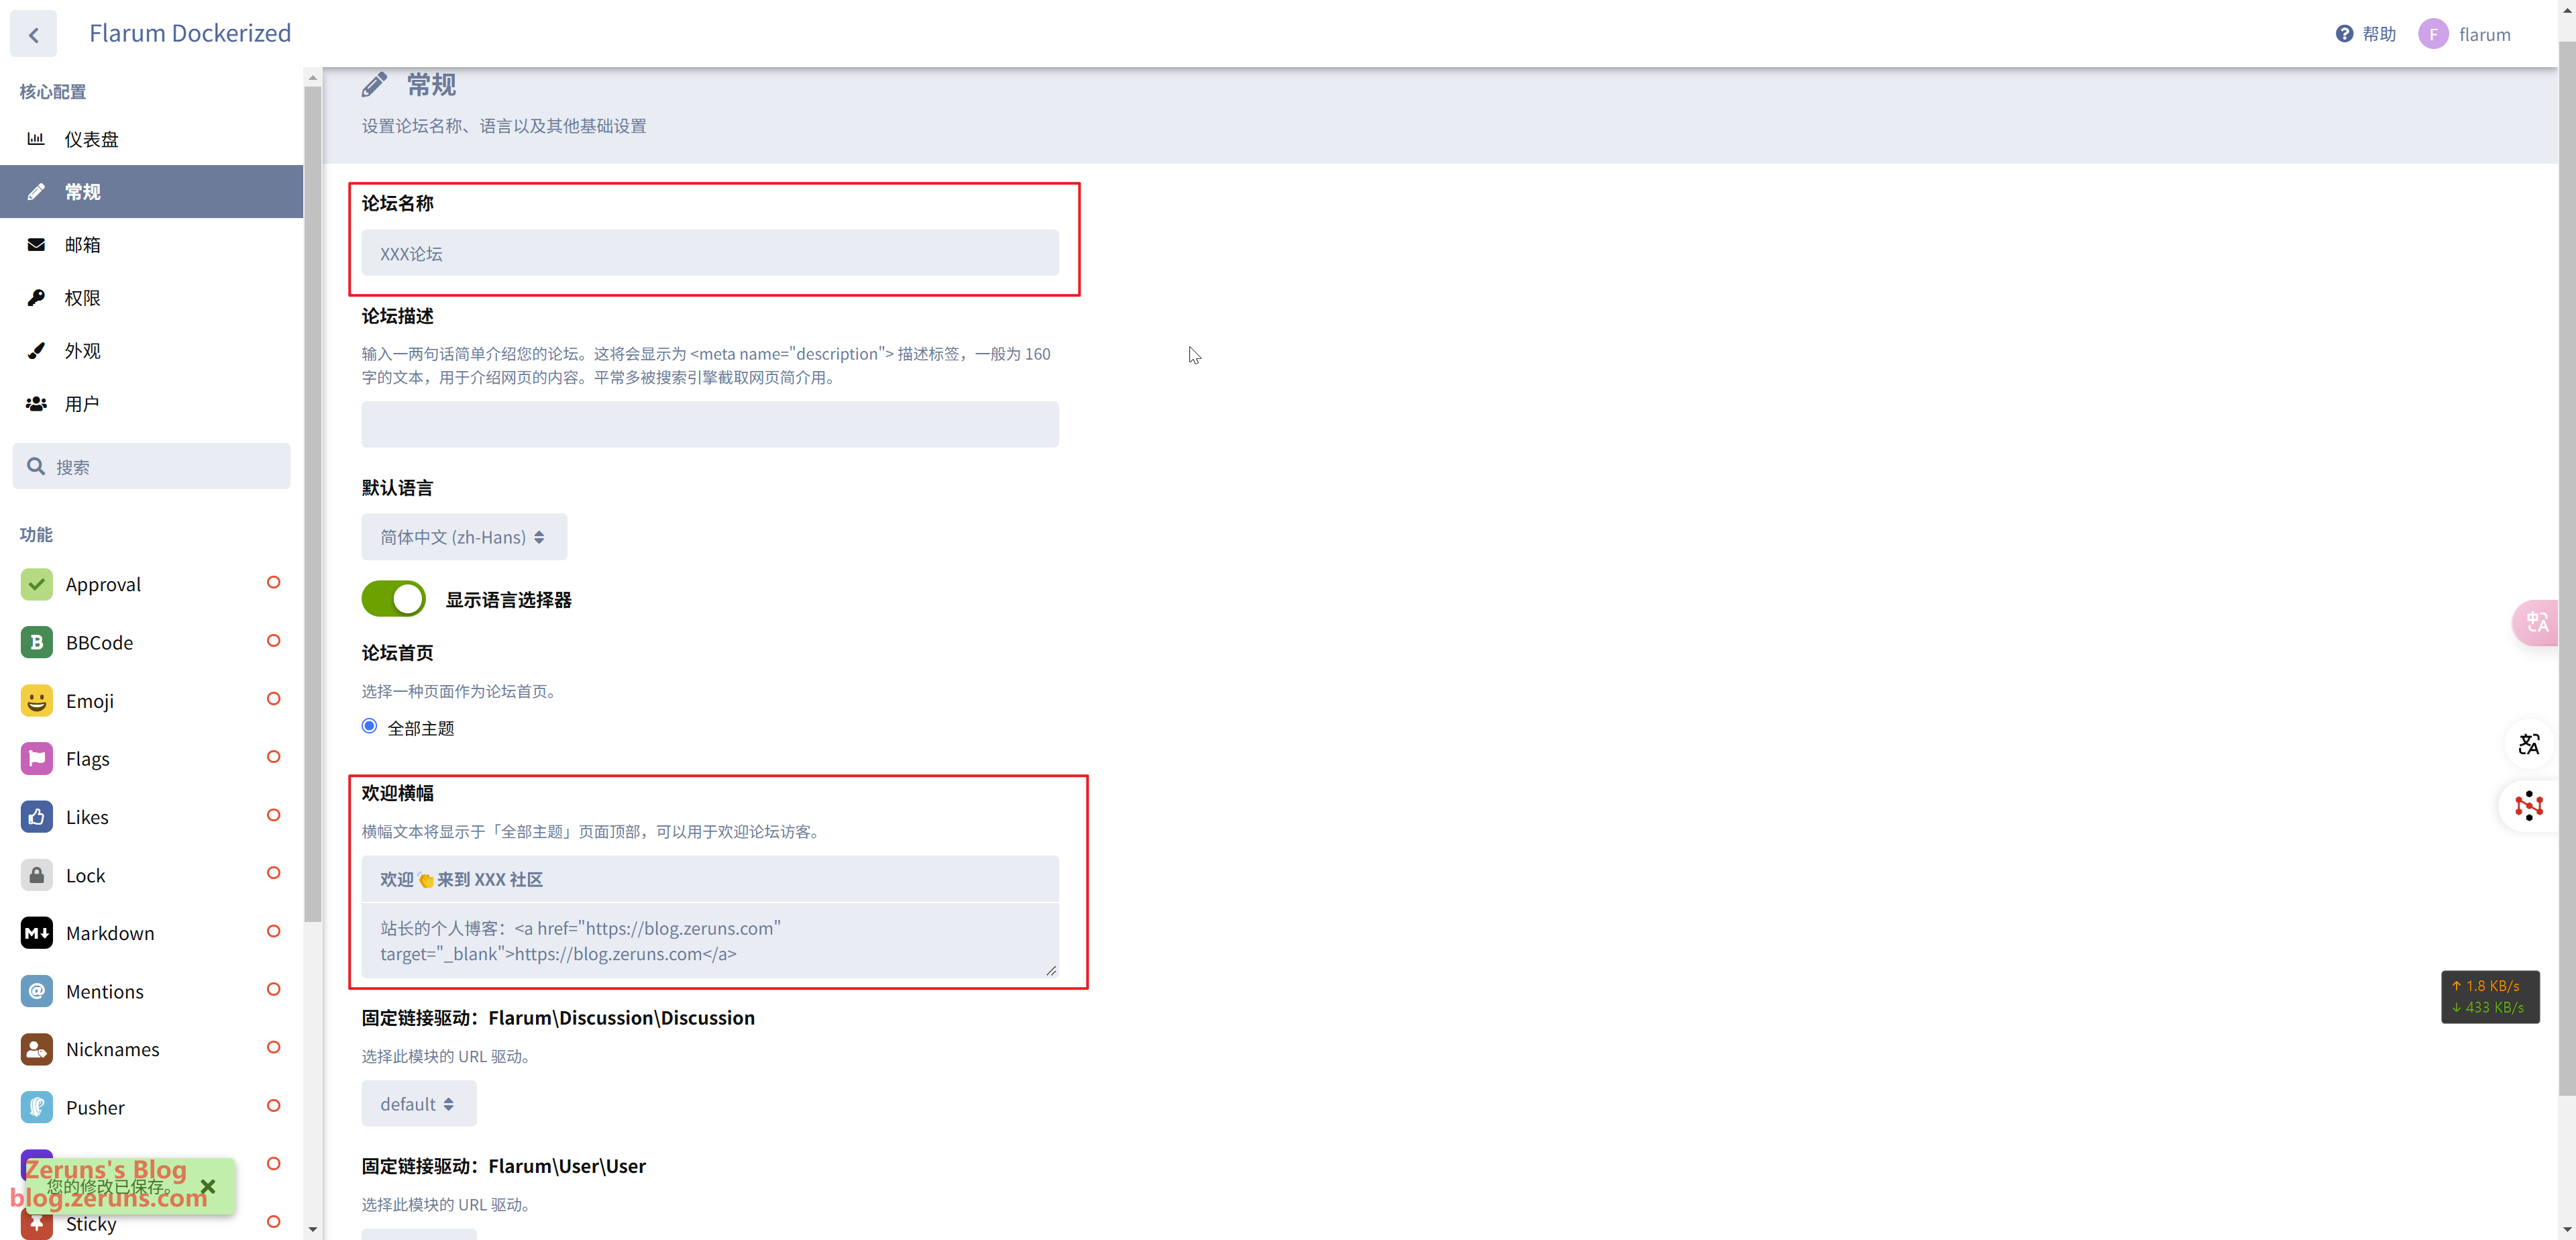
After you're done, the welcome banner should look like this:
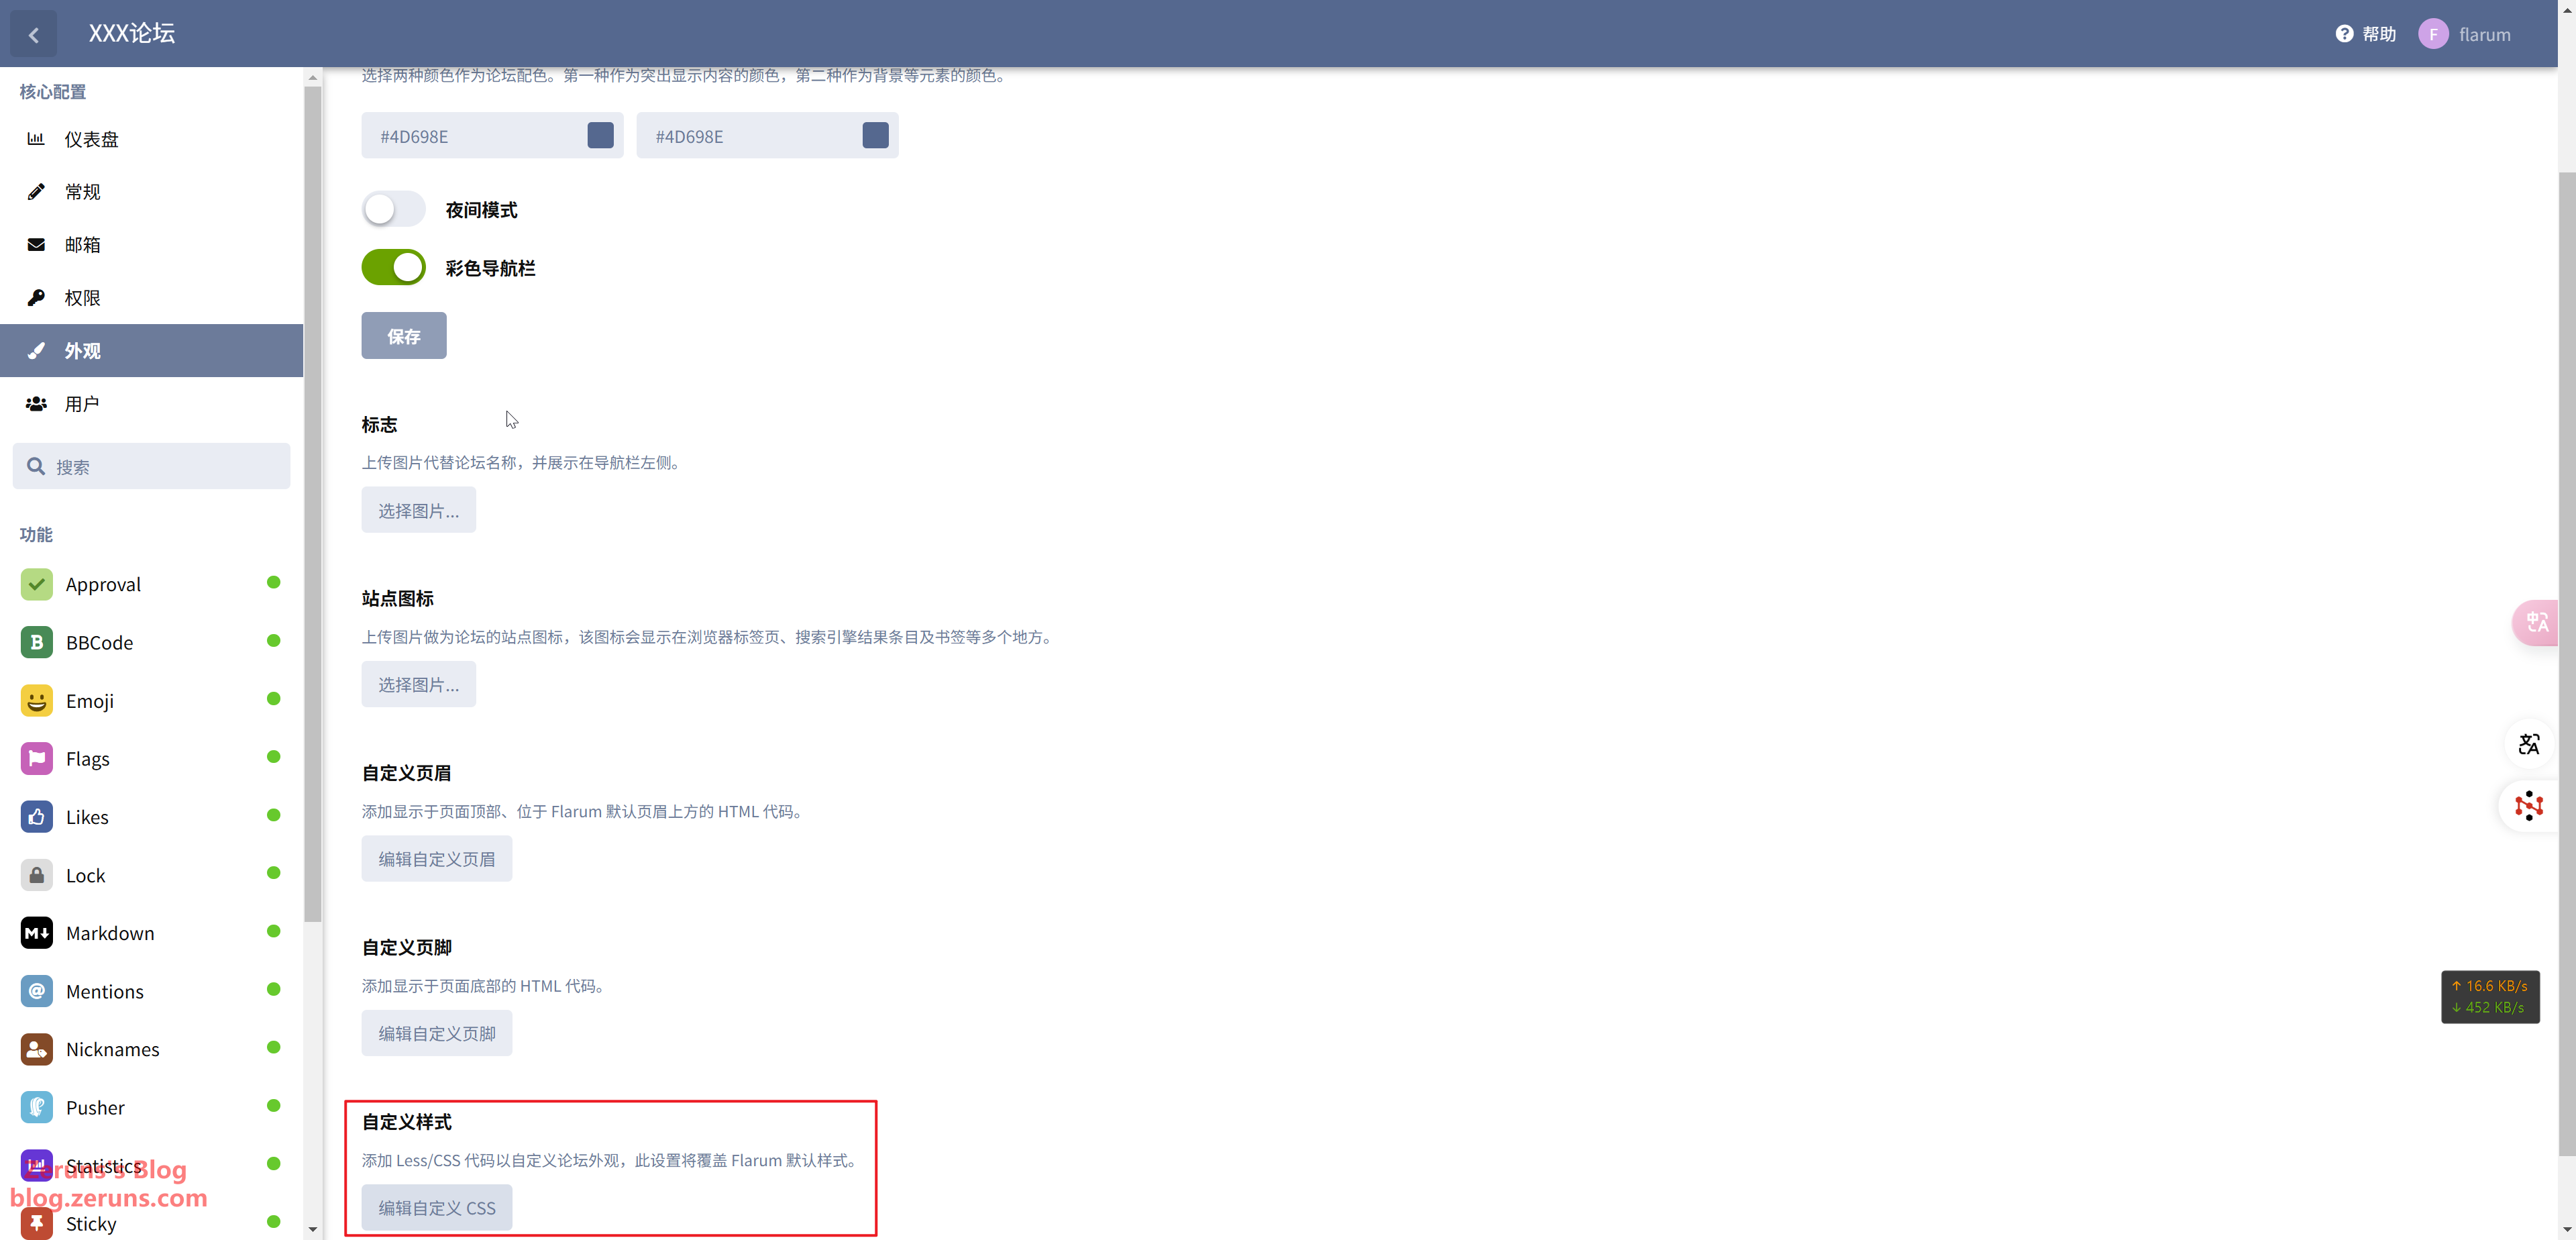
If you want to change the welcome banner to left-align, go to Appearance and click Edit Custom CSS, then paste in the following CSS:
.Hero-close {
    float: right;
    margin-top: -10px;
    color: inherit;
    opacity: 0.5;
    visibility: hidden;
}
.Hero h1 {
    margin: 0;
    font-weight: bold;
    line-height: 1.5em;
}
.containerNarrow {
    max-width: none;
    margin: 0 auto;
    text-align: left;
}
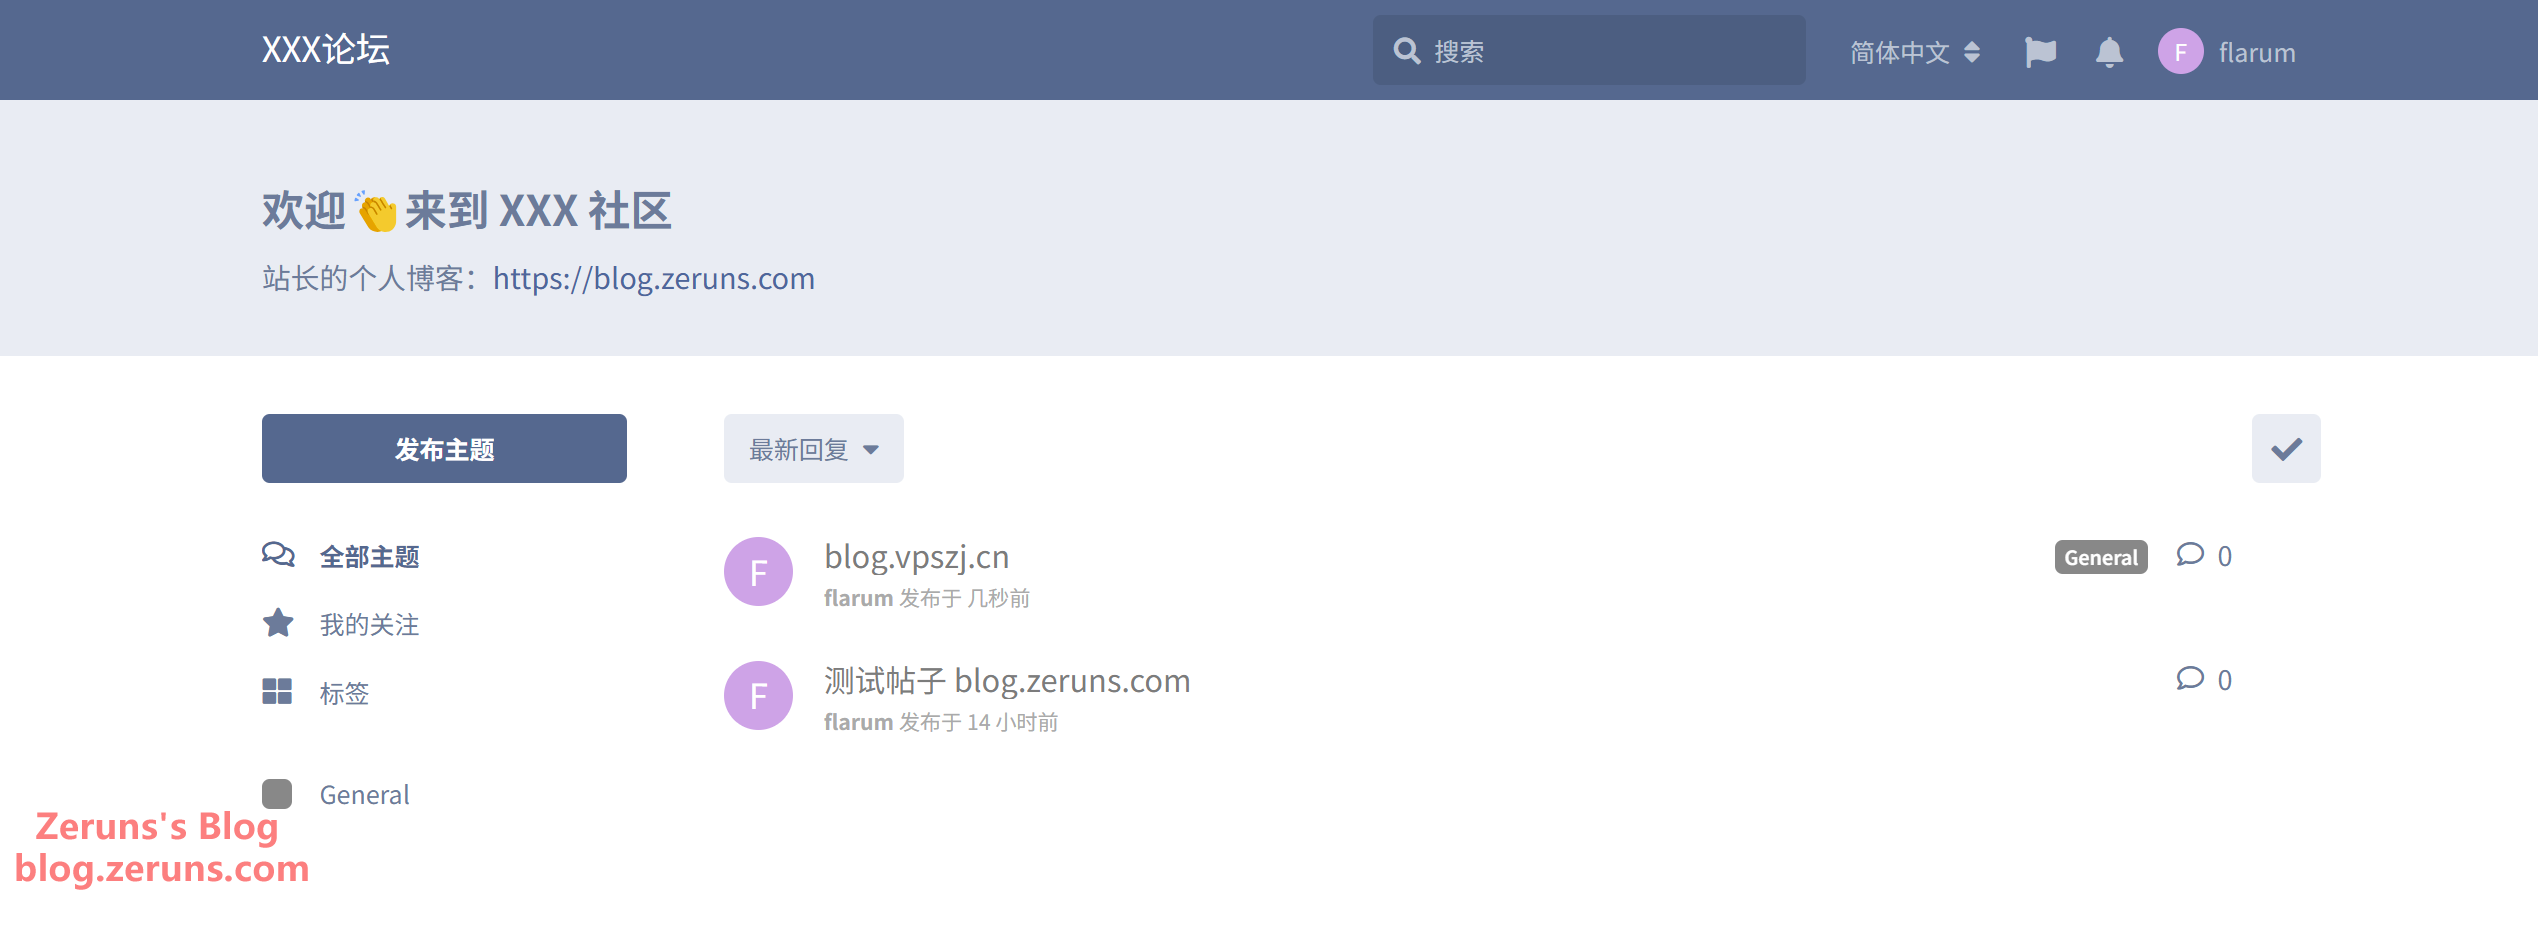
After saving, refresh the page to see the changes:
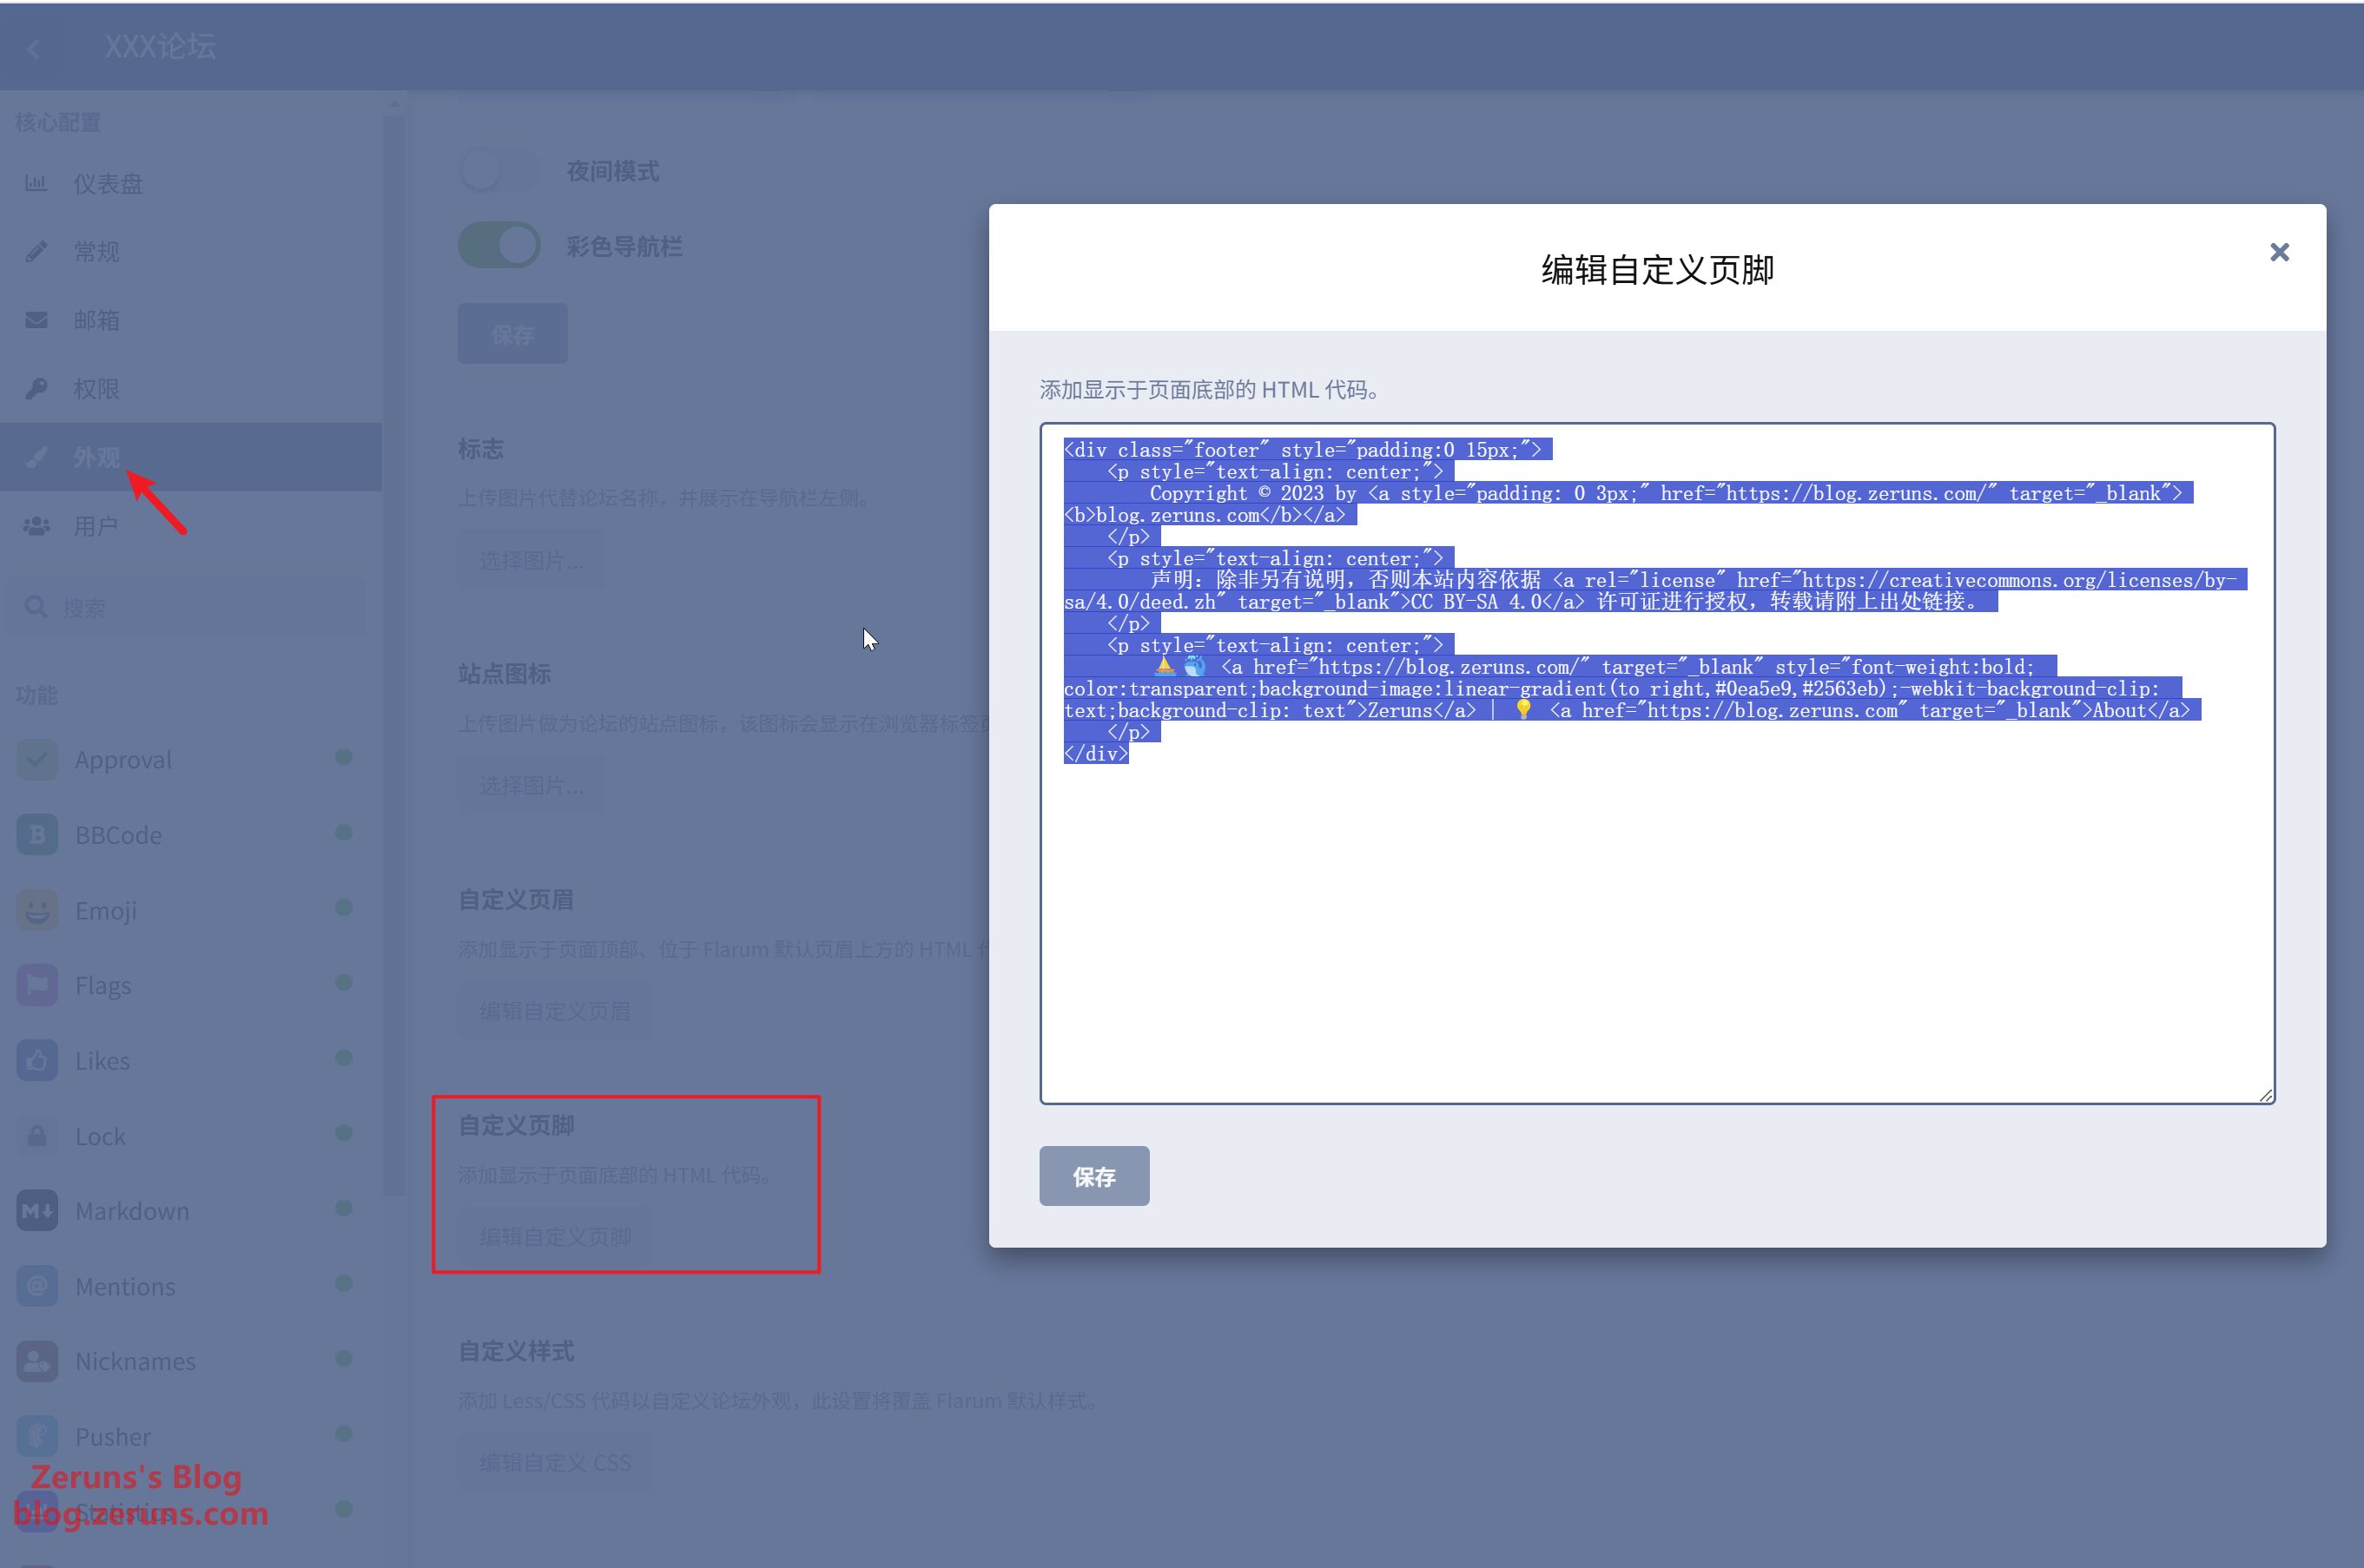
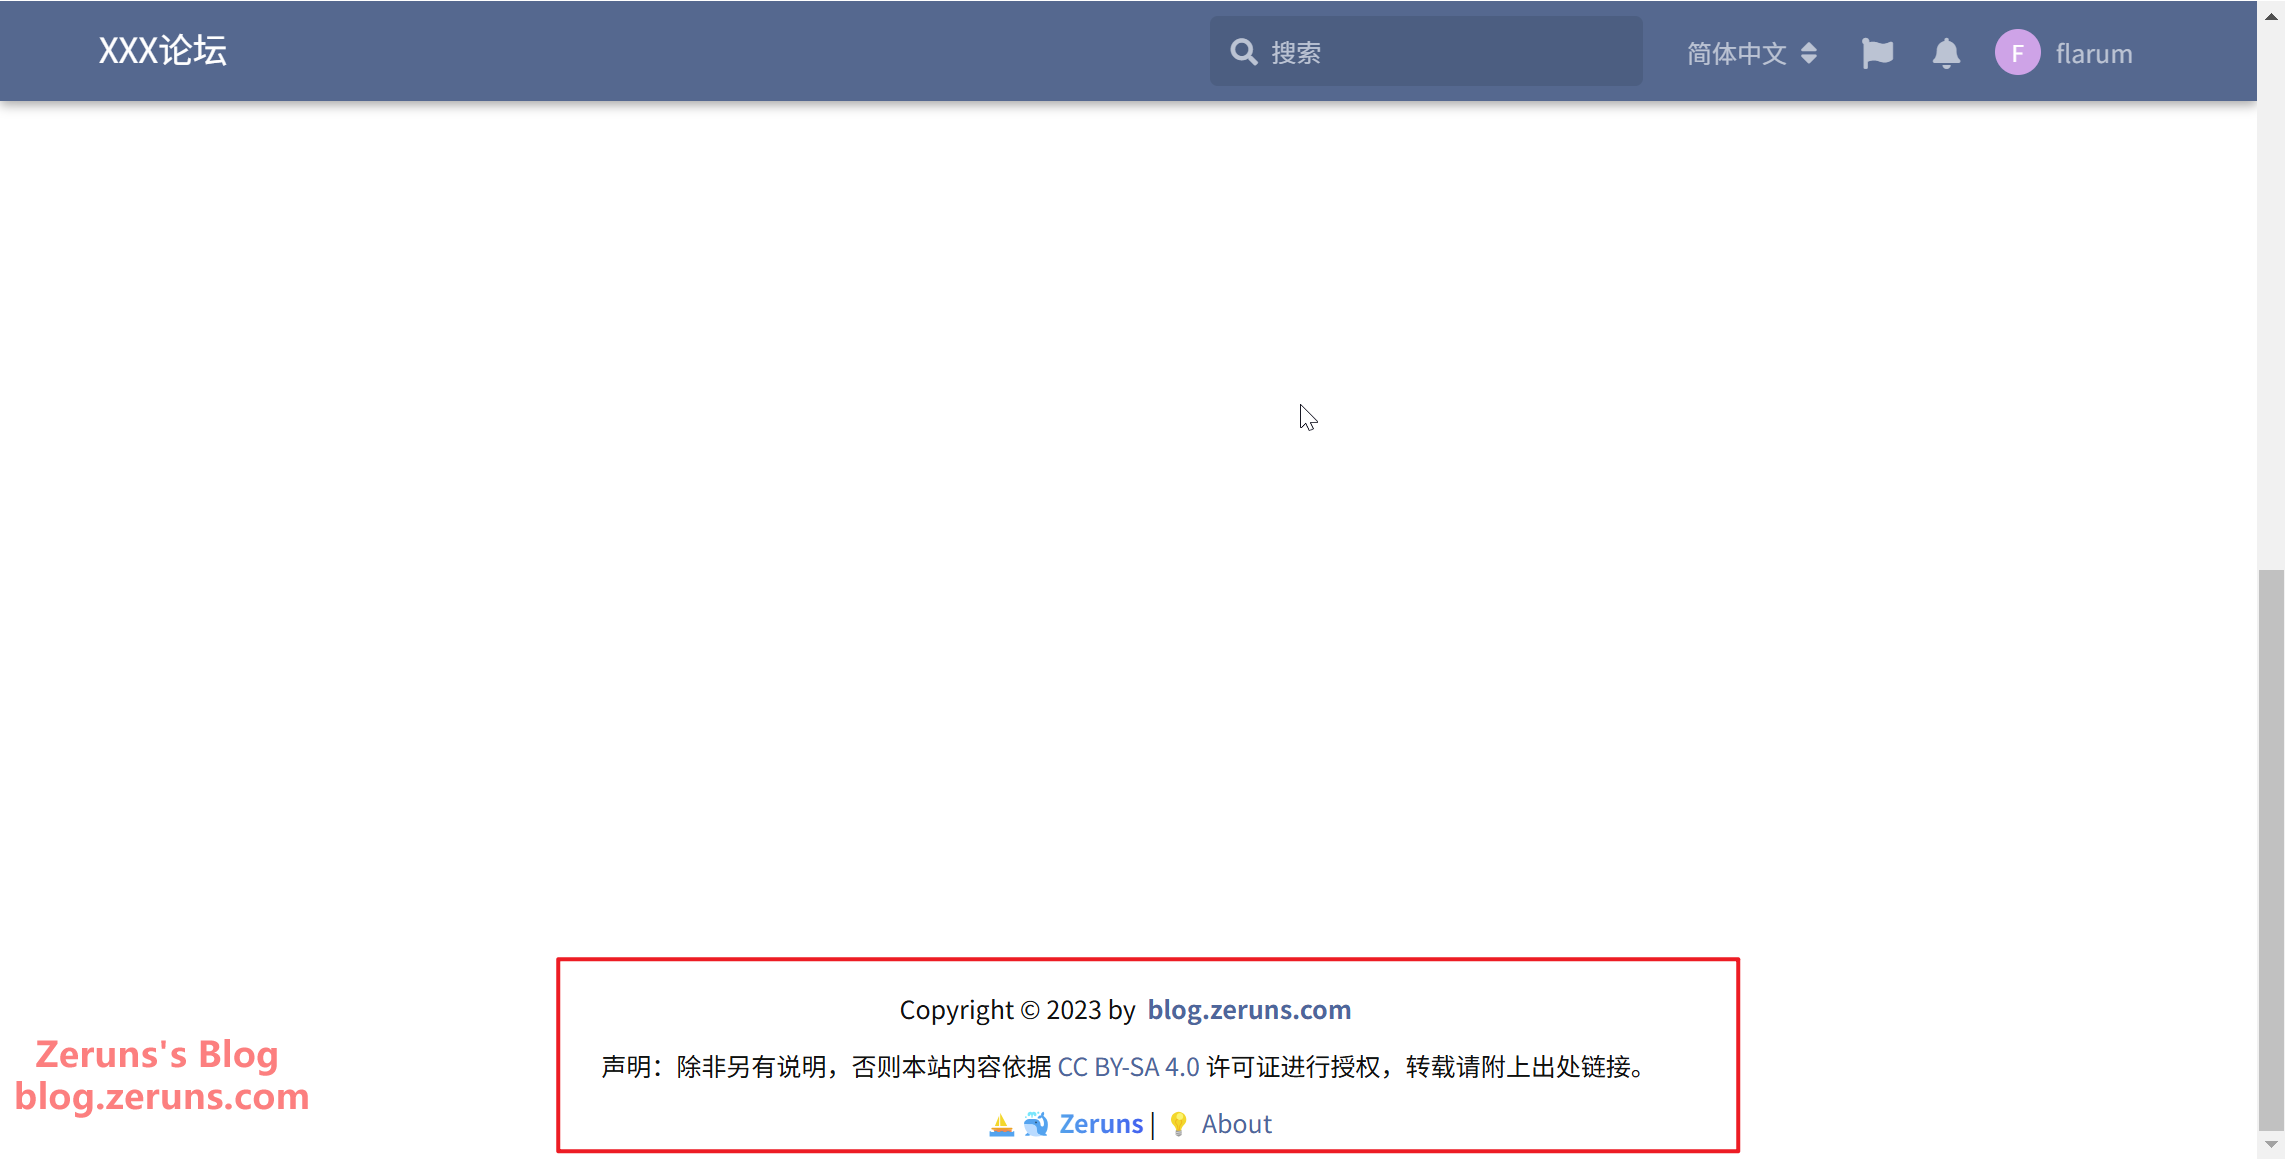
The header and footer can also be customized. For example:
<div class="footer" style="padding:0 15px;">
    <p style="text-align: center;">
        Copyright © 2023 by <a style="padding: 0 3px;" href="https://blog.zeruns.com/" target="_blank"><b>blog.zeruns.com</b></a>
    </p>
    <p style="text-align: center;">
        Disclaimer: Unless otherwise noted, the content of this site is licensed under <a rel="license" href="https://creativecommons.org/licenses/by-sa/4.0/deed.zh" target="_blank">CC BY-SA 4.0</a>; please include a link to the source when reprinting.
    </p>
    <p style="text-align: center;">
        ⛵️🐳 <a href="https://blog.zeruns.com/" target="_blank" style="font-weight:bold; color:transparent;background-image:linear-gradient(to right,#0ea5e9,#2563eb);-webkit-background-clip: text;background-clip: text">Zeruns</a> | 💡 <a href="https://blog.zeruns.com" target="_blank">About</a>
    </p>
</div>
The final result will look like this:
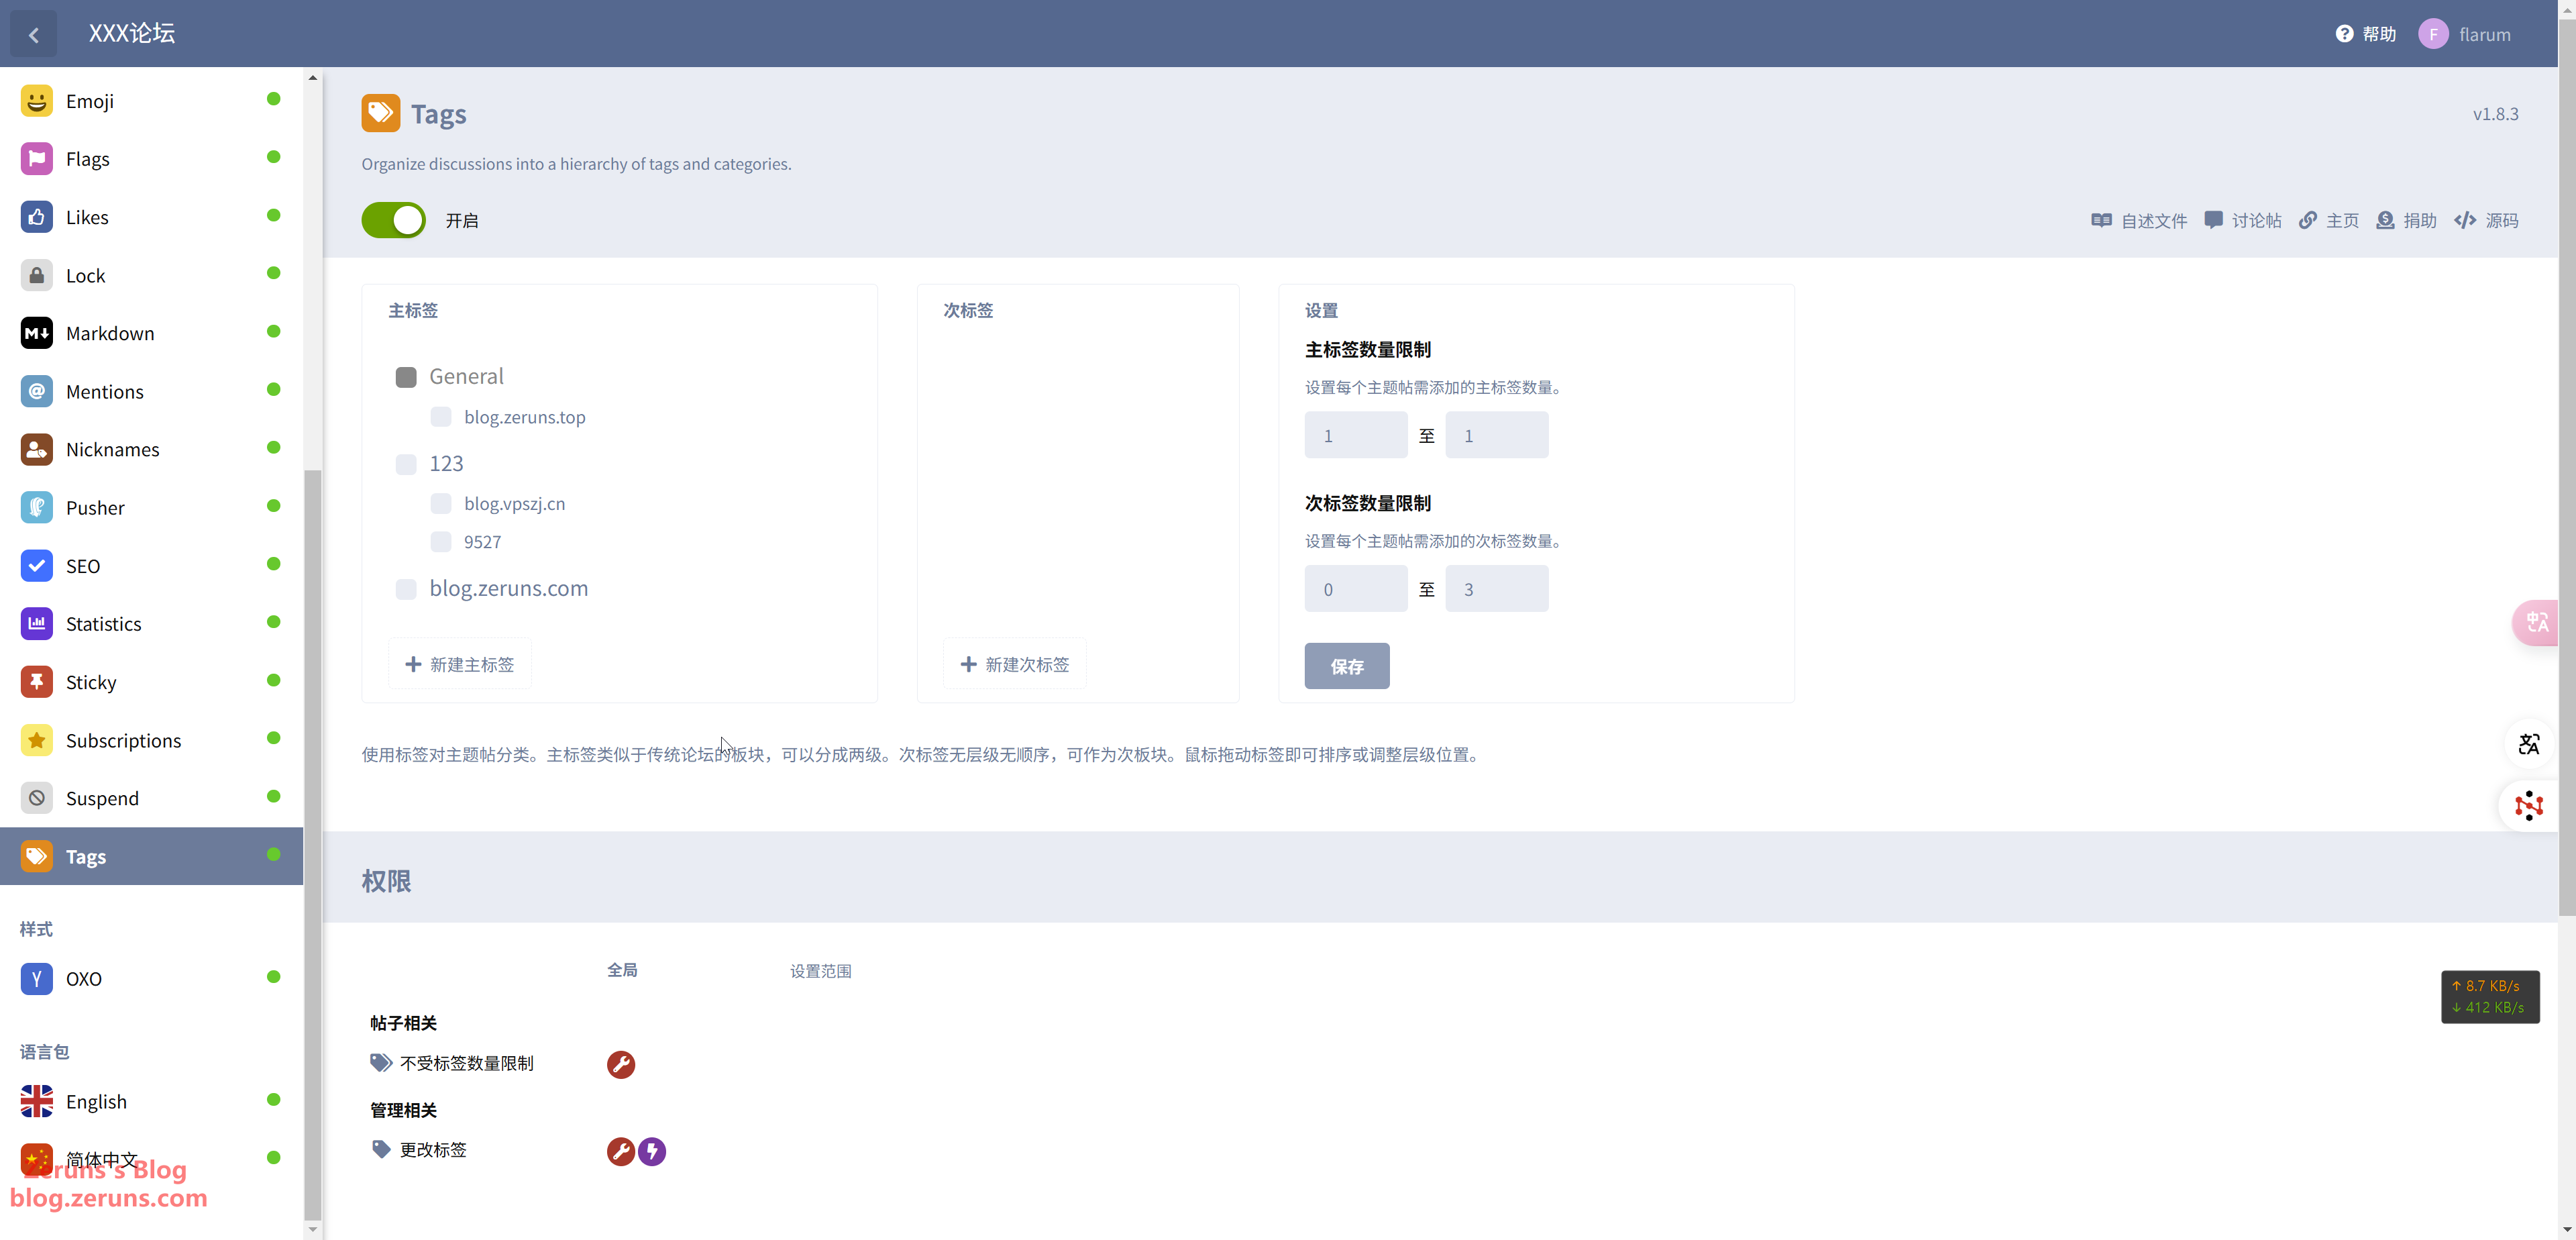
You can use the tag feature to divide the forum into sections and categories. In the flarum backend, just enable the built-in Tags extension and configure it as needed.
Theme Recommendation
I recommend one theme, available on GitHub: https://github.com/yannisme/flarum-oxo-theme.
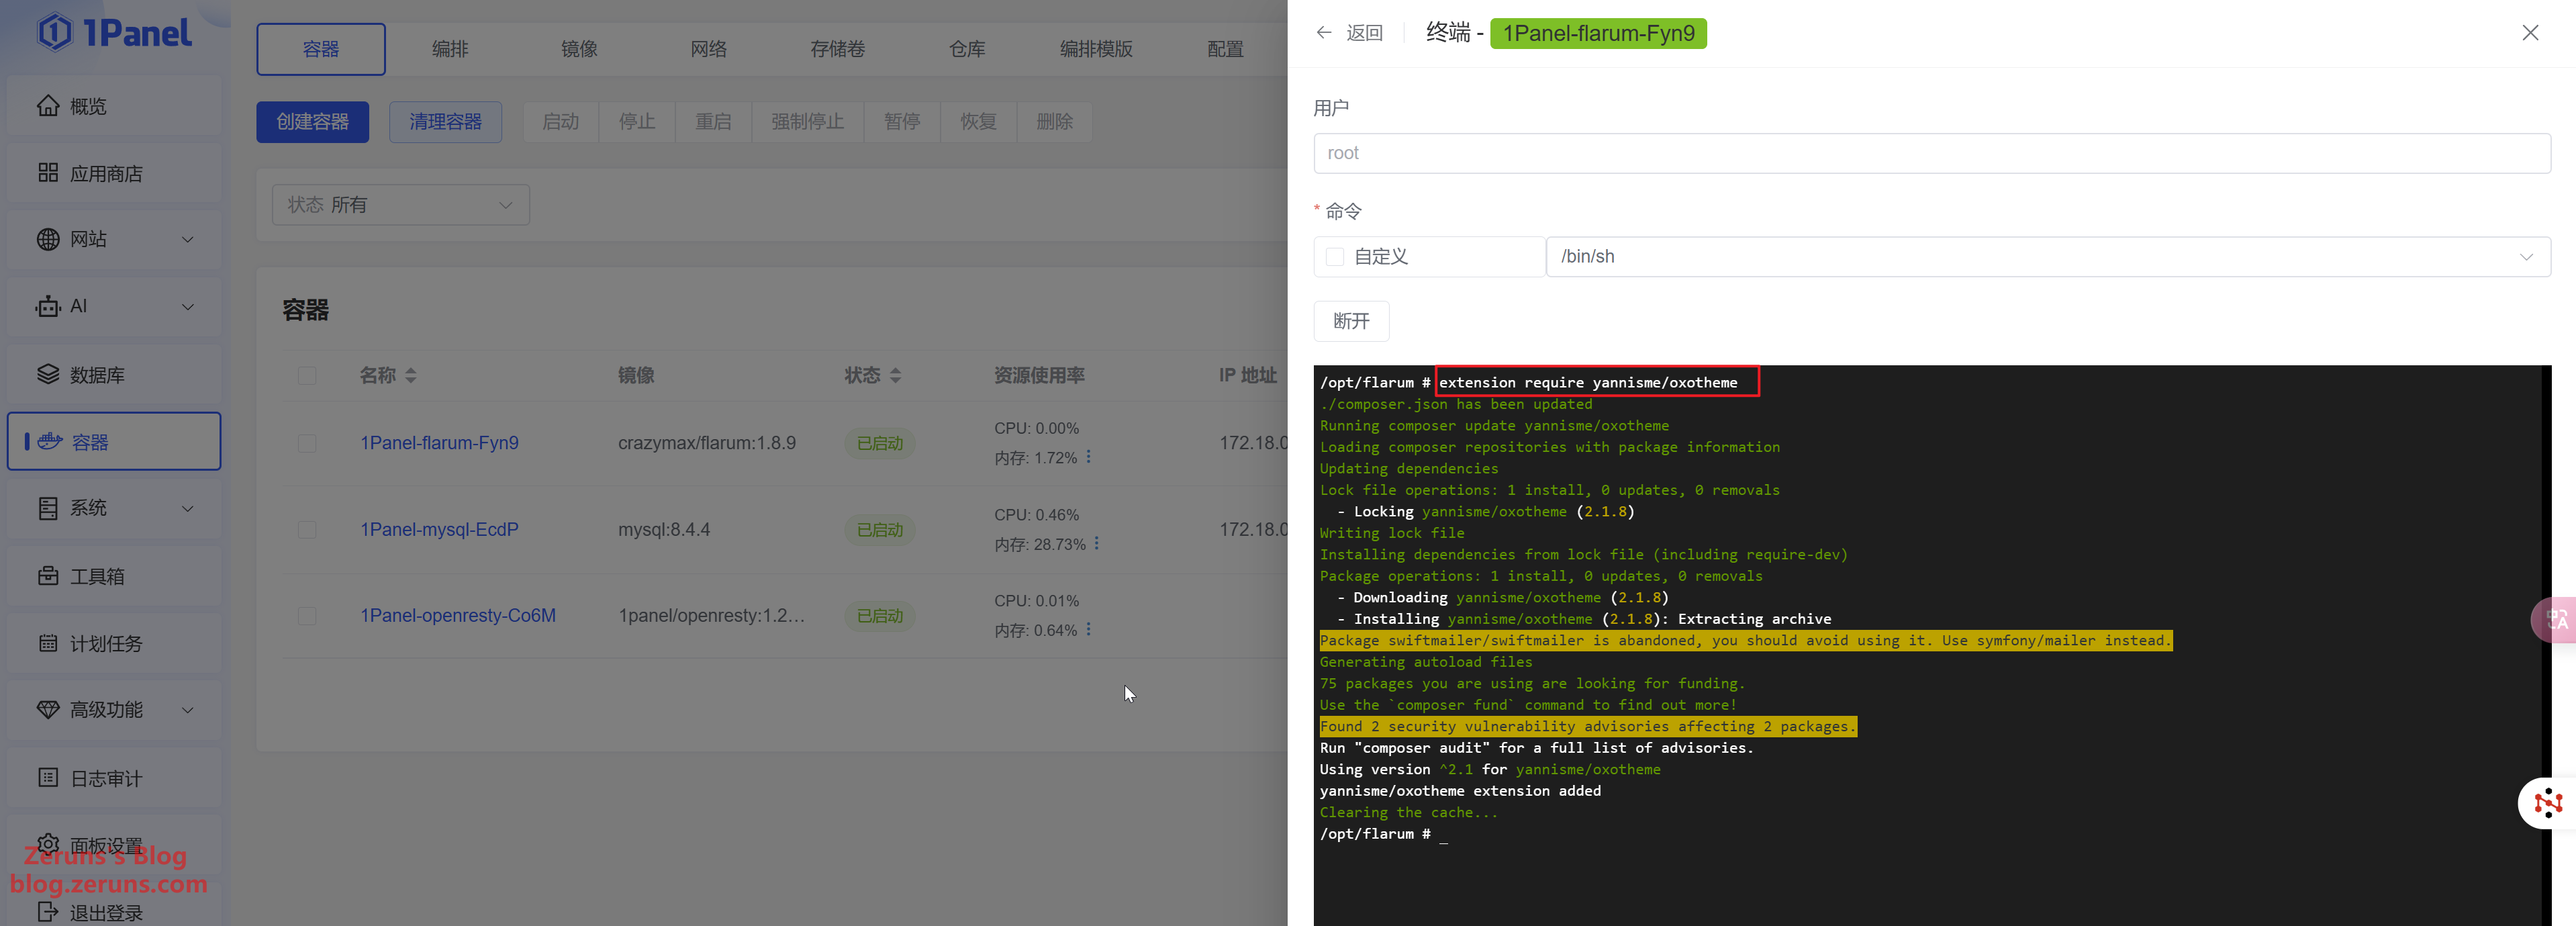
The installation method is similar to before. In the 1Panel dashboard, click Containers, find the container corresponding to flarum, then click Terminal → Connect. Copy and paste the following command into the terminal and press Enter to run it.
extension require yannisme/oxotheme
After installation, enable the theme in the admin dashboard.
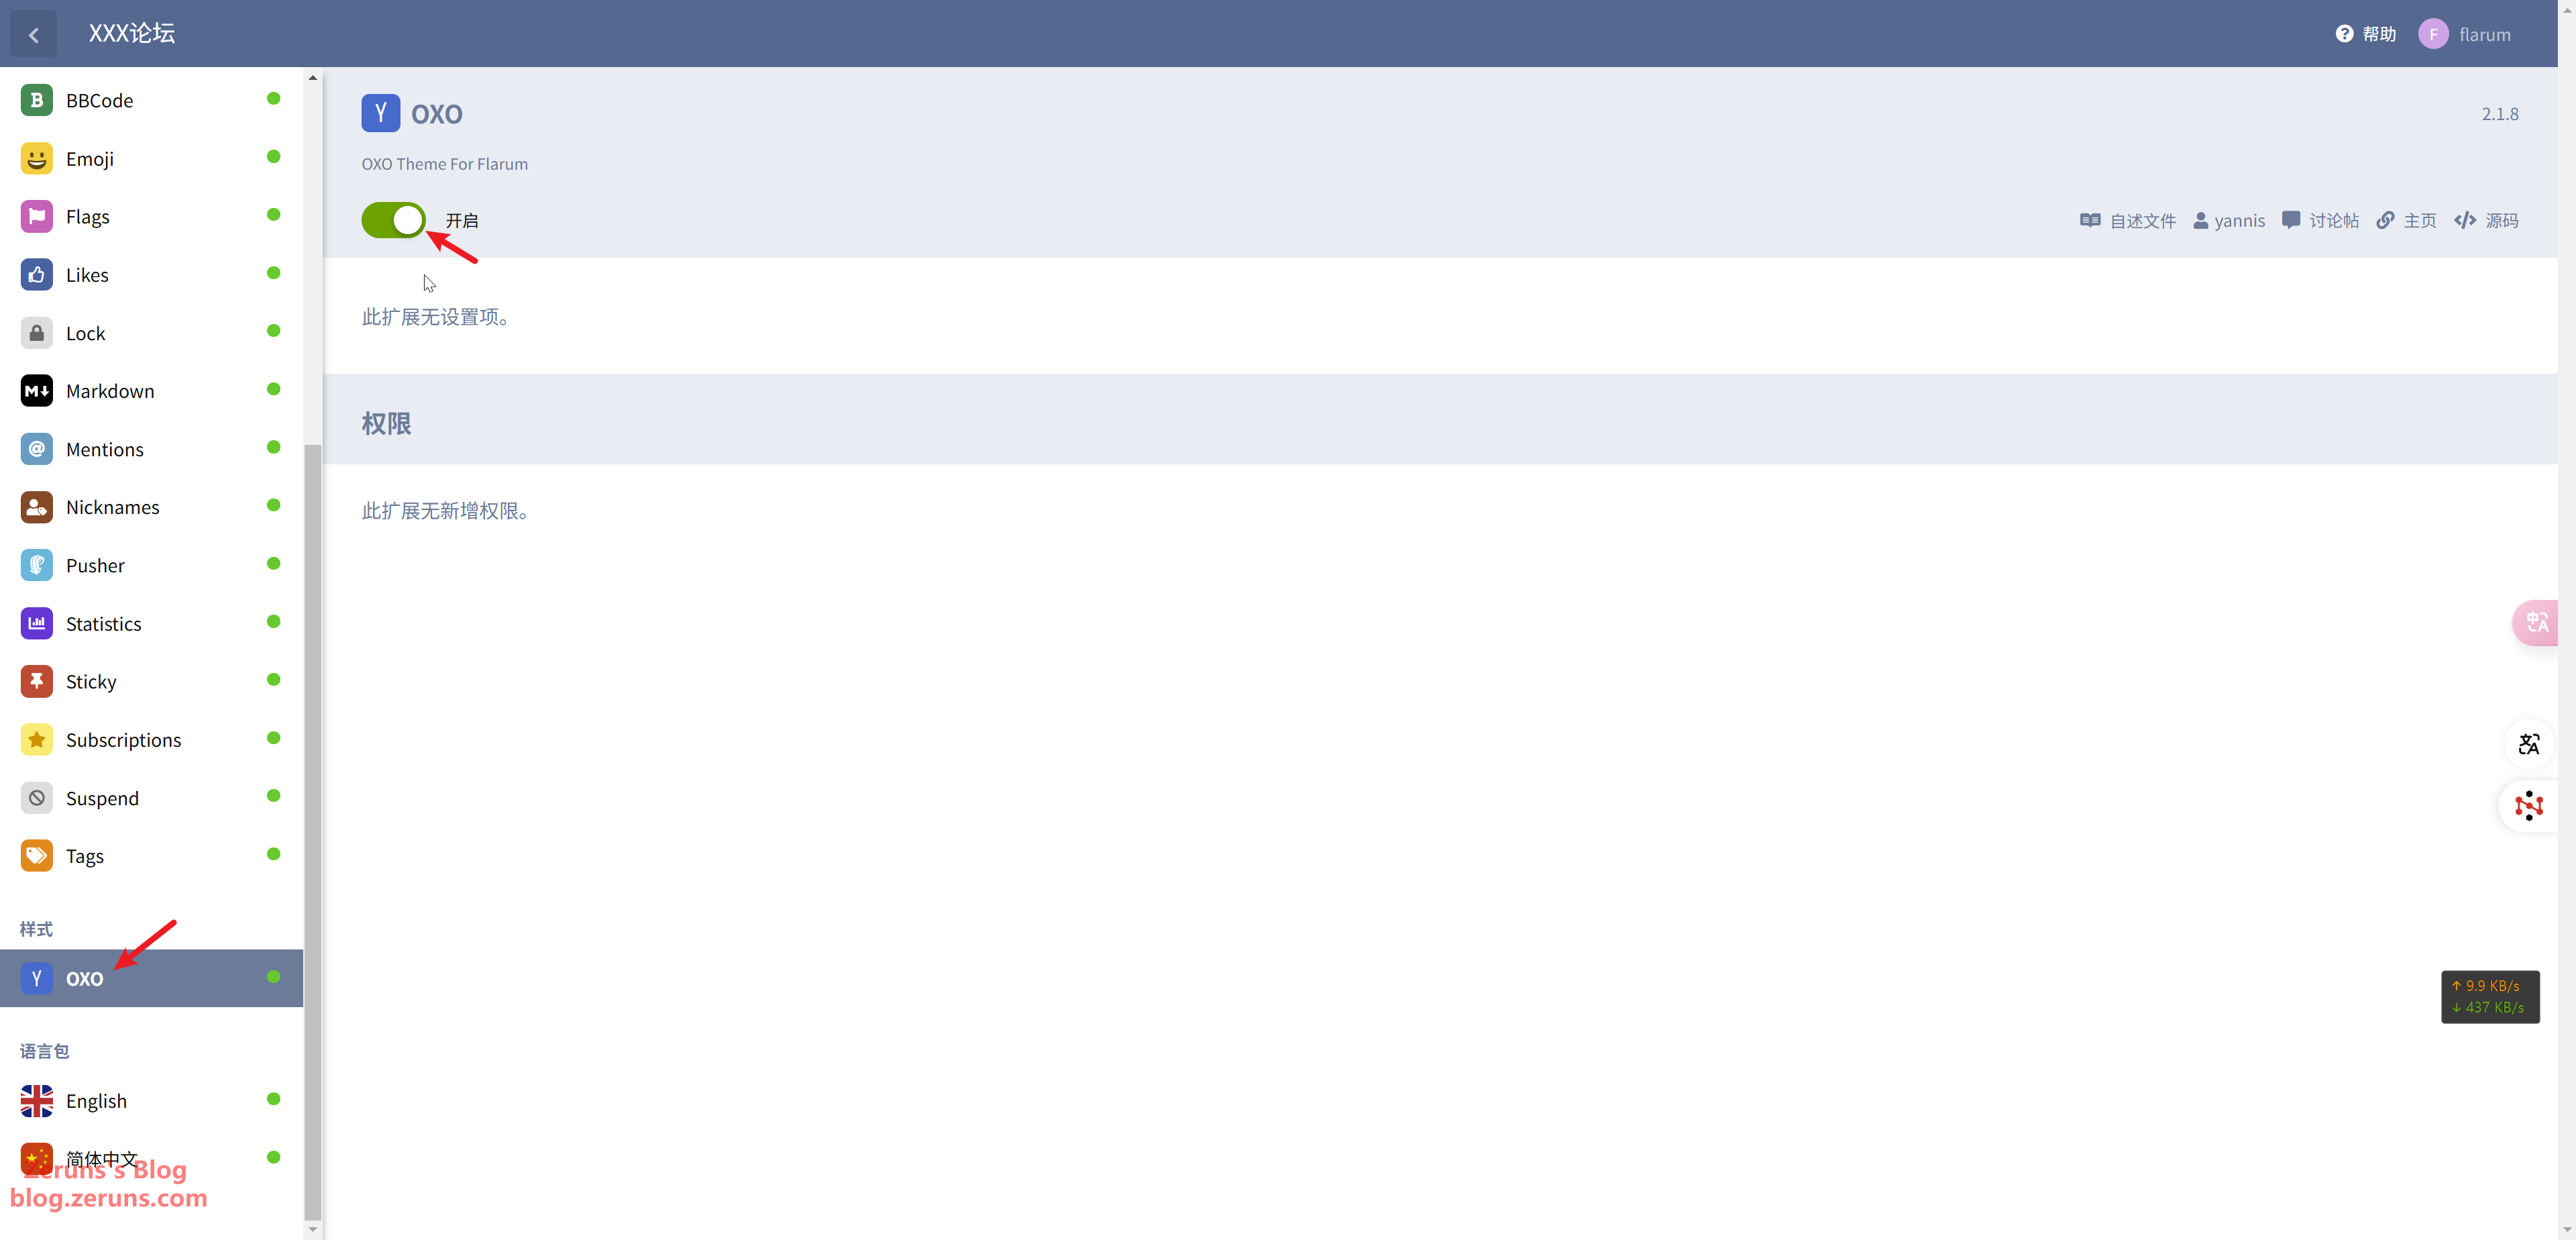
The final appearance is as follows:
If you want to explore other themes, visit the Flarum official community. The installation commands provided are generally similar to composer require yannisme/oxotheme, but you need to change the command by replacing composer with extension.
Flarum official community theme section URL: https://url.zeruns.com/XO3Rc
Recommended Essential Extensions
One of Flarum's greatest charms is its extensibility. By installing a variety of extensions, you can add new features and functionalities to your forum to meet your community's specific needs. Whether it's enhancing SEO performance, integrating third-party authentication, supporting full-text search, or implementing real-time chat, there's always an extension available to suit your requirements.
Below are some high-quality, commonly used extensions:
- FoF User Directory: Adds a user directory page to the forum, making it easy to browse and search for users.
Installation:extension require fof/user-directory:"*" - FoF Filter: Helps forum administrators automatically review and filter user-generated content.
Installation:extension require fof/filter:"*" - FoF Links: Allows you to add custom links to the forum's navigation bar, sidebar, or footer, enabling quick access to important pages both within and outside the forum.
Installation:extension require fof/links - SEO: Focused on SEO optimization.
Installation:extension require v17development/flarum-seo - Discussion Views: Displays the view count for each discussion, giving both users and administrators a clear idea of content popularity.
Installation:extension require michaelbelgium/flarum-discussion-views - Echo Showfloor: Displays floor numbers like Baidu Tieba.
Installation:extension require wanecho/showfloor:"*" - Emoji Picker: Allows users to easily insert emojis into posts. Note that it conflicts with the forum's built-in Emoji extension, so you must disable the default one first.
Installation:extension require clarkwinkelmann/flarum-ext-emojionearea - Fancybox-Plus: Enhances image viewing functionality on your Flarum forum. Once installed, clicking on an image will pop up an elegant lightbox-style viewer.
Installation:extension require tohsakarat/fancybox-plus - FoF Sitemap: Provides a sitemap feature for your Flarum forum, improving your site's SEO performance.
Installation:extension require fof/sitemap
That's quite a few already! For more extensions, you can check out the Flarum Extension Marketplace at https://url.zeruns.com/flarum-extension.
Note: When installing extensions, always replace the installation command's composer with extension. For example, the official installation command for an extension might be composer require michaelbelgium/flarum-discussion-views; in your flarum container terminal, change it to extension require michaelbelgium/flarum-discussion-views.
After installing the extensions, simply enable them in the Flarum administration dashboard.
Enabling HTTPS/SSL
Enabling SSL allows your website to be accessed via https, ensuring that the communication between the browser and your website is encrypted so that the browser no longer flags the site as insecure.
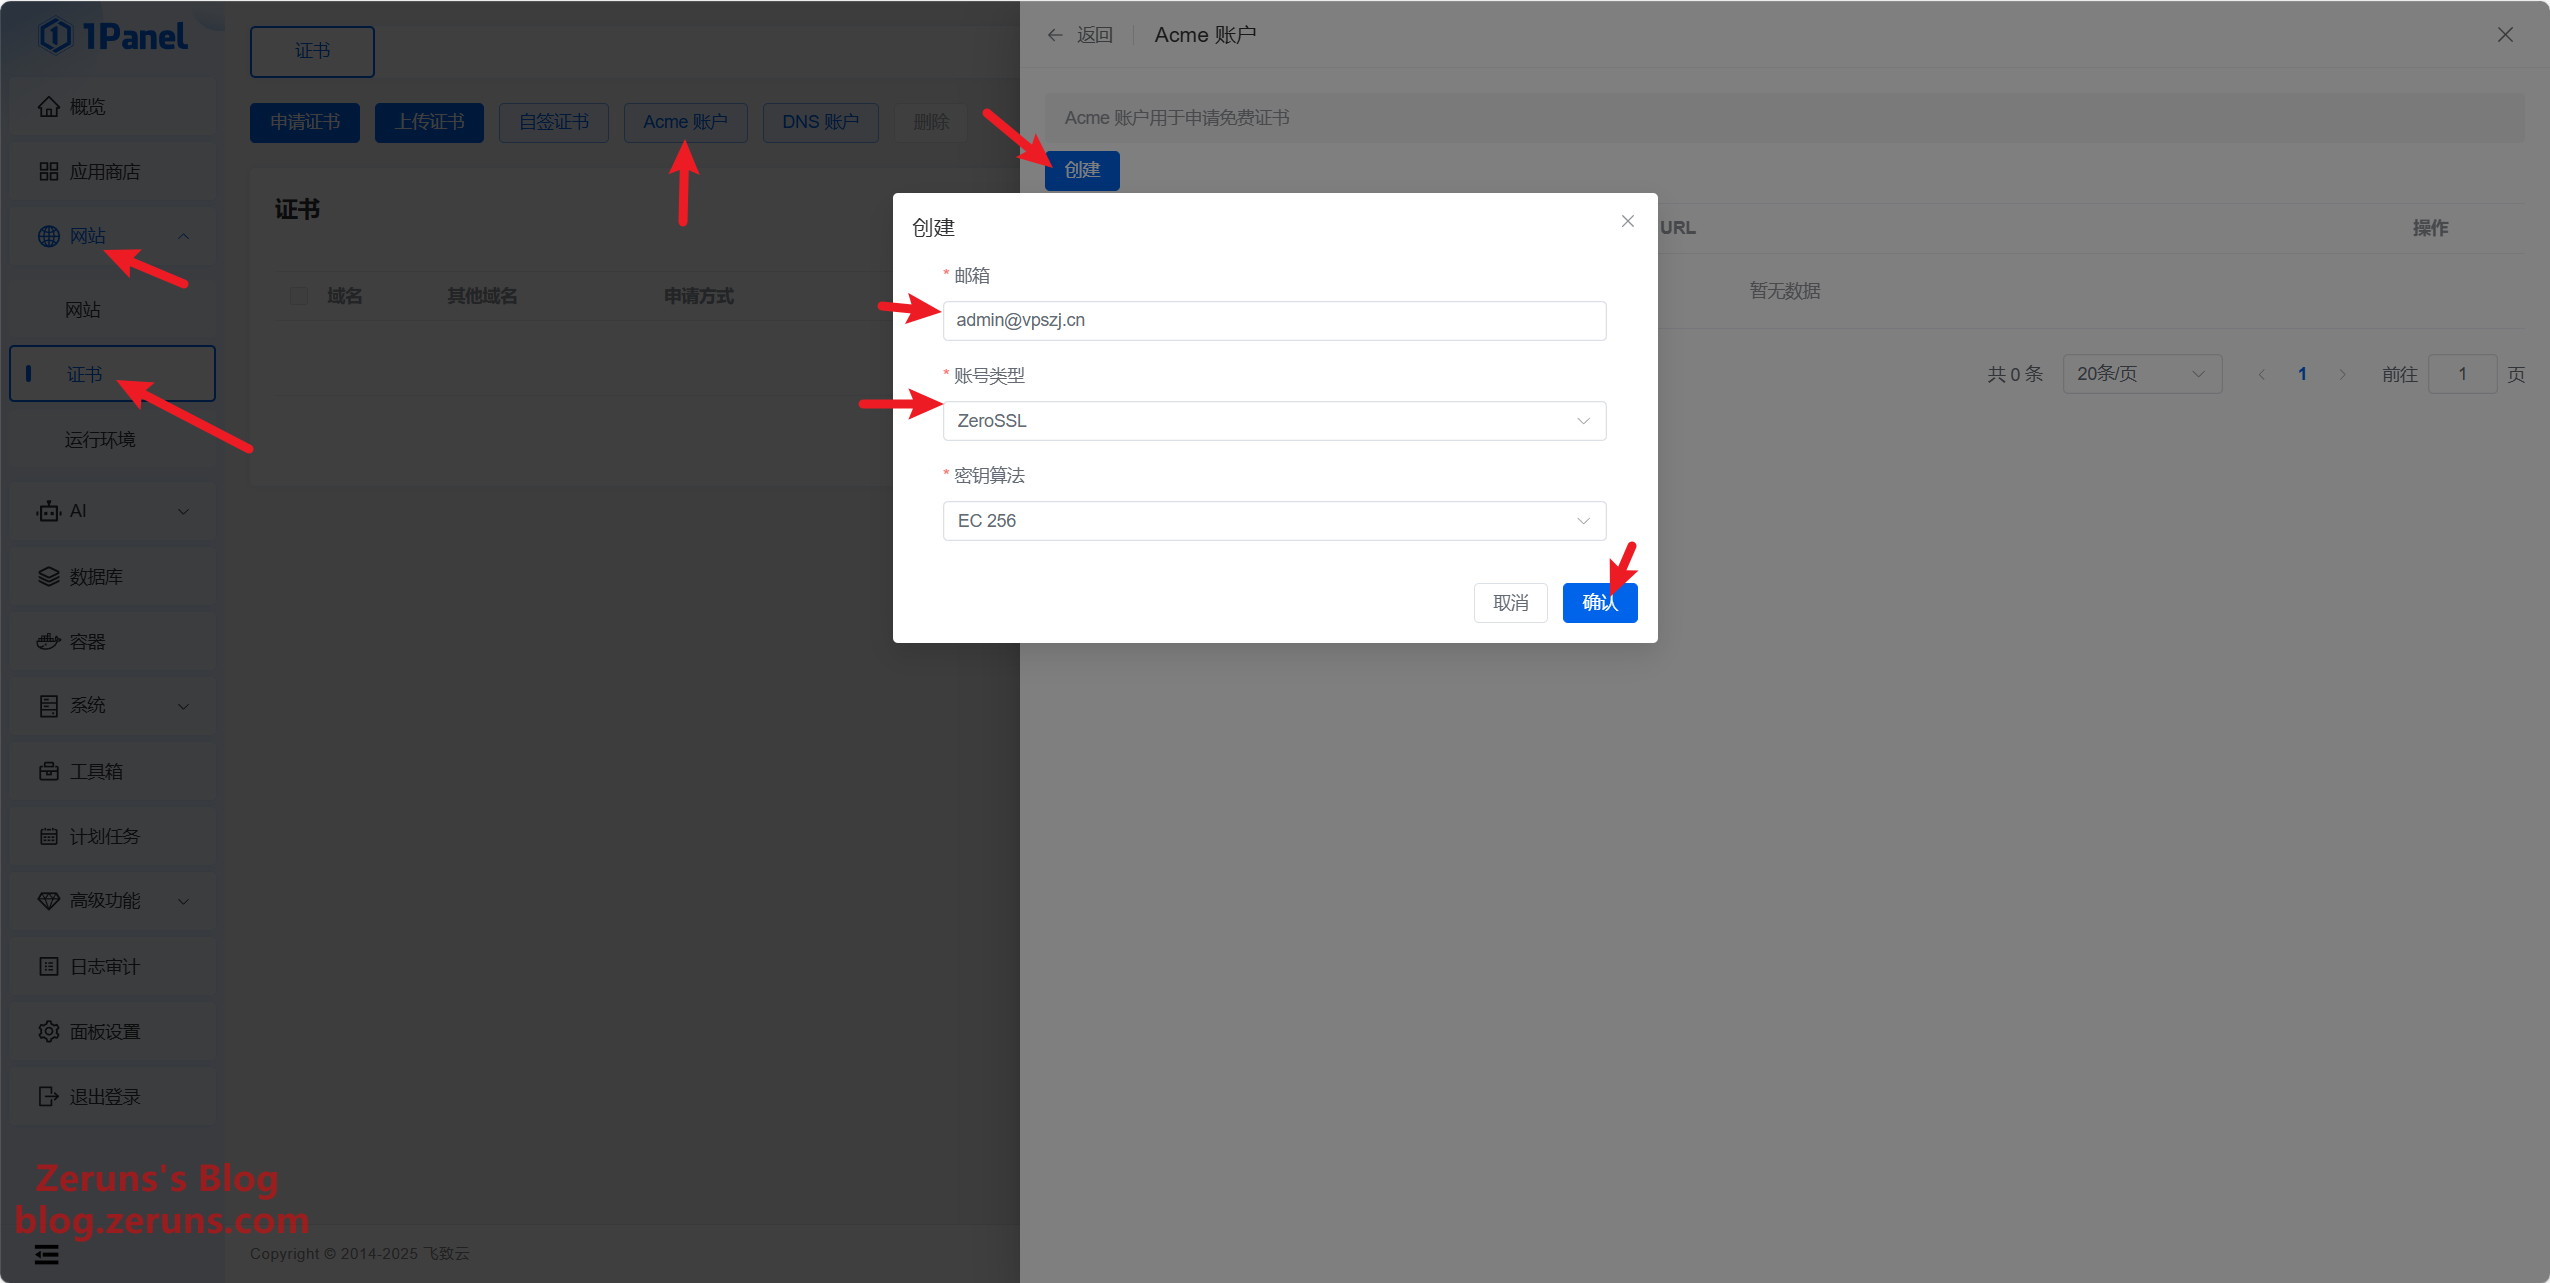
As shown in the image below, in the 1Panel dashboard locate Certificates and click Acme Account. First, create an Acme Account, selecting the account type as ZeroSSL (I personally prefer ZeroSSL certificates), then enter your email address and click Confirm.
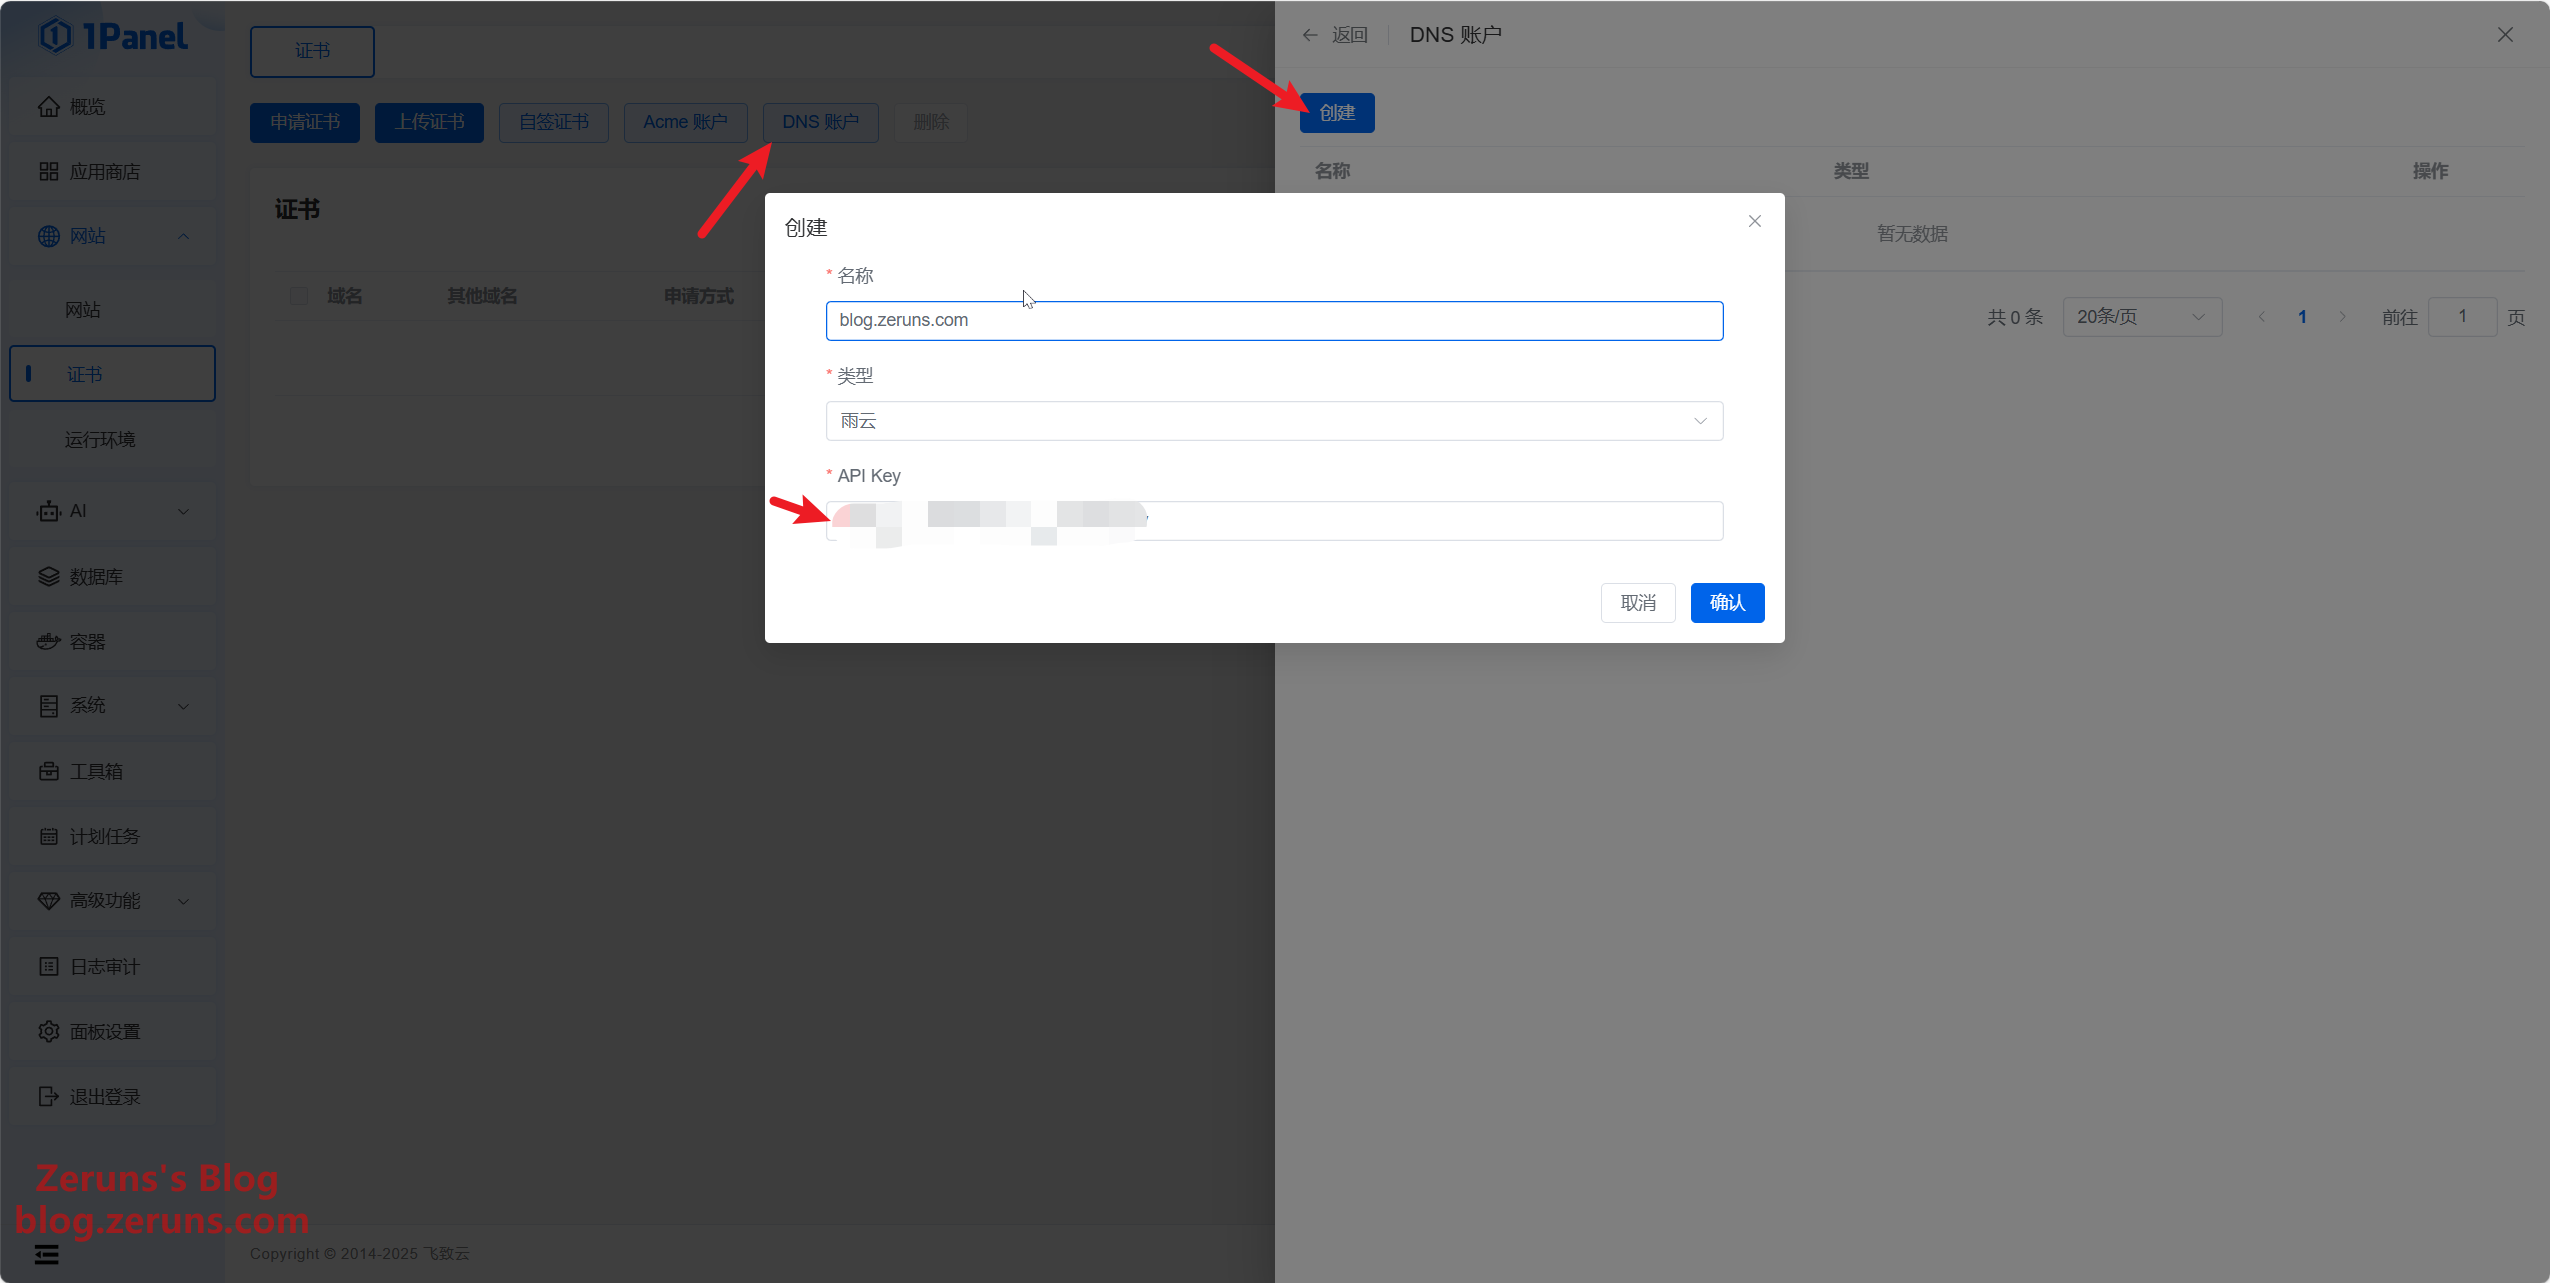
Next, under DNS Account, add Rainyun. This allows automatic domain resolution configuration for easier SSL certificate auto-renewal. (You can also skip this step and configure the DNS manually later via the Rainyun control panel when applying for the SSL certificate.)
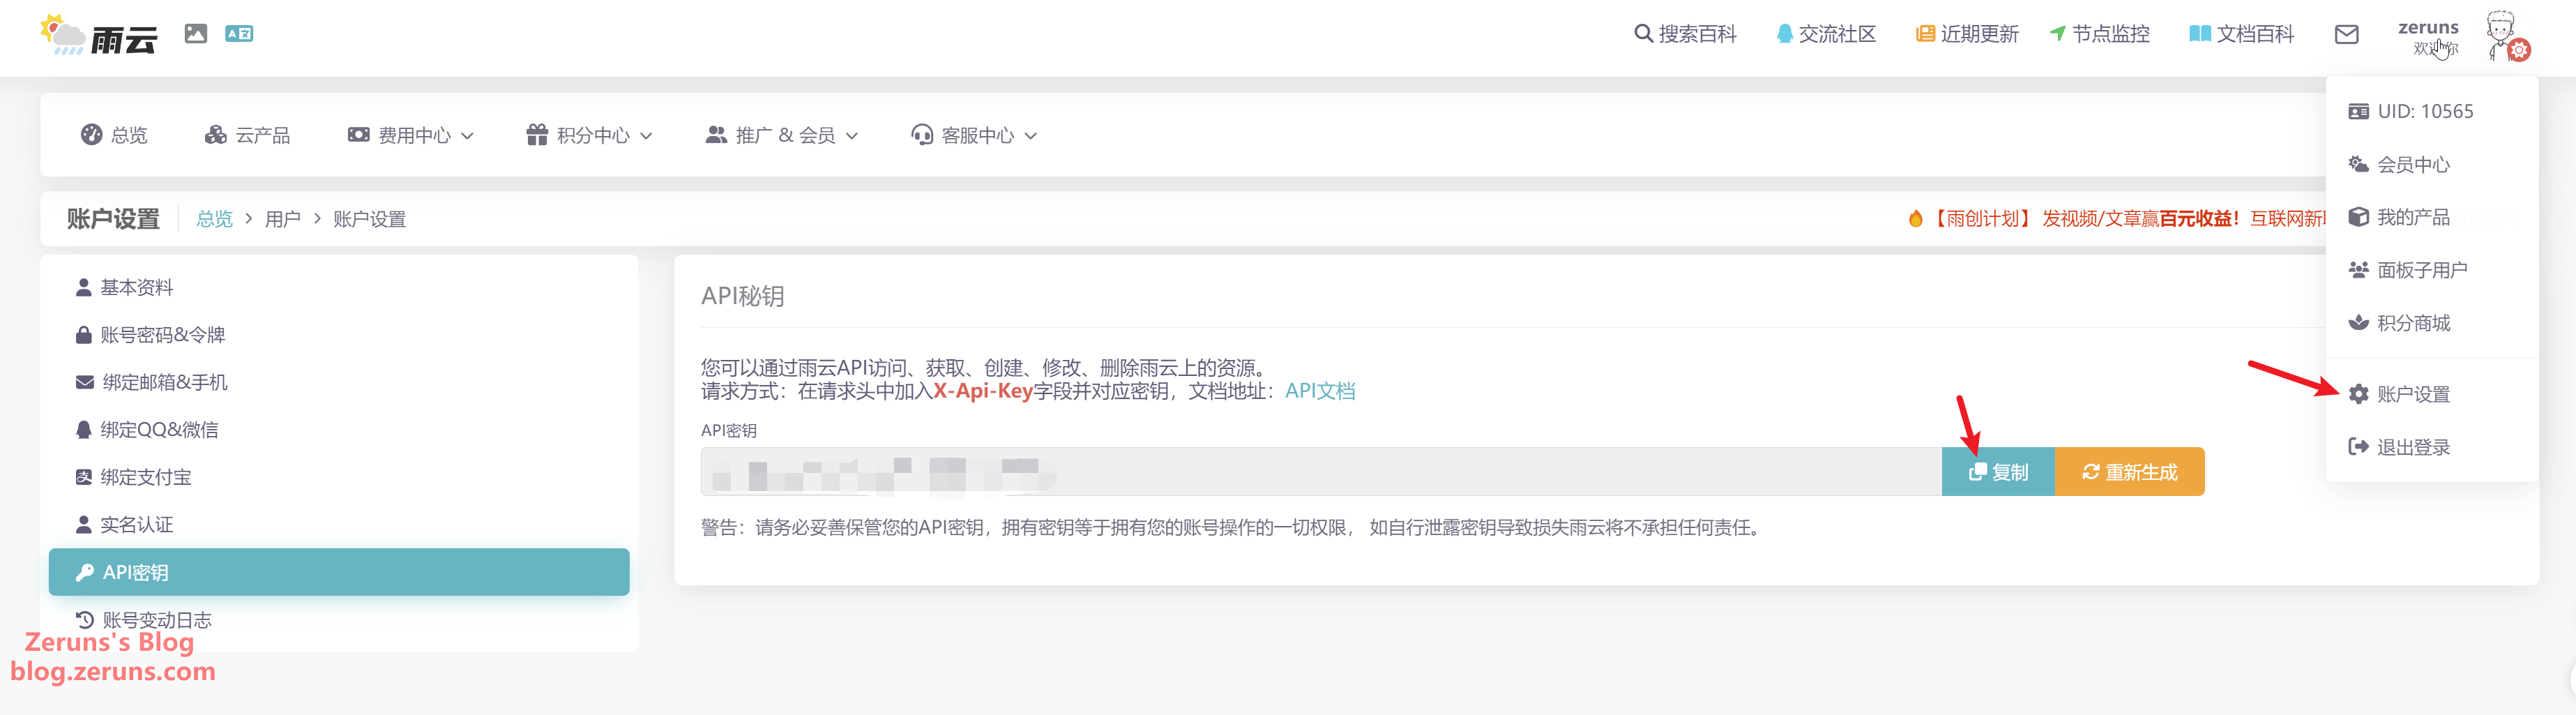
Go to the Rainyun Control Panel → Account Settings to get the API Key and fill it in; you can name it anything you like.
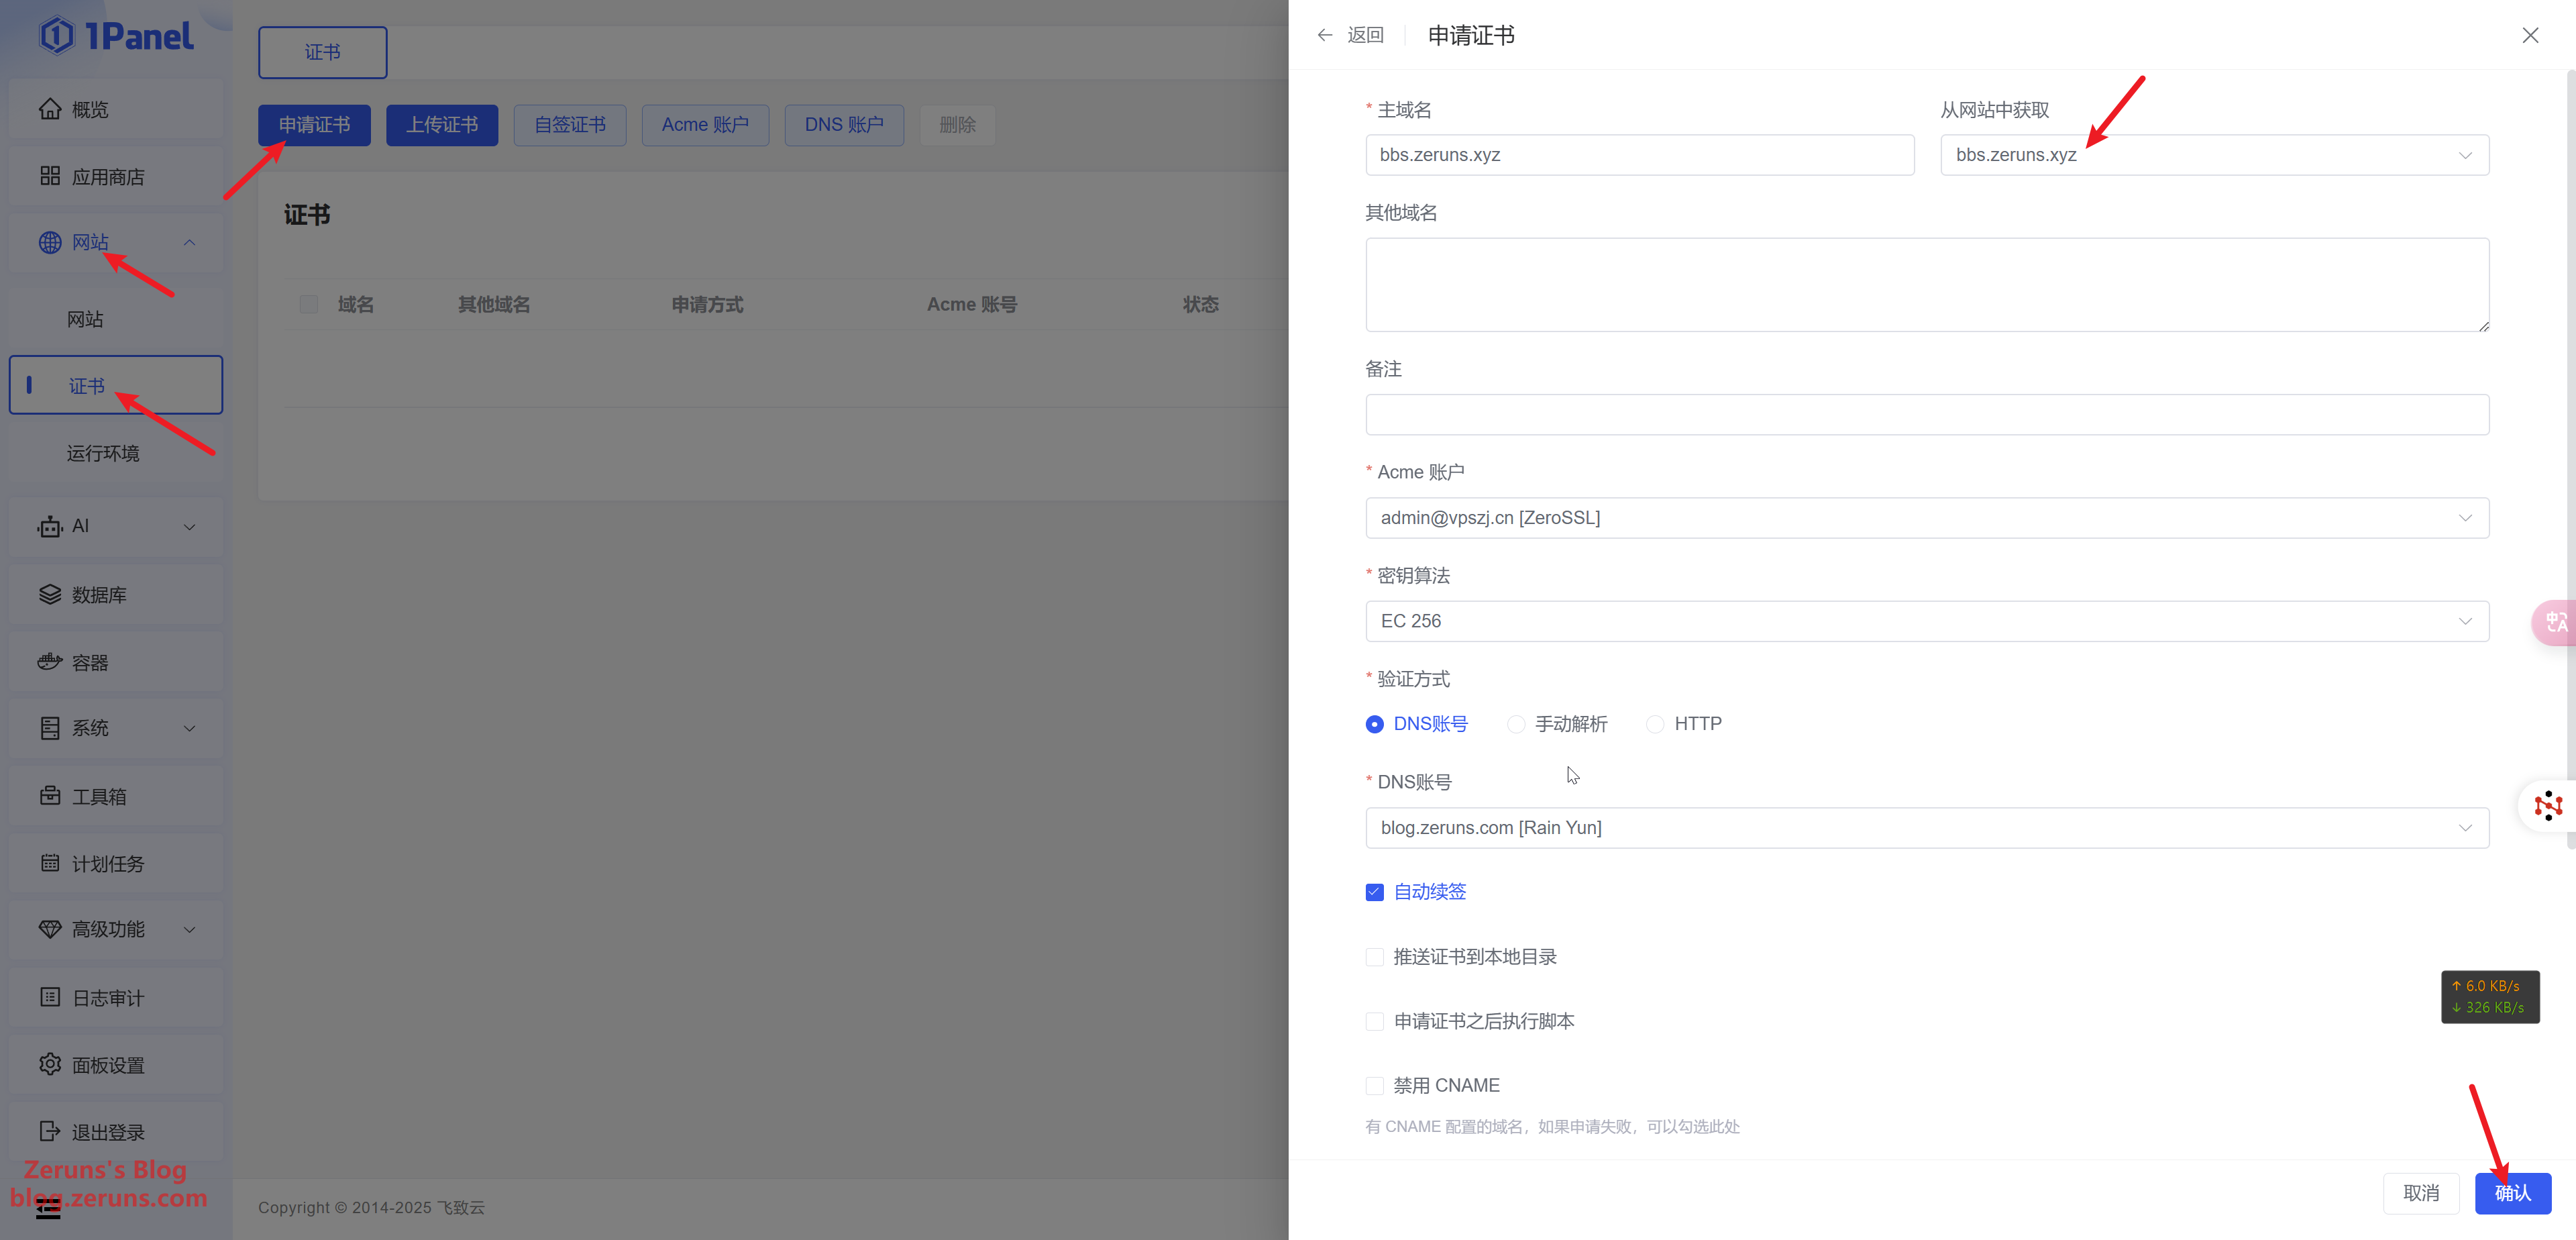
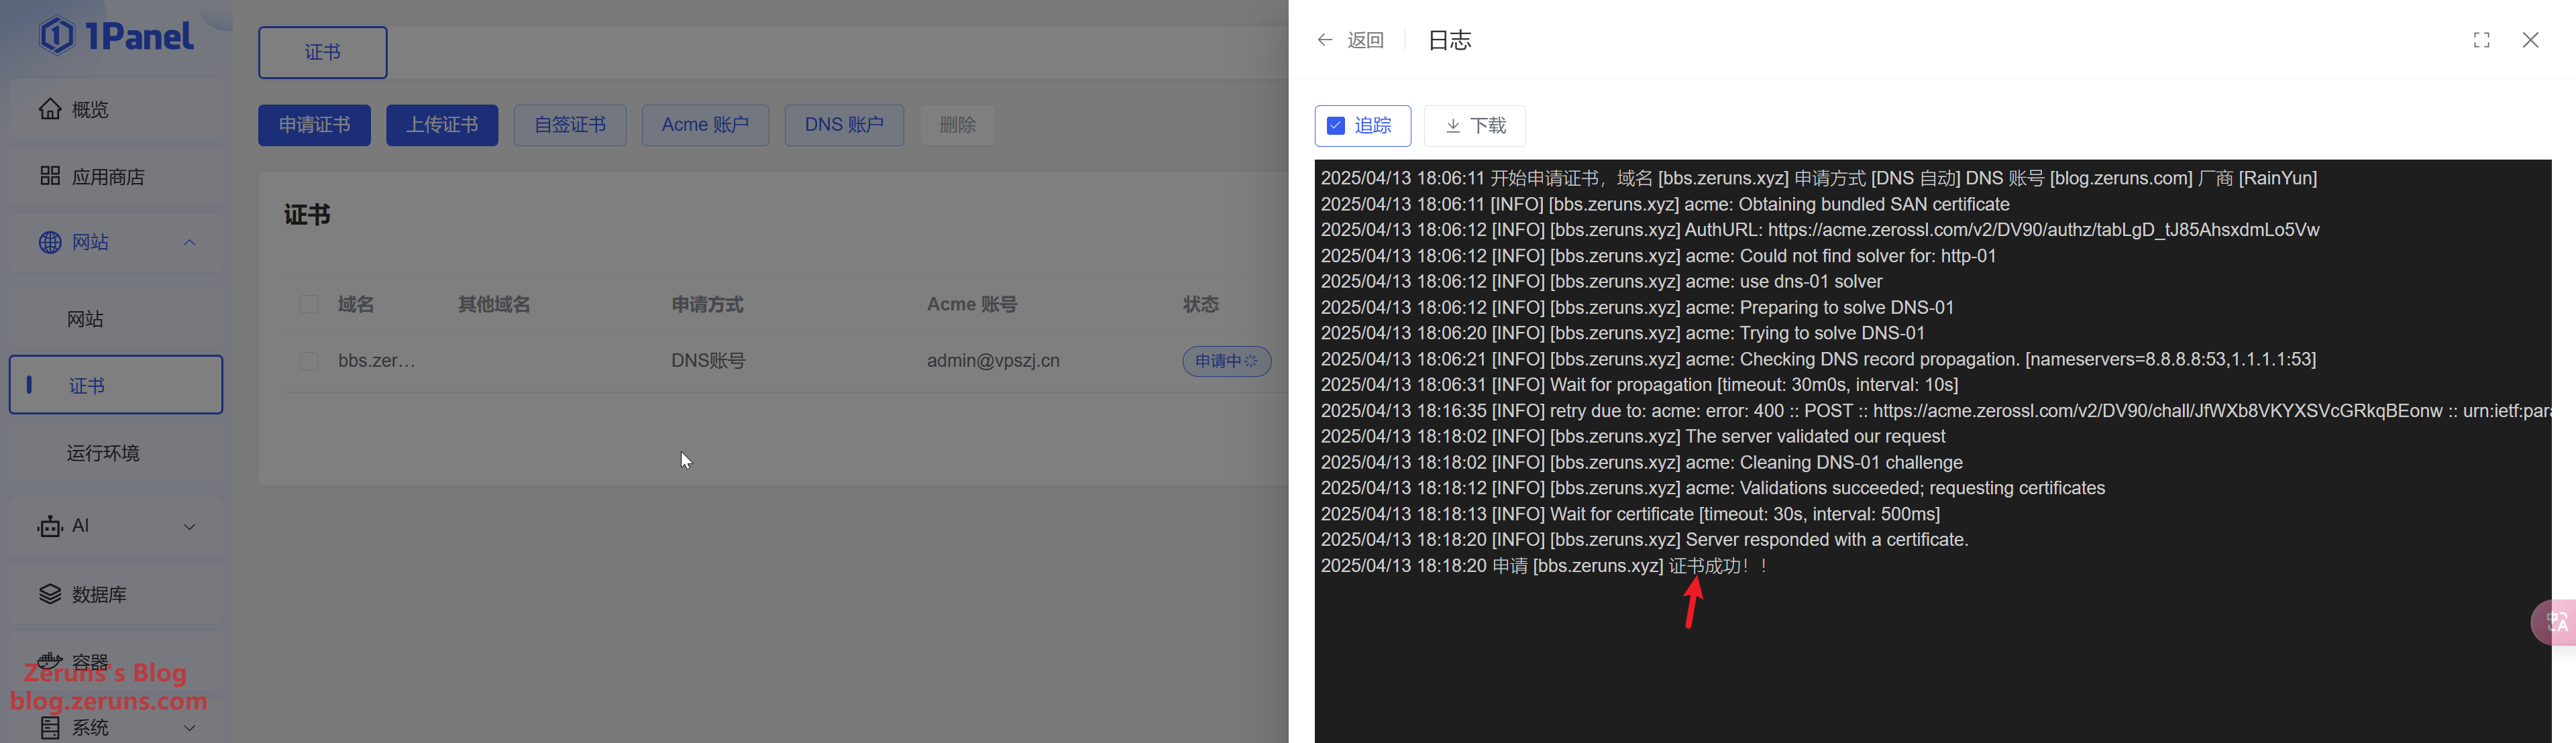
Then click Apply for Certificate, select the website you just created, and confirm. After a short wait, the certificate should be successfully issued.
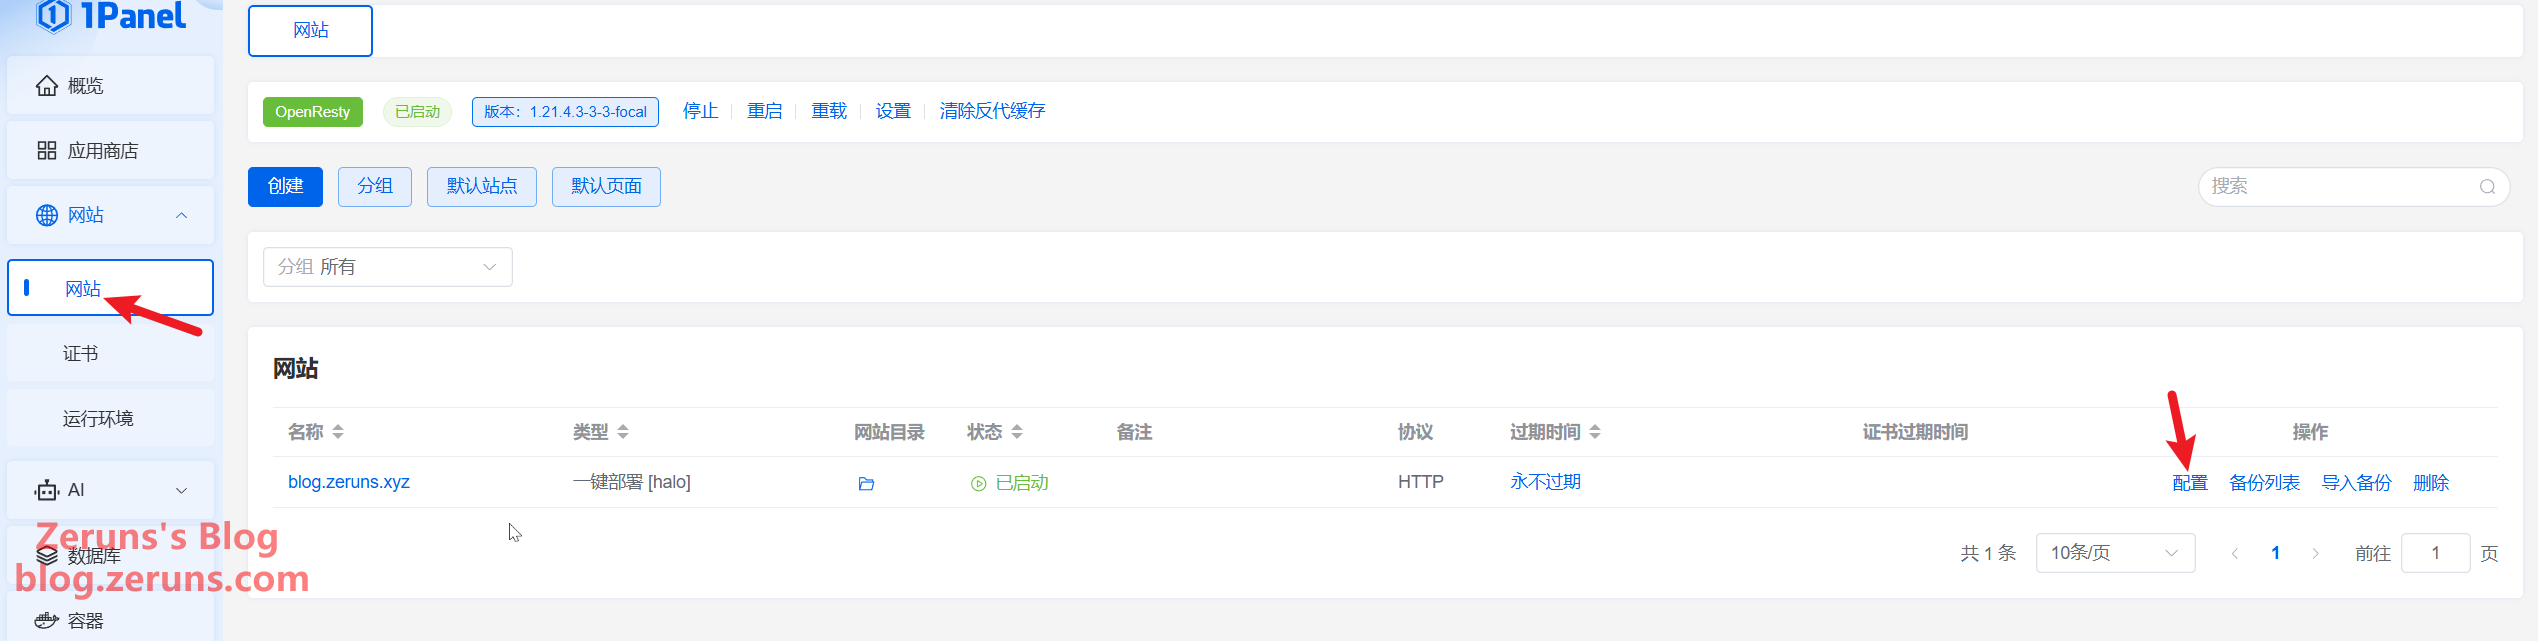
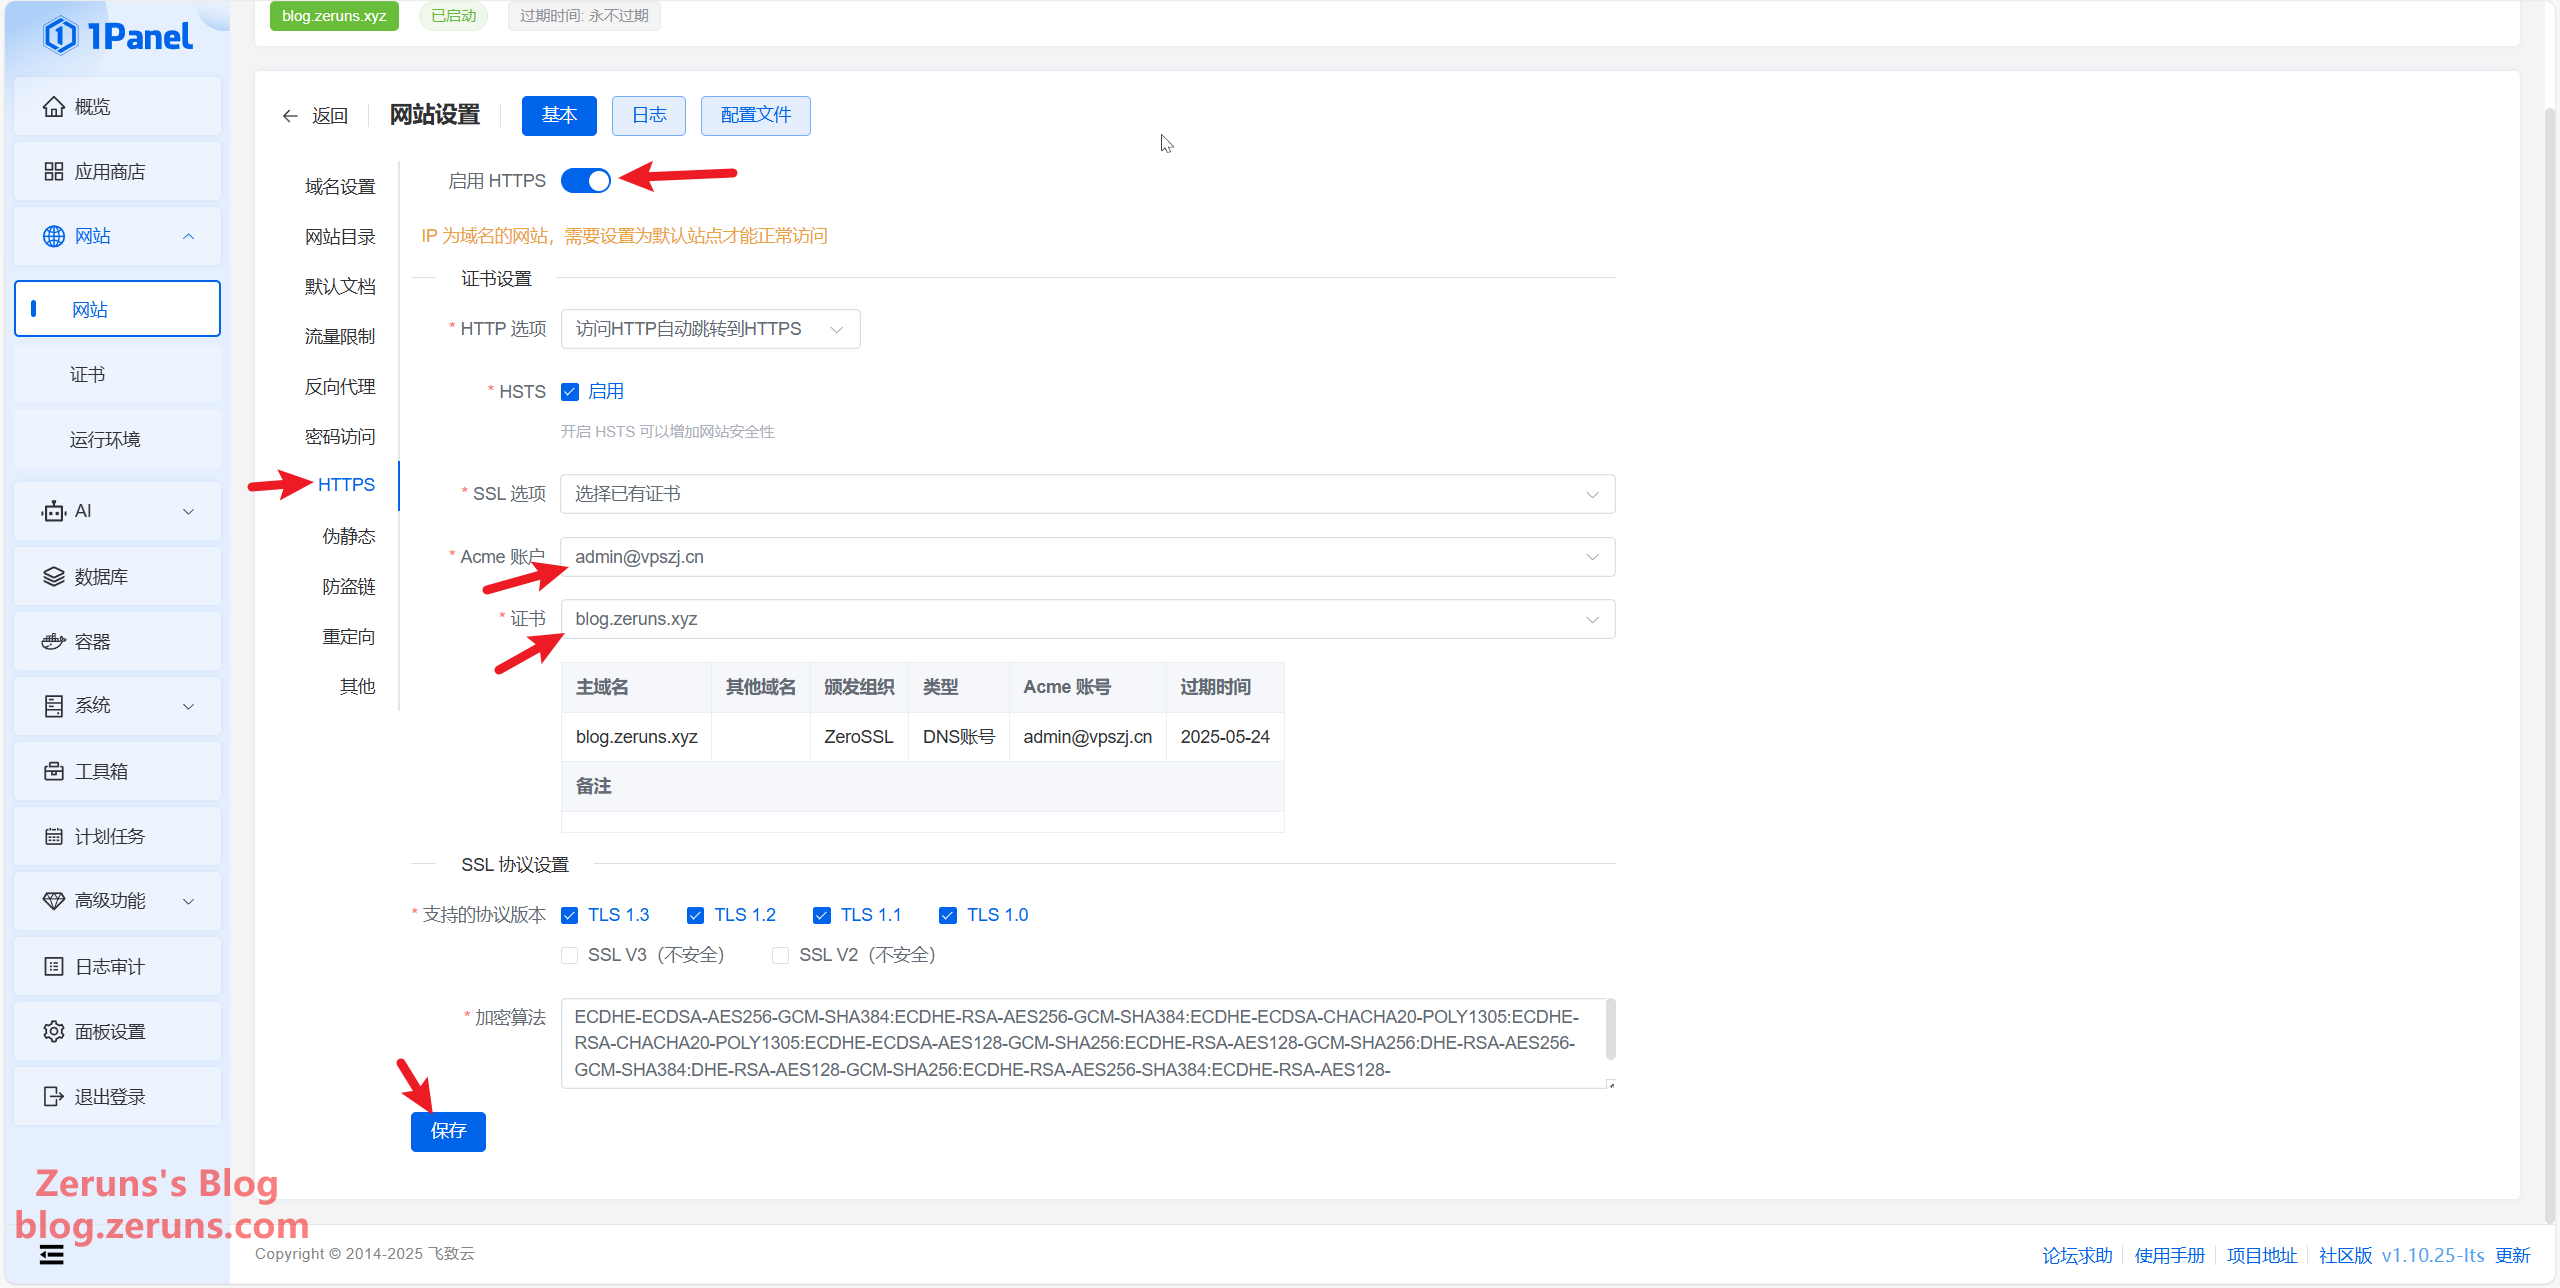
Next, click Website → Configuration → HTTPS → Enable HTTPS, select the SSL certificate you just applied for, then click Save.
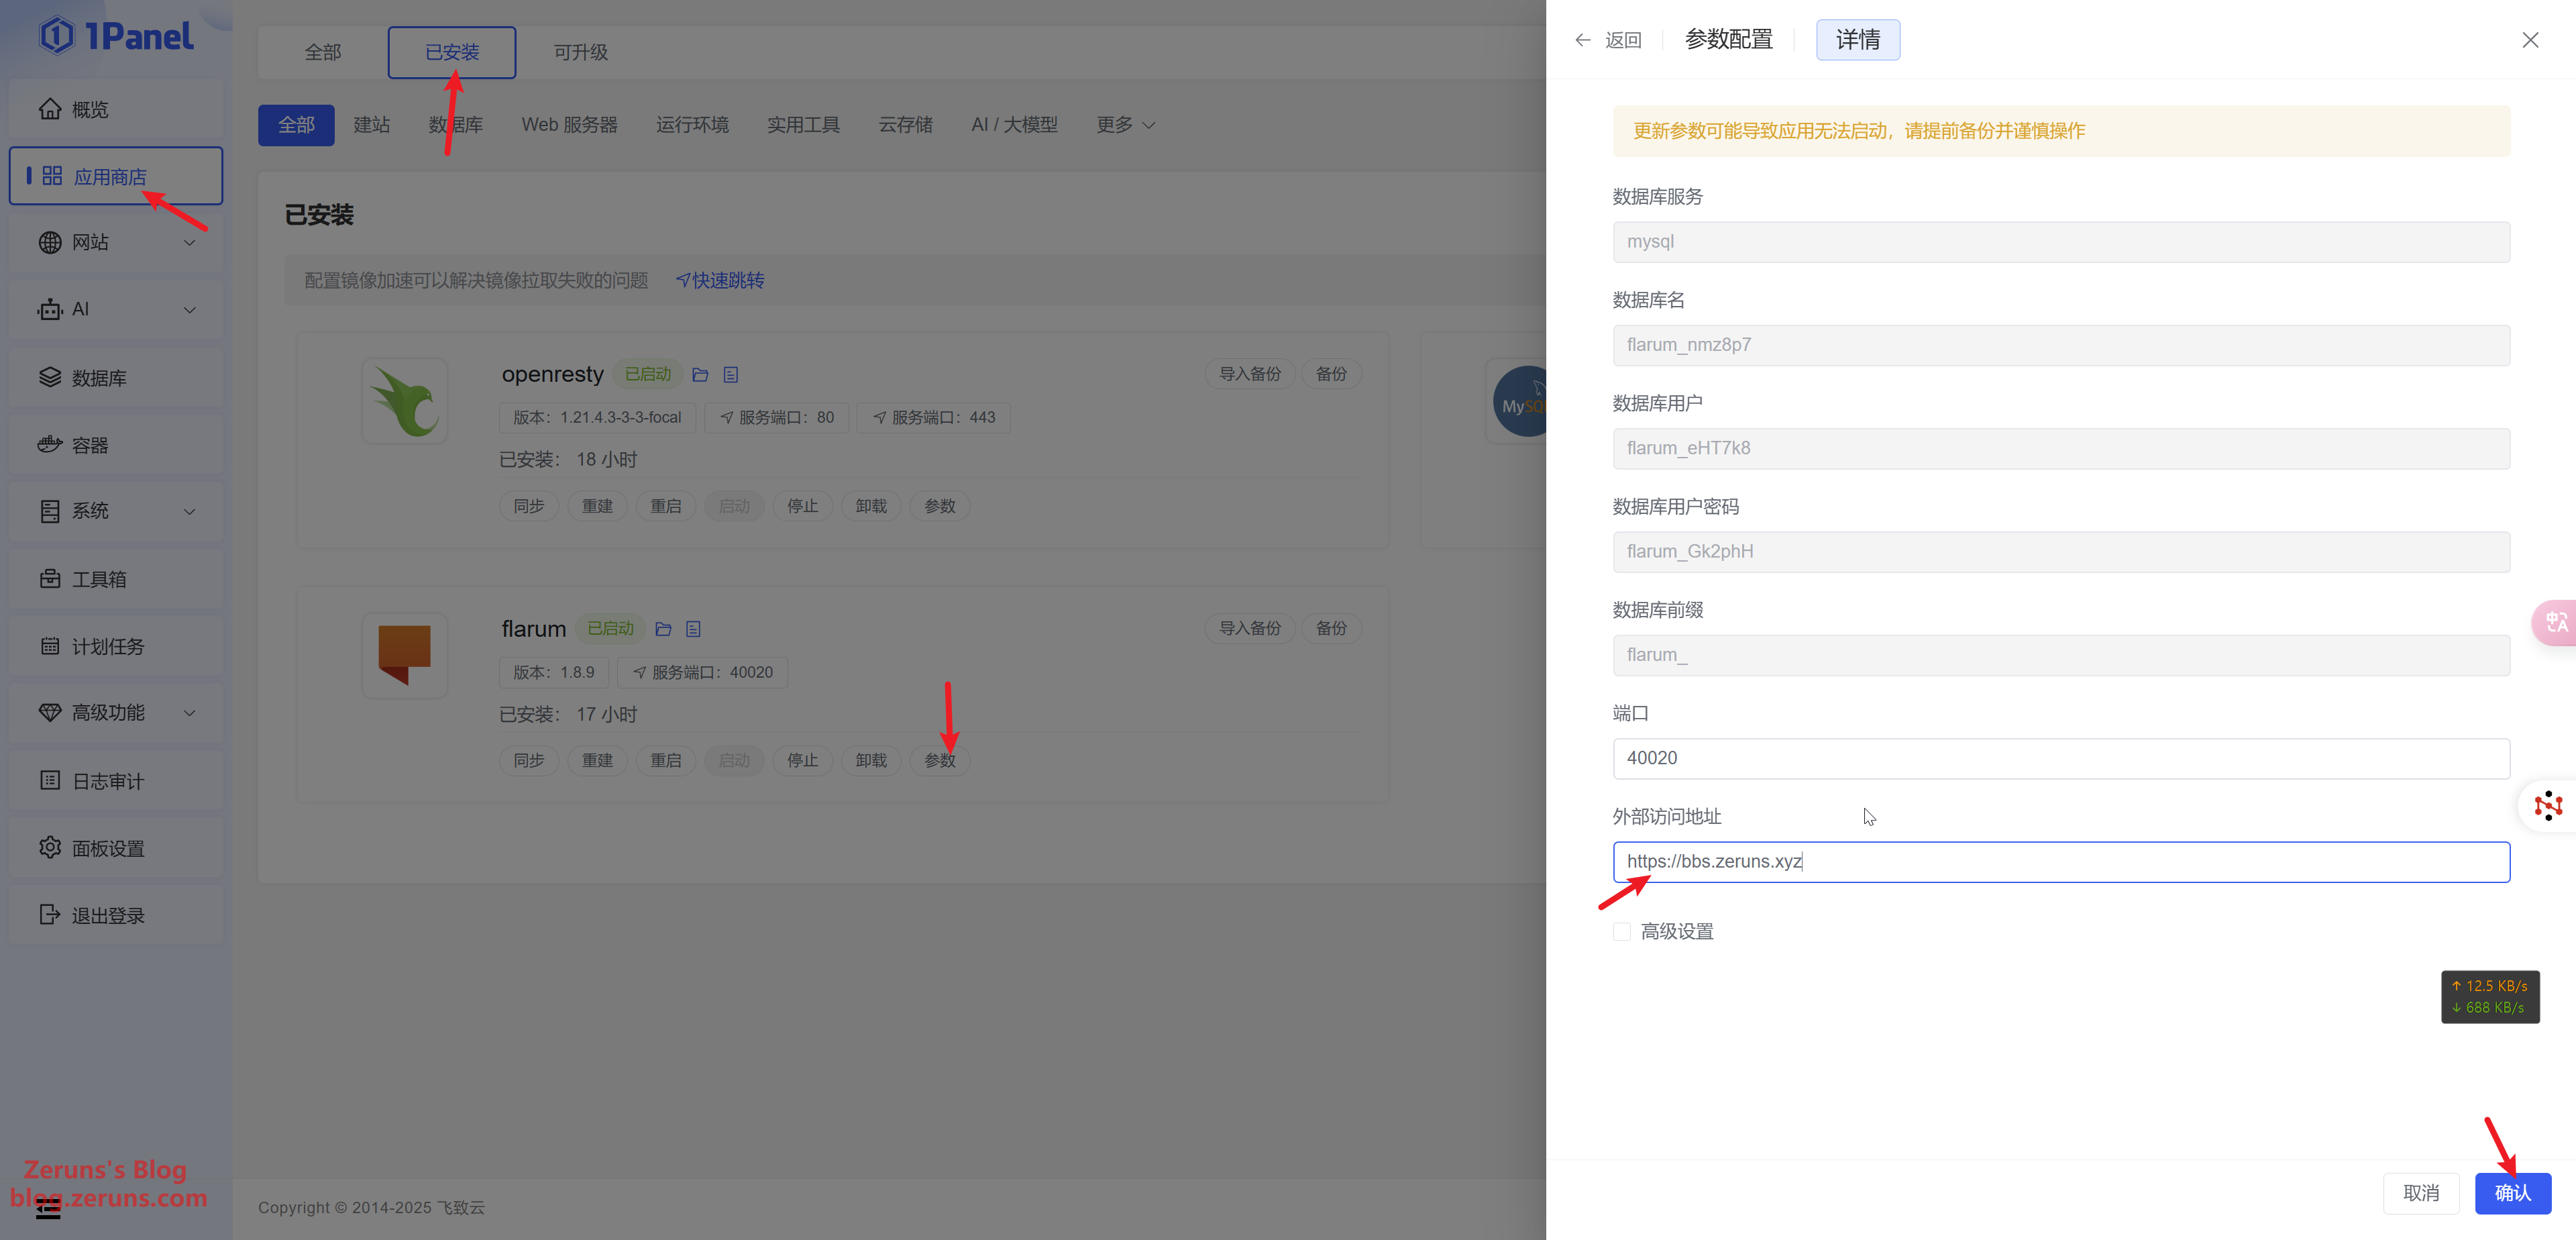
Then, go to App Store → Installed, find the flarum application, click Settings, change the external access URL from http to https, and click Confirm.
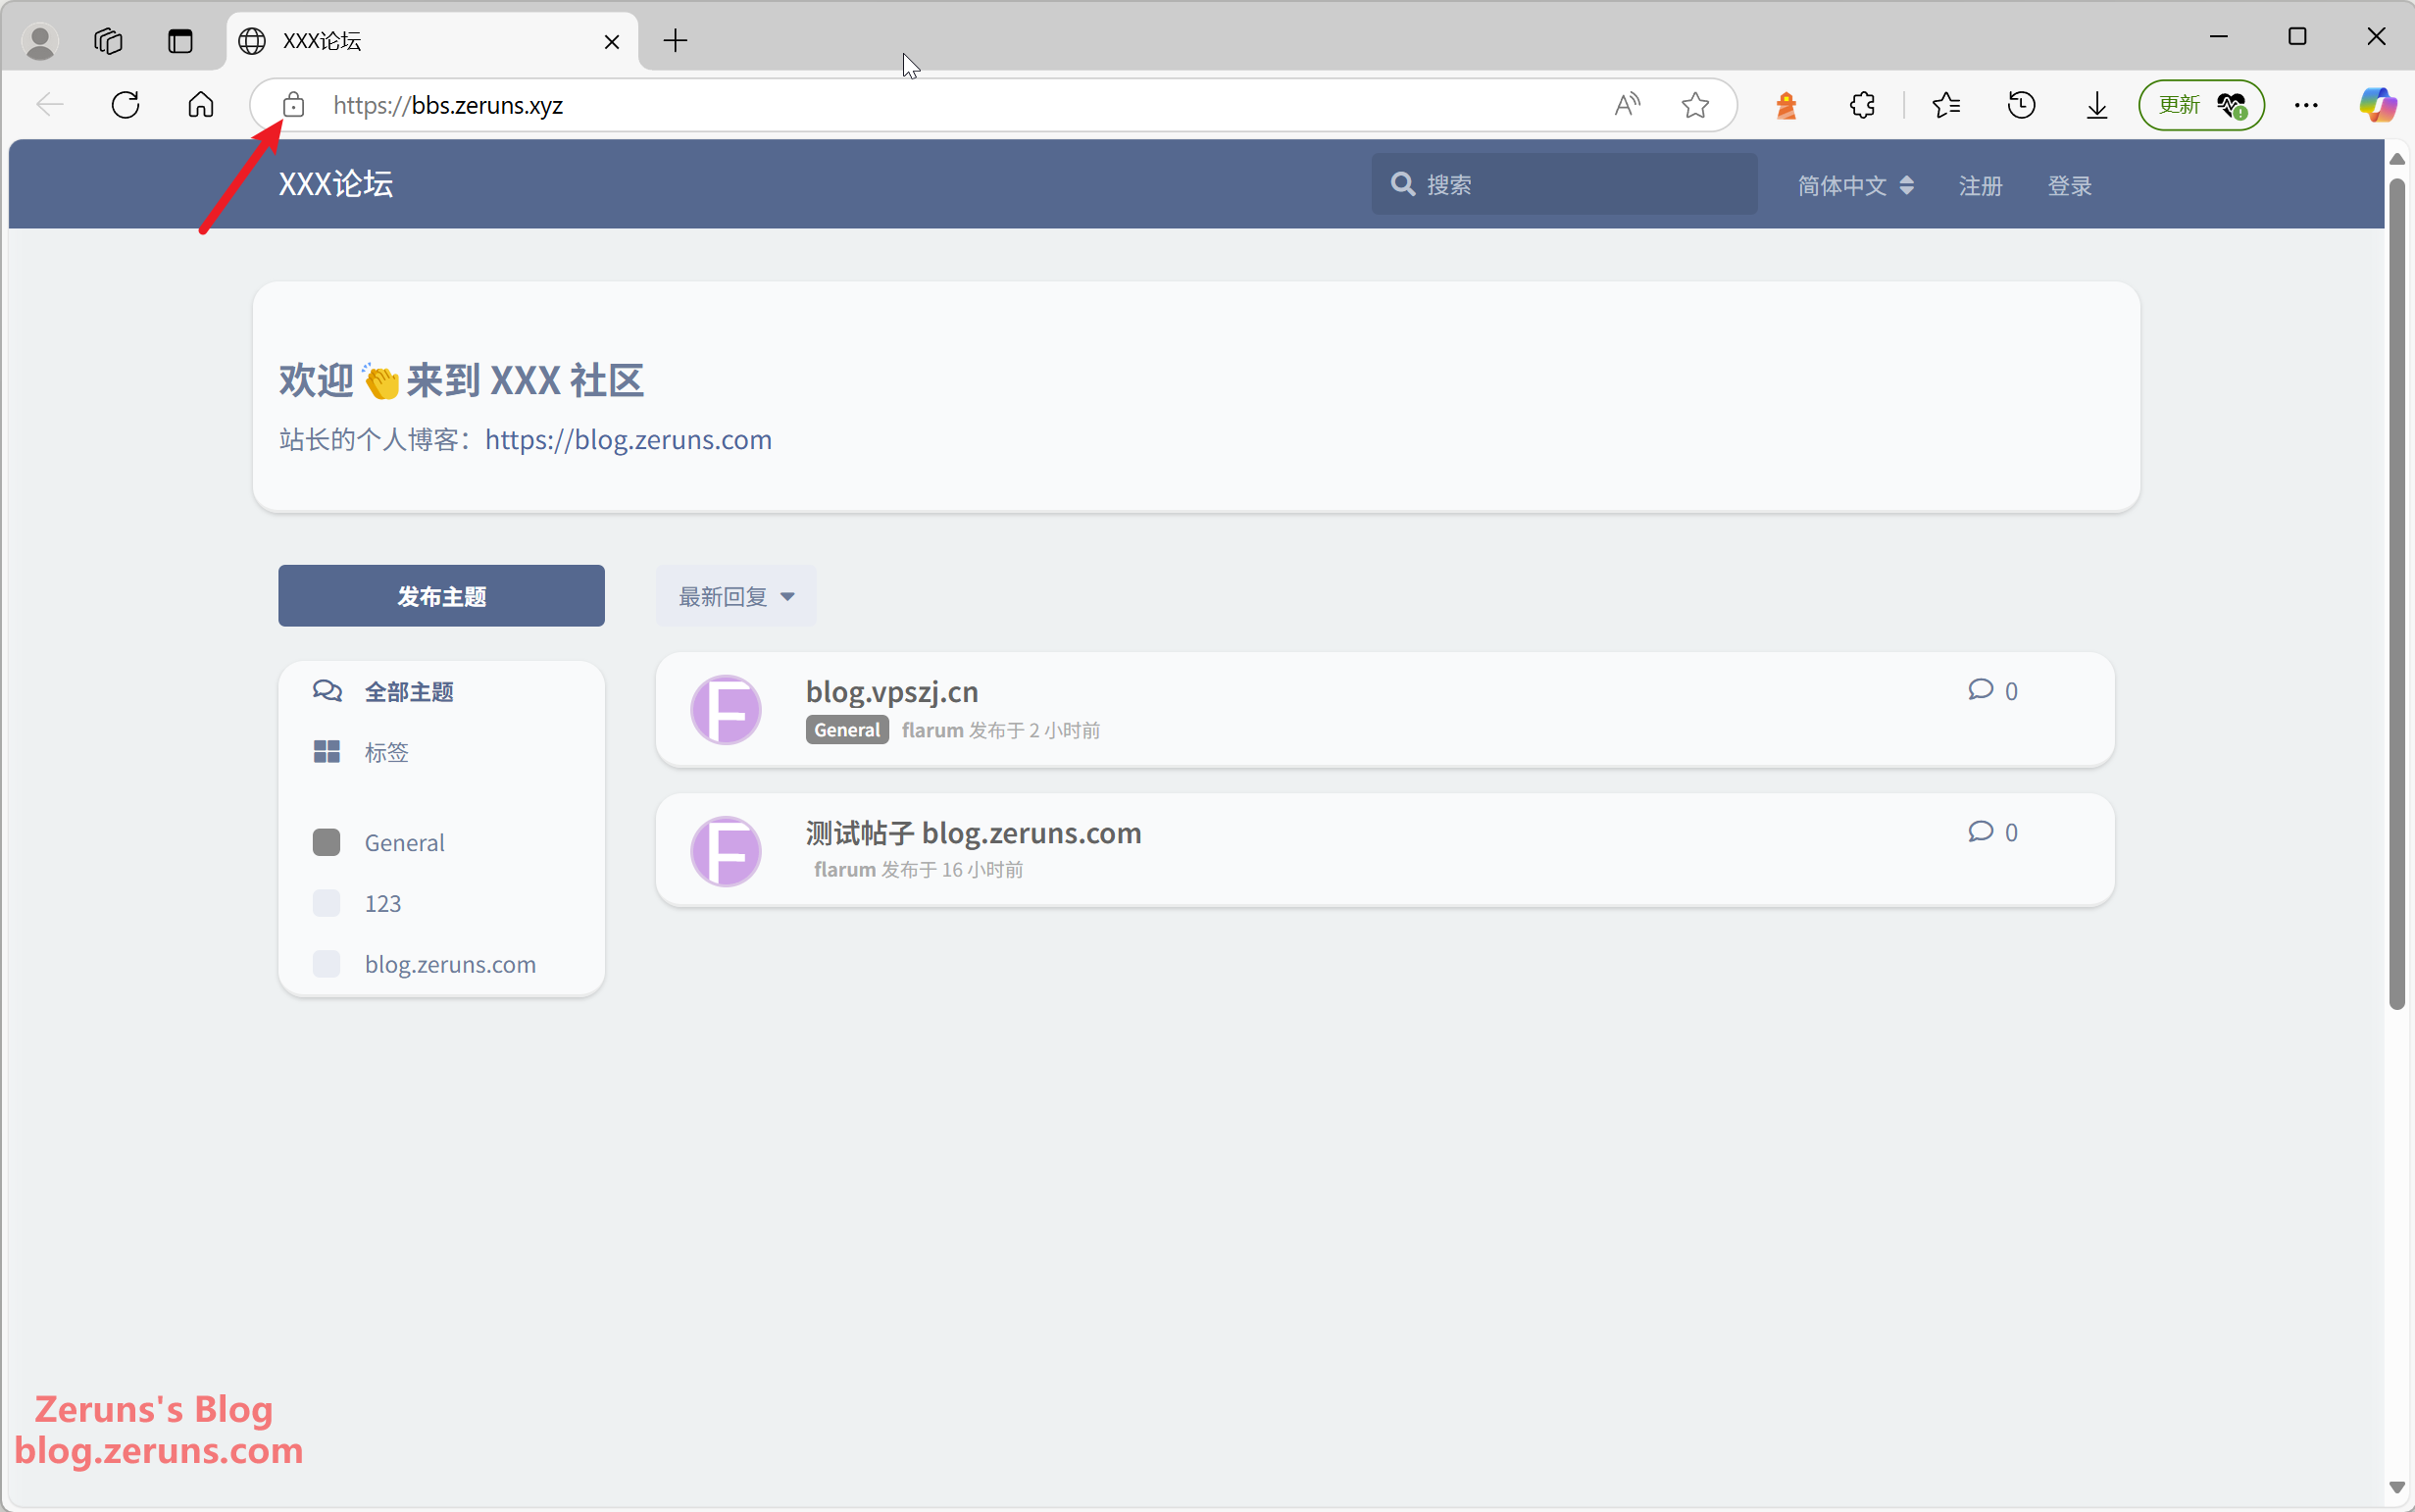
When you visit the blog website again, you will notice a small lock icon in the address bar.
This concludes the tutorial. Feel free to explore the joy of building your website further—for example, by using a CDN service to speed up site access.
Recommended Reading
- High Cost-Effectiveness and Affordable VPS/Cloud Server Recommendations: https://blog.zeruns.com/archives/383.html
- Minecraft Server Setup Tutorial: https://blog.zeruns.com/tag/mc/
- Introduction to 4 Excellent Panel Hosts for one-click deployment of various MC modpacks, Phantom Beast Parlor, 7 Days to Die, CSGO, etc.: https://blog.zeruns.com/archives/808.html
- Open-source synchronized rectifier Buck-Boost digital power supply based on STM32: https://blog.zeruns.com/archives/791.html
- Open-source 140W+65W step-up/step-down PD3.1 fast-charging module (2C+1A port), featuring IP6557+IP6538: https://blog.zeruns.com/archives/801.html
- Ultra7-265K and Gigabyte Z890M-AORUS-ELITE-WIFI7 Motherboard Unboxing and Review: https://blog.zeruns.com/archives/863.html


Comment Section