Setting Up a Email Server with Poste.io on Linux + Docker. Create your own domain-based email server using Poste.io, allowing unlimited sending and receiving of emails!
Video tutorial: https://www.youtube.com/watch?v=YK169CPffvE
Introduction
What is a Domain Email?
A domain email refers to an email service that uses your own domain as the email address. This type of email (e.g., [email protected]) not only enhances the brand recognition of individuals or businesses but also projects a more professional and formal image. Compared to common free email services, domain emails offer more customization options and security features, making them ideal for business environments.
About Poste.io
Poste.io is an open-source email server solution that provides a simple yet powerful mail server environment for individual users, small businesses, or organizations. Poste.io's goal is to offer an email solution that is easy to install, configure, and manage, while minimizing complexity.
Here are some of the main features and functions of Poste.io:
- Easy Installation and Configuration: Poste.io offers a streamlined installation and configuration process that allows users to quickly set up and launch their mail server.
- Web User Interface: It provides an intuitive web user interface, allowing users to easily manage the mail server, create and manage mail accounts, set up domains, and more.
- Email Features: Poste.io supports standard email functions, including sending and receiving emails, mailbox management, email search, auto-forwarding, auto-reply, etc.
- Security: Poste.io uses various security measures to protect your emails and server, including encrypted communication, anti-spam filters, antivirus scanning, and more.
- Email Filtering and Rules: You can set up email filters and rules to automatically process emails based on custom conditions, such as categorizing specific types of emails into designated folders.
- Multi-Domain Support: Poste.io allows you to manage multiple domains and related mail accounts, making it easy to create and manage independent email addresses for different organizations or teams.
Website admin group: 767557452
Domain Registration
What is a Domain?
A domain can be understood as the "house number" or "address" on the internet. Each website has a unique address on the internet, known as a domain. For example, commonly visited domains like "baidu.com" or "blog.zeruns.tech" are all domain names. They consist of a string of characters, usually including letters, numbers, and hyphens ("-"), and are divided into parts by periods (".”). The purpose of a domain is to make it easier for people to access and remember websites without needing to memorize complex IP addresses. Domains also have commercial value and can serve as a brand identity or a marker for businesses and individuals on the internet.
Domain Registration
You can register a domain through platforms like Tencent Cloud, Alibaba Cloud, and Rainyun.
- Tencent Cloud Discount Registration: https://curl.qcloud.com/rbDL8jYd
- Alibaba Cloud Discount Registration: https://www.aliyun.com/minisite/goods?userCode=jdjc69nf
- Rainyun Discount Registration: https://www.rainyun.com/zeruns_?s=blog-en
Let's take Rainyun as an example and register the domain zeruns.top.
In the cloud products section, find the domain service.

Click "Domain Registration" and search for the domain you want to register.
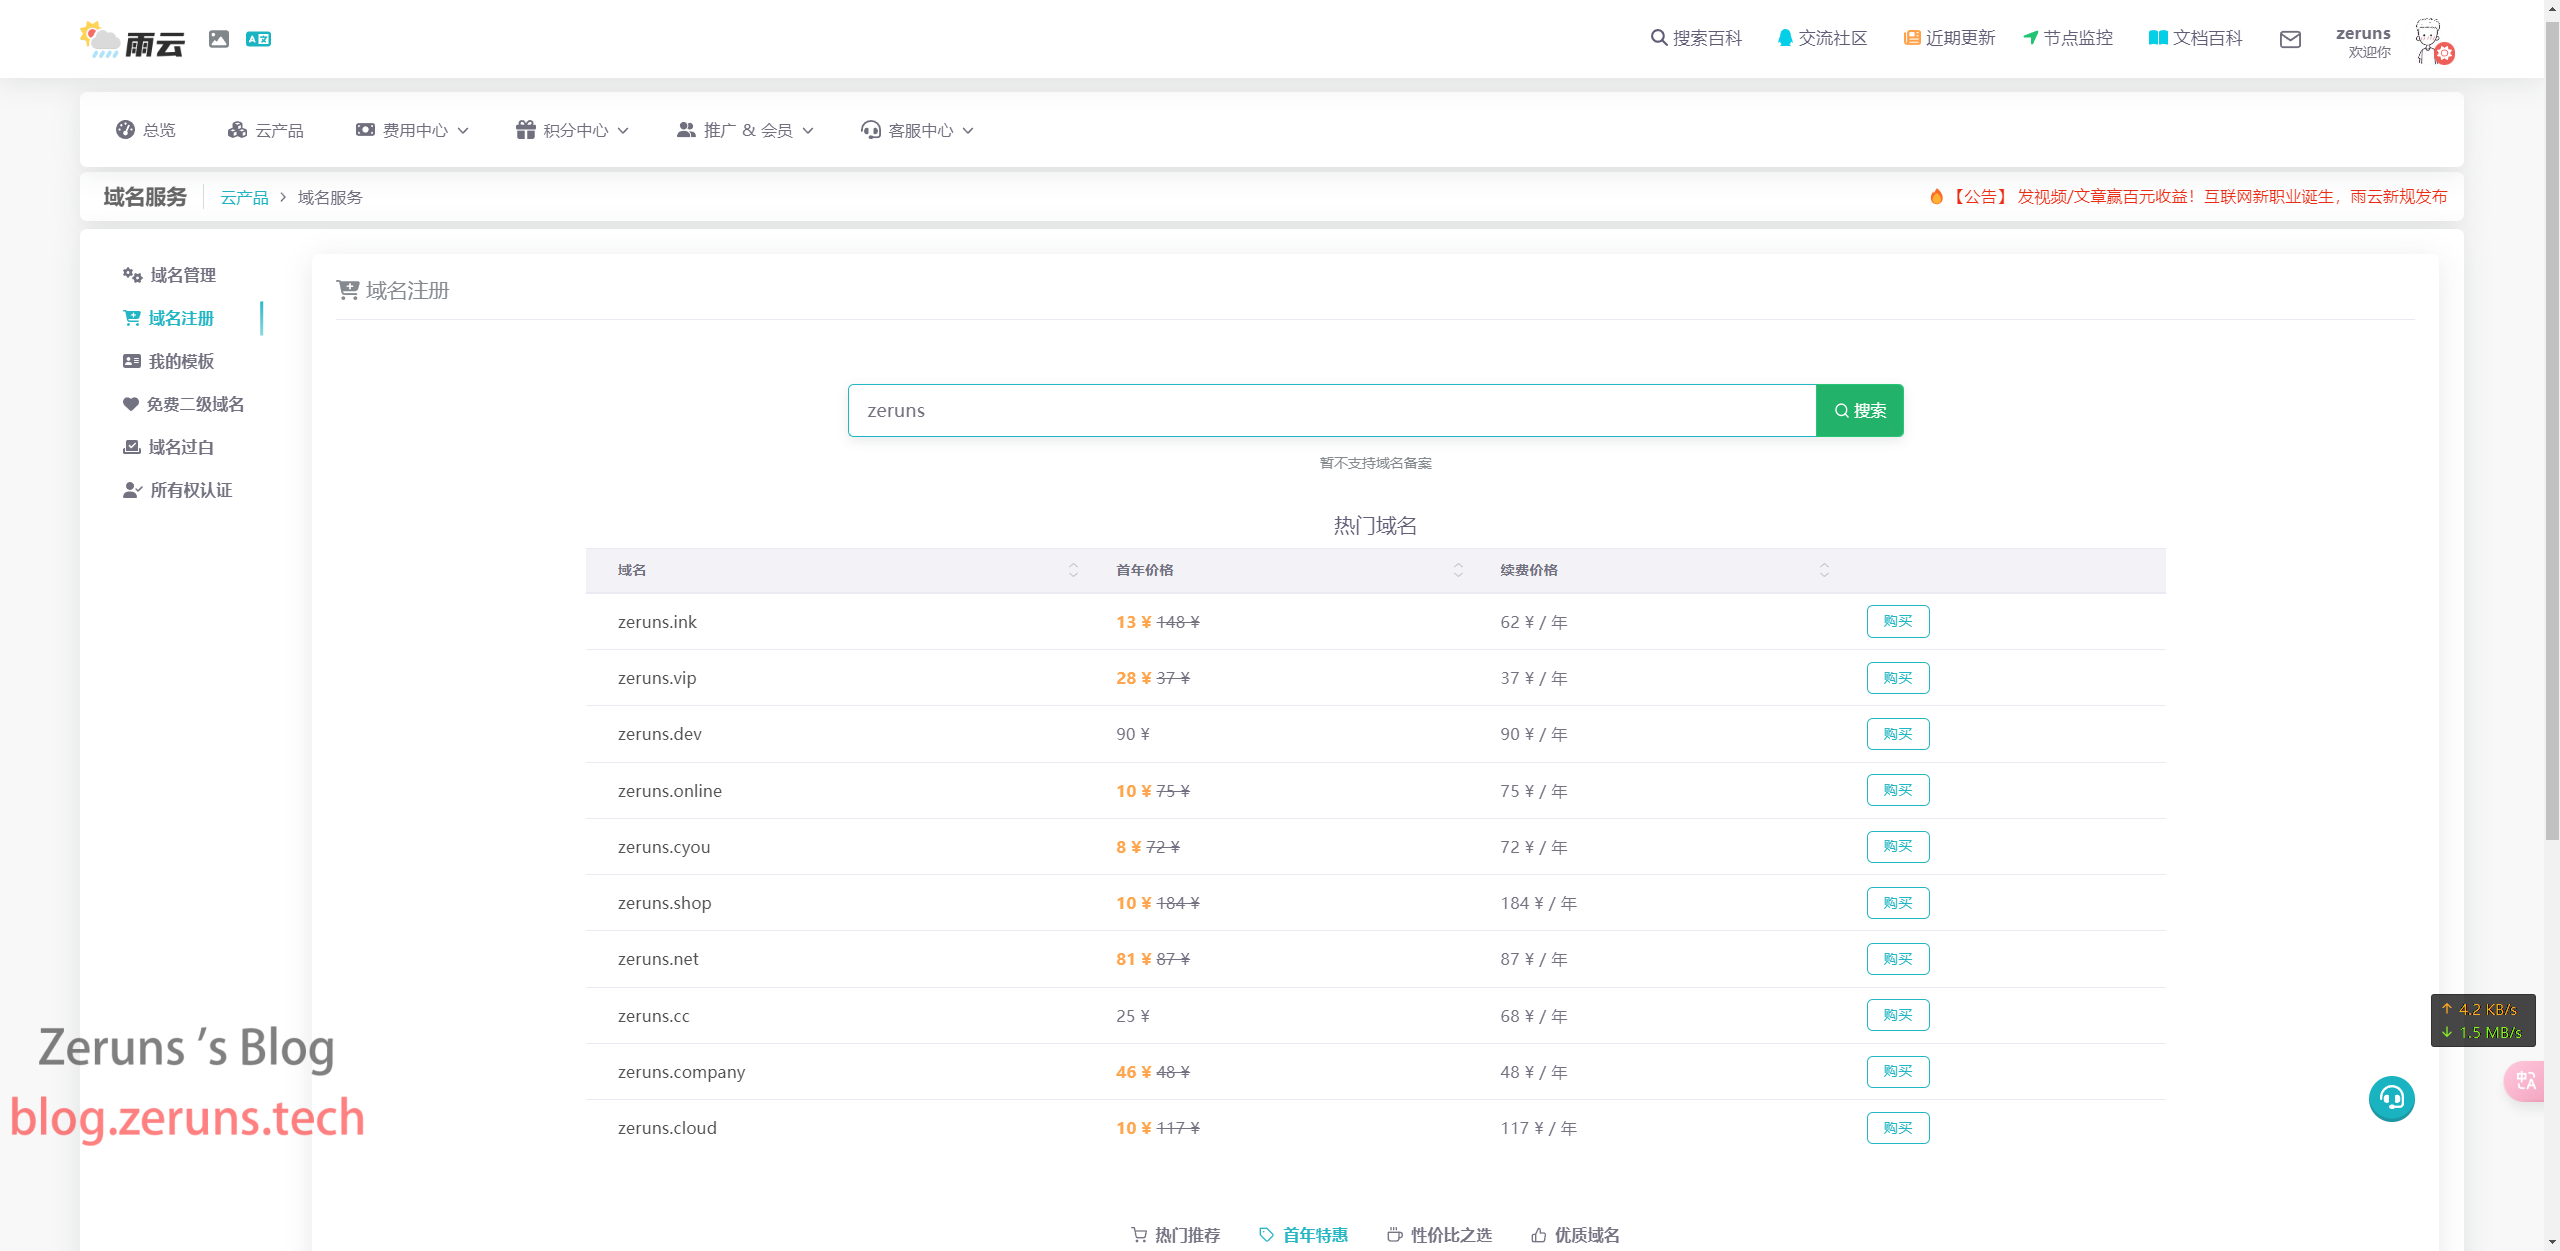
Enter the required information as prompted.

After filling in the information, click "Register Now", and then wait for the review process to complete.

If you're using a domestic server, you'll also need to complete the domain filing process.
The filing process will not be covered in detail here; you can look it up on your own.
Reminder: Purchasing a 3-month plan from Tencent Cloud or Alibaba Cloud offers free domain filing services. Rainyun's Hubei or Ningbo cloud servers also provide free domain filing services.
Preparation
Important Note: Before deploying your own email server, make sure that port 25 is open on your server, with both inbound and outbound connections allowed. Some domestic server providers or data centers block port 25, so you may need to submit a support ticket or contact customer service to inquire whether port 25 is open or if you can request its opening!
In addition to port 25, this email server also requires ports 80 and 443 for web services. Therefore, you cannot install web server software directly. If both are required, you need to set up port forwarding in Docker to map the email server's 80 and 443 ports to other ports and then use reverse proxies. This setup can be quite complex, so if you're unfamiliar with this, it’s better to run the email server on its own separate server.
If the domain you're using has not been filed (备案), you can only use overseas servers. If you need relatively lower latency, you can choose servers in Hong Kong.
Here, I recommend Rainyun's Hubei Shiyan cloud server and Haoliang Cloud's Ningbo cloud server. Both of these I’ve tested and confirmed do not block port 25.
- Rainyun Hubei Shiyan 8272CL high-defense high-performance cloud server review: https://blog.vpszj.cn/archives/2084.html
- Beishao Cloud Henan 8272CL cloud server performance review: https://blog.vpszj.cn/archives/2150.html
- Haoliang Cloud Ningbo E5-2667v4 cloud server performance review: https://blog.zeruns.tech/archives/821.html
- Yecao Cloud Hong Kong BGP large bandwidth VPS review: https://blog.vpszj.cn/archives/2211.html
- Other cost-effective server recommendations: https://blog.vpszj.cn/archives/41.html
For the following tutorial, I’ll demonstrate using Haoliang Cloud's Ningbo cloud server. First, register an account:
Haoliang Cloud discount registration link: https://www.haoliangyun.com/?source=blog-en&aff=zeruns
Invitation Code: zeruns (the link gives a 50% discount for the first month and an 80% coupon)
Rainyun discount registration link: https://www.rainyun.com/zeruns_?s=blog-en
Discount code: zeruns (the link gives a 50% discount for the first month)
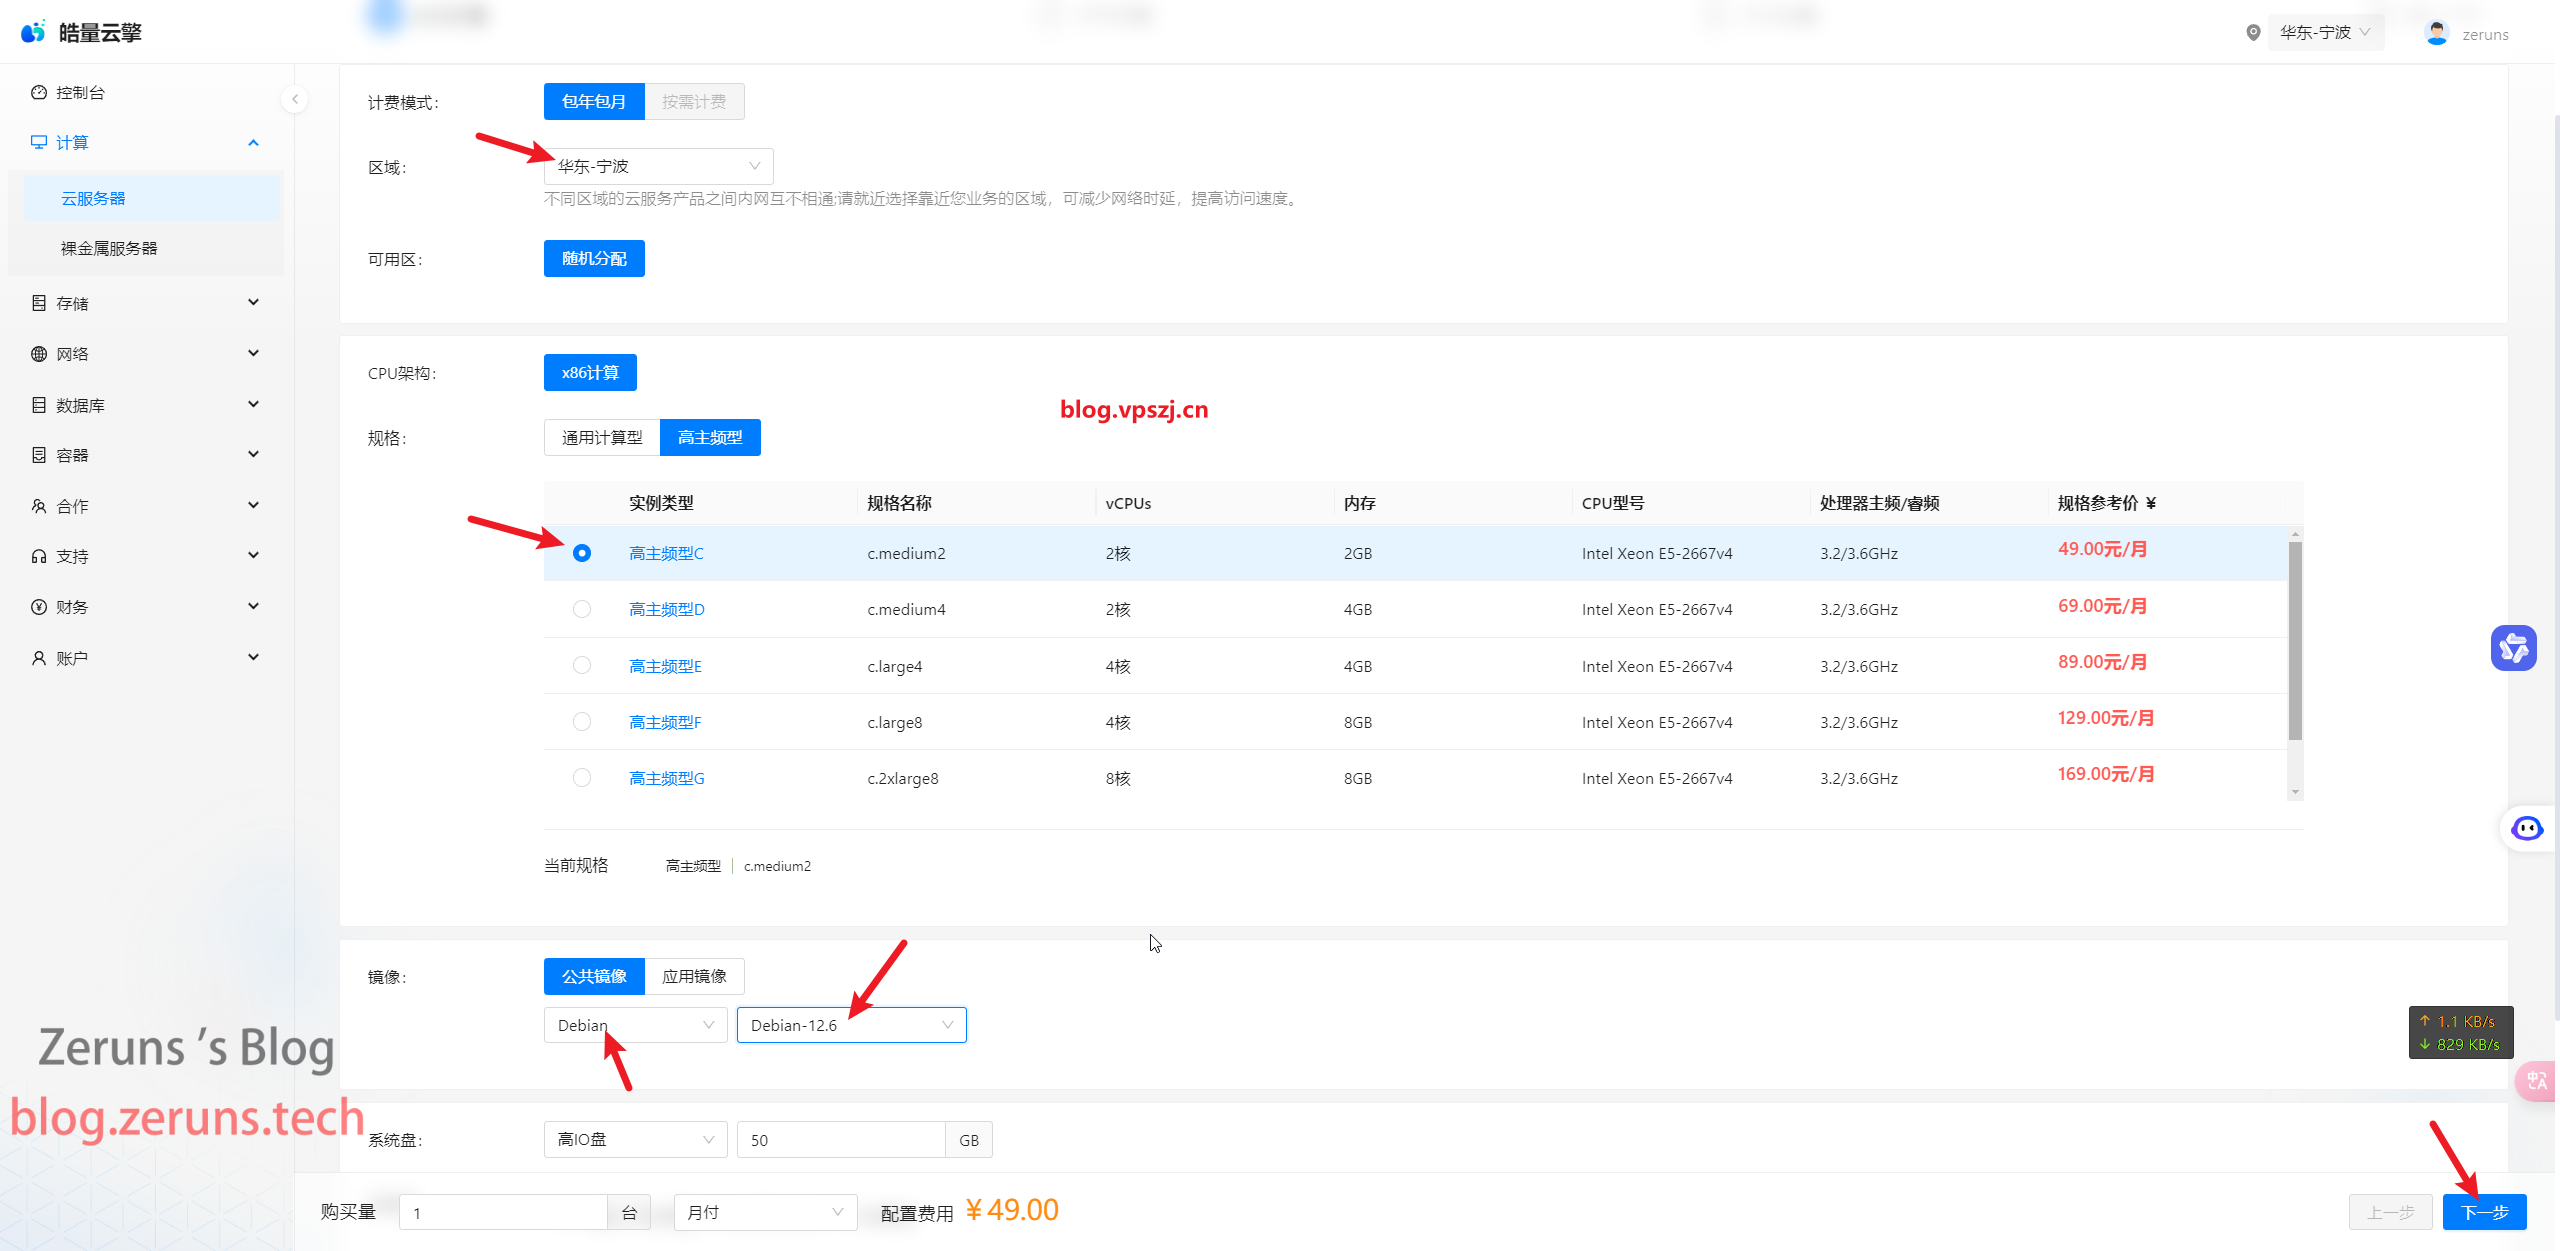
After registering, click Compute → Cloud Server → Buy Cloud Server

Select East China - Ningbo as the region, and for configuration, the 2-core 2GB option should be sufficient (for businesses with high email volume or workloads, it’s recommended to choose a higher configuration, and a larger disk is also preferable). For the system image, choose Debian12 and click Next.
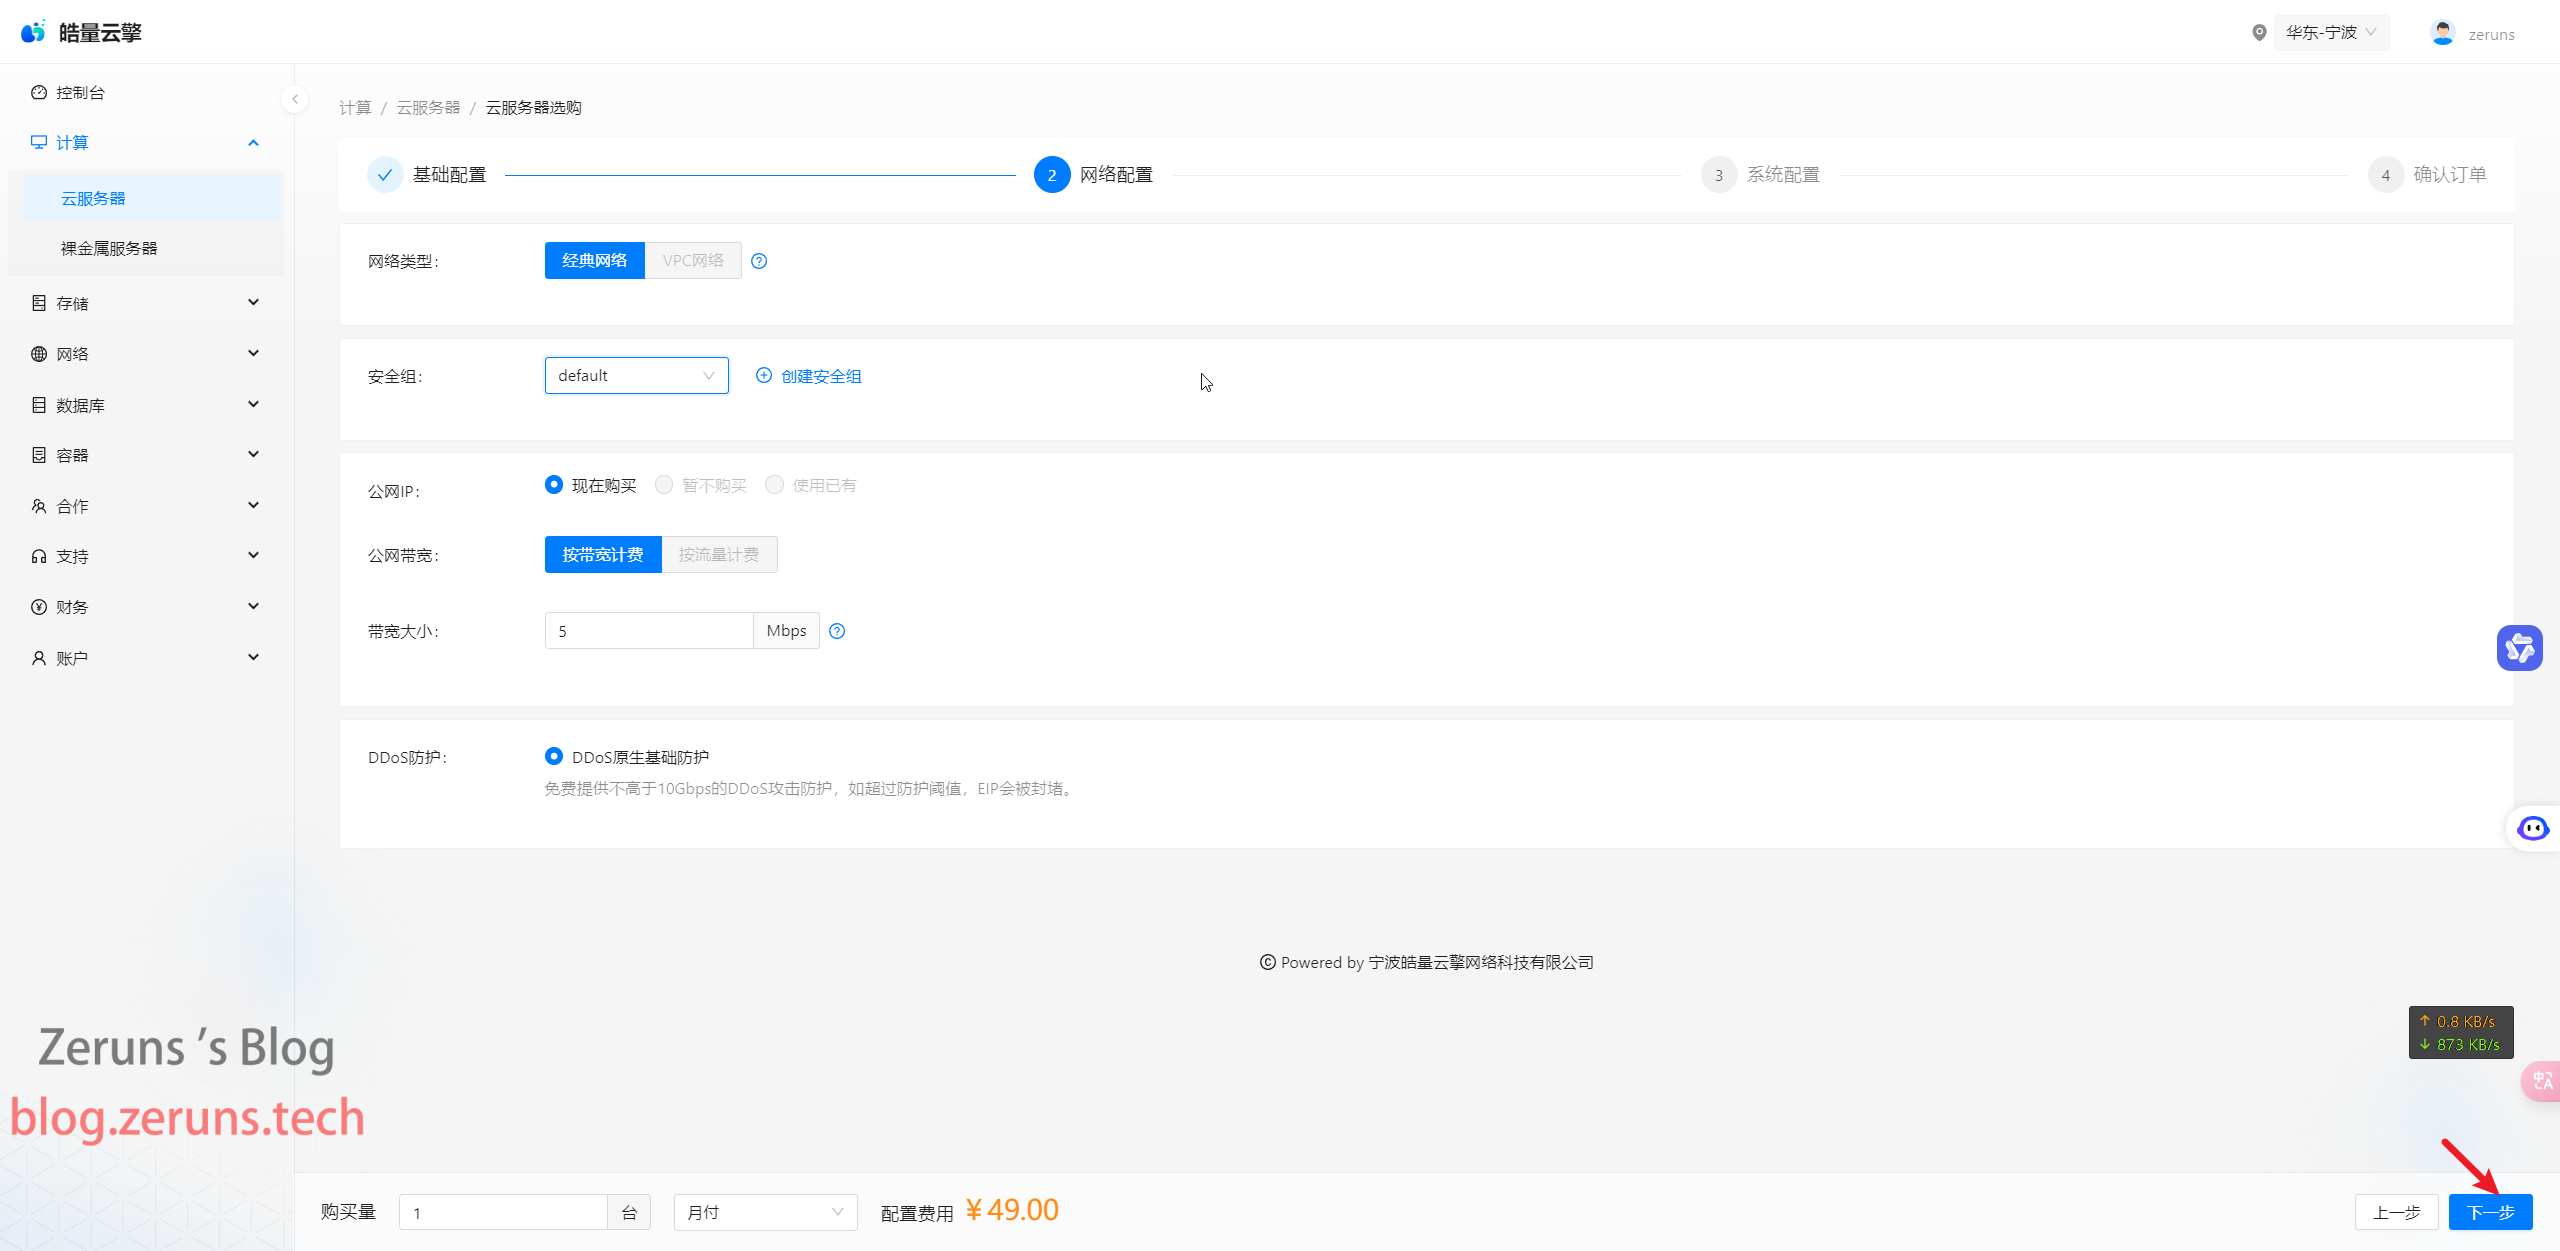
Choose the bandwidth; the default 5Mbps should be fine (for businesses with high email volume or traffic, it’s recommended to select higher bandwidth), then click Next.
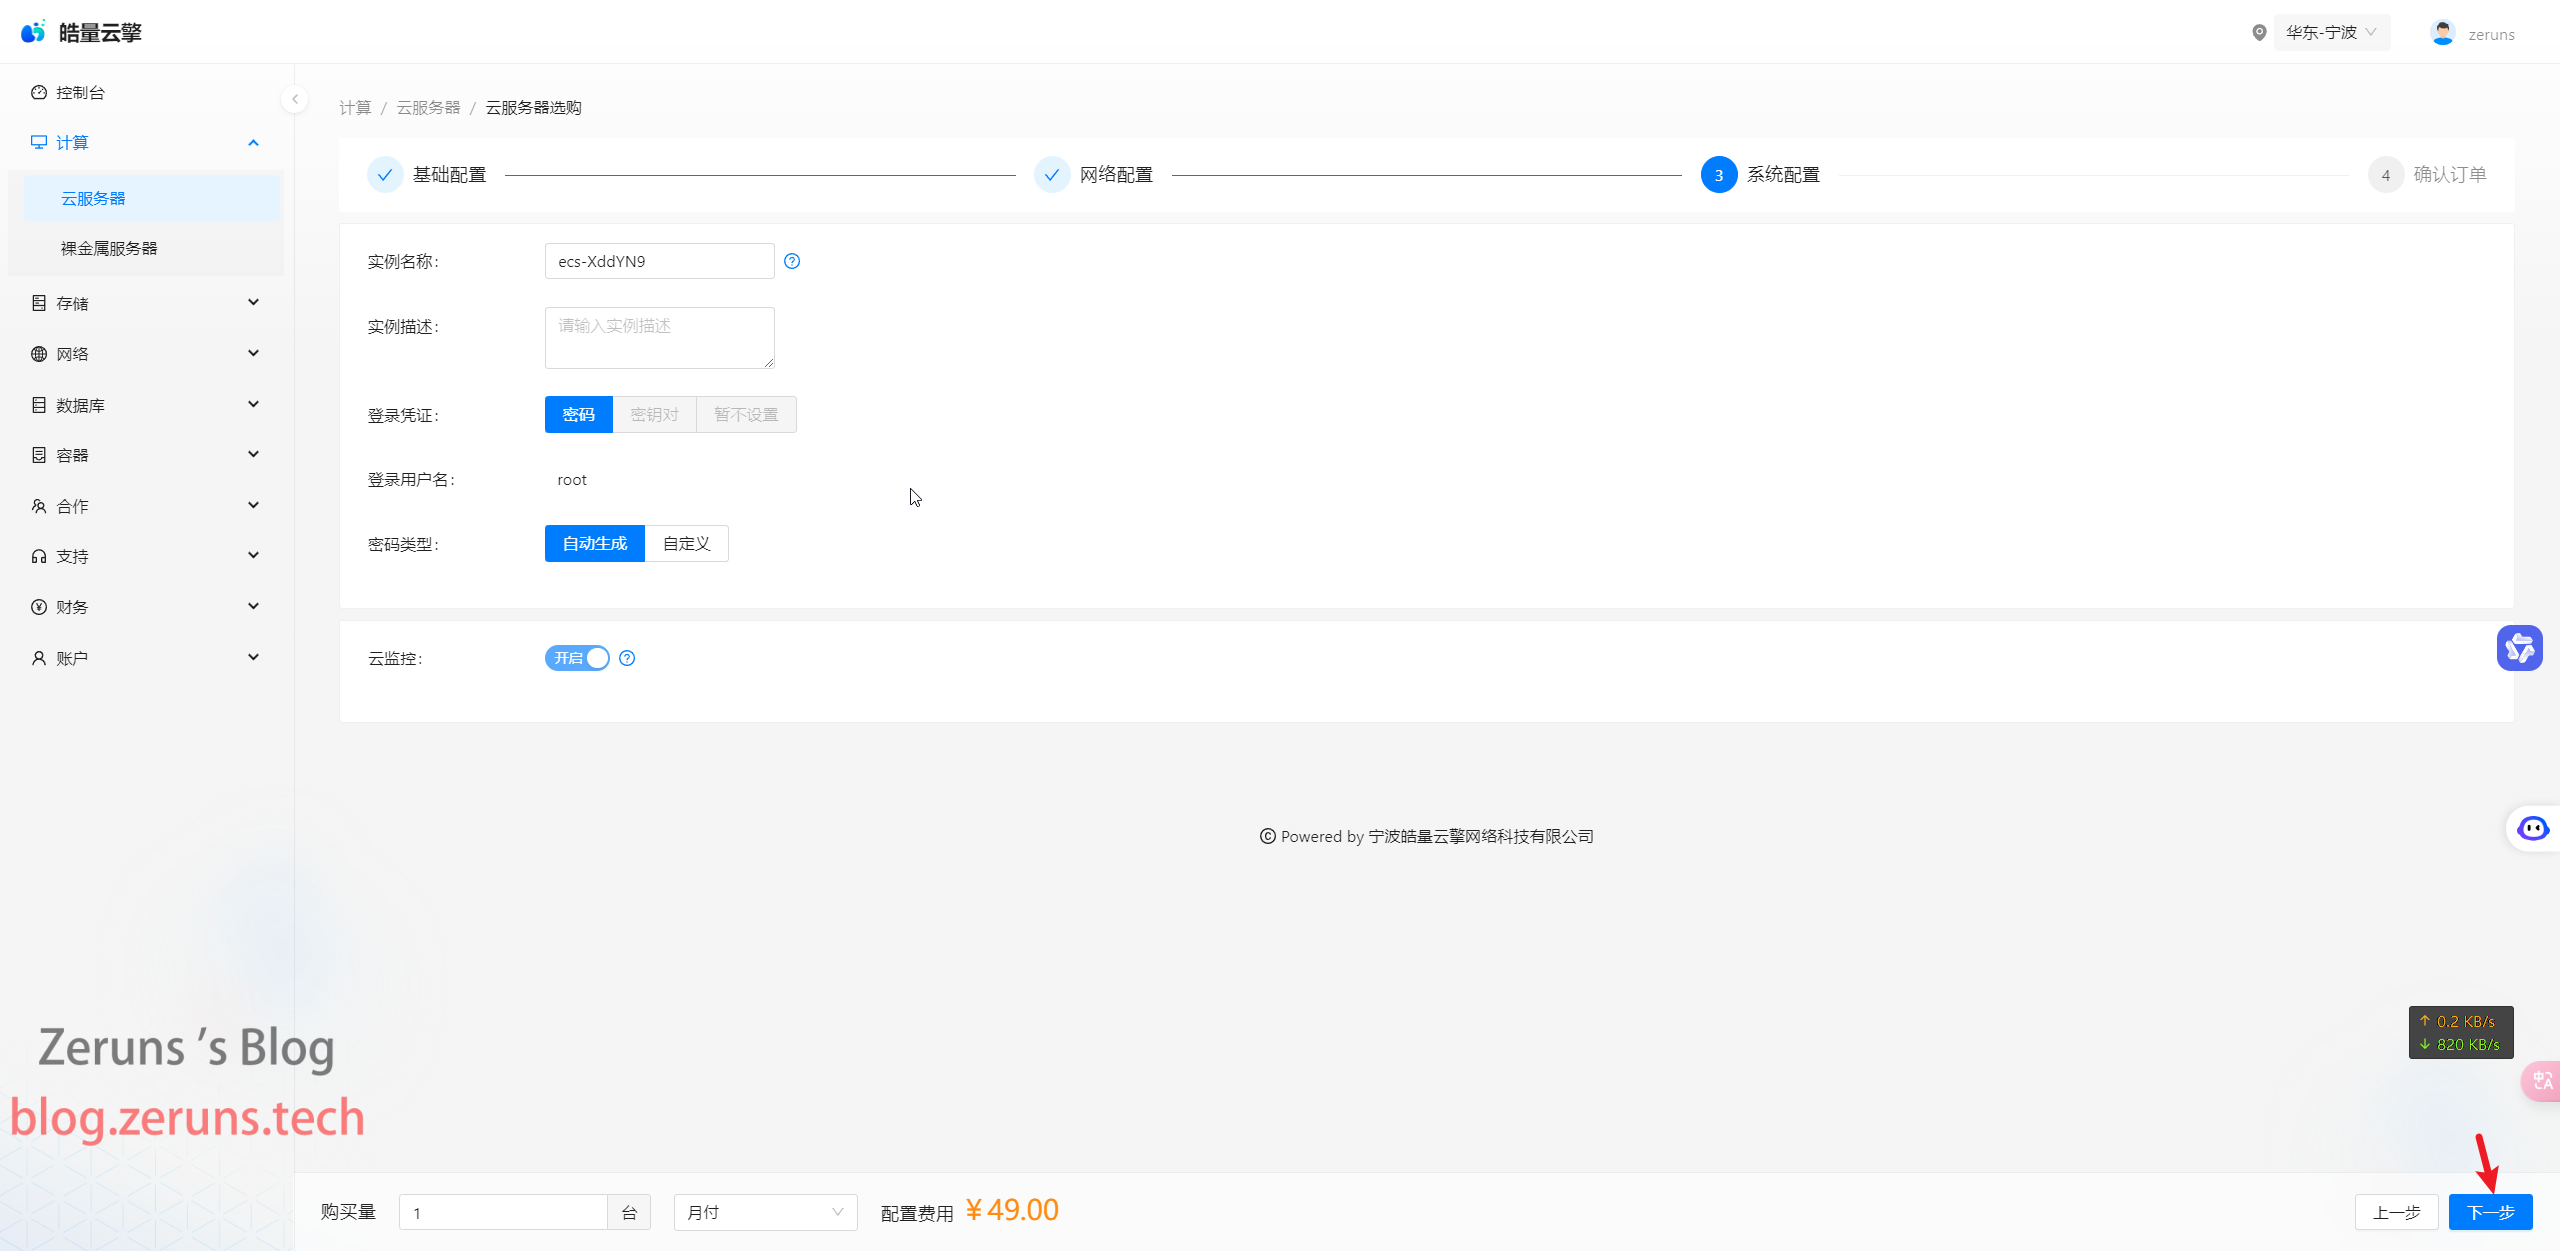
Here you can set the server password, the default auto-generated password is fine. Click Next, then confirm and submit the order.
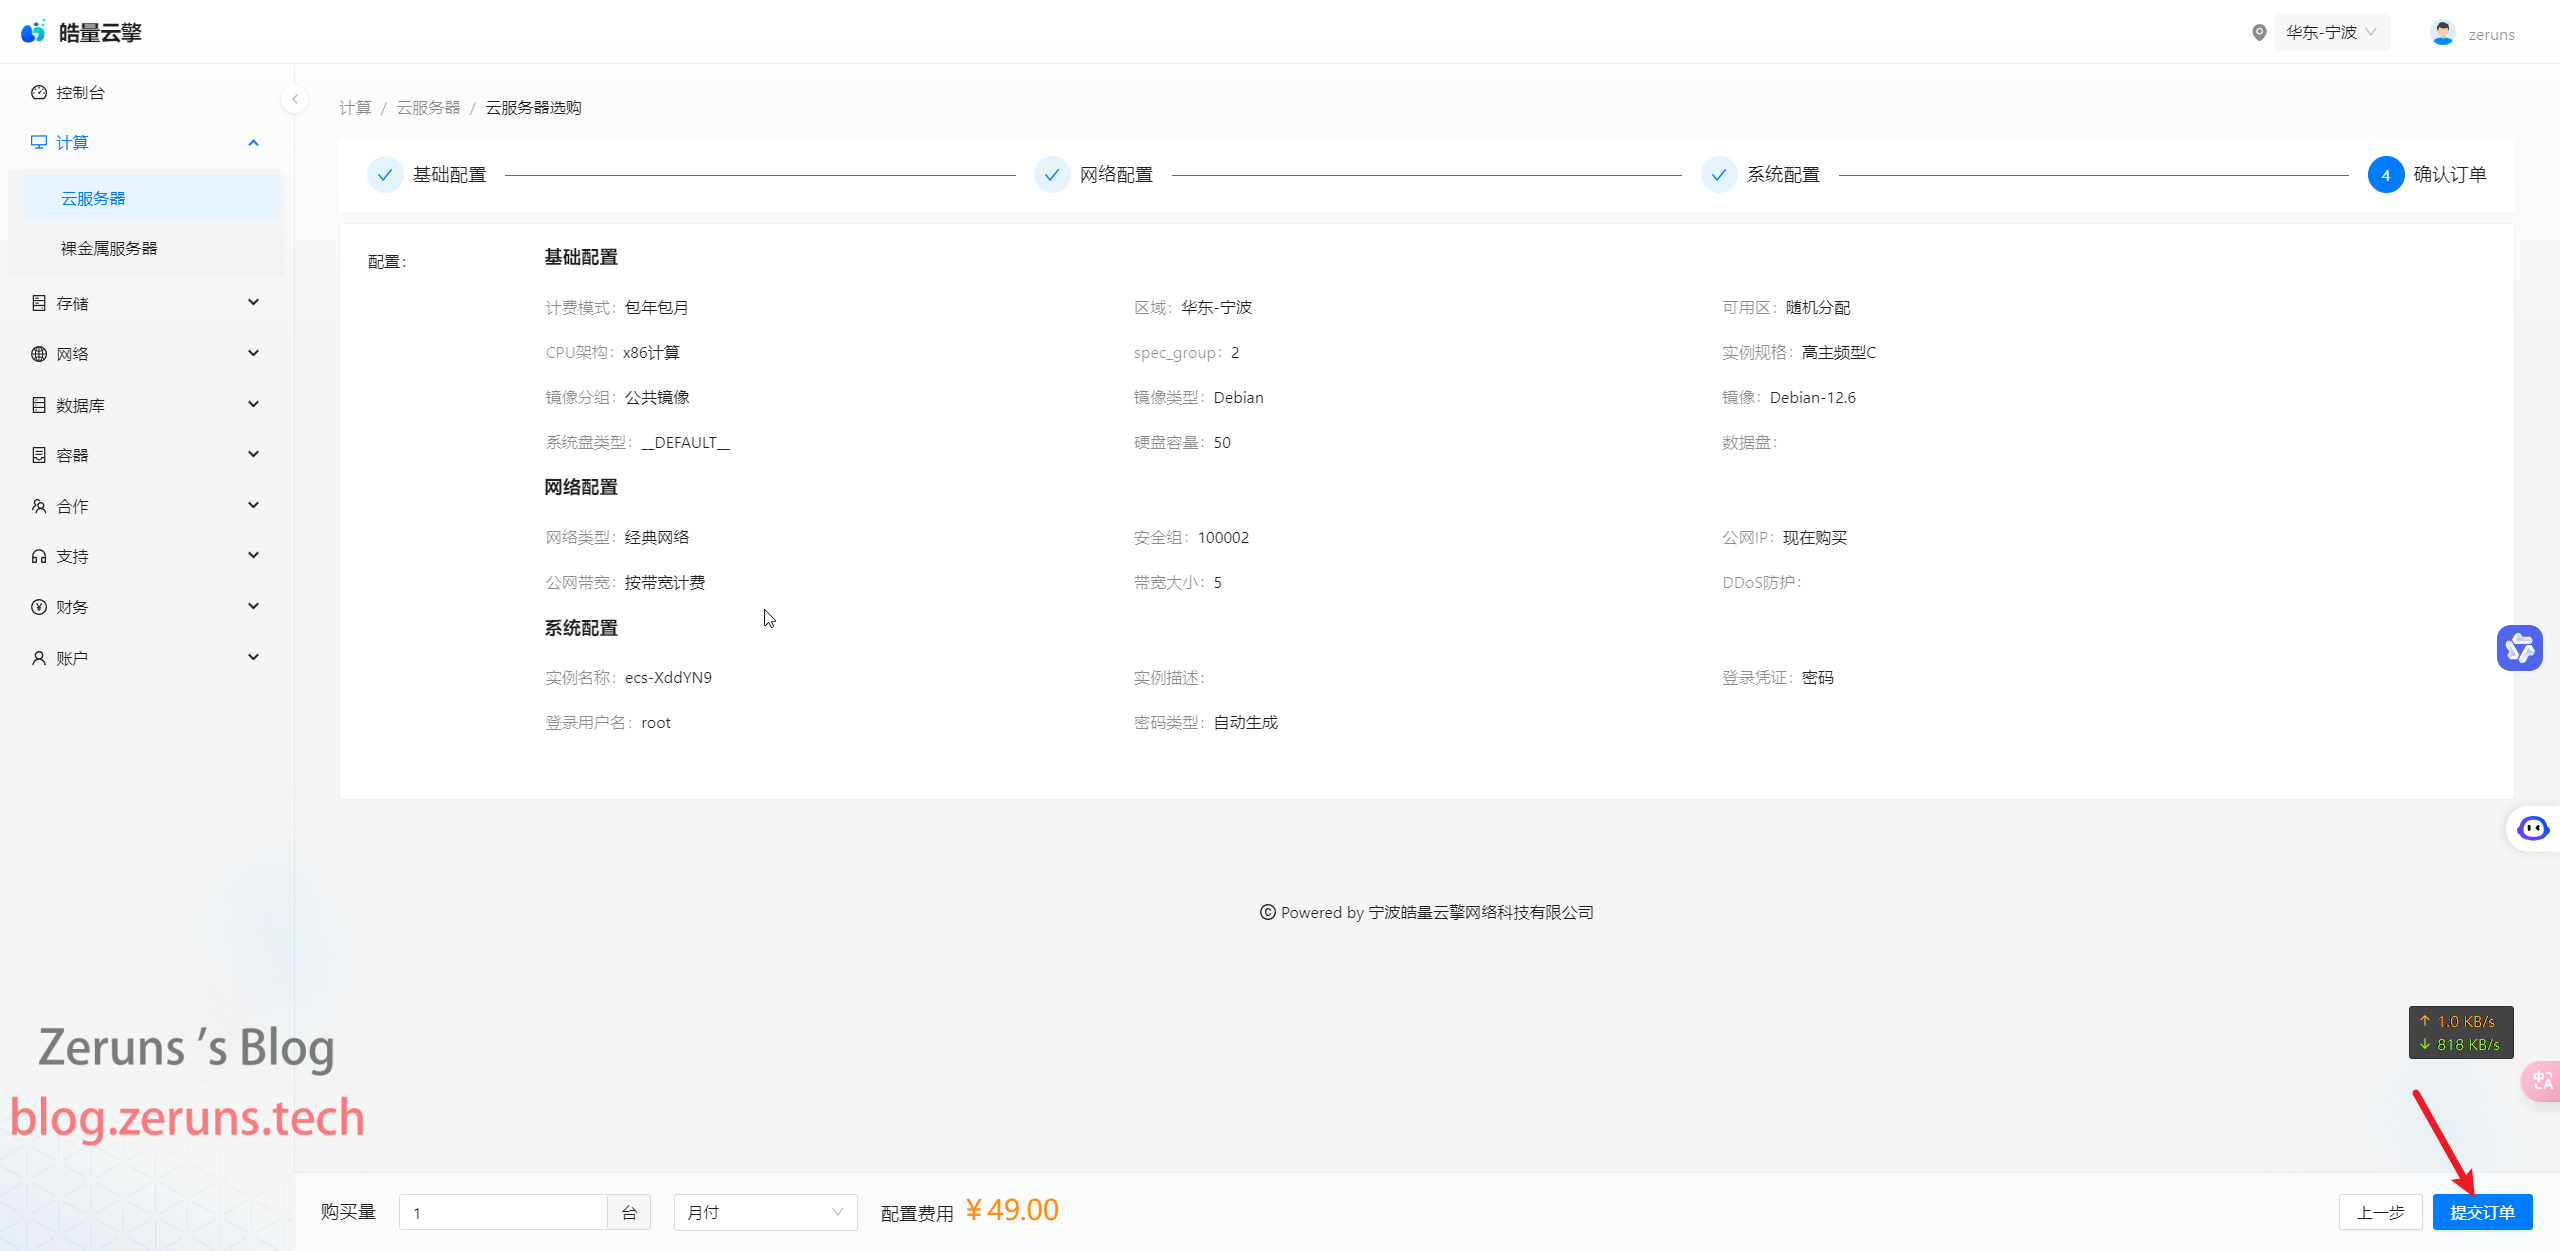
After purchase, you can see your purchased cloud server under Cloud Servers. Click Manage.

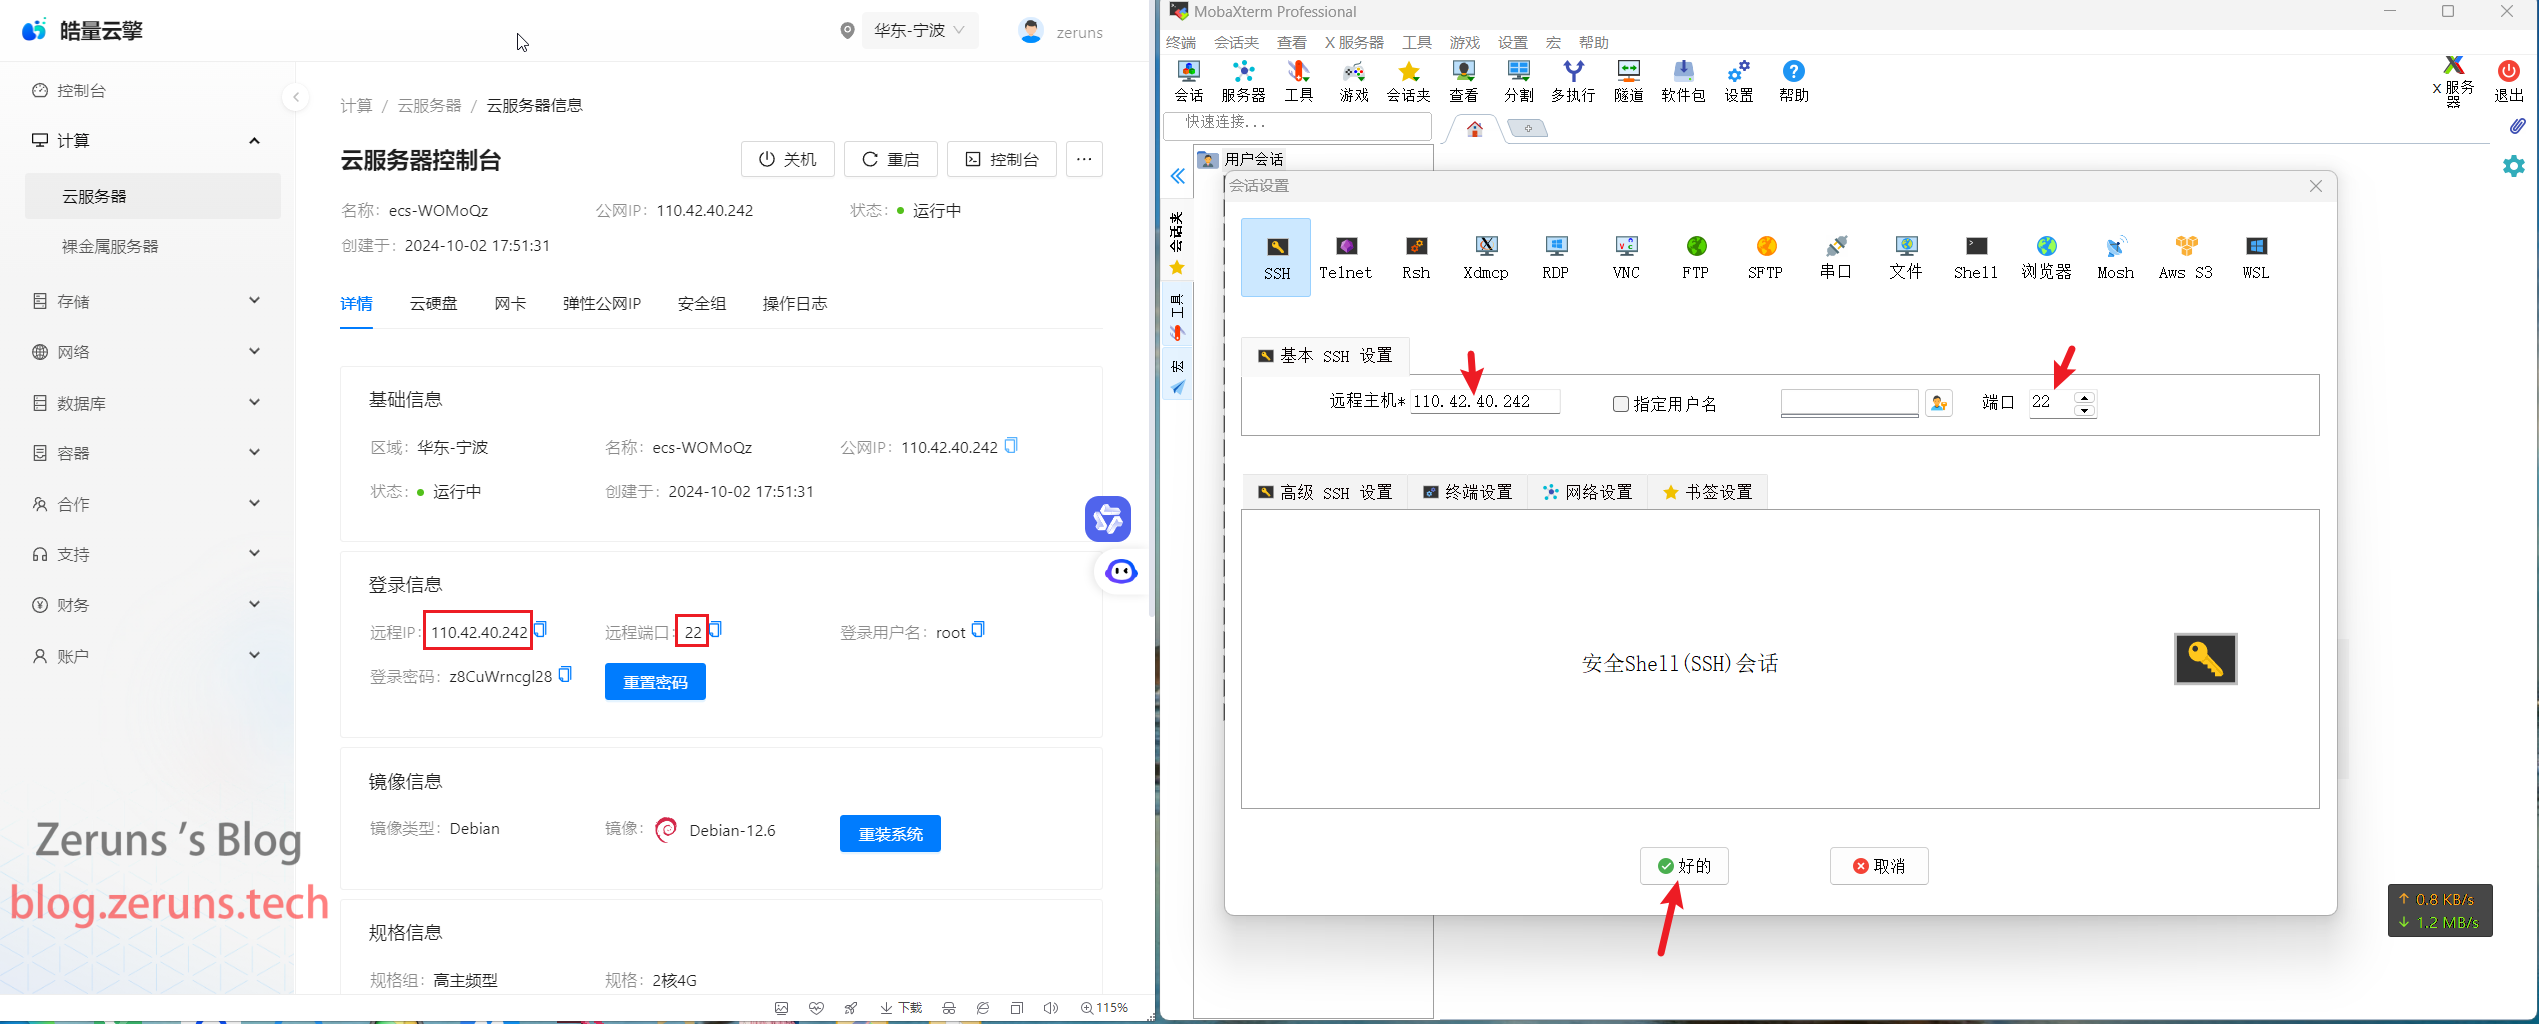
You can now see the cloud server information, where you can reinstall/switch systems, reset the password, etc., and you can also upgrade the configuration.
Connecting to the Server
Download and install an SSH client software, such as PuTTY or MobaXterm.
Here, I use MobaXterm. In the SSH client, enter your server's IP address and SSH port, then click OK or Open.
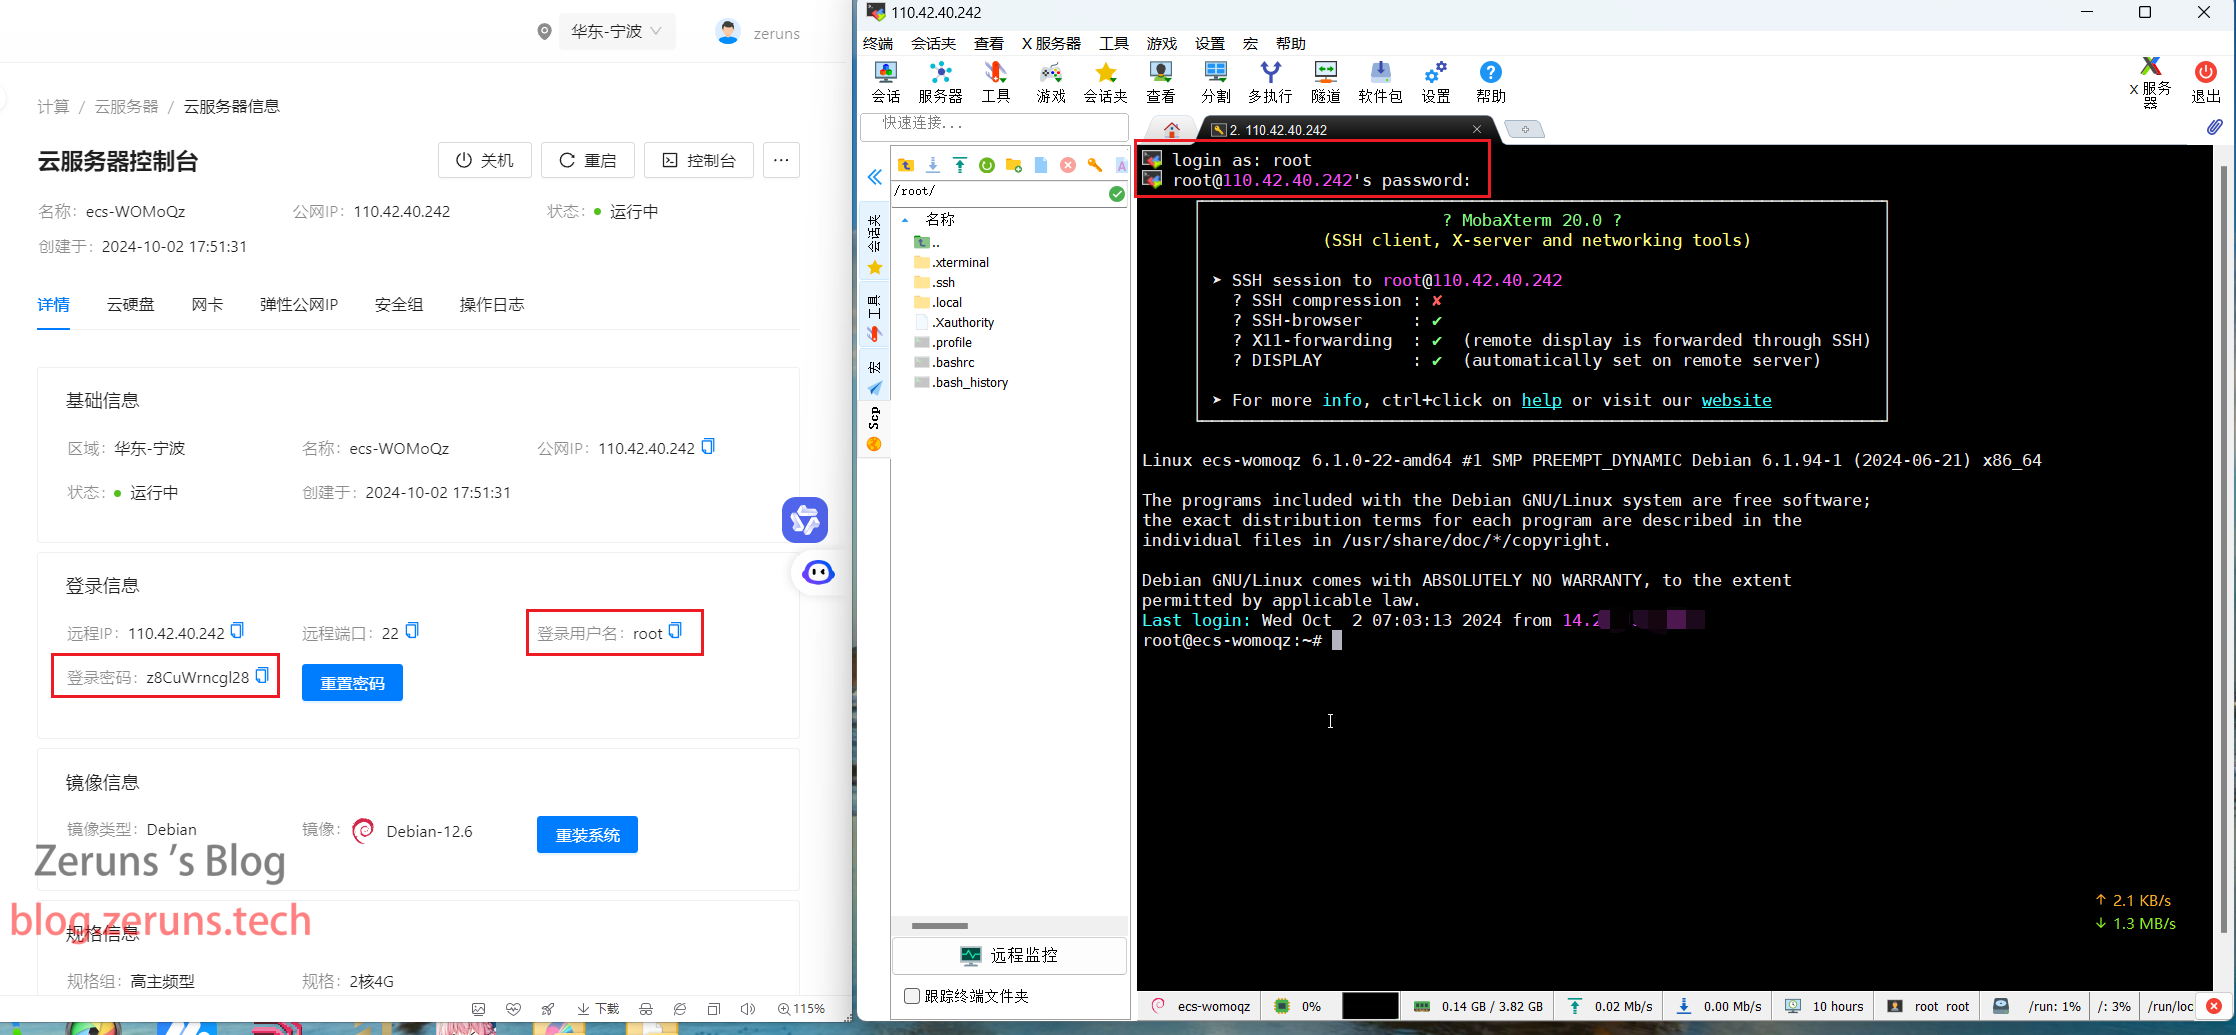
Then, enter your username and press Enter. The default username is generally root, then enter the password and press Enter. The password won’t show up as you type it.
Tip: In the SSH terminal, hold the left mouse button to select text, release the mouse, and then click anywhere on the screen to copy the selected text; right-click in the SSH terminal to paste.
Verify Port 25 Availability
To check if port 25 is open, execute the following command on your server:
telnet smtp.qq.com 25
If the output is:
Trying 43.129.255.54...
telnet: connect to address 43.129.255.54: Connection timed out
then you can abandon setting up the mail server.
If the output is as follows, it indicates that port 25 on the server is functioning normally and you can proceed with setting up the mail server. Enter quit and press Enter to exit.
Trying 183.47.101.192...
Connected to smtp.qq.com.
Escape character is '^]'.
220 newxmesmtplogicsvrszb16-1.qq.com XMail Esmtp QQ Mail Server.

The ports required for this email server are: 25, 80, 443, 110, 143, 465, 587, 993, 995
Remember to open these ports in the security group/firewall settings of major cloud providers!
Set Up Domain Name Resolution
Configure as follows. Replace mail.vpszj.cn with your own domain name.
| Host Record | Record Type | Record Value |
|---|---|---|
| A | Your server's IP address | |
| smtp | CNAME | mail.vpszj.cn |
| pop | CNAME | mail.vpszj.cn |
| imap | CNAME | mail.vpszj.cn |
| @ | MX | mail.vpszj.cn |
| @ | TXT | v=spf1 mx ~all |
As shown below:

Install Docker
Return to the SSH terminal and enter the following commands.
Install using the apt package manager:
# Install docker, input y when prompted to continue
apt install docker.io

# Enable docker to start at boot and start docker
systemctl enable docker && systemctl start docker

# Check if installation was successful, should display Docker version x.x.x
docker -v

If installation fails, try the following script:
# Install docker
curl -sSL https://get.daocloud.io/docker | sh

# Enable docker to start at boot and start docker
systemctl enable docker && systemctl start docker

# Check if installation was successful, should display Docker version x.x.x
docker -v
If it still doesn't work, refer to the manual installation tutorial below
Manual installation guide for Docker: https://url.zeruns.tech/YkABB
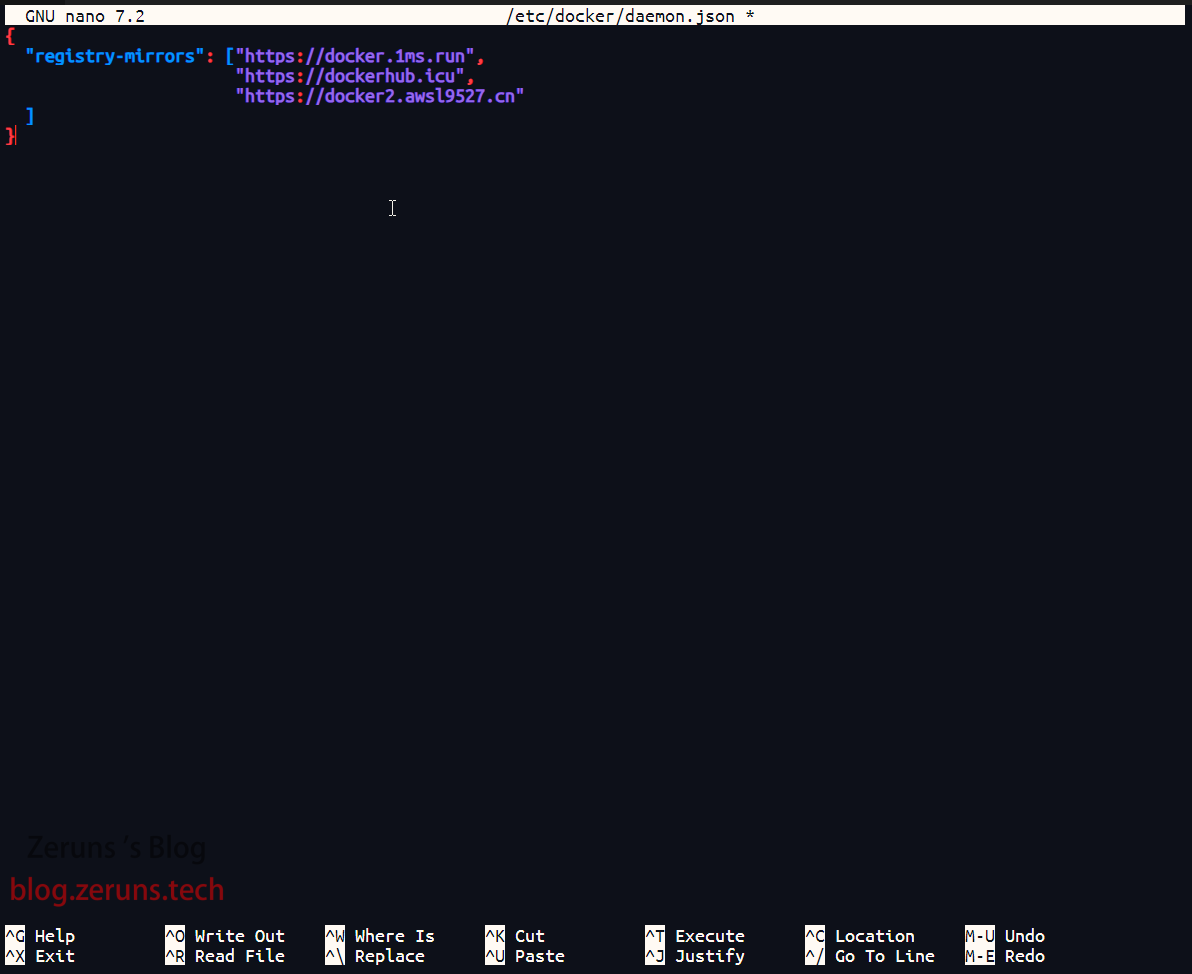
Change Docker Image Source (if the image source URL becomes invalid, find a new one)
# Create or modify /etc/docker/daemon.json file
apt install nano && nano /etc/docker/daemon.json

# Then input the following content: (after entering, press Ctrl+O then Enter to save, next press Ctrl+X to exit editor)
{
  "registry-mirrors": ["https://docker.1ms.run",
                       "https://dockerhub.icu",
                       "https://docker2.awsl9527.cn"
  ]
}

# Restart docker service
systemctl restart docker.service
Install and Configure Poste.io
For this deployment of poste.io, we will use Docker.
Execute the following commands in the SSH terminal:
The path /home/mail in the command is where the configuration files and data for the email system are stored. You can modify it as needed.
Replace the domain mail.vpszj.cn after -h with your desired domain.
docker run -d \
   --net=host \
   -e TZ=Asia/Shanghai \
   -v /home/mail:/data \
   --name "mailserver" \
   -h "mail.vpszj.cn" \
   -t analogic/poste.io:latest
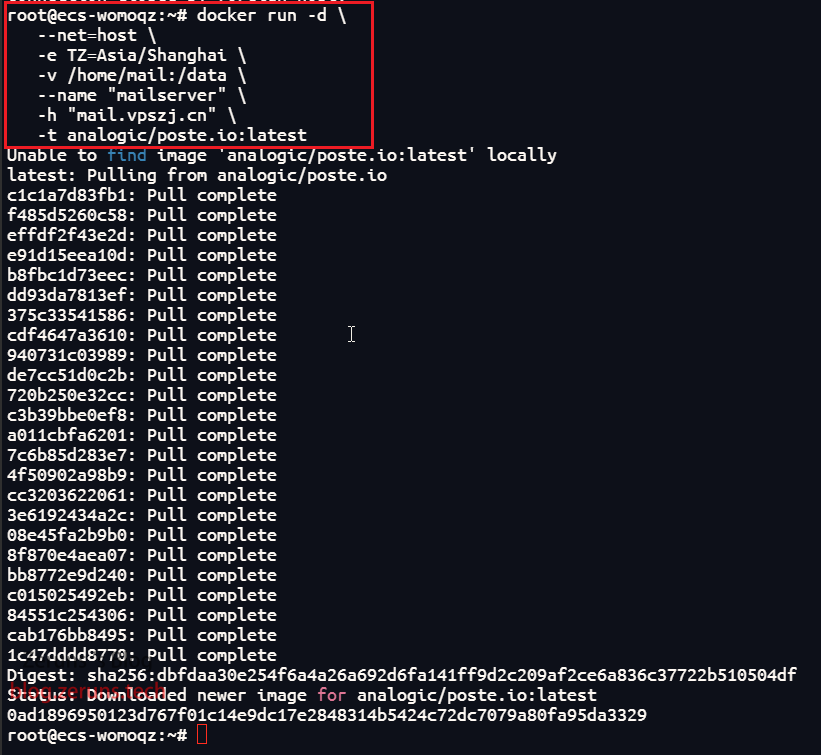
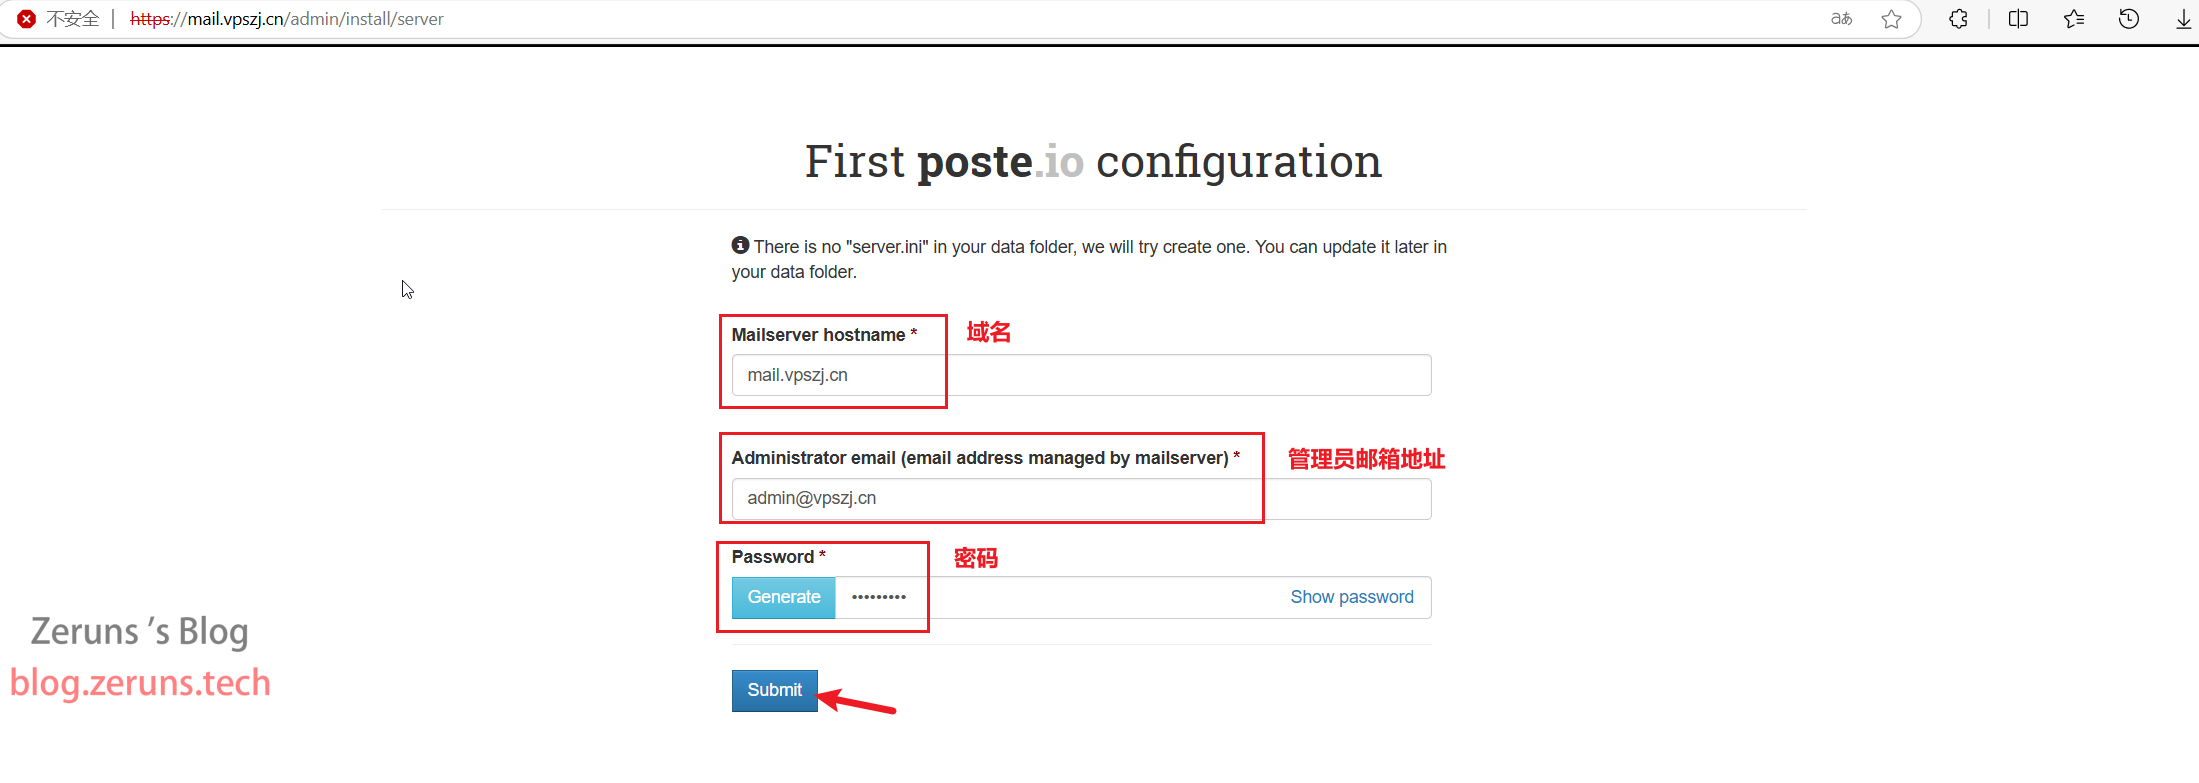
After the container starts, enter https://服务器IP/admin/install/server or https://your-domain/admin/install/server in the browser address bar to access the configuration page.
On this page, input your email domain, admin email address, and generated password (you can also manually input a password), then submit. Make sure to record the email domain and admin account.
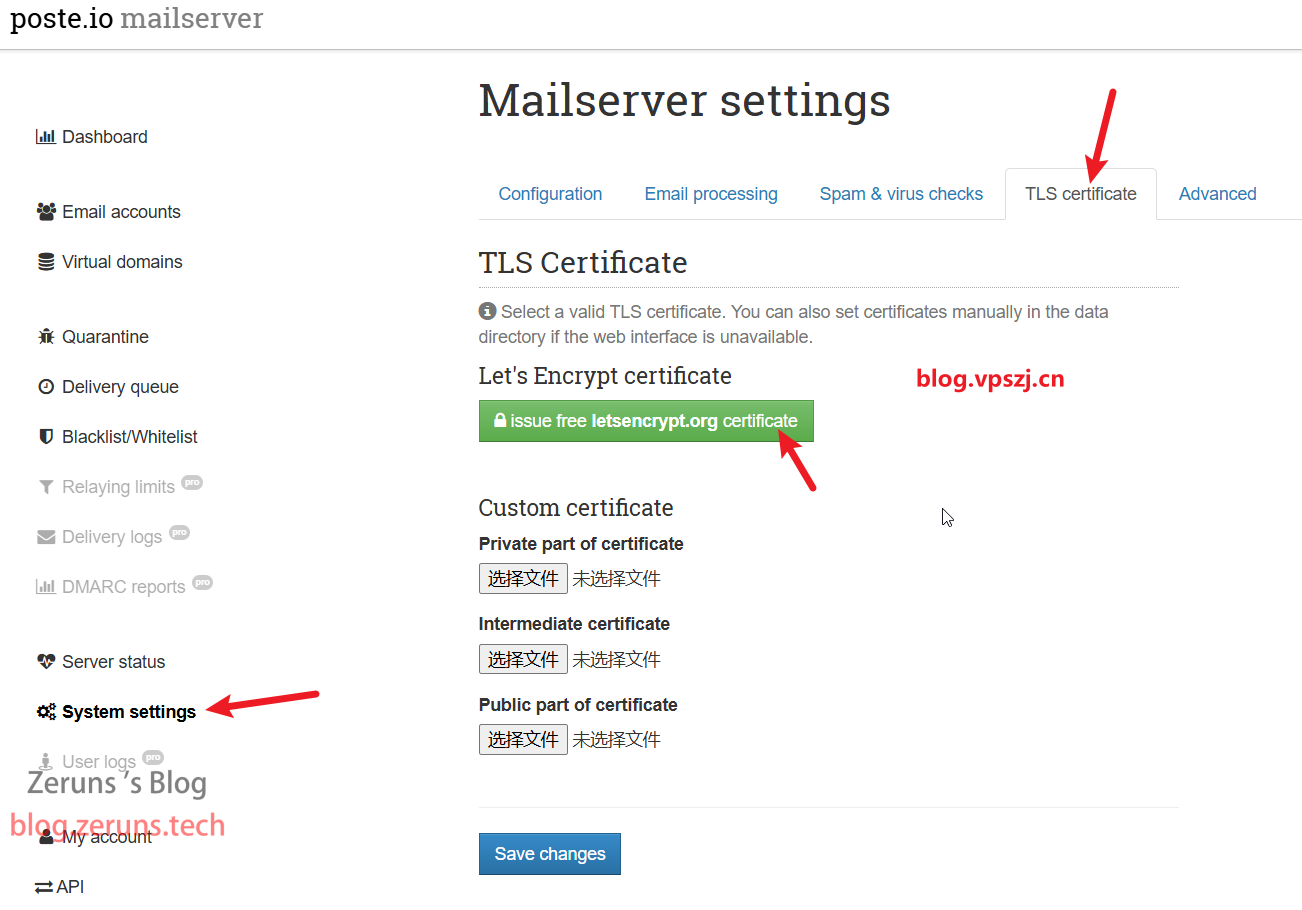
Log into the backend, navigate to System settings → TLS certificate, and click issue free letsencrypt.org certificate to request an SSL certificate (after obtaining the SSL certificate, the browser address bar will show a small green lock, indicating that the site is secure).
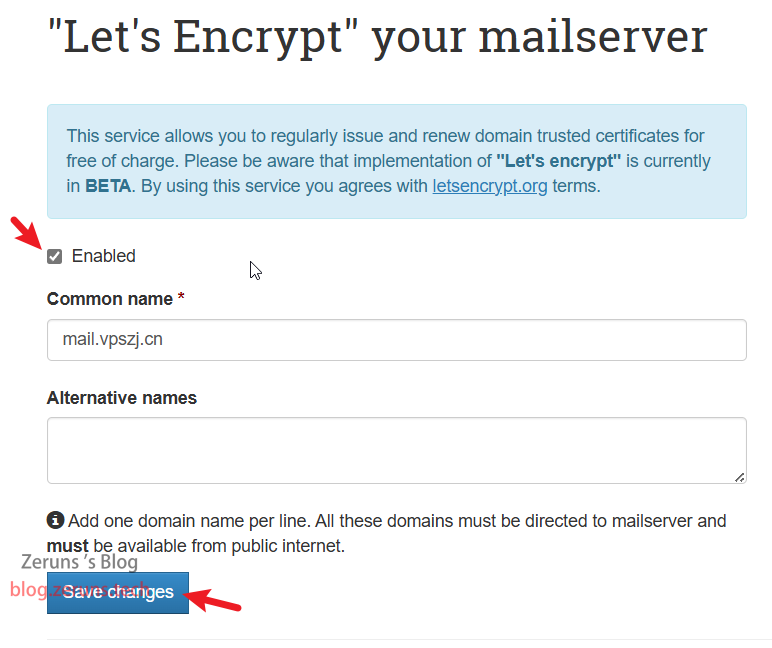
After completion, visit the email domain from the frontend again. In my case, it's mail.vpszj.cn.
It will automatically redirect to the email login page. Enter the previously set admin credentials to log in.
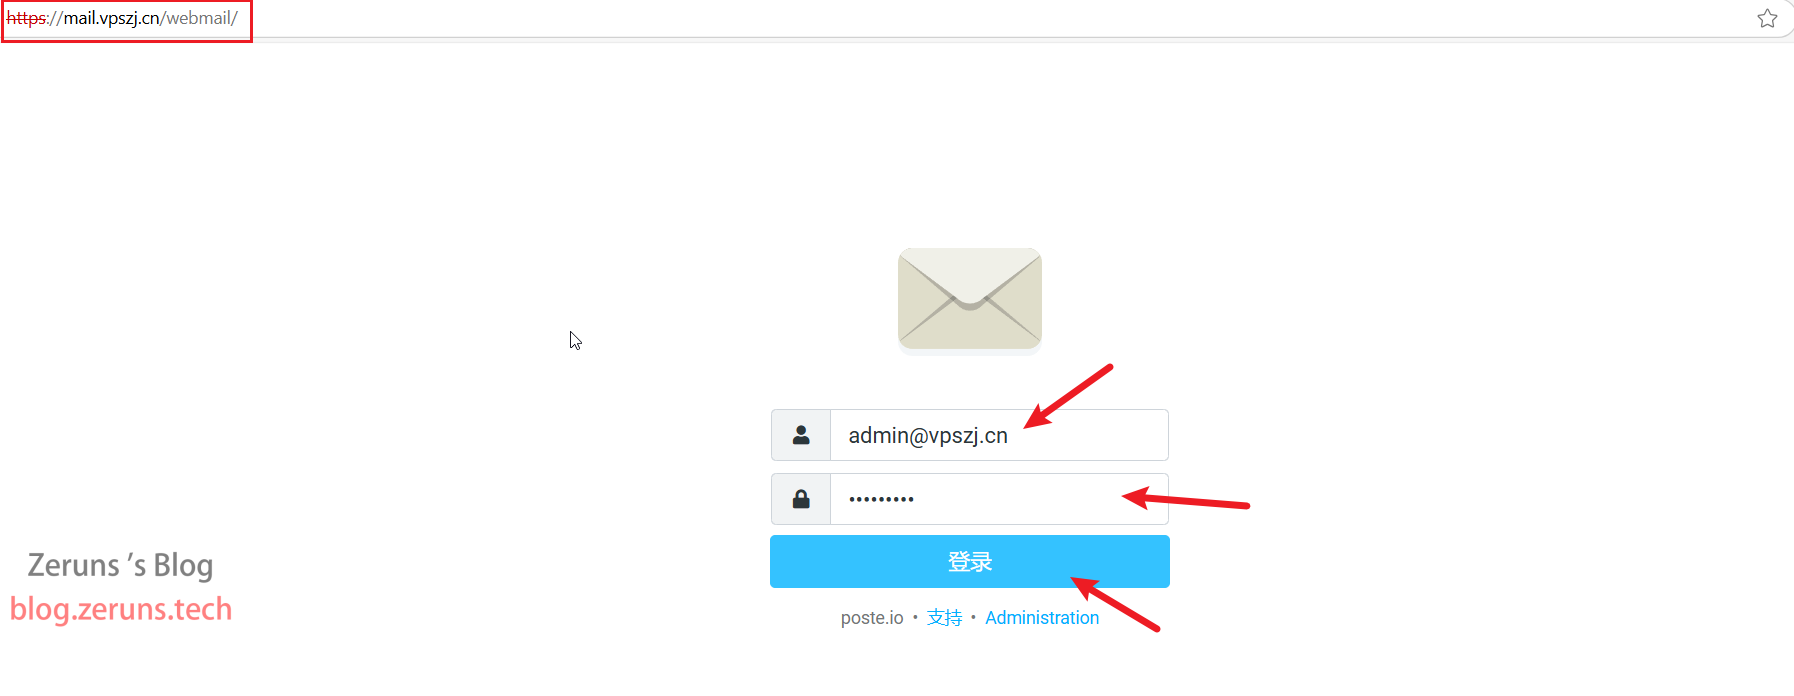
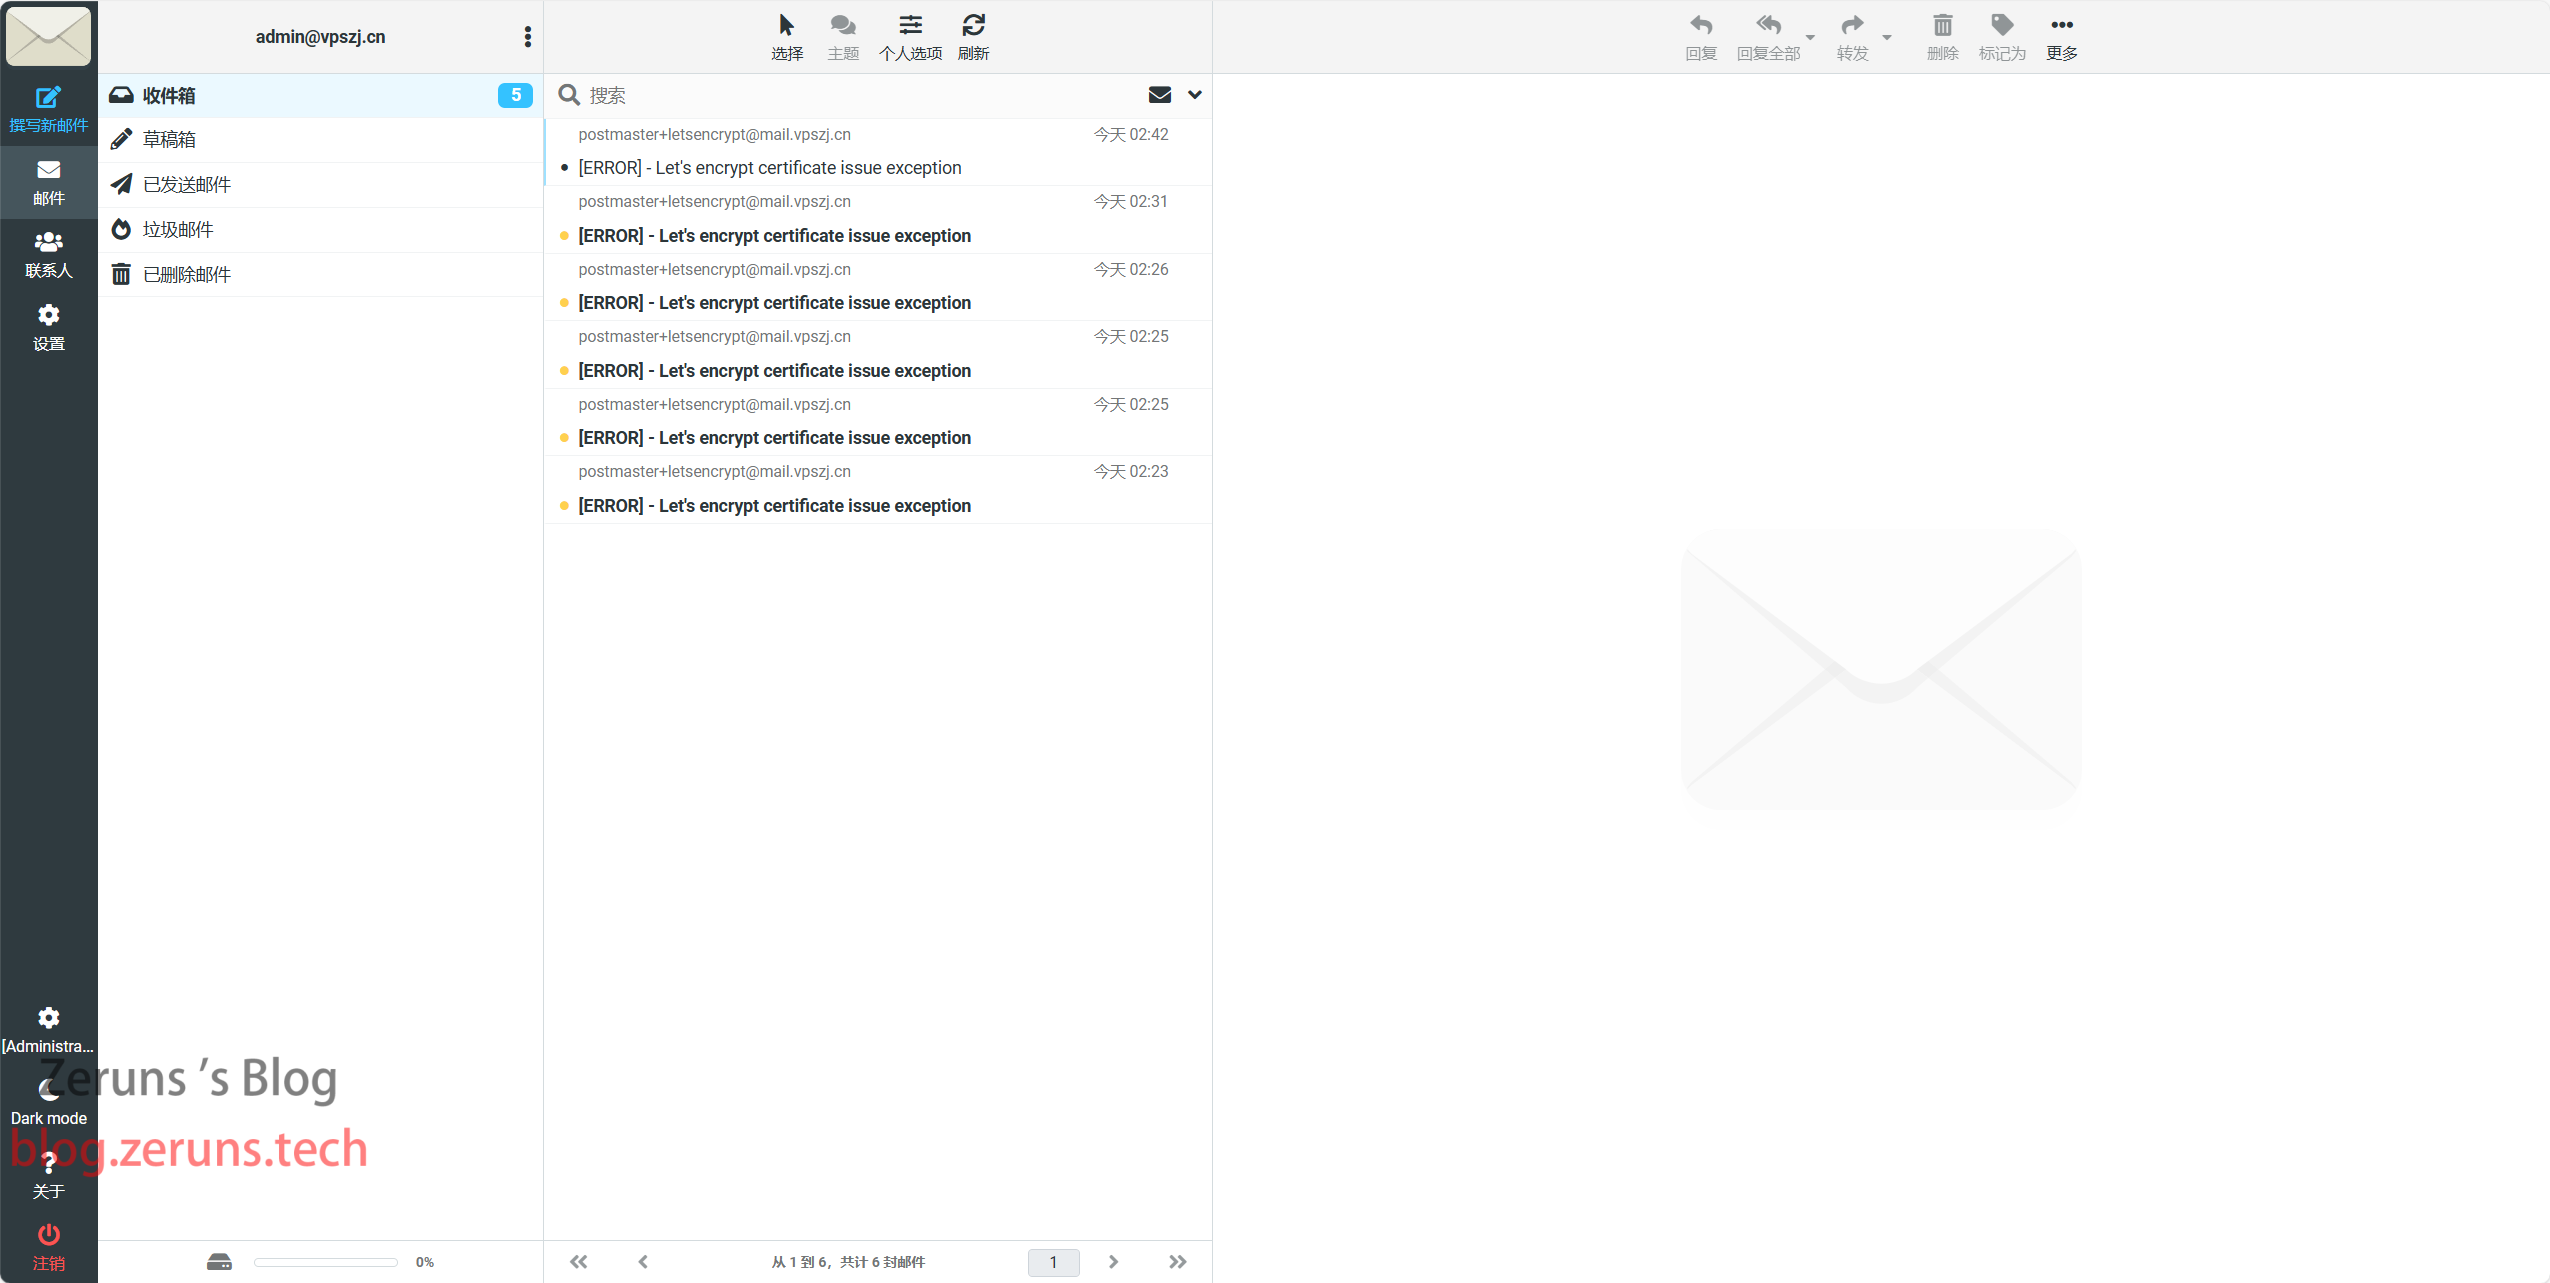
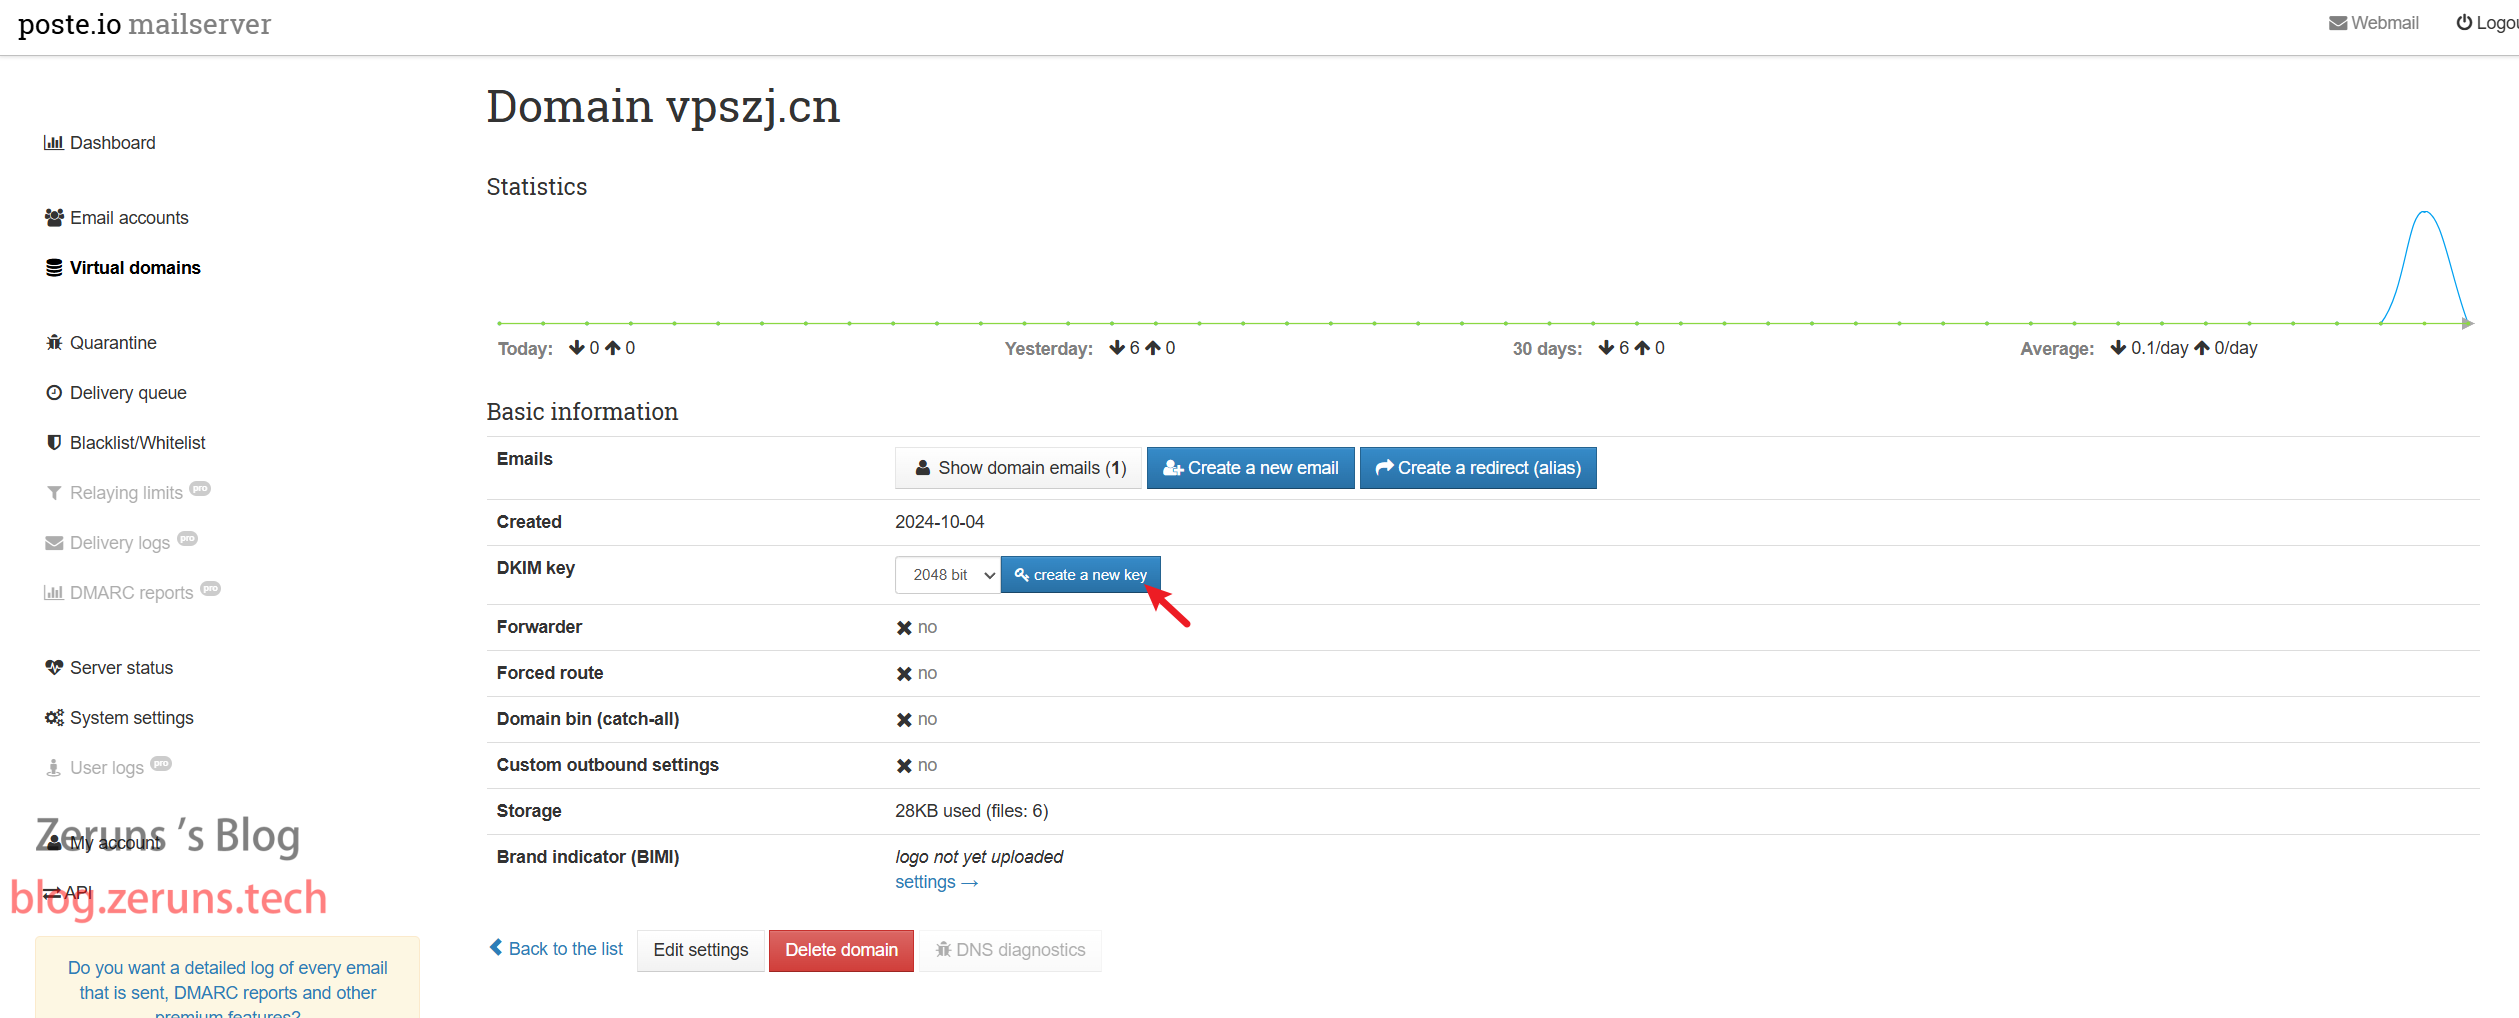
Next, go to Virtual domains, click on your domain, and apply for DKIM.

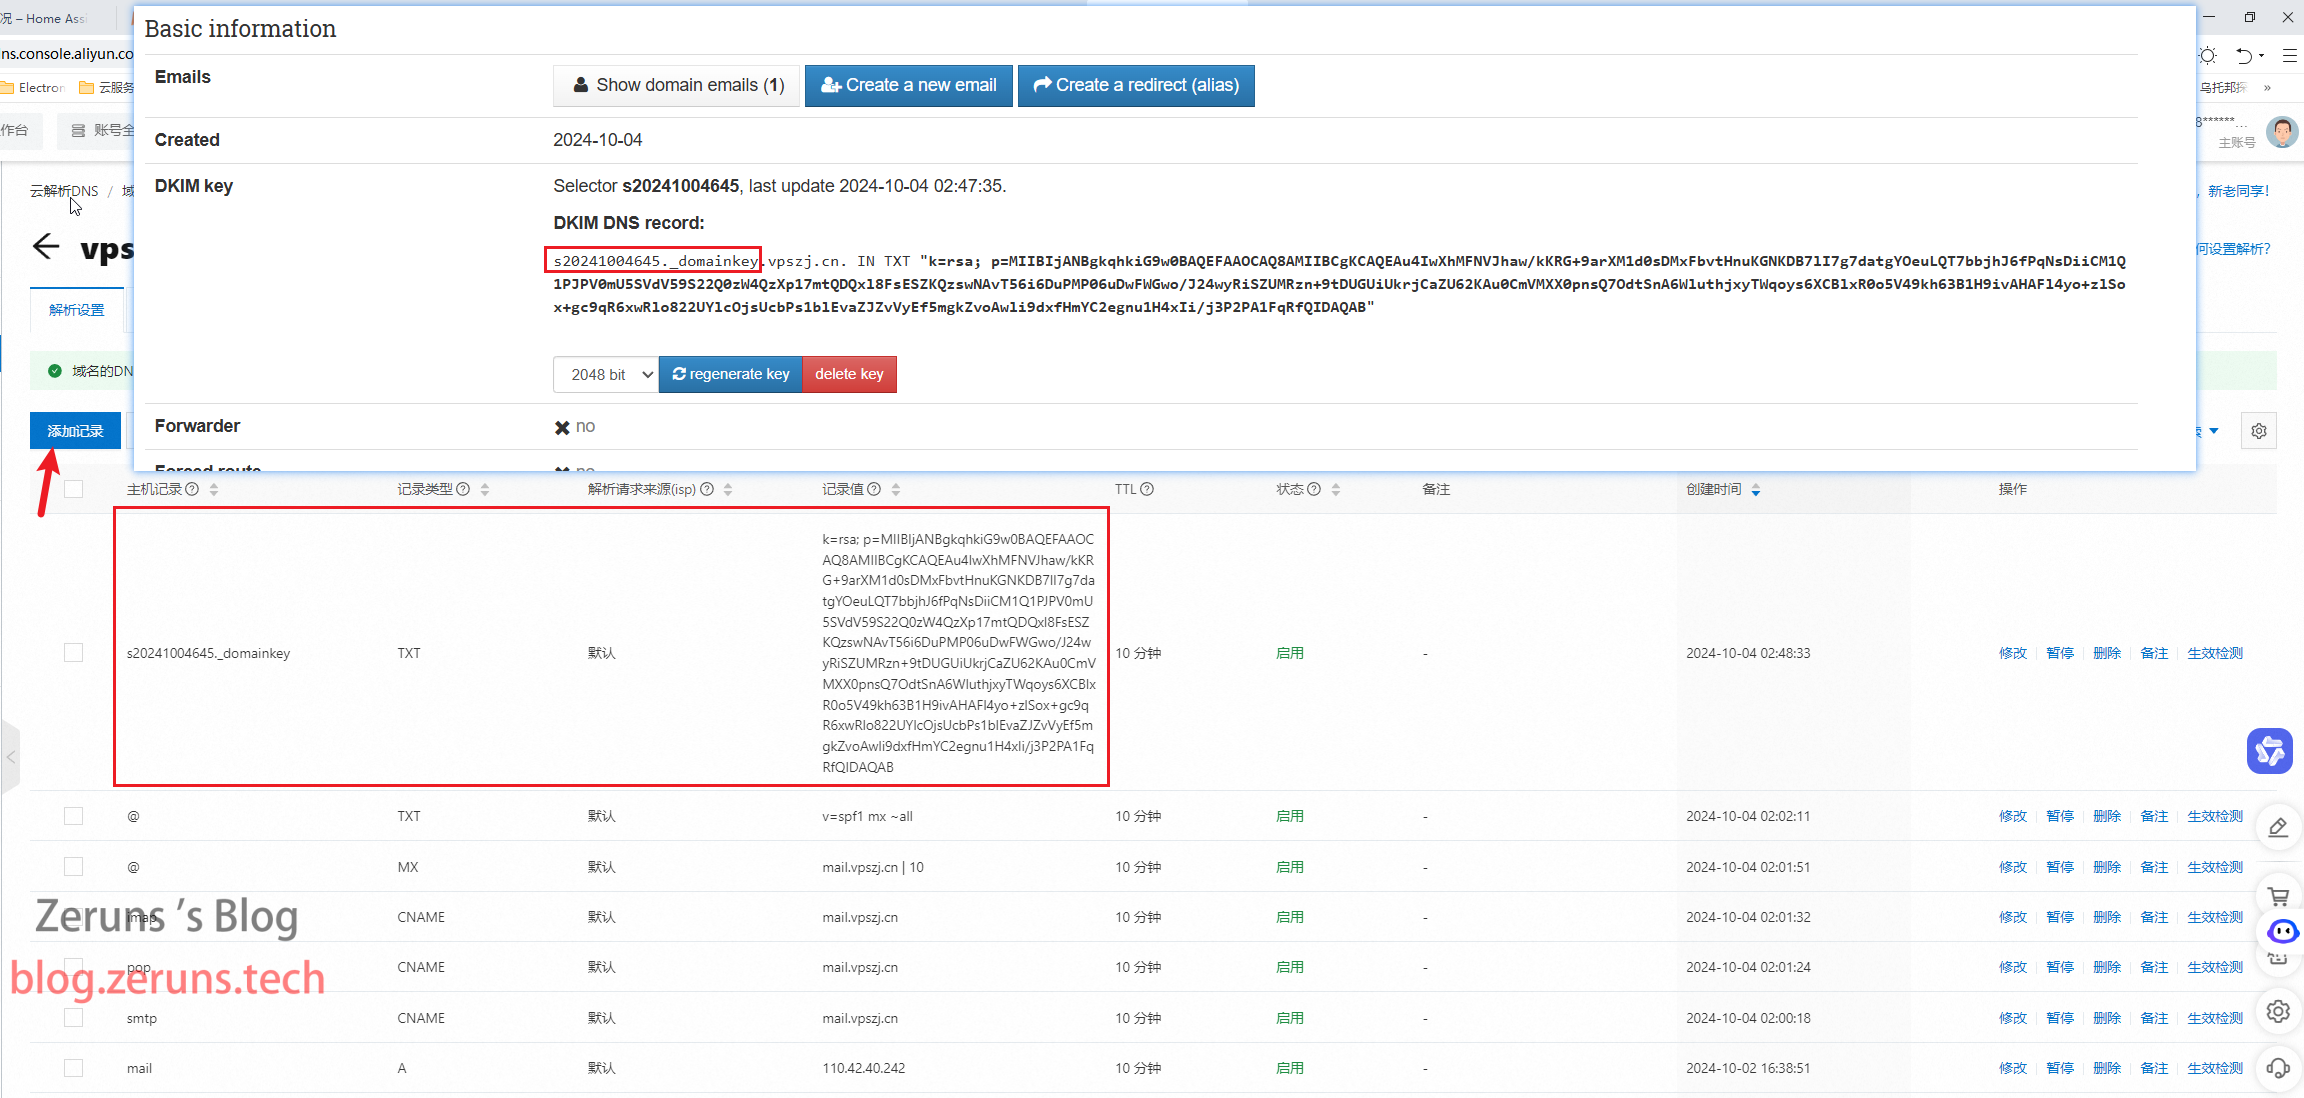
After application, follow the instructions on the page to update DNS records by creating a new TXT record.
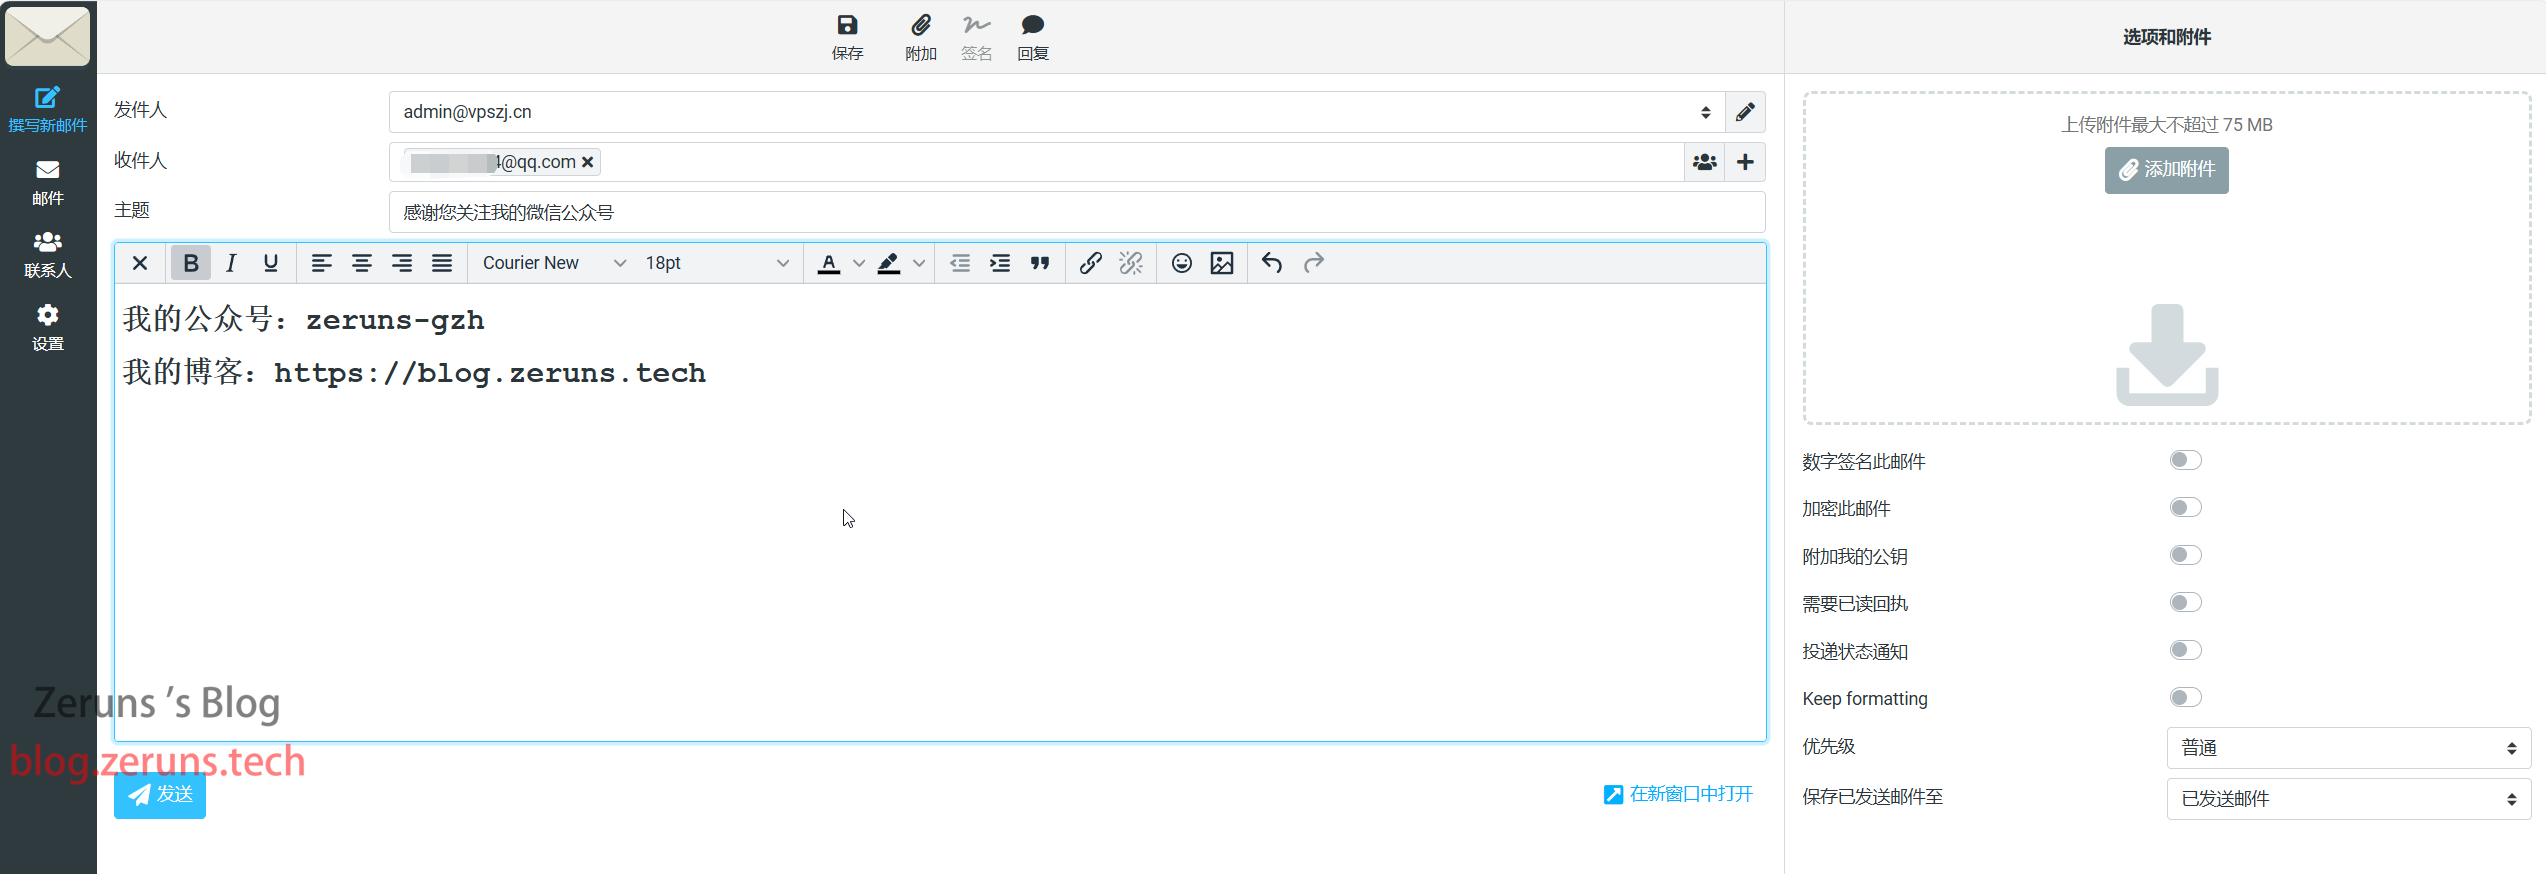
Now let's test sending an email. Create a new email, edit some content, and send it to my QQ email. You can see that all the necessary features of an email are present.
QQ Email View: Received (if you don't find it, try checking the spam folder~)

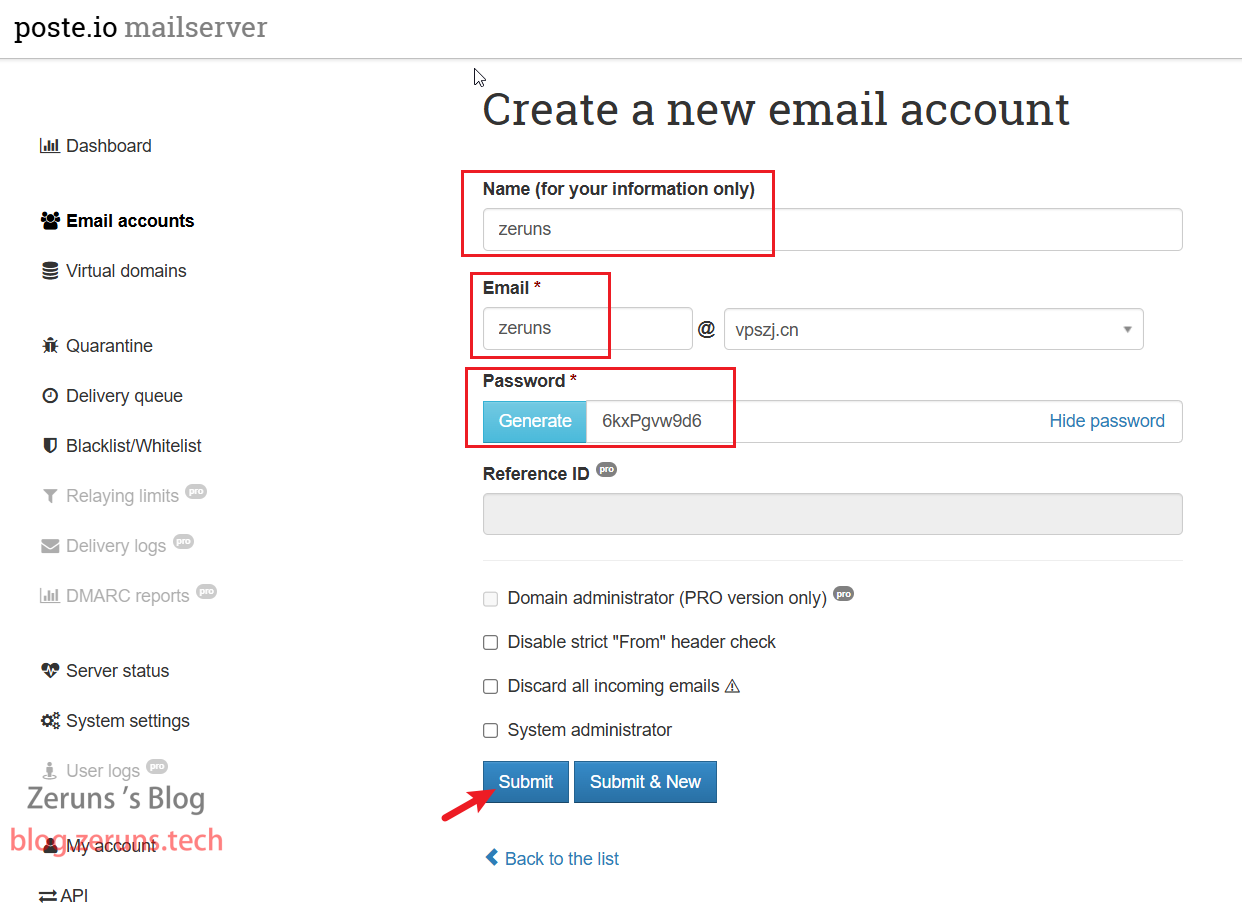
Adding a new account to this mail server is simple. Go to Email accounts in the backend and create a new email account.

Test sending an email from QQ Email to our domain email. The test was successful.

This concludes the tutorial. If you found the tutorial helpful, please give it a thumbs up. Thank you!
Appendix
If you need to coexist with BaoTa Panel and other web services, you can refer to the following Docker command, which maps ports 80 and 443 to other ports and uses reverse proxy.
docker run -d \
    -p 25:25 \
    -p 81:80 \
    -p 433:443 \
    -p 110:110 \
    -p 143:143 \
    -p 465:465 \
    -p 587:587 \
    -p 993:993 \
    -p 995:995 \
    -e TZ=Asia/Shanghai \
    -v /www/wwwroot/mail:/data \
	--name "mailserver" \
	-h "mail.vpszj.cn" \
    -t hub.vpszj.top/analogic/poste.io
Recommended Reading
- High-performance and affordable VPS/cloud servers: https://blog.vpszj.cn/archives/41.html
- Build a blog website without coding! Detailed personal blog setup tutorial: https://blog.zeruns.tech/archives/783.html
- My blog website suffered another CC attack; here’s the record: https://blog.zeruns.tech/archives/819.html
- Minecraft server setup tutorial: https://blog.zeruns.tech/tag/mc/
- Linux Discuz forum website setup tutorial: https://blog.zeruns.tech/archives/681.html
- Mechanical Revolution imini Pro820 mini PC review and teardown: https://blog.zeruns.tech/archives/813.html
Source Article URL:https://blog.zeruns.tech/archives/822.html


Comment Section